1
GB
F
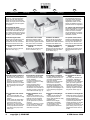
B) Connection scheme.
The ESC is factory installed and
already connected to motor. You
only need to plug in the 3P servo
cable into the receiver.
However, The connection scheme
is depicted below.
Remark: The ESC output wires
A,B and C can be connected to
the motor wires A,B and C without
any order, if the motor runs in the
opposite direction, swap 2 wires
randomly.
B. Schéma des connexions
Le contrôleur est programmé
d’usine et déjà raccordé au moteur.
Il suffit de connecter le cordon
3-fils au récepteur dans le canal de
contrôle du moteur. Voir schéma
ci-dessous.
Attention : Les câbles de
connexions (moteur au contrôleur)
AB et C peuvent être connectés
librement. Si le moteur tourne dans
le mauvais sens , il suffit d’inverser
2 câbles au choix.
B) Anschluss Schema:
Der Regler wurde fabrikmässig
vormontiert und ist bereits mit dem
Motor angeschlossen. Sie müssen
nur noch das 3-polige Servokabel
an den Empfänger anschliessen.
(siehe Abbildung) Bemerkung:
Die Ausgangs-Kabel A, B und C
können willkürlich angeschlossen
werden an die Motorkabel A, B und
C . Wenn der Motor in die andere
Richtung dreht, tauschen Sie zwei
beliebige Kabel aus.
B) Verbindingsschema
The snelheidsregelaar werd in de fabriek reeds geïnstalleerd en is reeds
met de motor verbonden. Enkel de
3-polige servokabel dient nog in de
ontvanger geplugd te worden.
Het verbindingsschema bevindt zich
hieronder.
Opmerking: De uitgangsdraden AB
en C van de ESC kunnen in willekeurige volgorde met de aansluitdraden
A, B en C van de motor verbonden
worden. Indien de motor in de verkeerde richting draait, verwissel dan
2 draden naar keuze.
C) Throttle range calibration
Before running the boat, the ESC
must be calibrated to the throttle
range of the transmitter.
The ESC must be calibrated again
after :
- installing the ESC in a new model
- using another or new transmitter
- changing the settings of the neutral position of the throttle stick,
ATV or EPA settings.
C) Calibrage des gaz
Lorsque la radiocommande est
installée il est nécessaire de calibrer
le contrôleur à l’émetteur.
Le contrôleur doit être calibré chaque fois après :
- L’installation du contrôleur dans
un nouveau bateau.
- Lors de la mise en service d’une
nouvelle radiocommande
- Après chaque changement de la
programmation du neutre gaz, de
l’ATV ou EPA.
C) Reichweite des Gashebels
kalibrieren:
Ehe Sie mit dem Modell losfahren,
müssen Sie die Reichweite des
Reglers zum Sender kalibrieren.
Sie müssen den Regler neu kalibrieren:
- wenn Sie den Regler in ein neues
Modell installieren.
- wenn Sie einen anderen oder
einen neuen Sender benutzen.
- wenn Sie die Einstellungen der
Neutralpostion, ATV oder EPA
ändern.
C) Kalibratie van het gasbereik.
Alvorens met de boot te varen, dient
de regelaar gekalibreerd te worden
naar het gasbereik van de zender.
De ESC moet telkens opnieuw gekalibreerd worden na:
- Installatie van deze regelaar in een
nieuw model
- Gebruik van een nieuwe zender
- Bij de wijziging van de instellingen
ivm neutrale gasstick stelling, ATV
of EPA instellingen.
Procedure:
- Turn on the transmitter and set
all EPA/ATV settings to 100%,
disable the ABS brake function on
the transmitter. Some transmitters may require reversing the
throttle function.
- Move the throttle stick to the full
throttle position and connect the
battery pack to the ESC. After 2
seconds you will hear a double
confirmation tone and the LED on
the ESC will flash twice.
- Release the throttle stick to the
neutral position . You will hear
one confirmation tone and the
LED in the ESC will flash once.
If you want to use the radios full
range for forwards running only,
use the bottom stick position as
neutral.
The throttle range calibration is
now finished.
Procédure
- Allumez l’émetteur et mettez les
programmations EPA et ATV à
100% et désactiver l’ABS. Certains
émetteurs nécessitent un inversement de la fonction des gaz .
- Positionnez le stick gaz au maximum et connectez la batterie au
contrôleur. Après 2 secondes le
contrôleur émettra 2x BEEP + LED
clignotera également 2 fois. Ceci
confirme que la position plein gaz
est programmé
- Positionnez le stick gaz au point
neutre. Un BEEP sonore + LED
clignotera confirmant la programmation du point neutre.
Le calibrage est maintenant terminé
et si vous désirez utiliser toute la
plage du mouvement du stick Gaz
pour la marche avant, programmez
la position de Gaz minimum au lieu
de la position au point neutre.
Vorgehensweise:
- Schalten Sie Ihren Sender ein
und stellen Sie alle EPA/ATV Einstellungen auf 100%. Schalten
Sie die ABS Bremsfunktion am
Sender aus. Bei manchen Sendern müssen Sie die Gashebelfunktion umschalten.
- Bewegen Sie den Gashebel in die
Vollgas-Position und schliessen
Sie das Akku-pack an den Regler.
Nach 2 Sekunden hören Sie einen Bestätigungston und die LED
am Regler blinkt zwei mal auf.
- Lassen Sie den Gashebel los in
seine Neutral-Position. Sie hören
einen Bestätigunston und die
LED am Regler blinkt einmal auf.
Das Kalibrieren ist beendet.
Procedure:
- Zet de zender aan en zet alle EPA/
ATV instellingen op 100%, schakel
de ABS remfunctie op de zender
uit. Sommige zenders vereisen een
ompoling van de gasfunctie.
- Zet de gasstick in de volgas positie
en verbind het batterijpakket met de
regelaar.
Na 2 seconden zal een dubbele
confirmatietoon te horen zijn en de
LED op de regelaar zal twee maal
flikkeren.
- Zet de gasstick in de neutrale
positie. Een enkele confirmatietoon
zal nu klinken, de LED in de regelaar
knippert één keer. Het kalibratieproces is nu afgelopen. Indien u de
volledige weg van de gasstick wenst
te gebruiken voor het voorwaarts
varen, gebruik dan de laagste
gaspositie in plaats van de neutrale
gaspositie bij het programmeren van
het neutrale punt.
D) Normal start up.
- Move the throttle stick to the lowest
throttle or neutral (steering wheel
transmitter) position and turn on the
transmitter
- Connect the battery to the ESC,
Several beep tones will be emitted,
representing the number of LiPo cells.
If only one beep tone is emitted, the
battery voltage is too low.
D) Démarrage normal
Positionnez le stick gaz en position
minimum ou neutre (Emetteur à
poignée) et allumez l’émetteur.
- Connectez la batterie au contrôleur, un nombre de BEEP suivra
confirmant le nombre d’éléments
LiPo de la batterie. Un seul BEEP
indique que la tension de la batterie est trop faible.
D) Normaler Start.
- Bewegen Sie den Gasknüppel in
den niedrigsten Gasstand oder in
die neutral-Position und schalten
sie den Sender ein.
- Schliessen Sie Ihre Akku an den
Regler. Sie werden verschiedene
Beeptöne hören die die Anzahl
der LiPo-Zellen angeben. Wenn
Sie nur einen Beepton hören
D) Normaal opstarten.
Zet de gasstick in de laagste positie
of neutrale positie (bij stuurwielzenders) en schakel de zender in.
- verbind de batterij met de ESC,
Een aantal pieptonen wordt weergegeven, overeenkomstig het aantal
LiPo cellen van de batterij.
Indien slechts één enkele biep toon
weergegeven wordt,
copyright © 2010 BMI
D
NL
# 920 Aurora 1300