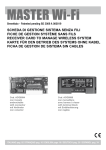
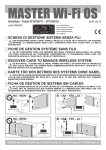
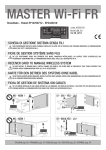
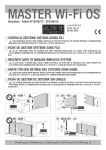
1
MASTER Wi-Fi FR
Brevettato - Patent EP10706772 - EP2345019
fw 01_04_13
code ACG6150
con morsettiera
avec bornes à visser
with terminal block
mit Endblockierung
con regleta
I
SCHEDA DI GESTIONE SISTEMA SENZA FILI
F
FICHE DE GESTION SYSTÈME SANS FILS
G
B
D
E
S
NON POSIZIONARE DIETRO A MURI, PANNELLI METALLICI O ALTRI TIPI DI OSTACOLI CHE POSSANO
IMPEDIRE LA COMUNICAZIONE RADIO CON TUTTI I DISPOSITIVI Wi-Fi.
NE LES POSITIONNEZ DONC PAS DERRIÈRE DES MURS, PANNEAUX MÉTALLIQUES, OU AUTRES
TYPES D’OBSTACLES QUI POURRAIENT COMPROMETTRE LA TRANSMISSION RADIO AVEC TOUS LES
DISPOSITIFS Wi-Fi.
RECEIVER CARD TO MANAGE WIRELESS SYSTEM
DO NOT INSTALL IT BEHIND WALLS, METAL FRAMES OR PANELS, OR OTHER KIND OF OBSTACLES
THAT COULD PREVENT THE PROPER RADIO COMMUNICATION WITH ALL Wi-Fi ACCESSORIES.
KARTE FÜR DEN BETRIEB DES SYSTEMS OHNE KABEL
NICHT INSTALLIEREN HINTER MAUERN, METALLPLATTEN ODER ANDERE ARTEN VON HINDERNISSEN,
DIE DEN FUNKVERKEHR MIT Wi-Fi ZUBEHÖR BEEINTRÄCHTIGEN KÖNNEN.
FICHA DE GESTION DE SISTEMA SIN CABLES
NO LO DEBEN INSTALAR EN UN LUGAR DETRÁS DE LAS PAREDES, DE PANELES DE METAL O DE
OTRO TIPO DE OBSTÁCULOS QUE PUEDAN IMPEDIR LA COMUNICACIÓN POR RADIO CON TODOS
LOS ACCESSORIOS Wi-Fi.
NO - NEIN !
SI - OUI - YES - JA !
MASTER Wi-Fi FR
MASTER Wi-Fi FR
NO - NEIN !
SI - OUI - YES - JA !
MASTER Wi-Fi FR
MASTER Wi-Fi FR
ITALIANO pag. 02 / FRANÇAIS pag. 10 / ENGLISH page 18 / DEUTSCH pag. 26 / ESPAÑOL pag. 34
I
SUN 2CH
Cod. ACG6052
SUN 4CH
Cod. ACG6054
SUN CLONE 2CH
Cod. ACG6056
SUN CLONE 4CH
Cod. ACG6058
NOVA Wi-Fi
Cod. ACG8037
BLOCK Wi-Fi
Cod. ACG6098
SPARK Wi-Fi
Cod. ACG7064
VERTIGO Wi-Fi 8
Cod. ACG8042
VERTIGO Wi-Fi 10
Cod. ACG8043
TOUCH Wi-Fi
Cod. ACG3016
TX RED
Cod. ACG6202
TOUCH
Cod. ACG3015
o costa di altra
marca meccanica o
resistiva
Il SISTEMA Wi-Fi è conforme alla norma EN13849-2:2008 e
congiuntamente ad un quadro elettronico RIB è un dispositivo di
protezione di Classe 2.
Il SISTEMA Wi-Fi permette la realizzazione tramite la scheda
MASTER Wi-Fi FR di un impianto con fotocellule NOVA Wi-Fi e coste
TOUCH Wi-Fi fissate anche sull’anta in movimento senza l’adozione
di sistemi raccogli cavo.
Il sistema verifica costantemente la presenza dei vari dispositivi di
sicurezza e dello stato delle batterie, soddisfacendo completamente
l’esigenza di una sicurezza attiva su tutti i tipi di aperture.
Utilizzando i quadri elettronici RIB è possibile eseguire l’autotest del
sistema come richiesto dalle norme in vigore.
Ogni dispositivo di sicurezza radio ha un proprio codice identificativo
interno che lo distingue dagli altri.
SICUREZZE
RIFERIMENTI
MASTER Wi-Fi FR gestisce fino a 100 codici diversi dei telecomandi:
- Telecomandi SUN bicanali 433,92 MHz (cod. ACG6052)
- Telecomandi SUN quadricanali 433,92 MHz (cod. ACG6054)
- Telecomandi SUN CLONE bicanali 433,92 MHz (cod. ACG6056)
- Telecomandi SUN CLONE quadricanali 433,92 MHz (cod. ACG6058)
- Selettore a chiave BLOCK Wi-Fi monocanale 433,92 MHz (cod.
ACG6098).
E’ possibile collegare comandi filari con contatto N.O. (selettori a chiave,
pulsantiere, ecc).
AUTOMATICI
MASTER Wi-Fi FR può gestire fino a 6 sicurezze (NOVA Wi-Fi +
VERTIGO Wi-Fi + TOUCH Wi-Fi + TX RED) simultaneamente.
- Fotocellule NOVA Wi-Fi (cod. ACG8037): hanno la possibilità di
collegare una costa meccanica TOUCH (cod. ACG3015) o una costa
resistiva sia sulla fotocellula trasmettitore, sia sulla fotocellula ricevitore.
- Fotocellule VERTIGO Wi-Fi (VERTIGO Wi-Fi 8 cod. ACG8042 VERTIGO Wi-Fi 10 cod. ACG8043): fotocellule verticali senza fili
sostitutive della costa.
- Costa TOUCH Wi-Fi (cod. ACG3016), con ricetrasmettitore incorporato.
- TX RED (cod. ACG6202): trasmettitore per gestire via radio coste
meccaniche o resistive.
COMANDI
NORMATIVI PER PORTE E CANCELLI
L’installatore deve assicurarsi che il SISTEMA Wi-fi sia collegato come
specificato nella norma EN12453 al punto 5.1.1.6 (punti e ed f) ad una
centrale elettronica in grado di effettuare un controllo del funzionamento
prima di effettuare il movimento di chiusura (AUTOTEST).
Utilizzare quindi i dispositivi RIB permette di realizzare un’installazione
conforme alle Norme e Direttive in vigore.
Una volta ultimata l’installazione della macchina ci si deve sincerare che
sia conforme alla norma EN13241-1.
RIB non puó considerarsi responsabile per eventuali danni causati da un
uso improprio, erroneo o irragionevole del prodotto.
SEGNALAZIONI VISIVE
MASTER Wi-Fi FR può gestire uno o più lampeggiatori SPARK Wi-Fi
(868,3 MHz) cod. ACG7064.
MASTER Wi-Fi FR possiede dei led per il monitoraggio dello stato del
sistema e per l’identificazione delle fotocellule o delle coste con batterie
quasi scariche o scariche.
MASTER Wi-Fi
E’ il cuore del sistema: gestisce tutti i dispositivi di comando (433,92
MHz), di sicurezza e di segnalazione (868,3 MHz) programmati in fase
di installazione.
MASTER Wi-Fi è disponibile in 4 modelli:
- MASTER Wi-Fi con connettore (cod. ACG6094), applicabile a tutti i
quadri elettronici RIB non CRX.
- MASTER Wi-Fi con morsettiera (cod. ACG6099), applicabile a quadri
di altre marche o RIB CRX.
- MASTER Wi-Fi FR con morsettiera (cod. ACG6150), applicabile a
quadri di altre marche o RIB CRX.
- MASTER Wi-Fi OS con morsettiera (cod. ACG6152), applicabile a
quadri di altre marche o RIB CRX.
SEGNALAZIONI ACUSTICHE
MASTER Wi-Fi FR possiede un buzzer che segnala le fasi di installazione
e lo stato di attenzione in caso di batterie quasi scariche e scariche o lo
stato di allarme in caso di guasto di uno dei dispositivi.
2
I
A - PREDISPOSIZIONE IMPIANTO
Il sistema Wi-Fi può essere installato su diverse tipologie di automazione (escluso le barriere automatiche). Di seguito indichiamo alcune possibilità.
SCORREVOLE
BATTENTE
MASTER Wi-Fi FR
MASTER Wi-Fi FR
BASCULANTE
SEZIONALE/SERRANDA
MASTER Wi-Fi FR
MASTER Wi-Fi FR
B - MONTAGGIO DISPOSITIVI DI PROTEZIONE
FOTOCELLULE NOVA Wi-Fi
- Fissare le fotocellule NOVA Wi-Fi, sui pilastri o sulle colonnine ad
un’altezza di circa 40÷60 cm dal suolo e ad una distanza max di 10 cm
dalla zona di convogliamento o schiacciamento o subito dopo l’ingombro
dato da un’eventuale costa, a max 20 metri di distanza dal MASTER
Wi-Fi FR.
- Installate il ricevitore in ombra o in una posizione in cui il sole non possa
battere orizzontalmente.
- In ogni caso si consiglia di posizionare le fotocellule alla stessa altezza
e allineate tra loro.
- Per il corretto posizionamento delle fotocellule fare riferimento al loro
manuale d’installazione o comunque alla norma EN12445.
COSTE TOUCH Wi-Fi
- Fissare le coste TOUCH Wi-Fi nelle zone di convogliamento o
schiacciamento a max 20 metri di distanza dal MASTER Wi-Fi FR.
TX RED
- Collegare il trasmettitore alla costa a max 20 metri di distanza dal
MASTER Wi-Fi FR.
LAMPEGGIATORE SPARK Wi-Fi
- Fissare il lampeggiatore SPARK Wi-Fi a max 20 metri di distanza dal
MASTER Wi-Fi FR, in modo che sia visibile.
FOTOCELLULE VERTIGO Wi-Fi
- Fissare le fotocellule VERTIGO Wi-Fi nelle zone di convogliamento o
schiacciamento a max 20 metri di distanza dal MASTER Wi-Fi FR.
ATTENZIONE:
Se viene tolta l’alimentazione del MASTER Wi-Fi FR per un periodo di tempo prolungato le coste TOUCH Wi-Fi, le fotocellule
NOVA Wi-Fi e le fotocellule VERTIGO Wi-Fi esauriranno più velocemente del normale la carica delle loro batterie. Tenere i
MASTER Wi-Fi FR sempre correttamente alimentati per garantire la durata di 3 anni delle batterie come dichiarata da RIB.
Se per esempio viene tolta la tensione al cancello tutte le notti, fotocellule e coste “cercano” ripetutamente il segnale dal
MASTER Wi-Fi FR senza trovarlo e quindi la durata delle batterie di questi accessori si riduce a meno di un anno.
ATTENZIONE:
Se vengono comandati contemporaneamente 2 MASTER Wi-Fi FR installati a distanza inferiore a 20 m tra loro, i loro segnali
di controllo e verifica delle sicurezze installate possono sovrapporsi con conseguente attivazione di allarme.
3
I
C - LAYOUT SCHEDA
S1
SW1
JP1
JP2
Led bicolore
EDGE PHOT 1-6
J8
J4
J1
J5
BUZZER
J2
12/24V ac/dc
10 9
6 5
+ -
2 1
6 5 4 3 2 1
+ -
MASTER Wi-Fi FR con morsettiera cod. ACG6150
1 centrale antenna 433
2 massa antenna
3 alimentazione negativa a 12/24V ac/dc
4 alimentazione positiva a 12/24V ac/dc
5-6 da collegare alla centrale di comando all’ingresso del pulsante
di apertura/chiusura totale (K BUTTON se quadro RIB)
J1 => C
ONNETTORE PER COLLEGAMENTI AL QUADRO DI
COMANDO, AGLI INGRESSI DI SICUREZZE
Filo verde => costa EDGE 2
NOTA: questa uscita è abilitata dalle coste
memorizzate nelle posizioni 4-5-6
Filo grigio => comune dei contatti COM
Filo giallo =>costa EDGE 1
NOTA: questa uscita è abilitata dalle coste
memorizzate nelle posizioni 1-2-3
Filo nero
=> fotocellula PHOT N.C.
Filo bianco => morsetto a cui collegare il filo proveniente dal
pulsante N.O. di comando già presente nell’impianto
Filo marrone=> alimentazione autotest A-D+ TEST.
J2 => CONNETTORE PER COLLEGAMENTI AL QUADRO DI
COMANDO A 12/24V ac/dc, ALL’USCITA DEL LAMPEGGIATORE
(ATTENZIONE ALLE POLARITA’)
Filo rosso => positivo (da collegare al polo positivo dell’uscita
lampeggiatore)
Filo nero
=> negativo (da collegare al polo negativo dell’uscita
lampeggiatore)
J4 => MORSETTI PER COLLEGAMENTI AL QUADRO DI
COMANDO 120/230V, ALL’USCITA LAMPEGGIATORE
J5 => MORSETTIERA PER COLLEGAMENTI SU QUADRI DI
COMANDO DI ALTRE MARCHE O RIB CRX
J8 => MORSETTO PER COLLEGAMENTO ANTENNA 868,3 MHz
JP1 => A/D+ TEST vedere tabella TABELLA QUADRI ELETTRONICI RIB
ABILITATI AL CONTROLLO AUTOTEST.
-
Jumper selezione modalità AUTOTEST per quadri di comando
non RIB con alimentazione AUTOTEST negativa
+/~
Jumper selezione modalità AUTOTEST per quadri di comando RIB
JP2 =>Abilitazione cancellazione codici radio per apertura totale e
SW1
pedonale
=> Microinterruttori
di abbinamento e identificazione coste e
fotocellule
S1
=> PROG. RX
Pulsante per programmazione
BUZZER => Segnalazione sonora per stati di installazione, attenzione
e allarme
LED
DL1 (rosso) - contatto coste N.C. (EDGE 2)
DL2 (rosso) - contatto coste N.C. (EDGE 1)
DL3 (rosso) - contatto fotocellule N.C. (PHOTO)
DL4 (rosso) - comando apertura totale con pulsante N.O. già presente
nell’impianto
DL5 (verde) - comando radio apertura totale attivato.
DL6 (giallo) - presenza tensione di alimentazione 12-24V ac/dc
DL7 (bicolore)- apprendimento codici radio per apertura totale e
lampeggiatore
LED BICOLORE EDGE PHOT
spento
=> funzionamento regolare
verde
=> costa o fotocellula impegnata
rosso/verde => allarme
LED EDGE PHOT 1 - COSTA O FOTOCELLULA 1
LED EDGE PHOT 2 - COSTA O FOTOCELLULA 2
LED EDGE PHOT 3 - COSTA O FOTOCELLULA 3
LED EDGE PHOT 4 - COSTA O FOTOCELLULA 4
LED EDGE PHOT 5 - COSTA O FOTOCELLULA 5
LED EDGE PHOT 6 - COSTA O FOTOCELLULA 6
SW1 MICROINTERRUTTORI - DIP
DIP 1 ON => COSTA O FOTOCELLULA 1 ATTIVATA
DIP 2 ON => COSTA O FOTOCELLULA 2 ATTIVATA
4
I
DIP 3
DIP 4
DIP 5
DIP 6
ON
ON
ON
ON
=>
=>
=>
=>
COSTA O
COSTA O
COSTA O
COSTA O
FOTOCELLULA 3 ATTIVATA
FOTOCELLULA 4 ATTIVATA
FOTOCELLULA 5 ATTIVATA
FOTOCELLULA 6 ATTIVATA
ATTENZIONE: Ogni volta che si esegue un cambio di posizione dei
microinterruttori, premere il tasto PROG RX per 6 volte in modo da
aggiornare la programmazione del sistema.
Al termine i led bicolore devono risultare tutti spenti.
D - COLLEGAMENTO DELLA SCHEDA MASTER Wi-Fi FR
ATTENZIONE: L’uso del prodotto all’interno di contenitori in metallo può generare un malfunzionamento del sistema. Si consiglia quindi
in questi casi di aggiungere l’antenna cod. ACG5451 da applicare sul carter metallico per una perfetta ricezione/trasmissione dei segnali.
ATTENZIONE: UTILIZZANDO MASTER Wi-Fi FR CON QUADRI DI ALTRE MARCHE È IMPORTANTE ATTIVARE SU QUELLE CENTRALI DI
COMANDO LA FUNZIONE DI PRELAMPEGGIO (SE DISPONIBILE).
Si consiglia di memorizzare sulla scheda comando motore un tempo di chiusura automatica non superiore ad un minuto.
Normalmente la scheda MASTER Wi-Fi FR quando innestata su quadri elettronici RIB, è protetta contro i corto circuiti tramite fusibile collegato in serie al secondario
di alimentazione.
In caso si utilizzi la scheda MASTER Wi-Fi FR con altri quadri elettronici verificare la presenza della protezione. In caso non sia presente, collegare in serie
all’alimentazione un fusibile ritardato (T) da 200 mA.
- Togliere tensione al quadro di comando dell’automazione.
- Collegare la scheda MASTER Wi-Fi FR come indicato qui di seguito.
NOTA: l’apertura del cancello avviene circa 2 secondi dopo che si è dato un comando da pulsante. Questo per consentire alla scheda MASTER Wi-Fi FR di verificare
la presenza ed il corretto funzionamento delle sicurezze memorizzate.
*
120/230V ac
EDGE 2
filo verde
COM
filo grigio
EDGE 1
filo giallo
PHOT.N.C. filo nero
PULSANTE DI COMANDO
filo bianco
A/D+ TEST filo marrone
!
+
12/24V ac/dc
10 9
65
Il Sistema Wi-Fi funziona regolarmente
se gestisce lui tutti i comandi radio
(tramite il suo modulo radio 433MHz) e
filari (tramite il suo filo bianco).
In caso di utilizzo di radio ricevitori
e comandi filari già esistenti (quindi
esterni al Sistema Wi-Fi), per un
regolare funzionamento collegarli al
filo bianco del MASTER Wi-Fi FR.
+ -
21
654321
6
5
Contatto comando
apertura totale
COM-OPEN/K
+ 4+ 3Alimentazione
12/24V ac/dc
-
**
12/24V ac/dc
1 Centrale
Collegamento antenna 433,92 MHz
2 Massa antenna
INGRESSO EDGE 1 (filo grigio COM, filo giallo EDGE 1) dedicato alla costa
IN APERTURA.
Attenzione: l’eventuale ponte a filo presente sui morsetti morsetti COM-EDGE
dei quadri di comando deve essere rimosso.
!
* Collegamento OBBLIGATORIO per quadri con uscita lampeggiatore
a 120/230V ac
** Collegamento OBBLIGATORIO per quadri con uscita lampeggiatore
a 12/24V ac/dc ATTENZIONE RISPETTARE LE POLARITA’
Il collegamento è obbligatorio anche nel caso non sia presente un
lampeggiatore sull’impianto.
ATTENZIONE: Collegare sempre l’uscita del lampeggiatore del quadro di
comando alla scheda MASTER Wi-Fi FR in uno dei morsetti dedicati, a
seconda che il lampeggiatore venga alimentato a 230V o ai fili del connettore
J2 per 12/24V. Se il collegamento non viene eseguito la porta non funziona ed
il buzzer emette 4 toni avvertendo del mancato collegamento.
INGRESSO FOTOCELLULE (filo grigio COM, filo nero PHOT) dedicato alle
fotocellule.
Attenzione: l’eventuale ponte a filo presente sui morsetti morsetti COM-PHOT
dei quadri di comando deve essere rimosso.
PULSANTE DI COMANDO (filo grigio COM, filo bianco PULSANTE N.O.)
Scollegare ogni comando filare dal quadro di comando e collegarlo al filo bianco
del MASTER Wi-Fi FR.
INGRESSO EDGE 2 (filo grigio COM, filo verde EDGE 2) dedicato alla costa
IN CHIUSURA.
Attenzione: l’eventuale ponte a filo presente sui morsetti morsetti COM-EDGE dei
quadri di comando deve essere rimosso.
COLLEGAMENTO DELL’INGRESSO AUTOTEST (filo marrone A/D+ TEST)
(per il rispetto della norma EN13849-2:2008)
- Se il quadro utilizzato è dotato di autotest posizionare il ponticello JP1 come
5
I
s pecificato nella “TABELLA QUADRI ELETTRONICI RIB ABILITATI AL
CONTROLLO AUTOTEST” oppure in base all’alimentazione fornita dal quadro
di comando utilizzato (attenersi al relativo manuale).
- Collegare l’uscita autotest del quadro di comando al morsetto A/D+ TEST della
scheda MASTER Wi-Fi FR così da poter controllare il sistema al termine di ogni
completa apertura dell’automazione.
- La chiusura viene effettuata solo se la scheda MASTER Wi-Fi FR ha superato
il test di controllo.
- Se il controllo della scheda MASTER Wi-Fi FR ha avuto esito negativo, il quadro
di comando blocca l’automazione, il led bicolore sulla scheda MASTER Wi-Fi FR
riferito alla sicurezza guasta, lampeggia alternativamente rosso verde.
Il buzzer emette un tono alternato per 1 minuto segnalando l’anomalia.
Lo stato di allarme tramite buzzer si rinnova per 1 minuto a fronte di un comando.
Se il quadro non è dotato di autotest, il test di controllo viene ignorato.
TABELLA QUADRI ELETTRONICI RIB ABILITATI AL CONTROLLO AUTOTEST
QUADRO ELETTRONICO RIB
COLLEGARE IL MORSETTO
A/D+ TEST AL MORSETTO
ABILITARE LA FUNZIONE DI
AUTOTEST TRAMITE
K2007 / K2007 CRX
S1
T2 - T2 CRX
T2 24V - T2 24V CRX
J - J CRX
BOSS 24V CRX
BOSS 230V CRX
A+ TEST
A+ TEST
D+ TEST
A+ TEST
D+ TEST
Morsetto 8
Morsetto 8
DIP 10
DIP 12
DIP 13
DIP 12
DIP 7
DIP 6
DIP 6
E - ALIMENTAZIONE MASTER Wi-Fi FR
POSIZIONARE IL JUMPER
JP1 SULLA SCHEDA
MASTER WI-FI IN POSIZIONE
+/~
+/~
+/~
+/~
+/~
JP1
+/~
+/~
+/~
DGE PHOT 1 si accende rosso lampeggiando per 1 minuto (tempo utile per
E
eseguire la memorizzazione).
- Premere il tasto PROG TX sulla sicurezza con microinterruttore 1 su ON
=> su MASTER Wi-Fi FR il led bicolore EDGE PHOT 1 da rosso lampeggiante
diventa verde e un tono di buzzer segnala la corretta memorizzazione della
sicurezza, subito dopo si accende lampeggiante rosso il led bicolore EDGE
PHOT 2.
- Se non vengono memorizzate altre sicurezze lasciare trascorrere un
minuto ed il led bicolore EDGE PHOT 2 si spegnerà oppure premere il tasto
PROG. RX per 4 volte per terminare la procedura di memorizzazione => tutti
i led bicolore EDGE PHOT devono risultare spenti.
Dopo avere eseguito tutti i collegamenti, alimentare il quadro di comando con
MASTER Wi-Fi FR.
Il led giallo DL6 si deve accendere e il buzzer deve emettere un suono per
segnalare la corretta alimentazione.
Il led DL7 lampeggerà alternativamente rosso-verde segnalando che non vi sono
telecomandi e lampeggiatore memorizzati.
F - IDENTIFICAZIONE DELLE SICUREZZE
PER MEMORIZZARE ALTRE SICUREZZE
- Dopo avere memorizzato la prima sicurezza, automaticamente il led bicolore
EDGE PHOT 2 si accende di colore rosso lampeggiando per 1 minuto (tempo
utile per eseguire la memorizzazione).
- Premere il tasto PROG. TX sulla sicurezza con microinterruttore 2 su ON
=> su MASTER Wi-Fi FR il led bicolore EDGE PHOT 2 da rosso lampeggiante
diventa verde lampeggiante e un suono del buzzer segnala la corretta
memorizzazione della sicurezza.
- Eseguire la stessa procedura per eventuali altre sicurezze (fino ad un
massimo di 6).
ATTENZIONE: PRIMA DI ESEGUIRE L’IDENTIFICAZIONE DELLE
SICUREZZE, VERIFICARE SE IL QUADRO DI COMANDO E’ PREDISPOSTO
PER UNO O DUE INGRESSI DI COLLEGAMENTO COSTE.
ESEGUIRE QUINDI IL SETTAGGIO DEL PONTICELLO JP2 IN BASE AL
NUMERO DI INGRESSI PER COLLEGAMENTO COSTE.
MASTER Wi-Fi FR puo’ gestire 6 coste Wi-Fi che agiscono su 2 uscite
separate per la gestione delle coste.
3 coste possono essere assegnate per ognuna delle 2 uscite.
Soluzione da adottare se la centrale di comando del cancello ha 2 ingressi separati
per la gestione delle coste in apertura e in chiusura:
EDGE 1 = filo giallo - coste in apertura (LED EDGE/PHOT disponibili da 1 a 3)
EDGE 2 = filo verde - coste in chiusura (LED EDGE/PHOT disponibili da 4 a 6)
AGGIUNTA DI ALTRE SICUREZZE (MAX 6 TOTALI)
Se dopo l’installazione si decide di applicare altre sicurezze (FOTOCELLULE O
COSTE) per aumentare lo stato di sicurezza della porta, si consiglia di:
- Togliere tensione alla porta.
- Fissare la sicurezza nella posizione desiderata e identificarla spostandone il
microinterruttore interno.
- Eseguire la programmazione posizionando su ON un microinterruttore diverso
da quello delle altre sicurezze installate e identificare il dispositivo installato
con l’adesivo numerato corrispondente (vedi paragrafo F - IDENTIFICAZIONE
DELLE SICUREZZE Wi-Fi).
- Su MASTER Wi-Fi FR mettere su ON il microinterruttore corrispondente a quello
della sicurezza appena aggiunta.
- Dare tensione alla porta.
- Eseguire la procedura di memorizzazione delle sicurezze come indicato in
precedenza.
Ogni sicurezza Wi-Fi deve essere OBBLIGATORIAMENTE identificata mettendo
su ON un solo microinterruttore dei 6 presenti sul suo circuito (diverso per ognuna
delle 6 sicurezze). Ovviamente una coppia di fotocellule è considerata una
sicurezza e quindi dovrà avere ricevitore e trasmettitore con lo stesso DIP su ON.
IDENTIFICARE I CONTENITORI DELLE SICUREZZE CON IL NUMERO DEL
MICROINTERRUTTORE ATTIVATO APPLICANDO L’ADESIVO NUMERATO IN
DOTAZIONE ALL’ESTERNO DI OGNI CONTENITORE.
L’adesivo serve per identificare velocemente la sicurezza che necessita di
manutenzione.
Nota: Ogni sicurezza viene fornita con i microinterruttori in posizione OFF per
evitare che le batterie si scarichino quando non viene utilizzata (se inserite).
Inserire le batterie nelle sicurezze Wi-Fi.
VERIFICA DEL CORRETTO FUNZIONAMENTO DELLE FOTOCELLULE NOVA
Wi-Fi E VERTIGO Wi-Fi
- Verificare che il microinterruttore selezionato sul trasmettitore TX NOVA Wi-Fi sia
il medesimo selezionato sul ricevitore RX NOVA Wi-Fi (esempio 1 ON).
- Il corretto funzionamento del TX NOVA Wi-Fi è visualizzato dal led verde che si
accende per 10 secondi.
- Premere e rilasciare il pulsante S3 “PROG. TX” sul ricevitore NOVA Wi-Fi (si
attiva un tempo di 3 minuti per poter eseguire l’allineamento). Se le fotocellule
sono già allineate il led rosso si accende fisso. Se il led rosso è spento o
lampeggiante eseguire l’allineamento fino a quando rimane acceso fisso.
G - MEMORIZZAZIONE DELLE SICUREZZE
Dopo avere eseguito l’identificazione delle sicurezze, ed averle alimentate tramite
le batterie, posizionare in ON i microinterruttori contrassegnati dagli stessi
numeri di quelli delle sicurezze su MASTER Wi-Fi FR per attivare le sicurezze
da memorizzare.
Per eseguire la memorizzazione seguire la seguente procedura:
- Premere il tasto PROG RX che si trova su MASTER Wi-Fi FR => il led bicolore
6
I
- Dopo l’allineamento verificare che interponendo un ostacolo il led rosso si
spenga e contemporaneamente il led bicolore EDGE PHOT associato, durante
la memorizzazione, si accenda di colore verde per la durata dell’interposizione
su MASTER Wi-Fi FR.
- Sulla scheda MASTER Wi-Fi FR anche il led DL3 si deve spegnere indicando
l’avvenuto corretto scambio del contatto dedicato all’ingresso PHOT sul quadro
di comando.
- Ripetere la verifica sulle altre fotocellule NOVA Wi-Fi installate.
- Eseguire una verifica funzionale di tutte le fotocellule installate attivando la
movimentazione dell’automazione e controllando che interponendo un ostacolo
l’automazione si fermi/inverta se in chiusura, oppure si fermi/continui ad aprire
se in apertura.
abilitato). Posizionarlo su ON.
STATO DI ATTENZIONE (avviso di sostituzione batterie)
Lo stato di attenzione (WARNING) avverte l’utilizzatore dell’imminente necessità
di sostituire le batterie.
Quando le batterie quasi scariche raggiungono i 2,3V per NOVA Wi-Fi e i 3V per
TOUCH Wi-Fi, la fotocellula ricevitore NOVA Wi-Fi o la costa segnalano via radio
a MASTER Wi-Fi FR lo stato di batteria quasi scarica e MASTER Wi-Fi FR attiva
il BUZZER di con un tono ogni 3 secondi per 1 minuto.
Lo stato di attenzione si rinnova per 1 minuto a fronte di un comando della porta.
Il led bicolore su MASTER Wi-Fi FR riferito alla fotocellula o alla costa con batterie
quasi scariche, si accende fisso di colore rosso.
Il lampeggiatore SPARK Wi-Fi (se disponibile) segnalerà lo stato di
attenzione emettendo 2 lampeggi consecutivi seguiti da una pausa di 3
secondi per la durata dell’apertura o della chiusura della porta.
Durante queste segnalazioni lo stato del sistema è ancora funzionante, ma è
opportuno sostituire al più presto le batterie per evitare il blocco funzionale della
porta che avviene al raggiungimento dei 2,0 V per NOVA Wi-Fi e i 2,7 V per
TOUCH Wi-Fi.
VERIFICA DEL CORRETTO FUNZIONAMENTO DELLE COSTE TOUCH Wi-Fi
Dopo aver eseguito la corretta taratura della costa TOUCH Wi-Fi:
- Premere il contatto di una costa TOUCH Wi-Fi (esempio la sicurezza numero 3).
- Verificare che su MASTER Wi-Fi FR il corrispondente led EDGE PHOT 3
esegua un lampeggio di colore verde e che il rispettivo led DL2 si spenga
momentaneamente e poi si riaccenda.
ATTENZIONE: dopo avere ricevuto il primo segnale, altri segnali vengono
ignorati per 2 secondi. Se un segnale arriva durante questi 2 secondi si avrà solo
una segnalazione visiva del led EDGE PHOT 3 che diventerà verde.
- Ripetere la verifica dell’attivazione led su MASTER Wi-Fi FR premendo le altre
coste TOUCH Wi-Fi installate.
- Eseguire un controllo finale di tutte le coste installate attivando la movimentazione
dell’automazione e controllando che all’impatto con la costa l’automazione fermi/
inverta il movimento.
STATO DI ALLARME (batterie completamente scariche o guasto)
Lo stato di allarme si attiva con batterie completamente scariche (2V per NOVA
Wi-Fi e i 2,7V per TOUCH Wi-Fi) o in caso di guasto.
Su MASTER Wi-Fi FR i led DL2 e DL3 si spengono e MASTER Wi-Fi FR blocca
l’automazione.
Su MASTER Wi-Fi FR il led bicolore riferito alla fotocellula o alla costa con batterie
completamente scariche o guasta, lampeggia di colore rosso. Il BUZZER emette
un tono ogni 3 secondi per 1 minuto.
Il lampeggiatore SPARK Wi-Fi (se disponibile) segnalerà lo stato di allarme
emettendo 2 lampeggi consecutivi seguiti da una pausa di 3 secondi per
1 minuto, richiamando l’attenzione dell’utilizzatore che dovrà sostituire le
batterie o riparare il guasto.
Lo stato di allarme si rinnova per 1 minuto a fronte di un comando della
porta.
ANTENNA
Per comunicare con le sicurezze Wi-Fi a 868MHz MASTER
Wi-Fi FR è dotato di un pezzo di filo elettrico che funge da
antenna collegato al morsetto J8. Se si rende necessario
migliorare il segnale radio (per esempio, con MASTER Wi-Fi
FR inserito nei motori SUPER o MASTER Wi-Fi FR installato
in un contenitore metallico), collegare l’antenna 868,3 MHz
(cod. ACG5451) al morsetto J8 rispettando il collegamento del filo centrale e della
massa, e posizionarla in modo che sia “in vista” di tutte le sicurezze.
PROCEDURA DI CANCELLAZIONE TOTALE DELLE SICUREZZE
MEMORIZZATE
Per eseguire una cancellazione totale delle sicurezze (NOVA Wi-FI e TOUCH
Wi-FI) registrate nella memoria di MASTER12/24V
Wi-Fi
ac/dc FR, è sufficiente premere e
mantenere premuto il tasto PROG. RX per 10 secondi.
Al termine dei 10 secondi tutti i led bicolore (da EDGE PHOT 1 a EDGE
PHOT 6) lampeggeranno alternativamente per 6 volte segnalando
l’avvenuta cancellazione.
Al termine i led EDGE PHOT bicolore ed i led DL2 e DL3 si spegneranno.
Per ottenere il corretto funzionamento del sistema è necessario che
tra MASTER Wi-Fi FR e le sicurezze non ci siano ostacoli quali muri in
cemento armato, superfici in ferro, ecc. che potrebbero ostacolare le
comunicazioni radio e conseguentemente ridurre la vita delle batterie
delle sicurezze.
Per i comandi funzionanti a 433,92 MHz, anche in questo caso
l’antenna è già collegata (spezzone di filo nel quadro di comando
RIB), tuttavia se fosse necessario installarla per ottenere una
maggiore portata, collegarla ai morsetti 1-2 se MASTER Wi-Fi FR
CON MORSETTIERA, oppure ai morsetti dedicati al collegamento
dell’antenna sui quadri di comando RIB.
ATTENZIONE: CON LED DL1, DL2 E DL3 SPENTI L’AUTOMAZIONE NON
PUO’ FUNZIONARE.
PROCEDURA DI CANCELLAZIONE DELLA SINGOLA SICUREZZA
(FOTOCELLULA O COSTA)
Per cancellare una singola sicurezza memorizzata su MASTER Wi-Fi FR,
procedere nel seguente modo:
- Premere una o più volte il tasto PROG. RX per selezionare il led bicolore EDGE
PHOT, che lampeggia di color verde, corrispondente alla sicurezza da eliminare.
- Selezionata la sicurezza, premere e mantenere premuto il tasto PROG. RX per
10 secondi.
- Al termine dei 10 secondi il led bicolore EDGE PHOT lampeggia per 6 volte
alternativamente di colore rosso e verde, segnalando l’avvenuta cancellazione.
VERIFICA DELLA SEGNALAZIONE DI ALLARME DELLE FOTOCELLULE
NOVA Wi-Fi E VERTIGO Wi-Fi
Verificare che staccando una batteria dal ricevitore della fotocellula con
microinterruttore, per esempio 3 su ON, ed eseguendo un comando di apertura
della porta, su MASTER Wi-Fi FR si accenda alternativamente verde-rosso il led
bicolore 3, mentre i led DL2 e DL3 si spengono, e che il buzzer emetta un suono
alternato per 1 minuto.
Ripetere la verifica su eventuali altri ricevitori delle fotocellule installate.
Nota: se togliendo la batteria ed eseguendo un comando di apertura della porta il
buzzer su MASTER Wi-Fi FR non suona, il microinterruttore 3 su MASTER
Wi-Fi FR si trova su OFF (consenso non abilitato). Posizionarlo su ON.
ATTENZIONE: Posizionare in OFF il microinterruttore relativo alla sicurezza
eliminata, poi eseguire una scansione dei led bicolore premendo per 6 volte il
tasto PROG. RX. IMPORTANTE: Togliere le batterie alla sicurezza eliminata.
VERIFICA DELLA SEGNALAZIONE DI ALLARME PER COSTE TOUCH Wi-Fi
Verificare che staccando una batteria dal trasmettitore con microinterruttore, per
esempio DIP3 su ON, su MASTER Wi-Fi FR si accenda lampeggiante di colore
rosso il led bicolore EDGE PHOT 3 mentre il led DL2 si spegne, e che il buzzer
emetta un suono ogni 3 secondi per 1 minuto.
Ripetere la verifica su eventuali altre coste installate.
Nota: Se togliendo la batteria il buzzer su MASTER Wi-Fi FR non suona, il
microinterruttore 3 su MASTER Wi-Fi FR si trova su OFF (consenso non
SOSTITUZIONE DELLE BATTERIE
La durata delle batterie tipo AA da 1,5V applicate alle sicurezze è di circa 3 anni.
Nel caso di sostituzione delle batterie non è necessario rifare la programmazione
delle fotocellule, come di nessun altro dispositivo RIB Wi-Fi.
- Identificare la sicurezza con le batterie scariche verificando i leds EDGE PHOT
su MASTER Wi-Fi FR.
7
I
- Identificare tramite il numero a lato del led bicolore EDGE PHOT che
lampeggia rosso o che è acceso rosso fisso il numero della sicurezza con le
batterie scariche.
- Ricercare il dispositivo NOVA Wi-Fi o TOUCH Wi-Fi con l’adesivo con il numero
di identificazione corrispondente al numero del led bicolore che è in allarme nella
scheda MASTER Wi-Fi FR.
- Sostituire le batterie facendo attenzione al rispetto delle polarità.
- Premere il tastino PROG TX su NOVA Wi-Fi o TOUCH Wi-Fi per riattivare il
funzionamento del MASTER Wi-Fi FR.
- Il buzzer a bordo di MASTER Wi-Fi FR si spegnerà e i led DL2- DL3 (se era in
allarme) si accenderanno. Il led bicolore riferito alla sicurezza a cui sono state
sostituite le batterie si spegnerà.
L’automazione è pronta a ripartire in tutta sicurezza.
ATTENZIONE: Si ricorda che le batterie vanno smaltite secondo le Norme vigenti.
In caso di rottamazione delle sicurezze, si rammenta di togliere le batterie tipo AA
e di smaltirle secondo le norme vigenti.
- Se non viene inviato alcun codice, dopo 10 secondi il led DL7 bicolore rosso
del MASTER Wi-Fi FR si spegne segnalando l’uscita dalla procedura di
programmazione. Il led DL7 bicolore lampeggia alternativamente verde e rosso
segnalando l’assenza di codici in memoria.
- La corretta memorizzazione del codice è visualizzata dal led DL7 bicolore che
si accende verde per 500ms e da un suono emesso dal buzzer, segnalando la
corretta memorizzazione.
- Dopo avere appreso il primo codice, il tempo utile per l’apprendimento si rinnova
di altri 10 secondi e si possono memorizzare altri codici.
- Per terminare la procedura di apprendimento codici è sufficiente lasciare
trascorrere 10 secondi fino allo spegnimento del led DL7 che lampeggia rosso.
In alternativa potete premere per un istante il pulsantino PROG RX su MASTER
Wi-Fi FR, ed anche in questo caso il led DL7 che lampeggia rosso si spegne per
segnalare la fine della procedura di memorizzazione.
Con il led DL7 bicolore spento MASTER Wi-Fi FR è pronto a lavorare.
Premete il tasto di un telecomando memorizzato precedentemente. Il led verde
DL7 su MASTER Wi-Fi FR si accende per un attimo segnalando il riconoscimento
di un codice valido. Dopo 2 secondi si accende per un attimo il led DL5, nello
stesso
istante viene comandata l’apertura totale.
Nota: Se premendo un tasto del telecomando si accende per un attimo il led DL7
bicolore di colore rosso, questo significa che il tasto/codice non è presente
in memoria e che dovete pertanto eseguire la procedura di memorizzazione
dall’inizio.
H - PROGRAMMAZIONE LAMPEGGIATORE SPARK Wi-Fi
- Premere e mantenere premuto per almeno 3 secondi il tasto PROG. RX su
MASTER Wi-Fi FR.
- Al rilascio del tasto PROG. RX il led bicolore DL7 inizia a lampeggiare di colore
rosso per 10 secondi.
- Premere il tasto S4 PROG. TX sul lampeggiatore SPARK Wi-Fi per inviare il
segnale radio a MASTER Wi-Fi FR.
- La corretta memorizzazione è segnalata da un tono di buzzer e dal led bicolore
DL7 rosso su MASTER Wi-Fi FR che diventa verde, mentre il led rosso DL7 sulla
scheda SPARK Wi-Fi lampeggia per 3 volte.
- Per terminare la programmazione lasciate trascorrere 10 secondi, oppure
premete per un istante il tasto PROG. RX su MASTER Wi-Fi FR.
- Rimontare la protezione.
- Montare il diffusore e fissarlo con le viti in dotazione.
A MASTER Wi-Fi FR si possono abbinare più lampeggiatori.
Ogni lampeggiatore SPARK Wi-Fi riceve durante la programmazione uno stesso
identico codice inviato da MASTER Wi-Fi FR a cui viene abbinato.
Quando viene dato un comando di movimento MASTER Wi-Fi FR trasmette
un unico codice che viene ricevuto da tutti gli SPARK Wi-Fi che sono stati a lui
abbinati e che conseguentemente inizieranno a lampeggiare in perfetta sincronia.
PROCEDURA DI CANCELLAZIONE TOTALE DEI COMANDI RADIO
- Posizionare il ponticello JP2 come da disegno:
- Premere e rilasciare il pulsantino PROG RX di MASTER Wi-Fi FR.
La conferma dell’avvenuta cancellazione totale dei codici è data dall’accensione
del led DL7 bicolore rosso per 0,5 sec. che poi rimane spento.
- Posizionare il ponticello JP2 come da disegno:
- Il led DL7 inizia a lampeggiare alternativamente verde e rosso segnalando lo
stato di memoria vuota.
Nota: Il ponticello JP2 durante il normale funzionamento deve essere posizionato
come da disegno:
SEGNALAZIONE MEMORIA SATURA
VERIFICA FUNZIONALE
Eseguire un comando della porta e verificare il corretto lampeggio dello SPARK
Wi-Fi.
Se premendo e mantenendo premuto il pulsantino PROG RX su MASTER Wi-Fi
FR per almeno 3 secondi, al rilascio il led bicolore DL7 lampeggia verde per 6
volte, questo vuol dire che la memoria è piena (max 100 codici).
PROGRAMMAZIONE TELECOMANDI E SELETTORE BLOCK Wi-Fi
PER APERTURA TOTALE (massimo 100 codici)
Tramite la seguente procedura è possibile memorizzare in MASTER Wi-Fi FR i
seguenti telecomandi:
SUN BICANALI 433 MHz
Cod. ACG6052
SUN QUADRICANALI 433 MHz
Cod. ACG6054
SUN CLONE BICANALI 433 MHz
Cod. ACG6056
SUN CLONE QUADRICANALI 433 MHz
Cod. ACG6058
SELETTORE A CHIAVE BLOCK Wi-Fi 433 MHz
Cod. ACG6098
Per scaricare il video di installazione inserisci questo
indirizzo nel tuo browser o leggi il QR code con il tuo
cellulare:
All’accensione di MASTER Wi-Fi FR il led giallo DL6 si illumina.
- Contemporaneamente viene emesso un suono dal buzzer che segnala
lo stato di corretta alimentazione.
a - Se la memoria sul MASTER Wi-Fi FR è vuota (versione standard) il led
bicolore DL7 lampeggia alternativamente verde e rosso.
b - Se nella memoria ci sono già dei codici, il led DL7 bicolore rimane spento
(eseguire una cancellazione totale - vedi il paragrafo PROCEDURA DI
CANCELLAZIONE TOTALE DEI CODICI).
- Premere e mantenere premuto il pulsantino PROG RX per almeno 3 secondi.
Al rilascio,su MASTER Wi-Fi FR, il led DL7 bicolore si attiva di colore rosso
lampeggiando per 10 secondi. Durante questo tempo è sufficiente premere uno
dei tasti sul trasmettitore per memorizzare il codice.
- MASTER Wi-Fi FR, oltre al codice, apprende anche il canale che si vuole
utilizzare. Fate quindi attenzione al pulsante del telecomando che premete
durante la procedura di apprendimento dei codici perché sarà quello che
in seguito attiverà l’apertura totale.
http://www.youtube.com/user/RIBSRL?feature=mhee
8
I
IN CASO DI DIFFICOLTA’
SINTOMO
VERIFICA
Il cancello non si muove, il buzzer emette un tono alternato, ed uno dei led bicolore si accende verderosso alternato.
Se vengono comandati contemporaneamente 2 MASTER Wi-Fi FR installati a distanza inferiore a 20 m tra
loro, i loro segnali di controllo e verifica delle sicurezze installate possono sovrapporsi con conseguente
attivazione di allarme. Allontanare i 2 MASTER Wi-Fi ad una distanza superiore a 20 m.
Il cancello non si muove, il buzzer emette un tono alternato, ed uno dei led bicolore si accende verderosso alternato, OPPURE
il cancello tenta di aprire/chiudere e poi si ferma, il buzzer emette un tono alternato, ed uno dei led bicolore
si accende verde-rosso alternato.
Mancata supervisione tra MASTER Wi-Fi FR una delle fotocellule o coste:
-C
ollegare un’antenna 868MHz (cod. ACG5451) a MASTER Wi-Fi FR per garantire il corretto dialogo tra
MASTER Wi-Fi FR e sicurezze installate.
Attenzione: l’antenna deve essere posizionata in vista di tutte le sicurezze installate.
Se la segnalazione persiste, controllare il valore delle batterie e se non idoneo sostituitele.
Tutti i led della scheda MASTER Wi-Fi FR sono spenti
Verificare la presenza di tensione 12 o 24 Vac/dc ai morsetti di alimentazione del MASTER Wi-Fi FR
Durante la memorizzazione delle sicurezze il buzzer suona per 3/5 secondi
Si è tentato di memorizzare una sicurezza con microinterruttore errato.
Verificare che il led bicolore che lampeggia su MASTER Wi-Fi FR corrisponda al microinterruttore presente
sulla sicurezza da memorizzare.
Durante la memorizzazione delle sicurezze il buzzer emette 2 toni
Sicurezza già presente in memoria
Dando un comando il buzzer emette 3 toni
- Nessuna sicurezza è stata memorizzata, memorizzarne almeno una, OPPURE
- I DIP riferiti alle sicurezze memorizzate sulla scheda MASTER Wi-Fi FR sono in OFF. Posizionarli in ON
Dando un comando il buzzer emette 4 toni
Possibili cablaggi mancanti tra MASTER Wi-Fi FR e scheda comando porta:
- Fili staccati collegamento lampeggiatore alla scheda, OPPURE
- Filo staccato collegamento costa alla scheda, OPPURE
- Filo staccato collegamento fotocellula alla scheda
Il buzzer emette 5 toni alla pressione della costa collegata al ricevitore della fotocellula
Errore di configurazione contatto costa collegata al ricevitore della fotocellula
Dando un comando il buzzer emette 5 toni
- Resistenza non collegata in serie al contatto N.C. della costa collegata al ricevitore della fotocellula,
OPPURE
- Fili staccati su costa con contatto N.O. OPPURE
- Resistenza non collegata in serie al contatto N.C. della costa, OPPURE
- Fili staccati su costa con contatto N.O. collegata al ricevitore della fotocellula
Il buzzer emette un tono ogni 3 secondi ed il lampeggiatore durante il funzionamento del cancello emette
2 lampeggi consecutivi seguiti da una pausa di 3 secondi per 1 minuto ed uno dei led bicolore risulta
acceso rosso fisso
Sostituire al più presto le batterie delle/a fotocellule/a o delle costa/e in quanto sono quasi scariche
Il cancello non si muove, il buzzer emette un tono ogni 3 secondi ed il lampeggiatore emette 2 lampeggi
consecutivi seguiti da una pausa di 3 secondi per 1 minuto ed uno dei led bicolore si accende rosso
lampeggiante.
Sostituire le batterie delle/a fotocellule/a o delle costa/e in quanto scariche
Led DL2 spento e uno dei led EDGE bicolore si accende verde fisso
- Fili staccati su costa con contatto N.C., OPPURE
- Verificare la presenza della resistenza da 8,2kΩ in serie al contatto N.O. della costa collegata al ricevitore
della fotocellula
Togliendo le batterie dalla costa il buzzer non suona
Verificare su MASTER Wi-Fi FR che il microinterruttore corrispondente alla costa sia posizionato su ON
La porta non apre o non chiude ed uno dei led bicolore e’ acceso di colore verde
- Fotocellula non allineata, impegnata o batterie scariche sul trasmettitore fotocellula, OPPURE
- Resistenza da 8,2 kΩ non collegata in serie al contatto N.C. o in parallelo al contatto N.O. della costa
collegata sul trasmettitore fotocellula, OPPURE
- Resistenza da 8,2 kΩ non collegata in parallelo al contatto N.O. della costa collegata sul ricevitore della
fotocellula
La porta non apre o chiude, il buzzer emette un tono ogni 3 secondi ed il lampeggiatore emette 2 lampeggi
consecutivi seguiti da una pausa di 3 secondi per 1 minuto ed uno dei led bicolore si accende rosso
lampeggiante.
Batterie scariche sul ricevitore della fotocellula o delle coste
La costa collegata al trasmettitore o ricevitore fotocellula non agisce come sicurezza
Verificare il corretto settaggio dei ponticelli sul trasmettitore o sul ricevitore della fotocellula. Se i ponticelli
sono settati in modo corretto, togliere e rimettere le batterie.
CARATTERISTICHE TECNICHE
- ALIMENTAZIONE
- TENSIONE APPLICABILE AL MORSETTO J4
- TENSIONE APPLICABILE AL MORSETTO J2
- ASSORBIMENTO A RIPOSO
- ASSORBIMENTO MASSIMO
- TEMPERATURA DI LAVORO
- DIMENSIONI
- PESO
- TIPO DI MODULAZIONE
- PORTATA
12/24V ac/dc
120/220/230V 50/60Hz
12/24V ac/dc
40 mA
100 mA
-20°C ÷ +60°C
125x55x28 mm
0,090 kg
FSK
20 m in spazio libero
DATI TECNICI SEGNALE RADIOFREQUENZA COMANDI DI
ATTIVAZIONE
- FREQUENZA
433,92 MHz
- SENSIBILITA’
-107 dBm
- TIPO DI MODULAZIONE
OOK
- PORTATA
100 m in spazio libero con antenna
DATI TECNICI SEGNALE RADIOFREQUENZA SICUREZZE E
SEGNALAZIONE
- FREQUENZA
868,3 MHz
- SENSIBILITA’
-108 dBm
- POTENZA DI EMISSIONE
<25 mW
9
F
SUN 2CH
Code ACG6052
SUN 4CH
Code ACG6054
SUN CLONE 2CH
Code ACG6056
SUN CLONE 4CH
Code ACG6058
NOVA Wi-Fi
Code ACG8037
BLOCK Wi-Fi
Code ACG6098
SPARK Wi-Fi
Code ACG7064
VERTIGO Wi-Fi 8
Code ACG8042
VERTIGO Wi-Fi 10
Code ACG8043
TOUCH Wi-Fi
Code ACG3016
TX RED
Code ACG6202
Le SYSTEME Wi-Fi est conforme à la norme EN13849-2:2008 et est
un dispositif de protection de 2ème classe si associé à une armoire
électronique RIB.
Le SYSTEME Wi-Fi permet de réaliser grâce à la carte MASTER Wi-Fi
FR une installation avec photocellules NOVA Wi-Fi et barres palpeuses
TOUCH Wi-Fi fixées également sur le battant en mouvement sans
avoir à utiliser de fils.
Le système vérifie constamment la présence des différents dispositifs de
sécurité ainsi que l’état des batteries, satisfaisant totalement les exigences
d’une sécurité active sur tous les types d’ouvertures automatiques.
Il est possible d’effectuer un contrôle automatique du système par le biais
de l’armoire électronique RIB, comme le requièrent les normes en vigueur.
Chaque dispositif de sécurité radio dispose de son propre code interne qui
le distingue des autres.
NORMES
DE REFERENCE POUR PORTES ET PORTAILS
AUTOMATIQUES
- MASTER Wi-Fi OS avec bornier (code ACG6152), applicable à toutes
les armoires d’autres marques et aux RIB CRX.
SECURITES
MASTER Wi-Fi FR peut gérer jusqu’à 6 sécurités (NOVA Wi-Fi + VERTIGO
Wi-Fi + TOUCH Wi-Fi + TX RED) simultanément.
- Photocellules NOVA Wi-Fi (code ACG8037): elles peuvent connecter
une barre palpeuse mécanique TOUCH (code ACG3015) ou une barre
palpeuse résistive aussi bien sur la photocellule émettrice que sur la
photocellule réceptrice.
- Photocellules VERTIGO Wi-Fi (VERTIGO Wi-Fi 8 code ACG8042 VERTIGO Wi-Fi 10 code ACG8043): photocellules verticales sans fil pour
remplacer la barre palpeuse.
- Barre palpeuse TOUCH Wi-Fi (code ACG3016), avec émetteurrécepteur incorporé.
- TX RED (code ACG6202): émetteur radio à gérer barre palpeuse
mécanique ou résistif.
L’installateur doit s’assurer que le SYSTEME Wi-Fi soit bien connecté,
comme stipulé dans la norme EN12453 au point 5.1.1.6 (alinéas e et f), à une
centrale électronique en mesure d’effectuer un contrôle du fonctionnement
avant d’actionner le mouvement en fermeture (AUTOTEST).
L’utilisation des dispositifs RIB permet donc de réaliser une installation
conforme aux Normes et Directives en vigueur.
Une fois l’installation de l’appareil terminée, il faut s’assurer qu’elle soit
conforme à la norme EN13241-1.
RIB se dégage de toute responsabilité quant à d’éventuels dommages
causés par une utilisation non conforme, erronée ou irresponsable du
produit.
COMMANDES
MASTER Wi-Fi
SIGNALISATIONS VISUELLES
C’est le cœur du système: il gère tous les dispositifs de commande (433,92
MHz), de sécurité et de signalisation (868,3 MHz) programmés en phase
d’installation.
MASTER Wi-Fi est disponible dans 4 modèles:
- MASTER Wi-Fi avec connecteur électrique (code ACG6094), applicable
à toutes les armoires électroniques RIB non CRX.
- MASTER Wi-Fi avec bornier (code ACG6099), applicable à toutes les
armoires d’autres marques et aux RIB CRX.
- MASTER Wi-Fi FR avec bornier (code ACG6150), applicable à toutes
les armoires d’autres marques et aux RIB CRX.
TOUCH
Code ACG3015
ou barre palpeuse
mécanique ou
résistif d’autres
marques
MASTER Wi-Fi FR gère jusqu’à 100 codes différents des télécommandes:
- Télécommandes SUN bicanal 433,92 MHz (code ACG6052)
- Télécommandes SUN quadricanal 433,92 MHz (code ACG6054)
- Télécommandes SUN CLONE bicanal 433,92 MHz (code ACG6056)
- Télécommandes SUN CLONE quadricanal 433,92 MHz (code
ACG6058)
- Sélecteur à clé BLOCK Wi-Fi monocanal 433,92 MHz (code ACG6098).
Il est également possible de connecter commandes filaires avec contact
N.O. (sélecteur à clé, poussoir...).
MASTER Wi-Fi FR peut gérer un ou plusieurs clignotants SPARK Wi-Fi
(868,3 MHz) code ACG7064.
MASTER Wi-Fi FR dispose de LED destinées à surveiller l’état du système
et à identifier les photocellules ou les barres palpeuses dont les piles sont
déchargées ou presque.
SIGNALISATIONS SONORES
MASTER Wi-Fi FR dispose d’un bip qui signale les phases d’installation,
l’état d’attention au cas où les piles seraient déchargées ou l’état d’alarme
en cas de panne d’un des dispositifs.
10
F
A - PREDISPOSITION INSTALLATION
Le système Wi-Fi peut être installé sur différentes typologies d’automation (àl’exclusion des barrières automatiques). Vous trouverez ci-dessous quelques
possibilités.
COULISSANT
BATTENT
MASTER Wi-Fi FR
MASTER Wi-Fi FR
BASCULANT
SECTIONNEL/RIDEAU
MASTER Wi-Fi FR
MASTER Wi-Fi FR
B - MONTAGE DES DISPOSITIFS DE PROTECTION
PHOTOCELLULES NOVA Wi-Fi
- Fixer les photocellules NOVA Wi-Fi, sur des piliers ou sur des potelets
de support à une hauteur de 40-60 cm environ et à une distance
maximum de 10 cm de la zone de passage piéton ou d’écrasement, ou
tout de suite après l’obstacle dû à une éventuelle pente, et à 20 mètres
maximum du MASTER Wi-Fi FR.
- Installer le récepteur dans une zone ombragée ou dans une position où
le soleil ne tape pas horizontalement.
- Dans tous les cas, il est vivement recommandé de positionner les
photocellules à la même hauteur, de manière à ce qu’elles soient
parfaitement alignées.
- Se référer au manuel d’installation de l’opérateur et lire la norme
EN12445 pour un positionnement correct des photocellules.
BARRES PALPEUSES TOUCH Wi-Fi
- Fixer les barres palpeuses TOUCH Wi-Fi dans les zones de passage ou
d’écrasement à 20 mètres maximum du MASTER Wi-Fi FR.
TX RED
- Connectez le transmetteur à la barre palpeuse à 20 mètres maximum
du MASTER Wi-Fi FR.
CLIGNOTEUR SPARK Wi-Fi
- Fixer le clignoteur SPARK Wi-Fi à 20 mètres maximum du MASTER
Wi-Fi FR, et de façon à ce qu’il soit visible.
PHOTOCELLULES VERTIGO Wi-Fi
- Fixer les photocellules VERTIGO Wi-Fi dans les zones de passage ou
d’écrasement à 20 mètres maximum du MASTER Wi-Fi FR.
ATTENTION:
Si vous avez enlevée l’alimentation du MASTER Wi-Fi FR pour une période de temps rallongé, les barre palpeuse TOUCH Wi-Fi, les
photocellules NOVA Wi-Fi et les photocellules VERTIGO Wi-Fi termineront plus rapidement du normal la charge de leurs batteries.
Gardez les MASTER Wi-Fi FR toujours correctement alimentés, pour garantir la durée de 3 ans des batteries, comme déclarée de RIB.
Par exemple, si l’alimentation est coupée à la grille toutes les nuits, les photocellules et les cordons “essaient” à plusieurs reprises
sans trouver le signal du MASTER Wi-Fi FR et l’autonomie des batteries de ces accessoires peut être réduite à moins d’un an.
ATTENTION:
Si on commande en même temps 2 MASTER Wi-Fi FR installés à moins de 20 m de distance entre eux, leurs signals de
contrôle et vérification des sécurités installées peuvent se superposer et activer l’alerte.
11
F
C - LAYOUT
S1
SW1
JP1
JP2
Led bicolore
EDGE PHOT 1-6
J8
J4
J1
J5
BUZZER
J2
12/24V ac/dc
10 9
6 5
+ -
2 1
6 5 4 3 2 1
+ -
MASTER Wi-Fi FR avec bornier code ACG6150
1 centrale antenne 433
2 masse antenne
3 alimentation négative 12/24V ac/dc
4 alimentation positive 12/24V ac/dc
5-6 à raccorder à la centrale de commande à l’entrée du bouton
d’ouverture/fermeture totale (K BUTTON si armoire RIB)
J1 => C
ONNECTEUR POUR RACCORDEMENTS AU TABLEAU DE
COMMANDES EN ENTREES DE SECURITES
Fil vert
=> barre palpeuse EDGE 2
NOTE: Cette sortie est activée à partir des barre
palpeuses entreposés en des endroits 4-5-6
Fil gris
=> commun des contacts COM
Fil jaune => barre palpeuse EDGE 1
NOTE: Cette sortie est activée à partir des barre
palpeuses entreposés en des endroits 1-2-3
Fil noir
=> photocellule PHOT N.C.
Fil blanc => borne de raccordement du fil provenant du bouton
N.O. de commande déjà présent sur l’appareil
Fil marron => alimentation contrôle automatique A-D+ TEST.
J2 => CONNECTEUR POUR RACCORDEMENTS AU TABLEAU
DE COMMANDES A 12/24V ac/dc, EN SORTIE DU
CLIGNOTEUR (RESPECTER LES POLARITES)
Fil rouge => positif (à raccorder au pôle positif de sortie du
clignoteur)
Fil noir
=> négatif (à raccorder au pôle négatif de sortie du
clignoteur)
J4 => BORNES POUR RACCORDEMENTS AU TABLEAU DE
COMMANDE 120/230V, EN SORTIE DU CLIGNOTEUR
J5 => BORNIER POUR RACCORDEMENTS SUR TABLEAUX DE
COMMANDE D’AUTRES MARQUES OU RIB CRX
J8 => BORNE POUR RACCORDEMENT ANTENNE 868,3 MHz
JP1 => A/D+ TEST voir TABLEAUX ELECTRONIQUES RIB HABILITES
AU CONTROLE AUTOTEST.
-
Cavalier de sélection du mode AUTOTEST pour tableaux de
commande d’autres marques avec alimentation AUTOTEST
négative
+/~
Cavalier de sélection du mode AUTOTEST pour tableaux de
commande RIB
JP2
=> Habilitation
d’effacement des codes radio pour l’ouverture
totale
SW1
=> Micro-interrupteurs de couplage et d’identification des barres
palpeuses et des photocellules
S1
=> PROG. RX
Bouton de programmation
BUZZER => Signalisation sonore pour les états d’installation, d’attention
et d’alarme
LED
DL1 (rouge) - contact barres palpeuses N.C. (EDGE 2)
DL2 (rouge) - contact barres palpeuses N.C. (EDGE 1)
DL3 (rouge) - contact photocellules N.C. (PHOTO)
DL4 (rouge) - commande ouverture totale avec bouton N.O. présent
dans installe
DL5 (verte) - commande radio d’ouverture totale activée.
DL6 (jaune) - présence de tension alimentation 12-24V ca/cc
DL7 (bicolore)- apprentissage des codes radio pour ouverture totale et
clignoteur
LED BICOLORE EDGE PHOT
éteinte
=> fonctionnement normal
verte
=> barre palpeuse ou photocellule occupée
rouge/verte => alarme
LED EDGE PHOT 1 - BARRE PALPEUSE OU PHOCELLULE
LED EDGE PHOT 2 - BARRE PALPEUSE OU PHOCELLULE
LED EDGE PHOT 3 - BARRE PALPEUSE OU PHOCELLULE
LED EDGE PHOT 4 - BARRE PALPEUSE OU PHOCELLULE
LED EDGE PHOT 5 - BARRE PALPEUSE OU PHOCELLULE
LED EDGE PHOT 6 - BARRE PALPEUSE OU PHOCELLULE
1
2
3
4
5
6
SW1 MICROINTERRUPTEURS - DIP
DIP 1 ON => BARRE PALPEUSE OU PHOCELLULE 1 ACTIVEE
DIP 2 ON => BARRE PALPEUSE OU PHOCELLULE 2 ACTIVEE
12
F
DIP 3
DIP 4
DIP 5
DIP 6
ON
ON
ON
ON
=>
=>
=>
=>
BARRE
BARRE
BARRE
BARRE
PALPEUSE
PALPEUSE
PALPEUSE
PALPEUSE
OU
OU
OU
OU
PHOCELLULE
PHOCELLULE
PHOCELLULE
PHOCELLULE
3 ACTIVEE
4 ACTIVEE
5 ACTIVEE
6 ACTIVEE
ATTENTION: Lorsque Vous effectuez un changement de position des
microinterrupteurs, pressez la touche PROG RX pour 6 fois, de façon à ajourner la
programmation du système. Au terme, les leds bicolores doivent résulter tous éteints.
D - RACCORDEMENT DE LA CARTE MASTER Wi-Fi FR
ATTENTION: L’utilisation du produit à l’intérieur de conteneurs en métal peut causer un mauvais fonctionnement du système. Il est donc recommandé
dans ces cas, d’ajouter l’antenne code ACG5451 à appliquer au carter métallique pour une parfaite réception/ transmission des signaux.
ATTENTION: À UTILISER DE MASTER Wi-Fi FR AVEC ARMOIRES D’AUTRES MARQUES EST IMPORTANT DE SÉLECTIONNER SUR CELLES CENTRALE
DE COMMANDE LA FONCTION PRÉ-CLIGNOTEMENT (SI DISPONIBLE).
On conseille de se mémoriser sur la fiche commande moteur un temps de fermeture automatique pas supérieure à une minute.
Normalement le coffret MASTER Wi-Fi FR lorsque greffé sur des cadres électroniques RIB, est protégé contre les court-circuits par fusible relié en série au secondaire
d’alimentation.
En cas vous utilisiez le coffret MASTER Wi-Fi FR avec autres cadres électroniques, vérifier la présence de la protection. En cas elle ne soit pas présente, relier
en série à l’alimentation un fusible (T) de T 200 mA.
- Débrancher le tableau de commande de l’automatisme.
- Brancher ou raccorder la carte MASTER Wi-Fi FR comme indiqué sur le schéma suivant.
NOTE: l’ouverture de la grille se produit environ 2 secondes après qu’il a donné une commande par radio ou sur le bouton. C’es pour permettre à la fiche MASTER Wi-Fi
FR de vérifier la présence et le correct fonctionnement des sûretés mémorisées.
*
120/230V ac
EDGE 2
fil vert
COM
fil gris
EDGE 1
fil jaune
PHOT.N.C. fil noir
BOUTON DE COMMANDE
fil blanc
A/D+ TEST fil marron
!
+
12/24V ac/dc
10 9
65
Le
système
Wi-Fi
fonctionne
normalement s’il gère toutes les radio
commandes (avec son module radio 433
MHz) et filaires (avec son fil blanc).
En cas d’utilisation de récepteurs radio
et de commandes filaires déjà (donc
extérieurs au Système Wi-Fi), pour un
fonctionnement regulier il faut les lier à
travers le fil blanc du MASTER Wi-Fi FR.
21
654321
+ -
+ 6
5
Contact de commande
d’ouverture totale
COM-OPEN/K
4+ 3Alimentation
12/24V ac/dc
-
**
12/24V ac/dc
1 Centrale
Raccordement antenne 433,92 MHz
2 Masse antenne
ENTREE EDGE 1 (fil gris COM, fil jaune EDGE 1) dédiée aux sécurités de la barre
palpeuse EN OUVERTURE.
Attention: le cavalier présent sur les bornes COM-EDGE des tableaux de
commande doit être retiré.
!
* Raccordement OBLIGATOIRE pour tableaux avec sortie clignoteur
à 120/230V ac
** Raccordement OBLIGATOIRE pour tableaux avec sortie clignoteur
à 12/24V ac/dc ATTENTION RESPECTER LES POLARITES
La connexion est obligatoire, même au cas où il n’y ait pas un clignoteur dans
le système.
ATTENTION: Toujours connecter la sortie du clignoteur de la centrale de
commande à la carte MASTER Wi-Fi FR dans une des bornes prévues à cet effet,
selon que le clignoteur est alimenté à 230V ou à les fils du connecteur J2 pour
12/24V. Si le raccordement n’est pas correct, la porte ne devrait pas fonctionner
et le bipper devrait émettre quatre bips signalant le mauvais branchement.
ENTREE PHOTOCELLULES (fil gris COM, fil noir PHOT) dédiée aux sécurités
des photocellules.
Attention: le cavalier présent sur les bornes COM-PHOT des tableaux de
commande doit être retiré.
BOUTON DE COMMANDE (fil gris COM, fil blanc BOUTON N.O.)
Déconnecter chaque commandes filaires de la centrale de commande et le
connecter à fil blanc de MASTER Wi-Fi FR.
ENTREE EDGE 2 (fil gris COM, fil jaune EDGE 2) dédiée aux sécurités de la
barre palpeuse EN FERMETURE.
Attention: le cavalier présent sur les bornes COM-EDGE des tableaux de
commande doit être retiré.
RACCORDEMENT DE L’ENTREE AUTOTEST (fil marron A/D+ TEST) pour le
respect de la norme EN13849-2:2008
- Si le tableau électrique utilisé dispose d’un autotest, placer le cavalier JP1
13
F
c omme indiqué dans le “TABLEAUX ELECTRONIQUES RIB HABILITES AU
CONTROLE AUTOTEST” ou sur la base de la alimentation fournie par le tableaux
de commande utilisé (voir le relatif manuel).
- Raccorder la sortie autotest du tableau de commande à la borne A/D+ TEST de
la carte MASTER Wi-Fi FR afin de pouvoir contrôler le système après chaque
ouverture complète de l’automatisme.
- La fermeture ne s’effectue que si la carte MASTER Wi-Fi FR a passé le test.
- Si le test de la carte MASTER Wi-Fi FR s’avère négatif, le tableau de
commande bloque l’automatisme, la LED bicolore sur la carte MASTER Wi-Fi FR
correspondant à la sécurité en panne clignote rouge/vert en alternance.
- Le bipper émet un bip pendant 1 minute pour signaler le dysfonctionnement.
- L’état d’alarme se renouvelle pendant 1 minute après une demande d’ouverture/
fermeture.
Si le tableau ne dispose pas d’un autotest, le test de contrôle est ignoré.
TABLEAUX ELECTRONIQUES RIB HABILITES AU CONTROLE AUTOTEST
TABLEAU ELECTRONIQUE RIB
RELIER LA BORNE A/D+ TEST
A LA BORNE
HABILITER LA FONCTION
D’AUTOTEST PAR
K2007 / K2007 CRX
S1
T2 - T2 CRX
T2 24V - T2 24V CRX
J - J CRX
BOSS 24V CRX
BOSS 230V CRX
A+ TEST
A+ TEST
D+ TEST
A+ TEST
D+ TEST
Borne 8
Borne 8
DIP 10
DIP 12
DIP 13
DIP 12
DIP 7
DIP 6
DIP 6
E - ALIMENTATION MASTER Wi-Fi FR
Les raccordements effectués, alimenter le tableau de commande grâce à la carte
MASTER Wi-Fi FR.
La LED jaune DL6 devrait s’allumer et le bipper devrait émettre un son pour signaler
le branchement.
La LED DL7 clignotera rouge/vert en alternance pour signaler qu’il n’y a pas de
télécommandes ou de clignoteur mémorisés.
F - IDENTIFICATION DES SECURITES
ATTENTION: AVANT L’IDENTIFICATION DE SÉCURITÉ, VÉRIFIER SI LE
CENTRALE EST CONÇUE POUR UNE OU DEUX ENTRÉES POUR BARRE
PALPEUSE.
EXÉCUTEZ LE RÉGLAGE DE JP2 SELON LE NOMBRE D’ENTRÉES POUR
BARRES PALPEUSES.
PLACER LE CAVALIER JP1
SUR LA CARTE MASTER
Wi-Fi EN POSITION:
+/~
+/~
+/~
+/~
+/~
JP1
+/~
+/~
+/~
Pour effectuer la mémorisation, suivre la procédure suivante:
- Appuyer sur la touche PROG RX qui se trouve sur la carte MASTER Wi-Fi FR
=> la LED bicolore EDGE PHOT 1 clignotera en rouge pendant 1 minute (temps
nécessaire pour effectuer la mémorisation).
- Appuyer sur la touche PROG TX qui se trouve sur la sécurité avec le
micro-interrupteur 1 sur ON => la LED bicolore EDGE PHOT 1 présente sur le
MASTER Wi-Fi FR passera du rouge clignotant au vert et un bip préviendra de la
mémorisation de la photocellule. À ce moment là, la LED bicolore EDGE PHOT
2 s’allumera et clignotera rouge.
- Si d’autres photocellules ne doivent pas être mémorisées, patienter 1 minute
(la LED EDGE PHOT 2 s’éteindra) ou bien appuyer sur la touche PROG. RX
4 fois pour terminer la procédure de mémorisation => toutes les LED EDGE
PHOT doivent rester éteintes pendant le fonctionnement normal de l’appareil.
POUR MEMORISER D’AUTRES SECURITES
- Après avoir mémorisé la première sécurité, la LED bicolore EDGE PHOT
2 clignote automatiquement rouge pendant 1 minute (temps nécessaire à la
mémorisation).
- Appuyer sur la touche PROG. TX sur la sécurité avec le micro-interrupteur
2 sur ON => la LED bicolore EDGE PHOT 2 présente sur le MASTER Wi-Fi FR
passera du rouge clignotant au vert et un bip préviendra de la mémorisation de
la photocellule.
- Effectuer la même procédure pour mémoriser d’autres photocellules
(jusqu’à 6 maximum).
MASTER Wi-Fi FR peut gérer 6 barres palpeuses Wi-Fi qui agissent sur 2
sorties séparées pour la gestion des barres palpeuses.
3 barres palpeuses puissent être attribuées pour chaqune des 2 sorties.
Solution qui’il faut utiliser si la central de commande du portail a 2 éntrées
séparées pour la gestion des barres palpleuses en ouverture et en fermeture:
EDGE 1 = fil jaune - barres palpeuses en ouverture (LED EDGE/PHOT disponibles
de 1 à 3)
EDGE 2 = fil vert - barres en fermeture (LED EDGE/PHOT disponibles de 4 à 6)
Chaque sécurité Wi-Fi doit être OBLIGATOIREMENT identifiée en configurant
sur ON un seul des 6 micro-interrupteurs présents sur son circuit (différent pour
chacune des 6 sécurités). Bien entendu, une paire de photocellules est considérée
comme une sécurité et par conséquent les boitiers DIP correspondants de
l’émetteur et du récepteur devront être configurés sur ON.
IDENTIFIER LES BOITIERS DES SECURITES AVEC LE NUMERO DU
MICROINTERRUPTEUR ACTIVE EN UTILISANT L’ETIQUETTE FOURNIE A
CET EFFET SUR L’EXTERIEUR DE CHAQUE BOITIER.
L’étiquette sert à identifier rapidement la sécurité qui nécessite une intervention.
Remarque: Chaque sécurité est livrée avec les micro-interrupteurs en position OFF
pour éviter que les batteries se déchargent quand elle n’est pas utilisée
(si elles sont insérées).
Insérer les piles dans les sécurités Wi-Fi.
G - MEMORISATION DES SECURITES
Après avoir identifié les sécurités, et après avoir inséré les piles, configurer les
micro-interrupteurs dont les numéros correspondent à ceux des sécurités sur la
carte MASTER Wi-Fi FR sur ON pour activer les sécurités à mémoriser.
AJOUT D’AUTRES SECURITES (AU MAX 6)
Si après l’installation, d’autres sécurités doivent être installées (PHOTOCELLULES
OU BARRES PALPEUSES) pour augmenter la sécurité de la porte, il est
recommandé de:
- Débrancher le courant à la porte.
- Fixer la sécurité dans la position souhaitée et l’identifier en configurant le microinterrupteur interne à la sécurité.
- Effectuer la programmation en plaçant un autre micro-interrupteur que celui des
autres sécurités déjà installées sur ON et identifier le dispositif à peine installé
grâce à l’étiquette prévue à cet effet (voir chapitre F: IDENTIFICATION DES
SECURITES Wi-Fi).
- Sur la MASTER Wi-Fi FR mettre le micro-interrupteur correspondant à la sécurité
ajoutée sur ON.
- Rebrancher la porte.
- Effectuer la procédure de mémorisation et de contrôle comme indiqué dans les
chapitres précédents.
CONTROLE DU FONCTIONNEMENT DES PHOCELLULES NOVA Wi-Fi ET
VERTIGO Wi-Fi
- Vérifier que le micro-interrupteur sélectionné sur l’émetteur TX NOVA Wi-Fi soit
le même que celui sélectionné sur le récepteur RX NOVA Wi-Fi (exemple 1 ON).
- La LED verte qui s’allume pendant 10 secondes prévient du bon fonctionnement
du TX NOVA Wi-Fi.
14
F
- Appuyer et relâcher la touche S3 PROG TX sur le récepteur NOVA Wi-Fi
(qui s’allume pendant 3 minutes pour pouvoir effectuer l’alignement). Si les
photocellules sont déjà alignées, la LED rouge s’allume fixement. Si la LED rouge
est éteinte ou clignote, effectuer une mise au point jusqu’à ce qu’elle s’allume
fixement.
- Contrôler qu’en interposant un obstacle la LED rouge s’éteigne et qu’en même
temps la LED bicolore EDGE PHOT correspondante présente sur la MASTER
Wi-Fi FR s’illumine en vert pendant la durée de l’interposition.
- Même la LED DL3 de la carte MASTER Wi-Fi FR doit s’éteindre pour signaler le
bon changement du contact dédié à l’entrée PHOT se trouvant sur le boîtier de
commandes.
- Répéter le contrôle sur les autres photocellules NOVA Wi-Fi installées.
- Effectuer ensuite un contrôle de fonctionnement de toutes les photocellules
installées en activant le mouvement de l’automatisme et en contrôlant que
l’interposition d’un obstacle arrête/inverse (si automatisme en fermeture) le
mouvement, ou qu’elle arrête/continue à ouvrir (si automatisme en ouverture).
CONTROLE DU FONCTIONNEMENT DES BARRES PALPEUSES TOUCH Wi-Fi
Après avoir procédé au réglage de la barre palpeuse TOUCH Wi-Fi:
- Appuyer sur la tranche d’une barre palpeuse TOUCH Wi-Fi (par exemple la
sécurité numéro 3).
- Vérifier que la LED EDGE PHOT 3 présente sur MASTER Wi-Fi FR clignote vert
et que la LED correspondante DL2 s’éteigne momentanément et puis se rallume.
ATTENTION: après avoir reçu le premier signal, les éventuels autres signaux
sont ignorés pendant 2 secondes. Si un signal arrive pendant ces 2 secondes, il n’y
aura qu’un signal visuel de la LED EDGE PHOT 3 qui deviendra verte.
- Répéter le contrôle de l’activation des LED présentes sur MASTER Wi-Fi FR en
appuyant sur les autres barres palpeuses TOUCH Wi-Fi installées.
- Effectuer un contrôle final sur toutes les barres palpeuses installées en activant
le mécanisme d’ouverture/fermeture et en contrôlant qu’à l’impact avec la barre
palpeuse le mouvement s’arrête/s’inverse.
ANTENNE
Pour communiquer avec la sécurité Wi-Fi 868MHz, MASTER
Wi-Fi FR est muni d’un morceau de fil connecté à la borne
J8 qui agit comme une antenne. En cas de besoin, pour
améliorer le signal radio (par exemple, quand MASTER Wi-Fi
FR est intégré dans un moteur SUPER ou installé dans un
conteneur métallique), brancher le fil central et la masse de
l’antenne 868,3 MHz (codifiée ACG5451) à la borne J8, et la positionner de sorte
à ce qu’elle soit “en vue” de tous les accessoires de sécurité.
Pour obtenir le bon fonctionnement du système, il est nécessaire qu’il
n’y ait pas d’obstacles entre les sécurités et MASTER Wi-Fi FR tels que
murs en béton armé, surfaces en fer, etc. ce qui pourrait entraver les
communications radio et réduire la durée de vie des piles des accessoires.
Répéter le contrôle sur les autres barres palpeuses installées.
Remarque: si en enlevant une pile du récepteur photocellule et en demandant
l’ouverture de la porte, le buzzer sur la carte MASTER Wi-Fi FR ne s’actionne pas,
le micro-interrupteur 3 sur MASTER Wi-Fi FR est positionné sur OFF (non habilité).
Le positionner sur ON.
ÉTAT D’ATTENTION (signal de remplacement imminent des piles)
L’état d’attention (WARNING) avertit l’utilisateur d’un remplacement imminent des piles.
Quand les piles presque vides atteignent les 2,3V (pour NOVA Wi-Fi) et les 3V
(pour TOUCH Wi-Fi), la photocellule du récepteur NOVA Wi-Fi ou la barre palpeuse
signale via Wifi à la MASTER Wi-Fi FR que les piles sont presque vides et le buzzer
de MASTER Wi-Fi FR émettra un bip toutes les 3 secondes pendant 1 minute.
L’état d’attention se renouvelle pendant 1 minute après une demande d’ouverture
de la porte.
La LED bicolore sur MASTER Wi-Fi FR correspondant à la photocellule ou à la
barre palpeuse avec piles presque vides s’allume fixement en rouge.
Le clignoteur SPARK Wi-Fi (si disponible) signalera l’état d’attention en
émettant 2 clignotements consécutifs suivis d’une pause de 3 secondes
pendant toute la durée de l’ouverture ou de la fermeture de la porte.
Pendant ces avertissements le système est toujours en état de marche, mais il est
recommandé de s’occuper du changement des piles au plus vite, pour éviter le
blocage de la porte qui survient quand la puissance des piles n’est plus que de 2,0
V pour les NOVA Wi-Fi et de 2,7 pour les TOUCH Wi-Fi.
ÉTAT D’ALARME (piles complètement déchargées ou panne)
L’état d’alarme s’active quand les piles sont complètement vides (2,0 V pour NOVA
Wi-Fi et 2,7 pour TOUCH Wi-Fi) ou quand la photocellule est en panne.
Sur MASTER Wi-Fi FR les LED DL2 et DL3 s’éteignent et bloquent l’automatisme.
Sur MASTER Wi-Fi FR la LED correspondant à la photocellule ou à la barre
palpeuse en panne ou dont les piles sont vides clignote rouge. Le BUZZER émet
un son toutes les 3 secondes pendant 1 minute, alors que le clignoteur SPARK
Wi-Fi (si disponible) signalera l’état d’alarme en émettant 2 clignotements
consécutifs suivis d’une pause de 3 secondes pendant 1 minute, afin d’attirer
l’attention de l’utilisateur, qui devra soit changer les piles soit réparer la panne.
L’état d’alarme se renouvelle pendant 1 minute après une demande d’ouverture
de la porte.
PROCEDURE D’EFFACEMENT TOTAL DES SECURITES MEMORISEES
Pour procéder à un effacement total des sécurités (NOVA Wi-Fi et TOUCH Wi-Fi),
enregistrées dans la mémoire de MASTER Wi-Fi FR, il suffit d’appuyer et de
maintenir appuyée la touche PROG. RX pendant 10 secondes.
A la fin des 10 secondes toutes les LED bicolores (de EDGE PHOT 1 à EDGE
PHOT 6) clignoteront alternativement 6 fois pour signaler l’effacement effectué.
12/24V ac/dc
Enfin les LED EDGE PHOT bicolores et les LED DL2 e DL3 s’éteindront.
ATTENTION: AVEC LES LED DL1, DL2 ET DL3 ETEINTES L’AUTOMATISME
NE PEUT PAS FONCTIONNER.
Pour les commandes en fréquence 433,92, dans ce cas l’antenne est
déjà connectée (morceau de fil dans le panneau de contrôle RIB), mais
si vous avez besoin d’installer pour obtenir une plus grande portée,
connecter la aux bornes 1-2 sur MASTER Wi-Fi FR pour sa version À
BORNES de raccordements ou bien sur le panneau de contrôle RIB
pour sa version à embrocher.
CONTROLE DU SIGNAL D’ALARME DES PHOTOCELLULES NOVA Wi-Fi ET
VERTIGO Wi-Fi
Vérifier qu’en enlevant une pile du récepteur photocellule avec micro-interrupteur
ON (par exemple 3 sur ON), et en demandant l’ouverture de la porte, la LED
bicolore 3 sur la MASTER Wi-Fi FR s’allume alternativement en vert et en rouge,
pendant que les LED DL2 et DL3 s’éteignent et que le buzzer émette un son
entrecoupé pendant 1 minute.
Répéter le contrôle sur les autres photocellules NOVA Wi-Fi installées.
ATTENTION: si en enlevant une pile du récepteur photocellule et en demandant
l’ouverture de la porte, le buzzer sur la carte MASTER Wi-Fi FR ne s’actionne pas,
le micro-interrupteur 3 sur MASTER Wi-Fi FR est positionné sur OFF (non habilité).
Le positionner sur ON.
CONTROLE DU SIGNAL D’ALARME DES BARRES PALPEUSES TOUCH Wi-Fi
Vérifier qu’en enlevant une pile du transmetteur photocellule avec micro-interrupteur
(par exemple DIP3 sur ON), la LED bicolore EDGE PHOT 3 présente sur MASTER
Wi-Fi FR clignote rouge, pendant que la LED DL2 s’éteint et que le buzzer émet un
son toutes les 3 secondes pendant 1 minute.
PROCEDURE D’EFFACEMENT D’UNE SEULE SECURITE (PHOTOCELLULE
OU BARRE PALPEUSE)
Pour effectuer l’effacement d’une seule sécurité mémorisée sur MASTER Wi-Fi FR,
procéder de la manière suivante:
- Appuyer une ou plusieurs fois sur la touche PROG. RX pour sélectionner la LED
bicolore EDGE PHOT verte clignotante correspondant à la sécurité qu’il faut
effacer.
- Une fois la sécurité sélectionnée, appuyer et maintenir appuyée la touche PROG.
RX pendant 10 secondes.
- A la fin des 10 secondes, la LED bicolore EDGE PHOT clignote 6 fois rouge/vert
en alternance, afin de signaler l’effacement de la sécurité.
ATTENTION: Positionner le micro-interrupteur correspondant à la sécurité
effacée sur OFF, puis effectuer un balayage des LED bicolores en appuyant 6 fois
sur la touche PROG. RX. IMPORTANT: Retirez les piles de la sécurité éliminés.
REMPLACEMENT DES PILES
La durée de vie des piles de type AA 1,5V des sécurités est de 3 ans environ.
Dans le cas de remplacement des batteries, il n’y a pas besoin de refaire la
programmation des photocellules, comme de aucun autre dispositif Wi-Fi RIB.
- Identifier la sécurité dont les piles sont déchargées en analysant les LED EDGE
PHOT sur MASTER Wi-Fi FR.
15
F
- Identifier la sécurité dont les piles sont déchargées grâce au numéro sur le côté
de la LED bicolore EDGE PHOT qui clignote rouge ou qui est allumée rouge fixe.
- Rechercher le dispositif NOVA Wi-Fi ou TOUCH Wi-Fi avec l’étiquette
correspondante au numéro de la LED bicolore qui est en alarme sur la carte
MASTER Wi-Fi FR.
- Remplacer les piles en respectant les polarités.
- Appuyer sur la touche PROG TX sur NOVA Wi-Fi ou TOUCH Wi-Fi pour réactiver
le fonctionnement de la MASTER Wi-Fi FR.
- Le buzzer de la MASTER Wi-Fi FR s’éteindra et les LED DL2- DL3 (si en alarme)
s’allumeront. La LED bicolore correspondant à la sécurité dont les piles ont été
remplacées s’éteindra.
L’automatisme est prêt à repartir en toute sécurité.
ATTENTION: Nous vous rappelons que les piles doivent être éliminées selon les
normes en vigueur. En cas de destruction des sécurités, nous vous rappelons de
retirer les piles et de les éliminer selon les normes en vigueur.
H - PROGRAMMATION DU CLIGNOTEUR SPARK Wi-Fi
- Appuyer sur la touche PROG. RX sur MASTER Wi-Fi FR en restant appuyé au
moins 3 secondes.
- Au relâchement du bouton PROG. RX, la LED bicolore DL7 se met à clignoter
rouge pendant 10 secondes.
- Appuyer sur la touche S4 PROG. RX sur le clignoteur SPARK Wi-Fi pour envoyer
le signal radio au MASTER Wi-Fi FR.
- La mémorisation correcte est signalée par un bip et par le changement de couleur
de la LED bicolore DL7 sur MASTER Wi-Fi FR qui passe du rouge au vert, tandis
que la LED rouge DL7 clignote 3 fois sur la carte SPARK Wi-Fi.
- Pour terminer la programmation, attendre 10 secondes, ou appuyer sur le bouton
PROG. RX sur MASTER Wi-Fi FR.
- Refixer la protection.
- Monter le cache et le fixer avec les vis fournies.
MASTER Wi-Fi FR est mesure de piloter simultanément plusieurs clignotants à
leds sans fil.
Chaque clignotant SPARK Wi-Fi reçoit pendant sa programmation un signal
identique provenant du même MASTER Wi-Fi FR auquel il est accouplé.
Quand un ordre de commande est donné, MASTER Wi-Fi FR transmet un signal
unique qui sera reçu par tous les SPARK Wi-Fi avec lequel il aurait été accouplé et
ce qui aura pour effet de les faire clignoter, en parfaite synchronie.
VÉRIFICATION DU FONCTIONNEMENT
Exécuter une commande de la porte et vérifier que le SPARK Wi-Fi clignote
correctement.
PROGRAMMATION DES TÉLÉCOMMANDES ET DE L’INTERRUPTEUR
- Si aucun appareil n’est mémorisé pendant 10 secondes, la LED DL7 bicolore rouge
du MASTER Wi-Fi FR s’éteint signalant la fin du processus de programmation. La
LED DL7 bicolore clignote alternativement vert et rouge pour signaler l’absence
d’appareil enregistré dans la mémoire.
- La mémorisation correcte de l’appareil est signalée par un bip et par la LED
bicolore DL7 qui s’allume vert pendant 500ms.
- Après avoir mémorisé le premier appareil, le temps nécessaire à la mémorisation
est renouvelé (10 secondes supplémentaires) et il est possible de mémoriser
d’autres appareils.
- Pour terminer le processus de mémorisation des appareils, attendre 10 secondes
jusqu’à ce que la LED DL7 qui clignote rouge s’éteigne. Il est aussi possible
d’appuyer sur la touche PROG RX sur MASTER Wi-Fi FR, dans ce cas aussi
la LED DL7 qui clignote rouge s’éteint pour signaler la fin du processus de
mémorisation.
Lorsque la LED DL7 bicolore est éteinte, cela signifie que MASTER Wi-Fi FR est
prêt à l’usage.
Appuyer sur la touche de la télécommande précédemment mémorisée. La LED
verte DL7 du MASTER Wi-Fi FR s’allume un moment pour signaler que l’appareil a été
reconnu et qu’il est valide.
Après 2 secondes on allume pour un instant le led DL5, dans le même instant est
commandée l’ouverture totale.
Remarque: Si en appuyant sur une touche de la télécommande la LED DL7
bicolore éclairée rouge s’allume, cela signifie que la touche/l’appareil
n’est pas enregistré(e) dans la mémoire et que vous devez donc
reprendre la procédure de mémorisation depuis le début.
PROCÉDURE
D’EFFACEMENT
TOTAL
DES
APPAREILS
ENREGISTRÉS
- Placer le jumper JP2 comme sur le schéma:
- Appuyer et relâcher la touche PROG RX du MASTER Wi-Fi FR. La confirmation de
l’effacement total des appareils enregistrés est signalée par la LED DL7 bicolore
qui s’allume rouge pendant 0,5 seconde et qui reste éteinte ensuite.
- Placer le jumper JP2 comme sur le schéma:
- La LED DL7 commence à clignoter alternativement vert et rouge pour signaler
que la mémoire est vide.
Remarque: Le jumper JP2 doit être positionné comme sur le schéma pendant le
fonctionnement normal.
SIGNAL DE MÉMOIRE SATURÉE
Si lorsque vous appuyez sur la touche PROG RX du MASTER Wi-Fi FR pendant 3
secondes au moins, la LED bicolore DL7 se met à clignoter vert 6 fois lorsque vous
relâchez la touche, la mémoire est pleine (max 100 appareils).
À CLÉ BLOCK Wi-Fi POUR UNE OUVERTURE TOTALE (100 codes
maximum)
Grâce à la procédure suivante, il est possible de mémoriser les télécommandes
suivantes sur le MASTER Wi-Fi FR:
SUN BICANAL 433 MHz
SUN QUADRICANAL 433 MHz
SUN CLONE BICANAL 433 MHz
SUN CLONE QUADRICANAL 433 MHz
SÉLECTEUR À CLÉ BLOCK Wi-Fi 433 MHz
Code ACG6052
Code ACG6054
Code ACG6056
Code ACG6058
Code ACG6098
À l’allumage de MASTER Wi-Fi FR, la LED jaune DL6 s’allume.
- Au même moment, un bip signale que l’appareil est correctement alimenté.
a - Si la mémoire sur le MASTER Wi-Fi FR est vide (version standard) la LED
bicolore DL7 clignote alternativement vert et rouge.
a - Si des appareils sont déjà mémorisés, la LED DL7 bicolore reste
éteinte (procéder à un effacement total - voir le paragraphe PROCÉDURE
D’EFFACEMENT TOTAL DES APPAREILS MÉMORISÉS).
- Appuyer sur la touche PROG RX et rester appuyé pendant 3 secondes minimum.
Au relâchement, la LED bicolore DL7 clignote rouge pendant 10 secondes sur
le MASTER Wi-Fi FR. Pendant ces 10 secondes, il suffit d’appuyer sur un des
boutons de l’émetteur pour mémoriser l’appareil.
- En plus des appareils, MASTER Wi-Fi FR mémorise aussi le canal que vous
souhaitez utiliser. Faites donc attention à la touche de la télécommande sur
laquelle vous appuyez pendant le processus de mémorisation des appareils,
car ce sera elle qui activera ensuite l’ouverture totale.
Pour télécharger la vidéo d’aide à l’installation, utiliser le
lien indiqué ci-dessous ou bien lisez le QR code avec votre
téléphone mobile:
http://www.youtube.com/user/RIBSRL?feature=mhee
16
F
EN CAS DE PROBLÈMES
PROBLÈMES
VÉRIFICATION
Le portail ne se mouve pas, le vibreur sonore émet un ton alterné, et un des led à deux couleurs s’allume
vert-rouge alterné.
Si on commande en même temps 2 MASTER Wi-Fi FR installés à moins de 20 m de distance entre eux, leurs
signals de contrôle et vérification des sécurités installées peuvent se superposer et activer l’alerte.
Eloigner les 2 MASTER Wi-Fi FR à plus de 20 m de distance entre eux.
Le portail ne se mouve pas, le vibreur sonore émet un ton alterné, et un des led à deux couleurs s’allume
vert-rouge alterné, OU
Le portail cherche d’ouvrir/fermer et puis s’arrête, le vibreur sonore émet un ton alterné, et un des led à deux
couleurs s’allume vert-rouge alterné.
Si le MASTER Wi-Fi FR pendant le test ne trouve des réponses positives par les photocellules ou cordons
de sécurité:
- Relier un clignotant 868MHz (code ACG5451) au MASTER Wi-Fi FR pour obtenir la correcte communication
entre MASTER Wi-Fi FR et les accessoires de sécurité installés.
Attention: le clignotant doit se positionner en vue de tous les accessoires de sécurité installés.
Si le signal continue, controler la valeur des batteries et éventuellement les remplacer.
Toutes les LED de la carte MASTER Wi-Fi FR sont éteintes
Vérifier la tension 12 ou 24 Vac/dc aux bornes d’alimentation du MASTER Wi-Fi FR
Pendant la mémorisation des sécurités, le buzzer sonne pour 3/5 secondes.
On a tenté de mémoriser une sûreté avec microinterrupteur erroné.
Vérifier que le led bicolore qui clignote sur MASTER Wi-Fi FR corresponde au microinterrupteur présent sur
la sûreté à mémoriser.
Pendant la mémorisation des sécurités, 2 bips sont émis
Vérifier si la sécurité a déjà été enregistrée
Si en exécutant une commande, 3 bips sont émis
- S i aucune sécurité n’a été mémorisée, en mémoriser au moins une, OU BIEN
- V érifier si les boitiers DIP pour la sécurité mémorisés sur la carte MASTER Wi-Fi FR ne sont pas en position
OFF. Les mettre en position ON
Si en exécutant une commande, 4 bips sont émis
Des raccordements peuvent manquer entre le MASTER Wi-Fi FR et la carte de commande de la porte:
-D
es fils sont débranchés du clignoteur à la fiche, OU BIEN
-U
n fil est débranché de la barre palpeuse à la fiche, OU BIEN
-U
n fil est débranché de la photocellule à la fiche
5 bips sont émis lorsque la barre palpeuse touche le récepteur de la photocellule.
Erreur de configuration du contact de la barre palpeuse avec le récepteur de la photocellule
Si en exécutant une commande, 5 bips sont émis
-R
ésistance non connectée en série au contact N.C. de la barre palpeuse avec le récepteur de la photocellule,
OU BIEN
-D
es fils sont débranchés sur la barre palpeuse au niveau du pôle N.O. OU BIEN
-R
ésistance non connectée en série au contact N.C. de la barre palpeuse, OU BIEN
-D
es fils sont débranchés sur la barre palpeuse au niveau du pôle N.O. connectée au récepteur de la
photocellule
Le buzzer émet un ton chaque 3 secondes et le clignoteur pendant le fonctionnement de la grille émet 2
clignotes consécutives , suites d’une pause de 3 secondes pour 1 minute et un des leds bicolores résulte
allumé rouge fixe
Remplacer rapidement les piles de la/les photocellule(s) ou de la/des barre(s) palpeuse(s) si elles sont
déchargées
La porte ne bouge pas, le buzzer émet un ton toutes les 3 secondes et le clignoteur émet 2 clignotes
consécutives, suites d’une pause de 3 secondes pour 1 minute et un des leds bicolores clignote rouge
Remplacer les piles de la/les photocellule(s) ou de la/des barre(s) palpeuse(s) si elles sont déchargées
La LED DL2 est éteinte et une des LED EDGE bicolore s’allume vert en continu
-D
es fils sont débranchés sur la barre palpeuse au niveau du pôle N.C., OU BIEN
- V érifier que la résistance de 8,2kΩ soit branchée en série au pôle N.O. de la barre palpeuse connectée au
récepteur de la photocellule.
En enlevant les piles de la barre palpeuse, aucun bip n’est émis
Vérifier sur MASTER Wi-Fi FR que le micro-interrupteur correspondant à la barre palpeuse soit en position ON
La porte ne s’ouvre ou ne se ferme pas et une des LED bicolores est allumée vert
- P hotocellule non alignée, occupée ou piles déchargées sur l’émetteur de la photocellule, OU BIEN
- L a résistance de 8,2kΩ n’est pas branchée en série au pôle N.C. ou en parallèle au pôle N.O. de la barre
palpeuse reliée à l’émetteur de la photocellule, OU BIEN
-R
ésistance de 8,2kΩ non branchée en parallèle au pôle N.O. de la barre palpeuse connectée au récepteur
de la photocellule
La porte ne s’ouvre ou ne se ferme pas, le buzzer émet un ton toutes les 3 secondes et le clignoteur émet 2
clignotes consécutives, suites d’une pause de 3 secondes pour 1 minute et un des leds bicolores clignote rouge
Piles déchargées dans le récepteur de la photocellule ou de la barre palpeuse
La barre palpeuse reliée à l’émetteur ou au capteur n’agit pas comme une sécurité
Vérifier que la configuration des jumpers sur l’émetteur ou sur le récepteur de la photocellule soit correcte. Si
les jumpers sont correctement définis, enlever et remettre les batteries.
CARACTÉRISTIQUES TECHNIQUES
- ALIMENTATION
- TENSION APPLICABLE À LA BORNE J4
- TENSION APPLICABLE À LA BORNE J2
- CONSOMMATION EN VEILLE
- CONSOMMATION MAXIMALE
- TEMPÉRATURE DE FONCTIONNEMENT
- DIMENSIONS
- POIDS
12/24 Vac/dc
120/220/230V 50/60Hz
12/24V ac/dc
40 mA
100 mA
-20°C ÷ +60°C
125x55x28 mm
0,090 kg
- TYPE DE MODULATION
- PORTÉE
FSK
20 m sans obstacle
DONNÉES TECHNIQUES SIGNAL DE FRÉQUENCE RADIO DES
COMMANDES D’ACTIVATION
- FRÉQUENCE
433,92 MHz
- SENSIBILITÉ
-107 dBm
- TYPE DE MODULATION
OOK
- PORTÉE
100m sans obstacle avec antenne
DONNÉES TECHNIQUES SIGNAL DE FRÉQUENCE RADIO DE
SÉCURITÉS ET SIGNAUX
- FRÉQUENCE
868,3MHz
- SENSIBILITÉ
-108 dBm
- PUISSANCE D’ÉMISSION
<25mW
17
G
B
SUN 2CH
Code ACG6052
SUN 4CH
Code ACG6054
SUN CLONE 2CH
Code ACG6056
SUN CLONE 4CH
Code ACG6058
NOVA Wi-Fi
Code ACG8037
BLOCK Wi-Fi
Code ACG6098
SPARK Wi-Fi
Code ACG7064
VERTIGO Wi-Fi 8
Code ACG8042
VERTIGO Wi-Fi 10
Code ACG8043
TOUCH Wi-Fi
Code ACG3016
TX RED
Code ACG6202
TOUCH
Code ACG3015
or other brands
mechanical or
resistive strip
The Wi-Fi System complies with the standard EN13849-2:2008 and
together with a RIB electronic control panel is a Class 2 protection
device.
The Wi-Fi System through the use of the MASTER Wi-Fi FR card
permits the construction of a system with NOVA Wi-Fi photocells and
TOUCH Wi-Fi strips which also attach to the moveable panel without
the need for a cable collector.
The system constantly monitors the presence of the various safety devices
and the status of the batteries, completely meeting the need for active
safety for all types of openings.
Using the RIB electronic control panel it is possible for the system to
perform an auto test as required by current standards.
Each radio-controlled safety device has its own internal identification code
which distinguishes it from the others.
SAFETY DEVICES
REFERENCE
MASTER Wi-Fi FR runs up to 100 different remote control codes:
- SUN dual-channel 433,92 MHz remote controls (code ACG6052)
- SUN four-channel 433,92 MHz remote controls (code ACG6054)
- SUN CLONE dual-channel 433,92 MHz remote controls (code ACG6056)
- SUN CLONE four-channel 433,92 MHz remote controls (code ACG6058)
-B
LOCK Wi-Fi mono-channel 433,92 MHz key selector switch (code
ACG6098).
MOON remote controls may be coded with a single code.
It is also possible to connect a wired controls with N.O. contact (key
selectors, push-buttons...).
GATES
STANDARDS FOR AUTOMATIC DOORS AND
The installer must ensure that the Wi-Fi System is connected as specified
by the standard EN12453 as per 5.1.1.6 (points e and f) to an electronic
control panel capable of performing an operations check before closing
(AUTO TEST).
Therefore, the use of RIB devices permits system installation in compliance
with current Standards and Directives.
Once machine installation is complete it must be ascertained that it
complies with standard EN13241-1.
RIB may not be held responsible for any damage caused by improper,
wrong or unreasonable use of the product.
MASTER Wi-Fi
This is the heart of the system: it runs all of the control (433,92 MHz), safety
and signaling (868,3 MHz) devices programmed in the installation phase.
MASTER Wi-Fi is available in 4 versions:
- MASTER Wi-Fi with connection couplings (code ACG6094), for use
with all non-CRX RIB electronic control panels.
- MASTER Wi-Fi with terminal block (code ACG6099), for use with other
brands or RIB CRX panels.
- MASTER Wi-Fi FR with terminal block (code ACG6150), for use with
other brands or RIB CRX panels.
- MASTER Wi-Fi OS with terminal block (code ACG6152), for use with
other brands or RIB CRX panels.
MASTER Wi-Fi FR can operate up to 6 safety devices (NOVA Wi-Fi +
VERTIGO Wi-Fi + TOUCH Wi-Fi + TX RED) at the same time.
- NOVA Wi-Fi photocells (code ACG8037): can be connected to a TOUCH
mechanical strip (code ACG3015) or a resistive strip on both the photocell
transmitter and the photocell receiver.
- VERTIGO Wi-Fi photocells (VERTIGO Wi-Fi 8 code ACG8042 VERTIGO Wi-Fi 10 code ACG8043): wireless vertical photocells
substituting the sensitive edge.
- TOUCH Wi-Fi strip (code ACG3016), with built-in transmitter/receiver.
- TX RED (code ACG6202): radio transmitter to manage mechanical or
resistive safety strips.
CONTROLS
VISUAL SIGNALS
MASTER Wi-Fi FR can operate one or more SPARK Wi-Fi Blinkers (868,3
MHz) code ACG7064.
MASTER Wi-Fi FR has LEDs for monitoring system status and for
identifying photocells or strips with low or exhausted batteries.
SOUND SIGNALS
MASTER Wi-Fi FR has a buzzer which signals installation phases and a
warning if the batteries are low or exhausted or, acts as an alarm in case
one of the devices is not functioning.
18
G
B
A - INSTALLATION OPTIONS
The Wi-Fi system can be installed on several types of automation (excluding automatic barriers).
SLIDING GATE
SWING GATE
MASTER Wi-Fi FR
MASTER Wi-Fi FR
UP AND OVER GARAGE DOOR
SECTIONAL GARAGE DOOR
MASTER Wi-Fi FR
MASTER Wi-Fi FR
B - MOUNTING PROTECTIVE DEVICES
NOVA Wi-Fi PHOTOCELLS
- Attach the NOVA Wi-Fi photocells to the poles or columns about
40÷60 cm from the ground and a maximum of 10 cm from the area of
movement or closing or just after the encumbrance of any strip present,
a maximum of 20 meters from the MASTER Wi-Fi FR.
- Install the receiver in a shaded area or in a position not exposed to
horizontal sunlight.
- It is advisable in every case to place the photocells at the same height
and in line with each other.
- For the correct positioning of the photocells refer to the user installation
manual or to standard EN12445.
TOUCH Wi-Fi STRIPS
- Attach the TOUCH Wi-Fi strips in the movement or closing area a
maximum of 20 meters from the MASTER Wi-Fi FR.
TX RED
- Connect the transmitter to the strip a maximum of 20 meters from
MASTER Wi-Fi FR.
SPARK Wi-Fi BLINKER
- Attach the SPARK Wi-Fi blinker a maximum of 20 meters from the
MASTER Wi-Fi FR, so that it is visible.
VERTIGO Wi-Fi PHOTOCELLS
- Attach the VERTIGO Wi-Fi photocells in the movement or closing area
a maximum of 20 meters from MASTER Wi-Fi FR.
WARNING:
If you remove the power of the MASTER Wi-Fi FR for a long time, the TOUCH Wi-Fi safety strips, the NOVA Wi-Fi photocells
and the VERTIGO Wi-Fi photocells will exhaust faster than normal the charging of their batteries. Keep the MASTER Wi-Fi FR
always properly fed to ensure a period of three years for the batteries-life, as stated by RIB.
If for instance, the power to the system is cut off every night, the photocells and the safety strips will regularly and constantly
search for the MASTER Wi-Fi FR without finding it. Therefore, the life span of the batteries may be reduce to less than one year.
ATTENTION:
If two MASTER Wi-Fi FR, installed at a distance of about 20 m from one another, are commanded simultaneously, their communication
and check signals with the accessories can overlap and interfere with each other, causing the systems to go into alarm.
19
G
B
C - LAYOUT
S1
SW1
JP1
JP2
Dual-color Led
EDGE PHOT 1-6
J8
J4
J1
J5
BUZZER
J2
12/24V ac/dc
10 9
6 5
+ -
2 1
6 5 4 3 2 1
+ -
MASTER Wi-Fi FR with terminal block code ACG6150
1 central antenna 433
2 ground-plane antenna
3 negative power feed 12/24V ac/dc
4 positive power feed 12/24V ac/dc
5-6 connects to the control panel at the total open/close control
input button (K BUTTON for RIB panels)
J1 => C
ONNECTOR FOR CONNECTIONS TO THE CONTROL PANEL
AND SAFETY INPUTS
Green wire => safety strip EDGE 2
NOTE: this output is enabled from the safety
strips stored in 4-5-6 positions
Gray wire => contact common COM
Yellow wire => safety strip EDGE 1
NOTE: this output is enabled from the safety
strips stored in 1-2-3 positions
Black wire => photocell PHOT N.C.
White wire => terminal for connecting the wire coming from the
system control button N.O.
Brown wire => auto test power feed A-D+ TEST.
J2 => CONNECTOR FOR CONNECTIONS TO THE 12/24V ac/
dc CONTROL PANEL AT THE BLINKER OUTPUT (CHECK
POLARITY)
Red wire=> positive (connects to the positive pole of the blinker
output)
Black wire => negative (connects to the negative pole of the
blinker output)
J4 => TERMINALS FOR CONNECTIONS TO THE 120/230V
CONTROL PANEL, AT THE BLINKER OUTPUT
J5 => TERMINAL BOARD FOR CONNECTIONS TO OTHER BRANDS
OR RIB CRX CONTROL PANELS
J8 => TERMINAL FOR CONNECTION TO THE ANTENNA 868,3 MHz
JP1 => A/D+ TEST see SELF-TEST-ENABLED RIB ELECTRONIC
BOARD CHART.
-
Jumper selection AUTOTEST mode for other brands control
panels with AUTOTEST negative power feed
+/~
Jumper selection AUTOTEST mode for RIB control panels
JP2 => Radio-control code removal for total opening
SW1
=> Micro-switches
for pairing and identifying strips and
photocells
S1
=> PROG. RX
Programming button
BUZZER => Sound signal for installation, warning and alarm status
LED
DL1 (red)
DL2 (red)
DL3 (red)
DL4 (red)
-
strip contact N.C. (EDGE 2)
strip contact N.C. (EDGE 1)
photocell contact N.C. (PHOTO)
total opening command with push-button N.O. in the
system
DL5 (green)
- activated total opening radio-control.
DL6 (yellow)
- electrical power indicator 12-24V ac/dc
DL7 (dual-color) - radio code learning for total and blinker opening
DUAL-COLOR LED EDGE PHOT
off
=> operating normally
green
=> strip sensor or photocell engaged
red/green => alarm
LED
LED
LED
LED
LED
LED
EDGE
EDGE
EDGE
EDGE
EDGE
EDGE
PHOT 1
PHOT 2
PHOT 3
PHOT 4
PHOT 5
PHOT 6
-
EDGE
EDGE
EDGE
EDGE
EDGE
EDGE
SENSOR
SENSOR
SENSOR
SENSOR
SENSOR
SENSOR
OR
OR
OR
OR
OR
OR
PHOTOCELL 1
PHOTOCELL 2
PHOTOCELL 3
PHOTOCELL 4
PHOTOCELL 5
PHOTOCELL 6
SW1 MICRO-SWITCHES - DIP
DIP 1 ON => STRIP SENSOR OR PHOTOCELL 1 ACTIVATED
DIP 2 ON => STRIP SENSOR OR PHOTOCELL 2 ACTIVATED
DIP 3 ON => STRIP SENSOR OR PHOTOCELL 3 ACTIVATED
20
G
B
DIP 4 ON => STRIP SENSOR OR PHOTOCELL 4 ACTIVATED
DIP 5 ON => STRIP SENSOR OR PHOTOCELL 5 ACTIVATED
DIP 6 ON => STRIP SENSOR OR PHOTOCELL 6 ACTIVATED
ATTENTION: every time is executed a change of position of dip
switches, press PROG RX push-botton for 6 times to update the
system programming. At the end the dual-color leds must be turn off.
D - CONNECTING THE MASTER Wi-Fi FR CARD
ATTENTION: The use of the product inside of metal containers can cause a system-malfunction. It is therefore recommended in these cases
to add the aerial code ACG5451 to apply to the metal casing for a perfect reception/transmission of the signals.
ATTENTION: USING MASTER Wi-Fi FR WITH OTHER BRANDS OF CONTROL PANELS SELECT ON THIS CONTROL PANELS THE PREFLASHING FUNCTION (IF AVAILABLE).
It is strongly advisable to avoid using an automatic closing time delay, not longer than 1 minute.
The MASTER Wi-Fi FR card when inserted on RIB electronic control panels is protected against short circuits by a fuse connected to the secondary of the power supply.
When using a MASTER Wi-Fi FR card with control panels of other brands, please verify the presence of this protection. In case it is not available, please connect
a fuse (T) of T 200 mA in series on the power supply.
- Turn off power to the automation control panel.
- Couple or connect the MASTER Wi-Fi FR card and perform the connections as in the following diagram.
NOTE: The opening of the gate occurs 2 seconds after receiving a radio or push button command. That is done to allow the MASTER Wi-Fi FR card to verify the presence
and correct functioning of the memorized safety devices.
*
120/230V ac
EDGE 2
green wire
COM
gray wire
EDGE 1
yellow wire
PHOT.N.C. black wire
CONTROL BUTTON
white wire
A/D+ TEST brown wire
!
+
12/24V ac/dc
10 9
65
21
The Wi-Fi system is operating normally if he
handles all the radio controls (through its 433
MHz radio module) and the wired controls
(through its white wire).
In case of using radio receivers and wired
controls (and therefore external to the Wi-Fi
system), for a correct functioning of the system,
these commands must be connected through
the white wire of the MASTER Wi-Fi FR.
654321
+ -
!
+ 6
5
Total opening
control contact
COM-OPEN/K
4+ 3Power feed
12/24V ac/dc
-
**
12/24V ac/dc
1 Central
antenna connection 433,92 MHz
2 Antenna ground
EDGE 1 INPUT (gray wire COM, yellow wire EDGE 1) dedicated to the strip
safety device IN OPENING.
Attention: any wire jumper present on the COM-EDGE terminals of control panels
must be removed.
* OBLIGATORY connection for panels with a 120/230V ac blinker
output
** OBLIGATORY connection for panels with a 12/24V ac/dc blinker
output. ATTENTION: CHECK POLARITY
PHOTOCELL INPUT (gray wire COM, black wire PHOT) dedicated to
the photocell safety devices.
Attention: any wire jumper present on the COM-PHOT terminals of control panels
must be removed.
The connection is compulsory also in those cases where the blinker is
not installed in the system.
ATTENTION: Always connect the control panel blinker output to the
MASTER Wi-Fi FR card with one of the dedicated terminals, depending on
whether the blinker is 230V or connected to the wires of the J2 connector
for 12/24V. If the connection is not made the door will not work and the
buzzer emits 4 sounds indicating that the connection is missing.
CONTROL BUTTON (gray wire COM, white wire N.O. BUTTON)
Disconnect every wired command from the control panel and connect it to this
white wire of MASTER Wi-Fi FR.
EDGE 2 INPUT (gray wire COM, yellow wire EDGE 2) dedicated to the safety
strip device IN CLOSING.
Attention: any wire jumper present on the COM-EDGE terminals of control panels
must be removed.
CONNECTION OF THE AUTOTEST INPUT (brown wire A/D+ TEST) for
compliance with standard EN13849-2:2008
- If the panel used is equipped with autotest place jumper JP1 as indicated in the
“SELF-TEST-ENABLED RIB ELECTRONIC BOARD CHART” (following) or by
the control panel power supply used (see relative instructions).
21
G
B
- Connect the auto test output of the control panel to the A/D+ TEST terminal of
the MASTER Wi-Fi FR card in order to be able to control the system at the end
of every complete automated opening.
- Closing will only occur when the MASTER Wi-Fi FR card has passed the control
test.
- If the MASTER Wi-Fi FR card control test fails, the control panel will block the
automation, the dual-color LED on the MASTER Wi-Fi FR card indicates a safety
outage, alternately flashing red and green.
he buzzer emits an alternating sound for 1 minute to signal the problem.
T
The alarm status of the buzzer comes on again for 1 minute when a control is
given.
If the panel is not equipped with an auto test, the control test is ignored.
SELF-TEST-ENABLED RIB ELECTRONIC BOARD CHART
RIB ELECTRONIC BOARD
CONNECT A/D+ TEST TERMINAL
TO TERMINAL
ENABLE SELF-TEST FUNCTION
THROUGH
K2007 / K2007 CRX
S1
T2 - T2 CRX
T2 24V - T2 24V CRX
J - J CRX
BOSS 24V CRX
BOSS 230V CRX
A+ TEST / D+ TEST
A+ TEST
D+ TEST
A+ TEST
D+ TEST
Terminal 8
Terminal 8
DIP 10
DIP 12
DIP 13
DIP 12
DIP 7
DIP 6
DIP 6
E - MASTER Wi-Fi FR POWER
After having made all of the connections, provide power to the control panel with
MASTER Wi-Fi FR.
The yellow LED DL6 should come on and the buzzer will emit a sound indicating
correct power.
The LED DL7 will alternately flash red and green indicating that no remote controls
or blinkers have been memorized.
F - IDENTIFICATION OF SAFETY DEVICES
ATTENTION: BEFORE THE SAFETY STRIPS IDENTIFICATION, CHECK IF
THE CONTROL BOARD IS DESIGNED FOR ONE OR TWO INPUTS FOR
SAFETY STRIPS CONNECTING.
RUN THE JUMPER JP2 SETTING ACCORDING TO THE NUMBER OF
INPUTS FOR SAFETY STRIPS CONNECTING.
PLACE JUMPER JP1 ON
THE MASTER WI-FI CARD IN
POSITION:
+/~
+/~
+/~
+/~
+/~
JP1
+/~
+/~
+/~
devices on the MASTER Wi-Fi FR in the ON position to activate the safety
devices to be memorized.
Use the following procedure for memorization:
- Push the button PROG RX on the MASTER Wi-Fi FR => dual-color LED
EDGE PHOT 1 flashes red for 1 minute (the time needed for memorization).
- Push the button PROG TX on the safety device with micro-switch 1 in the ON
position => on the MASTER Wi-Fi FR the dual-color LED EDGE PHOT 1 flashing
red turns green and a sound from the buzzer indicates that the safety device has
been memorized correctly, immediately the dual-color LED EDGE PHOT 2
begins flashing red.
- If there are no other safety devices to be memorized after one minute the
dual-color LED EDGE PHOT 2will turn off or, push the button PROG. RX 4
times to end the memorization procedure => all of the dual-color LED EDGE
PHOT should be off.
MEMORIZATION OF OTHER SAFETY DEVICES
- After having memorized the first safety device, the dual-color LED EDGE
PHOT 2 automatically begins flashing red for 1 minute (the time needed for
memorization).
- Push the button PROG. TX on the safety device with micro-switch 2 in the
ON position => on the MASTER Wi-Fi FR the dual-color LED EDGE PHOT 2
flashing red turns green and a sound from the buzzer indicates that the safety
device has been memorized correctly.
- Follow the same procedure for any other safety devices (up to a maximum
of 6).
MASTER Wi-Fi FR can manage 6 Wi-Fi Safety Edges that operates on 2
different outputs for the management of the safety edges.
3 safety edges can be assigned for each of the 2 outputs.
Solution to be used if the control panel that manage the movement of the gate has
2 inputs for the different management of the safety edges in opening and closing:
EDGE 1 = yellow wire - safety edge in opening (LED EDGE/PHOT available from
1 to 3)
EDGE 2 = green wire - safety edge in closing (LED EDGE/PHOT available from
4 to 6)
Every Wi-Fi safety device must OBLIGATORILY be identified placing only one
of the 6 micro-switches present on its circuit (different for each of the 6 safety
devices) in the ON position. Obviously one pair of photocells is considered one
safety device and must therefore have a receiver and transmitter with the same
DIP in the ON position.
IDENTIFY THE CONTAINERS OF THE SAFETY DEVICES WITH THE NUMBER
OF THE ACTIVATED MICRO-SWITCH AND ATTACH THE NUMBERED
ADHESIVE STRIP SUPPLIED TO THE OUTSIDE OF EACH CONTAINER.
The adhesive strip serves as a means of quickly identifying the safety device when
it needs maintenance.
Note: Each safety device is supplied with the micro-switches in the OFF position
so that battery power is not consumed when not in use (if inserted).
Insert the batteries in the Wi-Fi safety devices.
G - MEMORIZATION OF THE SAFETY DEVICES
After having performed the identification of the safety devices, and provided power
with the batteries, place the micro-switches with the same number of the safety
ADDING OTHER SAFETY DEVICES (UP TO 6 TOTAL)
If after installation the use of further safety devices (PHOTOCELLS OR STRIPS)
is desired, to increase door safety, it is recommended to:
- Turn off power to the door.
- Place the safety device in the desired position and identify it by moving the
internal micro-switch.
- Perform the programming by setting to ON a micro-switch different from that of
the other safety devices installed and identify it with the corresponding numbered
adhesive strip (see paragraph F – IDENTIFICATION OF Wi-Fi SAFETY
DEVICES).
- Enable the micro-switch of the safety device just added on the MASTER Wi-Fi
FR card.
- Return power to the door.
- Follow the memorization procedure and system check as indicated previously.
NOVA Wi-Fi AND VERTIGO Wi-Fi PHOTOCELLS SYSTEM CHECK
- Check that the micro-switch selected on the transmitter TX NOVA Wi-Fi is the
same as that selected on the receiver RX NOVA Wi-Fi (example 1 ON).
- Proper function of the TX NOVA Wi-Fi is shown by the green LED which comes
on for 10 seconds.
- Push and release the button S3 “PROG. TX” on the NOVA Wi-Fi receiver (it
activates for 3 minutes to perform the alignment procedure). If the photocells are
22
G
B
already aligned the red LED emits a constant light. If the red LED is off or emits
a flashing light, perform the alignment until it emits a constant light.
- After the alignment check by placing an obstacle that the red LED turns off
and that at the same time the dual-color LED EDGE PHOT associated with it
during memorization shines green on the MASTER Wi-Fi FR for the time that
the obstacle is present.
- On the MASTER Wi-Fi FR card, LED DL3 should also be off indicating a proper
exchange of the dedicated input with the PHOT on the control panel.
- Repeat the procedure on the other installed NOVA Wi-Fi photocells.
- Perform a function check of all the installed photocells, activating the movement
of the automation and checking that by placing an obstacle the automation stops/
reverses when closing, or stops/continues to open when opening.
TOUCH Wi-Fi STRIP SYSTEM CHECK
After having calibrated the TOUCH Wi-Fi strip correctly:
- Push the contact of a TOUCH Wi-Fi strip (for example: safety device number 3).
- On the MASTER Wi-Fi FR check that the corresponding LED EDGE PHOT 3
flashes green and that the paired LED DL2 momentarily turns off and then turns
on.
ATTENTION: after receiving the first signal, other signals are ignored for 2
seconds. If there is a signal in these 2 seconds it will be from the LED EDGE
PHOT 3 which turns green.
- Repeat the LED activation check on the MASTER Wi-Fi FR pushing the other
TOUCH Wi-Fi strips installed.
- Perform a final check of all of the strips installed, activating the movement of the
automation and ensuring that upon impact with the strip the automation stops/
reverses movement.
ANTENNA
In
order
to
communicate
with
868
MHz
Wi-Fi safety devices, MASTER Wi-Fi FR is
equipped with a piece of electric wire that acts as an antenna
linked to the J8 terminal. If it is necessary to improve the
radio signal (for example, with MASTER Wi-Fi FR inserted
in the SUPER motors or MASTER Wi-Fi FR installed in a
metallic connector), connect the 868.3 MHz antenna (code ACG5451) to the J8
terminal, ensuring the correct connection of the central wire and the earth wire,
and position it in such a way so that it is “in view” of all safety devices.
To ensure the system functions correctly it is necessary that between the
MASTER Wi-Fi FR and the safety devices there are no obstacles such as
reinforced cement walls, iron surfaces, etc. that could obstruct the radio
communications and consequently reduce the battery life of the safety
devices.
WARNING (replace the batteries)
The WARNING tells the user of the immediate need to replace the batteries.
When battery power reaches 2,3V for NOVA Wi-Fi and 3V for TOUCH Wi-Fi, the
NOVA Wi-Fi photocell receiver or the strip signal the MASTER Wi-Fi FR via radio
of the low battery status and activate the BUZZER of the MASTER Wi-Fi FR with
a sound every 3 seconds for 1 minute.
The warning is renewed for 1 minute if a command is given to the door.
The dual-color LED on the MASTER Wi-Fi FR corresponding to the photocell or
the strip with the low batteries emits a constant red light.
The SPARK Wi-Fi blinker (if available) indicates the warning by emitting 2
consecutive flashes followed by a pause for 3 seconds for the duration of
the opening or closing of the door.
The system is still operational during these signals, but it is advantageous to
replace the batteries as soon as possible in order to avoid a full stop of the door
operation which happens when the batteries reach 2,0 V for NOVA Wi-Fi and 2,7
V for TOUCH Wi-Fi.
ALARM (batteries completely exhausted or not working)
The alarm activates when the batteries are completely exhausted (2V for NOVA
Wi-Fi and 2,7V for TOUCH Wi-Fi) or when they stop working.
On MASTER Wi-Fi FR the LEDs DL2 and DL3 turn off MASTER Wi-Fi FR blocks
the automation.
On MASTER Wi-Fi the dual-color LED corresponding to the photocell or the strip
with the low or non-functioning batteries flashes red. The BUZZER emits a sound
every 3 seconds for 1 minute, while the SPARK Wi-Fi blinker (if available)
signals the alarm status by emitting emitting 2 consecutive flashes followed
by a pause for 3 seconds, notifying the user that the batteries must be
replaced or repaired.
The alarm is renewed for 1 minute if a command is given to the door.
TOTAL REMOVAL PROCEDURE FOR MEMORIZED SAFETY DEVICES
To perform a total removal of the safety devices (NOVA Wi-FI and TOUCH Wi-FI)
recorded in the MASTER Wi-Fi FR memory just push and hold the button PROG.
RX for 10 seconds.
After 10 seconds all of the dual-color LEDs (from EDGE PHOT 1 to EDGE PHOT
6) will flash alternately 6 times, indicating successful removal.
Afterwards the dual-color LED EDGE PHOT and LEDs DL2 and DL3 will turn off.
ATTENTION: WITH LED DL1, DL2 AND DL3
12/24VOFF
ac/dc AUTOMATION DOES NOT
WORK.
For control panels working at 433,92 MHz, the antenna is also in this
case already connected (wire billet in the RIB control panel), however,
if it is necessary to install the antenna to attain greater range, connect
it to terminals 1-2 if MASTER Wi-Fi FR WITH TERMINAL BOARD,
or to the terminals dedicated to antenna connection on RIB control
panels.
NOVA Wi-Fi AND VERTIGO Wi-Fi PHOTOCELL ALARM SIGNAL CHECK
Check that by taking the battery out of the photocell receiver with micro-switch,
for example 3 in the ON on position, and commanding the door to open, the dualcolor LED3 on the MASTER Wi-Fi FR alternates green and red , while LEDs DL2
and DL3 turn off, and that the buzzer emits an alternating sound for 1 minute.
Repeat the check for any other photocell receivers installed.
Note: if when removing the battery and commanding the door to open the buzzer
on the MASTER Wi-Fi FR does not sound, micro-switch 3 on the MASTER Wi-Fi
FR is in the OFF position (go-ahead not enabled). Turn it to ON.
TOUCH Wi-Fi STRIP ALARM SIGNAL CHECK
Check that by taking the battery out of the transmitter with micro-switch, for
example DIP3 in the ON position, the dual-color LED EDGE PHOT 3 on the
MASTER Wi-Fi lights flashing red while LED DL2 turns off, and that the buzzer
emits every 3 seconds sound for 1 minute.
Repeat the check for any other strips installed.
Note: if the battery is removed and the buzzer on the MASTER Wi-Fi FR does not
sound, micro-switch 3 on the MASTER Wi-Fi FR is in the OFF position (go-ahead
not enabled). Turn it to ON.
REMOVAL PROCEDURE FOR A SINGLE SAFETY DEVICE (PHOTOCELL OR
STRIP)
In order to remove a single memorized safety device on the MASTER Wi-Fi FR,
use the following procedure:
- Push the button PROG. RX one or more times to select the dual-color LED
EDGE PHOT which begins flashing green, corresponding to the safety device
to be eliminated.
- After selecting the safety device, push and hold the button PROG. RX for 10
seconds.
- After 10 seconds the dual-color LED EDGE PHOT flashes alternately red and
green 6 times, indicating successful removal.
ATTENTION: Place the micro-switch corresponding to the eliminated safety device
in the OFF position, then scan the dual-color LED pushing the button PROG. RX
6 times. IMPORTANT: Remove the batteries from the eliminated safety device.
REPLACING THE BATTERIES
The lifespan of the 1.5 V AA batteries used in the safety devices is about 3 years.
In case it is required to replace the batteries, it will not be necessary to re-program
the photocells, nor any other RIB Wi-Fi accesories.
- Identify the safety device with the exhausted batteries by checking the diagnostic
of the LED EDGE PHOT on the MASTER Wi-Fi FR.
- Using the number on the side of the dual-color LED EDGE PHOT which is
flashing red or that emits a constant red light identify the number of the safety
device with the exhausted batteries.
- Find the NOVA Wi-Fi or TOUCH Wi-Fi device with the adhesive strip bearing the
identification number corresponding to the number of the dual-color LED which
is in alarm status on the MASTER Wi-Fi FR.
23
G
B
- Replace the batteries, checking that the polarity is correct.
- Push button PROG TX on the NOVA Wi-Fi or TOUCH Wi-Fi to restart the
MASTER Wi-Fi FR.
- The buzzer on the strip of the MASTER Wi-Fi FR will turn off and the LEDs DL2DL3 (if in alarm status) will come on. The dual-color LED corresponding to the
safety device with the replaced batteries will turn off.
The automation is now ready for safe operation.
ATTENTION: Please remember that batteries must be disposed of properly
according to current standards. In case of disposal of the safety devices please
remember to remove the AA batteries and dispose of them properly
H - PROGRAMMING THE SPARK Wi-Fi BLINKER
- Push and hold the button PROG. RX on the MASTER Wi-Fi FR for at least 3
seconds.
- After releasing the button PROG. RX the dual-color LED DL7 will begin flashing
red for 10 seconds.
- Push the button S4 PROG. TX on the SPARK Wi-Fi blinker to send a radio signal
to the MASTER Wi-Fi FR.
- Successful memorization is indicated by a sound from the buzzer and the red
dual-color LED DL7 on the MASTER Wi-Fi FR turning green, while the red LED
DL7 on the SPARK Wi-Fi card flashes 3 times.
- Allow 10 seconds to pass to conclude programming, or push button PROG. RX
on the MASTER Wi-Fi FR for a moment.
- Replace the casing.
- Mount the diffuser and attach it with the screws provided.
More than one blinker can be memorized by the MASTER Wi-Fi FR.
Each SPARK Wi-Fi blinker receives during the memorization one single identic
code from the MASTER Wi-Fi FR to which it is paired up.
When the MASTER Wi-Fi FR is activated by a command, all SPARK Wi-Fi
blinkers memorized in it will start blinking simoultanesly.
- To finish the code memorization procedure, allow 10 seconds to pass until
the flashing red LED DL7 turns off. Alternatively, push button PROG RX on
the MASTER Wi-Fi FR, also in this case the flashing red LED DL7 turns off,
indicating the end of the memorization procedure.
With the dual-color DL7 off, the MASTER Wi-Fi FR is ready to work.
Push a button of a previously memorized remote control. The green LED DL7 on
the MASTER Wi-Fi FR comes on for a moment, indicating recognition of a valid
code. After 2 second led DL5 comes on for a moment, at the same time, total
opening is ordered.
Note: If, when pushing a button on the remote control, the dual-color LED DL7
turns red for a moment, this means that the button/code is not in the memory and
you must therefore perform the memorization procedure again.
TOTAL CODE REMOVAL PROCEDURE
- Position jumper JP2 as shown here:
- Push and release button PROG RX on the MASTER Wi-Fi FR. The dual-color
LED DL7 emits a red light for 0.5 sec. and then turns off, indicating successful
removal of codes and start-up information..
- Position jumper JP2 as shown here:
- The LED DL7 begins flashing alternately red and green, indicating that the
memory is empty.
Note: Jumper JP2 during normal operation must be positioned as shown here:
FULL MEMORY SIGNAL
If, when pushing and holding button PROG RX on the MASTER Wi-Fi FR for at
least 3 seconds, upon release the dual-color LED DL7 flashes green 6 times, this
means that the memory is full (maximum 100 codes).
SYSTEM CHECK
Give a command to the door and check that the SPARK Wi-Fi blinker flashes
correctly.
PROGRAMMING
REMOTE CONTROLS AND THE Wi-Fi BLOCK
SELECTOR FOR TOTAL OPENING (maximum of 100 codes)
Using the following procedure it is possible for MASTER Wi-Fi FR to memorize
the following remote controls:
SUN DUAL-CHANNEL 433 MHz
SUN FOUR-CHANNEL 433 MHz
SUN CLONE DUAL-CHANNEL 433 MHz
SUN CLONE FOUR-CHANNEL 433 MHz
BLOCK Wi-Fi KEY SELECTOR 433 MHz
Code ACG6052
Code ACG6054
Code ACG6056
Code ACG6058
Code ACG6098
At MASTER Wi-Fi FR start-up the yellow LED DL6 will turn on.
- At the same time the buzzer will emit a sound indicating proper power status.
a - If the MASTER Wi-Fi FR memory is empty (standard version) the dual-color
LED DL7 flashes alternately red and green.
a - If codes are already present in the memory, the dual-color LED DL7 remains
off (perform a total removal - see paragraph TOTAL CODE REMOVAL
PROCEDURE).
- Push and hold the button PROG RX for at least 3 seconds. After release the
dual-color LED DL7 on the MASTER Wi-Fi FR flashes red for 10 seconds. At
this time pressing one of the buttons on the transmitter will memorize the code.
- In addition to the codes, MASTER Wi-Fi FR also learns the channels that
are desired for use. Be careful to remember the buttons pushed on the
remote controls during the code memorization procedure as they will be
those used thereafter for the total opening.
- If no code is sent, after 10 seconds the red dual-color LED DL7 on the MASTER
Wi-Fi FR turns off indicating the end of the programming procedure. The dualcolor LED DL7 flashes alternately red and green indicating that there are no
codes in the memory.
- Successful code memorization is shown by the dual-color LED DL7 emitting
a green light for 500ms and by a sound from the buzzer, indicating successful
memorization.
- After memorizing the first code, the memorization time resets for 10 seconds and
it is possible to memorize more codes.
TO download the video of the installation write the following
address in your browser, or, read the QR code with your
smartphone:
http://www.youtube.com/user/RIBSRL?feature=mhee
24
G
B
TROUBLESHOOTING
PROBLEM
CHECK
The gate would not move, the buzzer is emitting an alternating sound, and one of the LED is blinking red/
green.
If two MASTER Wi-Fi FR, installed at a distance of about 20 m from one another, are commanded simultaneously,
their communication and check signals with the accessories can overlap and interfere with each other, causing
the systems to go into alarm. Move the two MASTER Wi-Fi FR away from each other over the 20 m.
The gate would not move, the buzzer is emitting an alternating sound, and one of the LED is blinking red/
green, OR
the gate is trying to open/close, but stops almost immediately, the buzzer is emitting an alternating sound,
and one of the LED is blinking red/green.
Failed control between MASTER Wi-Fi FR and the safety accessories, either the photocells or the safety
edges:
- Install the 868MHz aerial (code ACG5451) on the MASTER Wi-Fi FR to guarantee the correct
communication between the MASTER Wi-Fi FR and the safety accessories installed.
Attention: The aerial must be placed in sight of all the safety accessories installed.
If the indication of failure persists, check the level of charge of the batteries, and if not adequate, replace
them.
All of the LEDs on the MASTER Wi-Fi FR are off
Ensure that 12 or 24 V ac/dc power is present to the power feed terminals of the MASTER Wi-Fi FR
During memorization of the safety devices the buzzer sounds for 3/5 second
It has been tried to memorize a safety device with wrong microswitch.
Verify that the dual-color led that flashes on MASTER Wi-Fi FR corresponds at the safety device
microswitch to memorize.
During memorization of the safety devices the buzzer sounds 2 twice
A safety device is already in the memory
When giving a command the buzzer sounds 3 times
-N
o safety device has been memorized, memorize at least one, OR
- T he DIP corresponding to the safety devices memorized on the MASTER Wi-Fi FR card are OFF. Turn
them to ON
When giving a command the buzzer sounds 4 times
Possible cable missing between the MASTER Wi-Fi FR and the door control card:
- B linker to card connection wires detached, OR
- S trip to card connection wires detached, OR
- P hotocell to card connection wires detached
The buzzer sounds 5 times when the strip connected to the photocell receiver is pressed
Contact configuration error with the strip connected to the photocell receiver
When giving a command the buzzer sounds 5 times
-R
esistance not connected in series with the N.C. contact of the strip connected to the photocell receiver,
OR
-W
ires detached on the strip with N.O. contact, OR
-R
esistance not connected in series with the N.C. contact of the strip, OR
-W
ires detached on the strip with N.O. contact connected to the photocell receiver
The buzzer emits a sound every 3 seconds and the blinker during the gate operation flashes 2 times in
succession followed by a pause of 3 seconds for 1 minute and one of the dual-color leds is ignited red fixed
Replace the batteries of the photocell(s) or the strip(s) as they are low
The gate doesn’t move, the buzzer emits a sound every 3 seconds and the blinker flashes 2 times in
succession followed by a pause of 3 seconds for 1 minute and one of the dual-color leds lights flashing red
Replace the batteries of the photocell(s) or the strip(s) as they are exhausted
LED DL2 is off and one of the dual-color LED EDGE emits a constant green light
-W
ires detached on the strip with N.C. contact, OR
- E nsure that there is resistance of 8,2kΩ in series with the N.O. contact of the strip connected to the
photocell receiver
The buzzer does not sound when the batteries are removed from the strip
Ensure that the micro-switch on the MASTER Wi-Fi FR corresponding to the strip is in the ON position
The door does not open or close and one of the dual-color LEDs emits a constant green light
- P hotocell is not aligned or it is engaged. The batteries in the photocell transmitter are exhausted, OR
-R
esistance of 8,2 kΩ is not connected in series with the N.C. contact or in parallel with the N.O. contact of
the strip connected to the photocell transmitter, OR
-R
esistance of 8,2 kΩ is not connected in parallel with the N.O. contact of the strip connected to the
photocell transmitter
The door does not open or close, the buzzer emits a sound every 3 seconds and the blinker flashes 2
times in succession followed by a pause of 3 seconds for 1 minute and one of the dual-color LEDs lights
flashing red
Photocell or strip receiver batteries are exhausted
The strip connected to the photocell transmitter or receiver does not work as a safety device
Check the correct setting of the jumper of the photocell transmitter/receiver. If the jumpers are correctly
setting, remove and put again the batteries.
TECHNICAL SPECIFICATIONS
- POWER
- APPLICABLE TENSION ON CONTACT J4
- APPLICABLE TENSION ON CONTACT J2
- ABSORPTION AT REST
- MAXIMUM ABSORPTION
- WORKING TEMPERATURE
- SIZE
- WEIGHT
12/24 Vac/dc
120/220/230V 50/60Hz
12/24V ac/dc
40 mA
100 mA
-20°C ÷ +60°C
125x55x28 mm
0,090 kg
SAFETY DEVICES AND SIGNALING RADIO FREQUENCY SIGNAL
TECHNICAL INFORMATION
- FREQUENCY
868,3 MHz
- SENSITIVITY
-108 dBm
- EMITTING POWER
<25 mW
- MODULATION TYPE
- RANGE
FSK
20 m in open spaces
COMMAND ACTIVATION RADIO FREQUENCY SIGNAL TECHNICAL
INFORMATION
- FREQUENCY
433,92 MHz
- SENSITIVITY
-107 dBm
- MODULATION TYPE
OOK
- RANGE
100 m in open spaces with antenna
25
D
SUN 2CH
Kode ACG6052
SUN 4CH
Kode ACG6054
SUN CLONE 2CH
Kode ACG6056
SUN CLONE 4CH
Kode ACG6058
NOVA Wi-Fi
Kode ACG8037
BLOCK Wi-Fi
Kode ACG6098
SPARK Wi-Fi
Kode ACG7064
VERTIGO Wi-Fi 8
Kode ACG8042
VERTIGO Wi-Fi 10
Kode ACG8043
TOUCH Wi-Fi
Kode ACG3016
TX RED
Kode ACG6202
Das Wi-Fi SYSTEM erfüllt die Norm EN13849-2:2008 und zusammen
mit einer elektronischen RIB-Schalttafel bildet es ein Schutzgerät der
Klasse 2.
Das Wi-Fi SYSTEM ermöglicht durch die Benutzung der MASTER
Wi-Fi FR Karte den Aufbau eines Systems mit NOVA Wi-Fi Fotozellen
und TOUCH Wi-Fi Kontaktleisten, die auch auf sich bewegende Teile
montiert werden können, da sie keinen Kabelanschluss benötigen.
Das System überwacht fortlaufend die Gegenwart der verschiedenen
Sicherheitsgeräte und den Batteriezustand. Es erfüllt alle Anforderung für
aktive Sicherheit bei allen Arten von Öffnungsfunktionen.
Mit der elektronischen Schalttafel von RIB ist es dem System möglich, den
von den aktuellen Normen geforderten Selbsttest durchzuführen.
Jedes funkgesteuerte Sicherheitsgerät verfügt über seinen eigenen
internen Identifizierungscode, welcher ihn von den anderen unterscheidet.
NORMEN FÜR AUTOMATISCHE TORE UND TÜREN
- MASTER Wi-Fi OS mit Klemmleiste (Kode ACG6152), für die
Verwendung mit anderen Marken oder RIB CRX Schalttafeln.
SICHERHEITSGERÄTE
MASTER Wi-Fi FR kann bis zu 6 Sicherheitsgeräte (NOVA Wi-Fi +
VERTIGO Wi-Fi + TOUCH Wi-Fi + TX RED) gleichzeitig betreiben.
- NOVA Wi-Fi Fotozellen (Kode ACG8037): können an TOUCH mechanische
Kontaktleisten (Kode ACG3015) oder an resistive Kontaktleisten, sowohl
am Fotozellensender als auch -empfänger, angeschlossen werden.
- VERTIGO Wi-Fi Fotozellen (VERTIGO Wi-Fi 8 Kode ACG8042 VERTIGO Wi-Fi 10 Kode ACG8043): kabellose vertikale Fotozelle ersetzt
die Schaltleisten.
- TOUCH Wi-Fi Kontaktleiste (Kode ACG3016), mit integriertem Sender/
Empfänger.
- TX RED (Kode ACG6202): Radio-Sender für mechanische oder resistive
Kontaktleisten.
Der Installateur muss sicherstellen, dass das Wi-Fi System gemäß der
Norm EN 12453 Punkt 5.1.1.6 e und f an die elektronische Schalttafel
angeschlossen ist und in der Lage ist eine Funktionsüberprüfung vor dem
Schließen durchzuführen (SELBSTTEST).
Dieses wird durch die Verwendung von RIB-Geräten bei der Installation
eines Systems in Übereinstimmung mit den geltenden Normen und
Richtlinien ermöglicht.
Nachdem die Anlage installiert ist muss nachgewiesen werden, dass sie die
Norm EN 13241-1 erfüllt.
RIB haftet nicht für Schäden jeglicher Art, die sich auf unsachgemäße,
falsche oder unangemessene Verwendung der Produkte zurückführen
lassen.
FERNSTEUERUNGEN
MASTER Wi-Fi
VISUELLE SIGNALE
Dieses ist das Herz des Systems: Die Steuerung arbeitet mit 433,92 MHz,
Geräte für Sicherheit und Signalisierung arbeiten mit 868,3 MHz und
werden während der Installation programmiert.
MASTER Wi-Fi ist in 4 Versionen erhältlich:
- MASTER Wi-Fi mit Steckverbindungen (Kode ACG6094), für die
Verwendung mit allen elektronischen CRX RIB Schalttafeln ohne Funk.
- MASTER Wi-Fi mit Klemmleiste (Kode ACG6099), für die Verwendung
mit anderen Marken oder RIB CRX Schalttafeln.
- MASTER Wi-Fi FR mit Klemmleiste (Kode ACG6150), für die
Verwendung mit anderen Marken oder RIB CRX Schalttafeln.
TOUCH
Kode ACG3015
oder mechanische
oder resistive
Kontaktleiste mit
anderen Marken
MASTER Wi-Fi FR kann mit bis zu 100 verschiedenen Kodes von
Fernsteuerung arbeiten:
- SUN Doppelkanal 433,92 MHz Fernsteuerungen (Kode ACG6052)
- SUN Vier-Kanal 433,92 MHz Fernsteuerungen (Kode ACG6054)
- SUN CLONE Doppelkanal 433,92 MHz Fernsteuerungen (Kode ACG6056)
- SUN CLONE Vier-Kanal 433,92 MHz Fernsteuerungen (Kode ACG6058)
- BLOCK Wi-Fi Mono-Kanal 433,92 MHz Schlüsselwählschalter (Kode
ACG6098).
Es ist auch möglich Kabelsteuerungen mit N.O. Kontakt anzuschließen
(Schlüsselschalter, Taster...).
MASTER Wi-Fi FR kann mit eine oder mehrere SPARK Wi-Fi Blinker
(868,3 MHz) Kode ACG7064 betrieben werden.
MASTER Wi-Fi FR verfügt über LEDs für die Überwachung des
Systemstatus und für die Identifizierung von Fotozellen oder Kontaktleisten
mit leeren Batterien.
TONSIGNALE
MASTER Wi-Fi FR verfügt über einen Summer zur Signalisierung der
Installationsphasen und Warnung, wenn Batterien leer sind, oder dient als
Alarm für den Fall, dass die Geräte nicht funktionieren.
26
D
A - VORBEREITUNG DER ANLAGE
Das System Wi-Fi kann an verschiedenen Automatisierungsarten installiert werden (ausgenommen automatische Schranken), von denen wir in Folgenden einige
angeben.
SCHIEBETÜR
FLÜGELTOR
MASTER Wi-Fi FR
MASTER Wi-Fi FR
SCHWINGTÜR
SEKTIONALTOR/ROLLTOR
MASTER Wi-Fi FR
MASTER Wi-Fi FR
B - MONTAGE VON SCHUTZGERÄTEN
NOVA Wi-Fi FOTOZELLEN
- NOVA Wi-Fi Fotozellen an den Pfosten oder Säulen in ca. 40 cm bis 60
cm Höhe über dem Boden und maximal 10 cm vom Bewegungsbereich
abschließend oder knapp hinter der Druckstelle von jeder Kontaktleiste
in maximal 20 m Entfernung vom MASTER Wi-Fi FR befestigen.
- Montieren Sie den Empfänger in einem schattigen Bereich oder in einer
Position, die keinem horizontalen Sonnenlicht ausgesetzt ist.
- In jedem Fall ist es ratsam die Fotozelle in gleicher Höhe und
aufeinander ausgerichtet anzuordnen.
- Für die korrekte Positionierung der Fotozellen beachten Sie bitte das
Benutzer-Installationshandbuch oder die Norm EN 12445.
TOUCH Wi-Fi KONTAKTLEISTEN
- TOUCH Wi-Fi Kontaktleisten in den Bewegungs- oder Schließbereich in
einer Entfernung von maximal 20 m vom MASTER Wi-Fi FR befestigen.
TX RED
- Den Sender an die Kontaktleiste von maximal 20 m vom MASTER Wi-Fi
FR verbinden.
SPARK Wi-Fi BLINKLICHT
- Das SPARK Wi-Fi Blinklicht so in maximal 20 m Entfernung vom
MASTER Wi-Fi FR befestigen, das es gut sichtbar ist.
VERTIGO Wi-Fi FOTOZELLEN
- VERTIGO Wi-Fi Fotozellen in den Bewegungs- oder Schließbereich in
einer Entfernung von maximal 20 m vom MASTER Wi-Fi FR befestigen.
WARNUNG:
Wenn die Speisung des MASTER Wi-Fi FR für eine lange Zeit entfernt wird, leeren die Kontaktleisten TOUCH Wi-Fi, die Fotozellen NOVA Wi-Fi
und die Fotozellen VERTIGO Wi-Fi schneller als die normale Aufladung ihrer Batterien. Halten die MASTER Wi-Fi FR immer richtig ernährt, die
Batterien sorgen für einen Zeitraum von drei Jahren, als von RIB angegeben ist.
Zum Beispiel, wenn die Speisung am Tor, jede Nacht, entfernt wird, “versuchen” Fotozellen und Kontaktleisten wiederholt, ohne Befund, das
Signal vom MASTER Wi-Fi FR und dann die Lebensdauer der Batterien dieser Zubehörteile auf weniger als ein Jahr reduziert werden kann.
ACHTUNG:
Wenn sie gleichzeitig gesteuert werden 2 MASTER Wi-Fi FR in einem Abstand von weniger als 20 m voneinander installiert
ist, kann ihre Signale zur Kontrolle und Sicherheitseinrichtungen installiert überlappen sich dabei den Alarm aktivieren.
27
D
C - LAYOUT
S1
SW1
JP1
JP2
Zweifarbige LED
EDGE PHOT 1-6
J8
J4
J1
J5
BUZZER
J2
12/24V ac/dc
10 9
6 5
+ -
2 1
6 5 4 3 2 1
+ -
MASTER Wi-Fi FR mit Klemmleiste Kode ACG6150
1 Hauptantenne 433
2 Antenne mit Grundplatte
3 Negativer Leiter 12/24V ac/dc
4 Positiver Leiter 12/24V ac/dc
5-6 Anschluss an die Schalttafel an der Steuereingabetaste für
vollständiges Öffnen/Schließen (K-TASTE für RIB-Schalttafeln).
J1 => S
TECKER FÜR ANSCHLÜSSE AN SCHALTTAFEL UND
SICHERHEITSEINGÄNGE
Grüne Ader
=> Kontaktleiste EDGE 2
ACHTUNG: Dieser Ausgang wird von den
Kontaktleisten in den Positionen 4-5-6
gespeichert aktiviert
Graue Ader
=> Allgemeiner Anschluss COM
Gelbe Ader
=> Kontaktleiste EDGE 1
ACHTUNG: Dieser Ausgang wird von den
Kontaktleisten in den Positionen 1-2-3
gespeichert aktiviert
Schwarze Ader => Fotozelle PHOT N.C.
Weiße Ader
=> Klemme für Anschluss von Kabel der SystemSteuertaste N.O.
Braune Ader => Selbsttest-Stromversorgung A-D+ TEST.
J2 => STECKER FÜR SCHLÜSSE AN 12/24V ac/dc AUF DEM
BLINKLICHT-AUSGANG (POLARITÄT ÜBERPRÜFEN)
Rote Ader
=> Plus (Anschluss an den Pluspol vom
Blinklichtausgang)
Schwarze Ader => Minus (Anschluss an den Minuspol vom
Blinklichtausgang)
J4 => K LEMMEN
ZUM
ANSCHLUSS
DER
120/230V
SCHALTTAFEL AM BLINKLICHT-AUSGANG
J5 => KLEMMBRETT FÜR ANSCHLUSS ANDERER MARKEN ODER
RIB CRX SCHALTTAFELN
J8 => KLEMME FÜR ANSCHLÜSSE AN ANTENNE 868,3 MHz
JP1 => A/D+ TEST, siehe TABELLE DER ZUR AUTOTEST-KONTROLLE
ZUGELASSENEN RIB-STEUERUNGEN
-
Jumper-Auswahl AUTOTEST-Modus für anderer marken
Schalttafeln Steuerungen mit Negativer Leiter AUTOTEST
+/~
Jumper-Auswahl AUTOTEST-Modus für RIB-Schalttafeln
Steuerungen
JP2 =>Funk-Steuercode für vollständige Öffnung löschen
SW1
=> DIP-Schalter für Paarbildung und Identifizierung von
Kontaktleisten und Fotozellen
S1
=> PROG. RX
Programmiertaste
BUZZER => Summton für Installation, Warnung und Alarmstatus
LED
DL1 (rot)
DL2 (rot)
DL3 (rot)
DL4 (rosso)
-
Kontaktleiste Kontakt N.C. (EDGE 2)
Kontaktleiste Kontakt N.C. (EDGE 1)
Fotozelle Kontakt N.C. (PHOTO)
Auftrag Gesamtöffnung mit gegenwärtigem N.O.-Knopf
in installiert
DL5 (grün)
- Aktivierte Funksteuerung für vollständige Öffnung.
DL6 (gelb)
- Spannungsanzeige 12V bis 24V Gleichstrom/
Wechselstrom
DL7 (zweifarbig) - Funkprogrammierung für vollständige und BlinklichtÖffnung
ZWEIFARBIGE LED EDGE PHOT
Aus
=> Normalbetrieb
grün
=> Kontaktleiste oder Fotozelle eingeschaltet
Rot/grün
=> Alarm
LED EDGE PHOT 1 - KONTAKTLEISTE ODER FOTOZELLE
LED EDGE PHOT 2 - KONTAKTLEISTE ODER FOTOZELLE
LED EDGE PHOT 3 - KONTAKTLEISTE ODER FOTOZELLE
LED EDGE PHOT 4 - KONTAKTLEISTE ODER FOTOZELLE
LED EDGE PHOT 5 - KONTAKTLEISTE ODER FOTOZELLE
LED EDGE PHOT 6 - KONTAKTLEISTE ODER FOTOZELLE
1
2
3
4
5
6
SW1 DIP-SCHALTER - DIP
DIP 1 ON => KONTAKTLEISTE ODER FOTOZELLE 1 AKTIVIERT
DIP 2 ON => KONTAKTLEISTE ODER FOTOZELLE 2 AKTIVIERT
28
D
DIP 3
DIP 4
DIP 5
DIP 6
ON
ON
ON
ON
=>
=>
=>
=>
KONTAKTLEISTE
KONTAKTLEISTE
KONTAKTLEISTE
KONTAKTLEISTE
ODER
ODER
ODER
ODER
FOTOZELLE
FOTOZELLE
FOTOZELLE
FOTOZELLE
3 AKTIVIERT
4 AKTIVIERT
5 AKTIVIERT
6 AKTIVIERT
ACHTUNG: Wenn Sie eine Veränderung der Position der DIP-Schalter
auszuführen, drücken Sie die PROG RX für 6 Mal, um den Status der DIP-Schalter
zu aktualisieren. Nach dem Zwei-Farben-LEDs sollten alle ausgeschaltet werden.
D - ANSCHLUSS DER MASTER Wi-Fi FR KARTE
WARNUNG: Die Verwendung des Produkts innerhalb von Metallbehältern eine Funktionsstörung des Systems führen kann. Es ist daher in diesen
Fällen empfohlen, die Antenne Kode ACG5451 dem Metallgehäuse hinzuzufügen, für einen perfekten Empfang / Übertragung von Signalen.
WARNUNG: VERWENDEN VON MASTER Wi-Fi FR MIT ANDEREN MARKEN SCHALTTAFELN IST ES WICHTIG, DIE FUNKTION VORBLINKEN WÄHLEN (WENN VORHANDEN).
Darüber hinaus ist es empfehlenswert, die Steuerung eines Motors zu speichern, automatische Schließzeit nicht mehr als eine Minute.
Normalerweise die Steuerung MASTER Wi-Fi FR, wenn sie auf RIB Steuergeräte veredelt, ist gegen Kurzschlüsse durch Sicherungen in Reihe an die Stromversorgung
angeschlossen sekundären geschützt.
Wenn Sie die Steuerung MASTER Wi-Fi FR mit anderen Control Panels, um das Vorhandensein des Schutzes zu überprüfen. Falls nicht vorhanden, in Reihe
mit einer Sicherung T 200 mA.
- Stromversorgung zur Automatik-Schalttafel abschalten.
- Die MASTER Wi-Fi FR Karte anschließen und die Verbindungen wie im nachfolgenden Diagramm dargestellt ausführen.
HINWEIS: Die Öffnung des Tores wird etwa 2 Sekunden, nachdem man ein Radio-Befehl oder Button gab. Dies ist es, die MASTER Wi-Fi FR für die Sicherheit und das
reibungslose Funktionieren des Gedächtnisses zu überprüfen.
*
120/230V ac
EDGE 2
Grüne Ader
COM
Graue Ader
EDGE 1
Gelbe Ader
PHOT.N.C. Schwarze Ader
CONTROL BUTTON
Weiße Ader
A/D+ TESTBraune Ader
!
+
12/24V ac/dc
10 9
65
21
Die Wi-Fi-System arbeitet normal, wenn er all
das Radiosteuerungen (mit seinem 433 MHzFunkmodul) und Kabelsteuerungen (mit seinem
weiße Kabel) behandelt.
Im Falle der Verwendung der bestehenden
Radio-Empfänger und Kabelsteuerungen
(außerhalb von Wi-Fi-System), für eine richtiege
Arbeitsweise, müssen Sie sie durch den weißen
Kabel des MASTER Wi-Fi FR verbinden.
654321
+ -
+ 6
5
Steuerungskontakt
COM-OPEN/K für
vollständige Öffnung
-
**
12/24V ac/dc
1 Central
Antennenanschluss 433,92 MHz2 Erdung
2 Antenne mit Grundplatte
4+ 3Anschlussklemme
12/24V ac/dc
EDGE 1 INPUT (graue Ader COM, gelbe Ader EDGE 1) ist für die Kontaktleiste
vorgesehen (SCHLIESSEN).
Warnung: An den COM-EDGE Klemmen der RIB Schalttafeln müssen alle
Überbrückungen entfernt werden.
!
* OBLIGATORISCHER Anschluss für Schalttafeln mit einem 120/230V ac
für Blinklicht
** OBLIGATORISCHER Anschluss für Schalttafeln mit einem 12/24V ac/dc
für Blinklicht. WARNUNG: POLARITÄT ÜBERPRÜFEN
Die Verbindung ist erforderlich, auch wenn Sie keine Blinkleuchte in das
System haben.
WARNUNG: Immer den Ausgang für das Blinklicht der Schalttafel zur MASTER
Wi-Fi FR Karte mit einer der zugeordneten Klemmen, abhängig davon ob das
Blinklicht mit 230 V oder 12/24 V betrieben wird, verbinden. Wenn diese
Verbindung nicht erfolgt, wird die Tür nicht funktionieren und es ertönt ein
Summton von 4 Sekunden, der anzeigt, dass diese Verbindung fehlt.
PHOTOCELL INPUT (graue Ader COM, schwarze Ader PHOT) ist für die Fotozelle
vorgesehen.
Warnung: An den COM-PHOT Klemmen der RIB Schalttafeln müssen alle
Überbrückungen entfernt werden.
CONTROL BUTTON (graue Ader COM, weiße Ader N.O. BUTTON)
Trennen Sie die Kabelsteuerungen von der Schalttafel und verbinden Sie den
weißen Kabel des MASTER Wi-Fi FR.
EDGE 2 INPUT (graue Ader COM, gelbe Ader EDGE 2) ist für die Kontaktleiste
vorgesehen (ÖFFNUNG).
Warnung: An den COM-EDGE Klemmen der RIB Schalttafeln müssen alle
Überbrückungen entfernt werden.
ANSCHLUSS DES SELBSTTESTEINGANGES (Brown wire A/D+ TEST)
zur Erfüllung der Norm EN13849-2:2008
- Sofern die benutzte Schalttafel mit einem Selbsttest-Jumper JP1, wie in der
29
D
folgenden TABELLE DER ZUR AUTOTEST-KONTROLLE ZUGELASSENEN
RIB-STEUERUNGEN angegeben, ausgestattet ist. Ansonsten nach die
Stromversorgung über der Schalttafel geliefert wird (siehe Anleitung).
- Schließen Sie den Ausgang für den Selbsttest der Schalttafel an die Klemmen A/D+
Test auf der MASTER Wi-Fi FR Karte derart an, damit diese das System am Ende
von jeder vollständigen automatischen Öffnung überprüfen kann.
- Ein Schließen wird nur dann erfolgen, wenn die MASTER Wi-Fi FR Karte den
Kontrolltest passiert hat.
- Wenn die MASTER Wi-Fi FR Karte den Kontrolltest nicht besteht, wird die
chalttafel den Automatikbetrieb blockieren und die zweifarbige LED auf der
S
MASTER Wi-Fi FR Karte zeigt einen Sicherheitsausfall an, indem sie abwechseln
rot und grün aufblinkt.
Um das Problem anzuzeigen ertönt ein sich ändernder Summton für eine Minute.
Der Alarmstatus des Summtons ertönt wieder für 1 Minute, wenn ein Befehl
übertragen wird.
Wenn die Schalttafel nicht mit einem Selbsttest ausgestattet ist, wird der
Kontrolltest ignoriert.
TABELLE DER ZUR AUTOTEST-KONTROLLE ZUGELASSENEN RIB-STEUERUNGEN
RIB-STEUERUNG
DIE KLEMME A/D+ TEST AN DIE
KLEMME ANSCHLIEßEN
FREIGABE DER AUTOTESTFUNKTION MITTELS
K2007 / K2007 CRX
S1
T2 - T2 CRX
T2 24V - T2 24V CRX
J - J CRX
BOSS 24V CRX
BOSS 230V CRX
A+ TEST
A+ TEST
D+ TEST
A+ TEST
D+ TEST
Klemme 8
Klemme 8
DIP 10
DIP 12
DIP 13
DIP 12
DIP 7
DIP 6
DIP 6
JUMPER JP1 AUF DER
MASTER WI-FI KARTE AUF
DIE POSITION:
+/~
+/~
+/~
+/~
+/~
JP1
+/~
+/~
+/~
E - MASTER Wi-Fi FR POWER SETZEN
G - SPEICHERN DER SICHERHEITSGERÄTE
Legen Sie nach der Installation aller Verbindungen die Spannung an die Schalttafel
mit dem MASTER Wi-Fi FR an.
Die gelbe LED DL6 sollte aufleuchten und ein Summton ertönen, der anzeigt, dass
die korrekte Spannung anliegt.
Die LED DL7 wird abwechselnd rot und grün aufleuchten und zeigt an, dass keine
Fernsteuerungen oder Blinklichter gespeichert wurden.
Nach der Identifizierung der Sicherheitsgeräte und dem Einlegen der Batterien
werden die DIP-Schalter mit der gleichen Nummer der Sicherheitsgeräte auf
dem MASTER Wi-Fi FR auf die Position ON gesetzt, um die Speicherung der
Sicherungsgeräte zu aktivieren.
Zum Speichern:
- Drücken Sie die Taste PROG RX auf dem MASTER Wi-Fi FR => die zweifarbige
LED EDGE PHOT 1 blinkt rot für 1 Minute auf (für die Speicherung erforderliche
Zeit).
- Drücken Sie die Taste PROG TX auf dem Sicherheitsgerät mit DIP-Schalter 1
in der Position ON => auf dem MASTER Wi-Fi FR blinkt die LED EDGE PHOT 1
rot auf und wechselt nach grün und es ertönt ein Summton, der anzeigt, dass das
Sicherheitsgerät korrekt gespeichert wurde. Die LED EDGE PHOT beginnt sofort
rot zu blinken.
- Wenn keine weiteren Sicherheitsgeräte gespeichert werden müssen, schaltet
sich die LED EDGE PHOT 2 nach 1 Minute aus, oder drücken Sie die TASTE
PROG. RX 4 Mal um die Speicherung abzuschließen => alle zweifarbigen LEDs
EDGE PHOT müssen sich ausschalten.
F - IDENTIFIZIERUNG VON Wi-Fi SICHERHEITSGERÄTEN
ACHTUNG: BEVOR DER SICHERHEITS-IDENTIFIZIERUNG AUSFÜHREN,
PRÜFEN DASS DIE STEUERUNG FÜR EIN ODER ZWEI EINGÄNGE VON
KONTAKTLESITE-VERBINDUNG VORBEREITET IST.
EINSTELLEN DER JUMPER JP2 NACH DEM NUMMER-EINGÄNGE VON
KONTAKTLEISE-LEITUNG.
SPEICHERUNG VON WEITEREN SICHERHEITSGERÄTEN
- Nachdem das 1. Sicherheitsgerät gespeichert wurde, beginnt die zweifarbige
LED EDGE PHOT 2 automatisch für 1 Minute rot zu blinken (für die Speicherung
erforderliche Zeit).
- Taste PROG. TX auf dem Sicherheitsgerät mit DIP-Schalter 2 in der Position
ON drücken => auf dem MASTER Wi-Fi FR leuchtet die rot blinkende LED EDGE
PHOT 2 jetzt grün auf und ein Summton zeigt an, dass das Sicherheitsgerät korrekt
gespeichert wurde.
- Wiederholen Sie den gleichen Ablauf für jedes weitere Sicherheitsgerät (bis
zu 6 Mal).
MASTER Wi-Fi FR kann 6 Wi-Fi Kontaktleiste behandelt, diese auf 2 separate
Ausgänge für Kontaktleiste-Leitung handelt.
3 Kontaktleiste können zu jedem der 2 Ausgänge zugewiesen werden.
Lösung zu erlassen, wenn die Tor-Steuerung hat 2 separate Eingänge für die
Kontaktleiste-Leitung in der Öffnung und Schließung:
EDGE 1 = gelbe Draht - Kontaktleiste in Öffnung (LED EDGE/PHOT verfügbar
von 1 bis 3)
EDGE 2 = grüne Draht - Kontaktleiste in Schließung (LED EDGE/PHOT verfügbar
von 4 bis 6)
Jedes Wi-Fi Sicherheitsgerät muss (OBLIGATORISCH) durch Setzen von nur einem
der 6 DIP-Schalter auf ihren Leiterplatten (jedes einzelne der 6 Sicherheitsgeräte
unterschiedlich) in die Position ON gekennzeichnet werden. Selbstverständlich
wird ein Fotozellenpaar als ein Sicherheitsgerät betrachtet und muss daher über
einen Empfänger und Sender mit dem gleichen DIP-Schalter in der Position ON
gekennzeichnet werden.
KENNZEICHNEN SIE DIE GEHÄUSE DER SICHERHEITSGERÄTE MIT DER
NUMMER DES AKTIVIERTEN DIP-SCHALTERS UND BEFESTIGEN SIE DEN
NUMMERIERTEN MITGELIEFERTEN KLEBESTREIFEN AUSSEN AUF DEM
ENTSPRECHENDEN GEHÄUSE.
Der Klebestreifen hilft bei der schnellen Identifizierung des Sicherheitsgerätes, wenn
dieses gewartet werden muss.
Hinweis: Jedes Sicherheitsgerät wird mit den DIP-Schaltern in der Position OFF
geliefert, sodass die Batterien nicht verbraucht werden, wenn das Gerät nicht benutzt
wird (sofern eingelegt).
Legen Sie die Batterien in das Wi-Fi Sicherheitsgerät ein.
ANDERE SICHERHEITSGERÄTE HINZUFÜGEN (BIS INSGESAMT 6 STÜCK)
Falls nach der Installation die Benutzung weitere Sicherheitsgeräte (FOTOZELLEN
ODER KONTAKTLEISTEN) gewünscht wird, um die Sicherheit an der Tür zu
erhöhen, wird folgendes Vorgehen empfohlen:
- Schalten Sie die Stromversorgung zur Tür ab.
- Positionieren Sie das Sicherheitsgerät in der gewünschten Position und identifizieren
Sie es durch Setzen des internen DIP-Schalters.
- Führen Sie die Programmierung durch Setzen eines weiteren DIPSchalters, unterschiedlich von dem von anderen installierten Fotozellen oder
Sicherheitsgeräten, auf ON und identifizieren Sie diese mit dem entsprechenden
nummerierten Klebebandstreifen (Siehe Absatz F - Kennzeichnung von Wi-Fi
Sicherheitsgeräten).
- Aktivieren Sie den DIP-Schalter auf dem hinzugefügten Sicherheitsgerät auf der
MASTER Wi-Fi FR Karte.
- Schalten Sie die Stromversorgung zur Tür wieder ein.
- Führen Sie die Speicherung und die Systemüberprüfung, so wie weiter oben
beschrieben, durch.
30
D
NOVA Wi-Fi UND VERTIGO Wi-Fi FOTOZELLEN SYSTEMÜBERPRÜFUNG
- Überprüfen Sie ob der auf dem Sender TX NOVA Wi-Fi ausgewählte DIP-Schalter
der gleiche ist wie auf dem Empfänger des RX NOVA Wi-Fi (z. B. 1 auf ON).
- Die korrekte Funktion des TX NOVA Wi-Fi wird durch die grüne LED angezeigt, die
für 10 Sekunden aufleuchtet.
- Taste PROG. TX auf dem NOVA Wi-Fi Empfänger drücken und loslassen (wodurch
dieser für 3 Minuten für die Ausrichtung aktiviert wird). Wenn die Fotozellen
bereits ausgerichtet sind, leuchtet die rote LED ununterbrochen auf. Wenn die rote
LED nicht leuchtet oder blinkt, muss die Ausrichtung optimiert werden, bis diese
ununterbrochen leuchtet.
- Nach dem Ausrichten ist zu überprüfen, ob die rote LED sich ausschaltet, wenn
ein Hindernis zwischen die Fotozellen gestellt wird und ob gleichzeitig die bei der
Speicherung zugeordnete zweifarbige LED EDGE PHOT auf dem MASTER Wi-Fi
FR grün aufleuchtet, solange das Hindernis vorhanden ist.
- Auf der MASTER Wi-Fi FR Karte muss sich die LED DL3 ausschalten, was einen
korrekten Austausch des zugeordneten Eingangs mit der PHOT auf der Schalttafel
anzeigt.
- Wiederholen Sie den Prozess für alle anderen installierten NOVA Wi-Fi Fotozellen.
- Führen Sie anschließend eine Systemüberprüfung von allen installieren Fotozellen
durch Aktivierung der automatisierten Bewegung aus und überprüfen Sie mit
einem Gegenstand das automatische Stoppen/Zurückfahren beim Schließen oder
Stoppen/Weiterfahren beim Öffnen.
SYSTEMÜBERPRÜFUNG Wi-Fi KONTAKTLEISTEN
Nachdem die TOUCH Wi-Fi Kontaktleiste korrekt kalibriert wurde:
- Drücken Sie auf den Kontakt einer TOUCH Wi-Fi Kontaktleiste (z. B.: Sicherheitsgerät 3).
- Überprüfen Sie auf dem MASTER Wi-Fi FR ob die entsprechende LED EDGE
PHOT 3 grün blinkt und die gepaarte LED DL2 sich augenblicklich aus- und dann
wieder einschaltet.
WARNUNG: Nach dem Empfang des ersten Signals werden alle weiteren Signale
für 2 Sekunden ignoriert. Wenn innerhalb dieser 2 Sekunden ein Signal vorhanden
ist, stammt dieses von der LED EDGE PHOT 3, welche dann grün aufleuchtet.
- Wiederholen Sie die LED-Aktivierungsüberprüfung auf dem MASTER Wi-Fi FR
durch Drücken der anderen installierten TOUCH Wi-Fi Kontaktleisten.
- Führen Sie eine Abschlussprüfung aller installierten Kontaktleisten durch, indem
die automatische Bewegung aktiviert und überprüft wird, ob bei Druck auf die
Kontaktleiste die automatische Bewegung gestoppt/umgekehrt wird.
ANTENNE
Zur Verbindung mit den Wi-Fi-868-MHz-Sicherungen ist
MASTER Wi-Fi FR mit einem Stück elektrischen Draht
ausgestattet, der als Antenne fungiert und an die Klemme
J8 angeschlossen wird. Falls es nötig ist, das Funksignal zu
verbessern (etwa wenn MASTER Wi-Fi FR in einen SUPERoder MASTER Wi-Fi FR-Moter eingefügt ist, der sich wiederum
in einem Metallbehälter befindet), schließen Sie die 868,3 MHz-Antenne (Code
ACG5451) an die Klemme J8 an. Achten Sie dabei auf den Anschluss des zentralen
Drahts und der Erdung, und positionieren Sie die Antenne so, dass sie sich im
„Sichtbereich“ aller Sicherungen befindet.
Für eine ordnungsgemäße Funktion des Systems dürfen sich keine
Hindernisse wie Stahlbeton-Mauern, Eisenflächen usw. zwischen MASTER
Wi-Fi FR und den Sicherungen befinden. Diese könnten die Funkverbindung
stören und folglich die Lebensdauer der Batterien der Sicherungen
verringern.
Auf Schalttafeln, die mit 433,92 MHz arbeiten, ist die Antenne in diesem
Fall bereits angeschlossen (Kabelfähnchen in der RIB Schalttafel),
dennoch es erforderlich sein, eine Antenne für eine größere Reichweite
zu installieren. Schließen Sie diese an die Klemmen 1-2 an, sofern ein
MASTER Wi-Fi FR MIT KLEMMBRETT verwendet wird oder an die
Klemmen, die dem Antennenanschluss auf der RIB Schalttafel vorbehalten sind, an.
ÜBERPRÜFUNG NOVA Wi-Fi UND VERTIGO Wi-Fi FOTOZELLEN-ALARMSIGNAL
Die Überprüfung erfolgt, indem die Batterie aus dem Fotozellenempfänger mit
beispielsweise DIP-Schalter 3 in der Position ON, herausgenommen wird und der
Befehl Tür öffnen gegeben wird. Die zweifarbige LED3 auf dem MASTER Wi-Fi FR
wechselt zwischen grün und rot, während die LEDs DL2 und DL3 ausgeschaltet
werden und ein sich ändernder Summton für 1 Minute zu hören ist.
Wiederholen Sie die Überprüfung für jeden weiteren installierten Fotozellenempfänger.
Hinweis: Wenn die Batterie herausgenommen wurden und der Befehl Tür öffnen
gegeben wurde und der Summton auf dem MASTER Wi-Fi FR nicht zu hören ist,
befindet sich der DIP-Schalter 3 auf dem MASTER Wi-Fi FR in der Position OFF
(nicht aktiviert). Setzen Sie ihn auf ON.
TOUCH Wi-Fi KONTAKT-ALARMSIGNALÜBERPRÜFUNG
Hierzu wird die Batterie aus dem Sender mit beispielsweise DIP-Schalter 3 in
der Position ON herausgenommen. Die zweifarbige LED EDGE PHOT 3 auf dem
MASTER Wi-Fi wechselt zwischen rot, während LED DL2 sich ausschaltet und dass
der Buzzer einen Ton abgibt alle 3 Sekunden bis 1 Minute.
Wiederholen Sie die Überprüfung für jede weitere installierte Kontaktleiste.
Hinweis: Wenn die Batterie herausgenommen wurde und der Summton auf dem
MASTER Wi-Fi FR nicht zu hören ist, befindet sich der DIP-Schalter 3 auf dem
MASTER Wi-Fi FR in der Position OFF (nicht aktiviert). Setzen Sie ihn auf ON.
WARNUNG (Austauschen der Batterien)
Diese WARNUNG teilt dem Benutzer mit, dass die Batterien unverzüglich
auszutauschen sind.
Wenn die Batteriespannung vom NOVA Wi-Fi 2,3 V und vom TOUCH Wi-Fi
3,0V erreicht, signalisiert der NOVA Wi-Fi Fotozellenempfänger oder das
Kontaktleistensignal dem MASTER Wi-Fi FR per Funk, dass die Batterien leer sind
und aktiviert den SUMMER auf dem MASTER Wi-Fi FR mit einem Summton alle 3
Sekunden während 1 Minute.
Diese Warnung für 1 Minute wird erneuert, wenn der Tür ein Befehl übermittelt wird.
Die zweifarbige LED auf dem MASTER Wi-Fi FR der entsprechenden Fotozelle mit
leerer Batterie leuchtet ununterbrochen rot auf.
Das SPARK Wi-Fi Blinklicht (sofern vorhanden) warnt durch 2
aufeinanderfolgende Blitze, gefolgt von einer Pause von 3 Sekunden, während
die Tür geöffnet oder geschlossen wird.
Das System wird während dieser Signale weiterhin funktionieren. Es ist jedoch ratsam die
Batterien schnellstmöglich auszutauschen, da bei einer Batteriespannung des NOVA
Wi-Fi von 2,0 V und des TOUCH Wi-Fi von 2,7 V die Funktion der Tür gestoppt wird.
ALARM (Batterien komplett leer oder funktionieren nicht)
Der Alarm wird aktiviert, wenn die Batterien komplett leer sind (2 V bei NOVA Wi-Fi
und 2,7 V bei TOUCH Wi-Fi) oder wenn sie nicht mehr funktionieren.
Auf dem MASTER Wi-Fi FR schalten sich die LEDS DL2 und DL3 aus und der
MASTER Wi-Fi blockiert den Automatikbetrieb.
Auf dem MASTER Wi-Fi blinkt die zweifarbige LED der entsprechenden Fotozelle
oder Kontaktleiste mit der leeren oder nicht funktionieren Batterie abwechselnd rot
auf. Der Buzzer einen Ton abgibt alle 3 Sekunden bis 1 Minute, während die SPARK
Wi-Fi Blinkleuchte (Sofern vorhanden) den Alarmzustand durch Ausgabe von
2 aufeinanderfolgenden Blitzen, gefolgt von einer Pause von 3 Sekunden,
signalisiert und dem Benutzer mitteilt, dass die Batterien ausgetauscht oder
repariert werden müssen.
Dieser Alarm von 1 Minute wird erneuert, wenn der Tür ein Befehl übermittelt
wird.
ALLE GESPEICHERTEN SICHERHEITSGERÄTE LÖSCHEN
Um alle im MASTER Wi-Fi FR gespeicherten
Sicherheitsgeräte (NOVA Wi-Fi
12/24V ac/dc
und TOUCH Wi-Fi) zu löschen muss die Taste PROG. RX für 10 Sekunden
niedergedrückt werden.
Nach 10 Sekunden werden alle zweifarbigen LEDs (von EDGE PHOT 1 bis EDGE
PHOT 6) abwechselnd 6 Mal aufleuchten um anzuzeigen dass die Löschung
erfolgreich ausgeführt wurde.
Danach schalten sich die zweifarbigen LED EDGE PHOT und die LEDs DL2 und
DL3 aus.
WARNUNG: BEI AUSGESCHALTETEN LED DL1, DL2 UND DL3 FUNKTIONIERT
DER AUTOMATIKBETRIEB NICHT.
LÖSCHEN VON NUR EINEM SICHERHEITSGERÄT (FOTOZELLE ODER
KONTAKTLEISTE)
Um nur ein gespeichertes Sicherheitsgerät auf dem MASTER Wi-Fi FR zu löschen,
ist folgendes auszuführen:
- Taste PROG. RX ein oder mehrere Male drücken, um die zweifarbige LED EDGE
PHOT, die zu blinken beginnt, auszuwählen, um anschließend das zugeordnete
Sicherheitsgerät zu löschen.
- Nach Auswahl des Sicherheitsgerätes muss die Taste PROG. RX für 10 Sekunden
niedergedrückt werden.
31
D
- Nach 10 Sekunden blinkt die zweifarbige LED EDGE PHOT abwechselnd 6 Mal
rot und grün auf, um anzuzeigen, dass die Löschung erfolgreich ausgeführt wurde.
AUSTAUSCHEN DER BATTERIEN
Die Lebensdauer der 1,5 V AA Batterien in einem Sicherheitsgerät beträgt ca. 3 Jahre.
Beim Auswechseln der Batterien müssen nicht auf die Programmierung der
Fotozellen nochmals machen, wie kein anderes Gerät RIB Wi-Fi.
- Sicherheitsgeräte mit leeren Batterien lassen sich durch Überprüfung der Diagnose
der LED EDGE PHOT auf dem MASTER Wi-Fi FR identifizieren.
- Mit der Nummer neben der zweifarbigen LED EDGE PHOT, die rot aufblinkt oder
die ununterbrochen rot aufleuchtet, wird die Nummer des Sicherheitsgerätes mit
leeren Batterien identifiziert.
- Die NOVA Wi-Fi oder TOUCH Wi-Fi lassen sich mit Hilfe der Klebeetiketten mit der
Nummer zur Identifizierung entsprechend der Nummer der zweifarbigen LED mit
Alarmstatus auf dem MASTER Wi-Fi FR finden.
- Tauschen Sie die Batterien aus und achten Sie dabei auf die richtige Polarität.
- Taste PROG TX auf dem NOVA Wi-Fi oder TOUCH Wi-Fi drücken, um den
MASTER Wi-Fi FR zurückzusetzen.
- Der Summer am Rand des MASTER Wi-Fi FR schaltet sich aus und die LEDs DL2DL3 (sofern im Alarmstatus befindlich) schalten sich ein. Die dem Sicherheitsgerät
zugeordnete zweifarbige LED schaltet sich nach Austausch der Batterien aus.
Der Automatikbetrieb ist wieder für einen sicheren Betrieb bereit.
WARNUNG: Bitte beachten Sie, dass die alten Batterien entsprechend der aktuellen
Normen entsorgt werden. Im Fall, dass die Sicherheitsgeräte entsorgt werden
müssen, bitte daran denken die Batterien zu entnehmen und diese entsprechend
getrennt zu entsorgen.
b - Wenn bereits Codes im Speicher vorhanden sind, leuchtet die zweifarbige LED
DL7 nicht (Löschung aller Daten durchführen – Siehe Absatz ALLE CODES
LÖSCHEN).
- Taste PROG RX für mindestens 3 Sekunden niedergedrückt halten. Nach dem
Loslassen blinkt die LED DL7 auf dem MASTER Wi-Fi FR für 10 Sekunden rot auf.
Durch Drücken von einer der Tasten auf dem Sender während dieser Zeit kann der
Code gespeichert werden.
- Zusätzlich zu den Codes können auch die für die Benutzung gewünschten
Kanäle auf dem MASTER Wi-Fi FR programmiert werden. Dabei müssen Sie
sich die während der Code-Speicherung auf der Fernsteuerung betätigten
Tasten merken, da diese anschließend für die Öffnung verwendet werden.
- Wenn kein Code gesendet wird, schaltet sich das rote Licht der zweifarbigen
LED DL7 auf dem MASTER Wi-Fi FR nach 10 Sekunden aus und zeigt damit die
Beendigung der Programmierung an. Die zweifarbige LED DL7 blinkt abwechselnd
rot und grün auf und zeigt damit an, dass keine Codes im Speicher vorhanden sind.
- Die erfolgreiche Code-Speicherung wird durch die LED DL7 mit einem grünen Licht
von 500 ms Dauer und einem Summton bestätigt.
- Nach der Speicherung des ersten Codes wird die Speicherzeit für 10 Sekunden
zurückgesetzt und es können weitere Codes gespeichert werden.
- Zum Beenden der Code-Speicherung muss 10 Sekunden abgewartet werden bis
sich die rote LED DL7 ausschaltet. Alternativ kann die Taste PROG RX auf dem
MASTER Wi-Fi FR gedrückt werden. Auch in diesem Fall schaltet sich die rote LED
DL7 aus und zeigt damit an, dass die Speicherung beendet wurde.
Wenn die zweifarbige LED DL7 ausgeschaltet ist, ist der MASTER Wi-Fi FR
betriebsbereit.
Taste auf der zuvor gespeicherten Fernsteuerung drücken. Die grüne LED DL7 auf
dem MASTER Wi-Fi FR leuchtet für einen Augenblick auf und zeigt an, dass ein
gültiger Code erkannt wurde. 2 Sekunden nachher haben Sie die Beleuchtung für
einen Augenblick der LED DL5, zugleich die vollständige Öffnung gesteuert wird.
Hinweis: Wenn beim Drücken einer Taste auf der Fernsteuerung die zweifarbige
LED DK7 für einen Augenblick rot aufleuchtet, bedeutet dieses, dass der Tastencode
nicht gespeichert wurde und die Speicherung erneut durchgeführt werden muss.
H - PROGRAMMIERUNG DER SPARK Wi-Fi BLINKLEUCHTE
ALLE CODES LÖSCHEN
WARNUNG: Die DIP-Schalter der entsprechenden gelöschten Sicherheitsgeräte
sind auf OFF zu setzen, anschließend muss die zweifarbige LED gescannt
werden, in dem die Taste PROG. RX 6 Mal gedrückt wird. WICHTIG: Entfernen
Sie die Batterien aus der Sicherheit eliminiert.
- Taste PROG. RX auf dem MASTER Wi-Fi FR für mindestens 3 Sekunden
niedergedrückt halten.
- Taste PROG. RX loslassen. Die zweifarbige LED DL7 wird jetzt für 10 Sekunden
rot aufblinken.
- Taste S4 PROG. TX auf der SPARK Wi-Fi Blinkleuchte drücken, um ein Funksignal
zum MASTER Wi-Fi FR zu senden.
- Die erfolgreiche Speicherung wird durch einen Summton angezeigt und die
zweifarbige LED DL7 auf dem MASTER Wi-Fi FR wechselt die Farbe von rot nach
grün, während die rote LED DL7 auf der SPARK Wi-Fi Karte 3 Mal aufblinkt.
- Warten Sie 10 Sekunden ab, um die Programmierung abzuschließen oder drücken
Sie die Taste PROG. RX auf dem MASTER Wi-Fi FR für einen Augenblick.
- Setzen Sie das Gehäuse wieder auf.
- Montieren Sie den Diffuser und befestigen Sie ihn mit den mitgelieferten Schrauben.
MASTER Wi-Fi FR kann an mehre Blinkern verbindet sein.
Während der Programmierung, jeder Blinker die gleiche Kode erhält; diese
Kode von die verbindet MASTER Wi-Fi FR gesendet ist. Wenn eine Bedienung
gegeben wird, der MASTER Wi-Fi FR eine einzige Kode sendet. Diese Kode
von allen verbindet SPARK Wi-Fi erhaltet wird und die Blinkern beginnen, in
perfektr Gleichzeitigkeit, zu blinken.
SYSTEMÜBERPRÜFUNG
Senden Sie einen Befehl an die Tür und überprüfen Sie, ob das SPARK Wi-Fi
Blinklicht korrekt blinkt.
PROGRAMMIERUNG
VON FERNSTEUERUNGEN UND DES Wi-Fi
BLOCK SELEKTORS FÜR VOLLSTÄNDIGE ÖFFNUNG (maximal 100
Kodes)
- Jumper JP2 wie dargestellt setzen:
- Taste PROG RX auf dem MASTER Wi-Fi FR drücken und wieder loslassen.
Die zweifarbige LED DL7 gibt ein 0,5 Sekunden dauerndes rotes Lichtsignal
ab und schaltet sich anschließend aus, um anzuzeigen dass die Codes und
Einschaltinformationen erfolgreich gelöscht wurden.
- Jumper JP2 wie dargestellt setzen:
- Die LED DL7 blinkt abwechselnd rot und grün auf und zeigt an, dass der Speicher
leer ist.
Hinweis: Für Normalbetrieb muss der Jumper JP2 wie nachfolgend abgebildet
gesetzt werden:
SIGNAL SPEICHER VOLL
Wenn bei Drücken und gedrückt halten der Taste PROG RX auf dem MASTER Wi-Fi
FR für mehr als 3 Sekunden, trotz Loslassen, die zweifarbige LED DL7 sechs Mal
grün aufleuchtet, bedeutet dieses, dass der Speicher voll ist (Maximal 100 Codes).
Zum Download der Video-Installation geben Sie diese
Adresse in Ihren Browser ein oder lesen Sie den QR-Code
mit Ihrem Handy:
http://www.youtube.com/user/RIBSRL?feature=mhee
Mit nachfolgendem Verfahren wird ein Speichern der folgenden Fernsteuerungen auf
dem MASTER Wi-Fi FR ermöglicht:
SUN DUAL-CHANNEL 433 MHz
Kode ACG6052
SUN FOUR-CHANNEL 433 MHz
Kode ACG6054
SUN CLONE DUAL-CHANNEL 433 MHz
Kode ACG6056
SUN CLONE FOUR-CHANNEL 433 MHz
Kode ACG6058
BLOCK Wi-Fi KEY SELECTOR 433 MHz
Kode ACG6098
Beim Einschalten von MASTER Wi-Fi FR leuchtet die gelbe LED DL6 auf.
- Gleichzeitig ertönt ein Summton der den korrekten Spannungsstatus anzeigt.
a - Wenn der Speicher vom MASTER Wi-Fi FR leer ist (Standardversion) blinkt die
zweifarbige LED DL7 abwechselt rot und grün auf.
32
D
FEHLERBESEITIGUNG
PROBLEM
ÜBERPRÜFUNG
Das Tor bewegt sich nicht, gibt der Summer einen Ton abwechselnd, und einer der Zwei-Farben-LED leuchtet
abwechselnd grün und rot.
Wenn sie gleichzeitig gesteuert werden 2 MASTER Wi-Fi FR in einem Abstand von weniger als 20 m voneinander
installiert ist, kann ihre Signale zur Kontrolle und Sicherheitseinrichtungen installiert überlappen sich dabei den Alarm
aktivieren. Entfernen Sie die 2 MASTER Wi-Fi FR in einem Abstand von mehr als 20 m.
Das Tor bewegt sich nicht, gibt der Summer einen Ton abwechselnd, und einer der Zwei-Farben-LED leuchtet
abwechselnd grün und rot, ODER
das Tor versucht zu öffnen / schließen und dann stoppt, ertönt der Summer eine alternative, und einer der ZweiFarben-LED leuchtet abwechselnd grün und rot.
Mangelnde Aufsicht zwischen MASTER Wi-Fi FR und eine Fotozelle oder Leisten.
- Anschließen Sie einen Antenne 868MHz (Kode ACG5451) auf MASTER Wi-Fi FR, um die ordnungsgemäße Dialog
zwischen MASTER Wi-Fi FR undinstallierte Sicherheitseinrichtungen zu gewährleisten.
Achtung: Die Antenne muss in Anbetracht all der Sicherheitseinrichtungen installiert positioniert werden.
Wenn die Meldung weiterhin, überprüfen Sie den Zustand der Batterien und ersetzen Sie sie, falls nicht geeignet.
Alle LEDs auf dem MASTER Wi-Fi FR sind ausgeschaltet
Überprüfen Sie, ob die 12 V oder 24 V Wechselspannung/Gleichspannung an den Anschlussklemmen des MASTER
Wi-Fi FR anliegt.
Während der Speicherung von Sicherheiten, ertönt der Summer für 3/5 Sekunden.
Sie haben versucht, eine Sicherheit mit Mikroschalter falsch zu speichern.
Überprüfen Sie, dass die Zwei-Farben-LED auf MASTER Wi-Fi FR blinkend, entsprechend dem Microschalter auf
die Sicherheit zu speichern.
Während der Speicherung auf den Sicherheitsgeräten ertönt der Summton 2 Mal.
Auf dem Speicherplatz wurde bereits ein Sicherheitsgerät gespeichert.
Wenn ein Befehl abgegeben wird ertönt der Summton 3 Mal.
- Es wurde kein Sicherheitsgerät gespeichert, es muss mindestens eines gespeichert werden, ODER
- Der dem gespeicherten Sicherheitsgerät entsprechende DIP-Schalter auf dem MASTER Wi-Fi FR befindet sich in
der Position OFF. Dieser ist auf ON zu setzen
Wenn ein Befehl abgegeben wird ertönt der Summton 4 Mal.
Möglicherweise fehlt ein Kabel zwischen dem MASTER Wi-Fi FR und der Tür-Steuerplatine:
- Blinklicht-Anschlusskabel herausgezogen, ODER
- Kontaktleisten-Anschlusskabel herausgezogen, ODER
- Fotozellen-Anschlusskabel herausgezogen
Der Summton ertönt 5 Mal, wenn die am Fotozellenempfänger angeschlossene Kontaktleiste gedrückt wird.
Kontakt-Konfigurationsfehler mit an den Fotozellenempfänger angeschlossener Kontaktleiste
Wenn ein Befehl abgegeben wird ertönt der Summton 5 Mal.
- Widerstand wurde nicht mit dem N.C.-Kontakt der mit dem Fotozellensender verbundenen Kontaktleiste in Reihe
geschaltet, ODER
- Kabel auf der Kontaktleiste mit N.O.-Kontakt herausgezogen, ODER
- Widerstand wurde nicht mit dem N.C.-Kontakt, ODER
- Kabel auf der Fotozellensender verbundenen Kontaktleiste in Reihe mit N.O.-Kontakt herausgezogen
Der Summer ertönt ein Signal, alle 3 Sekunden und der Blinker beim Betrieb des Tores zwei aufeinanderfolgenden
Blitzen, eine Pause von 3 Sekunden für 1 Minute und einer der Zwei-Farben-LED leuchtet rot fest
Die Batterien der Fotozelle(n) oder der Kontaktleiste(n) austauschen, wenn diese leer sind
Das Tor bewegt sich nicht, der Summer ertönt ein Signal alle 3 Sekunden und der Blinker blinkt zwei
aufeinanderfolgenden Blitzen, eine Pause von 3 Sekunden für 1 Minute gefolgt, und einer der Zwei-Farben-LED
leuchtet rot
Die Batterien der Fotozelle(n) oder der Kontaktleiste(n) austauschen, wenn diese leer sind
LED DL2 ist aus und eine der zweifarbigen LED EDGE leuchtet ununterbrochen grün auf.
- Kabel auf der Kontaktleiste mit N.C.-Kontakt herausgezogen, ODER
- Überprüfen ob ein Widerstand von 8,2kΩ mit dem N.O.-Kontakt auf der Kontaktleiste mit dem Fotozellenempfänger
in Reihe geschaltet wurde.
Der Summton ertönt nicht, wenn die Batterien aus der Kontaktleiste herausgenommen wurden.
Überprüfen Sie, ob der der Kontaktleiste entsprechende DIP-Schalter auf dem MASTER Wi-Fi FR sich in der Position
ON befindet.
Die Tür öffnet oder schließt nicht und eine der zweifarbigen LEDs leuchtet ununterbrochen grün auf.
- Fotozelle wurde nicht ausgerichtet oder ist nicht eingeschaltet. Die Batterien des Fotozellensenders sind lee, ODER
- Der Widerstand von 8,2 kΩ ist nicht mit dem N.C.-Kontakt in Reihe oder mit dem N.O.-Kontakt parallel der mit
Fotozellensender verbundenen Kontaktleiste geschaltet, ODER
- Widerstand von 8,2 kΩ ist nicht parallel geschaltet mit dem N.O.-Kontakt der Kontaktleiste des Empfängers der
Fotozelle
Die Tür öffnet oder schließt nicht, der Summer ertönt ein Signal alle 3 Sekunden und das Blinklicht blinkt 2 Mal in
Folge auf, gefolgt von einer Pause von 3 Sekunden, für eine Minute auf und eine der zweifarbigen LEDs wechselt
zwischen rot
Fotozellen oder Kontaktleiste-Batterien sind leer
Die mit dem Sender der Fotozelle verbundene Kontaktleiste funktioniert nicht als Sicherheitsgerät.
Überprüfen Sie die korrekte Position des Jumpers auf dem Sender/Empfänger der Fotozelle. Wenn die Jumper richtig
sind, entfernen und ersetzen Sie die Batterien.
TECHNISCHE DATEN
- SPANNUNG
- ANWENDBARE SPANNUNG ZU DIE KLAMMER J4
- ANWENDBARE SPANNUNG ZU DIE KLAMMER J2
- STROMAUFNAHME IM RUHEZUSTAND
- MAXIMALE STROMAUFNAHME
- BETRIEBSTEMPERATUR
- ABMESSUNGEN
- GEWICHT
12/24 Vac/dc
120/220/230V 50/60Hz
12/24V ac/dc
40 mA
100 mA
-20°C bis +60°C
125x55x28 mm
0,090 kg
SICHERHEITSGERÄTE UND SIGNALISIERUNG
FUNKFREQUENZSIGNAL TECHNISCHE DATEN
- FREQUENZ
868,3 MHz
- EMPFINDLICHKEIT
-108 dBm
- SENDELEISTUNG
- MODULATIONSART
- REICHWEITE
<25 mW
FSK
20 m in freien Bereichen
BEFEHL AKTIVIERUNG FUNKFREQUENZSIGNAL TECHNISCHE
DATEN
- FREQUENZ
433,92 MHz
- EMPFINDLICHKEIT
-107 dBm
- MODULATIONSART
OOK
- REICHWEITE
100 m in freien Bereichen mit Antenne
33
E
S
SUN 2CH
cód. ACG6052
SUN 4CH
cód. ACG6054
SUN CLONE 2CH
cód. ACG6056
SUN CLONE 4CH
cód. ACG6058
NOVA Wi-Fi
cód. ACG8037
BLOCK Wi-Fi
cód. ACG6098
SPARK Wi-Fi
cód. ACG7064
VERTIGO Wi-Fi 8
cód. ACG8042
VERTIGO Wi-Fi 10
cód. ACG8043
TOUCH Wi-Fi
cód. ACG3016
TX RED
cód. ACG6202
El SISTEMA Wi-fi cumple con la norma EN13849-2:2008 y, unido a un
cuadro electrónico RIB, es un dispositivo de protección de Clase 2.
El SISTEMA Wi-fi permite realizar, mediante la tarjeta MASTER Wi-Fi
FR, una instalación con fotocélulas NOVA Wi-Fi y costas TOUCH
Wi-Fi que también se fijan sobre la hoja en movimiento sin tener que
adoptar sistemas recoge-cables.
El sistema comprueba constantemente la presencia de los distintos
dispositivos de seguridad y el estado de las baterías, cumpliendo
totalmente la exigencia de poseer una seguridad activa para todo tipo de
aberturas.
Con el uso de los cuadros electrónicos RIB es posible llevar a cabo el
autotest del sistema, tal como lo exige la norma vigente.
Cada dispositivo de seguridad de radio tiene un código propio de
identificación interno que lo distingue de los otros dispositivos.
REFERENCIAS NORMATIVAS PARA PUERTAS Y CANCELAS
AUTOMÁTICAS
El instalador debe asegurarse de que el SISTEMA Wi-fi esté conectado
conforme a las especificaciones de la norma EN12453, en el punto 5.1.1.6
(incisos e y f) a una central electrónica capaz de efectuar un control del
funcionamiento antes de ejecutar el movimiento de cierre (AUTOTEST).
El uso de los dispositivos RIB permite realizar una instalación conforme a
las Normas y Directivas vigentes.
Una vez ultimada la instalación de la máquina, es preciso asegurarse de
que ésta sea conforme a la norma EN13241-1.
RIB no puede considerarse responsable por los eventuales daños
derivados del uso impropio, erróneo o inadecuado del producto.
MASTER Wi-Fi
Es el corazón del sistema: gestiona todos los dispositivos de mando
(433,92 MHz), seguridad y señalización (868,3 MHz) programados
durante la fase de instalación.
MASTER Wi-Fi está disponible en 4 modelos:
- MASTER Wi-Fi con conector (cód. ACG6094), aplicable a todos los
cuadros electrónicos RIB no CRX.
- MASTER Wi-Fi con regleta de bornes (cód. ACG6099), aplicable a
cuadros electrónicos de otras marcas o RIB CRX.
- MASTER Wi-Fi FR con regleta de bornes (cód. ACG6150), aplicable a
cuadros electrónicos de otras marcas o RIB CRX.
TOUCH
cód. ACG3015
o costa mecánica
o resistiva de otras
marcas
-M
ASTER Wi-Fi OS con regleta de bornes (cód. ACG6152), aplicable a
cuadros electrónicos de otras marcas o RIB CRX.
SEGURIDADES
MASTER Wi-Fi FR puede gestionar simultáneamente hasta un máximo de
6 seguridades (NOVA Wi-Fi + VERTIGO Wi-Fi + TOUCH Wi-Fi + TX RED).
- Fotocélulas NOVA Wi-Fi (cód. ACG8037): ofrecen la posibilidad de
conectar una costa mecánica TOUCH (cód. ACG3015) o una costa
resistiva, tanto sobre la fotocélula del transmisor como sobre la del
receptor.
- Fotocélulas VERTIGO Wi-Fi (VERTIGO Wi-Fi 8 cód. ACG8042 VERTIGO Wi-Fi 10 cód. ACG8043): fotocélulas verticales sin cables para
reemplazar a la costa.
- Costa TOUCH Wi-Fi (cód. ACG3016), con transceptor incorporado.
- TX RED (cód. ACG6202): transmisor radio para gestionar costa
mecánica o resistiva.
MANDOS
MASTER Wi-Fi FR gestiona hasta 100 códigos distintos de los mandos
a distancia:
- Mandos a distancia SUN bicanales 433,92 MHz (cód. ACG6052)
- Mandos a distancia SUN tetracanales 433,92 MHz (cód. ACG6054)
- Mandos a distancia SUN CLONE bicanales 433,92 MHz (cód. ACG6056)
- Mandos a distancia SUN CLONE tetracanales 433,92 MHz (cód.
ACG6058)
- Selector de llave BLOCK Wi-Fi monocanal 433,92 MHz (cód. ACG6098).
También es posible conectar mandos alámbricos con contacto N.O.
(selector de llave, botonera...).
SEÑALIZACIONES VISUALES
MASTER Wi-Fi FR puede gestionar uno o más intermitentes SPARK
Wi-Fi (868,3 MHz) cód. ACG7064.
MASTER Wi-Fi FR posee leds para la monitorización del estado del
sistema y para la identificación de las fotocélulas o de las costas con
baterías casi o totalmente descargadas.
SEÑALIZACIONES ACÚSTICAS
MASTER Wi-Fi FR posee un buzzer que indica las fases de instalación y el
estado de atención, en caso de baterías casi descargadas y descargadas,
o el estado de alarma, en caso de avería de alguno de los dispositivos.
34
E
S
A - PREDISPOSICIÓN DE LA INSTALACIÓN
El sistema Wi-Fi puede instalarse en distintos tipos de automatismos (excepto barreras automáticas). A continuación indicamos algunas posibilidades:
CORREDERA
BATIENTE
MASTER Wi-Fi FR
MASTER Wi-Fi FR
BASCULANTE
SECCIONALES/CORTINAS
MASTER Wi-Fi FR
MASTER Wi-Fi FR
B - MONTAJE DE LOS DISPOSITIVOS DE PROTECCIÓN
FOTOCÉLULAS NOVA Wi-Fi
- Fije las fotocélulas NOVA Wi-Fi, sobre pilastras o postes a una altura
aproximada de 40÷60 cm del suelo y a una distancia máxima de 10 cm de
la zona de desplazamiento o aplastamiento o inmediatamente después del
espacio dado por una posible costa, a una distancia máxima de 20 metros
de la MASTER Wi-Fi FR.
- Instale el receptor a la sombra o en una posición donde la luz del sol no se
refleje horizontalmente.
- En todos los casos, se sugiere colocar las fotocélulas a la misma altura y
alineadas entre sí.
- Para posicionar correctamente las fotocélulas, haga referencia al manual
de instalación o a la Norma EN12445.
COSTAS TOUCH Wi-Fi
- Fije las costas TOUCH Wi-Fi en las zonas de desplazamiento o
aplastamiento a una distancia máxima de 20 metros de MASTER Wi-Fi FR.
TX RED
- Conecte el transmisor a la costa a una distancia máxima de 20 metros de
MASTER Wi-Fi FR.
INTERMITENTE SPARK Wi-Fi
- Fije el intermitente SPARK Wi-Fi a una distancia máxima de 20 metros de
MASTER Wi-Fi FR, en un lugar donde quede visible.
FOTOCÉLULAS VERTIGO Wi-Fi
- Fije las fotocélulas VERTIGO Wi-Fi en las zonas de desplazamiento o
aplastamiento a una distancia máxima de 20 metros de MASTER Wi-Fi FR.
ATTENCIÓN:
Quitando el alimentación del MASTER Wi-Fi FR por un periodo largo de tiempo, las baterias de las costas TOUCH Wi-Fi, de las
fotocelulas NOVA Wi-Fi y de las fotocelulas VERTIGO Wi-Fi perderan su carga mas rapidamente de lo normal. Mantener siempre los
MASTER Wi-Fi FR correctamente alimentados para garantizar una vida de las baterias de 3 años como declarado por RIB.
Si por ejemplo, todas las noches se quita el alimentación al sistema, la fotocelulas y los burletes de seguridad, siguen buscando el
signal del MASTER Wi-Fi FR, sin encuentrarlo. Por lo tanto la vida de las baterias de estos accesorios pondrà durar menor de un año.
ATENCIÓN:
Si dos MASTER Wi-Fi FR, instalados a una distancia de 20 metros el uno del otro, se actionan a la vez, las señales de comunicación
y comprobación, con los accesorios, pueden sobreponerse e interferir entre sí, actionando el alarma en todo el sistema.
35
E
S
C - LAYOUT
S1
SW1
JP1
JP2
Led bicolor
EDGE PHOT 1-6
J8
J4
J1
J5
BUZZER
J2
12/24V ac/dc
10 9
6 5
+ -
2 1
6 5 4 3 2 1
+ -
MASTER Wi-Fi FR con regleta de bornes cód. ACG6150
1 central antena 433
2 masa antena
3 alimentación negativa a 12/24V ac/dc
4 alimentación positiva a 12/24V ac/dc
5-6 para conectar la central de mando a la entrada del botón de
apertura/cierre total (K BUTTON con cuadro RIB)
J1 => C
ONECTOR PARA CONEXIONES AL CUADRO DE MANDO, A
LAS ENTRADAS A LAS SEGURIDADES
Cable verde => costa EDGE 2
NOTA: esta salida es activada por las costas
almacenados en las posiciones 4-5-6
Cable gris
=> común de los contactos COM
Cable amarillo=> costa EDGE 1
NOTA: esta salida es activada por las costas
almacenados en las posiciones 1-2-3
Cable negro => fotocélula PHOT N.C.
Cable blanco => borne al que debe conectarse el cable
proveniente del botón de mando N.O. ya
presente en la instalación.
Cable marrón => alimentación autotest A-D+ TEST.
J2 => CONECTOR PARA CONEXIONES AL CUADRO DE
MANDO A 12/24V ac/dc, A LA SALIDA DEL INTERMITENTE
(ATENCIÓN A LAS POLARIDADES)
Cable rojo
=> positivo (para conectar al polo positivo de la
salida del intermitente)
Cable negro => negativo (para conectar al polo negativo de la
salida del intermitente)
J4 => BORNES PARA CONEXIONES AL CUADRO DE MANDO
120/230V, A LA SALIDA DEL INTERMITENTE
J5 => REGLETA DE BORNES PARA CONEXIONES SOBRE CUADROS
DE MANDO DE OTRAS MARCAS O RIB CRX
J8 => BORNE PARA CONEXION ANTENA 868,3 MHz
JP1 => A/D+ TEST véase TABLA CUADROS ELECTRÓNICOS RIB
HABILITADOS PARA EL CONTROL AUTOEVALUACIÓN.
-
Jumper selección modalidad AUTOTEST para cuadros de mando
de otras marcas con alimentación AUTOTEST negativa
+/~
Jumper selección modalidad AUTOTEST para cuadros de mando
RIB
JP2
SW1
=> Habilitación/cancelación
códigos de radio para apertura total
=> Microinterruptores de combinación e identificación de costas
y fotocélulas
S1
=> PROG. RX Botón para programación
BUZZER=> Señalización sonora para los estados de instalación,
atención y alarma
LED
DL1 (rojo)
- contacto costas N.C. (EDGE 2)
DL2 (rojo)
- contacto costas N.C. (EDGE 1)
DL3 (rojo)
- contacto fotocélulas N.C. (PHOTO)
DL4 (rojo)
- mando apertura total con botón N.O. ya presente en la
instalación
DL5 (verde) - mando radio apertura total activado
DL6 (amarillo)- presencia de tensión de alimentación 12-24V ca/cc
DL7 (bicolor) - memorización de los códigos de radio para apertura total
y intermitente
LED BICOLOR EDGE PHOT
apagado => funcionamiento regular
verde
=> costa o fotocélula ocupada
rojo/verde => alarma
LED EDGE PHOT 1 - COSTA O FOTOCÉLULA 1
LED EDGE PHOT 2 - COSTA O FOTOCÉLULA 2
LED EDGE PHOT 3 - COSTA O FOTOCÉLULA 3
LED EDGE PHOT 4 - COSTA O FOTOCÉLULA 4
LED EDGE PHOT 5 - COSTA O FOTOCÉLULA 5
LED EDGE PHOT 6 - COSTA O FOTOCÉLULA 6
SW1 MICROINTERRUPTORES - DIP
DIP 1 ON => COSTA O FOTOCÉLULA 1 ACTIVADA
DIP 2 ON => COSTA O FOTOCÉLULA 2 ACTIVADA
DIP 3 ON => COSTA O FOTOCÉLULA 3 ACTIVADA
36
E
S
DIP 4 ON => COSTA O FOTOCÉLULA 4 ACTIVADA
DIP 5 ON => COSTA O FOTOCÉLULA 5 ACTIVADA
DIP 6 ON => COSTA O FOTOCÉLULA 6 ACTIVADA
ATENCIÓN: Cuando efectúa un cambio de posición de los microinterruptores,
presionan la tecla PROG RX por 6 veces, de tal modo que remita la programación
del sistema. Al término, los leds bicolores deben resultar muy apagados.
D - CONEXIÓN DE LA TARJETA MASTER Wi-Fi FR
¡ATENCIÓN!: La utilización del producto puesto adentro de un contenedor en metal puede dar luego a malfuncionamientos del sistema.
En estos casos, se aconseja de utilizar el antenna (cód. ACG5451) y instalarla afuera del contenedor de metal, para obtener una perfecta
recepción/transmision de los signales.
¡ATENCIÓN!: EL USO DE MASTER Wi-Fi FR CON CUADROS ELECTRÓNICOS DE OTRAS MARCAS ES IMPORTANTE SELECCIONAR EN
LOS CUADROS ELECTRÓNICOS LA FUNCIÓN PRE-INTERMITENTE (SI EXISTE).
Se aconseja de mantener el tiempo de cierre automaticos inferior al minuto.
Normalmente, la ficha MASTER Wi-Fi FR, cuando está introducida en el cuadro electrónico RIB, está protegida contra cortocircuitos mediante un fusible
conectado en serie al secundario de alimentación.
En caso de que se utilice la ficha MASTER Wi-Fi FR con otros cuadros electrónicos, compruebe la presencia de las protecciones. En caso de que
no esté presente, conecte en serie un fusible (T) de 200 mA a la alimentación.
- Quite la tensión del cuadro de mando de la automatización.
- Acople o conecte la tarjeta MASTER Wi-Fi FR según el esquema siguiente.
NOTA: El apertura del porton occurre 2 segundos despues haber recibido un commando radio o de la pulsadora. Esto occurre para permitir a la tarjeta
MASTER Wi-Fi FR de averiguar la presencia y el funcionamiento correcto de los accessorios de seguridad memorizados.
*
120/230V ac
EDGE 2
cable verde
COM
cable gris
EDGE 1
cable amarillo
PHOT.N.C. cable negro
BOTÓN DE MANDO
cable blanco
A/D+ TEST cable marrón
!
+
12/24V ac/dc
10 9
65
21
El Sistema Wi-Fi funciona con normalidad
si se encarga de todos los radio-mandos (a
través de su módulo-radio 433 MHz) y mandos
alámbricos (a través de su cable blanco).
En caso di utilización de radio-receptores
y mandos alámbricos ya existentes (por
lo tanto esterior al Sistema Wi-Fi), por un
corecto funcionamiento, se deben conectar
atravez del cable blanco del MASTER Wi-Fi.
654321
+ -
+ 6
5
Contacto mando
apertura total
COM-OPEN/K
4+ 3Alimentación
12/24V ac/dc
-
**
12/24V ac/dc
1 Central
Conexión antena 433,92 MHz
2 Masa antena
ENTRADA EDGE 1 (cable gris COM, cable amarillo EDGE 1) específica de la seguridad de la
costa en APERTURA.
Atención: el eventual puente con cable presente sobre los bornes COM-EDGE de los cuadros de
mando RIB debe ser removido.
!
* Conexión OBLIGATORIA para cuadros con salida intermitente a
120/230V ac
** Conexión OBLIGATORIA para cuadros con salida intermitente a
12/24V ac/dc ¡ATENCIÓN! RESPETE LAS POLARIDADES
La conexion està obligatoria también en el caso no sea instalado un
destellador en el sistema.
ATENCIÓN: Conecte siempre la salida del intermitente de la central de
mando a la tarjeta MASTER Wi-Fi FR en uno de los bornes específicos para
ello, en función de si el intermitente es alimentado a 230V o a los cables del
conector J2 para 12/24V. Si la conexión no se realiza, la puerta no funciona
y el buzzer emite 4 tonos, alertando acerca de la falta de conexión.
ENTRADA FOTOCÉLULAS (cable gris COM, cable negro PHOT específica de las seguridades de
las fotocélulas. Atención: el eventual puente con cable presente sobre los bornes COM-PHOT de
los cuadros de mando RIB debe ser removido.
BOTÓN DE MANDO (cable gris COM, cable blanco BOTÓN N.O.)
Desconecte de cada mandos alámbricos de la central de mando y conéctelo a este cable blanco
de MASTER Wi-Fi FR.
ENTRADA EDGE 2 (cable gris COM, cable amarillo EDGE 2) específica de la seguridad de la
costa en CIERRE.
Atención: el eventual puente con cable presente sobre los bornes COM-EDGE de los cuadros de
mando RIB debe ser removido.
CONEXIÓN DE LA ENTRADA AUTOTEST (cable marrón A/D+ TEST) para respetar la norma
EN13849-2:2008
- Si el cuadro utilizado está dotado de autotest coloque el jumper JP1 como indica la “TABLA
CUADROS ELECTRÓNICOS RIB HABILITADOS PARA EL CONTROL AUTOEVALUACIÓN”
37
E
S
o dependiendo de la alimentación de el cuadro de mando utilizado (ver instrucciones de el cuadro
de mando).
- Conecte la salida autotest del cuadro de mando al borne A/D+ TEST de la tarjeta MASTER Wi-Fi FR
de modo que permita controlar el sistema al final de cada apertura completa de la automatización.
- El cierre se ejecuta sólo si la tarjeta MASTER Wi-Fi FR superó la prueba de control.
- Si el control de la tarjeta MASTER Wi-Fi FR obtuvo un resultado negativo, el cuadro
d e mando bloqueo la automatización, el led bicolor sobre la tarjeta MASTER Wi-Fi FR, vinculado a
la seguridad averiada, parpadea de modo alternado rojo/verde.
El buzzer emite un tono alternado durante 1 minuto, indicando la anomalía.
Frente a un mando, el estado de alarma emitido por el buzzer se renueva por
1 minuto.
Si el cuadro no está dotado de autotest, la prueba de control se ignora.
TABLA CUADROS ELECTRÓNICOS RIB HABILITADOS PARA EL CONTROL AUTOEVALUACIÓN
CUADRO ELECTRÓNICO RIB
CONECTAR EL BORNE A/D+ TEST
AL BORNE
HABILITAR LA FUNCIÓN DE
AUTOEVALUACUÓN MEDIANTE
K2007 / K2007 CRX
S1
T2 - T2 CRX
T2 24V - T2 24V CRX
J - J CRX
BOSS 24V CRX
BOSS 230V CRX
A+ TEST / D+ TEST
A+ TEST
D+ TEST
A+ TEST
D+ TEST
Borne 8
Borne 8
DIP 10
DIP 12
DIP 13
DIP 12
DIP 7
DIP 6
DIP 6
E - ALIMENTACIÓN MASTER Wi-Fi FR
Tras haber efectuado todas las conexiones, alimente el cuadro de mando con
MASTER Wi-Fi FR.
El led amarillo DL6 debe encenderse y el buzzer debe emitir un sonido para indicar
la correcta alimentación.
El led DL7 parpadeará de modo alternado rojo/verde indicando que no hay mandos
a distancia ni intermitente memorizados.
F - IDENTIFICACIÓN DE LAS SEGURIDADES Wi-Fi
ATENCION: ANTES DE LA IDENTIFICACIÓN DE LAS SEGURIDADES,
VERIFICAR SI LAS CENTRAL ESTÁ DISEÑADO PARA UNA O DOS
ENTRADAS PARA CONEXIÓN DE LAS COSTAS.
EJECUTE EL AJUSTE DE JP2 SEGÚN EL NÚMERO DE ENTRADAS PARA
CONEXIÓN DE LAS COSTAS.
COLOQUE EL JUMPER
JP1 SOBRE LA TARJETA
MASTER WI-FI EN POSICIÓN:
+/~
+/~
+/~
+/~
+/~
JP1
+/~
+/~
+/~
- Presione la tecla PROG RX presente en la tarjeta MASTER Wi-Fi FR => el
led bicolor EDGE PHOT 1 se enciende rojo intermitente durante 1 minuto (tiempo
necesario para efectuar la memorización).
- Presione la tecla PROG TX sobre la seguridad con el microinterruptor 1 en
posición ON => sobre la tarjeta MASTER Wi-Fi FR el led bicolor EDGE PHOT
1 cambia de rojo intermitente a verde y un tono de buzzer indica la correcta
memorización de la seguridad; inmediatamente después, el led bicolor EDGE
PHOT 2 se enciende rojo intermitente.
- Si no se memorizan otras seguridades, deje transcurrir un minuto y el led bicolor
EDGE PHOT 2 se apagará, o bien presione 4 veces la tecla PROG. RX para
concluir el procedimiento de memorización => todos los led bicolor EDGE PHOT
deben estar apagados.
PARA MEMORIZAR OTRAS SEGURIDADES
- Después de haber memorizado la primera seguridad, el led bicolor EDGE
PHOT 2 se enciende automáticamente con luz roja intermitente durante 1 minuto
(tiempo necesario para efectuar memorización).
- Presione la tecla PROG. TX sobre la seguridad con el microinterruptor 2 en
posición ON => sobre la MASTER Wi-Fi FR el led bicolor EDGE PHOT 2 cambia
de rojo intermitente a verde intermitente y un tono de buzzer indica la correcta
memorización de la seguridad.
- Lleve a cabo el mismo procedimiento para otras posibles seguridades (hasta
un máximo de 6).
MASTER Wi-Fi FR puede manejar 6 costas de seguridad Wi-Fi que actuan
desde 2 salidas distintas para la gestion de las costas de seguridad.
Cada una de las 2 salidas pueden manejar 3 costas de seguridad.
Solucción que se utiliza cuando el cuadro de maniobra que comanda la cencela
tiene 2 entradas para manejar distintamente las costas de seguridad en abre y
cierre:
EDGE 1 = cable amarillo - costas en abre (LED EDGE/PHOT disponibles de 1 a 3)
EDGE 2 = cable verde - costas en cierre (LED EDGE/PHOT disponibles de 4 a 6)
Cada seguridad Wi-Fi debe estar OBLIGATORIAMENTE identificada colocando en
posición ON un único microinterruptor de los 6 presentes en su circuito (distinto para
cada una de las 6 seguridades). Obviamente, un par de fotocélulas es considerado
una seguridad y, por ello, deberá tener el receptor y el transmisor con el mismo DIP
en posición ON.
IDENTIFIQUE LOS CONTENEDORES DE LAS SEGURIDADES CON EL
NÚMERO DEL MICROINTERRUPTOR ACTIVADO, APLICANDO EL ADHESIVO
NUMERADO SUMINISTRADO EN DOTACIÓN SOBRE LA CARA EXTERIOR DE
CADA CONTENEDOR.
El adhesivo sirve para identificar rápidamente la seguridad que requiere un
mantenimiento.
Nota: Cada seguridad se suministra con los microinterruptores en posición OFF para
evitar que las baterías se descarguen cuando no es utilizada (si están introducidas)
Introduzca las baterías en las seguridades Wi-Fi.
G - MEMORIZACIÓN DE LAS SEGURIDADES
Tras haber efectuado la identificación de las seguridades y haberlas alimentado
mediante las baterías, coloque en posición ON los microinterruptores marcados
con los mismos números que los de las seguridades sobre MASTER Wi-Fi FR para
activar las seguridades que deben memorizarse.
Para efectuar la memorización respete el siguiente procedimiento:
INCLUSIÓN DE OTRAS SEGURIDADES (MAX 6 TOTALI)
Si tras haber efectuado la instalación, decidiese aplicar otras seguridades
(FOTOCÉLULAS O COSTE) para aumentar el estado de seguridad de la puerta,
sugerimos efectuar lo siguiente:
- Quite la tensión a la puerta.
- Fije la seguridad en la posición deseada e identifíquela moviendo el interruptor
interno.
- Lleve a cabo la programación colocando en posición ON un microinterruptor
distinto al de las otras seguridades instaladas e identifique el dispositivo instalado
con el correspondiente adhesivo numerado (véase apartado F - IDENTIFICACIÓN
DE LAS SEGURIDADES Wi-Fi).
- Sobre la tarjeta MASTER Wi-Fi FR coloque en posición ON el microinterruptor
relativo a la seguridad recién incorporada.
- Vuelva a dar tensión a la puerta.
- Realice los procedimientos de memorización y comprobación siguiendo las
indicaciones precedentes.
VERIFICACIÓN DEL CORRECTO FUNCIONAMIENTO DE LAS FOTOCÉLULAS
NOVA Wi-Fi Y VERTIGO Wi-Fi
- Verifique que el microinterruptor seleccionado sobre el transmisor TX NOVA Wi-Fi
sea el mismo que se ha seleccionado sobre el receptor RX NOVA Wi-Fi (ejemplo
1 ON).
- El correcto funcionamiento del TX NOVA Wi-Fi se visualiza a través del led verde
que se enciende durante 10 segundos.
- Presione y libere el botón S3 “PROG. TX” sobre el receptor NOVA Wi-Fi (se activa
un lapso de 3 minutos para poder efectuar la alineación). Si las fotocélulas ya han
38
E
S
s ido alineadas, el led rojo se enciende con luz fija. Si el led rojo está apagado o
parpadea, realice la alineación hasta que dicho led permanezca encendido con
luz fija.
- Después de haber efectuado la alineación compruebe que, al interponer un
obstáculo, el led rojo se apague y, contemporáneamente, el led bicolor EDGE
PHOT asociado, durante la memorización, se encienda con luz verde sobre la
MASTER Wi-Fi FR., mientras dura la interposición.
- Sobre la tarjeta MASTER Wi-Fi FR el led DL3 también debe apagarse indicando
que se ha producido correctamente el cambio del contacto relativo a la entrada
PHOT sobre el cuadro de mando.
- Repita la comprobación sobre las otras fotocélulas NOVA Wi-Fi instaladas.
- Realice una verificación funcional de todas las fotocélulas instaladas activando la
movilización de la automatización y controlando que, al interponer un obstáculo, la
automatización se detenga/invierta su movimiento si se estaba cerrando o bien, se
detenga/continúe la apertura si se estaba abriendo.
VERIFICACIÓN DEL CORRECTO FUNCIONAMIENTO DE LAS COSTAS TOUCH
Wi-Fi
Después de haber efectuado correctamente el calibrado de la costa TOUCH Wi-Fi:
- Presione el contacto de una costa TOUCH Wi-Fi (ejemplo seguridad número 3).
- Compruebe que sobre MASTER Wi-Fi FR el correspondiente led EDGE PHOT
3 realice una intermitencia de color verde y que el respectivo led DL2 se apague
momentáneamente y después se vuelva a encender.
ATENCIÓN: después de haber recibido la primera señal, las otras señales
son ignoradas por 2 segundos. Si una señal llega durante estos 2 segundos,
se producirá simplemente una señalización visual del led EDGE PHOT 3 que
cambiará a color verde.
- Repita la comprobación de la activación del led sobre MASTER Wi-Fi FR
presionando las otras costas TOUCH Wi-Fi instaladas.
- Realice un control final de todas las costas instaladas activando la movilización de
la automatización y controlando que, al impactar con la costa, la automatización se
detenga/invierta el movimiento.
ANTENA
Para comunicar con los dispositivos de seguridad Wi-Fi
de 868MHz, MASTER Wi-Fi FR está provisto de un cable
eléctrico que funciona de antena y que está conectado al
borne J8.
En caso de que sea necesario mejorar la señal de radio (por
ejemplo, con MASTER Wi-Fi FR insertado en los motores
SUPER o con MASTER Wi-Fi FR instalado en un contenedor metálico), conecte la
antena 868,3 MHz (cod. ACG5451) al borne J8 respetando la conexión del cable
central y de la masa y colóquela de modo que sea “visible” por todos los
dispositivos de seguridad.
Para que el sistema funcione correctamente, es necesario que entre
MASTER Wi-Fi FR y los dispositivos de seguridad no haya obstáculos como
paredes de cemento, superficies de hierro, etc., ya que podrían impedir
la comuniación de radio y; por tanto, reducir la carga de la batería de los
dispositivos de seguirdad.
Asimismo, en el caso de aquellos mandos que funcionan a 433,92
MHz, la antena también está conectada (sección de cable en el cuadro
de mando RIB); no obstante, si fuese necesario instalarla para obtener
un mayor alcance, conéctela a los bornes 1-2 para MASTER Wi-Fi FR
CON REGLETA DE BORNES, o bien a los bornes exclusivos para la
conexión de la antena sobre los cuadros de mando RIB.
VERIFICACIÓN DE LA SEÑALIZACIÓN DE ALARMA PARA COSTAS TOUCH Wi-Fi
Compruebe que al extraer una batería del transmisor con microinterruptor (por
ejemplo 3 en posición ON) sobre MASTER Wi-Fi FR se encienda intermitente en rojo
el led bicolor EDGE PHOT 3, mientras que el led DL2 se apaga y el buzzer emite un
sonido cada 3 segundos durante 1 minuto.
Repita la verificación sobre otros posibles costas instaladas.
ATENCIÓN: si al extraer la batería, el buzzer sobre MASTER Wi-Fi FR no suena,
esto indica que el microinterruptor 3 en MASTER Wi-Fi FR se encuentra en posición
OFF (consentimiento no habilitado). Colóquelo en posición ON.
ESTADO DE ATENCIÓN (aviso sustitución de baterías)
El estado de atención (WARNING) advierte al usuario de la inminente necesidad de
sustituir las baterías.
Cuando las baterías casi descargadas alcanzan los 2,3V para NOVA Wi-Fi y 3V para
TOUCH Wi-Fi, la fotocélula del receptor NOVA Wi-Fi o la costa, señala vía radio a
MASTER Wi-Fi FR el estado de batería casi descargada, y activa el BUZZER de
MASTER Wi-Fi FR con un tono cada 3 segundos durante 1 minuto.
El estado de alerta se renueva por 1 minuto ante un mando de la puerta.
El led bicolor sobre MASTER Wi-Fi FR referido a la fotocélula o a la costa cuyas
baterías están casi descargadas, se enciende con luz roja fija.
El intermitente SPARK Wi-Fi (si está disponible) indicará el estado de atención
emitiendo 2 intermitencias consecutivas seguidas de una pausa de 3 segundos
mientras dure la apertura o el cierre de la puerta.
Durante estas señalizaciones el estado sistema aún se encuentra en funcionamiento,
pero es oportuno sustituir con la mayor brevedad las baterías, evitando el bloqueo
funcional de la puerta, el cual se produce cuando las baterías alcanzan los 2,0 V
para NOVA Wi-Fi y 2,7 V para TOUCH Wi-Fi.
ESTADO DE ALARMA (baterías completamente descargadas o avería)
El estado de alarma se activa cuando las baterías alcanzan la descarga completa
(2,0 V para NOVA Wi-Fi y 2,7V para TOUCH Wi-Fi) o en caso de avería.
Sobre MASTER Wi-Fi FR los led DL2 y DL3 se apagan y MASTER Wi-Fi FR bloquea
la automatización.
Sobre MASTER Wi-Fi FR, el led vinculado a la fotocélula o a la costa cuyas baterías
están completamente descargadas o ante la avería de la fotocélula o de la costa,
parpadea rojo. El buzzer emite un tono cada 3 segundos durante 1 minuto, mientras
que el intermitente SPARK Wi-Fi (si está disponible) señalará el estado de alarma
emitiendo 2 intermitencias consecutivas seguidas de una pausa de 3 segundos
durante un minuto, llamando la atención del usuario, quien deberá sustituir las
baterías o reparar la avería.
Frente a un mando de la puerta, el estado de alarma se renueva por 1 minuto.
PROCEDIMIENTO DE CANCELACIÓN TOTAL DE LAS SEGURIDADES
MEMORIZADAS
Para realizar la cancelación total de las seguridades (NOVA Wi-FI y TOUCH Wi-FI)
12/24V FR,
ac/dc basta presionar y mantener
registradas en la memoria de MASTER Wi-Fi
presionada la tecla PROG. RX durante 10 segundos.
Finalizados estos 10 segundos, todos los led bicolor (de EDGE PHOT 1 a EDGE
PHOT 6) parpadearán alternativamente 6 veces indicando que se ha efectuado
exitosamente la cancelación.
Al final, los led EDGE PHOT bicolor y los led DL2 y DL3 se apagarán.
ATENCIÓN: CON LED DL1, DL2 Y DL3 APAGADOS, LA AUTOMATIZACIÓN NO
PUEDE FUNCIONAR.
VERIFICACIÓN DE LA SEÑALIZACIÓN DE ALARMA DE LAS FOTOCÉLULAS
NOVA Wi-Fi Y VERTIGO Wi-Fi
Compruebe que al extraer una batería del receptor fotocélula con microinterruptor
(por ejemplo 3 en posición ON) y que, al ejecutar un mando de apertura de la puerta,
se encienda el led bicolor 3 sobre la MASTER Wi-Fi FR de modo alternado verde/
rojo, que los led DL2 y DL3 se apaguen y que el buzzer emita un sonido alternado
durante 1 minuto.
Repita la verificación sobre otros posibles receptores de las fotocélulas instaladas.
ATENCIÓN: si al extraer una batería y al ejecutar un mando de apertura de la puerta,
el buzzer sobre MASTER Wi-Fi FR no suena, esto indica que el microinterruptor 3
en MASTER Wi-Fi FR se encuentra en posición OFF (consentimiento no habilitado).
Colóquelo en posición ON.
PROCEDIMIENTO DE CANCELACIÓN INDIVIDUAL DE LAS SEGURIDADES
(FOTOCÉLULA O COSTA)
Para cancelar una seguridad memorizada de manera individual sobre MASTER
Wi-Fi FR, proceda de la siguiente manera:
- Presione una o más veces la tecla PROG. RX para seleccionar el led bicolor EDGE
PHOT, que parpadea con luz verde, correspondiente a la seguridad que se desea
eliminar.
- Una vez seleccionada la seguridad, presione y mantenga presionada la tecla
PROG. RX durante 10 segundos.
- Al finalizar estos 10 segundos, el led bicolor EDGE PHOT parpadea 6 veces de
modo alternado rojo/verde, indicando que se ha efectuado
exitosamente la cancelación.
39
ATENCIÓN: Coloque en posición OFF el microinterruptor relativo a la seguridad
eliminada, y después ejecute una exploración de los led bicolor presionando 6
veces la tecla PROG. RX. IMPORTANTE: Quite las baterías de la seguridad
eliminada.
E
S
SUSTITUCIÓN DE LAS BATERÍAS
La duración de las baterías tipo AA de 1,5V aplicadas a las seguridades es de 3
años aproximadamente.
En el caso de remplazo de las baterias, no es necesario reprogramar las fotocelulas,
y ni siguiera todos los otros dispositivos RIB Wi-Fi.
- Identifique cuál es la seguridad que tiene las baterías descargadas, observando los
led EDGE-PHOT sobre la tarjeta MASTER Wi-Fi FR.
- Identifique mediante el número situado al lado del led bicolor EDGE PHOT que
parpadea rojo o que permanece encendido con luz roja fija el número de la
seguridad que presenta las baterías descargadas.
- Localice el dispositivo NOVA Wi-Fi o TOUCH Wi-Fi con el adhesivo con el número
de identificación correspondiente al número del led bicolor que está en estado de
alarma en la tarjeta MASTER Wi-Fi FR.
- Sustituya las baterías respetando las polaridades.
- Presione la tecla PROG TX sobre NOVA Wi-Fi o TOUCH Wi-Fi para volver a activar
el funcionamiento de MASTER Wi-Fi FR.
- El buzzer presente en la MASTER Wi-Fi FR se apagará y los led DL2- DL3 (en
caso de estado de alarma) se encenderán. El led bicolor vinculado a la seguridad
a la cual se le han sustituido las baterías se apagará.
- La automatización está lista para volver a funcionar en total seguridad.
ATENCIÓN: Recuerde que las baterías deben eliminarse conforme a las normas
vigentes. En caso de desguace de las seguridades, recuerde extraer las baterías
tipo AA y eliminarlas conforme a las normas vigentes.
H - PROGRAMACIÓN INTERMITENTE SPARK Wi-Fi
- Presione y mantenga presionado por al menos 3 segundos la tecla PROG. RX
sobre MASTER Wi-Fi FR.
- Al liberar la tecla PROG. RX el led bicolor DL7 comienza a parpadear con luz roja
durante 10 segundos.
- Presione la tecla S4 PROG. TX sobre el intermitente SPARK Wi-Fi para enviar la
señal de radio a MASTER Wi-Fi FR.
- La correcta memorización queda evidenciada por un tono de buzzer y por el led
bicolor DL7 que cambia de rojo a verde sobre MASTER Wi-Fi FR, mientras que el
led rojo DL7 sobre la tarjeta SPARK Wi-Fi parpadea 3 veces.
- Para concluir con el procedimiento de programación deje transcurrir 10 segundos,
o bien presione un instante la tecla PROG. RX sobre MASTER Wi-Fi FR.
- Vuelva a montar la protección.
- Monte el difusor y fíjelo con los tornillos suministrados en dotación.
MASTER Wi-Fi FR puede memorizar mas de un destelleante.
Cada destelleante SPARK Wi-Fi, durante la memorización, recibe el mismo codigo
enviado por el MASTER Wi-Fi FR en lo cual está acoplado.
Cuando el MASTER Wi-Fi FR viene activado por un comando, eso transmite su
codigo unico a todos los destelladores acoplados que por lo tanto comenzarán a
relampaguear en perfecta sincronía.
VERIFICACIÓN FUNCIONAL
Ejecute un mando de la puerta y compruebe la correcta intermitencia del SPARK
Wi-Fi.
- Presione y mantenga presionado el botón PROG RX durante al menos 3 segundos.
Al liberarlo, sobre MASTER Wi-Fi FR, el led DL7 bicolor se activa con luz roja
intermitente por 10 segundos. Durante este tiempo basta presionar una de las
teclas sobre el transmisor para memorizar el código.
- MASTER Wi-Fi FR, además del código, memoriza también el canal que se
desea utilizar. Por ello, preste atención al botón del mando a distancia que
presiona durante el procedimiento de memorización de los códigos, pues
será el que activará la apertura total de ahora en más.
- Si no se envía ningún código, después de 10 segundos, el led DL7 bicolor
rojo del MASTER Wi-Fi FR se apaga indicando la salida del procedimiento de
programación. El led DL7 bicolor parpadea de modo alternado verde/rojo indicando
la ausencia de códigos en la memoria.
- La correcta memorización del código queda evidenciada por el led DL7 bicolor
que se enciende con luz verde durante 500ms y por un tono emitido por el buzzer.
- Después de haber memorizado el primer código, el tiempo útil para la memorización
se renueva por otros 10 segundos y es posible memorizar otros códigos.
- Para concluir con el procedimiento de memorización de los códigos basta dejar
transcurrir 10 segundos hasta que se apaga el led DL7 que parpadea con luz roja.
Como alternativa, puede presionar un instante el botón PROG RX sobre MASTER
Wi-Fi FR y, también en este caso, el led DL7 que parpadea con luz roja, s
e apaga para indicar que el procedimiento de memorización ha finalizado.
Con el led DL7 bicolor apagado, MASTER Wi-Fi FR está lista para funcionar.
Presione la tecla de un mando a distancia memorizado anteriormente. El led verde
DL7 sobre MASTER Wi-Fi FR se enciende un instante indicando el reconocimiento
de un código válido. Después de 2 segundos se enciende para un momento el led
DL5, en el mismo momento se ordena la apertura total.
Nota: Si presionando una tecla del mando a distancia se enciende por un instante
el led DL7 bicolor de color rojo, esto significa que la tecla/código no está presente
en la memoria y que, por consiguiente, debe efectuarse el procedimiento de
memorización desde el comienzo.
PROCEDIMIENTO DE CANCELACIÓN TOTAL DE LOS CÓDIGOS
- Posicione el puente JP2 como indica el dibujo:
- Presione y libere el botón PROG RX de MASTER Wi-Fi FR. El led DL7 bicolor
rojo se enciende por 0,5 segundos y después permanece apagado confirmando la
cancelación total de los códigos.
- Posicione el puente JP2 como indica el dibujo:
- Posicione el puente JP2 como indica el dibujo:
- El led DL7 comienza a parpadear de modo alternado verde/rojo indicando el estado
de memoria vacía.
Nota: el puente JP2 durante el funcionamiento normal, debe estar colocado como
indica el dibujo:
SEÑALIZACIÓN DE MEMORIA SATURADA
Si se presiona y mantiene presionado el botón PROG RX sobre MASTER Wi-Fi FR
durante un mínimo de 3 segundos y después se libera, el led bicolor DL7 parpadea
6 veces con luz verde, indicando que la memoria está llena (máx.100 códigos).
PROGRAMACIÓN MANDOS A DISTANCIA Y SELECTOR BLOCK Wi-Fi
PARA APERTURA TOTAL (máximo 100 códigos)
Mediante el siguiente procedimiento es posible memorizar en MASTER Wi-Fi FR los
siguientes mandos a distancia:
SUN BICANAL 433 MHz
SUN TETRACANAL 433 MHz
SUN CLONE BICANAL 433 MHz
SUN CLONE TETRACANAL 433 MHz
SELECTOR A LLAVE BLOCK Wi-Fi 433 MHz
Cód. ACG6052
Cód. ACG6054
Cód. ACG6056
Cód. ACG6058
Cód. ACG6098
Para descargar el video de la instalación, escriba este dirección
en su browser, o, leiga el codigo QR con su telefono mobil:
http://www.youtube.com/user/RIBSRL?feature=mhee
Al encender MASTER Wi-Fi FR el led amarillo DL6 se ilumina
- Contemporáneamente se emite un tono del buzzer que indica el correcto estado
de alimentación.
a - Si la memoria sobre MASTER Wi-Fi FR está vacía (versión estándar) el led
bicolor DL7 parpadea de modo alternado verde/rojo.
b - Si en la memoria ya hay códigos presentes, el led DL7 bicolor permanece
apagado (realice una cancelación total – véase apartado PROCEDIMIENTO
DE CANCELACIÓN TOTAL DE LOS CÓDIGOS).
40
E
S
EN CASO DE INCONVENIENTES
SÍNTOMA
COMPROBACIÓN
La puerta no se mueve, el “buzzer” emite un tono alternado, y uno de los LED de dos colores se vuelve
verde y rojo alternativamente
Si dos MASTER Wi-Fi FR, instalados a una distancia de 20 metros el uno del otro, se actionan a la vez, las
señales de comunicación y comprobación, con los accesorios, pueden sobreponerse e interferir entre sí,
actionando el alarma en todo el sistema. Còloque los dos MASTER Wi-Fi FR a distancia de 20 m uno del otro.
La puerta no se mueve, el “buzzer” emite un tono alternado, y uno de los LED de dos colores se vuelve
verde y rojo alternativamente, O BIEN
la puerta intenta abrir / cerrar y luego se detiene, el “buzzer” y uno de los LED de dos colores se vuelve
verde y rojo alternativamente.
La falta de supervisión entre el MASTER Wi-Fi FR y una fotocélula o una banda de seguridad:
- Conecte una antena 868MHz (código ACG5451) a MASTER Wi-Fi FR para asegurar un diálogo
adecuado entre el MASTER Wi-Fi FR y los dispositivos de seguridad instalados.
Advertencia: La antena deberá ser colocada a la vista de todos los dispositivos de seguridad
instalados.
Si el mensaje persiste, compruebe el valor de las pilas y cámbielas si no es apropiado.
Todos los led de la tarjeta MASTER Wi-Fi FR están apagados
Compruebe la presencia de tensión 12 o 24 V ca/cc en los bornes de alimentación del MASTER Wi-Fi FR
Durante la memorización de las seguridades el buzzer emite un tono para 3/5 segundos
Se intentó memorizar una seguridad con microinterrupteur erróneo.
Comprobar que el led bicolor que emite intermitencias sobre MASTER Wi-Fi FR corresponda al
microinterrupteur presente sobre la seguridad que debe memorizarse.
Durante la memorización de las seguridades el buzzer emite 2 tonos
Seguridad ya presente en la memoria
Actuando un mando el buzzer emite 3 tonos
-N
o se ha memorizado ninguna seguridad; memorice al menos una, O BIEN
- L os DIP vinculados a las seguridades memorizadas sobre la tarjeta MASTER Wi-Fi FR están en OFF.
Colóquelos en posición ON
Actuando un mando de buzzer emite 4 tonos
Faltan posibles cableados entre MASTER Wi-Fi FR y la tarjeta de mando de la puerta:
-C
ables desconectados conexión intermitente a la tarjeta, O BIEN
-C
able desconectado conexión costa a la tarjeta, O BIEN
-C
able desconectado conexión fotocélula a la tarjeta
El buzzer emite 5 tonos cuando se presiona la costa conectada al receptor de la fotocélula
Error de configuración contacto costa conectada al receptor de la fotocélula
Actuando un mando el buzzer emite 5 tonos
-R
esistencia no conectada en serie al contacto N.C. de la costa conectada al receptor de la fotocélula,
O BIEN
-C
ables desconectados sobre la costa con contacto N.O., O BIEN
-R
esistencia no conectada en serie al contacto N.C. de la costa, O BIEN
-C
ables desconectados sobre la costa con contacto N.O. conectada al receptor de la fotocélula
El buzzer emite un tono cada 3 segundos y el intermitente durante el funcionamiento de la puerta emite
2 intermitencias consecutivas seguidas de una pausa de 3 segundos durante 1 minuto y uno del led
bicolor se enciende rojo fijo.
Sustituya en la mayor brevedad posible las baterías de la/s fotocélula/s o de la/s costa/s pues están
casi descargadas
La puerta no se mueve, el buzzer emite un tono cada 3 segundos y el intermitente emite 2 intermitencias
consecutivas seguidas de una pausa de 3 segundos durante 1 minuto y uno del led bicolor se enciende
rojo intermitente
Sustituya las baterías de la/s fotocélula/s o de la/s costa/s pues están descargadas.
El led DL2 está apagado y uno de los led EDGE bicolor se enciende con luz fija verde.
-C
ables desconectados sobre la costa con contacto N.C., O BIEN
-V
erifique la presencia de la resistencia de 8,2kΩ en serie al contacto N.O. de la costa conectada al
receptor de la fotocélula
Quitando las baterías de la costa, el buzzer no suena
Verifique sobre MASTER Wi-Fi FR que el microinterruptor correspondiente a la costa esté colocado en
posición ON
La puerta no se abre ni se cierra y uno de los led bicolor está encendido con luz verde
- F otocélula no alineada, ocupada o baterías descargadas sobre el transmisor fotocélula, O BIEN
-R
esistencia de 8,2 kΩ no conectada en serie al contacto N.C. o en paralelo al contacto N.O. de la costa
conectada sobre el transmisor fotocélula, O BIEN
-R
esistencia de 8,2 kΩ no conectada en paralelo al contacto N.O. de la costa conectada sobre el
receptor de la fotocélula
La puerta no se abre ni se cierra, el buzzer emite un tono cada 3 segundos y el intermitente emite 2
intermitencias consecutivas seguidas de una pausa de 3 segundos durante 1 minuto y uno de los led
bicolor se enciende rojo intermitente
Baterías descargadas sobre el receptor de la fotocélula o de la costa
La costa conectada al transmisor o receptor fotocélula no actúa como seguridad
Compruebe la correcta configuración de los jumper sobre el transmisor o sobre el receptor de la
fotocélula. Si los jumpers se definen correctamente, retirar y volver a poner las baterías.
CARACTERÍSTICAS TÉCNICAS
- ALIMENTACIÓN
12/24 Vac/dc
- TENSIÓN APLICABLE AL BORNE J4
120/220/230V 50/60Hz
- TENSIÓN APLICABLE AL BORNE J2
12/24V ac/dc
- ABSORCIÓN EN REPOSO
40 mA
- ABSORCIÓN MÁXIMO
100 mA
- TEMPERATURA DE FUNCIONAMIENTO -20°C ÷ +60°C
- DIMENSIONES
125x55x28 mm
- PESO
0,090 kg
DATOS TÉCNICOS SEÑAL DE RADIOFRECUENCIA SEGURIDADES
Y SEÑALIZACIÓN
- FRECUENCIA
868,3 MHz
- SENSIBILIDAD
-108 dBm
- POTENCIA DE EMISIÓN
- TIPO DE MODULACIÓN
- ALCANCE
<25 mW
FSK
20 m en espacio libre
DATOS TÉCNICOS SEÑAL RADIOFRECUENCIA MANDOS DE
ACTIVACIÓN
- FRECUENCIA
433,92 MHz
- SENSIBILIDAD
-107 dBm
- TIPO DE MODULACIÓN
OOK
- ALCANCE
100 m en espacio libre con antena
41
NOTES
42
43
44
45
46
R.I.B. S.r.l.
25014 Castenedolo - Brescia - Italy
Via Matteotti, 162
Tel. ++39.030.2135811
Fax ++39.030.21358279 - 21358278
www.ribind.it - [email protected]
AZIENDA CON SISTEMA
DI QUALITÀ CERTIFICATO
DA DNV
COMPANY WITH QUALITY
SYSTEM CERTIFIED
BY DNV
DICHIARAZIONE DI CONFORMITÁ - DÉCLARATION DE CONFORMITÉ
DECLARATION OF COMPLIANCE - DECLARACIÓN DE CONFORMIDAD
Dichiariamo sotto la nostra responsabilità che MASTER Wi-Fi FR è conforme alle seguenti norme e Direttive:
MASTER Wi-Fi FR se conforme aux normes suivantes:
We declare under our responsibility that MASTER Wi-Fi FR is conform to the following standards:
Wir erklaeren das MASTER Wi-Fi FR den folgenden EN-Normen entspricht:
Declaramos bajo nuestra responsabilidad que MASTER Wi-Fi FR ed conforme a la siguientes normas y disposiciones:
EN 12978
EN 55014-1
EN 55014-2
EN 60335-1
EN 61000-3-2
EN 61000-3-3
2009
2012
2009
2013
2011
2009
EN 61000-6-1
EN 61000-6-2
EN 61000-6-3
EN 61000-6-4
EN 300 220-1
EN 301 489-1
2007
2006
2012
2012
(2012)
(2011)
EN 301 489-3
EN 60950-1
(2012)
(2012)
Inoltre permette un’installazione a Norme - Permit, en plus, une installation selon les normes suivants
You can also install according to the following rules - Desweiteren genehmigt es eine Installation der folgenden Normen
Además permite una instalación según las Normas:
EN 13849-2 2013 - EN 13241-1 2011
Come richiesto dalle seguenti Direttive - Conformément aux Directives
As is provided by the following Directives - Gemaß den folgenden Richtlinien
Tal y como requerido por las siguientes Disposiciones:
89/106/EEC - 1999/5/EC - 2004/108/CE - 2006/95/CE
Il presente prodotto non può funzionare in modo indipendente ed è destinato ad essere incorporato in un impianto costituito da ulteriori elementi.
Rientra perciò nell’Art. 6 paragrafo 2 della Direttiva 2006/42/CE (Macchine) e successive modifiche, per cui segnaliamo il divieto di messa in
servizio prima che l’impianto sia stato dichiarato conforme alle disposizioni della Direttiva.
Le présent dispositif ne peut fonctionner de manière indépendante, étant prévu pour être intégré à une installation constituée d’autres éléments. Aussi
rentre-t-il dans le champ d’application de l’art. 6, paragraphe 2 de la Directive machines 2006/42/CEE et de ses modifications successives. Sa mise
en service est interdite avant que l’installation ait été déclarée conforme aux dispositions prévues par la Directive.
This product can not work alone and was designed to be fitted into a system made up of various other elements. Hence, it falls within Article 6,
Paragraph 2 of the EC-Directive 2006/42 (Machines) and following modifications, to which respect we point out the ban on its putting into service
before being found compliant with what is provided by the Directive.
Dieses Produkt kann nicht allein funktionieren und wurde konstruiert, um in einen von anderen Bestandteilen zusammengesetzten System eingebaut
zu werden. Das Produkt fällt deswegen unter Artikel 6, Paragraph 2 der EWG-Richtlinie 2006/42 (Maschinen) und folgenden.
El presente producto no puede funcionar de manera independiente y está destinado a ser incorporado en un equipo constituido por ulteriores
elementos. Entra por lo tanto en el Art. 6 párrafo 2 de la Directiva 2006/42/CEE (Máquinas) y sucesivas modificaciones, por lo que señalamos la
prohibición de puesta en servicio antes de que el equipo haya sido declarado conforme con las disposiciones de la Directiva.
Legal Representative
(Rasconi Antonio)
47
26/07/2010
MASTER Wi-Fi FR
TOUCH
RED
BLOCK Wi-Fi
Selettore a chiave via radio
Sélecteur à clé via radio
Key Selector operating by radio
Funkgesteuerter Schlüsselwählschalter
Selector de llave vía radio
Code ACG6098
SPARK Wi-Fi
Lampeggiatore via radio
Clignoteur via radio
Blinker operating by radio
Funkgesteuertes Blinker
Intermitente vía radio
Code ACG7064
Fotocellule via radio
Photocellules via radio
Photocells operating by radio
Funkgesteuerte Fotozellen
Fotocélulas vía radio
Code ACG8037
Cavo di alimentazione.
L’unico cavo necessario.
Fils d’alimentation.
L’unique fil nécessaire.
Power Supply cable.
The only one required.
Netzanschlusskabel. Das
einzige erforderliche Kabel.
Cable de alimentación.
Único cable necesario.
VERTIGO Wi-Fi
Fotocellule verticali senza fili
sostitutive della costa.
Photocellules verticales sans fil pour
remplacer la barre palpeuse.
Wireless vertical photocells
substituting the sensitive edge.
Kabellose vertikale Fotozelle ersetzt
die Schaltleisten.
Fotocélulas verticales sin cables para
reemplazar a la costa.
VERTIGO Wi-Fi 8 - Code ACG8042
VERTIGO Wi-Fi 10 - Code ACG8043
MASTER Wi-Fi FR
Gestisce via radio tutti gli accessori di comando, protezione
e segnalazione del cancello
Gère par onde radio tous les accessoires de commande,
protection et signal du portail
It manages by radio all command, protection and signalling
devices of the gate
Funksteuerung von allen Torbefehlen, Schutz- und
Signalzubehörteilen
Gestiona vía radio todos los accesorios de mando, protección
y señalización de la cancela
con morsettiera
avec bornes à visser
with terminal block
mit Endblockierung
con regleta
Code ACG6150
SUN 2CH
SUN CLONE 2CH
Code ACG6052
Code ACG6056
SUN 4CH
SUN CLONE 4CH
Code ACG6054
Code ACG6058
TOUCH Wi-Fi
Costa meccanica via radio
Barre palpeuse via radio
Mechanical strip operating by radio
Funkgesteuerte mechanische
Kontaktleiste
Costa mecánica vía radio
Code ACG3016
Questo prodotto è stato completamente progettato e costruito in Italia · Ce produit a été complètement développé et fabriqué en Italie · This product has been completely
developed and built in Italy · Dieses Produkt wurde komplett in Italien entwickelt und hergestellt · Artìculo totalmente proyectado y producido en Italia
25014 CASTENEDOLO (BS) - ITALY
Via Matteotti, 162
Tel. +39.030.2135811
Fax +39.030.21358279
www.ribind.it - [email protected]
Cod. CVA2038 - 16052013 - Rev. 06
NOVA Wi-Fi
Costa meccanica
Barre palpeuse
Mechanical strip
Mechanische
Kontaktleiste
Costa mecánica
Code ACG3015
Trasmettitore radio RED
Transmetteur radio RED
Radio transmitter
Radio RED - Sender
Transmisor radio RED
Code ACG6202