1
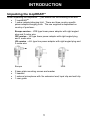
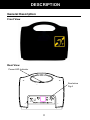
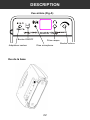
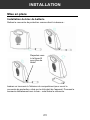
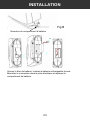
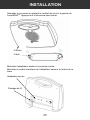
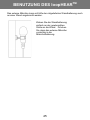
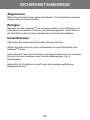
LH100
Page 1
Page 18
Deutsch Page 34
Página 52
CONTENTS
CONTENTS
1
INTRODUCTION
Unpacking the loopHEARTM
2
3
DESCRIPTION
4
INSTALLATION
Setting Up
Locating the loopHEARTM
6
6
9
USING THE loopHEARTM
Turn the loopHEARTM On
Turn the loopHEARTM Off
Using the Headset
Using the External Microphone
10
10
10
10
10
TROUBLESHOOTING
12
SAFETY INFORMATION
13
GUARANTEE
14
RECYCLING DIRECTIVES
16
68
1
INTRODUCTION
Congratulations on purchasing your GeemarcTM loopHEARTM. This is a
portable induction loop system that can be used in a variety of locations,
both public and private.
This tough but light unit is easily transported and an integral battery
enables it to be freestanding. This battery is both replaceable and
rechargeable and long usage can be expected (up to 24 hours). The loop
is contained within the unit hence there are no trailing wires. The
loopHEARTM will cover an area of approximately 1m2 /3.3ft2. There is an
integral microphone that picks up speech and conversations. An external
microphone may be added if required (supplied). This induction loop
system is designed to assist hearing aid users by transmitting direct to their
telecoil equipped hearing aid (which must be switched to the ‘T’ position).
Note: users of digital hearing aids must make sure their aids have
been programmed for use with the ‘T’ setting.
The outer carton has been specially designed as a handy carrying case. It
is recommended to retain this carrying case to enable safe transportation
when transporting the loopHEARTM.
Its is important that you read the instructions below in order to use your
GeemarcTM loopHEARTM to its full potential. Keep this user guide in a safe
place for future reference.
2
INTRODUCTION
Unpacking the loopHEARTM
When unpacking the loopHEARTM, you should find the following in the box:
• 1 loopHEARTM
• 1 power adaptor/charging Unit. There are three country specific
power adaptor/charging units. The one supplied is dependant on
country of purchase Europe version – VDE type linear power adaptor with right angled
plug and 3 metre wire
UK version – UK type linear power adaptor with right angled plug
and 3 metre wire
US version – cUL type line power adaptor with right angled plug and
3 metre wire
Europe
•
•
•
•
UK
USA
2 base plate mounting screws and washer
1 headset
1 external microphone with 3m extension lead, lapel clip and wall clip
1 user guide
3
DESCRIPTION
General Description
Front View
Rear View
Power LED Indicator
See below
Fig A
4
DESCRIPTION
Rear View (Fig A)
Headset Volume
DC Power
EXT mic jack
Headset jack
ON/OFF switch
Base View
Removable Base Plate
5
INSTALLATION
Setting Up
Battery Charging
Remove the base plate from the unit as shown below:
See Fig. B for
further detail
Insert a screwdriver into the opening of the catch mechanism. This is found
on the bottom right of the base plate. Push the catch gently with the
screwdriver - this will release the base plate. Lift the loopHEARTM unit off the
base plate.
6
INSTALLATION
Fig B
Opening of the catch mechanism
Remove the battery door. Insert the supplied rechargeable battery, plug the
connector into the socket and replace the battery door.
7
INSTALLATION
Replace the base plate by placing the hook found on the bottom left of the
loopHEARTM into the catch on the base plate. Press the loopHEARTM down
gently until you hear a click.:
Hook
Catch
Plug the power cable into the power socket found on the rear of the unit.
Plug the adaptor into the mains supply and switch the supply on.
Strain Relief
8
INSTALLATION
Please use the strain relief mechanism as displayed. This provides extra
protection for the cable at the connection point. It will extend the life of the
power cable and reinforce the connection to the equipment.
The loopHEARTM will need to charge for 4 hours before its first use. The
power indicator will blink red whilst the battery is charging. When the power
indicator is blinking green, the battery is fully charged.
Locating the loopHEAR TM
In order to receive the optimal sound from the loopHEARTM, the ideal location
is facing the user. There are two options when locating the loopHEARTM.
Fully Portable
The loopHEARTM can be used as a fully portable unit with or without the base
plate attached. It can be used in a variety of locations with no setup required
and can be used immediately.
Semi Fixed
If you want to ensure the loopHEARTM stays in one place then it can be used
as a semi fixed unit as follows:
1) Choose the location to fix the loopHEARTM. Please bear in mind the range
of coverage available (see below). Ensure you make full use of it
2) Remove the base plate – as described in Battery Charging above
3) Screw the base plate to the table or desktop with the screws provided
4) Replace the base plate – as described in Battery Charging above
LH100
1m
60°
9
USING THE loopHEARTM
Turn the loopHEARTM On
Turn the power switch found at the rear of the unit to the I position. The
power indicator lights up (solid green if the power adaptor is not plugged in,
blinking green if it is plugged in).
When the battery is weak, the indicator will light up red (solid red if the power
adaptor is not plugged in, blinking red if it is plugged in).
Plug in the power adaptor to recharge the battery.
Turn the loopHEARTM Off
After use, turn off by setting the power switch at the back of the unit to the 0
position.
Using the Headset
A headset is supplied for hearing impaired
users who do not use a hearing aid or do
not have a ‘T’ switch on their hearing aid.
Simply, plug the headset into the
HEADSET jack (3.5mm), found at the rear
of the loopHEARTM unit. The volume can
be adjusted by using the volume knob also
found at the rear of the unit (turn knob
clockwise to increase volume).
Using the External Microphone
Plug the supplied microphone into the MIC JACK at the back of unit. The
external microphone will now override the built-in microphone. The indicator
will light up red when you speak to the built-in microphone or external
microphone.
The external microphone has a clip.
This is extremely useful for attaching
to your lapel as illustrated.
10
USING THE loopHEARTM
The external microphone can also be wall mounted with the wall clip supplied.
Simply stick the wall clip to the wall
in the most convenient location.
Gently push the external
microphone into the microphone
holder.
11
TROUBLESHOOTING
The RED LED is flashing
• Charge the battery
The loopHEARTM keeps on switching off
• Make sure that the batteries are fully charged
You cannot hear clearly due to interference or you cannot hear at all
• .Make sure the loopHEARTM is switched on and facing you
• .Move the loopHEARTM closer to you
BATTERY USAGE:
To ensure that your loopHear™ is always ready for use please follow the
recommendations below:
•
•
•
Always switch off when not in use
Always recharge the batteries after continuous use for more than 6
hours or when the red LED is ON
Recharge the batteries every four months if the unit has been
switched OFF for long periods of time
As a rough guide the battery will allow the following usage depending on the
volume levels and ambient noise:
• STANDBY WHEN TURNED OFF
4 MONTHS
• STANDBY WHEN TURNED ON BUT NOT IN USE
2 DAYS
• IN CONTINUOUS USE
8 HOURS
FROM FULLY CHARGED BATTERY
12
SAFETY INFORMATION
General
Do not open the unit. Contact the helpline for all repairs.
Cleaning
Clean the loopHEARTM with a soft cloth. Never use polish or cleaning agents
- they could damage the finish or the electronics inside.
Environmental
Do not expose to direct sunlight.
Always ensure there is a free flow of air over the surfaces of the loopHEARTM
Do not place any part of your product in water and do not use it in damp or
humid conditions e.g. bathrooms.
Do not expose your product to fire or other hazardous conditions.
13
GUARANTEE
From the moment your GeemarcTM product is purchased, GeemarcTM
guarantee it for the period of one year. During this time, all repairs or
replacements (at our discretion) are free of charge. Should you experience a
problem then contact our help line or visit our website at www.geemarc.com.
The guarantee does not cover accidents, negligence or breakages to any
parts. The product must not be tampered with or taken apart by anyone who
is not an authorised GeemarcTM representative. The GeemarcTM guarantee in
no way limits your legal rights.
IMPORTANT: YOUR RECEIPT IS PART OF YOUR GUARANTEE AND
MUST BE RETAINED AND PRODUCED IN THE EVENT OF A WARRANTY
CLAIM.
Please note: The guarantee applies to
the United Kingdom only
DECLARATION: GeemarcTM Telecom SA hereby declares that this
product is in compliance with the essential requirements and other
relevant provisions of the Radio and Telecommunications Terminal
Equipment Directive 1999/5/EEC and in particular article 3 section 1a,
1b and section 2.
The declaration of conformity may be consulted at www.geemarc.com
14
GUARANTEE
Electrical connection: The apparatus is designed to operate from a 230V
50Hz supply only. (Classified as ‘hazardous voltage’ according to EN60950
standard).
15
RECYCLING DIRECTIVES
The WEEE (Waste Electrical and Electronic Equipment) has been put in
place for the products at the end of their useful life are recycled in the best
way.
When this product is finished with, please do not put it in your domestic
waste bin.
Please use one of the following disposal options:
- Remove the batteries and deposit them in an appropriate WEEE skip.
Deposit the product in an appropriate WEEE skip.
- Or, hand the old product to the retailer. If you purchase a new one, they
should accept it.
Thus if you respect these instructions you ensure human health and
environmental protection.
For product support and help visit our website at www.geemarc.com
Telephone 01707 384438
Or fax 01707 372529
16
17
SOMMAIRE
SOMMAIRE
18
INTRODUCTION
Contenu du colis
19
20
DESCRIPTION
21
INSTALLATION
Mise en place
Utilisation du LoopHEARTM
23
23
26
FONCTIONNEMENT
Allummez le LoopHEARTM
Eteindre le LoopHEARTM
Utilisation du casque
Utilisation du microphone externe
27
27
27
27
27
PROBLEMES EVENTUELS
29
RECOMMANDATIONS
30
INFORMATIONS GENERALES
31
68
18
INTRODUCTION
Félicitation pour l’achat de votre Geemarc LoopHEARTM. Le loopHEAR
est une boucle d’induction mobile utilisable dans tous lieux publics et
professionnels
Le LoopHEAR est très facile à transporter d’autant plus qu’il est doté
d’une batterie intégré, remplaçable et rechargeable, avec une autonomie
de 24 heures .La boucle d’induction est contenu dans le LoopHEAR et
couvre une superficie de 1m2 /3.3ft2. Ce système de boucle d’induction
envoie un courant qui crée un champ magnétique. Ce champ est capté
par la bobine en position T. Le microphone est intégré mais un second
microphone externe peut être rajouté
Note: Pour que le LoopHEAR fonctionne, vérifiez que les utilisateurs
basculent leur prothèse auditives en position T.
L’emballage du colis a été spécialement conçu pour transporter le
LoopHEAR en toute sécurité.
Il est important de lire entièrement la notice d’utilisation du LoopHEAR
avant la première utilisation.
19
INTRODUCTION
Contenu du colis
Une fois le colis déballé, vérifiez que vous disposez de l’ensemble des
éléments présentés ci-après :
• 1 LoopHEARTM
• 1 adaptateur secteur. Il existe 3 modèles spécifiques de
adaptateur secteur. Un seul adaptateur secteur est livré par colis,
suivant votre pays :
Europe version – adaptateur secteur type VDE avec 3 mètres
de cordon.
UK version – adaptateur secteur type UK avec 3 mètres de
cordon.
US version – adaptateur secteur type cUL avec 3 mètres de
cordon.
Europe
•
•
•
•
UK
USA
2 vis pour la fixation murale
1 oreillette
1 microphone externe avec 3 mètres de cordon, lapel clip et un
clip mural
1 notice
20
DESCRIPTION
Description générale
Vue de face
Vue arrière
Voyant lumineux
Reportez-vous
à la figure
Apour plus de
détail
21
DESCRIPTION
Vue arrière (Fig A)
Bouton ON/OFF
Adaptateur secteur
Prise casque
Prise microphone
Vue de la base
22
Bouton volume
INSTALLATION
Mise en place
Installation du bloc de batterie
Retirez le couvercle de protection comme décrit ci-dessous :
Reportez-vous
à la figure B
pour plus de
détail
Insérez un tournevis à l’intérieur du compartiment pour ouvrir le
couvercle de protection, situé sur le côté droit de l’appareil. Poussez le
tournevis délicatement vers le bas – cela libéra le couvercle.
23
INSTALLATION
Fig B
Ouverture du compartiment à batterie
Ouvrez le bloc de batterie. Insérez la batterie rechargeable fournie.
Branchez le connecteur dans la prise électrique et replacez le
compartiment de batterie.
24
INSTALLATION
Remettez le couvercle en plaçant le crochet de celui-ci à gauche du
LoopHEARTM. Appuyez sur le couvercle pour fermer.
Crochet
Catch
Branchez l’adaptateur secteur à une prise murale.
Branchez le cordon électrique de l’adaptateur secteur à l’arrière de la
base
Adaptateur secteur
Passage de fil
25
INSTALLATION
Utilisez « le passage de fil » pour sécuriser la connexion.
Avant la première utilisation, le LoopHEARTM a besoin d’être chargé
pendant 4 heures. Pendant le temps de charge, le voyant lumineux rouge
s’allume. Lorsque le voyant lumineux passe au vert, la batterie est
complètement chargée.
Utilisation du LoopHEAR TM
TM
Pour recevoir un son optimal du LoopHEAR , placez-le en face de
l’utilisateur. Vous pouvez l’utiliser de deux façons :
De façon mobile
Vous pouvez transporter le LoopHEARTM où vous le souhaitez. Il vous
suivra partout où vous allez, sans configuration. Il s’utilise
immédiatement.
De façon fixe
Vous pouvez installer le LoopHEARTM dans un endroit fixe. Pour le fixer,
suivez les instructions décrites ci-dessous :
1) Choisissez l’emplacement pour fixer le LoopHEARTM
2) Retirez le couvercle de protection (voir description page 6)
3) Fixez le couvercle de protection sur une table ou un bureau en utilisant
les trous situés sur le couvercle.
4) Replacez le LoopHEARTM sur le couvercle fixé (voir description page 6)
LH100
1m
60°
26
FONCTIONNEMENT
Allumez le LoopHEARTM
Basculez l’interrupteur du LoopHEAR™sur la position « I » situé derrière
l’appareil.
Le voyant du LoopHEAR™ est vert : Il indique que la batterie du
LoopHEAR™ est chargée ou qu’il branché sur l’adaptateur secteur. (le
voyant clignote si l’adaptateur secteur est débranché du LoopHEAR™)
Le voyant du LoopHEAR™ est rouge : Il indique que la batterie du
LoopHEAR™ est faible. Branchez-le à l’adaptateur secteur pour charger
la batterie. Pendant le chargement, le voyant clignotera rouge.
Eteindre le LoopHEARTM
Après utilisation, basculez l’interrupteur sur “ 0 ” situé derrière l’appareil.
Utilisation du casque
Si vous n’avez pas d’appareil auditif, vous
pouvez utiliser le casque.
Branchez-le simplement dans la prise
casque (3.5mm), situé derrière le
LoopHEARTM. Vous pouvez ajuster le
volume du casque grâce au bouton
volume situé derrière l’appareil.(tournez le
bouton vers la droite pour augmenter le
volume).
Utilisation du Microphone Externe
Branchez le microphone externe dans la prise microphone située à
l’arrière de l’appareil. Une fois branché, seul le microphone externe
fonctionne.
Si vous utilisez le LoopHEAR™ avec le microphone intégré ou avec le
microphone externe, le voyant lumineux sera toujours rouge.
Le microphone externe est muni
d’un clip qui vous permet de
l’accrocher
facilement
à
un
vêtement.
27
FONCTIONNEMENT
Le microphone externe peut être également accroché au mur grâce à
son clip mural.
Accrochez le clip mural à un
endroit pratique.
Positionnez délicatement le
microphone externe dans le clip.
28
PROBLEMES EVENTUELS
Le voyant lumineux clignote rouge
•
Rechargez la batterie.
Le LoopHEARTM s’etient
•
Vérifiez que les batteries soient correctement chargées.
Vous entendez des interferences ou vous n’entendez pas
correctement :
•
•
Vérifiez que le LoopHEARTM soit allumé et placé en face de vous.
Placez le LoopHEARTM à côté de vous.
Utilisation des batteries :
Pour que votre loopHear™ soit toujours prêt, suivez les consignes
décrites ci-dessous:
• Arrêtez votre loopHear™ lorsque vous ne l’utilisez pas.
• Rechargez votre loopHear™ si vous l’utilisez plus de 6 heures ou
si le voyant lumineux rouge s’allume.
• Rechargez les batteries si votre loopHear™ reste inutilisé plus de
4 mois.
D’une manière général suivant l’usage, le réglage du volume et les bruits
ambiants, la batterie pourra:
• Rester chargée jusqu’à 4 mois le LoopHEARTM éteint.
• Rester en mode veille durant 2 jours (sans utilisation).
• Etre utilisée en continu durant 8 heures (batterie complètement
chargée au départ).
29
PROBLEMES EVENTUELS
Informations générales
Ne pas ouvrir l’appareil. En aucun de problème, appelez le Service Après
Vente au 03 28 56 78 99.
Nettoyage de l’appareil
Nettoyez le LoopHEARTM avec un chiffon doux. N’utilisez jamais de
produits d’entretiens car cela pourrait endommager les composants
électriques de l’appareil.
Consignes de sécurité
Ne pas exposer le LoopHEARTM au soleil.
Assurez-vous que le LoopHEARTM soit disposé dans un endroit où
circule l’air.
N’utilisez pas le LoopHEARTM dans un endroit humide où il y a rique
d’explosion.
30
INFORMATIONS GENERALES
Cet appareil est garanti 1 an pièces et main-d'oeuvre. La date d'achat
figurant sur le ticket de caisse fera foi. Cette garantie s'exerce sous
réserve d'une utilisation normale de l'appareil. Les dommages
occasionnés par les surtensions électriques, la foudre ou par un choc sur
l'appareil ne peuvent en aucun cas être couverts par la garantie. En cas
de problème fonctionnel et avant de nous retourner votre appareil,
contactez notre service après vente de : 8h30 à 12h30 et de 14h00 à
17h00 du Lundi au Jeudi et de 8h30 à 12h30 et de 14h00 à 16h30 le
Vendredi
Raccordement électrique :
L’appareil est prévu pour fonctionner uniquement avec l’adaptateur
secteur 230V 50Hz fourni. (Tension classée “dangereuse” selon les
critères de la norme EN60950).Par précaution en cas de danger, le bloc
alimentation secteur sert de dispositif de sectionnement de l’alimentation
230V. Il doit être installé à proximité du matériel et être aisément
accessible.
31
INFORMATIONS GENERALES
Recommandations pour le recyclage :
La directive DEEE (Déchet d'Equipement Electrique et Electronique) a
été
mise en place dans le but d'assurer la collecte sélective en vue de la
valorisation, réutilisation ou recyclage des produits en fin de vie.
Lorsque votre produit ne fonctionne plus, ne le jetez pas dans votre
poubelle ménagère.
Suivez l'une des procédures décrites ci-dessous:
- Déposez les batteries et votre ancien appareil dans un lieu de collecte
approprié.
- Ou rapportez votre ancien appareil au magasin ou vous achèterez le
nouveau. Il devra l'accepter.
Ainsi, si vous respectez ces instructions vous faites un geste pour
l'environnement et vous contribuez à la préservation des ressources
naturelles et à la protection de la santé humaine.
La déclaration de conformité peut être consultée sur le site :
www.geemarc.com
Parc de l’étoile
2 rue Galilée
59760 GRANDE SYNTHE
Téléphone 03 28 58 75 75
Ou fax 03 28 58 75 76
www.geemarc.com
32
33
INHALT
INHALT
34
EINLEITUNG
Auspacken des loopHEARTM
35
36
BESCHREIBUNG
37
INSTALLATION
Einstellungen
Aufstellen des loopHEARTM
39
39
42
BENUTZUNG DES loopHEARTM
Einschalten des loopHEARTM
Ausschalten des loopHEARTM
Benutzung des Headset
Benutzung des externen Mikrofons
44
44
44
44
44
FEHLERSUCHE
46
SICHERHEITSHINWEIS
47
GARANTIE
48
RECYCLINGVORSCHRIFT
50
68
34
EINLEITUNG
TM
TM
Herzlichen Glückwunsch zum Kauf Ihres Geemarc loopHEAR . Dies ist ein
tragbares Induktionsschleifensystem, das an einer Vielzahl von Orten benutzt werden
kann, sowohl privat als auch in der Öffentlichkeit.
Dieses robuste aber leichte Gerät kann leicht transportiert werden und eine integrierte
Batterie ermöglicht den kabellosen Betrieb. Diese Batterie ist sowohl austauschbar als
auch aufladbar, ein langer Betrieb (bis zu 24 Stunden) kann vorrausgesetzt werden. Die
Induktionsschleife ist in das Gerät eingebaut, so gibt es keine herabhängeden Kabel.
TM
Der loopHEAR
deckt in etwa einen Bereich von 1m2 ab. In ihm ist ein integriertes
Mikrofon enthalten, das Sprache und Unterhaltungen aufnimmt. Ein externes Mikrofon
(ebenfalls im Lieferumfang enthalten) kann bei Bedarf angeschlossen werden. Dieses
Induktionsschleifen-System ist entwickelt worden, um Benutzer von Hörgeräten dabei
zu unterstützen, direkt an ihr mit telecoil ausgestattetes Hörgerät zu übermitteln
(letzteres muss dafür auf die ‘T’ position umgestellt werden).
Hinweis: Benutzer von digitalen Hörgeräten müssen sicherstellen, dass ihr
Hörgerät für den Betrieb im ‘T’-Modus programmiert wurde.
Die äußere Verpackung wurde speziell als handliche Tragetasche konzipiert.
Wir empfehlen, die Verpackung beim Transport des loopHEARTM
wiederzuverwenden.
TM
TM
Um Ihr Geemarc
loopHEAR
in vollem Umfang nutzen zu können, ist es wichtig,
TM
Sie dieses Benutzerhandbuch
dass Sie untenstehende Anleitung lesen. Bewahren
an einem sicheren Ort auf, um später bei Bedarf darauf zurückgreifen zu können.
35
EINLEITUNG
Auspacken des loopHEARTM
Beim Auspacken des loopHEARTM sollten Sie Folgendes in der Verpackung
finden:
• 1 loopHEARTM
• 1 Spannungsadapter/Aufladeeinheit. Spannungsadapter und
Aufladeeinheit sind in drei länderspezifischen Ausführungen erhältlich,
von denen das für Ihr Land geeignete Modell im Lieferumfang
enthalten ist.
Europa - Linearer VDE-Netzadapter mit rechtwinkligem Netzstecker
und 3 Meter Kabellänge
Großbritannien – Linearer GB-Netzadapter mit rechtwinkligem
Netzstecker und 3 Meter Kabellänge
USA – Linearer cUL-Netzadapter mit rechtwinkligem Netzstecker und 3
Meter Kabellänge
Europa
•
•
•
•
GB
USA
2 Bodenplatten-Befestigungsschrauben und -unterlegscheiben
1 Headset
1 externes Microfon mit 3m Anschlussadapter, Reversklammer und
Wandhalterung
1 Benutzerhandbuch
36
BESCHREIBUNG
Allgemeine Beschreibung
Frontansicht
Rückansicht
Power-LED-Anzeige
Siehe AbbAfür
weitere Details
37
BESCHREIBUNG
Rückansicht
Abb A
EIN-/AUS-Schalter
Headset-Buchse
Lautstärkeregler
Headset
Gleichstromanschluss
Externe Mikrofonbuchse
Bodenansicht
38
INSTALLATION
Einstellungen
Batteriewechsel
Entfernen Sie die Bodenplatte von dem Gerät, wie unten gezeigt:
Siehe Abb. B
für weitere
Details
Stecken Sie einen Schraubenzieher in die Öffnung des
Verriegelungsmechanismus. Diesen finden Sie unten rechts an der
Bodenplatte. Drücken Sie den Riegel vorsichtig mit dem Schraubenzieher
weg – dadurch wird sich die Bodenplatte lösen. Heben Sie die loopHearTM
Einheit von der Bodenplatte.
39
INSTALLATION
Abb. B
Öffnen des Verriegelungsmechanismus
Entfernen Sie die Batterieklappe. Legen Sie die mitgelieferte
wiederaufladbare Batterie ein, stecken Sie den Anschluss in die passende
Buchse und setzen Sie dann die Batterieklappe wieder ein.
40
INSTALLATION
Bringen Sie die Bodenplatte wieder an, indem Sie den Haken unten links
am loopHearTM am Verschluss an der Bodenplatte positionieren. Drücken
Sie den loopHEARTM sanft nach unten bis Sie ein Klicken hören.
Haken
Verschluss
Stecken Sie das Spannungskabel in den Gleichstromanschluss auf der
Rückseite. Stecken Sie danach den Adapter in das Haushaltsversorgungsnetz
und schalten Sie den Netzanschluss ein.
Zugentlastung
41
INSTALLATION
Bitte nutzen Sie die Zugentlastung, wie in der Abbildung gezeigt. Diese
Vorrichtung dient zum zusätzlichen Schutz des Kabels an der
Verbindungsstelle, was zu einer längeren Lebensdauer des Kabels führt und
den Anschluss am Gerät festigt.
Der loopHEARTM muss vor dem ersten Gebrauch für vier Stunden geladen
werden. Die Spannungsanzeige blinkt rot während die Batterie geladen wird.
Wenn die Spannungsanzeige grün blinkt, ist die Batterie vollständig geladen.
Aufstellen des loopHEARTM
Für eine optimale Klangqualität mit des loopHEARTM sollte das Gerät zum
Gesicht des Benutzers zeigen. Zum Aufstellen des loopHEARTM gibt es zwei
Möglichkeiten.
Komplett tragbar
Der loopHEARTM kann als komplett tragbare Einheit mit oder ohne Bodenplatte
benutzt werden. Er kann an einer Vielzahl von Orten benutzt werden, ohne
dass zusätzliche Einstellungen nötig werden. Außerdem kann er sofort
eingesetzt werden.
Halbfest
Wenn Sie sicherstellen wollen, dass der loopHearTM an einer Stelle bleibt, so
kann er wie folgt als halbfeste Einheit genutzt werden:
1) Wählen Sie den Ort aus, an dem der loopHearTM befestigt werden soll. Bitte
beachten Sie Hörbereich, den das Gerät abdeckt (siehe unten). Nutzen Sie
den gesamten Bereich nach Möglichkeit aus.
2) Entfernen Sie die Bodenplatte, wie oben unter Batteriewechsel beschrieben
3) Schrauben Sie die Bodenplatte auf dem Tisch oder einer anderen
Unterfläche mit den mitgelieferten Schrauben fest.
42
INSTALLATION
4) Befestigen Sie den loopHearTM wieder an der Bodenplatte, wie oben unter
Batteriewechsel beschrieben
LH100
1m
60°
43
BENUTZUNG DES loopHEARTM
Einschalten des loopHEARTM
Stellen Sie den EIN-/AUS-Schalter auf der Rückseite des Gerätes auf die Position “I”.
Die Spannungsanzeige leuchtet auf. (permanent grün für den Fall, dass der
Spannungsadapter nicht eingesteckt ist, grün-blinkend wenn er eingesteckt ist).
Wenn die Batterie schwach ist, wird der Spannungsanzeiger rot leuchten (permanent
rotfür den Fall, dass der Spannungsadapter nicht eingesteckt ist, rot-blinkend wenn er
eingesteckt ist).
Stecken Sie den Spannungsadapter ein, um die Batterie wieder aufzuladen.
Ausschalten des loopHEARTM
Schalten Sie das Gerät nach dem Gebrauch aus, indem Sie den EIN-/AUS-Schalter auf
der Rückseite des Gerätes in die Position “0” bringen.
Benutzung des Headsets
Für Benutzer, die kein Hörgerät verwenden oder keinen
‚T‘-Schalter an ihrem Hörgerät haben, befindet sich ein
Headset im Lieferumfang. Stecken Sie einfach das
Headset in die Headset-Buchse (3.5mm) auf der
Rückseite des loopHEAR. Die Lautstärke kann mit dem
Lautstärkeregler eingestellt werden, den Sie ebenfalls auf
der Rückseite des Gerätes finden (drehen Sie den Regler
im Uhrzeigersinn, um die Lautstärke zu erhöhen).
Benutzung des externen Mikrofons
Stecken Sie das mitgelieferte Mikrofon in die Mikrofonbuchse hinten des
Gerätes. Das externe Mikrofon wird nun das integrierte Mikrofon übertönen.
Das externe Mikrofon besitzt eine Klammer. Diese
ist sehr nützlich um es wie gezeigt an ihr Revers
o.ä. zu heften.
44
BENUTZUNG DES loopHEARTM
Das externe Mikrofon kann mit Hilfe der mitgelieferten Wandhalterung auch
an einer Wand angebracht werden.
Kleben Sie die Wandhalterung
einfach an der gewünschten
Stelle an die Wand. Drücken
Sie dann das externe Mikrofon
vorsichtig in die
Mikrofonhalterung.
45
FEHLERSUCHE
Die rote LED blinkt
•
Laden Sie die Batterie.
Das loopHEARTM schaltet sich immer selbständig aus
•
Stellen Sie sicher, dass die Batterie voll geladen ist.
Der Ton ist auf Grund von Störeinflüssen nicht klar oder gar nicht zu
hören
•
•
Stellen Sie sicher, dass das loopHEARTM eingeschaltet ist und in
Ihre Richtung zeigt
Stellen Sie das loopHEARTM näher an sich heran
BATTERIEBETRIEB:
Um sicherzustellen, dass Ihr loopHear™ stets einsatzbereit ist, beachten
Sie bitte die folgenden Empfehlungen:
• Das Gerät immer ausschalten, wenn es nicht genutzt wird
• Die Batterien nach mehr als sechs Stunden Betrieb bzw. bei
leuchtender roter LED-Anzeige immer aufladen
• Falls das Gerät über einen längeren Zeitraum nicht eingeschaltet
wird, sollten die Batterien alle vier Monate aufgeladen werden
Je nach eingestellter Lautstärke und abhängig von den
Umgebungsgeräuschen ermöglichen die Batterien etwa die folgende
Betriebsdauer:
•
•
•
STANDBY BEI AUSGESCHALTETEM GERÄT
4 MONATE
STANDBY BEI EINGESCHALTETEM UND NICHT
GENUTZTEM GERÄT2 TAGE
DAUEREINSATZ 8 STUNDEN MIT VOLL AUFGELADENER
BATTERIE
46
SICHERHEITSHINWEISE
Allgemeines
Öffnen Sie das Gerät unter keinen Umständen. Für Reparaturen wenden
Sie sich bitte an unsere Hotline.
Reinigen
Reinigen Sie das loopHearTM nur mit einem weichen Tuch. Benutzen Sie
unter keinen Umständen Polituren oder Reinigungsmittel - diese könnten
die Oberfläche oder die interne Elektronik des Geräts beschädigen.
Umwelthinweis
Setzen Sie das Gerät niemals direktem Sonnenlicht aus.
Stellen Sie jeder Zeit eine gute Luftzirkulation an den Oberflächen des
loopHearTM sicher.
Setzen Sie die Teile ihres Produktes nicht dem Wasser aus, und benutzen
Sie es nicht unter dunstigen oder feuchten Bedingungen z.B. in
Badezimmern.
Setzen Sie Ihr Produkt auch nicht Feuer oder anderen gefährlichen
Bedingungnen aus.
47
GARANTIE
GeemarcTM bietet Ihnen eine Garantie für den Zeitraum eines Jahres ab
Kaufdatum. Während dieser Zeit sind alle Reparaturen oder
Ersatzleistungen (nach unserem Ermessen) für Sie gratis. Sollten Sie ein
Problem feststellen, so kontaktieren Sie bitte unsere Hotline oder besuchen
Sie unsere Internet-Seite unter www.geemarc.com/de. Die Garantie deckt
weder Unfälle, Fahrlässigkeit, noch Bruchschäden an irgendwelchen Teilen
ab. An dem Produkt dürfen weder Änderungen vorgenommen, noch darf es
auseinandergebaut werden von jemandem, der kein autorisierter
GeemarcTM Vertreter ist. Die GeemarcTM Garantie schränkt ihre
gesetzlichen Rechte in keiner Weise ein.
WICHTIG: IHR KAUFBELEG IST TEIL DER GARANTIE UND MUSS FÜR
DEN GARANTIEANSPRUCH AUFBEWAHRT UND VORGELEGT WERDEN.
ERKLÄRUNG: GeemarcTM Telecom SA bestätigt hiermit, dass dieses
Produkt in Übereinstimmung zu den wesentlichen Anforderungen und
anderen relevanten Vorschriften der Radio und Telekommunikation
Datenendgerät Richtlinie steht, insbesondere mit Artikel 3 Abschnitt 1a,
1b und Abschnitt 2.
Die Konformitätserklärung kann unter folgender Adresse gefunden werden :
www.geemarc.com/de
48
GARANTIE
Elektrische Verbindungen: Dieses Gerät ist entwickelt für den
ausschließlichen Betrieb an einer 230V 50Hz Spannungsversorgung.
(Klassifiziert als ‘gefährliche Spannung‘ nach EN60950 Standard).
49
RECYCLING VORSCHRIFT
Das WEEE (Waste Electrical and Electronic Equipment) wurde festgesetzt um
Geräte am Ende ihres Produktlebenszyklus auf die beste Art und Weise zu
recyceln.
Wenn dieses Produkt unverwendbar geworden ist, werfen Sie es bitte nicht in
Ihren normalen Haushaltsabfall.
Bitte nutzen Sie eine der folgenden Entsorgungsmöglichkeiten:
- Entfernen Sie die Batterien und werfen Sie sie in den entsprechenden WEEE
Müllcontainer. Werfen Sie auch das eigentliche Gerät in den dafür
vorgesehenen WEEE Müllcontainer.
- Alternativ können Sie das Gerät an den Verkäufer zurückgeben. Wenn Sie
ein neues kaufen, sollte er das alte zurücknehmen.
Wenn Sie diesen Anweisungen folgen, sichern Sie die Gesundheit Ihrer
Mitmenschen und den Schutz unserer Umwelt.
Produktunterstützung und Hilfe erhalten Sie auf unserer
Webseite www.geemarc.com/de
Telefon 069 / 96 217 635
oder Fax 069 / 96 217 620
50
51
ÍNDICE
ÍNDICE
52
INTRODUCCIÓN
Desempacar el loopHEAR™
53
54
DESCRIPCIÓN
55
INSTALACIÓN
Montaje
Ubicación del loopHEAR™
57
57
60
USO DEL loopHEAR™
Encendido del loopHEAR™
Apagado del loopHEAR™
Uso del auricular
Uso del micrófono externo
61
61
61
61
61
LOCALIZACIÓN DE FALLAS
63
INFORMACIÓN DE SEGURIDAD
64
GARANTÍA
65
DIRECTIVAS DE RECICLAJE
67
68
52
INTRODUCCIÓN
Felicitaciones por la compra de su loopHEAR™ Geemarc™. Este es un
sistema de bucle inductor portátil que se puede utilizar en una variedad de
lugares, tanto públicos como privados.
Esta unidad, liviana pero robusta, se puede transportar fácilmente y una
pila integral le facilita la autonomía. Esta pila es recambiable y recargable
y tiene larga duración (hasta 24 horas). El bucle está incorporado dentro
de la unidad, pese a que no hay hilos colgantes. El loopHEAR™ cubre un
área de 1m2 aproximadamente. Dispone de un micrófono integral que
capta la voz y las conversaciones. Se puede agregar un micrófono externo,
si fuera necesario (suministrado). Este sistema de bucle inductor está
destinado a ayudar a los usuarios de audífonos, transmitiendo
directamente a su audífono equipado con una bobina telecoil (que se
deberá colocar en la posición ‘T’).
Nota: los usuarios de audífonos digitales deberán comprobar que sus
aparatos fueron programados para usarlos en la configuración ‘T’.
El envase exterior fue diseñado especialmente como una práctica caja de
transporte. Se recomienda guardar esta caja de transporte para facilitar el
traslado seguro cuando se moviliza con el loopHEAR™.
Es importante leer las instrucciones que siguen a fin de aprovechar
plenamente el potencial del loopHEAR™ de Geemarc™. Guarde esta guía
de usuario en un lugar seguro para consultas futuras.
53
INTRODUCCIÓN
Desempacar el loopHEAR™
Cuando desempaque el loopHEAR™, encontrará en la caja lo siguiente:
•
•
1 loopHEAR™
1 adaptador de potencia/cargador. Hay unidades tres unidades
adaptadoras de potencia/cargadoras diferentes para distintos
países. La versión suministrada depende del país de adquisición:
Versión europea: Adaptador de potencia lineal tipo VDE con
enchufe en ángulo recto y 3 metros de cable
Versión GB: Adaptador de potencia lineal tipo GB con enchufe en
ángulo recto y 3 metros de cable
Versión EE.UU.: Adaptador de potencia lineal tipo cUL con
enchufe en ángulo recto y 3 metros de cable
Europa
•
•
•
•
Gran Bretaña
EE.UU.
2 placas base de montaje, tornillos y arandela
1 auricular
1 micrófono externo con 3 m de cable de prolongación, clip de
solapa y gancho de pared
1 guía del usuario
54
DESCRIPCIÓN
Descripción general
Vista frontal
Vista trasera
LED indicador de potencia
Vea más
detalles en
la Fig. A
55
DESCRIPCIÓN
Vista trasera (Fig A)
Toma mic. externo
Corriente DC
Interruptor ON/OFF
Volumen del auricular
Toma del auricular
Vista de la base
56
INSTALACIÓN
Montaje
Carga de la pila
Quite la placa base de la unidad como se indica abajo.
Vea más
detalles en la
Fig. B
Inserte un destornillador en la abertura del mecanismo de traba situado en
la parte inferior derecha de la placa base. Empuje suavemente la traba con
el destornillador para soltar la placa base. Saque la unidad del
loopHEAR™ de la placa base..
57
INSTALACIÓN
Fig B
Abrir el macanismo de traba
Quite la tapa de la pila. Inserte la pila recargable suministrada, enchufe el
conector en la toma y reponga la tapa de la pila.
58
INSTALACIÓN
Reponga la placa base colocando el gancho situado en la parte inferior
izquierda del loopHEAR™ en la traba de la placa base. Presione
levemente el loopHEAR™ hacia abajo hasta oír un clic.
Gancho
Traba
Conecte el cable en el enchufe situado en la parte posterior. Enchufe el
adaptador a la red de suministro y pase el interruptor de corriente a ON.
.
Liberación
de presión
59
INSTALACIÓN
Use el mecanismo liberador de presión como indica la figura. Esto
proporciona protección adicional al cable en el punto de conexión,
prolonga la vida del cable y refuerza la conexión al equipo.
Antes de usarlo por primera vez, será necesario cargar el loopHEAR™
durante 4 horas. El indicador de potencia destellará en rojo mientras la pila
se esté cargando. Cuando el indicador de potencia destelle en verde, la
pila estará plenamente cargada.
Ubicación del loopHEAR™
In order to receive the optimal sound from the loopHEARTM, the ideal location
is facing the user. There are two options when locating the loopHEARTM.
Totalmente portátil
El loopHEAR™ se puede utilizar como una unidad totalmente portátil con la
placa base montada o sin ella. Se puede utilizar en diversos lugares
inmediatamente y sin necesidad de instalación.
Semifija
Si desea asegurarse de que el loopHEAR™ quede en un sitio, se puede
utilizar como unidad semifija de la siguiente manera:
1) Elija el lugar para fijar el loopHEAR™. Deberá tomar en cuenta la
distancia de cobertura
disponible (ver abajo). Asegúrese de aprovecharla
al máximo.
2) Quite la placa base como se indica arriba en Carga de pila
3) Atornille la placa base a la mesa o escritorio con los tornillos suministrados
4) Reponga la placa base como se indica arriba en Carga de pila
LH100
1m
60°
60
USO DEL loopHEAR™
Encendido del loopHEAR™
Colocar el interruptor de potencia situado en la parte posterior de la unidad
en posición I. El indicador de corriente se enciende (verde fijo si el
adaptador de potencia no está enchufado, verde destellante si está
enchufado).
Cuando la pila está débil, el indicador se enciende en rojo (rojo fijo si el
adaptador de potencia no está enchufado, destellante si lo está).
Enchufar el adaptador de potencia para recargar la pila.
Apagado del loopHEAR™
Después de usarlo, apagar el aparato pasando a la posición 0 el
interruptor de potencia situado en la parte posterior de la unidad.
Uso del auricular
Para usuarios con discapacidad auditiva que
no usan audífono o no tienen un interruptor ‘T’
en su dispositivo, se suministran auriculares.
Simplemente deberá enchufarlos en la toma
correspondiente (3,5 mm) situada en la parte
posterior del loopHEAR. El volumen se puede
ajustar mediante la perilla correspondiente,
situada también en la parte posterior de la
unidad (girar la perilla en sentido horario para
aumentar el volumen).).
Uso del micrófono externo
Enchufar el micrófono suministrado en la toma de micrófono situada en la
parte posterior de la unidad. El micrófono externo no se superpone al
micrófono incorporado.
El micrófono externo tiene un clip.
Esto es sumamente útil para
abrocharlo en la solapa como
muestra la figura.
61
USO DEL loopHEAR™
El micrófono externo también se puede montar en la pared con el gancho
suministrado.
Simplemente inserte el gancho en la
pared en el lugar más cómodo. Empuje
suavemente el micrófono externo dentro
del soporte.
62
LOCALIZACIÓN DE FALLAS
El LED rojo destella
•
Cargue la pila
El loopHEAR™ se apaga constantemente
•
Compruebe que la pila esté cargada a tope
El usuario no puede oír o no oye claramente (interferencias)
• Compruebe que el loopHEAR™esté encendido y de cara al
usuario
• Coloque el loopHEAR™ más cerca del usuario
USO DE LA PILA:
Para asegurar que su loopHear™ esté siempre listo para usarlo, deberá
poner en práctica las recomendaciones que siguen:
•
•
•
Apáguelo siempre cuando no esté en uso.
Recargue siempre las pilas después del uso continuado durante
más de 6 horas o cuando se encienda el indicador rojo.
Recargue las pilas cada cuatro meses si el aparato ha quedado
apagado durante largos períodos de tiempo.
La pila facilitará aproximadamente el siguiente uso, dependiendo de los
niveles de volumen y del ruido ambiente:
LISTO (STAND BY) CUANDO ESTÁ APAGADO
4 MESES
LISTO CUANDO ESTÁ ENCENDIDO PERO NO EN USO
2 DÍAS
EN USO CONTINUADO DESDE LA PILA CARGADA A TOPE 8 HORAS
63
INFORMACIÓN DE SEGURIDAD
General
No abra la unidad. Llame al servicio telefónico de asistencia para cualquier
reparación.
Limpieza
Limpie el loopHEAR™ con un paño suave. Nunca use pulidores ni
detergentes que podrían dañar el acabado o la electrónica interna.
Medioambiente
No exponerlo a la radiación solar directa.
Asegure siempre que haya libre flujo de aire sobre las superficies del
loopHEAR™.
No coloque parte alguna del producto en agua y no lo use en condiciones
de humedad, p. ej. baños.
No exponga el producto al fuego u otras condiciones peligrosas.
64
GARANTÍA
Geemarc™ le confiere un año de garantía desde el momento de la compra
del aparato. Durante ese período, todas las reparaciones o recambios (a
nuestra discreción) son gratuitas. Si se presentara algún problema, deberá
contactar con nuestra línea telefónica de asistencia o visitar nuestro sitio
Web www.geemarc.com. Esta garantía no cubre accidentes, negligencia o
rotura de pieza alguna. El producto no debe ser forzado ni desarmado por
persona alguna que no sea el representante autorizado de Geemarc™. La
garantía de Geemarc™ no limita sus derechos legales de manera alguna.
IMPORTANTE: EL RECIBO ES PARTE DE LA GARANTÍA Y DEBERÁ
GUARDARLO Y PRESENTARLO EN CASO DE RECLAMO.
Importante: Esta garantía es válida
en España solamente
DECLARACIÓN: Geemarc™ Telecom SA declara por la presente que
este producto cumple con los requisitos esenciales y otras disposiciones
pertinentes del Directivo de Equipos Terminales de Radio y
Telecomunicaciones 1999/5/EEC y en particular el artículo 3, secciones 1a,
1b y 2.
Pueden consultar la declaración de conformidad en www.geemarc.com
65
GARANTÍA
Conexión eléctrica: El aparato está diseñado para operar solamente con
una alimentación de 230V 50Hz. (Clasificado como ‘voltaje peligroso’
según la norma EN60950).
66
DIRECTIVAS DE RECICLAJE
Los WEEE (Residuos de aparatos eléctricos y electrónicos) del producto
puestos en el lugar correspondiente al final de su vida útil, serán reciclados
de la mejor manera.
Cuando este producto haya finalizado su vida, no deberá ponerlo en su
cubo de basura doméstico.
Deberá utilizar una de las siguientes opciones de vertido:
- Quitar las pilas y depositarlas en un contenedor adecuado para WEEE.
Depositar el producto en un contenedor adecuado para WEEE.
- O bien, entregar el producto viejo al minorista. Si compra uno nuevo,
deberá aceptarlo.
Respetando estas instrucciones se asegura la salud humana y la
protección medioambiental.
Para apoyo y ayuda sobre el producto, visite nuestro sitio Web
www.Geemarc.comTeléfono 01707 384438
O fax 01707 372529
67
ASSEMBLY STEP
0
11
68
12
19
0
69
ASSEMBLY STEP
1
2
3
4
70
5
6
7
8
24h
24 hr.
12h
71
ASSEMBLY STEP
9
10
72
11
73
ASSEMBLY STEP
12
37mm
74
13
14
15
16
75
ASSEMBLY STEP
17
18
76
19
77
UGLoopHEAR_Ver.2.1