1
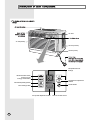
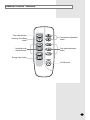
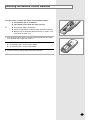
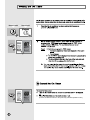
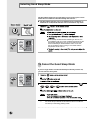
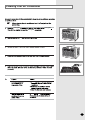
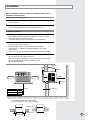
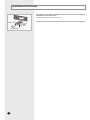
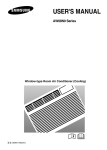
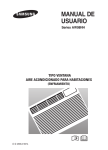
USER'S MANUAL AW08NH Series AW08NK Series Window-type Room Air Conditioner (Cooling) B98-26970A(7) Contents PREPARING YOUR AIR CONDITIONER Safety Precautions ......................................................................................... Description of Each Component .................................................................... Remote Control - Buttons .............................................................................. Getting Started ............................................................................................... Inserting the Remote Control Batteries .......................................................... 2 4 5 6 7 OPERATING YOUR AIR CONDITIONER Cooling Your Room ........................................................................................ 8 Airing Your Room ........................................................................................... 9 Removing Excess Humidity ............................................................................ 10 Adjusting the Air Flow Direction Horizontally .................................................. 11 Adjusting the Air Flow Direction Vertically ...................................................... 11 PROGRAMMING YOUR AIR CONDITIONER Setting the On Timer ...................................................................................... Setting the Off Timer ...................................................................................... Selecting Good Sleep mode .......................................................................... Selecting Energy Saving mode ...................................................................... 12 13 14 15 RECOMMENDATIONS FOR USE Temperature and Humidity Ranges ................................................................ 16 Cleaning Your Air Conditioner ........................................................................ 17 Solving Common Problems ............................................................................ 18 Technical Specifications ................................................................................. 18 ......................................................................................................... 19 E-3 Air outlet Air inlet(Inside) Air inlet (Outside) Air filter (Inside) . Temperature/Timer settings Mode selection button (Cool,Dry,Fan) Energy Saver button Temperature adjustment buttons Good Sleep setting button On/Off button Timer setting button Fan speed adjustment button Remote control sensor Remote Control - Buttons Timer setting button Selecting Good Sleep button Operating mode selection button Temperature adjustment button Fan speed adjustment button Energy Saver button On/Off button E-5 *HWWLQJ6WDUWHG 6KQ D=RA FQOP LQN?D=OA@ = 0=IOQJC SEJ@KSPULA/KKIEN KJ@EPEKJAN SDE?D ODKQH@ >A EJOP=HHA@ >UBKHHKSEJC UKQN EJOP=HH=PEKJ I=JQ=H 6KQN ,SJANO &JOPNQ?PEKJO ?KJP=EJ R=HQ=>HA EJBKNI=PEKJ KJ QOEJC UKQN =EN ?KJ@EPEKJAN -HA=OA P=GA PDA PEIA PK NA=@ PDAI =O PDAU SEHH DAHL UKQ P=GA BQHH =@R=JP=CA KB PDA QJEPO BA=PQNAO 1DA >KKGHAP EO KNC=JEVA@ =O BKHHKSO 1DA BKHHKSEJC BECQNAO =NA ODKSJ KJ L=CAO =J@ ġ !AO?NELPEKJ KB "=?D KILKJAJP /AIKPA ?KJPNKH Ġ>QPPKJO 1DAU SEHH DAHL UKQ BEJ@ PDA >QPPKJO =J@ QJ@ANOP=J@ PDA OUI>KHO @EOLH=UA@ &J PDA I=JQ=H UKQ SEHH BEJ@ = OANEAO KB OPAL>UOPAL LNK?A@QNAO BKN A=?D BQJ?PEKJ =R=EH=>HA 1DA EHHQOPN=PEKJO EJ PDA OPAL>UOPAL LNK?A@QNAO QOA BKQN @EBBANAJP OUI>KHOġ -/"00-20% ( &*-,/1+1 +,1" Inserting the Remote Control Batteries You must insert or replace the remote control batteries when : X You purchase the air conditioner X The remote control does not work correctly ± X Use two AAA, LR03 1.5V batteries. X Do not use old batteries or different kinds of batteries together. X Batteries may be completely discharged after 12 months, even if they have not been used. 1 Push the battery cover on the rear of the remote control with your thumb in the direction of the arrow and remove it. 2 Insert the two batteries, taking care to respect the polarities : X + on the battery with + on the remote control. X - on the battery with - on the remote control. 3 Close the cover by sliding it back until it clicks into place. E-7 You must select the Cool mode if you wish to lower the temperature in your room. You can also set the Fan speed. Remote Control Control Panel It will begin to cool after three minutes is displayed. 18 C 30 C C I higher than the selected temperature, the air conditioner starts cooling Airing Your Room If you want to provide air circulation without cooling, you can use the Fan mode. 1 If you wish to evacuate stale air outside, push the ventilation lever on the ). front of the unit to the right and the open position ( Result: The air inside the room circulates and stale air is evacuated outside. Otherwise, push the ventilation lever to the left and the closed position ( Result: 2 ). The air simply circulates inside the room. If necessary, press the Result: Remote Control (On/Off) button. Control Panel The Air Conditioner starts up in Cool mode. The unit beeps twice. 3 If the Fan Speed(F1, F2 or F3) is not displayed on the control panel: Press the button on the remote control or Press the button on the unit one or more times until the Fan Speed (F1, F2 or F3) is displayed. The unit beeps each time you press the / button. Result: The Air Conditioner starts up in Fan mode. Mode Cool/Dry/Fan Mode Cool/Dry/Fan You can change modes at any time. When the Air Conditioner is in Fan mode, the temperature cannot be set or displayed. 4 To set the Fan Speed: Press the , or button on the Remote control as desired. or Press the button on the unit one or more times until the desired Fan Speed(F1, F2 or F3) is displayed. Fan Speed 5 To control the direction of the air flow, refer to page 11. E-9 Removing Excess Humidity If the atmosphere in your room is very humid or damp, you can remove excess humidity without lowering the room temperature too much. Remote Control Control Panel 1 If necessary, press the Result: (On/Off) button. X The air conditioner starts up in the Cool mode. X The unit beeps. 2 3 If the temperature is not displayed on the control panel: XPress the button on the remote control or XPress the button on the unit one or more times until Result: XThe unit beeps each time you press the / XThe air conditioner starts up in the Cool mode. ± You can change modes at any time. E-10 is displayed. button. To adjust the temperature, press the or buttons one or more times until the required temperature is displayed. The temperature can be set between 18°C and 30°C. Result: 4 The air conditioner is fitted with a protection mechanism to prevent the unit from being damaged when it is started immediately after being: X Plugged in X Stopped It will begin to cool after three minutes. X Each time you press the or buttons: - The temperature is adjusted by 1°C - The unit beeps X The air conditioner starts removing the excess humidity; the quality of air is adjusted automatically. To control the direction of the air flow, refer to page 11. Adjusting the Air Flow Direction Horizontally Depending on the position of the unit in your room, you can adjust the orientation of the inner air flow blades on the unit. Adjust the inner air flow blades to the desired position by sliding them side to side. $GMXVWLQJWKH$LU)ORZ'LUHFWLRQ9HUWLFDOO\ The outer air flow blades can be adjusted to control the vertical air flow direction. RECOMMENDATION :KHQ &RROLQJ $GMXVWWKHEODGHVWRIDFH 8SZDUGV $GMXVWWKHouter DLUIORZEODGHVWRWKHGHVLUHGSRVLWLRQE\SXVKLQJWKHP XSZDUGVRUGRZQZDUGV ® ,I\RXpositionWKHouter DLUIORZEODGHVGRZQZDUGwhile theXQLW operates LQ&RROPRGHIRUORQJSHULRGVRIWLPHGHZPD\ )RUPRQWKHVXUIDFHRIWKHEODGHV 'ULSIURPWKHEODGHV E-11 /AIKPA KJPNKH KJPNKH -=JAH 7KH$LU&RQGLWLRQHUUHWXUQVWRWKHSUHYLRXVO\VHOHFWHGRSHUDWLRQPRGH /AIKPA KJPNKH WRWKHIDQVSHHGPRGHWKH2IIWLPHUPRGHLVFDQFHOHG KJPNKH -=JAH Selecting Good Sleep Mode The Good Sleep mode can be used when you are cooling your room to switch the air conditioner off automatically after 8 hours. The Good Sleep function can be set whether the air conditioner is switched on or off,and this function can be selected for any mode. If Good Sleep is selected after switching on the unit ,the air conditioner will run in Cool mode.During this period, the temperature displayed is one you set for the Cool mode. If the Good Sleep is selected before switch on the unit, the air conditioner starts running in Cool mode and the temperature is set to 26 °C. To Cancel the Good Sleep Mode If you no longer wish to use the Good Sleep mode that you have set, you can cancel it at any time. To cancel a selected Good Sleep mode,you can also press the If you select the Energy Saving mode in the Good Sleep mode, the Good Sleep mode will be canceled and the air conditioner will start up in the Energy Saving mode. Selecting Energy Saving Mode If you wish to save energy when using your air conditioner, select the energy saving mode. 1 To select the energy saving mode, press the control or E.Saver E.Saver button on the remote Remote Control Control Panel button on the unit one or more times until the Energy Saver indicator lights up. Result: The fan and compressor cycle on and off together. The fan will continue to run for a short time after the compressor cycles off. If you would like the air conditioner to run in Dry mode, do not press the E.Saver button. You cannot use the Dry mode in the energy saving mode. 2 To stop the energy saving mode, press the control or Result: E.Saver E.Saver button on the remote button on the unit again. The fan runs at all times, while the compressor cycles on and off. If you select the Good Sleep in the Energy Saving mode, the Energy Saving will be cancelled and the air conditioner will start up in the Good Sleep mode. E-15 7HPSHUDWXUHDQG+XPLGLW\5DQJHV 7KHIROORZLQJWDEOHLQGLFDWHVWKH DLU FRQGLWLRQHU V WHPSHUDWXUHDQGKXPLGLW\ RSHUDWLRQ UDQJH 0RGH ,QGRRU7HPSHUDWXUH &RROLQJ ( 2XWGRRU7HPSHUDWXUH 21CWR32CDSSUR[ 21CWR43CDSSURx. ,QGRRU+XPLGLW\ 8RUOHVV ,IWKHDLUFRQGLWLRQHULVXVHGDW 7KHQ +LJKHUWHPSHUDWXUHs 7KHDXWRPDWLFSURWHFWLRQIHDWXUHPD\EHWULJJHUHGDQGWKHDLU FRQGLWLRQHUZLOO VWRS /RZHUWHPSHUDWXUHs $ ZDWHUOHDNDJHRUVRPHRWKHUPDOIXQFWLRQPD\KDSSHQLIWKH KHDWH[FKDQJHUIUHH]HV +LJKHUKXPLGLW\OHYHOV :DWHUPD\FRQGHQVHRQDQGGULSIURPWKHVXUIDFHRIWKHXQLW LILWLVXVHGIRUORQJSHULRGV %NGCPKPI;QWT#KT%QPFKVKQPGT IURQWJULOOH IURQWJULOOH IURQWJULOOH DLU ZLWFK ZLWFK RQ RQ ( Technical Specifications Design and specifications are to change without notica Model AW08NHAA AW08NHAB AW08NKAF Voltage & Frequecy 115V~, 60Hz 115V~, 60Hz 115V~, 60Hz Capacity 8000 BTU/h 8000 BTU/h 8000 BTU/h Power Consumption Operating Current 820W 820W 760W 7.4A 7.4A 6.7A Installation Before installation, be sure to check the installation area or the air conditioner, and drain hose. Checkpoints prior to installation 1 Check the cabinet and front grille of the unit for any harmful defects such as scratches. 2 Be sure to check the power supply. - Refer to the specifications on the label attached to the unit. Installation Conditions 1 As the unit is heavy, the wall or window of the installation area should have sufficient strength and durability for operation of the air conditioner, and for prevention of any vibration or noise. If it is weak, reinforcement work should be performed separately. 2 It is advisable to install the air conditioner in the north or west side to prevent the effect of direct sunlight. When installing it in the south or east side due to unavoidable circumstances, it is advisable to install the sunshade to prevent the direct sunlight. In this case, take care not to cause any hindrance to the flow of outside air. 3 When installing the air conditioner, be sure to obtain sufficient space on the rear side of the unit for smooth flow of air. When operating the air conditioner in closed areas such as inner building with cooling operation, and result in trouble with the unit. See the illustration below. Awning 65mm min. 500mm 500mm 300mm “A” 500mm Approx.3˚ MODEL “A” AW08NH AW08NK 145 170 750mm 110mm min. If the wall is greater than 110mm thick, cut the wall back on a 45 angle if possible. Outdoor side 45 Indoor side 100mm or more 45 Installation(Continued) Installation of the Drain Tube Rear Rubber cap Screws(2EA) E-20 Gasket Drain Tube Fix the drain tube as shown in the figure. Memo E-1 DB98-20383A.indd 13 2006-10-26 19:05:07 C.P 11570 AV. Presidente Masaryk No. 111, Int. 701 Col. Chapultepec Morales, Delegacion Miguel Hidalgo Mexico D.F 01-800-SAMSUNG(726-7864) www.samsung.com/mx IMPORTADO POR : SAMSUNG ELECTRONICS MÉ’XICO S.A. DE C.V. AV. PRESIDENTE MASARIK No. 111 INT. 701 COL. CHAPULTEPEC MORALES, DELEGACION MIGUEL HIDALGO C.P. 11570, MEXICO, D.F. TEL: 5747-51-00, RFC: SEM950215S98 EXPORTADO POR : SAMSUNG ELECTRONICS CO., LTD. 501 AVENIDA ESTE SUHONG, ZONA INDUSTRIAL DE SUZHOU.PROVINCIA JIANGSU REPÚBLICA POPULAR CHINA 218 AVENIDA JIEPU, ZONA INDUSTRIAL DE SUZHOU.PROVINCIA JIANGSU REPÚBLICA POPULAR CHINA