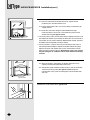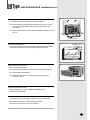
1
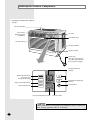
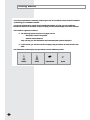
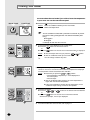
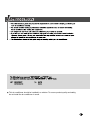
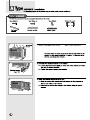
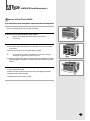
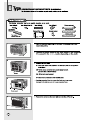
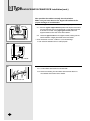
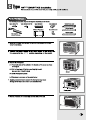
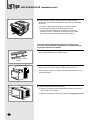
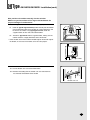
OWNER’S INSTRUCTIONS AW069CB AW109CB AW149CB AW089CB AW129CB AW189CB Window-type Room Air Conditioner (Cool) ( 6 'B81-00656A(1) !13'%)"?%?0AGE Register your product at www.samsung.com/global/register 3AFETY0RECAUTIONS 1DABKHHKSEJCO=BAPULNA?=QPEKJOIQOP>AP=GAJSDAJQOEJCUKQN=EN?KJ@EPEKJAN 4/+&+$ $52).' /0%2!4)/. 2ISK OF ELECTRIC SHOCK v #AN CAUSE INJURY OR DEATH v $ISCONNECT ALL REMOTE ELECTRIC POWER SUPPLIES BEFORE SERVICING INSTALLING OR CLEANING v4HISMUSTBEDONEBYTHEMANUFACTURERORITSSERVICEAGENTORASIMILAR QUALIFIEDPERSONINORDERTOAVOIDAHAZARD 5SERSOFTHISPRODUCTARECAUTIONEDNOTTOATTEMPTREPAIROFTHISPRODUCTATTHEIR OWNDISCRETION)NSTEADTHEYAREREQUESTEDTODIRECTLYCONTACTADESIGNATED SERVICECENTERORTHEOUTLETATWHICHTHEPRODUCTWASPURCHASED .EVERSPILLANYKINDOFLIQUIDINTOTHEUNIT3HOULDTHISHAPPENUNPLUGORMAIN SWITCHOFFTHEUNITANDCONTACTANAUTHORIZEDSERVICECENTER $ONOTINSERTANYTHINGBETWEENTHEAIROUTLETBLADESBECAUSETHEINNERFANMAY BEDAMAGEDANDCOULDCAUSEINJURY+EEPCHILDRENAWAYFROMTHEUNIT $ONOTPLACEANYOBSTACLESINFRONTOFTHEUNIT $ONOTSPRAYLIQUIDOFANYKINDINTOTHEINDOORUNIT3HOULDTHISHAPPENSWITCHOFF THEBREAKERUSEDFORYOURAIRCONDITIONERANDCONTACTYOURINSTALLATIONSPECIALIST -AKESURETHATTHEUNITISCORRECTLYVENTILATEDATALLTIMES $ONOTPLACECLOTHINGOROTHERMATERIALSOVERIT )FTHEWIRELESSREMOTECONTROLWILLNOTBEUSEDFORALONGTIMEREMOVETHE BATTERIES)FAPPLICABLE 7HENUSINGAWIRELESSREMOTECONTROLTHEDISTANCESHOULDNOTBEMORETHAN METERSFROMTHEAIRCONDITIONER)FAPPLICABLE 4HEAIRCONDITIONERMUSTBEPLUGGEDINTOITSOWNSPECIFICPOWERSOURCEWHICH MUSTBEINSTALLEDINCOMPLIANCEWITHNATIONALWIRINGEARTHINGANDSAFETY REGULATIONS )FTHEPOWERCORDISDAMAGEDINANYWAYITMUSTBEREPLACEDBYTHEMANUFACTURER ORITSSERVICEAGENTORASIMILARLYQUALIFIEDPERSONINORDERTOAVOIDAHAZARD 4HISDEVICEMUSTBEINSTALLEDACCORDINGTOTHENATIONALELECTRICALRULES 4HEAPPLIANCEMUSTBEINSTALLATIONTHATTHEPLUGSHOULDBEEASILYACCESSIBLE AFTERINSTALLATION )FTHEFUSEON0#BOARDISBROKENPLEASECHANGEITWITHTHETYPEOF4!6 4HEBREAKEROFTHEAIRCONDITIONERSHOULDBEALLPOLESWITCHANDTHEDISTANCE BETWEENITSTWOCONTACTSSHOULDBENOLESSTHANMM3UCHMEANSFOR DISCONNECTIONMUSTBEINCORPORATIONINTHEFIXEDWIRING $)30/3).' /& 4(% 5.)4 "EFORETHROWINGOUTTHEDEVICEITISNECESSARYTOPULLBACKTHEBATTERYCELLSAND GETRIDOFTHEMSAFELYFORRECYCLINGREASONS 7HENYOUNEEDTODISPOSEOFTHEUNITCONSULTYOURDEALER)FPIPESAREREMOVED INCORRECTLYREFRIGERANTMAYBLOWOUTANDCOMEINTOCONTACTWITHYOURSKINCAUSING INJURY2ELEASINGREFRIGERANTINTOTHEATMOSPHEREALSODAMAGESTHEENVIRONMENT 0LEASERECYCLEORDISPOSEOFTHEPACKAGINGMATERIALFORTHISPRODUCTINAN ENVIRONMENTALLYRESPONSIBLEMANNER /4(%23 .EVERSTOREORSHIPTHEAIRCONDITIONERUPSIDEDOWNORSIDEWAYSTOAVOIDDAMAGE TOTHECOMPRESSOR 4HEAPPLIANCEISNOTINTENDEDFORUSEBYYOUNGCHILDRENORINFIRMPERSONSWITHOUT SUPERVISION9OUNGCHILDRENSHOULDBESUPERVISEDTOENSURETHATTHEYDONOTPLAY WITHTHEAPPLIANCE -AXCURRENTISMEASUREDACCORDINGTO)%#STANDARDFORSAFETYANDCURRENTIS MEASUREDACCORDINGTO)3/STANDARDFORENERGYEFFICIENCY % Contents ◆ PREPARING YOUR AIR CONDITIONER ■ ■ ■ ■ ■ Safety Precautions ......................................................................................... Description of Each Component .................................................................... Remote Control - Buttons .............................................................................. Getting Started ............................................................................................... Inserting the Remote Control Batteries .......................................................... 2 4 5 6 7 ◆ OPERATING YOUR AIR CONDITIONER ■ ■ ■ ■ ■ Cooling Your Room ........................................................................................ 8 Airing Your Room ........................................................................................... 9 Removing Excess Humidity ............................................................................ 10 Adjusting the Air Flow Direction Horizontally .................................................. 11 Adjusting the Air Flow Direction Vertically ...................................................... 11 ◆ PROGRAMMING YOUR AIR CONDITIONER ■ ■ ■ ■ Setting the On Timer ...................................................................................... Setting the Off Timer ...................................................................................... Setting the Sleep Timer .................................................................................. Selecting Energy Saving mode ...................................................................... 12 13 14 15 ◆ RECOMMENDATIONS FOR USE ■ ■ ■ ■ Temperature and Humidity Ranges ................................................................ Cleaning Your Air Conditioner ........................................................................ Solving Common Problems ............................................................................ Technical Specifications ................................................................................. 16 17 18 19 ......................................................................................................... 20 E-3 'HVFULSWLRQRI(DFK&RPSRQHQW D 7KHGHVLJQDQGVKDSHDUHVXEMHFWWR FKDQJH $LULQOHW2XWVLGH ,QQHUDLUIORZ EODGHVULJKWOHIW RULHQWDWLRQ $LURXWOHW 9HQWLODWLRQOHYHU $LULQOHW,QVLGH $LULQOHW2XWVLGH $LUILOWHU,QVLGH 3RZHUSOXJ 7KHW\SHRISRZHUSOXJ PD\GLIIHUGHSHQGLQJRQ WKHORFDOSRZHUVXSSO\ 7HPSHUDWXUH7LPHU VHWWLQJV 0RGHVHOHFWLRQEXWWRQ &RRO)DQ'U\ (QHUJ\6DYHUEXWWRQ 0RGH &RRO'U\)DQ 7HPS (6DYHU 6OHHSWLPHUVHWWLQJEXWWRQ 6OHHS 7LPHUVHWWLQJEXWWRQ 7LPHU 3RZHU 2Q2IIEXWWRQ )DQ6SHHG )DQVSHHGDGMXVWPHQWEXWWRQ 7HPSHUDWXUHDGMXVWPHQW EXWWRQV 5HPRWHFRQWURO &$87,21 ,IWKH5HVHWEXWWRQRIWKHSRZHUSOXJRSHUDWHVWKHDLUFRQGLWLRQHU VWDUWVFRROLQJRSHUDWLRQDIWHUaPLQXWHV. ( Remote Control - Buttons Timer setting button Sleep timer setting button Mode selection buttons Temperature adjustment buttons Fan speed adjustment buttons Energy Saver button On/Off button E-5 *HWWLQJ6WDUWHG You have just purchased a Samsung window-type room air conditioner which should be installed by following your installation manual. Your Owner’s Instructions contain much valuable information on using your air conditioner. Please take the time to read them as they will help you take full advantage of the unit’s features. The booklet is organized as follows. U The following figures are shown on pages 4 and 5: Description of Each Component Remote control (buttons) They will help you find the buttons and understand the symbols displayed. U In the manual, you will find a series of step-by-step procedures for each function available. The illustrations in the step-by-step procedures use four different symbols: PRESS ( PUSH ® IMPORTANT NOTE Inserting the Remote Control Batteries You must insert or replace the remote control batteries when : ◆ You purchase the air conditioner ◆ The remote control does not work correctly ➢ ◆ Use two AAA, LR03 1.5V batteries. ◆ Do not use old batteries or different kinds of batteries together. ◆ Batteries may be completely discharged after 12 months, even if they have not actually been used. 1 Push the battery cover on the rear of the remote control with your thumb in the direction of the arrow and remove it. 2 Insert the two batteries, taking care to respect the polarities : ◆ + on the battery with + on the remote control. ◆ - on the battery with - on the remote control. 3 Close the cover by sliding it back until it clicks into place. E-7 &RROLQJ<RXU5RRP You must select the Cool mode if you wish to lower the temperature in your room. You can also set the Fan speed. Remote Control Control Panel 3UHVVWKH2Q2IIEXWWRQ 5HVXOW U7KHDLUFRQGLWLRQHUVWDUWVXSLQWKH&RROPRGH U7KHXQLWEHHSVWZLFH ,IWKHWHPSHUDWXUHLVQRWGLVSOD\HGRQWKHFRQWUROSDQHO U3UHVVWKHEXWWRQRQWKHUHPRWHFRQWURO RU U3UHVVWKHEXWWRQRQWKHXQLWRQHRUPRUHWLPHVXQWLO is displayed. 5HVXOW U7KHXQLWEHHSVHDFKWLPH\RXSUHVVWKHEXWWRQ U7KHDLUFRQGLWLRQHUVWDUWVXSLQWKH&RROPRGH ® 7KHDLUFRQGLWLRQHULVILWWHGZLWKDSURWHFWLRQPHFKDQLVPWRSUHYHQW WKHXQLWIURPEHLQJGDPDJHGZKHQLWLVVWDUWHGLPPHGLDWHO\DIWHU EHLQJ U3OXJJHGLQ U6WRSSHG It will begin to cool after three minutes <RXFDQFKDQJHPRGHVDWDQ\WLPH 7RDGMXVWWKHWHPSHUDWXUHSUHVVWKHRUEXWWRQVRQWKHUHPRWH FRQWURORUXQLWRQHRUPRUHWLPHVXQWLOWKHGHVLUHGWHPSHUDWXUHLVGLVSOD\HG 7KHWHPSHUDWXUHFDQEHVHWEHWZHHQ)DQG) 5HVXOW U(DFKWLPH\RXSUHVVWKHRUEXWWRQV ±7KHWHPSHUDWXUHLVDGMXVWHGE\)DQGGLVSOD\HGRQ WKHFRQWUROSDQHO ±7KHXQLWEHHSV U7KHDLUFRQGLWLRQHUVWDUWVFRROLQJLIWKHURRPWHPSHUDWXUHLV KLJKHUWKDQWKHVHOHFWHGWHPSHUDWXUH U,IWKHURRPWHPSHUDWXUHUHDFKHVWKHVHWWHPSHUDWXUHWKHDLU FRQGLWLRQHUVWRSVFRROLQJEXWWKHIDQVWLOORSHUDWHV 7RVHWWKHIDQVSHHG U3UHVVWKHRUEXWWRQRQWKHUHPRWHFRQWURODVGHVLUHG RU U3UHVVWKHEXWWRQRQWKHXQLWRQHRUPRUHWLPHVXQWLOWKH GHVLUHG)DQVSHHG))RU)LVGLVSOD\HG )DQ6SHHG ( 7RFRQWUROWKHGLUHFWLRQRIWKHDLUIORZUHIHUWRSDJH Airing Your Room If you want to provide air circulation without cooling, you can use the Fan mode. 1 If necessary, press the Result: Remote Control (On/Off) button. Control Panel ◆ The air conditioner starts up in the Cool mode. ◆ The unit beeps twice. 2 If the fan speed(F1, F2 or F3) is not displayed on the control panel: ◆ Press the button on the remote control or ◆ Press the button on the unit one or more times until the fan speed (F1, F2 or F3) is displayed. / button. Result: ◆ The unit beeps each time you press the ◆ The air conditioner starts up in Fan mode. Mode Cool/Dry/Fan Mode Cool/Dry/Fan ➢ 3 You can change modes at any time. When the air conditioner is in the Fan mode, the temperature cannot be set or displayed. To set the fan speed: ◆ Press the , or button on the remote control as desired. or ◆ Press the button on the unit one or more times until the desired fan speed(F1, F2 or F3) is displayed. Fan Speed 4 To control the direction of the air flow, refer to page 11. E-9 Removing Excess Humidity If the atmosphere in your room is very humid or damp, you can remove excess humidity without lowering the room temperature too much. Remote Control Control Panel 1 If necessary, press the Result: (On/Off) button. ◆ The air conditioner starts up in the Cool mode. ◆ The unit beeps. ☛ 2 3 If the temperature is not displayed on the control panel: ◆ Press the button on the remote control or ◆ Press the button on the unit one or more times until Result: ◆ The unit beeps each time you press the / ◆ The air conditioner starts up in the Cool mode. ➢ You can change modes at any time. E-10 is displayed. button. To adjust the temperature, press the or buttons one or more times until the required temperature is displayed. Possible temperatures are between 64°F and 86°F inclusive. Result: 4 The air conditioner is fitted with a protection mechanism to prevent the unit from being damaged when it is started immediately after being: ◆ Plugged in ◆ Stopped It will begin to cool after three minutes. ◆ Each time you press the or buttons: - The temperature is adjusted by 1°F - The unit beeps ◆ The air conditioner starts removing the excess humidity; the quality of air is adjusted automatically. To control the direction of the air flow, refer to page 11. Adjusting the Air Flow Direction Horizontally Depending on the position of the unit in your room, you can adjust the orientation of the inner air flow blades on the unit. Adjust the air flow blades to the desired position by sliding them side to side. $GMXVWLQJWKH$LU)ORZ'LUHFWLRQ9HUWLFDOO\ The outer air flow blades can be adjusted to control the vertical air flow direction. RECOMMENDATION :KHQ &RROLQJ $GMXVWWKHEODGHVWRIDFH 8SZDUGV $GMXVWWKHDLUIORZEODGHVWRWKHGHVLUHGSRVLWLRQE\SXVKLQJWKHP XSZDUGVRUGRZQZDUGV ® ,I\RXRULHQWWKHDLUIORZEODGHVGRZQZDUGVDQGWKHXQLWRSHUDWHV LQ&RROPRGHIRUORQJSHULRGVRIWLPHGHZPD\ )RUPRQWKHVXUIDFHRIWKHEODGHV 'ULSIURPWKHEODGHV E-11 The On Timer enables you to switch on the air conditioner automatically after a given time. You can select the On timer only when the air conditioner is off. Remote Control Control Panel The Off Timer enables you to switch off the air conditioner automatically after a given time. You can select the Off timer only when the air conditioner is on. Remote Control Control Panel 6HWWLQJWKH6OHHS7LPHU The Sleep Timer can be used when you are cooling your room to switch the air conditioner off automatically after 8 hours. ® Remote Control Control Panel ,I\RXZLVKWRVZLWFKWKHXQLWRIIDIWHUDVSHFLILFWLPHUHIHUWRSDJH 0DNHVXUHWKDW\RXKDYHVHOHFWHGWKH&RROPRGH 3UHVVWKHEXWWRQRQWKHUHPRWHFRQWURO RU 6OHHS 3UHVVWKHEXWWRQRQWKHXQLW 5HVXOW &RROLQJ U (DFKWLPH\RXSUHVVDEXWWRQWKHXQLWEHHSV U ZLOOEHGLVSOD\HG U 7KHUHPDLQLQJWLPHLVGLVSOD\HGDQGGHFUHDVHGE\KRXU DXWRPDWLFDOO\WRLQGLFDWHWKHUHPDLQLQJWLPH U 7KHDLUFRQGLWLRQHUZLOOEHFRQWUROOHGDVLOOXVWUDWHGEHORZ :KHQWKHWHPSHUDWXUHKDV EHHQLQFUHDVHGE\) DIWHUKRXULWLVPDLQWDLQHG IRUKRXUV 7R&DQFHOWKH6OHHS7LPHU 7RFDQFHOWKHWLPHUSUHVV U 6OHHSRQWKHUHPRWHFRQWURO RU U 6OHHSRQWKHXQLW 5HVXOWU 7KHXQLWEHHSV U 7KH6/((3 LQGLFDWRULVQRORQJHUGLVSOD\HG U 7KHDLUFRQGLWLRQHURSHUDWHVLQWKHPRGHVHOHFWHGODVW ® ( ,I\RXVHOHFWWKH(QHUJ\6DYLQJPRGHLQWKH6OHHS7LPHUPRGH WKH6OHHS7LPHUZLOOEHFDQFHOOHGDQGWKHDLUFRQGLWLRQHUZLOOVWDUWXS LQWKH(QHUJ\6DYLQJPRGH Selecting Energy Saving Mode If you wish to save energy when using your air conditioner, select the energy saving mode. 1 To select the energy saving mode, press the control or E.Saver E.Saver button on the remote Remote Control Control Panel button on the unit one or more times until the Energy Saver indicator lights up. Result: ➢ 2 ◆ The fan and compressor cycle on and off together. ◆ The fan will continue to run for a short time after the compressor cycles off. If you would like the air conditioner to run in Dry mode, do not press the E.Saver button. You cannot use the Dry mode in the energy saving mode. To stop the energy saving mode, press the control or Result: ➢ E.Saver E.Saver button on the remote button on the unit again. The fan runs at all times, while the compressor cycles on and off. If you select the Sleep Timer in the Energy Saving mode, the Energy Saving will be cancelled and the air conditioner will start up in the Sleep Timer mode. E-15 7HPSHUDWXUHDQG+XPLGLW\5DQJHV 7KHIROORZLQJWDEOHLQGLFDWHVWKH DLU FRQGLWLRQHU V WHPSHUDWXUHDQGKXPLGLW\ RSHUDWLRQ UDQJH ( 0RGH ,QGRRU7HPSHUDWXUH 2XWGRRU7HPSHUDWXUH ,QGRRU+XPLGLW\ &RROLQJ )WR)DSSUR[ )WR)DSSUR[ RUOHVV ,IWKHDLUFRQGLWLRQHULVXVHGDW 7KHQ +LJKHUWHPSHUDWXUH 7KHDXWRPDWLFSURWHFWLRQIHDWXUHPD\EHWULJJHUHGDQGWKHDLU FRQGLWLRQHUZLOO VWRS /RZHUWHPSHUDWXUH $ ZDWHUOHDNDJHRUVRPHRWKHUPDOIXQFWLRQPD\KDSSHQLIWKH KHDWH[FKDQJHUIUHH]HV +LJKHUKXPLGLW\OHYHOV :DWHUPD\FRQGHQVHRQDQGGULSIURPWKHVXUIDFHRIWKHXQLW LILWLVXVHGIRUORQJSHULRGV Cleaning Your Air Conditioner Be sure to clean the air filter periodically to maintain the air conditioner in the best condition for a long period of time. ☛ When cleaning the air conditioner, turn it off and pull out the power plug. 1 Open the front grille by pulling the tabs on both sides of the grille. Then lift it up slightly to open the front grille completely. 2 Grab the tabs on the filter and pull it up and out. 3 Remove all dust on the air filter with a vacuum cleaner or brush. 4 When you have finished, insert the air filter back into its original position. 5 Wipe the surface of the unit with a neutral detergent and then wipe it again with dry cloth. (Be sure not to use benzene, solvent or other chemical products.) ➢ If you... Then... Will not be using the air conditioner for a long period of time ◆ Set the fan going for a few hours to dry the inside of the air conditioner thoroughly. ◆ Switch the air conditioner off and unplug it from the wall socket. ◆ Clean the filter and outer surfaces. Have not used the air conditioner for a long period of time Set the fan going for a few hours to dry the inside of the air conditioner thoroughly. E-17 6ROYLQJ&RPPRQ3UREOHPV Before contacting an authorized service center, perform the following simple checks. They may save you the time and expense of an unnecessary call. 3UREOHP ([SODQDWLRQ6ROXWLRQ 7KHDLUFRQGLWLRQHUGRHV QRW RSHUDWHDWDOO U &KHFNWKDWWKHFLUFXLWEUHDNHUXVHGIRUWKHDLUFRQGLWLRQHUKDVQRWEHHQ WULJJHUHG U&KHFNWKDWWKHSRZHUFDEOHLVSOXJJHGLQWRDZDOOVRFNHWDQGWKHVRFNHWLV VZLWFKHGRQLIQHFHVVDU\ U&KHFNWKDWWKHWHPSHUDWXUHLQGLFDWRURQWKHXQLWLVOLWLIQHFHVVDU\ SUHVVWKH 2Q2IIEXWWRQRQWKHUHPRWHFRQWURORUXQLW 7KHDLUFRQGLWLRQHUGRHVQRW RSHUDWHZLWKWKHUHPRWH FRQWURO U &KHFNWKDWWKHUHDUHQRREVWDFOHVEHWZHHQ\RXDQGWKHXQLW U5HSODFHWKHUHPRWHFRQWUROEDWWHULHVLIQHFHVVDU\ U&KHFNWKDW\RXDUHFORVHHQRXJKWRWKHXQLWVHYHQPHWHUV\DUGVRUOHVV 1REHHSLVKHDUGZKHQ\RX SUHVVWKH 2Q2IIEXWWRQ RQWKHUHPRWHFRQWURO U &KHFNWKDW\RXDUHSRLQWLQJWKHUHPRWHFRQWURODWWKHUHPRWHFRQWUROVHQVRU RQWKHXQLW U5HSODFHWKHUHPRWHFRQWUROEDWWHULHVLIQHFHVVDU\ 7KHDLUFRQGLWLRQHUGRHVQRW FRRO U &KHFNWKDWWKHFRUUHFWRSHUDWLQJPRGHKDVEHHQVHOHFWHG&RRO U7KHURRPWHPSHUDWXUHPD\EHWRRORZ U 'XVWPD\EHEORFNLQJWKHDLUILOWHUUHIHUWRSDJHIRUFOHDQLQJLQVWUXFWLRQV U &KHFNWKDWWKHUHLVQRREVWDFOHEORFNLQJWKHDLUIORZLQWRRURXWRIWKHXQLW 7KHWLPHULVQRWFRUUHFWO\WULJ U &KHFNWKDWWKHWLPHUKDVEHHQSURJUDPPHGFRUUHFWO\UHIHUWRSDJHVa JHUHG 2GRUVDUHSHUPHDWLQJWKH URRPGXULQJDLUFRQGLWLRQLQJ ( U 9HQWLODWHWKHURRP 7HFKQLFDO6SHFLILFDWLRQV $ESIGN ANDSPECIFICATIONSARESUBJECTTOCHANGEWITHOUTNOTICE 0RGHO 3RZHU6XSSO\ $:&% $:&% $:&% $:&% $:&% 9a+] $:&% 9a+] ( INSTALLATION MANUAL Window-Type room air conditioner 7KLVDLUFRQGLWLRQHUVKRXOGEHLQVWDOOHGLQDZLQGRZ7RHQVXUHSURGXFWTXDOLW\DQGVDIHW\ GRQRWLQVWDOOWKHDLUFRQGLWLRQHULQDZDOO G ETTING STARTED Preparation for Installation ◆ Always have an assistant to help you. Never attempt to install any air conditioner alone. ◆ You risk the possibility of hurting yourself or injuring others by attempting to install it alone. Checkpoints Prior to Installation 1 Carefully remove the unit from the packing case and lay it on the floor and check that all accessories (as indicated) are enclosed. 2 Check the cabinet and front grille of the unit for any defects such as scratches. 3 Be sure to check the power supply. ◆ Refer to the specifications on the label attached to the unit. Installation Conditions 1 Electrical Requirements For personal safety: ◆ This appliance must be properly grounded. ◆ Do not, under any circumstances, cut or remove the third grounding prong from the power cord. ◆ We recommend that you do not use an extension cord or an adapter plug with this appliance. ◆ Do not change the plug on the power cord of this appliance. ◆ Follow national electrical codes or local codes and ordinances. 115V 15 AMP circuit "parallel" type 230-208V 20 AMP circuit "perpendicular" type 230-208V 15 AMP circuit "tandem" type 230-208V 30 AMP circuit "tandem" type ◆ If the electric supply provided does not meet the above specifications, call a licensed electrician. ◆ Aluminum house wiring may pose special problems consult a qualified electrician. ◆ This unit requires a separate circuit, serving only this appliance. E-22 :LQGRZ7\SH5HTXLUHPHQWV 6WDQGDUGGRXEOHKXQJZLQGRZZLWKDFWXDORSHQLQJZLGWKRI³;´ 7KHLQVWDOODWLRQZLOOQHHGWREHPRGLILHGIRUZLQGRZVRWKHUWKDQ WKHVWDQGDUGGRXEOHKXQJW\SH &OHDUYHUWLFDORSHQLQJRI³<´PLQLPXPIURPERWWRPRIVDVKWRVLOO ,QVWDOOWKHDLUFRQGLWLRQHULQDZLQGRZZKHUHWKHUHZLOOEH ³;´ ³<´MLQ. HQRXJKFOHDUDQFHDURXQGWKHFDELQHWWRDOORZDPSOHFLUFXODWLRQRI DLUWKURXJKWKHXQLW $OOVXSSRUWLQJSDUWVVKRXOGEHVHFXUHGWRILUPZRRGPDVRQU\ RUPHWDO 7\SH :LGWK 0RGHOV ³ ;´ ³ <´ 40FP 3 8 $ $:&% FPWRFP WR % $:&% FPWRFP WR % $:&% $:&% FPWRFP WR FP & $:&% $:&% FPWRFP WR 25 FP FP 7RROVQHHGHG 3KLOLSVKHDGVFUHZGULYHU 5XOHURUWDSHPHDVXUH $GMXVWDEOHZUHQFK 3HQFLO 6FLVVRUV ( IRXU $ A 7\SH $:6&%,QVWDOODWLRQFRQW ,QVWDOOWKHZLQGRZJDVNHW &XWWKHIRDPZLQGRZJDVNHWWRWKHZLQGRZZLGWKDQGVWXIILWEHWZHHQWKH ZLQGRZDQGWKHJODVVWRSUHYHQWDLUDQGLQVHFWVIURPJHWWLQJLQWRWKHURRP &KHFNIRUDLUOHDNVDQGVHDO 3OXJLQWKHSRZHUVZLWFKRQWKHDLUFRQGLWLRQHUWXUQWKHDLUFRQGLWLRQHURQ DQGRSHUDWHLWLQ&RROPRGHDQGFKHFNIRUXQXVXDOYLEUDWLRQV ® (26 $IWHUVHYHUDOPLQXWHVWKHXQLWZLOOEHEORZLQJRXWFROGDLU ,IWKHXQLWLVQRWFROGSOHDVHUHWXUQLWWRWKHGHDOHU A 7\SH $:6&%,QVWDOODWLRQFRQW 5HPRYDORIWKH)URQW*ULOOH If you need to remove the front grille for replacement, follow the steps below. 2SHQWKHIURQWJULOOHE\SXOOLQJWKHWDEVRQERWKVLGHVRIWKHJULOOH 7KHQOLIWLWXSVOLJKWO\WRRSHQWKHIURQWJULOOHFRPSOHWHO\ 5HPRYHWKHVFUHZWKDWKROGVWKHJULOOHLQSODFH ® 5HPRYHWKHVKLSSLQJWDSHEHIRUHSXOOLQJRXWWKHDLUILOWHU LIQHFHVVDU\ 'LVDVVHPEOHWKHIURQWJULOOH 3UHVVERWKVLGHVRIWKHFDELQHWLQWKHGLUHFWLRQRIWKHDUURZDVVKRZQ LQWKHILJXUH 3XOOWKHORZHUSDUWRIWKHIURQWJULOOHVOLJKWO\IRUZDUG ® 'RQRWSXOOERWWRPHGJHRIJULOOHWRZDUG\RXPRUHWKDQFP 'DPDJHWRWKHJULOOH¶VWZRWRSWDEVPD\RFFXU *UDVSWKHJULOOHDWERWKVLGHVQHDUWKHERWWRPDQGFDUHIXOO\OLIWLWVWUDLJKW XSWRGLVHQJDJHWKHJULOOH¶VWZRWRSWDEVIURPVORWVQHDUWKHWRSRIWKH FDELQHW 5HLQVWDOOWKHIURQWJULOOH )L[WKHXSSHUIURQWJULOOH 6OLGHRQHVLGHRIWKHORZHUSDUWRIWKHIURQWJULOOHVOLJKWO\EDFNZDUG 6OLGHWKHRWKHUVLGHEDFNZDUG 5HLQVWDOOWKHVFUHZDQGWKHDLUILOWHU (27 B Type $:&%$:&%$:&%,QVWDOODWLRQFRQW. &DUHIXOO\UHPRYHWKHFKDVVLVIURPWKHFDELQHWE\SXOOLQJLWIRUZDUG WRZDUGV\RX$ OLWWOHFDUHIXOOHYHUDJHZLWKDVFUHZGULYHUPD\KHOSWRVOLGH WKHXQLWRXW ®,WLVDOVRQRZDJRRGWLPHWRLQVSHFWWKHIDQWRFKHFNIRUGDPDJH FDXVHGE\VKLSPHQW5RWDWHWKHIDQEODGHZLWK\RXUKDQGV ,WVKRXOGUHYROYHIUHHO\ZLWKRXWDQ\VFUDWFKLQJRUXQXVXDOQRLVH ,IVXFKDQRLVHH[LVWVSDFNWKHXQLWXSDQGUHWXUQLWWR\RXUGHDOHU 7KHXQLWPD\KDYHEHHQPLVDOLJQHGGXHWRVKLSSLQJDEXVH 7KHHPSW\FDELQHWZLWKRXWWKHFKDVVLVLVQRZUHODWLYHO\OLJKW ,I\RXKDYHFRPPRQ'RXEOH+XQJ:LQGRZVSURFHHGWRLQVWDOOWKH WRSVXSSRUWFKDQQHORQWKHFDELQHW 5HPRYHWKHEDFNLQJIURPWKHWRSVXSSRUWFKDQQHOVHDOVWULSDQG DWWDFKLWWRWKHERWWRPRIWKHWRSVXSSRUWFKDQQHO 7RSVXSSRUWFKDQQHO VHDOVWULS ,QVWDOOWKHWRSVXSSRUWFKDQQHOZLWKIRXURUILYH7\SH%VFUHZV SURYLGHG 7RS6XSSRUW&KDQQHO ®0DNHVXUHWRVFUHZIURPWKHWRSRIWKHFDELQHWRQWRWKHFKDQQHO ®7KHWRSVXSSRUWFKDQQHOLV³/´VKDSHG7KHKLJKVLGHRIWKHFKDQQHOPXVW DOZD\VIDFHLQZDUGV $WWDFKWKHZLQGRZILOOHUSDQHOVWRWKHFDELQHW 6OLGHWKHZLQGRZILOOHUSDQHOVDQGWKHLUIUDPHVLQWRWKHFKDQQHOVRQWKH WRSDQGERWWRPRIWKHFDELQHW $WWDFKWKHZLQGRZILOOHUSDQHOVWRWKHFDELQHWXVLQJVL[7\SH%VFUHZV ( % 7\SH $:&%$:&%$:&%,QVWDOODWLRQFRQW 1RZSRVLWLRQWKHFDELQHWFHQWUDOO\LQWRWKHZLQGRZ 0DNHVXUH\RXKDYHDERXWDILYHGHJUHHWLOWEDFNZDUGVIRU SURSHUGUDLQDJHRIFRQGHQVDWLRQ $WWDFKWKHVXSSRUWEUDFNHWVWRWKHFDELQHWIRUDGMXVWLQJWKHSLWFK 6HOHFWWKH7\SH'VXSSRUWEUDFNHW SRVLWLRQWKDWZLOOSODFHWKHEUDFNHW QHDUWKHRXWHUPRVWSRLQWRQWKHZLQGRZVLOO,QPRVWFDELQHWVWKLVZLOO EHWKHILUVWVHWRIKROHV8VLQJHLJKW 7\SH%VFUHZVDWWDFKWKH VXSSRUWEUDFNHWVWRHDFKVLGHRIWKHFDELQHWERWWRP 7KUHDGWKH7\SH&EROWV LQWRWKHVXSSRUWEUDFNHWVPDNLQJVXUHWKH FDELQHWPDLQWDLQVDVOLJKWO\GRZQZDUGVODQWWRWKHRXWVLGH ®6RPHZLQGRZVGRQRWKDYHa VXIILFLHQWoutside ZLQGRZOHGJH. LQVXFKFDVHVWKHEUDFNHWVVHUYHQRXVHIXOSXUSRVH 7\SH% 6FUHZV 7\SH&%ROWV $WWDFKWKHZLQGRZVDVKVHDOWRWKHZLQGRZ &XWWKHZLQGRZVDVKVHDOWRWKHZLQGRZZLGWK 5HPRYHWKHEDFNLQJIURPWKHZLQGRZVDVKVHDODQGDWWDFKLWWR WKHXQGHUVLGHRIWKHERWWRPRIWKHZLQGRZ :LQGRZVDVKVHDO ( % 7\SH $:&%$:&%$:&%,QVWDOODWLRQFRQW ,QVWDOOWKHFDELQHWLQWKHZLQGRZ 3ODFHWKHFDELQHWLQWRWKHZLQGRZZLWKWKHWRSVXSSRUWFKDQQHO SRVLWLRQHGMXVWLQIURQWRIWKHERWWRPVDVK 3XOOWKHZLQGRZGRZQXQWLOLWUHVWVRQWKHFDELQHWMXVWEHKLQGWKHWRS VXSSRUWFKDQQHO 7RS6XSSRUW &KDQQHO /RFDWHWKUHHVFUHZKROHVDORQJWKHFDELQHWERWWRPIURQWHGJH &HQWHUWKHFDELQHWVLGHWRVLGHLQWKHZLQGRZDQGPRXQWLWWRWKH ZLQGRZVWRROXVLQJ WKUH H 7\SH$ VFUHZV )RUVHFXULW\DOZD\VPDNHVXUHWKHERWWRPFKDQQHOHQJDJHVRQWRWKHLQVLGH IURQWHGJHRIWKHZLQGRZ,I\RXUZLQGRZVLOOGLPHQVLRQVDUHVXFKWKDWWKLVLV QRWSRVVLEOH\RXPD\QHHGWRGULOOWKUHHDGGLWLRQDOKROHVHTXDOO\VSDFHGRQ WKHERWWRPFKDQQHOWRSURSHUO\VHFXUHWKHFDELQHW )RUVRPHZLQGRZVLWPD\EHQHFHVVDU\WRLQVWDOOFPZLGHVWULSVRI KDUGZRRGSRVLWLRQHGDORQJWKHZLGWKRIWKHZLQGRZWRREWDLQWKHSURSHU DOLJQPHQWDQGSLWFK7KHZRRGHQVWULSPXVWEHVFUHZHGGRZQVHFXUHO\ EHIRUHUHVWLQJWKHFDELQHWRQWRSRILW1HJOHFWLQJWRHQVXUHVXFKVHFXULW\ PD\ULVNKDYLQJWKHDLUFRQGLWLRQHUIDOORXWRIWKHZLQGRZDQGKXUWLQJ VRPHRQH ([WHQGWKHZLQGRZILOOHUSDQHOV 7\SH$ 6FUHZV :KHQWKHZLQGRZLVSXOOHGGRZQWKHZLQGRZVKRXOGUHVWRQWKH FDELQHWMXVWEHKLQGWKHZLQGRZILOOHUSDQHOIUDPHV 6OLGHWKHILOOHUSDQHOVRXWZDUGXQWLOWKH\WRXFKWKHVLGHVRIWKHZLQGRZ 6HFXUHWKHSDQHOVE\SXWWLQJIRXU 7\SH$ VFUHZV WKURXJKWKH PRXQWLQJKROHVLQWKHSDQHOVDQGGULYLQJWKHPLQWRWKHZLQGRZVWRRO DQGVDVK 7\SH$ 6FUHZV $WWDFKWKHVHFXULW\EUDFNHWZLWKD7\SH$ VFUHZ ( % 7\SH $:&%$:&%$:&%,QVWDOODWLRQFRQW 6OLGHWKHFKDVVLVLQWRWKHFDELQHW &DUHIXOO\VOLGHWKHDLUFRQGLWLRQHUEDFNLQWRWKHFDELQHW 3ODFHWKHERWWRPJDVNHWEHWZHHQWKHERWWRPRIWKHFKDVVLVDQGWKH LQVLGHERWWRPRIWKHFDELQHW)ROGXSWKHHQGVRQERWKVLGHVDQG SXVKWKHPLQ 5HLQVWDOOWKHFKDVVLVWRFDELQHWUHWDLQLQJVFUHZVUHPRYHGLQ SDJH %RWWRPJDVNHW :LQGRZJDVNHW ,QVWDOOWKHZLQGRZJDVNHW &XWWKHZLQGRZJDVNHWWRWKHZLQGRZZLGWKDQGVWXIILWEHWZHHQWKHZLQGRZ DQGWKHJODVVWRSUHYHQWDLUDQGLQVHFWVIURPJHWWLQJLQWRWKHURRP 5HLQVWDOOWKHSDQHODQGJULOOH )L[WKHXSSHUIURQWSDQHO 6OLGHRQHVLGHRIWKHORZHUSDUWRIWKHIURQWSDQHOVOLJKWO\EDFNZDUG 6OLGHWKHRWKHUVLGHEDFNZDUG 5HLQVWDOOWKHIURQWJULOOHWRWKHFDELQHWDIWHUUHSODFLQJWKHVFUHZ UHPRYHGLQVWHS &KHFNIRUDLUOHDNVDQGVHDO ®6RPHLQVWDOODWLRQVPD\UHTXLUHDGGLWLRQDOVHDOLQJDURXQGWKH ZLQGRZDQGDLUFRQGLWLRQHU 3OXJLQWKHSRZHUVZLWFKRQWKHDLUFRQGLWLRQHUWXUQWKHDLUFRQGLWLRQHU RQDQGRSHUDWHLWLQ&RROPRGHDQGFKHFNIRUXQXVXDOYLEUDWLRQV ® $IWHUVHYHUDOPLQXWHVWKHXQLWZLOOEHEORZLQJRXWFROGDLU ,IWKHXQLWLVQRWFROGSOHDVHUHWXUQLWWRWKHGHDOHU ( C Type $:149CB/AW189CB ,QVWDOODWLRQ(cont.) 5 5 Carefully remove the chassis from the cabinet by pulling it forward towards you. (A little careful leverage with a screwdriver may help to slide the unit out.) ➢ It is also now a good time to inspect the fan to check for damage caused by shipment. Rotate the fan blade with your hands. • It should revolve freely without any scratching or unusual noise. If such a noise exists, pack the unit up and return it to your dealer. The unit may have been misaligned due to shipping abuse. The empty cabinet without the chassis is now relatively light. If you have common Double Hung Windows, proceed to install the top support channel on the cabinet. 6 6 Remove the backing from the top support channel seal strip and attach it to the bottom of the top support channel. Top support channel seal strip 7 Top Support Channel 7 Install the top support channel with five Type B screws provided. ➢ Make sure to screw from the top of the cabinet onto the channel. ➢ The top support channel is “L” shaped. The high side of the channel must always face inwards. 8 8 Attach the window filler panels to the cabinet. 8-1 Slide the window filler panels and their frames into the channels on the top and bottom of the cabinet. 8-2 Attach the window filler panels to the cabinet using eight Type B screws. E-34 C Type $:149CB/AW189CB ,QVWDOODWLRQ(cont.) Now position the cabinet centrally into the window. Make sure you have about a five degree tilt backwards for proper drainage of condensation. 9 Attach the support brackets to the cabinet for adjusting the pitch. 9-1 9-1 Select the Type D support bracket position that will place the bracket near the outermost point on the window sill. In most cabinets this will be the first set of holes. Using eight Type B screws, attach the support brackets to each side of the cabinet bottom. 9-2 Thread the Type C bolts into the support brackets, making sure the cabinet maintains a slightly downward slant to the outside. ➢ Some windows do not have sufficient window ledge on the outside edge of the window, in such cases the brackets serve no useful purpose. 9-2 Type B Screws Type C Bolts 10 Attach the window sash seal to the window. 10 10-1 Cut the window sash seal to the window width. 10-2 Remove the backing from the window sash seal and attach it to the underside of the bottom of the window. Window sash seal E-35 C Type $:149CB/AW189CB ,QVWDOODWLRQ(cont.) 11 11 Install the cabinet in the window. 11-1 Place the cabinet into the window with the top support channel positioned just in front of the bottom sash. Top Support Channel 11-2 Pull the window down until it rests on the cabinet, just behind the top support channel. 11-3 Locate five screw holes along the cabinet bottom front edge. Center the cabinet, side to side, in the window and mount it to the window stool using five Type A screws. ➢ For security, always make sure the bottom channel engages onto the inside front edge of the window. If your window sill dimensions are such that this is not possible, you may need to drill three additional holes equally spaced on the bottom channel to properly secure the cabinet. ➢ For some windows, it may be necessary to install 5cm(2") wide strips of hard wood positioned along the width of the window to obtain the proper alignment and pitch. The wooden strip must be screwed down securely before resting the cabinet on top of it. Neglecting to ensure such security may risk having the air conditioner fall out of the window and hurting someone. 12 12 Extend the window filler panels. Type A Screws 12-1 When the window is pulled down, the window should rest on the cabinet just behind the window filler panel frames. 12-2 Slide the filler panels outward until they touch the sides of the window. Secure the panels by putting four Type A screws through the mounting holes in the panels and driving them into the window stool and sash. Type A Screws 13 E-36 13 Attach the security bracket with a Type A screw. C Type $:149CB/AW189CB ,QVWDOODWLRQ(cont.) 14 Slide the chassis into the cabinet. 14 14-1 Carefully slide the air conditioner back into the cabinet. 14-2 Place the bottom gasket between the bottom of the chassis and the inside bottom of the cabinet. Fold up the ends on both sides and push them in. 14-3 Reinstall 2 front screws on the side of unit among the removed screws in page 17. Bottom gasket 15 Install the window gasket. Cut the window gasket to the window width and stuff it between the window and the glass to prevent air and insects from getting into the room. 15 16 Reinstall the panel and grille. 16 Window gasket 16-1 Fix the upper front panel. 16-2 Slide one side of the lower part of the front panel slightly backward. 16-3 Slide the other side backward. 16-4 Reinstall the front grille to the cabinet after replacing the screw removed in step 2. 17 Check for air leaks and seal. ➢ Some installations may require additional sealing around the window and air conditioner. 18 Plug in the power, switch on the air conditioner, turn the air conditioner on and operate it in Cool mode and check for unusual vibrations. ➢ After several minutes the unit will be blowing out cold air. If the unit is not cold, please return it to the dealer. E37 SAMSUNG ROOM AIR CONDITIONER LIMITED WARRANTY TO ORIGINAL PURCHASER This SAMSUNG brand product, as supplied and distributed by SAMSUNG ELECTRONICS AMERICA, INC. (SAMSUNG) and delivered new, in the original carton to the original consumer purchaser, is warranted by SAMSUNG against manufacturing defects in materials and workmanship for a limited warranty period of: Five (5) Years Parts, Labor and Compressor Warranty This limited warranty begins on the original date of purchase, and is valid only on products purchased and used in the United States. Warranty repairs must be performed by SAMSUNG's authorized service center. To receive warranty service, the original dated bill of sale must be presented upon request as proof of purchase to SAMSUNG or SAMSUNG's authorized service center. SAMSUNG will repair or replace any part found to be defective at no charge, as stipulated herein, with new or reconditioned parts during the limited warranty period specified above. To request warranty service, the purchaser must contact SAMSUNG for problem determination and service procedures. SAMSUNG does not warrant uninterrupted or error-free operation of the product. All replaced parts and products become the property of SAMSUNG and must be returned to SAMSUNG. Replacement parts and products assume the remaining original warranty, or ninety(90) days,whichever is longer. In - Home Service : During the warranty labor period, in-home service will be provided subject to availability within the contiguous United States. In-home service is not available in all areas. If during in-home service repair can not be completed, it may be necessary to remove, repair and return the product. If in-home service is unavailable, SAMSUNG may elect, at our option, to provide for transportation of our choice to and from a SAMSUNG authorized service center. Otherwise, transportation to and from the SAMSUNG authorized service center is the responsibility of the purchaser. This limited warranty covers manufacturing defects in materials and workmanship encountered in normal, noncommercial use of this product and shall not apply to the following, including, but not limited to: delivery and installation; damage which occurs in shipment; applications and uses for which this product was not intended; failures or problems which are caused by products or equipment not supplied by SAMSUNG; accidents, misuse, abuse, neglect, misapplication, fire, water, lightning or other acts of nature; incorrect electrical line voltage, fluctuations or surges; damage caused by improper or faulty installation; product alteration or modification; improper or unauthorized repair; cosmetic damage or exterior finish; product with altered serial numbers; failure to follow operating and environmental instructions that are covered and prescribed in the instruction book; customer adjustments, routine maintenance and cleaning; consumable items such as filters; use of non-SAMSUNG or unauthorized parts, supplies, accessories or equipment which damage this product or result in service problems. THERE ARE NO EXPRESS WARRANTIES OTHER THAN THOSE LISTED AND DESCRIBED ABOVE, AND NO WARRANTIES WHETHER EXPRESS OR IMPLIED, INCLUDING, BUT NOT LIMITED TO, ANY IMPLIED WARRANTIES OF MERCHANTABILITY OR FITNESS FOR A PARTICULAR PURPOSE, SHALL APPLY AFTER THE EXPRESS WARRANTY PERIODS STATED ABOVE, AND NO OTHER EXPRESS WARRANTY OR GUARANTY GIVEN BY ANY PERSON, FIRM OR CORPORATION WITH RESPECT TO THIS PRODUCT SHALL BE BINDING ON SAMSUNG. SAMSUNG SHALL NOT BE LIABLE FOR LOSS OF REVENUE OR PROFITS, FAILURE TO REALIZE SAVINGS OR OTHER BENEFITS, OR ANY OTHER SPECIAL, INCIDENTAL OR CONSEQUENTIAL DAMAGES CAUSED BY THE USE, MISUSE OR INABILITY TO USE THIS PRODUCT, REGARDLESS OF THE LEGAL THEORY ON WHICH THE CLAIM IS BASED, AND EVEN IF SAMSUNG HAS BEEN ADVISED OF THE POSSIBILITY OF SUCH DAMAGES. NOR SHALL RECOVERY OF ANY KIND AGAINST SAMSUNG BE GREATER IN AMOUNT THAN THE PURCHASE PRICE OF THE PRODUCT SOLD BY SAMSUNG AND CAUSING THE ALLEGED DAMAGE. WITHOUT LIMITING THE FOREGOING, PURCHASER ASSUMES ALL RISK AND LIABILITY FOR LOSS, DAMAGE OR INJURY TO PURCHASER AND PURCHASERS PROPERTY AND TO OTHERS AND THEIR PROPERTY ARISING OUT OF THE USE, MISUSE OR INABILITY TO USE THIS PRODUCT SOLD BY SAMSUNG NOT CAUSED DIRECTLY BY THE NEGLIGENCE OF SAMSUNG. THIS LIMITED WARRANTY SHALL NOT EXTEND TO ANYONE OTHER THAN THE ORIGINAL PURCHASER OF THIS PRODUCT, IS NONTRANSFERABLE AND STATES YOUR EXCLUSIVE REMEDY. Some states do not allow limitations on how long an implied warranty lasts, or the exclusion or limitation of incidental or consequential damages, so the above limitations or exclusions may not apply to you. This warranty gives you specific legal rights, and you may also have other rights which vary from state to state. To obtain warranty service, please contact SAMSUNG at SAMSUNG ELECTRONICS AMERICA, INC. - CONSUMER ELECTRONICS CUSTOMER SERVICE 105 Challenger Road Ridgefield Park,NJ 07660-0511 1-800-SAMSUNG (1-800-726-7864) www.samsung.com