1
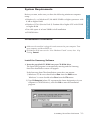
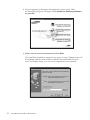
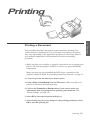
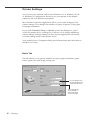
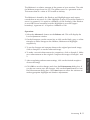
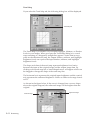
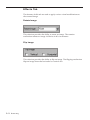
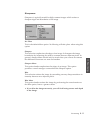
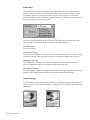
Laser Printer,
Scanner
User’s Guide
SF-5800P
ELECTRONICS
Internet Home Page: http://www.samsungelectronics.com
P/N: JC68-00042A Rev.2.00
Trademarks
¥ Windows is a trademark of Microsoft Corporation.
¥ IBM is a trademark of International Business Machines.
¥ Centronics is a trademark of Centronics Data Computer.
¥ Other names and trademarks mentioned in this manual are trademarks of their respective
holders.
Contents
1 Installing Software
Chapter 1
Installing SmarThru Software
2 Printing
About SmarThru Software ___________________________ 1.1
MFP Driver _________________________________________ 1.2
SmarThru Software __________________________________ 1.2
OCR software _______________________________________ 1.2
Bonus Software _____________________________________ 1.2
System Requirements _______________________________ 1.3
Installation Procedure _______________________________ 1.3
Install the Samsung Software _________________________ 1.3
Install Bonus Software _______________________________ 1.6
Uninstalling SmarThru Software _____________________ 1.6
In Windows 95/98, NT _______________________________ 1.6
In Windows 3.x ______________________________________ 1.7
Using the SmarThru CD-ROM_________________________ 1.8
3 Scanning
Chapter 2
Printing
4 Troubleshooting
Printing a Document ________________________________ 2.1
Printer Settings _____________________________________ 2.2
Basic Tab ___________________________________________ 2.2
Print Quality Tab ____________________________________ 2.3
Advanced Tab ______________________________________ 2.3
About Tab __________________________________________ 2.4
Using Help _________________________________________ 2.4
Changing Printer Settings for All Documents __________ 2.4
i
Chapter 3
Scanning
Overview___________________________________________ 3.1
Scanning the Image _________________________________ 3.2
Samsung TWAIN for Scan Windows __________________ 3.3
Using On-Line Help _________________________________ 3.3
Scanner Control Tabs _______________________________ 3.4
Basic Tab ___________________________________________ 3.4
Job Type ____________________________________________ 3.4
Image Type _________________________________________ 3.4
Resolution __________________________________________ 3.5
Image Area _________________________________________ 3.6
Reduce/Enlarge _____________________________________ 3.6
Balance Tab_________________________________________ 3.8
Color Channel_______________________________________ 3.8
Highlight ___________________________________________ 3.8
Shadow ____________________________________________ 3.8
Midtone ____________________________________________ 3.9
Advanced Selection __________________________________ 3.9
Effects Tab__________________________________________ 3.14
Rotate Image ________________________________________ 3.14
Flip Image __________________________________________ 3.14
Sharpness___________________________________________ 3.15
Descreen____________________________________________ 3.16
Preview Window ____________________________________ 3.17
Image Control Tools__________________________________ 3.18
Chapter 4
Troubleshooting
Fixing Problems_____________________________________ 4.1
Printer Problems ____________________________________ 4.1
Printer Quality Problems _____________________________ 4.3
ii
About SmarThru Software
You must install the SmarThru CD-ROM to print, scan, or to send and
receive electronic faxes. The SmarThru includes the followings:
¥ MFP Driver
¥ SmarThru Software
¥ OCR Software (AnyPage)
¥ Bonus software (Acrobat Reader 3.xx)
For details on the drivers, refer to each itemÕs description.
Installing SmarThru Software
1.1
1 Installing Software
Installing
SmarThru Software
MFP Driver
To use the machine as your printer, or scanner, or to send and receive
electronic faxes, you must install the MFP driver.
SmarThru Software
The SmarThru software contains:
ScanThru
It lets you scan documents and images quickly and easily. With the
ScanThru, you can set image type and resolution for the scanner, adjust
brightness and contrast, perform a color correction, and so on.
CopyThru
It lets you make a copy of the scanned documents or images. With
CopyThru, you can change resolution and image type used for copying,
and so on.
FaxThru
It helps you to create fax covers and send electronic faxes.
DocuThru
General form to work with messages. With DocuThru, you can perform all
the operations of the SmarThru system.
ImageThru
It is an image database manager and image editor program. With the
ImageThru, you can search the database for images, adjust parameters of
an image, such as brightness, contrast and saturation, and apply different
effects, such as sharpening, emboss, posterize, mosaic etc. You can also send
images by fax or mail
MailThru
With MailThru you can send, receive and easily organize your work with
e-mail messages. The system provides you with convenient tools which let
you sort and find messages using a number of criteria; operate on messages
using scenatios.
OCR Software (AnyPage)
OCR (Optical Character Recognition) is a software that has the ability to
recognize most character formats. So that a scanned document can be read
and edited on your word processor.
Bonus Software
Acrobat Reader 3.x is installed. With Acrobat Reader 3.x, you can view and
print the SmarThru UserÕs Guide contained in the SmarThru CD-ROM.
1.2
Installing SmarThru Software
System Requirements
¥ Windows 3.x, or Windows 95/98: 486SX 33MHz or higher processor with
8 MB or higher RAM
¥ Windows NT 4.0 (Service Pack 3): Pentium 90 or higher CPU with 32 MB
or higher RAM
¥ Free disk space of at least 50MB for full installation
¥ CD-ROM drive
Installation Procedure
à Make sure the machine is plugged in and connected to your computer. Turn
your computer and the machine on.
à If Windows 95/98 users see the ÒNew Hardware FoundÓ screen, close it by
clicking Cancel.
Install the Samsung Software
1. Insert the supplied CD-ROM into your CD-ROM drive.
The SmarThru program is automatically running and the Samsung
SmarThru Installation screen will appear.
If the Samsung SmarThru Installation screen does not appear:
1) Windows 95/98 users should select Run from the Start menu.
Windows 3.x users should select Run from the File menu.
2) Type D:\Setupint (where ÔDÔ represents the letter designation of your
computerÕs CD ROM drive), and click OK to start the installation
program.
Installing SmarThru Software
1.3
1 Installing Software
Before you start, make sure you have the following minimum computer
setup:
2. Select a language in dialog for international version setup. Then
the SmarThru program will begin. Click Install the Samsung Software
on your PC.
3. Follow the on-screen instructions and click Next.
The SmarThru installation supports two types of setup. Typical setup will
be installed with the most common options. Recommended for most
users. In Custom setup, you can select components to be installed.
1.4
Installing SmarThru Software
MFP driver to print, scan, or to
send and receive electronic faxes.
SmarThru soft to work with
scanned images, and electronic
documents.
AnyPage software to enable
OCR.
4. When the installation is completed, you must shut down and restart your
computer.
If your computer does not shut down and restart automatically, you must shut
it down manually and restart it before the changes you have made will be in
ineffect.
5. After Windows restarts, the Select Service dialog box will appear. You can
select the system service you want to use.
6. Click Next and follow the on-screen instructions.
Installing SmarThru Software
1.5
1 Installing Software
If you select Custom installation, you may choose the options you want to
install.
Install Bonus Software (Acrobat Reader 3.xx)
1. Insert the SmarThru CD-ROM into your CD-ROM drive.
The SmarThru installation program will begin. If the program does not
start, select Run from the Start menu for Wondows 95/98. For Windows
3.1x, select Run from the File menu, then type D (or E) : \Setupint, and
click OK to start the program.
2. Select a language in dialog for international version setup. When the
Samsung SmarThru Installation screen appears, click Install bunus
software on your PC, and follow the on-screen instructions.
Uninstalling SmarThru Software
Uninstallation is only required if you are upgrading the software, or if your
installation fails.
In Windows 95/98, NT
1. Start Windows if not already started.
2. If you find the SmarThru icon and/or the SmarThru engine icon on the
right corner of the taskbar at the bottom of your screen, the Smarthru
application and the SmarThru engine are woking. Close the application
and the engine as follows:
Right-click the icon. When the pop-up menu opens, select Close.
SmarThru icon
1.6
Installing SmarThru Software
SmarThru Engine icon
3. From the Start menu, select Programs.
In Windows 3.x
1. Start Windows if not already started.
2. If you find the SmarThru icon and/or the SmarThru engine icon at the
bottom of your screen, the Smarthru application and the SmarThru
engine are woking. Close the application and the engine as follows:
Click the icon. When the pop-up menu opens, select Close
3. From the Program Manager, double click the Samsung SmarThru.
4. In the SmarThru windows, double click the Uninstall icon. The
Uninstall dialog box appears. Follow the on-screen instructions to
complete uninstallation.
Installing SmarThru Software
1.7
1 Installing Software
4. Select Samsung SmarThru, then Uninstall. The uninstall dialog box
appears. Follow the instructions on the screen to complete uninstallation.
Using the SmarThru CD-ROM
You can uninstall the MFP driver and the SmarThru software with the
CD-ROM you have used to install the software.
1. If you find the SmarThru icon and/or the SmarThru engine icon at the
bottom of your screen, the SmarThru application and the SmarThru
engine are working. Close the application and the engine as follows:
Click the icon. When the pop-up menu opens, select Close.
2. Insert the SmarThru CD-ROM into your CD-ROM drive.
The SmarThru installation program will begin. If the program does not
start, select Run from the Start menu (for Wondows 95/98. For Windows
3.x, select Run from the File menu), then type D (or E) : \Setupint, and
click OK to start the program.
3. Select a language in dialog for international version setup. When the
Samsung SmarThru Installation screen appears, click Uninstall the
Samsung software your PC, and follow the on-screen instructions.
4. Click on the checkboxes to select the components you wish to
uninstall. Click on Next.
The selected components are uninstalled. You must shut down and restart
your computer to complete the uninstallation process. If your computer
does not shut down and restart automatically, you must shut it down
manually and restart it before the changes you have made will be in effect.
1.8
Installing SmarThru Software
Printing
This procedure describes the general steps required for printing from
various Windows applications. The exact steps for printing a document
may vary depending on the application program you are using. Refer to
your software applicationÕs documentation for the exact printing
procedure.
1. Make sure that your machine is properly connected to the computer, and
the On/Off Line lamp light is steadily on (if it is not, press the On/Off
Line button).
Make sure that you have installed the MFP driver contained on the
supplied setup CD-ROM. See ÔInstalling SmarThru SoftwareÕ on page 1.1.
2. Create or open the document you want to print.
3. Choose Print or Print Setup from the File menu. Make sure that your
printer is selected as the default printer.
4. Click on the Properties or Setup button if you want to make any
adjustments that are appropriate for printing your document. (See
ÔPrinter SettingsÕ on page 2.2.)
5. Select OK to close the Properties dialog box.
6. After making any necessary changes to the printing parameters, select
OK to start the printing job.
Printing
2.1
2 Printing
Printing a Document
Printer Settings
You can use your machine with all your Windows 3.x or Windows 95/98,
or Windows NT applications. Be sure to set your printer as the default
printer for all your Windows operations.
Most Windows software applications allow you to make changes to the
printer settings. This changes the number of copies, sequence of the pages,
and paper orientation.
If you click Properties, Setup, or Options in the Print dialog box, youÕll
access the printer driverÕs dialog box. It allows you to change additional
printer settings. Settings changed in the software application will usually
override settings made in the printer driver.
Your printer driverÕs Properties dialog box includes three tabs (four tabs on
Windows NT only).
Basic Tab
This tab allows you to specify number of copies, paper orientation, paper
source, paper size, and image scaling size.
If you load paper into
the manual feeder slot,
select ‘Manual Feed.’
This setting allows
you to enlarge or
reduce the image
on the print page.
2.2
Printing
Print Quality Tab
This tab allows you to specify the print resolution.
In general, higher
resolution looks better
but takes longer to print
and requires more
memory.
If you want to save toner
when you are printing,
select ‘ON’.
2 Printing
Advanced Tab
If you are a Windows NT user, you can see ÔAdvanced TabÕ, if you want to
know more about ÔAdvanced TabÕ, click on the help button. The help screen
gives detailed information about each menu.
Printing
2.3
About Tab
This tab shows the printer software version.
Using Help
Your printer driver includes comprehensive screen help. For detailed
information about each setting, press F1 key except Windows 3.x.
Changing Printer Settings for All Documents
Changing the printer settings from your application program will change
them for one document. If you want to change for all documents you print
on this printer, open the printer Properties dialog box as shown below, then
change the printer settings.
✔ Windows NT users should select properties via ApplicationÕs Print
Menu.
Windows 95/98 users should select Start, Settings, Printers. Then from the
File menu, click Properties.
Windows 3.x users should select Program Manager, Main, Control Panel,
Printers. Then click Setup.
2.4
Printing
Scanning
Overview
Scanning converts a photo or paper document into a computer image.
Types of documents that you can scan include photos, drawings, magazine
pages, newspaper articles, and just about any other type of single page
image. You put the paper into the scanner, and then the computer and
scanner work together to create a computer image.
You can also use other TWAIN-compliant image editing software
application like SoftScan Pagies SE, Text Bridge, or Adobe Photoshop. The
Samsung TWAIN for Scan window will be displayed when you choose
Samsung TWAIN for Scan to scan documents or photographs from the
TWAIN-compliant image editing application.
In general, SmarThru use ScanThru for scanning process.
If you want use TWAIN DriverÕs UI for professional scanning in manual,
please do following steps.
1. If you find the SmarThru icon on the right corner of the taskbar at the
bottom of your screen, the SmarThru application is working. Right-click
the icon. When the pop-up menu opens, select ScanThru Options.
2. If you want to use TWAIN UI, please select ÔShow TWAIN UIÕ item
After that you can use TWAIN DriverÕs UI when you scan.
Scanning 3.1
3 Scanning
After you have installed the supplied CD-ROM, you can use the machine as
a black and white scanner. The CD-ROM contains the SmarThru program
which is easy and convenient tool to manage your work with a scanned
image. With SmarThru, you can quickly scan and save the image, make
copies of part of the image, and use the image in creative projects, like
newsletters, brochures, letterhead, and more. You can also share the
scanned images electronically through E-mail, and fax. For details on how
to use the SmarThru program, use the on-line help, or refer to the UserÕs
Guide which is contained in the CD-ROM.
Scanning the Image
This section describes the basic procedures for scanning with a
TWAIN-compliant image editing application.
1. Turn on your machine and PC, then start Windows.
2. Open your TWAIN-compliant image editing application.
3. Choose Select Source from the File menu.
4. Select Samsung TWAIN for Scan in the Select Source dialog box.
5. Open the File menu, and select Acquire. The Samsung TWAIN for Scan
window will appear. For the window, see the next page.
6. Select the appropriate scanning options for the document or
photograph you want to scan.
For more information on scanning controls, preview options, and other
advanced scanning features, see page 3.4.
7. Load the document or photo in the document feeder of your machine.
8. Click on Scan. The document will be scanned and displayed in the
image editing application.
✔ After scanning, this User Interface dialog is not shown for multiple
scanning. If you donÕt need to additional scanning, please close this
TWAIN dialog.
3.2 Scanning
Samsung TWAIN for Scan Window
The Samsung TWAIN for Scan window is used to view and modify the
scanned image. Using the features of this window, various images
processing options can be applied to the scanned image.
Scanner Control Tabs
For more information, see
page 3.4.
Preview window
For details on the tools in
the preview window,
see page 3.17.
3 Scanning
Using On-Line Help
You can refer to the Samsung TWAIN for Scan on-line help function for
assistance. To access the on-line help, roll the course over the feature of the
window the help is desired for. A yellow popup dialog box will appear.
Click on the dialog box to access on-line help.
On-line Help contains information about using the menus and commands.
Use Help anytime you need information on how to use a particular menu
or command.
Scanning
3.3
Scanner Control Tabs
You can adjust the settings for the document or photograph to be scanned
prior to capturing the image using the features of the Scanner Control tabs.
Each of the tabs is described in detail in the following sections:
-for Basic tab, see page 3.4.
-for Balance tab, see page 3.8.
-for Effects tab, see page 3.14.
The About tab shows the version of the Samsung TWAIN for Scan
application.
Basic Tab
Job Type
This menu allows you to select the job type.
Image Type
This menu specifies the mode in which the image is to be scanned in.
The following pictures show examples of the various scan modes.
Gray 256 scales
3.4 Scanning
Halftone, B/W
Lineart, B/W
Gray 256 Scales
Images scanned in this mode will show up to 256 shades of gray. If high
quality copies of photographs or other continuous tone originals are
desired, Gray 256 Scales is the best choice.
Gray 256 Scales provides accurate representation of black and white, and
intermediate gray shades between black and white, for each individual
pixel. It actually provides 256 shades, representing white by the value 255
and black by the value zero, with progressively lighter intermediate shades
of gray by values from 1 through 254.
Halftone B/W
This scan mode uses various combinations of black and white pixels to
simulate gray scales. While not the same level of image quality as the Gray
256 Scales image type, this image type is good for continuous tone images
where smaller file size is more important than ideal image quality.
Lineart B/W
✔ In both Halftone and Lineart modes, the resolution can only be set to
150, 200, or 300 dpi.
Resolution
The resolution setting determines the amount of information the scanner
will capture in a resulting scanned image.
Scanning
3.5
3 Scanning
Lineart B/W mode is generally the best choice for printed text or pen-andink drawings. Like the Halftone B/W image type, this image type defines
the state of each pixel in the image with one bit that is either on or off. For
this reason, files created in this mode will require approximately the same
amount of disk space as a Halftone B/W file.
The resolution can be measured in dpi (dots per inch). The higher the
resolution is, the finer the image detail and the bigger the image file size is.
See the examples of images at 75 and 300 dpi.
300 dpi
75 dpi
You can select any one of the resolutions shown on the Resolution menu,
or specify your own resolution by selecting the Custom option which
invokes the Custom Resolution dialog box.
To use the Custom Resolution dialog box, type the desired resolution (in
dpi), and click OK. The custom resolution created will be displayed in the
Resolution menu.
✔ The Resolution settings can be restored by clicking Defaults at the
bottom of the Basic tab.
Image Area
You can select any size of scanning area on the image area menu. This
reflects the selection frame on Preview window.
Reduce/Enlarge
This feature allows an image to be automatically enlarged or reduced as it
is scanned. The default scale factor is 100%. The selected scaling factor, the
range of which is dependent on the selected image type, affects the printed
scan output.
3.6 Scanning
✔ When scanning a printed image for screen display only, scale the
image down to increase processing speed and decrease the file size.
Scaling 100%
Scaling 50%
Fixed scaling options are displayed in percentages of reduction or
enlargement. Image width and height are scaled proportionally when fixed
scaling factors are used. To scale to a size other than the fixed sizes, select
the Custom option in the Scaling menu. The Custom Scaling dialog box
will appear.
1. Insert the desired height or width value into the Height or Width edit
boxes.
2. The units of measurement may be changed to inches, centimeters,
millimeters, pixels, picas or percentages of the original image dimensions
by selecting the desired unit of measurement from the Units drop-down
list boxes to the right of the Height and Width text boxes.
3. To prevent distortion of the image when changing height and width
values, the height and width values are automatically linked - you need
only enter one value, either a Height or Width value. The other value will
be computed and the image will resize proportionately.
✔ You can also change Height and Width values by directly adjusting the
selection frame.
✔ Output image file size is proportional to both Height and Width. If
both Height and Width values are doubled, then the image area and
image file size will increase four-fold.
✔ Once you have confirmed or changed the size, resolution, and final
scan boundary settings, the scanning software determines the size of
the resulting scanned image and displays this information along with
available hard disk space.
Scanning 3.7
3 Scanning
To change Height or Width text box values:
Balance Tab
Color Channel
The Color Channel radio buttons are used to specify the color channel in
which to change the Highlight, Shadow and Midtone values.
The only channel available to be selected when using your machine to scan
is the Gray channel. Red, Green and Blue are used for scanners capable of
scanning documents in color.
Highlight
The Highlight value represents the lightest value in an image. All pixels
above this point will be rendered as pure white. If you subsequently
broaden the highlight points on the Level Adjustment graph, the pixels
will be remapped within the new range, thus allowing you to see more
detail in the image.
The Highlight scroll bar allows you to manually set a highlight level. The
default for the Highlight settings is 255. You can increase or decrease the
highlights in a particular image as needed by adjusting this scroll bar. The
value in the adjacent box will change in the range 1 to 255 as the slider
moves.
Shadow
The Shadow value represents the darkest value in an image. All pixels
below this point will be rendered as pure black. If you subsequently
broaden the shadow points on the Level Adjustment graph, the pixels will
be remapped within the new range thus allowing you to see more detail
in the image.
The default value for Shadow is 0. You can increase or decrease the
shadows in a particular image as needed by adjusting this scroll bar.
3.8 Scanning
Midtone
All optical devices such as monitors and scanners have some differences
in their light sensitivity characteristics. Samsung TWAIN provides
Midtone adjustment for you to compensate for these differences in your
scanner, and it produces better scanned images.
To change the Midtone value, move the slider to the left or right to change
the values in the adjacent text box. The value in the adjacent box will
change in the range 0.1 to 10.0 as the slider moves.
Ordinarily, good results can be obtained from your machine by leaving
the slider at its default value of 1.00.
Advanced Selection
The advanced selection will present features that allow you to modify the
Level Adjustment and the Tonal Map of the document.
To activate the Level Adjustment or Tonal Map functions, click on the
Advanced... button at the bottom of the Balance tab.
When this button is selected, the Level Adjustment window is displayed
by default.
Scanning 3.9
3 Scanning
For both the Level Adjustment and the Tonal Map functions, the window
displayed contains small representations, known as thumbnail views, of
the original and enhanced images (Samples 1 and 2).
Level Adjustment
The Level Adjustment dialog box shows the distribution of brightness
levels in your image. To adjust the histogram plot, drag the triangles,
located below the horizontal bar to the desired values. The left (black)
triangle changes the shadow levels. The right (white) triangle changes the
highlight levels. The middle (gray) triangle controls the midtone levels.
Level Adjustment tab
Highlight control
Shadow control
Midtone (Gamma)
control
By varying the Shadow and Highlight points you can change the relative
shades and highlights of the image. The Shadow point represents the
darkest value and the Highlight point is the brightest value.
The Midtone point represents the Gamma setting for your particular screen.
On the histogram, the Shadow and Highlight scales are divided into 255
units.
Therefore, all pixels in the original that are darker than the current shadow
point are now completely black in the enhanced image. Conversely, all
pixels in the original that are brighter than the current highlight point are
now completely white in the processed image.
Setting the highlight point to 200 renders all pixels greater than or equal to
200, on the original, completely white in the processed image. Similarly
setting the Shadow point to 200 renders all points less than or equal to 200,
on the original, completely black in the enhanced image. Photographers
often refer to these effects as Òhigh-keyÓ or Òlow-keyÓ. High-key is an image
pushed to the white end, and low-key is an image pushed to the black end
of the tone curve.
3.10 Scanning
The Midtone is a relative measure of the gamma of your monitor. The scale
for Midtone ranges from 0 to 255. The gamma curve is a geometric series.
This means that at a value of 255 it tends to infinity.
The Midtone is bound by the Shadow and Highlight terms and cannot
exceed them at any time. So, if the Highlight is set to 255 and the Shadow is
set to 0, a gamma of 1 is equal to a Midtone of 128. Similarly, if the Shadow
is set at 200 (lower boundary) and the Highlight is set at 220 (upper
boundary), a gamma of 1 is equal to a Midtone of 210.
Operation:
1. Select the Advanced... button on the Balance tab. This will display the
Level adjustment window.
2. On the histogram, use the mouse key to click on the black, gray ,or white
triangles to make changes to the Shadow, Midtone and Highlight
respectively.
3. To see the changes and compare them to the original previewed image,
click on Sample 1 to see the enhanced image.
4. To make a second enhancement for comparison, click on Sample 2. Make
new enhancements to the original. Compare the images of Sample 1 and
2.
6. Click OK to save the changes and close the Enhancement dialog box. If
you do not want to save the changes, click on the Cancel button to close
the Enhancement dialog box. Click Auto button to allow the software to
make appropriate highlight and shadow adjustments.
Scanning 3.11
3 Scanning
5. After completing enhancement settings, click on the desired sample to
choose the image
Tonal Map
If you select the Tonal Map tab, the following dialog box will be displayed.
Tonal Map tab
The Tonal Map is yet another way to adjust Highlight, Midtone, or Shadow
levels in your images. When you open the Tonal Map dialog box, a tonal
map consisting of a diagonally straight line appears. Notice that at every
point on the default tonal map, the output shadow, midtone, and highlight
brightness levels are equal to the input shadow, midtone, and highlight
brightness levels.
The shape and slant of the tonal map represent brightness level ratios
between the input of the original image and the output image data. By
clicking on the tonal map line, a hand-shaped cursor will appear which can
be dragged to change the shape of the tonal map line.
The horizontal axis represents the original input brightness and the vertical
axis represents the enhanced brightness. Values on either scale range from 0
to 255.
As shown in the figure below, if the curve is changed into a convex shape
above the original diagonal, the enhanced image will be brighter than the
original.
Normal Image
3.12 Scanning
Lightened Image
If the curve is changed into a concave shape below the original diagonal, the
enhanced image will be darker than the original.
Normal Image
Darkened Image
1. Click on the Tonal Map icon in the Preview window or the Tonal Map tab in
the Enhancement dialog box. The Tonal Map dialog box will appear.
2. Click on the Tonal Map curve, an indicator appears which can then be
dragged to change the shape of the curve.
a) If a previously saved Tonal Map is desired, select the Load button. An
Open dialog box appears for you to open the desired file.
b) Or, click on the Reset button to return the Tonal Map to the default
diagonal as in the original.
c) Click the Save button to save the changes as a customized setting. A Save
As dialog box will appear upon selection of this button. Enter the name
for the customized curve and click on the OK button.
3. Select the Histogram button to see a histogram of the changes made.
4. Select the OK button to accept all the changes or the Cancel button to
abandon all unsaved changes.
Scanning 3.13
3 Scanning
Operation:
Effects Tab
The features of this tab are used to apply various visual modifications to
the scanned image.
Rotate Image
This selection provides the ability to rotate an image. The rotation
mechanism rotates an image clockwise in 90 o increments.
Flip Image
This selection provides the ability to flip an image. The flipping mechanism
flips an image about the horizontal or vertical axis.
3.14 Scanning
Sharpness
Sharpness is typically useful for high-contrast images which soften or
sharpen edges and boundaries of an image.
No Filter
This is the default filter option. No filtering will take place when using this
option.
Sharpen
Sharpen More
This option further emphasizes the edges of an image. This option
produces a much stronger contrast than the Sharpen option.
Blur
This selection softens the image by smoothing out any sharp transitions in
intensity between two adjacent pixels.
Blur More
This option further softens the image by performing the same function as
the Blur option, but to a greater extent.
✔ If you blur the image too much, you will risk losing texture and depth
in the image.
Scanning 3.15
3 Scanning
This selection emphasizes the edges of an image. It sharpens the image
boundaries by increasing the relative contrast between adjacent pixels. In
general, sharpen filters should only be used when you want to accentuate
the differences between one area and another.
Descreen
This selection is used to eliminate moire patterns from the output image.
Moire occurs as a result of differences in the screen pattern used to print
document and the scanner electronics. Moire may appear as checkered
patterns bands or dots. Descreen preprocessing can minimize the transfer of
moire patterns into your image file.
Besides a default setting of No Descreen, The Descreen selector provides
three grades of descreen preprocessing as described below.
No Descreen
No descreening.
Art print (175 lpi)
The Art print selection is used to smooth the fine dot pattern found in high
quality art prints and magazines made in resolution higher than 200 dpi.
Magazine (133 lpi)
The Magazine selection is used to smooth the fine dot pattern found in
glossy magazines made in resolution higher than 200 dpi.
Newspaper (88 lpi)
The Newspaper selection is used to smooth the coarse grain pattern commonly
found in newspaper images made in resolution higher than 200 dpi.
Invert Image
This function inverts all the tone values, providing a photographic negative
of the original. This effect is similar to using the Tonal Map to tonally invert
the image.
Normal image
3.16 Scanning
Invert image
Preview Window
After adjusting the settings in the Scanner Control window, choose any one
of the tools in the Preview window to further enhance the image. The
following is detailed information about the tools available in the Preview
window.
Image Control tools
For information, see page 3.18.
Preview window
Used to view the prescanned
document.
Prescan and Scan buttons
For information, see page 3.20.
Scanning 3.17
3 Scanning
Any changes made to the
document are seen here.
Image Control Tools
The Image Control tools are used to control the image displayed in the
preview window. The functions of these tools are described below.
Frame Tool
After a preview image has been created, you can define the boundaries of
the area to be included in your final scan by using the Frame tool.
Use the Frame tool to select a rectangular portion (selection frame), or select
the entire preview screen, for the final scan boundaries. When you select
the Scan button, only the area within the selection frame will be included in
the final scan.
To use the Frame tool:
1. Select the Frame tool by clicking the Frame tool icon.
2. Drag the cursor to the preview area and release the mouse button when
the selection frame is in the desired position.
3. To adjust the selection frame size or shape, drag any edge or corner of the
frame in or out. Alternatively, hold down the Shift key and the mouse
key on one of the sides of the frame and then move the cursor
accordingly. This action will contract or expand the entire frame.
4. To move the selection frame to a different area of the image without
changing its size or shape, place the cursor within the selection frame
and drag it to the desired location.
5. To create an entirely new selection frame, place the cursor outside the
existing selection frame and drag diagonally. The first selection frame
will disappear while the second one remains.
✔ If you hold down the Shift key and drag the mouse diagonally, the
sides of the selection frame will resize proportionally.
3.18 Scanning
Zoom In and Out Tools
The Zoom In and Out tools allow you to zoom in or out on an image within
the Preview window; zooming in (the + sign appears on the zoom cursor)
enlarges the view of the active image so that you can work on small details
in an image. Zooming out (the - sign appears on the zoom cursor) reduces
the view of the active image.
To use the Zoom In tool:
1. Select the Zoom tool by clicking the Zoom In tool icon.
2. Drag the cursor to the preview area. The cursor will change to a
magnifying glass whenever it is in the preview space.
3. Zoom in (magnify an area) by positioning the cursor on an area of
interest in the preview area and clicking the left mouse button. The
preview area will be doubled in size. Click again and the area will again
be enlarged by a factor of 100%. By repeating this process, you can
enlarge the preview display of the image up to 800% of its original size.
As an alternative to the method outlined above, select the Zoom tool and
then, while holding the mouse key down, drag the cursor over the area
you want to enlarge. A solid frame, defining the area of enlargement, will
appear while the mouse key is being held down. Upon release of the
mouse key, the defined area will be enlarged.
To use the Zoom Out tool:
1. Select the Zoom Out tool by clicking the Zoom Out tool icon.
2. Drag the cursor to the preview area. The cursor will change to a
magnifying glass whenever it is in the preview space.
3. Zoom out by positioning the cursor in the preview area and clicking the
left mouse button.
✔ The Zoom In and Out tools do not affect the image produced by the
Scan control. It only affects the Preview display.
Scanning 3.19
3 Scanning
4. Use the scroll bars to view hidden areas of the displayed preview image.
Width and Height Indicators
The Width and Height indicators will display the width and height of the
frame defined with the Frame tool.
File Size Indicator
The file size indicator will display the file size that will result for the
scanned image defined with Frame tool.
Prescan Button
The Prescan button is used to obtain a low resolution preview of the
document. The prescanned document will appear in the Preview Window.
Scan Button
The Scan button is used to obtain the final scan of the document after all of
the enhancement features have been applied to the prescanned document.
When Scan is selected, the scanned image does not appear in the Preview
Window. It appears in the TWAIN compliant application from which the
scan was originated.
3.20 Scanning
Troubleshooting
Fixing Problems
Below are the problems you can solve by yourself. If not, call for
service.
Printer Problems
Symptom
Cause and Solution
¥ The printer cable is not connected properly. Check the
printer cable connection.
¥ The printer cable is defective. Swap the cable with one
known to work.
The printer does not
print.
¥ The port setting is incorrect. Check the Windows printer
settings to make sure that the print job is being sent to the
correct port (for example, LPT1).
¥ The image cartridge is not installed properly. Remove and
reinsert the image cartridge.
¥ The printer may be configured incorrectly. Check the
application to make sure that all print settings are correct.
4 Troubleshooting
¥ The printer driver may be incorrectly installed. Uninstall
the MFP driver and reinstall the MFP driver. Then try
printing a test page. Refer to ÔUninstalling SmarThru
SoftwareÕ on page 1.6
¥ A paper jam has occurred. Remove the jammed paper.
If there is resistance to the paper, and it does not move
immediately when you pull, or if the paper is jammed
inside the machine, stop pulling.
1. Pulling the cover release button
toward you, open the cover, then
remove the image cartridge.
2. Gently pull the paper toward you.
Check that there is no other paper in
the printer.
Troubleshooting
4.1
Printer Problems (Continued)
Symptom
The paper is not fed into
the printer.
Cause and Solution
¥ Paper has not been inserted correctly. Remove and reinsert
the paper correctly (refer to ÔLoading PaperÕ on page 1.13).
¥ There is too much paper in the automatic paper feeder.
Remove some of the paper from the automatic paper feeder.
Half of the page is blank.
¥ The page layout is too complex. Simplify the page layout
and remove any unnecessary graphics from the document if
possible.
¥ The page orientation setting may be incorrect. Change the
page orientation in the Printer Properties dialog box.
¥ The paper size and the software paper size settings do not
match. Insert the correct paper into the printer or change
the software paper size settings.
¥ Scaling may be set to less than 100%. Change the Scaling
setting in the Printer Properties dialog box.
¥ The printer cable specifications may be incorrect. Use or
replace the cable with an IEEE-1284 rated cable.
The printer prints the
wrong data, or it prints
incorrect characters.
¥ The printer cable might not be connected properly. Check
the printer cable connection.
¥ There may be a problem with the printer driver software.
Exit Windows and reboot the computer. Turn the printer off
and then back on again.
¥ The printer cable specifications may be incorrect. Use or
replace the cable with an IEEE-1284 rated cable.
The paper keeps
jamming.
¥ There is too much paper in the automatic paper feeder.
Remove some of the paper from the automatic paper feeder.
(If printing onto transparencies, or labels, insert them one at
a time in the manual feeder.)
¥ The paper setting method may be incorrect. If printing onto
envelopes, insert the envelopes so that there is a gap of
approximately 1 mm (1/32Ó) between the left and right
edge of the envelopes at the paper guide.
4.2
Troubleshooting
Symptom
Cause and Solution
¥ If using Windows 3.x, Print Manager may be disabled.
From the Control Panel Printers menu, check the Use Print
Manager box.
Printing is too slow.
¥ If using Windows 3.1x, the Background Printing item in the
Option menu of Print Manager may be set incorrectly.
Select Background Printing from the Option menu in the
Print Manager.
¥ If using Windows 95/98, the Spooling Setting may be set
incorrectly. From the Start menu, select Settings and
Printers. Click your printer icon with the right mouse
button, select Properties, click the Details tab, and then
click the Spool Settings button. Select the desired spool
setting from the available choices.
¥ If you are using Windows NT, the Scheduling setting may
be set incorrectly. From the Start menu, select Settings and
Printers. Click your printer icon with the right mouse
button, select Properties, click the Scheduling tab. Then,
select the desired scheduling setting from the available
choices.
4 Troubleshooting
Print Quality Problems
Symptom
Cause and Solution
White page or printout
too light to read
¥ Toner is low or empty. Replace the image cartridge.
Irregular faded patches
of print
¥ There is a paper quality problem. Use only paper that meets
the specifications required by the printer.
¥ Toner may be unevenly distributed. Remove the image
cartridge and shake it gently to evenly distribute the toner.
Then replace the image cartridge.
Troubleshooting
4.3
Symptom
Black staining
Cause and Solution
¥ There is a paper quality problem. Use only paper that meets
printer specifications.
¥ An image cartridge from another printer has been installed.
Always use the same image cartridge with the same printer.
Using a cartridge that has already been used in another
printer may not give satisfactory results.
Character voids
¥ The paper may be too dry. Try printing with a different
batch of paper.
Background scatter
¥ The paper may be too damp. Try printing with a different
batch of paper. Do not open packages of paper until
necessary so that the paper does not absorb too much
moisture from the air.
¥ Printing over uneven surfaces. If printing onto envelopes,
change your printing layout to avoid printing over areas
that have overlapping seams on the reverse side.
Missing characters
¥ The paper may be too damp. Try printing with a different
batch of paper. Do not open packages of paper until
necessary so that the paper does not absorb too much
moisture from the air.
Back of printout dirty
¥ The transfer roller may be dirty. Print a few blank pages
to clean the transfer roller.
Incorrect fonts
¥ True Type fonts may be disabled (Windows 3.x). Use the
Fonts dialog box in the Control Panel to enable True Type
fonts.
Faded graphics
4.4
Troubleshooting
¥ Toner may be low. Remove the image cartridge and shake
it gently to evenly distribute the toner. Then replace the
image cartridge. Have a spare image cartridge in
preparation for the toner running out.
Others Problems
Symptom
Cause and Solution
¥ There was an error writing to
LPT1: for the printer: The
parameter is incorrect.
¥ COM port initialization failed.
Check COM port parameters in
Modem properties dialog
¥ Modem initialization failed.
Switch on the modem and
check cable connection.
¥ Device canÕt be set to the H/W
mode you want.
¥ Port is disabled. Check if the
port is properly connected, or
power is on then restart your
computer
¥ TWAIN error occurred
¥ [Critical]: TWAIN is not
available.
¥ There were critical errors.
Program will not continue.
¥ While an application use LPT1 or SmarThru Fax
Port, the other application canÕt use them
concurrently.
So if ÒAutomatically answer for incoming calls
after (rings):Ó option is checked of Fax Gate
Properties,
You canÕt scan images or print documents.
If you want to scan or print, uncheck the option
and restart SmarThru.
If ÒAutomatically answer for incoming calls
after(rings):Ó option is not checked, one of printing,
scanning, faxing may be already processing and
another job try to process.
Then cancel one of them, redo canceled job after
another job is finished.
¥ The MFP does not allow dual job, so printing,
scanning faxing canÕt process concurrently.
Cancel and redo later job after the MFP finishes
current processing.
To install the MFP driver in
network environment
¥ Your MFP driver supports only Microsoft network
such as Windows 3.x, Windows 95/98 and
Windows NT 4.0.
¥ You should install the driver onto both PCs (Server
and client) by using the CD-ROM supplied.
4 Troubleshooting
Troubleshooting
4.5