1
00427A_B570E_XET_Cov
4/20/07
9:46 AM
Page 2
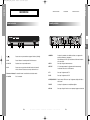
DIGITAL TERRESTRIAL RECEIVER
MF68-00427A
DTB-B570E
Istruzioni per l’uso
Instructions for use . . . . . . . . . . . . . . . . . . . . . GB
IT
GB
Istruzioni per l’uso . . . . . . . . . . . . . . . . . . . . . . IT
Instructions for use
DTB-B570E
REV. 1.1
RICEVITORE TERRESTRE DIGITALE
00427A_B570E_XET_Cov
4/20/07
9:46 AM
Page 4
Istruzioni per l’uso . . . . . . . . . . . . . . . . . . . . . . IT
DTB-B570E
00427A_B570E_XET_Ita2304
4/23/07
8:23 PM
Page ii
DTB-B570E
Istruzioni per l’uso
IT
RICEVITORE TERRESTRE DIGITALE
00427A_B570E_XET_Ita2304
4/23/07
8:23 PM
Page 2
AVVERTENZA!
Questo dispositivo STB è stato realizzato in modo tale da soddisfare gli standard di sicurezza.
Leggere attentamente le seguenti precauzioni relative alla sicurezza.
1. Per non danneggiare il cavo di alimentazione o la spina attenersi alle seguenti
indicazioni.
● Non modificare o usare in modo arbitrario il cavo di alimentazione o la spina.
● Non piegare o torcere eccessivamente il cavo di alimentazione.
● Scollegare il cavo di alimentazione afferrandolo per la spina.
● Tenere le apparecchiature che producono calore il più lontano possibile dal cavo di
alimentazione, per evitare che il rivestimento si fonda.
ALIMENTAZIONE DA RETE: CA 220-240V~, 50/60Hz
SOVRACCARICO:
LIQUIDI:
PULIZIA:
ACCESSORI:
Non sovraccaricare le prese a muro, i cavi di prolunga o gli adattatori
poiché ciò potrebbe causare incendi o scariche elettriche.
Tenere i liquidi lontani dall’STB. Non schizzare o sgocciolare liquidi
sull’apparecchio e non porre su di esso degli oggetti contenenti liquidi,
come ad esempio dei vasi.
Prima di pulire l’STB, scollegarlo dalla presa a muro.
Utilizzare un panno leggermente inumidito con acqua (non utilizzare
solventi) per pulire la parte esterna.
Non bloccare i fori di ventilazione dell’STB. Accertarsi che l’aria circoli
liberamente attorno al dispositivo. Non posizionare mai l’STB in modo
tale che sia esposto alla luce solare diretta o accanto ad apparecchi per
riscaldamento, ad esempio un radiatore.
Non impilare mai altre apparecchiature elettroniche sull’STB.
Posizionare l’STB ad almeno 30 mm dalla parete.
2. La mancata osservanza di una delle seguenti indicazioni può provocare una
scossa elettrica.
● Non aprire il corpo principale.
● Non inserire metalli od oggetti infiammabili all’interno del prodotto.
● Non toccare la spina del cavo di alimentazione con le mani bagnate.
● Scollegare il cavo di alimentazione in caso di temporale.
● Non coprire l’apertura di ventilazione del ricevitore con oggetti quali giornali,
vestiti, ecc.
● Non collocare il ricevitore sopra apparecchiature domestiche che generano calore.
Non utilizzare accessori che non siano raccomandati dal produttore per
evitare situazioni pericolose o danni all’apparecchiatura.
3. Non utilizzare il prodotto quando non funziona bene. Continuando a utilizzare il
prodotto anche se è difettoso, può verificarsi un danno grave. Se il prodotto non
funziona bene, rivolgersi al rivenditore locale.
CONNESSIONE AL SEGNALE TV VIA CAVO E AL TELEVISORE:
MANUTENZIONE:
Collegare tutti i componenti prima di inserire qualsiasi tipo di cavo
elettrico nella presa di corrente a muro. Spegnere sempre l’STB, il
televisore e ogni altro componente acceso prima di collegare o
scollegare qualsiasi tipo di cavo elettrico.
Non tentare di effettuare da soli operazioni di manutenzione del
prodotto. Eventuali tentativi invalideranno la garanzia.
Per la manutenzione rivolgersi a personale qualificato.
4. La presa di rete viene utilizzata per scollegare l'apparecchio e deve e ssere facilmente
accessibile in qualsiasi istante. Per staccare l'apparecchio dai main di avoirdupois, la
spina deve essere estratta dallo zoccolo dei main, quindi la spina dei main sarà
prontamente operabile.
TEMPESTE ELETTROMAGNETICHE:
Se l’STB è installato in un’area soggetta a un’intensa attività
elettromagnetica, i dispositivi di protezione per il connettore di rete e la
linea telefonica del modem dell’STB sono essenziali.
Durante le tempeste elettromagnetiche, è inoltre necessario attenersi
alleistruzioni fornite dai singoli produttori delle apparecchiature collegate
all’STB, come TV, Hi-Fi, ecc.
DICHIARAZIONE DI CONFORMITA
Il presente apparato è conforme ai requisisti fissati dalla dirretiva
99/47/CE in materia di emissione di segnali televisivi. Recepita in
Italia con Decreto Legislativo nr. 191 del 17 maggio 1999.
In particolare la suddeta apparecchiatura è conforme ai requisiti
fissati dall comitato congiunto (JTC) UER/ETSI/CENELEC standard
“DVB” Digital Video Broadcasting.
GMESSA A TERRA: L’antenna terrestre DEVE ESSERE MESSA A TERRA. Il sistema di
messa a terra deve essere conforme allo standard SABS 061.
IT-2
R
I
C
E
V
I
T
O
R
E
T
E
R
R
E
S
T
R
E
D
I
G
I
T
A
L
E
IT-3
IT
VENTILAZIONE:
DTB-B570E
DTB-B570E
ISTRUZIONI PER LA SICUREZZA
ISTRUZIONI PER LA SICUREZZA
00427A_B570E_XET_Ita2304
4/23/07
8:51 PM
Page 4
IT-4
.
.
.
.
.
.
.
.
.
.
.
.
.
.
.
.
.
.
.
.
.
.
.
.
.
.
.
.
.
.
.
.
.
.
.
.
.
.
.
.
.
.
.
.
.
.
.
.
.
.
.
.
.
.
.
.
.
.
.
.
.
.
.
.
.
.
.
.
.
.
.
.
.
.
.
.
.
.
.
.
.
.
.
.
.
.
.
.
.
.
.
.
.
.
.
.
.
.
.
.
.
.
.
.
.
.
.
.
.
.
.
.
.
.
.
.
.
.
.
.
.
.
.
.
.
.
.
.
.
.
.
.
.
.
.
.
.
.
.
.
.
.
.
.
.
.
.
.
.
.
.
.
.
.
.
.
.
.
.
.
.
.
.
.
.
.
.
.
.
.
.
.
.
.
.
.
.
.
.
.
.
.
.
.
.
.
.
.
.
.
.
.
.
.
.
.
.
.
.
.
.
.
.
.
.
.
.
.
.
.
.
.
.
.
.
.
.
.
.
.
.
.
.
.
.
.
.
.
.
.
.
.
.
.
.
.
.
.
.
.
.
.
.
.
.
.
.
.
.
.
.
.
.
.
.
.
.
.
.
.
.
.
.
.
.
.
R
.
.
.
.
.
.
.
.
.
.
.
.
.
.
.
.
.
.
.
.
.
.
.
.
.
.
.
.
.
.
.
.
.
.
.
.
.
.
.
.
.
.
.
.
.
.
.
.
.
.
.
.
.
.
.
.
.
.
.
.
.
.
.
.
.
.
.
.
.
.
.
.
.
.
.
.
I
.
.
.
.
.
.
.
.
.
.
.
.
.
.
.
.
.
.
.
.
.
.
.
.
.
.
.
.
.
.
.
.
.
.
.
.
.
.
.
.
.
.
.
.
.
.
.
.
.
.
.
.
.
.
.
.
.
.
.
.
.
.
.
.
.
.
.
.
.
.
.
.
.
.
.
.
C
.
.
.
.
.
.
.
.
.
.
.
.
.
.
.
.
.
.
.
.
.
.
.
.
.
.
.
.
.
.
.
.
.
.
.
.
.
.
.
.
.
.
.
.
.
.
.
.
.
.
.
.
.
.
.
.
.
.
.
.
.
.
.
.
.
.
.
.
.
.
.
.
.
.
.
.
.
.
.
.
.
.
.
.
.
.
.
.
.
.
.
.
.
.
.
.
.
.
.
.
.
.
.
.
.
.
.
.
.
.
.
.
.
.
E
.
.
.
.
.
.
.
.
.
.
.
.
.
.
.
.
.
.
.
.
.
.
.
.
.
.
.
.
.
.
.
.
.
.
.
.
.
.
.
.
.
.
.
.
.
.
.
.
.
.
.
.
.
.
.
.
.
.
.
.
.
.
.
.
.
.
.
.
.
.
.
.
.
.
.
.
V
.
.
.
.
.
.
.
.
.
.
.
.
.
.
.
.
.
.
.
.
.
.
.
.
.
.
.
.
.
.
.
.
.
.
.
.
.
.
.
.
.
.
.
.
.
.
.
.
.
.
.
.
.
.
.
.
.
.
.
.
.
.
.
.
.
.
.
.
.
.
.
.
.
.
.
.
I
.
.
.
.
.
.
.
.
.
.
.
.
.
.
.
.
.
.
.
.
.
.
.
.
.
.
.
.
.
.
.
.
.
.
.
.
.
.
.
.
.
.
.
.
.
.
.
.
.
.
.
.
.
.
.
.
.
.
.
.
.
.
.
.
.
.
.
.
.
.
.
.
.
.
.
.
2
5
6
8
8
9
10
12
15
15
15
16
16
17
18
18
18
18
19
20
20
21
21
22
22
22
23
23
24
24
24
25
25
26
27
35
35
36
T
O
1. SEZIONE UTENTE
400 CANALI PROGRAMMABILI
SCARICAMENTO SOFTWARE ATTRAVERSO PC
GUIDA ELETTRONICA AVANZATA AI PROGRAMMI
SUPPORTO MULTILINGUA PER OSD
TELETEXT (VBI) SUPPORTATO CON PIÙ LINGUE
TELECOMANDO A INFRAROSSI A FUNZIONALITÀ COMPLETA
SCANSIONE AUTOMATICA E MANUALE
ORGANIZZAZIONE DEI CANALI (PROGRAMMABILE)
EPG CON AGGIORNAMENTO AUTOMATICO
CONSUMO RIDOTTO DI ALIMENTAZIONE
IT
Istruzioni per la sicurezza . . . . . . . . . . . . . .
Funzionalità generali . . . . . . . . . . . . . . . . . .
Collegamento dell’STB . . . . . . . . . . . . . . . . .
Descrizione . . . . . . . . . . . . . . . . . . . . . . . . .
Pannello anteriore . . . . . . . . . . . . . . . . . . . .
Pannello posteriore . . . . . . . . . . . . . . . . . . .
Telecomando . . . . . . . . . . . . . . . . . . . . . . . .
Funzioni di base . . . . . . . . . . . . . . . . . . . . . .
Funzionamento del ricevitore . . . . . . . . . . .
Menu principale . . . . . . . . . . . . . . . . . . . . . .
1. Installazione. . . . . . . . . . . . . . . . . . . . . .
1.1 Auto scansione . . . . . . . . . . . . . . . .
1.2 Manuale scansione . . . . . . . . . . . . .
1.3 Azzera alle impostazioni di fabbrica .
2. Organizzazione canale . . . . . . . . . . . . . .
2.1 Cancella frequenza . . . . . . . . . . . . .
2.2 Cancella canale. . . . . . . . . . . . . . . .
2.3 Cancella tutti i canali . . . . . . . . . . . .
2.4 Sposta e modifica canale . . . . . . . .
3. Chiave elettronica . . . . . . . . . . . . . . . . .
3.1 Imposta blocco canale. . . . . . . . . . .
3.2 Modifica codice PIN. . . . . . . . . . . . .
3.3 Blocco minori. . . . . . . . . . . . . . . . . .
4. Impostazioni di sistema . . . . . . . . . . . .
4.1 Selezione lingua . . . . . . . . . . . . . . .
4.2 Impostazioni OSD. . . . . . . . . . . . . .
4.3 Impostazioni media. . . . . . . . . . . . .
4.4 Impostazioni ora e timer . . . . . . . . .
4.5 Informazioni di sistema.. . . . . . . . . .
4.6 Aggiornamento software . . . . . . . . .
4.7 Controllo appl. MHP. . . . . . . . . . . . .
4.8 Impostazione modem . . . . . . . . . . .
4.9 Impostazione funzionamento auto . .
5. Servizi pay per view. . . . . . . . . . . . . . . .
Numeri disponibili del fornitore . . . . . . . . . .
Risoluzione dei problemi . . . . . . . . . . . . . . .
Smaltimento . . . . . . . . . . . . . . . . . . . . . . . . .
Specifiche tecniche. . . . . . . . . . . . . . . . . . . .
FUNZIONALITÀ GENERALI
DTB-B570E
DTB-B570E
SOMMARIO
2. SEZIONE SINTONIZZATORE
SINTONIZZATORE A BANDA LARGA DA 50~860 MHz
USCITA RF LOOP-THROUGH (MASCHIO)
3. SEZIONE VIDEO
DVB-T COMPLIANT
VIDEO MPEG-2 (MP@ML)
1~15 Mb/s DATA RATE
SUPPORTA PROPORZIONI 4:3 (NORMALE) E 16:9 (WIDE SCREEN)
FFT: 2K O 8K
2 SCART, RCA
4. SEZIONE AUDIO
MPEG 1 AUDIO LAYER I & II
AUDIO MONO, DUAL, STEREO E JOINT STEREO
FREQUENZE DI CAMPIONAMENTO 32, 44,1 E 48 KHz
CONTROLLO DEL VOLUME E FUNZIONE DI DISATTIVAZIONE AUDIO
DA TELECOMANDO
USCITA AUDIO DIGITALE SPDIF
R
E
T
E
R
R
E
S
T
R
E
D
I
G
I
T
A
L
E
IT-5
00427A_B570E_XET_Ita2304
4/23/07
8:23 PM
Page 6
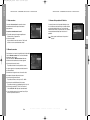
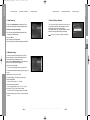
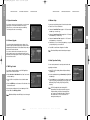
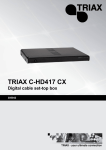
1. POSIZIONAMENTO DEL RICEVITORE
Il RICEVITORE deve essere posizionato in un ambiente adeguatamente ventilato.
Non posizionarlo in un armadietto completamente chiuso per non bloccare il flusso
dell’aria ed evitare surriscaldamenti.
Il dispositivo deve essere protetto dalla luce diretta del sole, dall’eccessiva umidità,
da manipolazioni improprie e dagli animali domestici.
Evitare di impilare altri componenti elettronici sul ricevitore.
Il dispositivo deve essere posizionato in modo tale che l’accesso per il cavo
dell’antenna sia sicuro.
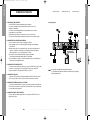
Schema di collegamento
IT
2. COLLEGAMENTO DEL RICEVITORE ALLE ANTENNE
È possibile collegare il ricevitore ai seguenti tipi di antenna:
● Utilizzare un’antenna da tetto standard per la ricezione di canali tra VHF e UHF.
● Poiché molte antenne da tetto meno recenti possono ricevere solo un numero
limitato di canali, è difficile o impossibile ricevere i canali digitali trasmessi sulle
frequenze piùalte. In questo caso, è possibile sostituire l’antenna.
● Alcune antenne esterne sono dirette verso un trasmettitore analogico.
In questo caso, l’antenna va diretta verso un trasmettitore TV digitale.
● Non è consigliabile utilizzare antenne interne o montate alle finestre, poiché
sarebbe difficile o impossibile ricevere i canali digitali.
3. COLLEGAMENTO DEL RICEVITORE AL TELEVISORE
Per collegare il ricevitore al televisore è possibile utilizzare un cavo SCART o RCA.
Se il televisore viene collegato tramite il cavo SCART, collegare il connettore SCART
contrassegnato con TV alla relativa presa SCART sul televisore.
Nota : In alcune aree, il segnale terrestre digitale potrebbe essere debole.
Per ricevere questi segnali, è consigliabile utilizzare un’antenna con potenziatore
del segnale incorporato.
4. COLLEGAMENTO DEL VCR
Per consentire il collegamento del VCR, il ricevitore è dotato di un connettore SCART
sul retro contrassegnato con la scritta “VCR”. Il connettore SCART consente di
collegare il VCR al ricevitore.
5. COLLEGAMENTO DEL SISTEMA AUDIO / HI-FI ESTERNO
Per consentire il collegamento del sistema Audio Hi-Fi esterno, il ricevitore è dotato
di due connettori RCA sul retro contrassegnati rispettivamente con la scritta AUDIO L
e R, per collegare l’audio sinistro e destro.
6. COLLEGAMENTO DI UN SISTEMA AUDIO DIGITALE
Collegare un cavo in fibra ottica tra SPDIF sul ricevitore e OPTICAL sul sistema
audio digitale.
IT-6
R
I
C
E
V
I
T
O
R
E
DTB-B570E
DTB-B570E
COLLEGAMENTO DELL’STB
COLLEGAMENTO DELL’STB
T
E
R
R
E
S
T
R
E
D
I
G
I
T
A
L
E
IT-7
00427A_B570E_XET_Ita2304
4/23/07
8:23 PM
Page 8
DTB-B570E
DTB-B570E
DESCRIZIONE
DESCRIZIONE
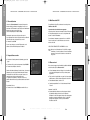
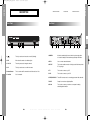
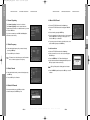
Pannello posteriore
Pannello anteriore
IT
1
2
3
4
5
1.
Questo tasto serve per accendere e spegnere il ricevitore (Standby).
2. LED
Questo indicatore si accende quando l'unità viene acceso.
3. CH+ / CH-
Questi tasti servono per cambiare canale.
4. OK
Questo tasto serve per inserire i dati del ricevitore nel sistema di
menu e confermarli. Questo tasto serve per selezionare le voci.
1. MODEM
Slot for smartcard.
IT-8
R
I
C
E
V
I
T
O
R
E
T
E
R
R
E
S
T
4
5
6
7
8
Il modem è un terminale che condivide una linea con un apparecchio
telefonico utilizzando uno sdoppiatore.
Viene utilizzato per la PPV e per il trasferimento di informazioni relative
alla sottoscrizione.
Serve per collegare un’antenna terrestre.
2. RF IN
5. Sensore a infrarossi Consente di ricevere i comandi a infrarossi del telecomando.
6. Card Slot
3
2
1
6
3. RF OUT
Ciò è usata per permettere il collegamento della ricevente analog.
La ricevente fornisce la ciclo di RF attraverso.
4. TV
Serve per il collegamento alla TV.
5. VCR
Serve per il collegamento al VCR.
6. VIDEO, AUDIO L/R
Questi connettori RCA servono per il collegamento di dispositivi video e
audio esterni.
7. SPDIF
Uscita per il collegamento a un amplificatore digitale.
8. RS-232
Serve per collegare il ricevitore a un computer per leggere e caricare dati.
R
E
D
I
G
I
T
A
L
E
IT-9
00427A_B570E_XET_Ita2304
4/23/07
8:23 PM
Page 10
DESCRIZIONE
1. TV
2. STB
3. STANDBY/ON
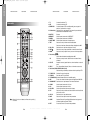
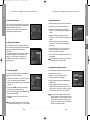
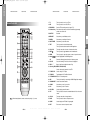
Telecomando
N o t a : Quando si inseriscono le batterie, verificare che la polarità (+/-)
sia corretta.
28. GUIDE
Il pulsante Electronic Program Guide (Guida elettronica ai programmi)
visualizza la guida ai programmi TV/Radio.
Per uscire da un menu o tornare al menu precedente.
29. EXIT
IT-10
R
I
C
E
V
I
T
O
R
E
T
E
R
R
E
S
T
R
E
D
I
G
I
T
A
L
E
IT-11
IT
Consente di selezionare TV.
Consente di selezionare STB.
Consente di mettere l’STB in modalità stand-by (nessun segnale al
televisore). Il pulsante è di colore grigio.
4. 0-9 Numeric key Questi tasti servono per immettere i valori numerici e per selezionare il
canale inserendone direttamente il numero.
5. SUBTITLE
Riservato
6. MEDIASET
Selezioni quando usate servizio di MEDIASET
7. PANGEA
Selezioni quando usate servizio di PANGEA
8. ON/OFF TIMER
Selezioni quando usate servizio di temporizzatore.
9. TEXT
Questo tasto serve per selezionare la modalità teletext.
Questo tasto viene futuro utilizzato ed utilizzato nell’applicazione MHP.
10. VOL+/VOLQuesti tasti servono per alzare o abbassare il volume.
11. MUTE
Questo tasto serve per passare dall’audio normale all’assenza di audio.
12. MENU
Questo tasto serve per aprire il menu o per tornare al menu precedente.
¦)
13. Tasto freccia (
Sposta la barra di evidenziazione dell’applicazione MHP.
OK
Questo tasto serve per inserire i dati del ricevitore nel sistema di menu e
confermarli.
14. CH. LIST
Premendolo mentre si guarda il televisore, viene visualizzato un elenco di
canali.
15. INFO “ i ”
Tasto “Now and Next Information” (Adesso e informazione successive).
16. Tasti colore (ROSSO, VERDE, GIALLO, BLU)
Questi tasti vengono utilizzati per selezionare funzioni speciali per l’STB.
17. TV INPUT SEL.
Seleziona il formato di uscita video.
18. TV/RADIO
Passa dai canali TV a quelli Radio.
19. TV STANDBY/ON Consente di mettere l’televisore in modalità stand-by
20. APP
È il tasto che consente di accedere al gestore dell’applicazione SAMSUNG.
21. CH.NUM INPUT Questi tasti servono per immettere i valori numerici della canal.
22. CONAX
Selezioni quando usate servizio di Conax
23. LA7
Selezioni quando usate servizio di LA&
24. SYS. INFO
Selezioni per visualizza la informazioni del sistema.
25. ALT
Questo tasto serve per selezionare l’elenco delle informazioni audio/video
per il servizio corrente.
26. CH+/CHQuesti tasti servono per cambiare canale.
27. BACK
Questo tasti è usato per ritornare al menu precedente.
DTB-B570E
DTB-B570E
DESCRIZIONE
00427A_B570E_XET_Ita2304
4/23/07
8:23 PM
Page 12
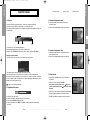
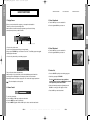
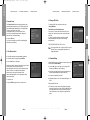
1. Schermo
DTB-B570E
DTB-B570E
FUNZIONI DI BASE
FUNZIONI DI BASE
3. Selezione informazioni audio
●
Premere il tasto ALT per visualizzare l’elenco delle
informazioni audio.
● Premere i tasti / e OK per effettuare una selezione.
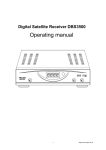
Prima di visualizzare il programma televisivo, è necessario eseguire l’installazione.
In un primo tempo sarà infatti possibile vedere solo le immagini dei menu.
Una volta programmati i canali televisivi, l’immagine che segue (banner) apparirà ogni volta che
si cambia canale:
Numero canale
Stato segnale
Informazioni sul programma
Il numero dell’audio nel
canale corrente
IT
● Premere il tasto i in modalità di visualizzazione.
Questa immagine appare anche ogni volta che si cambia canale.
Premendo il tasto TV/RADIO del telecomando, vengono attivati i programmi TV e Radio.
4. Selezione informazioni video
●
Premere il tasto ALT due volte per visualizzare l’elenco
delle informazioni video.
● Premere i tasti / e OK per effettuare una selezione.
Detailed program information
●
Premere il tasto i due volte mentre si sta visualizzando un programma.
Con la prima pressione del tasto apparirà il banner descritto sopra.
Dopo aver premuto il tasto i una seconda volta, si otterranno informazioni dettagliate sul
programma che si sta visualizzando e, se le informazioni sono numerose, verranno visualizzate
in un altro riquadro. Quando le informazioni sono costituite da più pagine, CH+/CH- può essere
utilizzato per sfogliare le pagine su è giù.
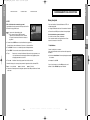
5. Elenco servizi
●
Premere il tasto CH.LIST mentre si sta visualizzando un
programma.
●
Selezionare l’elenco premendo TV/RADIO.
N o t a : questo servizio dipende dal provider.
Poste dietro il nome del canale, l’icona
indica che il
canale è criptato, mentre l’icona
indica che il canale è
bloccato.
2. Regolazione del volume
●
Per regolare il livello del volume:
●
Selezionare il canale premendo e premere CH+/CH per
passare alle pagine precedenti e successive dell’elenco.
Premere il tasto OK per visualizzare il canale selezionato.
●
Premere i tasti VOL+ o VOL- per regolare il livello del volume.
● Premere il tasto MUTE per disattivare l’audio.
● Premere nuovamente il tasto MUTE o i tasti VOL+ o VOL- per annullare la disattivazione
dell’audio.
IT-12
R
I
C
E
V
I
T
O
R
E
T
E
R
R
E
S
T
R
E
D
I
G
I
T
A
L
E
IT-13
00427A_B570E_XET_Ita2304
4/23/07
8:23 PM
Page 14
FUNZIONAMENTO DEL RICEVITORE
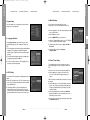
6. EPG
Menu principale
EPG - Guida elettronica avanzata ai programmi
La guida elettronica al programma fornisce per tutti i canali le
informazioni sul programma scelto.
Dopo avere installato il sistema dell’antenna e l’STB con i
connettori appropriati:
N o t e : 1. questo servizio dipende dal provider.
2. Dopo avere riconosciuto il GMT dal segnale,
operazione che richiede alcuni secondi, il ricevitore
è in grado di visualizzare le informazioni corrette sui
programmi.
●
●
Premere il tasto MENU per visualizzare il menu principale.
Premere il tasto GUIDE mentre si sta visualizzando un programma.
Tasto ROSSO : Il tasto rosso consente di passare alla data precedente.
●
Tasto VERDE : Il tasto verde consente di passare alla data successiva.
●
Tasto i
1. Installazione
Il menu è costituito da 3 sottomenu:
Auto scansione, Manuale scansione e Azzera alle impostazioni
di fabbrica.
: Questo tasto consente di visualizzare le informazioni sul programma, se non
sono tutte elencate nella stessa pagina. Utilizzare i tasti / per passare
alle pagine precedenti e successive.
Tasto ¦/ : Visualizza l’elenco dei programmi in blocchi da 30 minuti.
.
L’intervallo di tempo può essere regolato premendo i seguenti tasti sulla schermata EPG:
Tasto 1 : 1 ora e 30 minuti
tasto 2 : 30 minuti
IT
●
●
Collegare l’alimentazione di rete CA e accendere il ricevitore.
Verrà visualizzata la seguente schermata:
Le voci del sottomenu verranno visualizzate.
Per i sottomenu Installazione, Organizzazione e Chiave
elettronica è necessario il codice PIN.
Questa funzione viene visualizzata sullo schermo solo durante l’utilizzo.
●
●
DTB-B570E
DTB-B570E
FUNZIONI DI BASE
●
Selezionare “Installazione” dal menu principale per accedere
al sottomenu.
●
Immettere il codice PIN.
Se non è stato immesso un codice PIN personale, verrà
utilizzato il codice PIN 0000 impostato in fabbrica.
tasto 3 : 15 minuti
Selezionare il canale premendo i tasti / e premere il tasto OK per visualizzare il canale
selezionato.
IT-14
R
I
C
E
V
I
T
O
R
E
T
E
R
R
E
S
T
R
E
D
I
G
I
T
A
L
E
IT-15
00427A_B570E_XET_Ita2304
4/23/07
8:23 PM
Page 16
FUNZIONAMENTO DEL RICEVITORE
1.1 Auto scansione
1.3 Azzera alle impostazioni di fabbrica
Il sottomenu “Auto scansione” consente di scaricare
automaticamente i canali dal punto di caricamento
preprogrammato.
Consente di tornare ai valori impostati in fabbrica nel caso
in cui si verificassero dei problemi dopo la modifica di alcuni
valori relativi ai dati dei canali o per l’uso di valori errati.
Nella finestra di richiesta, se si preme il tasto OK, il ricevitore
viene automaticamente reimpostato in base ai valori
predefiniti.
Per scaricare automaticamente i canali:
●
È possibile selezionare la frequenza specificata tra
Frequenza inizio e Frequenza fine.
●
Premere il tasto OK.
Verrà visualizzato il menu Auto scansione. Tutti i canali
nell’elenco verranno automaticamente scaricati.
DTB-B570E
DTB-B570E
FUNZIONAMENTO DEL RICEVITORE
N o t a : Questa operazione elimina tutte le impostazioni
esistenti!
IT
1.2 Manuale scansione
Per sintonizzare i nuovi canali e i segnali più deboli, è disponibile
l’opzione “Manuale scansione” che consente di immettere
manualmente i dati sui canali.
Dopo aver selezionato “Manuale scansione” dal menu
Installazione verrà visualizzata la schermata seguente:
●
Selezionare il numero del canale.
È possibile selezionare il canale specifico da cercare.
Le opzioni seguenti sono impostante per default, tuttavia è
possibile modificarle.
La barra di stato del segnale mostra se il canale è valido.
●
Immettere la frequenza del canale da trovare.
●
Selezionare la larghezza di banda.
È possibile selezionare un valore pari a 6, 7 o 8 MHz.
●
Selezionare la modalità di intervallo di sicurezza.
È possibile selezionare il valore Auto, 1/32, 1/16, 1/8, o 1/4.
●
Selezionare la modalità FFT (Fast Fourier Transform).
Il valore AUTO, 2K e 8K è impostato automaticamente.
●
Una volta selezionate le opzioni, premere il tasto OK per
avviare la procedura di scansione.
IT-16
R
I
C
E
V
I
T
O
R
E
T
E
R
R
E
S
T
R
E
D
I
G
I
T
A
L
E
IT-17
00427A_B570E_XET_Ita2304
4/23/07
8:23 PM
Page 18
FUNZIONAMENTO DEL RICEVITORE
2.4 Sposta e modifica canale
2. Organizzazione canale
Il menu “Organizzazione canale” ha quattro opzioni:
Il menu “Organizzazione canale” viene utilizzato per eliminare
Frequenze e Canali oppure per spostarli e modificarli in base
alle
proprie preferenze.
●
Immettere il codice PIN.
Se non è stato immesso un codice PIN personale, verrà
utilizzato il codice 0000 impostato in fabbrica.
Selezionare l’elenco Interattivo/TV/RADIO premendo i tasti
¦/.
●
Selezionare l’elenco Interattivo/TV/RADIO premendo i tasti
/oppure i tasti CH+/CH- .
●
Selezionare il canale premendo il tasto ROSSO.
●
Premere i tasti / per modificare la posizione del canale
desiderato, e premere CH+/CH- per passare alle pagine
precedenti e successive dell’elenco. Premere il tasto OK per
confermare.
●
Per rimettere il canale nella posizione iniziale, premere il tasto
BLU senza premere il tasto OK.
●
Selezionare l’elenco delle frequenze da eliminare premendo il
tasto ROSSO.
●
Premere il tasto OK per confermare.
Per modificare il nome di un canale
N o t e : Questo commando non elimina le frequenze, ma solo
l’elenco dei canali registrati su quella frequenza.
●
Selezionare l’elenco Interattivo/TV/RADIO premendo i tasti
¦/.
●
Selezionare un elenco di canali da spostare in un’altra
posizione premendo i tasti /oppure i tasti CH+/CH- .
●
Premere il tasto VERDE.
Viene visualizzata la tabella dei font.
●
Selezionare il carattere desiderato premendo i tasti ¦/,/
quindi premere OK per associare il carattere alla stringa.
2.2 Cancella canale
N o t a : Tasto CH- : Elimina il carattere precedente.
●
Selezionare l’elenco dei canali da eliminare premendo il tasto
ROSSO.
●
Premere il tasto OK per confermare.
Premere il tasto MENU e poi il tasto OK per salvare i dati
impostati.
2.3 Cancella tutti i canali
Nella finestra di richiesta, premere il tasto OK per eliminare tutti i
canali e premere EXIT per uscire.
IT-18
R
I
C
E
V
I
T
O
R
E
T
E
R
R
E
S
T
R
E
D
I
G
I
T
A
L
E
IT-19
IT
●
2.1 Cancella frequenza
●
DTB-B570E
DTB-B570E
FUNZIONAMENTO DEL RICEVITORE
00427A_B570E_XET_Ita2304
4/23/07
8:23 PM
Page 20
FUNZIONAMENTO DEL RICEVITORE
3. Chiave elettronica
3.2 Modifica codice PIN
La funzione “Chiave elettronica” consente di impostare le
limitazioni della visualizzazione e impedisce l’accesso non
autorizzato all’STB tramite l’uso del PIN (Personal Identification
Number), un numero personale di 4 cifre.
(codice PIN preimpostato in fabbrica: 0000)
Per modificare il codice PIN, selezionare la seconda opzione,
“Modifica codice PIN”.
In questo modo si accederà al menu seguente:
In questa opzione, è necessario immettere il codice PIN corrente
in corrispondenza del primo cursore e in corrispondenza del
secondo il codice PIN desiderato.
Selezionando questo menu, si dispone di tre opzioni:
è possibile impostare il blocco di qualsiasi canale, modificare il
codice PIN personale, e impostare il blocco minori.
●
Per confermare, immettere nuovamente il nuovo codice PIN.
Occorre ricordare che il codice PIN deve essere un valore
numerico di 4 cifre.
Immettere il codice PIN.
CODICE PIN PREIMPOSTATO IN FABBRICA: 0 0 0 0.
3.1 Imposta blocco canale
N o t a : Nel caso in cui si dimenticasse il Codice PIN, contattare
il rivenditore o il servizio assistenza. Una volta modificata
la password, è necessario ricordarla e conservarla in un
luogo sicuro.
Selezionare il canale premendo i tasti ¦/ oppure i tasti
/.
●
Selezionare il blocco del canale premendo il tasto ROSSO.
●
Premere il tasto OK per confermare.
3.3 Blocco minori
Blocco minori protegge i vostri bambini dal soddisfare dell'adulto,
selezioni la terza opzione, “Blocco minori”.
Quando si desidera visualizzare il canale bloccato, è necessario
immettere ogni volta il codice PIN nella finestra di richiesta.
L’inserimento del codice PIN, che consente l’accesso a un
canale bloccato, agisce su tutti i canali bloccati.
Ciò significa che, inserendo il codice PIN corretto in uno
qualsiasi dei canali bloccati, è possibile accedere a tutti i canali
bloccati.
Per annullare il blocco:
●
Premere di nuovo il tasto ROSSO per annullare il blocco..
●
Usi i tasti ¦/per selezionare l'età per il vostro bambino più
in giovane età quindi premi il tasto OK per salvare questa
regolazione.
●
Tutti i servizi che i gradi di età sono uguali o più notevolmente
stabiliti saranno ostruiti e richiesta di entrare nel codice PIN.
●
Se desiderate disattivarsi, selezioni "off".
●
L'attivazione predefinita è "on" e l'età selezionata di limite è
"18 anni".
Immettere il codice PIN.
●
IT-20
R
I
C
E
V
I
T
O
R
E
T
E
R
R
E
S
T
Questa bandiera è indicata se servizio quale grado di età è
più grande di stabilito nei menu di controllo parentali.
Immettere il codice PIN a quattro cifre per nascondere questa
bandiera e mostrare il soddisfare di servizio. Il codice PIN
preimpostato in fabbrica è : 0000, e potete cambiarli in
“Modifica codice PIN”.
R
E
D
I
G
I
T
A
L
E
IT-21
IT
Se non è stato immesso un codice PIN personale, verrà
utilizzato il codice PIN 0000 impostato in fabbrica.
●
DTB-B570E
DTB-B570E
FUNZIONAMENTO DEL RICEVITORE
00427A_B570E_XET_Ita2304
4/23/07
8:23 PM
Page 22
FUNZIONAMENTO DEL RICEVITORE
4. Impostazioni di sistema
4.3 Impostazioni media
È possibile modificare le impostazioni predefinite del sistema in
base alle proprie esigenze.
È possibile definire varie impostazioni per i supporti.
Posizionare il cursore sul sottomenu e premere il tasto OK.
4.1 Selezione lingua
●
Per favorire gli utenti delle varie nazioni che parlano lingue
diverse, gli OSD sono disponibili in 5 lingue diverse. (Sono
attualmente supportate le lingue Italiano, Spagnolo, Inglese,
Tedesco e Francese,).
●
Per selezionare il menu nella lingua desiderata premere i tasti
¦/ quindi premere OK.
●
Gli OSD, le informazioni audio, il Teletext e l’EPG variano a
seconda della lingua selezionata.
Premere i tasti / per spostare le sotto voci e premere i
tasti ¦/ per selezionare l’opzione desiderata.
●
Premere il tasto OK per confermare.
●
Premere i tasti MENU/EXIT per uscire dal menu.
●
Selezionare la proporzione TV in base all’apparecchio
televisivo in uso:
STANDARD, rapporto 4 : 3 o WIDE SCREEN, rapporto 16 : 9.
●
Selezionare la conversione della proporzione:
Nessuno, Letter Box o Pan & Scan.
●
Selezionare il tipo di segnale video:
Composite o Composite+RGB.
4.4 Impostazioni ora e timer
È possibile impostare l’ora in diverse modalità, ad esempio ora
locale corrente, ora di accensione/spegnimento.
L’ora locale corrente può essere regolata mediante il GMT.
●
Posizionare il cursore sul sottomenu e premere il tasto OK.
4.2 Impostazioni OSD
●
Premere i tasti ¦/per modificare l’ora locale in base al fuso
orario. L’ora locale varia a seconda della località.
È possibile impostare la trasparenza dell’OSD e la durata della
visualizzazione.
Il GMT si riferisce all’ora standard di Greenwich.
Questa non può essere modificata.
●
Selezionare il livello di trasparenza dell’OSD. Il livello di
trasparenza dell’OSD varia da 0 a 100%.
L’impostazione viene effettuata premendo i tasti numerici¦/
oppure i tasti CH+/CH-.
●
Premere i tasti ¦/ per scegliere la ripetizione dell’evento da
prenotare: una volta sola oppure tutti i giorni, ogni domenica,
ogni lunedì, ogni martedì, ogni mercoledì, ogni giovedì, ogni
venerdì e ogni sabato.
●
Impostare la durata della visualizzazione del riquadro delle
informazioni che appare sullo schermo.
La durata varia da 0,5 a 60,0 secondi.
L’impostazione viene effettuata premendo i tasti numerici
¦/(a ogni pressione il valore decrementa o incrementa di
0.5 sec) oppure i tasti CH+/CH- (a ogni pressione il valore
decrementa o incrementa di 1 sec).
●
Inserire l’ora desiderata per l’accensione e lo spegnimento
utilizzando i tasti Numerici (0~9) e i tasti ¦/ . Premere i
tasti ¦/per scegliere un’ora da prenotare per l’accensione.
●
Selezionare il programma per impostare l’evento premendo i
tasti ¦/e i tasti Numerici (0~9).
IT-22
R
I
C
E
V
I
T
O
R
E
T
E
R
R
E
S
T
R
E
D
I
G
I
T
A
L
E
IT-23
IT
L’opzione “Selezione lingua” consente all’utente di selezionare
la lingua desiderata per OSD, informazioni audio, Teletext e
EPG.
●
DTB-B570E
DTB-B570E
FUNZIONAMENTO DEL RICEVITORE
00427A_B570E_XET_Ita2304
4/23/07
8:23 PM
Page 24
FUNZIONAMENTO DEL RICEVITORE
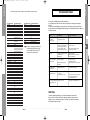
4.5 Informazioni di sistema
4.8 Impostazione modem
Nel caso in cui sia necessario contattare il service provider o un
centro di assistenza, è possibile che vengano richieste alcune
informazioni contenute in questo menu.
Posizionare il cursore sul sottomenu e premere il tasto OK.
Verrà visualizzata la seguente schermata:
Per impostare il modem, seguire le istruzioni fornite di seguito.
4.6 Aggiornamento software
Selezionare Tone o Pulse in Modalit di composizione.
●
Selezionare il ‘Tempo d’attesa portante’ nell’intervallo
compreso tra 1 e 255 secondi utilizzando i tasti ¦/ o i tasti
numerici.
●
Selezionare il ‘Tempo attuale portante’ nell’intervallo
compreso tra 0.1~25.5 secondi utilizzando i tasti ¦/o i tasti
numerici.
●
Selezionare il ‘Tempo perdita portante’ nell’intervallo
compreso tra 0.1 e 25.5 secondi utilizzando i tasti ¦/ o i
tasti numerici.
●
Selezionare Blank (Vuoto), 0, # o 9 nella casella Prefisso
utilizzando i tasti ¦/, per specificare il tasto di precomposizione per l’estensione telefonica.
●
Premere ‘OK’ per salvare la configurazione del modem, se è
stata modificata.
N o t a : Se si sceglie Exit senza premere il tasto OK le modifiche
apportate al modem non verranno salvate.
4.9 Impostazione funzionamento auto
4.7 Controllo appl. MHP
E’ possibile impostare i parametri per la ricerca di nuovi canali e
Per modificare la modalità di visualizzazione dell’applicazione
MHP, seguire le istruzioni fornite di seguito.
l’aggiornamento di nuovo software.
●
●
Selezionare Avvio automatico o Non consentito in modalità
Controllo avvio automatico utilizzando i tasti ¦/.
Selezionare Sì o NO in Modo standby e in Modo
funzionamento premendo i tasti ¦/keys.
●
●
Selezionare On/Off in modalità Mostra elenco appl. premendo
i tasti ¦/.
Inserire l’ora desiderata premendo i tasti Numerici (0~9),
CH+/CH- e ¦/.
●
●
Premere il tasto VERDE per modificare i dati contenuti in
Numero telefonico, Nome utente e Password.
Premere i tasti ¦/per selezionare l’opzione Event
Repetition (Ripetizione evento) da prenotare: Una volta sola
oppure tutti i giorni, ogni domenica, ogni lunedì, ogni martedì,
ogni mercoledì, ogni giovedì, ogni venerdì, ogni sabato.
●
Inserire il valore desiderato utilizzando i tasti Numerici (0~9) e
premendo i tasti ¦/ in DNS.
●
Premere ‘OK’ per salvare le nuove impostazioni Controllo
appl. MHP.
N o t a : Se si preme Sì in Modo standby (selezionando NO in
Modo funzionamento o Aborting the operation in progress
(Termina operazione in corso) in Modo funzionamento), il
ricevitore attiverà il funzionamento automatico dopo 45
minuti per il nuovo software e 1 ora per i nuovi canali dal
momento in cui entra in Modo standby.
N o t a : Se si sceglie Exit senza premere il tasto OK le modifiche
apportate al menu MHP App Control non verranno salvate.
IT-24
R
I
C
E
V
I
T
O
R
E
T
E
R
R
E
S
T
R
E
D
I
G
I
T
A
L
E
IT-25
IT
È possibile scaricare e aggiornare il software di sistema del
ricevitore utilizzando un canale specifico indicato dall’emittente.
Maggiori informazioni verranno fornite direttamente
dall’emittente.
Se si sceglie di scaricare una nuova versione del software, tutte
le impostazioni precedenti, come codici d’accesso, canali
preferiti,ecc., verranno eliminate! Lo scaricamento può
richiedere diverso tempo. Durante lo scaricamento, non
spegnere il ricevitore.
●
DTB-B570E
DTB-B570E
FUNZIONAMENTO DEL RICEVITORE
00427A_B570E_XET_Ita2304
4/23/07
8:23 PM
Page 26
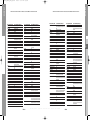
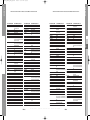
NUMERI DISPONIBILI DEL FORNITORE
5.Servizi Pay Per View
●
●
●
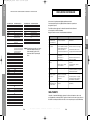
1. Tasto della TV + codice dell'utente delle 3 cifre
2. Tasti di funzionamento della TV: TV STANDBY/ON, NUMERIC(0~9), CH+/- , VOL+/-, INPUT
SEL., MUTE
Mediaset Premium
Mediaset Premium fornisce le informazioni della scheda per
servizio di broadcasting di Mediaset.
Quando la scheda è inserita, il numero di serie,
l'accreditamento corrente e le informazioni della ricarica sono
indicano a voi sul menu.
L'altra lista dei pacchetti è ugualmente disponibile sul menu
per riferimento futuro.
79
0DNHU%5$1'1$0(
6$0681*
$56<67(06
$&&(17
$&(&
$&85$
$'0,5$/
Pangea
Pangea fornisce le informazioni della scheda per i servizi di
broadcasting che sostengono Nagra CA.
Quando la scheda è inserita, il numero di serie,
l'accreditamento corrente e le informazioni della ricarica sono
indicati sul menu. L'altra lista dei pacchetti è egualmente
disponibile sul menu per riferimento futuro.
$'<621
$*$6+,
$*()
$,.2
$,:$
$.$,
LA7 Cartapiû
LA7 Cartapiû fornisce le informazioni della scheda per
servizio di broadcasting LA7.
Può anche gestire la corrente di versione di Irdeto e ricevere i
messaggi dall'azienda di radiodiffusione.
$.,%$
$.,72
$.85$
$/$521
$/%$
$/%,5$/
$/&<21
$//25*$1
$//67$5
$03/,9,6,21
$0675$'
Conax CA
Conax CA fornisce le informazioni della scheda per servizio di
broadcasting di Conax.
Quando la scheda è inserita, può gestire l'abbonamento e le
liste dell'evento, del segno corrente disponibile, del numero di
serie e della versione di Conax.
Può anche cambiare il PIN numero della scheda ed il livello
della valutazione di programma.
$1$0
$1$01$7,21$/
$1*/2
$1,7(&+
$1621,&
$5&(1&,(/
$5&$0
$5,6721$
$57+850$57,1
$6$
$6%(5*
$625$
$675$
$68.$
IT-26
R
I
C
E
V
I
T
O
R
E
T
E
R
R
E
S
T
R
E
D
I
G
I
&2'(180%(5',*,7/,67
T
A
L
E
0DNHU%5$1'1$0(
$7/$17,&
$725,
$8&+$1
$8',2621,&
$8',2721
$86,1'
$87292;
&2'(180%(5',*,7/,67
$:$
$<20,
%$,5'
%$1*2/8)6(1
%$5&2
%$6,&/,1(
%$67,'(
%$85
%(.2
%(21
%(67
%(67$5
%,1$721(
%/$&.67$5
%/$&.7521
%/$&.:$<
%/$8381.7
%/8(6.<
%/8(67$5
%21'67(&
%2276
%3/
%5$1'7
%5$1'7(/(&7521,& %5$1'7(/(&7521,48( %5,1.0$11
%5,219(*$
%5,7$11,$
%527+(5
%5816
%65
%7&
%86+
%86+8.
IT-27
IT
●
DTB-B570E
DTB-B570E
FUNZIONAMENTO DEL RICEVITORE
00427A_B570E_XET_Ita2304
4/23/07
8:23 PM
Page 28
0DNHU%5$1'1$0(
&$3621,&
&$55()285
&$6&$'(
&$6,2
&$7+$<
&&(
&(1785,21
&(1785<
&*(
NUMERI DISPONIBILI DEL FORNITORE
0DNHU%5$1'1$0(
',*,/,1(
',;,
'25,&
'5($1
'76
'8$/
'8$/7(&
'80217
'80217),1/8;
'8;
'<1$7521
(/%(
(/%,7
(/&,7
(/(&7$
(/(&7527(&+
(/(.7$
(/*
(/,1
(/,7(
(/0$1
(/7$
(0(5621
(55(6
(6&
(7521
(852)((/
(8520$1
(8523$
(8523+21
(;3(57
(;48,6,7
)$0,/</,)(
)(11(5
)(5*8621
),'(/,7<
),/6$,
),1/$1',$
),1/8;
),567/,1(
IT-28
R
0DNHU%5$1'1$0(
),6+(5
&2'(180%(5',*,7/,67
I
C
E
V
I
T
O
R
E
)/,17
)15
)250(17,
)250(17,3+2(1,;
)2575(66
)5$%$
)5,$&
)5217(&+
)8-,768
)8-,768*(1(5$/
)81$,
*$/$;,
*$/$;,6
*%&
*(
*($17&$6,12
*(&
*(&8.
*(/262
*(1(5$/
*(1(5$/7(&+1,&
*(1(;;$
*2/'+$1'
*2/'/,1(
*2/'67$5/*
*22'0$16
*25(1-(
*30
*5$',(17(
*5$(7=
*5$1$'$
*5$1$'$8.
*5$1',1
*521,&
*581',*
+$/,)$;
+$03721
T
E
R
R
E
S
T
R
E
D
I
G
I
&2'(180%(5',*,7/,67
T
A
L
E
0DNHU%5$1'1$0(
+$1,0(;
+$16($7,&
+$17$5(;
+$1725
+$5/(<'$9,'621
+$5:22'
+$833$8*(
+$9(50<
+&0
+(0$
+(00(50$11
+,),92;
+,*$6+,
+,*+/,1(
+,.21$
+,1$5,
+,6$:$
+,7
+,7$&+,
+,7$&+,)8-,$1
+,768
+251<3+21
+26+$,
+8$1<8
+<*$6+,
+<3(5
+<3(5621,&
+<3621
,%(5,$
,&(
,&(6
,03(5,$/
,1',$1$
,1*(/(1
,1*(562//
,112+,7
,1129$7,21
,17(5$&7,9(
,17(5%8<
,17(5)81.
IT-29
&2'(180%(5',*,7/,67
IT
&2'(180%(5',*,7/,67
&,+$1
&,0/,1(
&,7<
&/$5,92;
&/$7521,&
&06+,*+7(&
&207(/
&21&25'(
&21'25
&217(&
&217,1(17$/(',621 &260(/
&526/(<
&52:1
&5<67$/
&6(/(&7521,&6
&7&
&7&&/$7521,&
&857,60$7+(6
&<%(57521
'$(1<.
'$(:22
'$,1,&+,
'$16$,
'$16(77(
'$17$;
'$7685$
'$:$
'$<721
'(*5$$)
'(&&$
'(&&$8.
'(,7521
'(1.2
'(121
'(5:(17
'(60(7
',*$7521
DTB-B570E
DTB-B570E
NUMERI DISPONIBILI DEL FORNITORE
00427A_B570E_XET_Ita2304
4/23/07
8:23 PM
Page 30
0DNHU%5$1'1$0(
,17(51$/
,17(59,6,21
,5
,55$',2
,68.$,
,7&
,76
,77
,7712.,$
.$,68,
.$02621,&
.$03
.$36&+
.$5&+(5
.$7+5(,1
.$:$6+2
.%$5,672&5$7
.(1'2
.(11('<
.,1*6/(<
./$50$;
.1(,66(/
.2/67(5
.21.$
.217$.7
.253(/
.257,1*
.26026
.27521
.2<2'$
.5$.,1*
.5,(6/(5
.79
.852
.<26+8
.<272
/(&621
/(0$,5
/(1&2
NUMERI DISPONIBILI DEL FORNITORE
0DNHU%5$1'1$0(
/(12,5
/(6$
/(<&2
/,(6(1.77(5
/,)(
/,)(7(&
//2<'B6
/2(:(
/2(:(237$
/2*,.
/2*,;
/80$
/80$7521
/8;0$<
/8;25
/<&2
0$$=
0$',621
0$*1$'<1(
0$*1$)21
0$*1$92;
0$*180
0$1'25
0$1(67+
0$1+$77$1
0$5$17=
0$5(//,
0$5.
0$68'$
0$768,
0$;,0$/
0$;:(//
0(',$725
0(',21
0(*$6
0(*$7521
0(/(&7521,&
0(/92;
0(025(;
0(03+,6
0(5&85<
0(7=
0,&520$;;
0,&5267$5
IT-30
R
0DNHU%5$1'1$0(
0,1(59$
0,12.$
0,768%,6+,
&2'(180%(5',*,7/,67
I
C
E
V
I
T
O
R
E
&2'(180%(5',*,7/,67
0,9$5
021$&2
025*$1B6
027,21
027252/$
07&
07(&
08/7,67$1'$5'
08/7,7(&
08/7,7(&+
0853+<
0853+<8.
086,./$1'
0<5<$'
1$'
1$,.2
1$.,085$
1$21,6
1$7
1$7,21$/
1(&
1(&.(50$11
1(',$725
1(,
1(6&2
1(76$7
1(7:25.
1(8)81.
1(:7(&+
1(::25/'
1,&$0$*,&
1,..$,
12%/(;
12%/,.2
12*$0$7,&
12.,$
125'0(1'(
129$7521,&
T
E
R
R
E
S
T
R
E
D
I
G
I
T
A
L
E
0DNHU%5$1'1$0(
2&($1,&
2&($1,&)
2'(21
2.$12
20(*$
21&($6
21:$
23(5$
237,086
23721,&$
25%,7
25,21
25/,1(
250(17,3+2(1,;
25021'
26$.$
26$.,
26,2
262
2680(
27$.(
27729(56$1'
37$&7521
3$(/
3$//$',80
3$/621,&
3$1$0$
3$1$621,&
3$1$9,6,21
3$7+(&,1(0$
3$7+(&,1(0$)
3$7+(0$5&21,
3$86$
3$8=$
3(5',2
3(5)(.7
3(56+,1
3+,/&2
3+,/(;
3+,/+$5021,&
IT-31
&2'(180%(5',*,7/,67
IT
,79
-($1
-(&
-(732,17
-9&
&2'(180%(5',*,7/,67
DTB-B570E
DTB-B570E
NUMERI DISPONIBILI DEL FORNITORE
00427A_B570E_XET_Ita2304
4/23/07
8:23 PM
Page 32
0DNHU%5$1'1$0(
3+,/,36
3+2(1,;
3+212/$
3,/27
3,21((5
3529,6,21
3<(
3<0,
48$'5$9,6,21
48$6$5
48(//(
48(67$
5$',$/9$
5$',2/$
5$',20$5(//,
5$',21(77(
5$',26+$&.
5$',2721(
5$1.$5(1$
5&$
5(&25
5(&7,/,*1(
5(',))86,21
5(',))86,218.
NUMERI DISPONIBILI DEL FORNITORE
0DNHU%5$1'1$0(
5('67$5
5()/(;
5(2&
5(92;
5(;
5)7
5+$362'<
5/,1(
52$'67$5
52%27521
52'(;
52:$
52:621,&
52<$//8;
57)
6$%$
6$&&6
6$*(0
6$,6+2
6$/25$
6$0%(56
6$1'5$
6$1(/$
6$168,
6$1721
6$1<2
6$9(
6%5
6&+$8%/25(1=
6&+1(,'(5
6&277
6($56
6(*
6(,
6(,6,18'<1(
6(/(&2
6(1&25$
6(175$
IT-32
R
&2'(180%(5',*,7/,67
I
C
E
V
I
T
O
R
E
0DNHU%5$1'1$0(
6(5,12
6+$53
6+25$,
6,$0
6,$5(0
&2'(180%(5',*,7/,67
6,(0(16
6,(5$
6,(55$
6,(67$
6,/9$
6,/9(5
6,1*(5
6,18'<1(
6.$17,&
6.<
6.<:257+
62*(5$
62/$92;
621$:$
621,7521
6211(&/$,5
6212.2
6212/25
6217(&
621<
6281'9,6,21
6281':$9(
6281'(6,*1
63(&75$
66$1*<21*
67$1'$5'
67$5/,*+7
67(1:$<
67(51
675$72
681.$,
68167$5
681:22'
683(5/$
683(57(&+
6835$
686808
687521
6:,66/,1(
6<'1(<
6<6/,1(
T
E
R
R
E
S
T
R
E
D
I
G
I
T
A
L
E
0DNHU%5$1'1$0(
6<721*
7$&786
7$1'%(5*
7$1'<
7$6+,.2
7$781*
7&0
7($&
7(&
7(&+/,1(
7(&+,&$
7(&+1(0$
7(&+1,&6
7(&+12/$&(
7('(/(;
7(,521
7(.1,.$
7(/($9,$
7(/(&25
7(/()81.(1
7(/()86,21
7(/(*$=,
7(/(0(,67(5
7(/(621,&
7(/(67$5
7(/(7(&+
7(/(721
7(/(9,'(21
7(/(9,62
7(0&2
7(03(67
7(11(66((
7(16$,
7(60(7
7(781*
7(9,21
7(;(7
7+20621
7+251
7+251)(5*8621
72.$,
72.<2
720$6+,
726+,%$
72:$'$
72<2'$
IT-33
&2'(180%(5',*,7/,67
IT
3/$17521
3/$<621,&
32/,&20
3233<
3257/$1'
32:(532,17
35$1'21,35,1&(
35(&,6,21
35(0,(5
35,0$
35,1&(
35,1=
352)(;
352),7521,&
352/,1(
352621,&
3527(&+
&2'(180%(5',*,7/,67
DTB-B570E
DTB-B570E
NUMERI DISPONIBILI DEL FORNITORE
00427A_B570E_XET_Ita2304
4/23/07
8:23 PM
Page 34
0DNHU%5$1'1$0(
75$.721
75$16&217,1(16
75$1621,&
75$167(&
75,'(17
75,67$5
75,803+
8+(5
8/75$
8/75$92;
81,92;
87$;
9(*$92;
9(67(/
9(;$
9,&725
9,'(26<67(0
9,'(2/2*,48(
9,'(26$7
9,'(26<67(0
9,'(27(&+1,&
9,'(2721
9,',.521
9,'7(&+
9,3(5
9,6,2/$
9,6,21
9,625(;
9,67$5
92/7(&
9257(&
92;621
:$/7+$0
:$7621
:$775$',2
:(*$
:(*$&2/25
:(*$92;
:(/7%/,&.
:(67,1*+286(
:(6721
:+$5)('$/(
0DNHU%5$1'1$0(
:+,7(
:+,7(:(67,1*+286(
:,1&2
:,1'67$5
;5<3721
<$0,6+,
<2.$1
<2.2
<25;
=$1866,
=233$6
In alcune aree, il segnale terrestre digitale potrebbe essere debole.
Per ricevere questi segnali, è consigliabile utilizzare un’antenna con potenziatore
del segnale incorporato.
&2'(180%(5',*,7/,67
È possibile scaricare e aggiornare il software di sistema del ricevitore utilizzando
un canale specifico indicato dall’emittente.
Maggiori informazioni verranno fornite direttamente dal distributore.
N o t a : Per gestire questo prodotto con il vostro
telecomando attuale di Samsung TV,
dovete immettere il codice 014 nel
telecomando della TV per rendergli il
lavoro.
IT-34
Problem
Possible cause
Solution of the problem
Non si accende
sul pannello frontale;
non c'è alimentazione
il LED Il cavo di alimentazione non
è inserito correttamente
Inserire correttamente il cavo di
alimentazione
Non appaiono immagini
sullo schermo
Ricevitore in modalità Standby;
Scart non saldamente collegata
all'uscita video del televisore;
canale o uscita video non
corretti selezionati sul televisore
Impostare il ricevitore su “On”;
Verificare la connessione e correggere;
Non c'è audio
Il cavo audio non è collegato
correttamente;
livello volume = 0;
audio disattivato
Funzionamento non corretto;
Il telecomando non
funziona
Batterie scariche o inserite
non correttamente
Qualità dell'immagine
insufficiente
Forza del segnale troppo bassa
Messaggio di errore
"Searching for signal"
sullo schermo
Cavo dell'antenna non
collegato o non ben inserito;
posizione non corretta
dell'antenna
Messaggio di errore
"Channel data does not
exist" sullo schermo
Ricevitore non ancora
impostato
verificare l'uscita canale e video e
correggere (manuale di istruzioni dellaTV)
Verificare la connessione e correggere;
aumentare il volume sul televisore;
premere il tasto MUTE
Puntare il telecomando verso
il ricevitore;
sostituire le batterie o inserirle
correttamente
Verificare la potenza del segnale nel menu
“Installation” (Installazione), correggere
l'allineamento dell'antenna
Verificare la connessione e correggere;
controllare la posizione e correggere,
verificare la potenza del segnale nel
menu "Installation" (Installazione)
Scansione nel menu “Installation”
(Installazione)
SMALTIMENTO
Il dispositivo, il materiale di imballaggio, ad esempio la schiuma, e le batterie non devono mai
essere gettati nella normale immondizia. È opportuno informarsi circa le norme in vigore nella zona
di residenza e smaltire questi rifiuti in conformità con le norme previste per la raccolta differenziata.
R
I
C
E
V
I
T
O
R
E
T
E
R
R
E
S
T
R
E
D
I
G
I
T
A
L
E
IT-35
IT
81,&/,1(
81,7('
81,9(5680
&2'(180%(5',*,7/,67
RISOLUZIONE DEI PROBLEMI
DTB-B570E
DTB-B570E
NUMERI DISPONIBILI DEL FORNITORE
00427A_B570E_XET_Ita2304
4/23/07
8:23 PM
Page 36
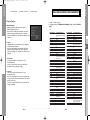
Alimentazione
Tipo :
SMPS
Tensione di ingresso :
CA 220-240V~, 50/60Hz
Potenza fusibili :
250V T1.6AH
Demodulatore
DEMODULAZIONE :
DEMODULAZIONE OFDM (DVB-T)
MODALITÀ :
2K/8K
VELOCITÀ CODIFICA :
Viterbi convoluzionale
Uscita A/V
SCART TV :
SCART VCR :
SPDIF :
RCA :
VIDEO (CVBS, RGB), AUDIO R&L
VIDEO (CVBS), AUDIO R&L
Uscita audio digitale
VIDEO, AUDIO R&L
Specifica fisica
Dimensioni (L x A x P) :
Peso (netto) :
Temperatura di esercizio :
Temperatura di stoccaggio :
270 mm x 200 mm x 45 mm
1.2 kg
da 0 °C a +45 °C
da -10 °C a +70 °C
Telecomando, manuale dell'utente,
2 batterie (AAA), cavo modem, cavo Scart
Sintonizzatore
Gamma Freq. :
50~860 MHz
Livello segnale in ingresso :
-20 ~ -65 dBm
Selezione canale :
Sintetizzatore frequenza PLL
Impedenza in ingresso :
75 Ω non bilanciato
Modello connettore :
Din tipo femmina (ingresso RF/uscita RF)
Decodificatore video
Decodifica sistema :
MPEG 2 ISO/IEC 13818
Corretto smaltimento del prodotto (rifiuti elettrici ed elettronici)
(flusso di trasporto)
(Applicabile in i paesi dell’Unione Europea e in quelli con sistema di raccolta differenziata)
Profilo e livello :
MPEG 2 MP@ML (4:2:2)
Velocità dati :
1~ 15 Mb/s
Formati video :
4:3 (standard) e 16:9 (widescreen)
Risoluzione immagini :
720 (H) x 576 (V) x 50 campi/sec
Il marchio riportato sul prodotto o sulla sua documentazione indica che il prodotto non deve
essere smaltito con altri rifiuti domestici al termine del ciclo di vita. Per evitare eventuali danni
all'ambiente o alla salute causati dall'inopportuno smaltimento dei rifiuti, si invita l'utente a separare
questo prodotto da altri tipi di rifiuti e di riciclarlo in maniera responsabile per favorire il riutilizzo sostenibile delle
risorse materiali.
Gli utenti domestici sono invitati a contattare il rivenditore presso il quale è stato acquistato il prodotto o l'ufficio
locale preposto per tutte le informazioni relative alla raccolta differenziata e al riciclaggio per questo tipo di prodotto.
Gli utenti aziendali sono invitati a contattare il proprio fornitore e verificare i termini e le condizioni del contratto di
acquisto. Questo prodotto non deve essere smaltito unitamente ad altri rifiuti commerciali.
Decodificatore audio
Decodifica sistema :
MPEG 1 ISO/IEC 11172~3 layer I e II
Modalità audio :
canale singolo, canale doppio, stereo,
joint stereo
Frequenza di campionamento :
32, 44.1, 48, 96 KHz
N o t a : la specifica del codificatore può essere modificata senza preavviso.
IT-36
R
I
C
E
V
I
T
O
R
E
T
E
R
R
E
S
T
R
E
D
I
G
I
T
A
L
E
IT-37
IT
Ecc
Accessori :
Velocità di codifica - 1/2, 2/3, 3/4, 5/6, 7/8
DTB-B570E
DTB-B570E
SPECIFICHE TECNICHE
SPECIFICHE TECNICHE
00427A_B570E_XET_Ita2304
4/23/07
8:23 PM
Page 38
MEMO
DTB-B570E
DTB-B570E
WARRENTY
Questo prodotto Samsung e’ garantito per un periodo di dodici (12) mesi dalla data di acquisto, da difetti di
fabbricazione o nei materiali. Nel caso di riparazione, il prodotto dovra’ essere riportato presso il rivenditore dal
quale si e’ effettuato l’acqusito. Comunque tutti i rivenditori e i centri di assistenza tecnica autorizzata Samsung
presenti nei paesi dell’ Europa occidentale riconosceranno la validita’ di questa garanzia compatibilménté con le
normativé vigenti nel paese interessato.
I centri di assistenza tecnica autorizzata sono gli unici riconosciuti idonei dalla Samsung ad effettuare l’ attivita’
di riparazione in garanzia.
In caso di difficolta’ la preghiamo di rivolgersi alla:
SAMSUNG ELECTRONICS ITALIA S.P.A
VIA C. DONAT CATTIN 5
20063, CERNUSCO SUL NAVIGLIO (MI)
TEL. 02/921891 FAX. 02/92141801
Servizio Clienti: Tel. 199.153.153
http://www.samsung.it
IT
■ CONDIZIONI DI GARANZIA
1. La garanzia viene accettata solo nel caso in cui il certificato risulta completamente compilato ed esibito
unitamente alla fattura comprovante l’acquisto o allo scontrino fiscale; inoltre nessuna alte-razione o
cancellazione dovranno essere apportate al certificato medesimo.
2. Gli obblighi della Samsung sono limitati alla riparazione o, a sua discrezione, alla sostituzione del prodotto
o delle parti difettose.
3. Ribadiamo che i centri di assistenza tecnica autorizzata sono gli unici incaricati dalla Samsung a svolgere
l’ attivita’ di garazia.
4. La garanzia del presente prodotto decadra’ immediatamente se lo stesso verra’ modificato ed adattato a
normative tecniche e di sicurezza diverse da quelle vigenti nel paese per il quale il prodotto e’ stato progettato
e costruito.
Non sara’ quindi previsto nessun rimborso per danni derivanti dalle modifiche qui menzionate.
5. La presente garanzia non copre:
a) Periodici controlli, manutenzione, riparazioni o sostituzioni di parti soggette ad usura.
b) Costi relativi a trasporto, spostamenti o installazione del presente prodotto.
c) Uso improprio, errori di utilizzazione o non corretta istallazione.
d) Danni causati da incendio, acqua, fenomeni naturali, guerra, moti pubblici, incorretta alimentazione,
ventilazione insufficiente od ogni altra causa non dipendente dalla Samsung.
6. Questa garanzia e’ valida per ogni persona che prende possesso formalmente del prodotto durante il
periodo di garanzia.
7. Questa garanzia non influisce sui diritti del cliente prescritti dalla legge secondo la legislazione nazionale
applicabile in vigore, ne sui diritti del cliente nei confronti del rivenditore derivanti dal contratto di
compra-vendita.
In assenza di legislazione nazionale applicabile questa garanzia sara’ la sola ed unica salvaguardia del cliente
e ne la Samsung ne la sua consociata o il, suo distributore saranno responsabili per alcun danno accidentale
o indiretto ai prodotti Samsung derivante dalla violazione dello condizioni di garanzia sin qui descritte.
8. Queste condizioni non pregiudicano i diritti riconosciuti al Consumatore dal Decreto Legislativo 2/02/02 n.
24 emesso in attuazione della Direttiva Europea 99/44/CE.
IT-38
R
I
C
E
V
I
T
O
R
E
T
E
R
R
E
S
T
R
E
D
I
G
I
T
A
L
E
IT-39
00427A_B570E_XET_Cov
4/20/07
9:46 AM
Page 6
Instructions for use . . . . . . . . . . . . . . . . . . . . . GB
DTB-B570E
00427A_B570E_XET_Eng2304
4/23/07
8:23 PM
Page ii
DTB-B570E
Instructions for use
GB
DIGITAL TERRESTRIAL RECEIVER
00427A_B570E_XET_Eng2304
4/23/07
8:23 PM
Page 2
DTB-B570E
DTB-B570E
SAFETY INSTRUCTIONS
WARNING!
This STB has been manufactured to satisfy international safety standards.
Please read the following recommended safety precautions carefully.
MAINS SUPPLY:
AC 220-240V~, 50/60Hz
OVERLOADING:
Do not overload wall outlets, extension cords or adapters as this
can result in fire or electrical shock.
LIQUIDS:
Keep liquids away from the STB. Apparatus shall not be exposed to
dropping or splashing and no objects filled with liquids, such as vases,
shall be placed on the apparatus.
Before cleaning, disconnect the STB from the wall socket.
Use a cloth lightly dampened with water(no solvents) to clean the
exterior.
VENTILATION:
Do not block the STB ventilation holes. Ensure that free airflow is
maintained around the STB. Never store the STB where it is exposed
to direct sunlight or near heating equipment e.g. a radiator.
Never stack other electronic equipment on top of the STB.
Place the STB at least 30mm from the wall. Need at least 10mm from
the top and both side of the STB for ventilation.
ATTACHMENTS:
2. Failure to follow one of them may cause electrical shock.
● Do not open the main body.
● Do not insert metals or inflammable objects inside the product.
● Do not touch the power plug with a wet hand.
● Disconnect the power cord in case of lightning.
● Do not cover the receiver’s ventilation openings with items such as newspapers,
clothes etc.
● Do not place the receiver on top of household appliances that emit heat.
3. Do not use the product when it is out of order. If you continue to use the product
with a defect, it can cause a serious damage to the product. Make sure to contact
your local product distributor when the product is out of order.
Do not use any attachment that is not recommended by the
manufacturer; it may cause a hazard or damage the equipment.
4. The Mains plug is used as a disconnect device and shall stay readily operable at
any time. To disconnect the apparatus from the AV mains, the plug must be pulled
out from the mains socket, therefore the mains plug shall be readily operable.
CONNECTION TO THE CABLE TV SIGNAL AND TV:
Connect all components before plugging any power cords into the
wall outlet. Always turn off the STB, TV and other components before
you connect or disconnect any cables.
SERVICING:
Do not attempt to service this product yourself.
Any attempt to do so will make the warranty invalid.
Refer all servicing to a qualified service agent.
LIGHTNING:
If the STB is installed in an area subject to intense lightning activity,
protection devices for the STB mains connector and modem telephone
line are essential. The individual manufacturer’s instruction for
safeguarding other equipment, such as TV set, Hi-Fi, etc., connected
to the STB must also be followed during lightning storms.
GROUNDING:
Terrestrial cable MUST BE EARTHED. The grounding system must
comply with SABS 061.
GB-2
D
I
G
I
T
A
L
T
E
R
R
E
S
T
R
I
A
L
R
E
C
E
I
V
E
R
GB-3
GB
CLEANING:
1. Follow these directions in order not to damage the power cord or plug.
● Do not modify or process the power cord or plug arbitrarily.
● Do not bend or twist the power cord too much.
● Make sure to disconnect the power cord with holding the plug.
● Separate heat appliances from the power cord as distance as possible in order to
prevent the cover from being melted.
00427A_B570E_XET_Eng2304
4/23/07
8:50 PM
Page 4
.
.
.
.
.
.
.
.
.
.
.
.
.
.
.
.
.
.
.
.
.
.
.
.
.
.
.
.
.
.
.
.
.
.
.
.
.
.
.
.
.
.
.
.
.
.
.
.
.
.
.
.
.
.
.
.
.
.
.
.
.
.
.
.
.
.
.
.
.
.
.
.
.
.
.
.
.
.
.
.
.
.
.
.
.
.
.
.
.
.
.
.
.
.
.
.
.
.
.
.
.
.
.
.
.
.
.
.
.
.
.
.
.
.
.
.
.
.
.
.
.
.
.
.
.
.
.
.
.
.
.
.
.
.
.
.
.
.
.
.
.
.
.
.
.
.
.
.
.
.
.
.
GB-4
.
.
.
.
.
.
.
.
.
.
.
.
.
.
.
.
.
.
.
.
.
.
.
.
.
.
.
.
.
.
.
.
.
.
.
.
.
.
.
.
.
.
.
.
.
.
.
.
.
.
.
.
.
.
.
.
.
.
.
.
.
.
.
.
.
.
.
.
.
.
.
.
.
.
.
.
.
.
.
.
.
.
.
.
.
.
.
.
.
.
.
.
.
.
.
.
.
.
.
.
.
.
.
.
.
.
.
.
.
.
.
.
.
.
.
.
.
.
.
.
.
.
.
.
.
.
.
.
.
.
.
.
.
.
.
.
.
.
.
.
.
.
.
.
.
.
.
.
.
.
.
.
.
.
.
.
.
.
.
.
.
.
.
.
.
.
.
.
.
.
.
.
.
.
.
.
.
.
.
.
.
.
.
.
.
.
.
.
.
.
.
.
.
.
.
.
.
.
.
.
.
.
.
.
.
.
.
.
.
.
.
.
.
.
.
.
.
.
.
.
.
.
.
.
.
.
.
.
.
.
.
.
.
.
.
.
.
.
.
.
.
.
.
.
.
.
.
.
.
.
.
.
.
.
.
.
.
.
.
.
.
.
.
.
.
.
.
.
.
.
.
.
.
.
.
.
.
.
.
.
.
.
.
.
.
.
.
.
.
.
.
.
.
.
.
.
.
.
.
.
.
.
.
.
.
.
.
.
.
.
.
.
.
.
.
.
.
.
.
.
.
.
.
.
.
.
.
.
.
.
.
.
.
.
.
.
.
.
.
.
.
.
.
.
.
.
.
.
.
.
.
.
.
.
.
.
.
.
.
.
.
.
.
.
.
.
.
.
.
.
.
.
.
.
.
.
.
.
.
.
.
.
.
.
.
.
.
.
.
.
.
.
.
.
.
.
.
.
.
.
.
.
.
.
.
.
.
.
.
.
.
.
.
.
.
.
.
.
.
.
.
.
.
.
.
.
.
.
.
.
.
.
.
.
.
.
.
.
.
.
.
.
.
.
.
.
.
.
.
.
.
.
.
.
.
.
D
.
.
.
.
.
.
.
.
.
.
.
.
.
.
.
.
.
.
.
.
.
.
.
.
.
.
.
.
.
.
.
.
.
.
.
.
.
.
.
.
.
.
.
.
.
.
.
.
.
.
.
.
.
.
.
.
.
.
.
.
.
.
.
.
.
.
.
.
.
.
.
.
.
.
.
.
I
.
.
.
.
.
.
.
.
.
.
.
.
.
.
.
.
.
.
.
.
.
.
.
.
.
.
.
.
.
.
.
.
.
.
.
.
.
.
.
.
.
.
.
.
.
.
.
.
.
.
.
.
.
.
.
.
.
.
.
.
.
.
.
.
.
.
.
.
.
.
.
.
.
.
.
.
G
.
.
.
.
.
.
.
.
.
.
.
.
.
.
.
.
.
.
.
.
.
.
.
.
.
.
.
.
.
.
.
.
.
.
.
.
.
.
.
.
.
.
.
.
.
.
.
.
.
.
.
.
.
.
.
.
.
.
.
.
.
.
.
.
.
.
.
.
.
.
.
.
.
.
.
.
I
.
.
.
.
.
.
.
.
.
.
.
.
.
.
.
.
.
.
.
.
.
.
.
.
.
.
.
.
.
.
.
.
.
.
.
.
.
.
.
.
.
.
.
.
.
.
.
.
.
.
.
.
.
.
.
.
.
.
.
.
.
.
.
.
.
.
.
.
.
.
.
.
.
.
.
.
T
.
.
.
.
.
.
.
.
.
.
.
.
.
.
.
.
.
.
.
.
.
.
.
.
.
.
.
.
.
.
.
.
.
.
.
.
.
.
.
.
.
.
.
.
.
.
.
.
.
.
.
.
.
.
.
.
.
.
.
.
.
.
.
.
.
.
.
.
.
.
.
.
.
.
.
.
A
.
.
.
.
.
.
.
.
.
.
.
.
.
.
.
.
.
.
.
.
.
.
.
.
.
.
.
.
.
.
.
.
.
.
.
.
.
.
.
.
.
.
.
.
.
.
.
.
.
.
.
.
.
.
.
.
.
.
.
.
.
.
.
.
.
.
.
.
.
.
.
.
.
.
.
.
L
1. USER SECTION
2
5
6
8
8
9
10
12
15
15
15
16
16
17
18
18
18
18
19
20
20
21
21
22
22
22
23
23
24
24
24
25
25
26
27
35
35
36
400 PROGRAMMABLE CHANNELS
SOFTWARE DOWNLOAD VIA PC
ADVANCED ELECTRONIC PROGRAM GUIDE
MULTI LANGUAGE SUPPORTED FOR OSD
TELETEXT (VBI) SUPPORTED WITH MULTI LANGUAGE
FULL FUNCTION INFRARED REMOTE CONTROL UNIT
AUTO AND MANUAL SCAN FACILITY
CHANNEL ORGANIZING (PROGRAMMABLE)
AUTO UPDATED EPG
LOW POWER CONSUMPTION
GB
Safety Instructions . . . . . . . . . . . .
General Features . . . . . . . . . . . . .
Connecting Your “STB” . . . . . . . .
Description . . . . . . . . . . . . . . . . .
Front Panel . . . . . . . . . . . . . . . . .
Rear Panel . . . . . . . . . . . . . . . . .
Remote Control Unit . . . . . . . . . .
Basic Functions . . . . . . . . . . . . . .
Operating The Receiver . . . . . . . .
Main Menu. . . . . . . . . . . . . . . . . . .
1. Installation . . . . . . . . . . . . . . .
1.1 Auto Scanning . . . . . . . . .
1.2 Manual Scanning. . . . . . .
1.3 Reset to Factory Defaults
2. Channel Organising . . . . . . . .
2.1 Delete Frequency . . . . . .
2.2 Delete Channel . . . . . . . .
2.3 Delete All Channels . . . . .
2.4 Move & Edit Channel . . . .
3. Parental Lock . . . . . . . . . . . . .
3.1 Set Channel Lock. . . . . . .
3.2 Change PIN Code . . . . . .
3.3 Parental Rating . . . . . . . .
4. System Setup. . . . . . . . . . . . .
4.1 Language Selection. . . . .
4.2 OSD Setting. . . . . . . . . . .
4.3 Media Settings. . . . . . . . .
4.4 Time & Timer Setting . . . .
4.5 System Information . . . . .
4.6 Software Upgrade . . . . . .
4.7 MHP App Control. . . . . . .
4.8 Modem Setup . . . . . . . . .
4.9 Auto Operation Setting . .
5. Pay Per View Ser. . . . . . . . . . .
Available manufacturer numbers .
Troubleshootings . . . . . . . . . . . . .
Disposal . . . . . . . . . . . . . . . . . . . .
Technical Specifications . . . . . . .
DTB-B570E
DTB-B570E
GENERAL FEATURES
CONTENTS
2. TUNER SECTION
50~860 MHz WIDE BAND TUNER
RF LOOP-THROUGH OUTPUT (MALE)
3. VIDEO SECTION
DVB-T COMPLIANT
MPEG-2 VIDEO(MP@ML)
1~15 Mb/s DATA RATE
SUPPORTS ASPECT RATIO 4:3(NORMAL) AND 16:9
(WIDE SCREEN)
FFT: 2K OR 8K
2SCART, RCA
4. AUDIO SECTION
MPEG-1 AUDIO LAYER I & II
MONO, DUAL, STEREO AND JOINT STEREO AUDIO MODE
32, 44.1 AND 48 kHz SAMPLING FREQUENCIES
VOLUME CONTROL AND MUTE FUNCTION THROUGH
REMOTE CONTROL UNIT
SPDIF DIGITAL AUDIO OUTPUT
T
E
R
R
E
S
T
R
I
A
L
R
E
C
E
I
V
E
R
GB-5
00427A_B570E_XET_Eng2304
4/23/07
8:23 PM
Page 6
1. LOCATION OF THE RECEIVER
Your RECEIVER should be placed under proper ventilation.
Don’t put in completely enclosed cabinet that will restrict the flow of air,
resulting in overheating.
The location should be safeguarded from direct sunlight, excess moisture,
rough handling or household pets.
Avoid stacking other electronic components on the top of the receiver.
The location should be safely accessible by the cable from your antenna system.
Connecting Figure
GB
2. CONNECTING THE RECEIVER WITH AERIALS
You can connect the receiver to the following type of aerials:
● Use a standard outdoor roof aerial intended for receiving channels between
VHF and UHF.
● Because many older roof-mounted aerials may only receive a limited number of
channels, it is difficult or impossible to receive digital channels transmitted on
higher frequencies. If so, you may replace the roof aerial.
● Some outdoor aerials are directed towards an analog transmitter.
The aerial must be directed towards a digital TV transmitter.
● It is not desirable to use indoor or window mounted aerials, as it will be difficult or
impossible to receive digital channels.
3. CONNECTING THE RECEIVER TO TV
To connect the receiver with your television, you can use SCART Cable or RCA cable.
In the case of connecting your TV through SCART cable, connect the SCART
connector marked TV to the respective SCART port on the TV.
Note : In some region, the digital terrestrial signal may be weak.
So you’d better use the antenna in which the booster was built, for watching
the weak signal channels.
4. CONNECTING YOUR VCR
To connect a VCR, the receiver has been provided with SCART at the rear marked
“VCR”. Using a SCART connector, the VCR can be connected to the receiver.
5. CONNECTING EXTERNAL AUDIO / HI-FI SYSTEM
To connect any external Audio Hi-Fi system, the receiver has been provided with two
RCA connectors at the back of the receiver, marked with AUDIO L and R respectively
to connect the left and right Audio.
6. CONNECTING DIGITAL AUDIO SYSTEM
Connect a fiber optic cable between SPDIF on the receiver and OPTICAL on the
Digital Audio System.
GB-6
D
I
G
I
T
A
L
T
DTB-B570E
DTB-B570E
CONNECTING YOUR “STB”
CONNECTING YOUR STB
E
R
R
E
S
T
R
I
A
L
R
E
C
E
I
V
E
R
GB-7
00427A_B570E_XET_Eng2304
4/23/07
8:23 PM
Page 8
Rear Panel
Front Panel
2
3
4
5
1.
This key is used to turn the receiver on and off (Standby).
2. LED
When the unit is turned on, the indicator lights.
3. CH+ / CH-
These keys are used to change the channels.
4. OK
This key is used to enter or confirm in the menu.
5. Infrared Sensor
This is to receive the IR commands from the Remote Control Unit.
6. Card Slot
Slot for smartcard.
GB-8
D
I
G
I
T
A
L
T
E
R
R
E
S
T
R
I
3
2
1
6
4
5
6
7
8
1. MODEM
Modem is a terminal which shares a line with a phone using splitter.
It is used for handling PPV and transferring subscription information.
2. RF IN
Use to connect a terrestrial antenna.
3. RF OUT
This is used to enable connection of Analog receiver. Receiver provides
RF loop through.
4. TV
This is used to connect to your TV.
5. VCR
This is used to connect to your VCR.
6. VIDEO, AUDIO L/R
These RCA connectors are for connecting any external video and audio.
7. SPDIF
Output for connection to a digital amplifier.
8. RS-232
This is used to connect your receiver to a computer for reading
andloading data information.
A
L
R
E
C
E
I
V
E
R
GB-9
GB
1
DTB-B570E
DTB-B570E
DESCRIPTION
DESCRIPTION
00427A_B570E_XET_Eng2304
4/23/07
8:23 PM
Page 10
DESCRIPTION
1. TV
Remote Control Unit
This key is used to control your TV set.
2. STB
This key is used to control the STB set.
3. STANDBY/ON
Puts the STB in stand-by mode (no signal to TV).
4. 0-9 Numeric key
Enter numeric value and to select the channel directly by entering
number on the Service list.
5. SUBTITLE
Reserved.
6. MEDIASET
Select when you use Mediaset service.
Select when you use Nagra CA service.
8. ON/OFF TIMER
Select when you use timer service.
9. TEXT
This key is used to select the teletext mode.
10. VOL+/VOL-
These keys are used to increase or decrease the volume.
11. MUTE
This key is used to toggle between normal & muted audio.
12. MENU
This key is used to open up the menu or return to the previous menu.
¦) Move the highlight bar for the MHP Application.
13. Arrow (
OK
Enter and confirm any data to the receiver in the menu system.
14. CH. LIST
Press while viewing TV and a list of channels is displayed.
15. INFO “ i ”
Button is the “Now and Next Information” Key.
16. Color key (RED, GREEN, YELLOW, BLUE)
Used to select special operation for the STB.
17. TV INPUT SEL.
Used to select your TV input.
18. TV/RADIO
Toggle between the TV and Radio channel.
19. TV STANDBY/ON Puts the TV in stand-by mode.
GB-10
D
I
G
I
T
A
L
T
E
R
R
E
S
T
R
I
20. APP
This key is the hard key for accessing the SAMSUNG application manager.
21. CH.NUM INPUT
Used to enter channel number
22. CONAX
Select when you use Conax service.
23. LA7
Select when you use LA7 service.
24. SYS. INFO
Used to display system information
25. ALT
This key is used to select the soundtrack/videotrack list for the current
service.
26. CH+/CH-
These keys are used to change channels.
27. BACK
This key is used to return to the previous menu
28. GUIDE
Used to displays the TV/Radio Program guide.
29. EXIT
Exit a menu or return to the previous menu.
A
L
R
E
C
E
I
V
E
R
GB-11
GB
7. PANGEA
This key is future used and used in the MHP application.
N o t e : When inserting batteries, make sure that the polarity(+/-) is correct.
DTB-B570E
DTB-B570E
DESCRIPTION
00427A_B570E_XET_Eng2304
4/23/07
8:23 PM
Page 12
1. Display Screen
DTB-B570E
DTB-B570E
BASIC FUNCTIONS
BASIC FUNCTIONS
3. Select Soundtrack
●
Before you can view the television program, you must perform the installation.
Therefore you will see only menu images at first.
After the television channels have been programmed, you will see the following
picture (banner) each time you switch channels:
●
Press the ALT key to see the soundtrack list.
Press the / and OK keys to select one.
Channel Number
●
Program Information
The number of soundtrack in current channel
GB
Signal Status
Press the i key in view mode.
4. Select Videotrack
You will also see this picture each time you change channels.
When you press TV/RADIO key on the Remote Control Unit, TV and Radio program are toggled.
Detailed program information
●
●
●
Press the ALT key to see the soundtrack list.
Press the / and OK keys to select one.
Press the i key twice while you are viewing a program.
5. Service List
First you will see the banner described above.
After pressing the i key a second time you will receive detailed program information for
current program can be displayed on another banner, if there is more information.
When this information is more than one page, CH+/CH- can be used for page up and down.
●
Press the CH.LIST key while you are viewing a program.
●
Select list by pressing the TV/RADIO
The icon
behind the channel name symbolizes
scrambled channel, and the icon
behind the channel
name symbolizes parental locked channel.
N o t e : This service depends on service provider.
●
2. Volume Control
●
Select the channel by pressing the and press the
CH+/CH- for moving up or down pages on the lists.
Press the OK key to watch that channel.
To control the volume level :
●
Press the VOL+ or VOL- keys to adjust the volume level.
Press the MUTE key to turn to silence mode.
● Press the MUTE key again or VOL+ or VOL- keys in order to cancel the mute function.
●
GB-12
D
I
G
I
T
A
L
T
E
R
R
E
S
T
R
I
A
L
R
E
C
E
I
V
E
R
GB-13
00427A_B570E_XET_Eng2304
4/23/07
8:23 PM
Page 14
OPERATING THE RECEIVER
6. EPG (Electronic Program Guide)
Main Menu
EPG-Electronic Program Guide
The electronic program guide gives you a channel list for the
channels.
After installing your antenna system and STB with appropriate
connectors.
N o t e : 1. This service depends on service provider.
2. After receiver recognized the GMT-time from the signal
which takes few seconds, it can display correct EPG
information.
●
●
Plug in the AC main power and switch on the receiver.
●
Press the MENU key to bring up the main menu.
DTB-B570E
DTB-B570E
BASIC FUNCTIONS
The following on screen display will appear:
The sub menu topics will be displayed.
For the sub-menus Installation, Channel Organization and
Parental Lock, you need the PIN Code.
Press the GUIDE key while you are viewing a program.
This function is displayed on the screen by using only time.
RED key
●
GREEN key : Green key is for moving to the next coming date.
●
i key
●
: Red key is for moving back to the
previous date.
This menu consists of 3 sub-menus:
Auto Scanning, Manual Scanning and
Reset to Factory Defaults.
: This key is used to watch the program information, if there is more
information than one page. Use the / keys to move up and down
pages.
¦/ key
: Use to display the program list by 30
minutes per block.
●
2 key: 30 minutes
●
Select “Installation” in the main menu mode to select the sub
menu.
●
Enter the PIN Code.
If you have not entered your own PIN Code then the PIN Code
0000 applies, which was set at the factory.
Time interval can be adjusted by press keys as followings on EPG screen:
1 Key: 1 hour and 30 minutes
GB
1. Installation
●
3 key: 15 minutes
Select the channel by pressing the / keys and press the OK key to watch this channel.
GB-14
D
I
G
I
T
A
L
T
E
R
R
E
S
T
R
I
A
L
R
E
C
E
I
V
E
R
GB-15
00427A_B570E_XET_Eng2304
4/23/07
8:23 PM
Page 16
OPERATING THE RECEIVER
1.1 Auto Scanning
1.3 Reset to Factory Defaults
The sub menu “Auto Scanning” will enable download of
the channels automatically from the preprogrammed load.
This is to restore the factory set values in case the user has
encountered some problems after changing any values of
channel data and others which may be in error.
At the request window, if you press the OK key, the receiver
will be reset to factory default settings automatically.
To download channels automatically:
●
You can select the specified frequency between Start
Frequency and End Frequency.
DTB-B570E
DTB-B570E
OPERATING THE RECEIVER
N o t e : This cause your previous settings to be deleted!
●
Press the OK key.
Auto Scanning menu will be displayed.
All the channels in the list will be automatically downloaded.
GB
1.2 Manual Scanning
To tune-in new channels and weak signals, the STB has
been provided with the option “Manual Scanning” where
the channel data can be entered by the user.
After selecting the “Manual Scanning” from the Installation
Menu, the following screen will be displayed:
●
Select the Channel Number.
You can select the specified channel you want to find.
The followings are defined as a default, but optionally you can
choose it.
Signal Status bar shows you if it is valid.
●
Input the frequency of the channel you want to find.
●
Select the bandwidth.
You can select the value of 6, 7 or 8 MHz.
●
Select the Guard Interval Mode.
You can select the value of Auto, 1/32, 1/16, 1/8, or 1/4.
●
Select the FFT (Fast Fourier Transform) Mode.
The value of AUTO, 2K and 8K is settings automatically.
●
After select option, press the OK key to start the scanning
process.
GB-16
D
I
G
I
T
A
L
T
E
R
R
E
S
T
R
I
A
L
R
E
C
E
I
V
E
R
GB-17
00427A_B570E_XET_Eng2304
4/23/07
8:23 PM
Page 18
OPERATING THE RECEIVER
2.4 Move & Edit Channel
2. Channel Organising
The “Channel Organising” menu has four functions:
The “Channel Organising” menu is used to delete the
Frequencies and Channels or move&edit channel as you want.
●
DTB-B570E
DTB-B570E
OPERATING THE RECEIVER
●
Select the TV/RADIO/Interactive list with¦/keys.
●
Select the TV/RADIO/Interactive list with/or CH+/CHkeys.
●
Select channel by pressing the RED key.
●
Press the / keys to change the position of the channel you
want, and CH+/CH- for moving up or down pages on list.
Press the OK key for confirmation.
●
If you want to return the channel to the initial position, do not
press the OK key but press the BLUE key.
Enter the PIN Code.
If you have not entered your own PIN Code 0000 applies,
which was set at the factory.
GB
2.1 Delete Frequency
●
Select the desired frequency list you want to delete by
pressing the RED key.
To edit Channel Name
●
Select the TV/RADIO/Interactive list with¦/keys.
●
Press the OK key for confirmation.
●
Select a channel list to move to other location with /or
CH+/CH- keys.
●
Press the GREEN key. Font Table will be displayed.
●
Select desired character with ¦/,/ and then press the
OK key to paste character to the string.
N o t e : This feature doesn’t delete frequency itself but deletes
the list of channels registered for frequency.
N o t e : CH- key : Backspace for deleting previous character.
2.2 Delete Channel
●
●
Select the desired channel you want to delete by pressing
the RED key.
●
Press the OK key for confirmation.
Press the MENU key and then press the OK key to save the
set data.
2.3 Delete All Channels
At the request window, press the OK key to delete
all channels and press the EXIT key to exit.
GB-18
D
I
G
I
T
A
L
T
E
R
R
E
S
T
R
I
A
L
R
E
C
E
I
V
E
R
GB-19
00427A_B570E_XET_Eng2304
4/23/07
8:23 PM
Page 20
OPERATING THE RECEIVER
3. Parental Lock
3.2 Change PIN Code
This “Parental Lock” feature sets viewing restrictions and
prevents unauthorized access to your STB through the PIN
(Personal Identification Number), which is a 4 digit number.
(The factory preset PIN Code : 0000)
On selecting this menu, you will have three options:
to set lock for any desired channel and to change your
PIN Code and to set Parental Rating.
To change the PIN Code, select the second option
“Change PIN Code”.
●
This will take you to the following menu:
In this option, you need to enter the current PIN Code at
the first cursor, and at the second cursor enter the desired
PIN Code.
To confirm, you need to enter the new PIN Code again.
Please remember the PIN Code should be a 4 digit
numerical value.
Enter the PIN Code.
If you have not entered your own PIN Code 0000 applies,
which was set at the factory.
N o t e : If you forget the PIN Code, contact your dealer or service
provider. Once you change password, please do not
forget and keep well.
3.1 Set Channel Lock
●
Select the channel by pressing the ¦/ or /keys.
●
Select the channel lock by pressing the RED key.
3.3 Parental Rating
●
Press the OK key for confirmation.
Parental Rating protects your children from adult content, select
the third option, “Parental Rating”.
Whenever you need to view the locked channel, you will have
to enter the PIN Code at the request window.
After entering PIN Code to able to access a parental locked
channel, it will work on all parental locked channels.
It means that you can access all parental locked
channels with entering PIN Code on any parental locked
channel successfully.
To cancel the lock :
Press the RED key again in order to cancel the lock.
●
Use the ¦/ keys to select age for your youngest child
then press the OK key to save this setting.
●
All services which age grades are equal or greater than set
will be blocked and request to enter the PIN Code.
●
If you want to deactivate, select “Off”.
●
By default, Activation is “On” and selected Limit age is “18
Years”.
Please enter the PIN Code.
●
GB-20
D
I
G
I
T
A
L
T
E
R
R
E
S
T
R
I
A
This banner is shown if service which age grade is greater
than set in Parental Control menu. Enter four digits PIN Code
to hide this banner and show service content. Factory PIN
Code is 0000, and you can change it in Change PIN Code
menu.
L
R
E
C
E
I
V
E
R
GB-21
GB
THE FACTORY PRESET PIN CODE : 0 0 0 0.
●
DTB-B570E
DTB-B570E
OPERATING THE RECEIVER
00427A_B570E_XET_Eng2304
4/23/07
8:23 PM
Page 22
OPERATING THE RECEIVER
4. System Setup
4.3 Media Settings
This option enables you to change the factory preset system
settings as per your requirements.
You can set the various media settings you want.
Place the cursor on this sub menu and press the OK key.
●
Press the / keys to move the sub items and pressthe ¦/
keys to select the option.
●
Press the OK key to confirm.
Press the MENU/EXIT keys to exit the menu.
●
The “Language Selection” option allows the user to select
the desired language of the OSD, Soundtrack, Teletext, and
EPG.
Select the TV Aspect Ratio according to your TV: STANDARD
4 : 3 ratio or WIDE SCREEN 16 : 9 ratio type.
●
Select the Aspect Ratio Conversion : None, Letter Box or
Pan & Scan.
●
To accommodate user from different regions speaking different
languages, OSD languages are available 5 languages.
(Italiano, Español, English, Deutsch and Français provided
currently)
●
Select the Video Signal Type : Composite or
Composite+RGB.
●
To select the desired language menu, press the¦/ keys to
change language and press the OK key.
●
The OSD, Soundtrack, Teletext, or EPG language will vary
according to the selected language.
4.4 Time & Timer Setting
The “Language Selection” option allows the user to select
the desired language of the OSD, Soundtrack, Teletext, and
EPG.
4.2 OSD Setting
You can set the OSD transparency, the display(banner) time and
Subtitle.
●
●
Place the cursor on this sub menu and press the OK key.
●
Press the ¦/keys to change the Local time in Time
Zone.The local time will be changed according to your
location.
GMT is referred to the standard time of Greenwich. This cannot
be changed.
Select OSD Transparency level. The OSD Transparency level
from 0 to 100%. Setting is made with the numeric keys,¦/
keys or CH+/CH- keys.
Set the display duration of the information(banner) box
displayed in the screen. The time ranges from 0.5 to 60.0
seconds. Setting is made with the numeric keys, ¦/keys to
be decrement/increment of 0.5sec and CH+/CH- keys 1sec.
GB-22
●
D
I
G
I
T
A
L
T
E
R
R
E
S
T
R
I
●
Press the ¦/ keys to choose Event Repetition you want to
reserve : Once, Daily, Every Sunday, Every Monday, Every
Tuesday, Every Wednesday, Every Thursday, Every Friday
and Every Saturday.
●
Insert the preferable Switch on/off time by the Numerical
(0~9) keys and¦/ keys. Press the ¦/keys to choose a
switch time you want to reserve.
●
Select program to set the event program by pressing the ¦/
and Numerical (0~9) keys.
A
L
R
E
C
E
I
V
E
R
GB-23
GB
●
4.1 Language Selection
DTB-B570E
DTB-B570E
OPERATING THE RECEIVER
00427A_B570E_XET_Eng2304
4/23/07
8:23 PM
Page 24
OPERATING THE RECEIVER
4.5 System Information
4.8 Modem Setup
If you have to contact your service provider or a service center
they might ask for information available from this menu.
Place the cursor on this sub menu and press the OK key.
The following will be the on-screen display.
If you want to setup Modem, please follow the instruction below.
Select Tone or Pulse in Dial Method.
●
Select the ‘Carrier Wait Time’ ranged in 1~255 seconds with
the¦/ keys or numeric keys.
●
Select the ‘Carrier Present Time’ ranged in0.1~25.5 seconds
with the¦/keys or numeric keys.
●
Select the ‘Carrier Loss Time’ ranged in 0.1~25.5 seconds
with the¦/ keys or numeric keys.
●
Select Blank, 0, # or 9 in Prefix by using¦/ keys, to specify
your pre-dialing key for phone extension.
●
Press ‘OK’ to save Modem configuration if modified.
4.6 Software Upgrade
You can download and upgrade the system software of the
receiver through a specific channel through a specific channel
designated by the broadcaster. The Broadcaster will provide you
with more information about that.
If you select to download a new software version, all your
previous settings, access code and favorite channels etc. will
be erased! Downloading may take a While, ‘During downloading’
don’t turn off the receiver.
N o t e : Exit without OK key makes Modem Setup unchanged.
4.9 Auto Operation Setting
You can set the parameters for searching new channels and
4.7 MHP App Control
upgrading new software.
If you want to change the display mode of MHP application,
please follow the instruction below.
●
Select YES or NO in Standby Mode and Operate Mode by
using¦/keys.
●
Select Auto Start or Not Allowed in Auto Start Control mode
with the ¦/ keys.
●
Insert the preferable time by the Numerical (0~9), CH+/CHand¦/keys.
●
Select On/Off in show Apllication List mode with the ¦/
keys.
●
●
Press the GREEN key to edit contents in Phone Number, User
Name and Password.
Press the¦/keys to choose Repetition you want to reserve:
Daily, Every Sunday, Every Monday, Every Tuesday, Every
Wednesday, Every Thursday, Every Friday and Every
Saturday.
●
Insert value by the Numerical (0~9) and ¦/ keys in DNS.
●
Press ‘OK‘ to save MHP App Control.
N o t e : If YES in Standby Mode (with selecting NO in
Operate Mode or Aborting the operation in progress
in Operate Mode), the receiver automatically starts
auto operation in Standby Mode after 45 minutes for
new software and 1 hour for new channels from
entering the standby mode.
N o t e : Exit without OK key makes MHP App Control unchanged.
GB-24
D
I
G
I
T
A
L
T
E
R
R
E
S
T
R
I
A
L
R
E
C
E
I
V
E
R
GB-25
GB
●
DTB-B570E
DTB-B570E
OPERATING THE RECEIVER
00427A_B570E_XET_Eng2304
4/23/07
8:23 PM
Page 26
AVAILABLE MANUFACTURER NUMBERS
5.Pay Per View Ser.
●
●
●
1. TV button + 3-Digit User Code
2. TV Operating buttons: TV STANDBY/ON, NUMERIC(0~9), CH+/- , VOL+/-, INPUT SEL.,
MUTE
Mediaset Premium
Mediaset Premium provides the Card Information for
Mediaset broadcasting service.
When the Card is inserted, the serial number, the current
credit and recharge information are shown on the Menu.
Other list of packages is also available on the Menu for future
reference.
79
0DNHU%5$1'1$0(
6$0681*
$56<67(06
$&&(17
$&(&
$&85$
$'0,5$/
Pangea
Pangea provides the Card Information for the broadcasting
services that support Nagra CA.
When the Card is inserted, the serial number, the current
credit and recharge information are shown on the Menu.
Other list of packages is also available on the Menu for future
reference.
$'<621
$*$6+,
$*()
$,.2
$,:$
$.$,
LA7 Cartapiu
LA7 Cartapiu provides the Card Information for LA7
broadcasting service.
It can also check the current Irdeto version and receive
messages from the broadcasting company.
$.,%$
$.,72
$.85$
$/$521
$/%$
$/%,5$/
$/&<21
$//25*$1
$//67$5
$03/,9,6,21
$0675$'
Conax CA
Conax CA provides the Card Information for Conax
broadcasting service.
When the Card is inserted, it can check the subscription and
the event lists, the current tokens available, the serial number
and the Conax version.
It can also change the PIN number of the Card and the level
of the program rating.
$1$0
$1$01$7,21$/
$1*/2
$1,7(&+
$1621,&
$5&(1&,(/
$5&$0
$5,6721$
$57+850$57,1
$6$
$6%(5*
$625$
$675$
$68.$
GB-26
D
I
G
I
T
A
L
T
E
R
R
E
S
T
R
I
A
L
R
E
C
E
&2'(180%(5',*,7/,67
I
V
E
R
0DNHU%5$1'1$0(
$7/$17,&
$725,
$8&+$1
$8',2621,&
$8',2721
$86,1'
$87292;
&2'(180%(5',*,7/,67
$:$
$<20,
%$,5'
%$1*2/8)6(1
%$5&2
%$6,&/,1(
%$67,'(
%$85
%(.2
%(21
%(67
%(67$5
%,1$721(
%/$&.67$5
%/$&.7521
%/$&.:$<
%/$8381.7
%/8(6.<
%/8(67$5
%21'67(&
%2276
%3/
%5$1'7
%5$1'7(/(&7521,& %5$1'7(/(&7521,48( %5,1.0$11
%5,219(*$
%5,7$11,$
%527+(5
%5816
%65
%7&
%86+
%86+8.
GB-27
GB
●
DTB-B570E
DTB-B570E
OPERATING THE RECEIVER
00427A_B570E_XET_Eng2304
4/23/07
8:23 PM
Page 28
0DNHU%5$1'1$0(
&$3621,&
&$55()285
&$6&$'(
&$6,2
&$7+$<
&&(
&(1785,21
&(1785<
&*(
0DNHU%5$1'1$0(
',*,/,1(
',;,
'25,&
'5($1
'76
'8$/
0DNHU%5$1'1$0(
),6+(5
&2'(180%(5',*,7/,67
'8$/7(&
'80217
'80217),1/8;
'8;
'<1$7521
(/%(
(/%,7
(/&,7
(/(&7$
(/(&7527(&+
(/(.7$
(/*
(/,1
(/,7(
(/0$1
(/7$
(0(5621
(55(6
(6&
(7521
(852)((/
(8520$1
(8523$
(8523+21
(;3(57
(;48,6,7
)$0,/</,)(
)(11(5
)(5*8621
),'(/,7<
),/6$,
),1/$1',$
),1/8;
),567/,1(
GB-28
AVAILABLE TV MANUFACTURER NUMBERS
D
I
G
I
T
A
L
T
E
)/,17
)15
)250(17,
)250(17,3+2(1,;
)2575(66
)5$%$
)5,$&
)5217(&+
)8-,768
)8-,768*(1(5$/
)81$,
*$/$;,
*$/$;,6
*%&
*(
*($17&$6,12
*(&
*(&8.
*(/262
*(1(5$/
*(1(5$/7(&+1,&
*(1(;;$
*2/'+$1'
*2/'/,1(
*2/'67$5/*
*22'0$16
*25(1-(
*30
*5$',(17(
*5$(7=
*5$1$'$
*5$1$'$8.
*5$1',1
*521,&
*581',*
+$/,)$;
+$03721
R
R
E
S
T
R
I
A
L
R
E
C
E
&2'(180%(5',*,7/,67
I
V
E
R
0DNHU%5$1'1$0(
+$1,0(;
+$16($7,&
+$17$5(;
+$1725
+$5/(<'$9,'621
+$5:22'
+$833$8*(
+$9(50<
+&0
+(0$
+(00(50$11
+,),92;
+,*$6+,
+,*+/,1(
+,.21$
+,1$5,
+,6$:$
+,7
+,7$&+,
+,7$&+,)8-,$1
+,768
+251<3+21
+26+$,
+8$1<8
+<*$6+,
+<3(5
+<3(5621,&
+<3621
,%(5,$
,&(
,&(6
,03(5,$/
,1',$1$
,1*(/(1
,1*(562//
,112+,7
,1129$7,21
,17(5$&7,9(
,17(5%8<
,17(5)81.
GB-29
&2'(180%(5',*,7/,67
GB
&2'(180%(5',*,7/,67
&,+$1
&,0/,1(
&,7<
&/$5,92;
&/$7521,&
&06+,*+7(&
&207(/
&21&25'(
&21'25
&217(&
&217,1(17$/(',621 &260(/
&526/(<
&52:1
&5<67$/
&6(/(&7521,&6
&7&
&7&&/$7521,&
&857,60$7+(6
&<%(57521
'$(1<.
'$(:22
'$,1,&+,
'$16$,
'$16(77(
'$17$;
'$7685$
'$:$
'$<721
'(*5$$)
'(&&$
'(&&$8.
'(,7521
'(1.2
'(121
'(5:(17
'(60(7
',*$7521
DTB-B570E
DTB-B570E
AVAILABLE TV MANUFACTURER NUMBERS
00427A_B570E_XET_Eng2304
4/23/07
8:23 PM
Page 30
0DNHU%5$1'1$0(
,17(51$/
,17(59,6,21
,5
,55$',2
,68.$,
,7&
,76
,77
,7712.,$
.$,68,
.$02621,&
.$03
.$36&+
.$5&+(5
.$7+5(,1
.$:$6+2
.%$5,672&5$7
.(1'2
.(11('<
.,1*6/(<
./$50$;
.1(,66(/
.2/67(5
.21.$
.217$.7
.253(/
.257,1*
.26026
.27521
.2<2'$
.5$.,1*
.5,(6/(5
.79
.852
.<26+8
.<272
/(&621
/(0$,5
/(1&2
0DNHU%5$1'1$0(
/(12,5
/(6$
/(<&2
/,(6(1.77(5
/,)(
/,)(7(&
0DNHU%5$1'1$0(
0,1(59$
0,12.$
0,768%,6+,
&2'(180%(5',*,7/,67
//2<'B6
/2(:(
/2(:(237$
/2*,.
/2*,;
/80$
/80$7521
/8;0$<
/8;25
/<&2
0$$=
0$',621
0$*1$'<1(
0$*1$)21
0$*1$92;
0$*180
0$1'25
0$1(67+
0$1+$77$1
0$5$17=
0$5(//,
0$5.
0$68'$
0$768,
0$;,0$/
0$;:(//
0(',$725
0(',21
0(*$6
0(*$7521
0(/(&7521,&
0(/92;
0(025(;
0(03+,6
0(5&85<
0(7=
0,&520$;;
0,&5267$5
GB-30
AVAILABLE TV MANUFACTURER NUMBERS
D
I
G
I
T
A
L
T
E
&2'(180%(5',*,7/,67
0,9$5
021$&2
025*$1B6
027,21
027252/$
07&
07(&
08/7,67$1'$5'
08/7,7(&
08/7,7(&+
0853+<
0853+<8.
086,./$1'
0<5<$'
1$'
1$,.2
1$.,085$
1$21,6
1$7
1$7,21$/
1(&
1(&.(50$11
1(',$725
1(,
1(6&2
1(76$7
1(7:25.
1(8)81.
1(:7(&+
1(::25/'
1,&$0$*,&
1,..$,
12%/(;
12%/,.2
12*$0$7,&
12.,$
125'0(1'(
129$7521,&
R
R
E
S
T
R
I
A
L
R
E
C
E
I
V
E
R
0DNHU%5$1'1$0(
2&($1,&
2&($1,&)
2'(21
2.$12
20(*$
21&($6
21:$
23(5$
237,086
23721,&$
25%,7
25,21
25/,1(
250(17,3+2(1,;
25021'
26$.$
26$.,
26,2
262
2680(
27$.(
27729(56$1'
37$&7521
3$(/
3$//$',80
3$/621,&
3$1$0$
3$1$621,&
3$1$9,6,21
3$7+(&,1(0$
3$7+(&,1(0$)
3$7+(0$5&21,
3$86$
3$8=$
3(5',2
3(5)(.7
3(56+,1
3+,/&2
3+,/(;
3+,/+$5021,&
GB-31
&2'(180%(5',*,7/,67
GB
,79
-($1
-(&
-(732,17
-9&
&2'(180%(5',*,7/,67
DTB-B570E
DTB-B570E
AVAILABLE TV MANUFACTURER NUMBERS
00427A_B570E_XET_Eng2304
4/23/07
8:23 PM
Page 32
0DNHU%5$1'1$0(
3+,/,36
3+2(1,;
3+212/$
3,/27
3,21((5
3529,6,21
3<(
3<0,
48$'5$9,6,21
48$6$5
48(//(
48(67$
5$',$/9$
5$',2/$
5$',20$5(//,
5$',21(77(
5$',26+$&.
5$',2721(
5$1.$5(1$
5&$
5(&25
5(&7,/,*1(
5(',))86,21
5(',))86,218.
0DNHU%5$1'1$0(
5('67$5
5()/(;
5(2&
5(92;
5(;
5)7
5+$362'<
5/,1(
52$'67$5
52%27521
52'(;
52:$
52:621,&
52<$//8;
57)
6$%$
6$&&6
6$*(0
6$,6+2
6$/25$
6$0%(56
6$1'5$
6$1(/$
6$168,
6$1721
6$1<2
6$9(
6%5
6&+$8%/25(1=
6&+1(,'(5
6&277
6($56
6(*
6(,
6(,6,18'<1(
6(/(&2
6(1&25$
6(175$
GB-32
D
AVAILABLE TV MANUFACTURER NUMBERS
&2'(180%(5',*,7/,67
I
G
I
T
A
L
T
E
0DNHU%5$1'1$0(
6(5,12
6+$53
6+25$,
6,$0
6,$5(0
&2'(180%(5',*,7/,67
6,(0(16
6,(5$
6,(55$
6,(67$
6,/9$
6,/9(5
6,1*(5
6,18'<1(
6.$17,&
6.<
6.<:257+
62*(5$
62/$92;
621$:$
621,7521
6211(&/$,5
6212.2
6212/25
6217(&
621<
6281'9,6,21
6281':$9(
6281'(6,*1
63(&75$
66$1*<21*
67$1'$5'
67$5/,*+7
67(1:$<
67(51
675$72
681.$,
68167$5
681:22'
683(5/$
683(57(&+
6835$
686808
687521
6:,66/,1(
6<'1(<
6<6/,1(
R
R
E
S
T
R
I
A
L
R
E
C
E
I
V
E
R
0DNHU%5$1'1$0(
6<721*
7$&786
7$1'%(5*
7$1'<
7$6+,.2
7$781*
7&0
7($&
7(&
7(&+/,1(
7(&+,&$
7(&+1(0$
7(&+1,&6
7(&+12/$&(
7('(/(;
7(,521
7(.1,.$
7(/($9,$
7(/(&25
7(/()81.(1
7(/()86,21
7(/(*$=,
7(/(0(,67(5
7(/(621,&
7(/(67$5
7(/(7(&+
7(/(721
7(/(9,'(21
7(/(9,62
7(0&2
7(03(67
7(11(66((
7(16$,
7(60(7
7(781*
7(9,21
7(;(7
7+20621
7+251
7+251)(5*8621
72.$,
72.<2
720$6+,
726+,%$
72:$'$
72<2'$
GB-33
&2'(180%(5',*,7/,67
GB
3/$17521
3/$<621,&
32/,&20
3233<
3257/$1'
32:(532,17
35$1'21,35,1&(
35(&,6,21
35(0,(5
35,0$
35,1&(
35,1=
352)(;
352),7521,&
352/,1(
352621,&
3527(&+
&2'(180%(5',*,7/,67
DTB-B570E
DTB-B570E
AVAILABLE TV MANUFACTURER NUMBERS
00427A_B570E_XET_Eng2304
4/23/07
8:23 PM
Page 34
0DNHU%5$1'1$0(
75$.721
75$16&217,1(16
75$1621,&
75$167(&
75,'(17
75,67$5
75,803+
8+(5
8/75$
8/75$92;
81,92;
87$;
9(*$92;
9(67(/
9(;$
9,&725
9,'(26<67(0
9,'(2/2*,48(
9,'(26$7
9,'(26<67(0
9,'(27(&+1,&
9,'(2721
9,',.521
9,'7(&+
9,3(5
9,6,2/$
9,6,21
9,625(;
9,67$5
92/7(&
9257(&
92;621
:$/7+$0
:$7621
:$775$',2
:(*$
:(*$&2/25
:(*$92;
:(/7%/,&.
:(67,1*+286(
:(6721
:+$5)('$/(
0DNHU%5$1'1$0(
:+,7(
:+,7(:(67,1*+286(
:,1&2
:,1'67$5
;5<3721
<$0,6+,
<2.$1
<2.2
<25;
=$1866,
=233$6
In some region, the digital terrestrial signal may be weak.
So you’d better use the antenna in which the booster was built, for watching the weak signal
channels.
You can download and upgrade the system software of the receiver through a specific channel
through a specific channel designated by the broadcaster. The Distributor will provide you with more
information about that.
&2'(180%(5',*,7/,67
Problem
Possible cause
Solution of the problem
No display LED on
the front panel;
No power supply
Power cord
not plugged in correctly
Power cord plug in correctly
No pictures on the screen
Receiver in Standby mode;
SCART not connected tightly
to video output of television;
incorrect channel or video
output selected on television
Set receiver to “On”;
Check connection;
No sound
SCART connected incorrectly;
Volume level = 0;
Muting active
Check connection;
Increase Volume on television set;
Press the MUTE key
Remote Control does not
operate directly
Incorrect operation;
Point remote control
towards the Receiver.
Replace batteries or insert correctly
Note : In order to control this product with your
existing Samsung TV Remote control,
you must input Code 014 into the TV
Remote control to make it work.
GB-34
Batteries dead or inserted
incorrectly
Poor picture quality
signal strength in
Signal strength too low
On-Screen Error Messages: Antenna cable not connected
“Searching for signal”
or not tight;
incorrect position of the
On-Screen Error Message
“Channel data does not
exist.”
Receiver not yet set
Check channel and video output
(TV instruction manual)
Check all wire connections.
Check connection and correct;
Check position and correct antenna;
Check the signal strength in
the “Installation” menu
Scanning of in “Installation” menu
DISPOSAL
The device, packaging material (e.g. Styrofoam) and the batteries must never be
disposed of with household refuse. Please obtain appropriate information about the
regulations in your community, and dispose of all refuse in accordance with regulations
at the separate locations provided.
D
I
G
I
T
A
L
T
E
R
R
E
S
T
R
I
A
L
R
E
C
E
I
V
E
R
GB-35
GB
81,&/,1(
81,7('
81,9(5680
&2'(180%(5',*,7/,67
TROUBLESHOOTINGS
DTB-B570E
DTB-B570E
AVAILABLE TV MANUFACTURER NUMBERS
00427A_B570E_XET_Eng2304
4/23/07
8:23 PM
Page 36
A/V output
Power supply
Type :
Input voltage :
Fuse rating :
SMPS
AC 220-240V~, 50/60 Hz
250 V/T1.6AH
TV SCART :
VIDEO (CVBS, RGB), AUDIO R&L
VCR SCART :
VIDEO (CVBS), AUDIO R&L
SPDIF :
Digital Audio Output
RCA :
VIDEO, AUDIO R&L
Physical Specification
Size (W x H x D) :
Demodulator
DEMODULATION :
OFDM DEMODULATION (DVB-T)
MODE :
2K/8K
CODE RATE :
Viterbi Convolutional
Code Rate - 1/2,2/3,3/4,5/6,7/8
270 mm x 200 mm x 45 mm
Weight(Net) :
1.2 kg
Operating Temperature :
0 °C to +45 °C
Storage Temperature :
-10 °C to +70 °C
Etc
RCU, User’s Manual, 2Batteries(AAA),
Modem cable, Scart Cable
Freq. Range :
50~860 MHz
Input signal level :
-20 ~ -65 dBm
Channel selection :
PLL frequency synthesizer
Input impedance :
75 Ω unbalanced
Connector type :
Din type female(RF in/RF out)
Video decoder
MPEG 2 ISO/IEC 13818
Correct Disposal of This Product (Waste Electrical & Electronic Equipment)
(Transport Stream)
(Applicable in the European Union and other European countries with separate collection
Profile and level :
MPEG 2 MP@ML (4:2:2)
systems)
Data rate :
1~ 15 Mb/s
This marking shown on the product or its literature, indicates that it should not be disposed with other
Video formats :
4:3 (normal) & 16:9 (widescreen)
Picture resolution :
720(H) x 576(V) x 50 fields/sec
household wastes at the end of its working life. To prevent possible harm to the environment or human
health from uncontrolled waste disposal, please separate this from other types of wastes and recycle it responsibly
to promote the sustainable reuse of material resources.
Household users should contact either the retailer where they purchased this product, or their local government
office, for details of where and how they can take this item for environmentally safe recycling.
Audio Decoder
System decoding :
MPEG 1 ISO/IEC 11172~3 layer I & II
Audio mode :
single channel, dual channel, stereo,
Business users should contact their supplier and check the terms and conditions of the purchase contract. This
product should not be mixed with other commercial wastes for disposal.
joint stereo
Sampling frequency :
32, 44.1, 48, 96 KHz
N o t e : The specification of the STB may be changed without notice in advance.
GB-36
D
I
G
I
T
A
L
T
E
R
R
E
S
T
R
I
A
L
R
E
C
E
I
V
E
R
GB-37
GB
Accessories :
Tuner
System decoding :
DTB-B570E
DTB-B570E
TECHNICAL SPECIFICATIONS
00427A_B570E_XET_Eng2304
4/23/07
8:23 PM
Page 38
DTB-B570E
DTB-B570E
MEMO
EU Declaration of Conformity (LVD,EMC,R&TTE)
For the following product :
(Category name):
(Model name):
(Variant model):
Digital Terrestrial Receiver
DTB-B570E
NONE
Manufactured at :
1. Another factory: Samsung Electronics Slovakia s.r.o
Address:
Hviezdoslavova 807, 924 27 Galanta, Slovakia
2. Another factory: P.T. Samsung Electronics Indonesia
Cikarang Industrial Estate JI, Jababeka Raya Blok F 29-33 Cikarang, Bekasi
17530, Indonesia
GB
Address:
We hereby declare, that all major safety requirements, concerning to CE Mark Directive
(93/68/EEC), Low Voltage Directive(2006/95/EC) and Electromagnetic Compatibility
Directives(89/336/EEC,92/31/EEC) are fulfilled, as laid out in the guideline set down by
the member states of the EEC Commission.
This declaration is valid for all samples that are part of this declaration, which are
manufactured according to the production charts appendix.
The standards relevant for the evaluation of electrical safety requirement are as follows;
(L V D):
EN60065:2002
(E M C):
EN55013:2001+A1:2003, EN55020:2002+A1:2003+A2:2005, EN61000-32:2000+A2:2005, EN61000-3-3:1995+A1:2001,
EN55022:1998+A1:2000+A2:2003, EN55024:1998+A1:2001+A2:2003
1. Certificate of conformity / Test report issued by:
(L V D):
(E M C):
Intertek Semko AB
Samsung CS Center
2. Technical documentation kept at :
(Company):
Samsung Electronics Co., Ltd.
which will be made available upon request.
(Manufacturer)
(Refresentative in the EU)
Brian Youn/Senior manager
Yong Sang Park/Senior manager
April 11, 2007
April 12, 2007
Samsung Electronics Huizhou Co., Ltd.
Samsung Electronics Euro QA Lab.
416, Maetan3-Dong, Yeongtong-Gu, Suwon City,
Blackbushe Business Park, Saxony Way, Yateley,
Gyeonggi-Do, Korea
Hampshire, GU46 6GG,
GB-38
D
UK
I
G
I
T
A
L
T
E
R
R
E
S
T
R
I
A
L
R
E
C
E
I
V
E
R
GB-39