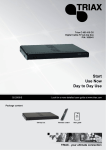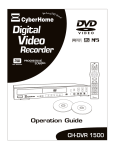
1
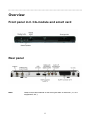
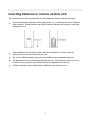
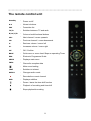
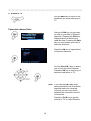
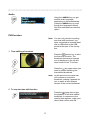
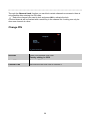
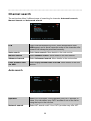
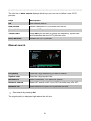
TRIAX C-HD417 CX
Digital cable set-top box
305042
2
Contents
Safety Precautions............................................................................................................. 4
Disposal of batteries and set-top box............................................................................ 5
Overview ............................................................................................................................. 6
Front panel incl. CA-module and smart card .................................................................... 6
Rear panel........................................................................................................................ 6
Inserting batteries in remote control unit .......................................................................... 7
The remote control unit .................................................................................................... 8
How to use the remote control ......................................................................................... 9
Use Now............................................................................................................................ 10
Day-to-day Use................................................................................................................. 12
How to Use the On-Screen Menus.................................................................................. 19
Overview of Menus .......................................................................................................... 21
Editing of Channels ......................................................................................................... 22
Favourite lists ................................................................................................................. 22
Using the Timer Function................................................................................................ 24
Timer programming using EPG ...................................................................................... 25
Customizing the Set-top Box .......................................................................................... 26
Language ....................................................................................................................... 26
Region ............................................................................................................................ 27
Output ............................................................................................................................ 27
Lock................................................................................................................................ 28
Lock/Unlock channels ................................................................................................. 28
Change PIN ................................................................................................................ 29
Channel search .............................................................................................................. 30
Auto search ................................................................................................................ 30
Manual search ............................................................................................................ 31
Advanced search ........................................................................................................ 32
Copy channel data via USB ........................................................................................ 32
Advanced ....................................................................................................................... 33
Updating software via USB stick ................................................................................. 34
Technical Information...................................................................................................... 35
Smart Card ....................................................................................................................... 36
PVR function .................................................................................................................... 37
Playback......................................................................................................................... 38
Troubleshooting............................................................................................................... 39
Glossary ........................................................................................................................... 40
Technical Data ................................................................................................................. 41
Manufacturer .................................................................................................................. 42
Declaration of Conformity ............................................................................................... 42
License ............................................................................................................................. 43
3
Safety Precautions
To prevent hazardous and dangerous situations always install and use the set-top box
according to the instructions below.
Mains supply
95-240 V AC 50/60Hz. Only use the original power supply. When
disconnecting from the mains pull the plug rather than the wire.
Use only mains connections installed by professionals.
Placing
Place the set-top box on a solid and surface close to the mains
connection. Ensure that the mains cord is places rightly to avoid
later damages hereon.
Never place the set-top box on top of other electrical units.
Never place the set-top box next to a heater or other source of
heat or direct sunlight.
Never expose the set-top box to a high level of dust.
Ventilation
Never place the set-top box in a closed cabinet without proper
ventilation.
Never put objects on the top of the set-top box preventing natural
ventilation.
Liquids etc.
Never expose the set-top box to liquids or moisture, and never
place objects containing any kind of liquid on the top of the box.
Never place hot or burning items such as candles on the set-top
box.
Thunderstorm
In case of thunder storms or when left unused for long periods of
time, it is recommended to disconnect the set-top box from the
mains and antenna.
Accessories
Never use accessories not being recommended by the
manufacturer.
Service
The set-top box should be opened by authorized technicians only.
Warranty is affected if non-authorized persons open the box.
Cleaning
The set-top box should always be kept dry and only dry cleaning
should be done.
Disconnect the mains IMMEDIATELY and contact an authorized technician place if:
Mains cord or plug is damaged.
The set-top box has been exposed to foreign bodies or liquid.
The set-top box doesn’t work.
The set-top box is heavily damaged.
4
The function of the set-top box is to receive open channels (Free-To-Air) and scrambled
digital channels. Any other use of the set-top box may result in material damage or
personal injury and warranty is void.
The manufacturer is by no means responsible for material damage or personal
injury occurred as a result of improper use or if the instructions are not followed.
Disposal of batteries and set-top box
Within the European Union this label indicates that the product cannot be
disposed together with general household waste. Neither the set-top box
nor the batteries for the remote control unit can be disposed of together
with general household waste.
For proper treatment and recycling of old products and used batteries,
please take them to applicable collection points in accordance with your
national legislation.
5
Overview
Front panel incl. CA-module and smart card
Rear panel
Note
Refer to the user manual of the units you want to connect (TV, hi-fi
equipment, etc.).
6
Inserting batteries in remote control unit
The remote control unit is operated by two AAA batteries. Please note the following:
Insert the batteries carefully in their right position (+/-), and place the cover carefully
after insertion. Wrong insertion can lead to battery leakage and corrosion, and thus
damage the unit.
When batteries are old replace them with two new batteries. Never insert old
batteries and never one used and one new.
Do not mix different battery types such as alkaline and manganese batteries.
Old batteries can start leaking and damage the unit. If the remote control unit is not
used for a very long time you should remove the batteries from the unit
Children should not play with batteries. Batteries may contain toxics.
7
The remote control unit
Standby
:
Power on/off
0-9
:
Numeric buttons
FAV
:
Favourites list
TV/R
:
Switches between TV and radio
R/Gr/Y/B
:
Coloured multifunctional buttons
CH+
:
Next channel / cursor upwards
CH-
:
Previous channel / cursor downwards
V-
:
Reduces volume / cursor left
V+
:
Increases volume / cursor right
OK
:
OK / Confirm
BACK
:
Quits menu or menu item/ Stops an operating Timer
EPG
:
Electronic Programme Guide
MENU
:
Displays main menu
INFO
:
Channel’s reception data
:
Mute sound setting
TEXT
:
Switches to teletext
AUDIO
:
Changes audio mode
:
Records the current channel
:
Displays subtitles
:
Pause / starts the time-shift function
:
Playback of recording and time-shift
:
Stops playback/recording
SUB
8
How to use the remote control
To navigate through the different on-screen menus of the set-top box, you use the
following keys:
Enter the main menu – or – returns to the main menu from any
submenu.
Move the cursor / selects submenus.
Move the cursor / select from a range of options.
Enter the selected menu.
Save the settings and go back to previous menu / in the main
menu you exit menu system and return to the normal viewing
screen.
The information bar at the bottom
of the TV screen displays the
functions assigned to various keys
on the remote control. You use
these keys to adjust the individual
settings in the submenus.
9
Use Now
1
Switch on TV and the set-top box
Switch on TV and set-top box
using your remote control units.
2
Welcome
Follow the instructions displayed
on the TV screen.
3
Select language and country
4
Data for channel searching
In case your CATV operator has
provided you with a USB stick,
place the stick in the USB socket at
the rear of the set-top box. Press
the OK key to start the channel
search.
The information that the USB stick
contains is used in connection with
the channel search.
10
Note Even if you do not use a USB stick
you have to press the OK key to
start the channel search.
Without the USB stick the channel
search uses the settings specified
below the menu item Advanced
search.
5
Searching for channels
This process may take several
minutes.
The result of the search is
displayed. Press the OK key to
continue.
6
Ready for use
Now the set-top box is ready for
using.
Press OK to watch TV.
11
Day-to-day Use
Switch the set-top box on or off
Press the Standby key on the
set-top box or the remote control
to switch the set-top box on or
off.
or
Select a channel
Use the CH+/CH- keys or the
numeric keys to select a channel.
Pressing the OK key displays the
channel list. Use the CH+/CHkeys to select a channel, press
OK to select the channel.
or
or
Adjust the volume
Use the V+/V- keys to turn the
volume up or down.
Use the
(Mute) key to turn the
sound off or on.
or
Switch between TV and radio
Use the TV/R key to switch
between TV and radio. Press OK
to open the TV list or the radio
list
12
Show the information bar
Use the INFO key to show the
information bar. The information
bar displays info about: channel
name, number, current and
following event and time.
Pressing the INFO key twice
displays more detailed information about the broadcast.
Press the key again to remove
the information.
Note Every time you change channel
the information bar is displayed
automatically.
If you press the INFO key when
you are playing a recording, the
information bar will display info
about the name of the recording,
which channel it was recorded
from, the time the recording was
started and the elapsed time of
the playback of the recording.
Display subtitles
Use the SUB key to display the
subtitles if the broadcast offers
the possibility.
Using the SUB key you can
browse the subtitle languages
that the channel offers.
Note You can only select language if a
channel offers subtitles in more
languages.
13
View teletext
1 Switch to teletext
Use the TEXT key to display
teletext.
2 Select the page
Use the numeric keys or the
CH+/CH- keys to select a page.
3 Return to TV
Use the TEXT key to switch off
teletext.
Using Electronic Programme Guide (EPG)
1 View EPG
Using the EPG key you get an
on-screen listing of programmes
currently broadcast and the
future programmes over the next
seven days, depending on the
broadcasters.
14
Not all broadcasters provide this
listing.
2 Sorting the information
Each of the coloured keys has a
specific function in the guide:
Red: Sort the channels
according to channel number.
Green: Sort according to the
time of broadcasts.
Yellow: Sort according to the
names of broadcasts.
Blue: Transfer a broadcast
directly to the timer.
3 Scrolling the listing of programmes
Use the V-/V+ keys to scroll
through the next seven days.
If you have sorted the list
according to channels you scroll
to a new channel every time you
press the V-/V+ keys.
4 Select a broadcast
Use the CH+/CH- keys to select
an event in the list.
Note If you press OK to the broascast
you have selected you automatically start watching the broadcast.
5 To view details of the broadcast
Using the INFO key you can
view the details of the broadcast
you selected in the list.
15
6 Return to TV
Use the EPG key to return to the
broadcast you were watching on
TV.
Favourite channel lists
Using the FAV key you get easy
ac-cess to your lists of favourite
channels. Pressing the FAV key
displays which of the lists you
used last time. Pressing the FAV
key you can browse your lists of
favourite channels.
Press the OK key to open the list
of favourite channels.
Use the CH+/CH- keys to select
one of your favourite channels.
Press the OK key to confirm your
selection and return to TV.
Note If you use the CH+/CH- keys,
having selected a list of favourite
channels and next a channel,
note that you can only switch
between the channels in the list
of favourites.
Press the TV/R key to get the
total list of TV or radio channels.
16
Audio
Using the AUDIO key you get
another audio language,
depending on the broadcasters.
Press the AUDIO key to scroll
though the languages offered.
Not all broadcasters provide this
option.
PVR function
Note You can only use the recording
and time-shift functions if you
have connected an external hard
disk or USB stick to the USB
socket at the rear of the set-top
box.
1 Time-shifting a broadcast
Press the
(pause) key to start
the time-shift function. The
broadcast freezes and a pause
icon is displayed in the top lefthand corner of the TV screen.
Press the
key again when you
want to resume watching the
time-shifted broadcast.
Note At the same time the hard disk
will continue to record the
broadcast, making it possible for
you to watch a time-delayed
version of the current broadcast.
2 To stop the time-shift function
Press the
(stop) key to stop
the playback of the time-shifted
broadcast. In response to the
warning that appears, make your
choice and confirm with OK.
17
3 Record a broadcast
Use the CH+/CH- keys to select
the channel and broadcast you
want to record.
Press the
(record) key to start
the recording.
Pressing the
key repeatedly
will set the recording time length
in 30 minute increments, up to a
maximum of 8 hours.
4 Playback a recording
Press the
(play) key. A list of
your recordings is displayed on
your TV screen.
Use the CH+/CH- keys to reach
the recording you want to play.
Press the OK key to watch the
selected recording.
5 Stop the playback of a recording
Press the
(stop) key to stop
the playback of the recording.
The list of your recordings is now
displayed on the TV screen.
Either you select and play
another recording or you can
press the BACK key to return to
the live TV broadcast.
18
How to Use the On-Screen Menus
You will get access to the entire operation and programming of the set-top box through the
on-screen main menu and the submenus.
You navigate through the menus using the keys displayed in the following five actions:
1
Display the main menu
From the main menu you
have access to 5 different
submenus.
2
Select a menu
Select the desired menu
(icon) and press OK to
continue to the submenus.
3
Select a submenu
Having selected a submenu
you can now adjust the
different settings.
19
4
Select or adjust
Move the cursor to the
desired function and press
OK to open the desired
function.
a
Change the settings.
Select the desired setting.
b
Press the BACK key to store
the settings and revert to the
previous menu.
5
To return to TV
Pressing the BACK key from
the main menu will exit the
menu and return to the
normal viewing screen.
20
Overview of Menus
The main menu contains the following menus and submenus:
Menus
Submenus
Channel Editor
Timer
Settings
Language
Region
Output
Lock
Channel Search
Advanced
System info
Card info
Conax Embedded CA
Recordings
21
Editing of Channels
Via the Channel Editor menu you can delete, change names, etc. of the different
channels. Besides you have access to create and edit your lists of favourite channels.
The info line displays which functions the coloured keys have in the Channel Editor
window.
Keys
Description
Red/Delete
Deletes the selected channel from the list.
Green/Skip
Use this key to mark selected channels for skipping when
zapping through the channel list.
Yellow/Browse
channel lists
Displays TV lists, Radio lists and Favourite lists.
Here you get access to create and edit your own favourite lists.
Blue/Rename
Rename the selected channel.
Favourite lists
From the Channel Editor menu you press the Yellow key to open the Active Channel
Lists menu.
In this menu you select one of the
favourite lists. Press the Blue
key to edit the list.
Press the Red key to display all
six favourite lists (A-F).
22
In edit mode you select one
channel at a time in the list to the
left. Pressing the OK key the
channel is moved to the favourite
list which is placed to the right.
Moving the cursor to the favourite
list you can change the order of
the channels using the OK key
and the CH+/CH- keys. When
you have moved the channel to
the desired position in your
favourite list, you finish the move
by pressing the OK key.
You can remove channels from
your favourite lists by pressing
the 0 key.
23
Using the Timer Function
Selecting Timer in the main menu you get access to program the set-top box to record a
broadcast if you have connected an external hard disk or USB stick to the set-top box.
By selecting the Timer icon in the main menu you enter the timer list. In the list you can set
a timer manually by filling out the following fields:
Channel
Select the required channel.
Date
Enter the date and year when you want to turn the set-top box
on.
Start time
Enter start time.
Stop time
Enter stop time.
Repeat
Select whether you want to repeat this timer. There are three
ways of repeating the timer.
Enter CA PIN
Enter your personal PIN code to the Conax smart card. The
PIN code is only needed if you want to record a broadcast from
a channel with a maturity rating. A maturity rating is selected
using the Card info icon in the main menu.
24
Note
Below the fields used for setting the timer you get information about
the maturity rating of your Conax smart card.
You change the maturity rating by selecting the Card info icon in the
main menu.
Timer programming using EPG
Using the Electronic Programme Guide (EPG) you can easily set a timer in the timer list:
Select the event you want to record.
Press the Record key to send the information to the timer.
In the Timer menu you have an overview of active timers.
25
Customizing the Set-top Box
By selecting Settings in the main menu you get access to six submenus which will help
you customize the set-top box. By customizing the set-top box you determine the language
of the menus, which channels you want to receive, which channels you want to lock,
aspect ratio etc.
Language
Menu
Select the desired language for the on-screen menus.
First audio
Select the preferred audio track.
Second audio
Select second choice of audio track if first choice is not
available.
First subtitle
Select which language you would like to use for the subtitles.
Second subtitle
Select second choice of subtitle language if first choice is not
available.
26
Region
Country
Select country
Time zone
Select time zone according to GMT.
Summertime
Select if internal clock should automatically be adjusted to
summer time
Output
Output settings
HDMI
Options for screen resolution: Auto, 576i, 576p, 720p, 1080i.
TV screen format
Select if your TV screen is 16:9 or 4:3 format.
Picture format
If screen format is 4:3, select between Automatic, Letter box
and Pan & Scan.
If screen format is 16:9, select between Automatic, Black
borders and zoom.
27
Audio delay
Adjust the audio delay to synchronize picture and sound. Using
for example surround sound system the sound may be delayed
and thus needs compensation.
Digital audio
Select desired format, PCM or Dolby Digital.
Lock
Lock/Unlock
channels
Select Locks/Unlock channels. More details in next section.
Change PIN
Select Change PIN. More details in next section.
Settings
Select whether you want to hinder access to the Settings
menu by asking for the PIN code to open the menu.
Receiver
Select whether you want to hinder access to the set-top box by
asking for the PIN code every time you start the set-top box
from standby.
Lock/Unlock channels
28
Through the Channel Lock function you can block certain channels so access to them is
only possible after entering the PIN code.
Select the channel you want to lock and press OK to activate the lock.
A locked channel will be marked with a small key in the channel list. Locking can only be
done one channel at a time.
Change PIN
Old PIN
Enter your personal PIN code.
Factory setting is: 0000
New PIN
Enter new PIN code.
Confirm PIN
Re-enter the new PIN code to confirm it.
29
Channel search
The set-top box offers 3 different ways of searching for channels: Automatic search,
Manual search and Advanced search.
LCN
Logic Channel Numbering on/off. Some broadcasters offer
LCN support and in those cases the order of the channels after
a search will always be prioritized correctly.
Auto search
Select Auto search. More details in the next section.
Manual search
Select Manual search. More details in the next section.
Advanced search
Select Advanced search. More details in the next section.
Copy channel data
via USB
Select Copy channel data via USB. More details in the next
section.
Auto search
Operator
Select CATV provider, or the operator your CATV provider is
using. You can define your CATV provider if not on the list by
using the keys in the info line.
Network search
Select NIT search on/off. Your CATV provider may offer NIT.
30
The info line in Auto search displays which keys you can use to define a new CATV
provider.
Keys
Description
OK
Start channel search.
Red/Delete
Delete a selected CATV provider from the list.
Green/Add
Add new CATV provider to the list.
Yellow/Edit
Using Edit you can add or change the frequency, symbol rate
and modulation that the CATV provider uses.
Blue/Rename
Rename the CATV provider.
Manual search
Frequency
Enter the 6 digit frequency you want to search.
Symbol rate
Enter the 4 digit symbol rate.
Modulation
Select modulation. You have five options.
Network search
Select NIT search on/off. Your CATV provider may offer NIT.
Network ID
Enter network ID if your CATV provider use this.
Start search by pressing OK.
The signal quality is displayed right above the info line.
31
Advanced search
Start frequency
Enter the 6 digit frequency from where the search should start.
Stop frequency
Enter the 6 digit frequency from where the search should stop.
Frequency step
Select the frequency step size from 0.5 – 8 MHz.
1. Symbol rate
Enter the 4 digit symbol rate.
2. Symbol rate
Enter the 4 digit symbol rate.
3. Symbol rate
Enter the 4 digit symbol rate.
4. Symbol rate
Enter the 4 digit symbol rate.
Modulation
Select modulation. You have six options, Auto – 256.
Network
Select NIT search on/off. Your CATV provider may offer NIT.
Network ID
Enter network ID
Start search by pressing OK.
The signal quality is displayed right above the info line.
Copy channel data via USB
Using Copy channel data via USB you can transfer lists of channels or CATV providers
to or from your set-top box to other set-top boxes.
32
Copy channels to
USB stick
Copies the list of channels from the set-top box to the USB
stick placed in the USB socket.
Restore channels
from USB stick
Copies the list of channels from the USB stick placed in the
USB socket to the set-top box.
Copy provider list to
USB stick
Copies the list of CATV providers from the set-top box to the
USB stick placed in the USB socket.
Restore provider list
from USB stick
Copies the list of CATV providers from the USB stick placed in
the USB socket to the set-top box.
Advanced
Transparency
Select whether you want menus and information bar to be
transparent.
Banner time
Select the number of seconds the info banner is displayed
when you change channel. Maximum time for displaying the
information banner is 10 sec.
Low power standby
Select whether you want low power consumption when the settop box is in standby mode. If you select “On”, the loop through
from the antenna socket ANT in to the antenna socket ANT
out on the set-top box will not be active.
OTC software
update
Select OTC software update and the software of your settop box will be updated if your CATV provider has made new
software available. If new software is unavailable you will get a
message telling you so.
Factory reset
Select Factory reset if you want to bring all settings back to
factory settings.
33
Updating software via USB stick
It is also possible to download software from the home page www.triax.com to an USB
stick and then update the set-top box using the USB stick.
The file that you download from the home page to the USB stick is an “.img” file. You must
place the “.img” file in the root of the USB stick, and not in a folder that you have created
on your USB stick. The USB stick must not contain other “.img” files.
Do the following to update the set-top box using the USB stick:
Switch on the set-top box so you get a picture on the TV screen.
Switch the set-top box off, i.e. turn off the mains switch.
Insert the USB stick into the USB socket at the rear of the set-top box.
Switch the set-top box on at the mains switch.
The following message is displayed on the TV screen.
When the download is finished, you have to restart the set-top box, i.e. you have to turn off
the mains switch and then turn it on again.
34
Technical Information
To communicate with authorized technical people the set-top box contains important and
very precise technical information about software and hardware implemented. You get
access to this information by selecting System info in the main menu.
Produkt ID
The product identification of the set-top box.
Bootloader version
Bootloader version.
Software version
Software version.
Hardware version
Hardware version
Serial number
Serial number of the set-top box.
35
Smart Card
The set-top box has an embedded Conax descrambler working together with a smart card
from your provider. You get access to information from the inserted smart card by
selecting Card info in the main menu.
The Conax smart card provides the following menu when you select Conax Embedded
CA:
Subscription status
Status of your subscription, i.e. which channel groups you can
get access to and whether your smart card has been updated
recently.
Tokens status
Status of available tokens for example for pay-per-view
services.
Event status
Status on pay-per-event services.
Change CA PIN
Change your personal PIN code for accessing information on
the smart card.
Maturity rating
Select the age rating for the different channels.
About Conax CA
Technical card information.
36
PVR function
By selecting Recordings in the main menu you get access to your recordings on the
external hard disk/USB stick you have connected to the set-top box.
Your recordings are listed to the left in the Recording Manager window, and to the right
you can see information about the selected recording, i.e. title of the broadcast, the length
of the recording, the name of the channel and the date and starting time of the recording.
Above the list of your recording you can see the root directory of the hard disk/USB stick,
the size of the hard disk/USB stick and how much free disk space you have left, e.g.
”/volume0:// ( 400/466 GB free)”.
Note
In the Recording Manager a time-shifted recording is always called
”Timeshift”. “TimeShift” is always listed at the top and it is never sorted
when you sort the other recordings on the list.
The info line displays which functions the coloured keys have in the Channel Editor
window.
Keys
Description
OK
Starts the playback of the selected recording.
Blue/Sort order
Sorts the list according to date, name or channel.
Yellow/Remove
Removes the selected recording.
Red/Format
Using Format you can format the hard disk you have
connected to the set-top box.
Note
When you record a broadcast from channel you are only able to
switch between channels from the same MUX (frequency) as the
channel you are recording from.
37
Playback
In connection with the playback of a recording you can use the following keys on the
remote control:
Keys
Description
INFO
If you press the INFO key when you are playing a recording,
the information bar will display information about the name of
the recording, which channel it was recorded from, the time the
recording was started and the elapsed time of the playback of
the recording. Pressing the INFO key once more you remove
the information bar.
Blue
Press the Blue key to skip 30 seconds forward when you are
playing a recording.
Yellow
If you press the Yellow key when you play a recording the
information bar is displayed. The red figures of the playback
counter to the right of the information bar indicate that here you
can specify a point in the recording that you want to jump to
and start the playback. You can only jump forward in the
recording.
Red
Press the Red key to skip 30 seconds backward when you are
playing a recording.
38
Troubleshooting
Problem
Possible cause
Suggested solution
Not working
Not plugged into the mains.
Make sure that the mains
lead is plugged in.
The remote control does
not work
The batteries have not been
inserted correctly.
Insert the batteries correctly.
The batteries are flat.
Insert new batteries.
The remote control is aligned
wrongly.
Align the remote control with
the front of the set-top box
and ensure that nothing is
placed between the remote
control and the set-top box.
No signal
Check antenna cable from
the set-top box to the outlet.
Neither picture nor sound,
only on-screen menus
Channel has got new
frequency
Delete channel and make a
new search.
Bad picture quality,
blocking fault, formation of
small blocks, drops in
sound
Bad connector or antenna
cable
Check connectors and
antenna cable. If this is OK
you have to contact your
CATV provider.
No picture, no sound,
signal strength is OK, but
signal quality is bad
Bad connector or antenna
cable
Check connectors and
antenna cable. If this is OK
you have to contact your
CATV provider.
39
Glossary
AC
Alternating Current. Mains is 230V AC.
Analogue
Unconverted signals not being numerical.
DC
Direct Current. The set-top box operates on 12 V DC.
Cinch connector
RCA connector for base band audio or video signals.
Coaxial cable
Cable for connecting to CATV network.
Digital
Signal converted to a series of numerical values.
Dolby Digital
Six channel Surround Sound system developed by Dolby
Laboratories.
DVB
Digital Video Broadcasting.
EPG
Electronic Programme Guide.
Programme guide providing you with detailed information on
all available programmes.
HDMI
High Definition Multimedia Interface.
The new digital standard for digital audio/video connection to
the TV or between other units
MPEG-2
International standard for compressing digital audio/video
signals.
MPEG-4
Further development of MPEG-2 for even better
compression.
MUX
Multiplexer - for mixing more signals into one single channel.
OSD
On-Screen Display - for menu driven operation of equipment.
QAM
Quadrature Amplitude Modulation - modulation normally used
for CATV.
SCART
Connection for audio and video signals for TV, DVD players,
etc.
Surround sound
Sound system using 5-6 loudspeakers to give a kind of 3dimnetional effect.
Swap function
Toggling between the two latest seen channels.
VCR
Video Cassette Recorder.
VTR
Video Tape Recorder.
40
Technical Data
Tuner and channel
Input connector
IEC 169-2; Female
Input frequency range
47 to 862 MHz
Input impedance
75 ohm, unbalanced
Demodulation
QAM 16 / 32 / 64 / 128 / 256
Symbol rate
1-7.2 Msym/s
MPEG transport stream A/V decoding
Transport stream
MPEG-2 / IEC 13818
Profile level
MPEG-2 MP@HL, MPEG-4/H.264 MP and HP level 4.1
Input rate
Max. 100 Mbit/s
Aspect ratio
4:3 / 16:9
Audio decoding
MPEG Layer I & II, AC3
Sampling rate
32, 44,1, and 48 kHz
A/V data in/out
Audio connectors
L/R analogue, coax SPDIF
Video connectors
HDMI, SCART.
HDMI connector
Resolution: 576i, 576p, 720p, 1080i
Processor and memory
Flash memory
4 Mbyte DDR memory: 96 Mbyte
CPU
STI 7101
Power supply
Input voltage
230 VAC +/- 15% / 12 VDC
Power consumption
Max. 10 W
Type
External switching mode
Standby power
Max. 0,5 W
41
Manufacturer
Dear Customer,
Should you require technical assistance and in the event that your expert dealer is unable
to help you, please contact us.
Triax A/S
Bjørnkærvej 3
8783 Hornsyld
Danmark
Declaration of Conformity
The manufacturer declares herewith that this product meets the following directives and
standards:
Low voltage directive 2006/95/EC
EN 60 065:2008
European EMC Directive 2004/108/EC
EN 55 013:2001+A1:2003+A2:2006
EN 55 020:2007
EN 61000-3-2:2006
EN 61000-3-3:1995+A1:2001+A2:2005
Svend Kristiansen
Quality Manager
Triax A/S
Bjørnkærvej 3
8783 Hornsyld
Danmark
42
License
Manufactured under license from Dolby Laboratories.
43
www.triax.com
06-2010-B
44