1
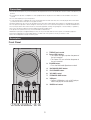
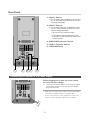
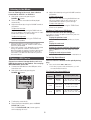
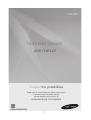
HW-H20 Multimedia Speaker user manual Imagine the possibilities Thank you for purchasing this Samsung product. To receive more complete service, please register your product at www.samsung.com/register AH68-02743A-00 1 Safety Warnings TO REDUCE THE RISK OF ELECTRIC SHOCK, DO NOT REMOVE THE COVER (OR BACK). NO USER-SERVICEABLE PARTS ARE INSIDE. REFER SERVICING TO QUALIFIED SERVICE PERSONNEL. CAUTION RISK OF ELECTRIC SHOCK DO NOT OPEN This symbol indicates “dangerous voltage” inside the product that presents a risk of electric shock or personal injury. CAUTION : TO PREVENT ELECTRIC SHOCK, MATCH WIDE BLADE OF PLUG TO WIDE SLOT, FULLY INSERT. This symbol indicates important instructions accompanying the product. WARNING • To reduce the risk of fire or electric shock, do not expose this appliance to rain or moisture. CAUTION • Do not expose this device to dripping or splashing. Do not place items containing liquids, such as vases, on this device. • To turn this device off entirely, you must disconnect its AC plug from the wall outlet. Consequently, the plug and AC wall outlet must be readily accessible at all times. • Only connect this device to an AC outlet with a protective grounding connection. • Toprevent electric shock, match the wide blade of the plug to the wide slot in the wall outlet. Fully insert the plug into the wall outlet. Accessories Check for the supplied accessories below. AUX Cable User's Manual Adapter Power Cord • Figures and illustrations in this User Manual are provided for reference only and may differ from actual product appearance. • An administration fee may be charged if either a. an engineer is called out at your request and there is no defect in the product (i.e. where you have failed to read this user manual) b. you bring the unit to a repair centre and there is no defect in the product (i.e. where you have failed to read this user manual). • The amount of such administration charge will be advised to you before any work or home visit is carried out. 2 Precautions • Ensure that the AC power in yourhouse matches the requirements listed on the identification sticker located on the back of your product. • Do not place the product on amplifiers or other equipment which may become hot. Make sure the ventilation slots are not covered. • Do not stack anything on top of the product. • To turn off the productcompletely, disconnect the AC plug from the wall outlet. Disconnect the AC plug from the wall outlet if you will leave the device unused for a long period of time. • During thunderstorms, disconnect the AC plug from the wall outlet. Voltage peaks due to lightning could damage the product. • Do not expose the product to direct sunlight or other heat sources. This could cause the product to overheat and malfunction. • Protect the product from moistureand excess heat and equipment creating strong magnetic or electric fields (i.e. speakers.). • Disconnect the power cable from the AC supply if the product malfunctions. • This product is for personal use only. It is not intended for industrial use. • Maintain an open space of approximately 6 inches (15 cm) on the sides and rear of the system, for ventilation purposes. • Place the loudspeakers at a reasonable distance on either side of the system to ensure good stereo sound. • Direct the loudspeakers towards the listening area. Description Front Panel 1. TREBLE level control 2. Power LED Lighting • The Power LED lights up when the power of the unit turned on. • The Power LED turns off when the power of the unit turned off. 3. POWER button • Turns the Multimedia Speaker on and off. 4. BACKWARD SKIP button 5. PLAY/PAUSE button 6. VOLUME control 7. FORWARD SKIP button 8. USB port • Connect USB devices such as MP3 players here to the play files on the devices. 9. BASS level control 1 2 3 4 5 6 7 8 9 3 Rear Panel 1. AUX IN 1 Terminal 1. Use an Audio Cable (supplied) to connect AUX IN 1 on the product to Audio Out on an external analog component. 2. AUX IN 2 Terminals 1. Use an Audio Cable (not supplied) to connect AUX IN 2 on the product to Audio Out on an external analog component. • Be sure to match connector colors. • If the external analog component has only one Audio Out jack, connect to either the left or right terminal. 3. SUBWOOFER Connector Terminal 4. FRONT L Connector Terminal 5. POWER SUPPLY IN 1 2 3 4 5 Connecting your System to the Power Supply Before plugging your system into a main socket, you must check the voltage. 1. Connect the AC power adaptor jack to the power supply jack properly, and then connect the AC power adaptor plug in the wall outlet. • When disconnecting the power cable of the AC power adaptor from a wall outlet, pull the plug. Do not pull the cable. • Do not connect this unit or other components to an AC outlet until all connections between components are complete. 4 Connecting the Speakers Recommended speaker setup. 1. The product may not operate properly if it is subject to shaking or external shocks or if the speakers are not installed as recommended. 2. Do not stretch the speaker wires or place a heavy object on them. Connecting External Components AUX IN 1: Connecting an External Component/MP3 player Components such as an MP3 Player. 1. Connect AUX IN 1 (Audio) on the rear of the product to the Audio Out of the external component/ MP3 player. Audio Cable (supplied) AUDIO OUT AUX IN 2: Connecting an External Analog Component Analog signal components such as a TV or Source Device. 1. Connect AUX IN 2 (Audio) on the rear of the product to the Audio Out of the external analog component. • Be sure to match connector colors. Audio Cable (not supplied) If the external analog component has only one Audio Out, connect either left or right. 5 Listening to the Music You can listening to the music from a device connected to AUX IN 1 or AUX IN 2. 5. A djust the volume by tuning the VOLUME control on the product. To adjust the low tone: Adjust the bass level by tuning the BASS level control on the product. Set the bass volume to an undistorted level to prevent system damage. To adjust the high tone: Adjust the treble level by tuning the TREBLE level control on the product. 1. Switch the system on by pressing the POWER ( ) button. 2. The music of the source device will be played automatically. 3. A djust the volume by tuning the VOLUME control on the product. o adjust the low tone: T Adjust the bass level by tuning the BASS level control on the product. Set the bass volume to an undistorted level to prevent system damage. To Select a Track from a USB Device You can select the music file during play. If you want to move to the previous/next track, press the [,] buttons briefly. To adjust the high tone: Adjust the treble level by tuning the TREBLE level control on the product. To play the previous track Press the [ button twice, the previous track starts playing. • If the source device has a bass boost function or equalizer function, set to off. If there functions are on, sound may be distorted. • If the system volume is high, depending on the volume setting, the operation software, and the devices being connected, the speaker sound may be paused. This is caused by the protection circuit, and is not a malfunction. Turn down the volume of the system or the source device. To play the next track Press the ] button. To play the current track from the beginning Press the [ button once, the current track starts playing. To play the track of your choice Press the [ or ] button to move to a desired track. Playing a USB Device To Use High Speed Search You can search the desired section quickly during play. Connect an external storage device such as a USB flash memory to the product. You can play MP3/WMA/AAC format file. 1. Press and hold the [ or ] button. • Each time you press and hold the button, you will move backward/forward fast. 1. Connect the USB device to the USB port on the front of the unit. 2. Switch the system on by pressing the POWER ( ) button. File Format Type Compatibility list: 3. The file plays automatically. 4. To pause playback temporarily, press the PLAY/ PAUSE ( p ) button. Press the PLAY/PAUSE ( p ) button again to continue playing the music. 6 File Format CODEC Sampling Rate (Hz) *.mp3 MPEG 1 Layer3 8k, 16k, 32k, 11.025k, 22.05k, 44.1k, 12k, 24k, 48k *.wma Wave Ver.9 Standard 8k, 16k, 32k, 11.025k, 22.05k, 44.1k, 48k *.m4a MPEG4 AAC-LC 8k, 16k, 32k, 11.025k, 22.05k, 44.1k, 12k, 24k, 48k Playing a USB Device (Cont.) Read through the instructions below before using a USB device with this unit. • This product not supported NTFS file system. • Turn the system off, disconnect the USB device from the product. • Some USB devices may not work properly with this product. • Connect USB devices directly to the USB port of the product. Otherwise, you may encounter a USB compatibility problem. • Do not connect multiple storage devices to the product via a multi-card reader. It may not operate properly. • Digital camera PTP protocols are not supported. • Do not remove the USB device while it is being read. • DRM-protected music files (MP3, WMA) from a commercial web site will not be played. • External HDDs are not supported. • Mobile phone devices are not supported. • IPOD devices are not supported. • If multiple source devices connected to the system are played back at the same time, the system outputs mixed sound from the devices. Stop playback of devices you are not listening to. Troubleshooting Refer to the chart below when this unit does not function properly. If the problem you are experiencing is not listed below or if the instructions below do not help, turn off the unit, disconnect the power cord, and contact the nearest authorized dealer or Samsung Electronics Service Center. Symptom Check Remedy The unit will not turn on. • Is the power cord plugged into the outlet? A function does not work when the button is pressed. • Is there static electricity in the • Disconnect the power plug air? and connect it again. Sound is not produced. • Is this product connected only TV? • Is the volume set to minimum? The sound from the left/right channels are reversed. • Are the left/right audio output • Check the left/right channel cables from the TV and connect it/them connected properly? correctly. 7 • Connect the power plug to the outlet. • Connect it correctly. • Adjust the volume. Specifications GENERAL Power supply DC 14 V Standby power consumption 0.45 W Power consumption 13 W USB 5V/0.5A Weight Dimensions (W x H x D) AMPLIFIER Front Speaker (R) 755 g Front Speaker (L) 635 g Subwoofer 4.63 Kg Front Speaker (L/R) 109 (W) x 224 (H) x 117.4 (D) mm Subwoofer 239.9 (W) x 359.9 (H) x 329 (D) mm Operating temperature range +5 °C to +35 °C Operating humidity range 10 % to 75 % Rated output Front Speaker (L/R) power Subwoofer 15 W, 6 OHM, THD = 10%, 1 kHz S/N ratio (Analogue input) 65 dB Separation(1kHz) 65 dB 30 W, 3 OHM, THD = 15%, 100 Hz * S/N ratio, distortion, separation and usable sensitivity are based on measurement using AES (Audio Engineering Society) guidelines. *: Nominal specification - Samsung Electronics Co., Ltd reserves the right to change the specifications without notice. - Weight and dimensions are approximate. For India Only "This product is RoHS compliant" 8 Contact SAMSUNG WORLD WIDE If you have any questions or comments relating to Samsung products, please contact the SAMSUNG customer care centre. ` Asia Pacific AUSTRALIA NEW ZEALAND CHINA HONG KONG INDIA INDONESIA JAPAN MALAYSIA PHILIPPINES SINGAPORE THAILAND TAIWAN VIETNAM ` MENA U.A.E OMAN KUWAIT BAHRAIN QATAR Area Contact Centre 1300 362 603 0800 SAMSUNG (0800 726 786) 400-810-5858 (852) 3698 4698 1800 3000 8282 - Toll Free 1800 266 8282 - Toll Free 30308282 -Non Toll Free 0800112888 021-56997777 0120-327-527 1800-88-9999 1-800-10-7267864 [PLDT] 1-800-8-7267864 [Globe landline and Mobile] 02-4222111 [Other landline] 1800-SAMSUNG (726-7864) 0-2689-3232, 1800-29-3232 0800-32-9999 1800 588 889 SYRIA IRAN MOROCCO 800-SAMSUNG (726-7864) 800-SAMSUNG(726-7864) 183-2255 (183-CALL) 8000-4726 800-2255 (800-CALL) 08000-726786 16580 021 36 11 00 0800-Samsung (72678) 80-1000-12 0800-22273 06 5777444 18252273 021-8255 080 100 2255 SAUDI ARABIA 920021230 TURKEY ` Africa NIGERIA 444 77 11 EGYPT ALGERIA PAKISTAN TUNISIA JORDAN GHANA COTE D’ IVOIRE SENEGAL CAMEROON KENYA UGANDA TANZANIA RWANDA BURUNDI DRC SUDAN SOUTH AFRICA BOTSWANA NAMIBIA ZAMBIA MOZAMBIQUE Web Site www.samsung.com/au/support www.samsung.com/nz/support www.samsung.com/cn/support www.samsung.com/hk /support (Chinese) www.samsung.com/hk_en/support (English) www.samsung.com/in/support www.samsung.com/id/support www.samsung.com/jp /support www.samsung.com/my /support www.samsung.com/ph /support www.samsung.com/sg /support www.samsung.com/th /support www.samsung.com/tw /support www.samsung.com/vn /support www.samsung.com/ae /support (English) www.samsung.com/ae_ar /support (Arabic) www.samsung.com/eg /support www.samsung.com/n_africa /support www.samsung.com/pk /support www.samsung.com/n_africa /support www.samsung.com/Levant /support (English) www.samsung.com/Levant /support (English) www.samsung.com/iran /support www.samsung.com/n_africa /support www.samsung.com/sa /support www.samsung.com/sa_en /support (English) www.samsung.com/tr/support 0800-726-7864 0800-10077 0302-200077 8000 0077 800-00-0077 7095- 0077 0800 545 545 0800 300 300 0685 88 99 00 9999 200 499999 1969 0860-SAMSUNG (726-7864) 8007260000 08 197 267 864 0211 350370 847267864 / 827267864 www.samsung.com/africa_en/support www.samsung.com/africa_fr /support www.samsung.com/support www.samsung.com/support 9 10