1
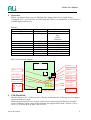
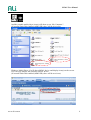
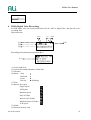
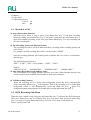
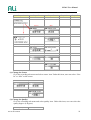
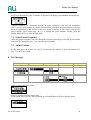
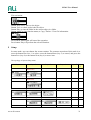
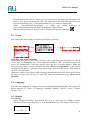
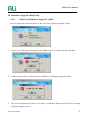
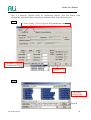
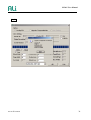
M5661 User Manual M5661User Manual www.ali.com.tw 1 M5661 User Manual Revision History Version Date 1.0 Dec.15, 2004 This document contains confidential proprietary information that is solely for authorized personnel. It is not to be disclosed to any unauthorized person without prior written consent of ALi Corporation. ALi Corporation ALi Corporation makes no representations or warranties with respect to the accuracy or completeness of the contents of this document. No license, whether express, implied, arising by estoppel or otherwise, to any intellectual property right is granted by this document. ALi Corporation also reserves the right to make changes to these specifications and product description at any time without notice. Contact your local sales office to obtain the latest specifications before placing your order. Third-party brands and name mentioned in this publication are for identification purpose only and may be the property of their respective owners. Copyright © ALi Corporation, 2004. All rights reserved History Date 9/15/2004 12/15 10/22/2005 Version 0.9 1.0 1.2 www.ali.com.tw Description First release Update features Update features Who David Chiu David Chiu Yen lung Chiu 2 Contents Contents ............................................................................................................................................. 3 1 Features ...................................................................................................................................... 4 2 Overview.................................................................................................................................... 6 3 USB Flash Disk.......................................................................................................................... 6 3.1 MSC mode ................................................................................................................. 7 3.2 MTP mode. ................................................................................................................ 7 4 Digital Audio device .................................................................................................................. 9 4.1 Power On/Off............................................................................................................. 9 4.2 Change mode ....................................................................................................................... 9 5 Music Mode ............................................................................................................................. 10 5.1 Playback............................................................................................................................. 11 5.2 Pause .................................................................................................................................. 11 5.3 Stop .................................................................................................................................... 11 5.4 File navigation (Select folder/file) ..................................................................................... 11 5.5 Select file ........................................................................................................................... 12 5.6 Fast backward/forward....................................................................................................... 12 5.7 Playback Sub-Menu ........................................................................................................... 12 5.8 A-B Repeat......................................................................................................................... 15 5.9 Adjust Volume ................................................................................................................... 15 6 DVR (Digital Voice Recording) .............................................................................................. 16 6.1 Record to a File........................................................................................................ 17 6.2 DVR Recording Sub-Menu...................................................................................... 17 6.3 Play a recorded file. ................................................................................................. 19 7 FM Radio ................................................................................................................................. 19 7.1 Adjust Frequency ..................................................................................................... 19 7.2 Automatic Search..................................................................................................... 19 7.3 Edit Preset Frequency .............................................................................................. 19 7.4 Select Preset Frequency ........................................................................................... 20 7.5 Adjust Volume ......................................................................................................... 20 8 File Manager ............................................................................................................................ 20 9 Setup ........................................................................................................................................ 21 9.1 Usb Mode................................................................................................................. 24 9.2 Time ......................................................................................................................... 24 9.3 Power ....................................................................................................................... 25 9.4 Language.................................................................................................................. 25 9.5 Display ..................................................................................................................... 25 9.6 Recording................................................................................................................. 26 9.7 Sys Tools.................................................................................................................. 26 9.8 Custom EQ............................................................................................................... 26 9.9 Storage ..................................................................................................................... 26 10 Firmware Upgrade (End-User) ........................................................................................ 27 10.1 “End-User Firmware Upgrade” utility..................................................................... 27 11 Firmware Upgrade (Engineering) .................................................................................... 28 M5661 User Manual 1 Features z Support internal memory (Nand flash) and external memory card NAND flash type: "M5661 Pen Drive Flash-Card Support.xls z z External memory card type: SD, MMC, Player: Playback source: internal memory or external memory card Support MP3 decoding: Bit rate: 8K bps ~ 320K bps Sampling rate: 8K ~48K Channel: Stereo Support WMA decoding: Bit rate: 5K bps ~ 320K bps Sampling rate: 8K ~48K Channel: Stereo Support IMA-ADPCM decoding: Bit rate: 32K bps ~ 352 K bps Sampling rate: 8K ~ 44.1K Channel: Mono/Stereo Support Lyrics display from LRC text file format Support artist / title / album display from MP3 tag: V1.0, V2.2, V2.3, V2.4 WMA content metadata Support A-B repeat. Support adjustable playback rate. Support fast forward / backward playback. Support long file-name, file navigation Selectable repeat mode: no repeat, single repeat, repeat all, and random all. Selectable equalizer mode: Normal / Pop / Rock / Classic / Jazz / Bass / User EQ. Selectable virtual surround mode: enable or disable. Voice Recorder Record source: Line-In, or MIC, or FM Record target: internal memory or external memory card Selectable record mode: high quality, normal quality, or long-time mode Support the following MP3 encoding modes: 256K bps, 44.1K sampling, stereo 128K bps, 44.1K sampling, stereo 64K bps, 22.05K sampling, stereo 32K bps, 16K sampling, mono 16K bps, 12K sampling, mono Support the following IMA-ADPCM encoding modes: www.ali.com.tw 4 M5661 User Manual Sampling: 8K , Sampling: 11.025K, Sampling: 16K, Sampling: 22.05K, Sampling: 32K Sampling: 44.1K Mono, Mono, Mono, Mono, Mono, Mono, Bit rate: 32K Bit rate: 44K Bit rate: 64K Bit rate 88K Bit rate 128K Bit rate 176k Sampling: 8K , Sampling: 11.025K , Sampling: 16K, Sampling: 22.05K, Sampling: 32K Sampling: 44.1K Stereo, Stereo, Stereo, Stereo, Stereo, Stereo, Bit rate: 64K Bit rate: 88K Bit rate: 128K Bit rate:: 172K Bit rate 256K Bit rate 352K The summary of file format with different source and quality mode Line In/ FM MIC High MP3, 128K bps, 44.1K, stereo MP3, 32K bps, 16K, mono Normal MP3, 64K bps, 22.05K, stereo MP3, 16K bps, 12K, mono Long time MP3, 32K bps, 16K, mono ADPCM, 32K bps, 8K, mono Support VAD in MP3 / IMA-ADPCM encoding mode. The VAD sensitivity level is adjustable.( 69 / 76 / 83 dBV) z FM Tuner Frequency: 87.5 ~108 MHz Tuner can adjust step by step or automatic search User can set 10 preset bands z Clock Time Alarm z LCD Selectable contrast Selectable backlight time z Automatic power off Selectable power off time Enable or disable power off function in playback is selectable z Multi-language Support unicode User interface can select Traditional Chinese, Simplified Chinese, or English. z Return to the environment last time automatically when power on www.ali.com.tw 5 M5661 User Manual 2 Overview M5661 can operate in two types: USB flash disk / digital audio device (stand-alone). If plugged to PC, it will become an USB flash disk. When it is stand-alone, it will become a portable digital audio device. Buttons: Button ID VolPlay Key number PB2 PB1 Vol+ Prev Function Next Rec Mode PB3 PB4 PB5 PB6 PB7 PB8 Function Volume decrease PowerOn, Play, Pause, PowerOff Volume increase Previous Command/Function Next Recording/A-B repeat Mode change The EV board block diagram: LCD Line-In Mic Headset FM PB2, VolPB6, Next PB1, Play PB5, Function PB3, Vol+ PB4, Prev PB7, Rec ] 3 USB host port (Behind the USB device port) PB8, Mode USB USB port device USB Flash Disk Plug the device to PC’s USB port the LCD panel will display the following icon according to current USB Device mode: DRM-10-compliant firmware (version 1.60.xx series) supports both MTP mode and MSC mode (USB mass storage class). If the firmware just supports MSC mode (Version 1.50.xx series ), it will just show up MSC icon on LCD. www.ali.com.tw 6 M5661 User Manual 3.1 MSC mode When M5661 device (MSC mode) gets connected to PC, and is in idle state. PC is writing data to M5661 device. PC is reading data from M5661 device And the removable disk(s) icons will show up on “My Computer”: (If external Flash Disk enabled (MMC/SD), there will be two disk icons) 3.2 MTP mode. When M5661 device (MTP mode) gets connected to PC (support XP only), and is in idle state. www.ali.com.tw 7 M5661 User Manual And the portable media player icon(s) will show up on “My Computer”: (If external Flash Disk enabled (MMC/SD), there will be two icons) Windows Media Player 10 will detect M5661 device and display icon(s) on the screen. User can sync transfer the content to M5661 device. (If external Flash Disk enabled (MMC/SD), there will be two icons) www.ali.com.tw 8 M5661 User Manual 4 Digital Audio device 4.1 Power On/Off Press the button Play (key1) can turn on the device, and press and hold this button will turn off the device. When power on, the LCD panel will display the power-on animation: ↓ ↓ ↓ ↓ Then it will go to the mode directly (Music, Voice, FM, Photo, File Manger, or Setup) when user powered off the device last time. Note: 1. The device can memorize the mode last time. If it was turned off from FM mode, it will return to FM mode when turn on. 2. The default mode is music mode. 4.2 Change mode Press the mode button (key 8) can change the mode, and the change sequence is as followed: Music --- DVR --- FM --- System Setup --- File Manager Layer 1 Layer 2 Music DVR FM www.ali.com.tw 9 M5661 User Manual Setup File Manager 5 Music Mode (16) (5)(6)(7) (8)(9) (11)(12) (10) (1) (2) (3) (4) (13) (14) (15) (1) Music mode icon (2) Current file number/Number of total files (3) Title/Artist/Album or filename (4) Lyrics Status: Stop Playback Pause Fast Forward Fast Backward (5) (6) (7) (8) Playback status Time File format Bit rate (9) Repeat: No repeat Single repeat All Repeat Random repeat Play in Folder Repeat All in Folder Random Repeat in Folder www.ali.com.tw 10 M5661 User Manual A-B repeat (10) (11) (12) (13) (14) Alarm External memory card Battery Key hold Equalizer: Normal Pop Rock Classic Jazz Bass User EQ (15) Virtual surround (16) Volume indicator Layer 1 Layer 2 Layer 3 Music Playback File navigation Layer 4 Layer 5 5.1 Playback When the device status is stop or pause, press the play button (key 1) to playback. 5.2 Pause When the device status is playback, press the play button (key 1) will pause it. 5.3 Stop When the device status is playback or pause, long press the function button (key 5) to stop it. 5.4 File navigation (Select folder/file) Long press the Button Menu (key 5) will enter folder/file browsing. User can browse all files in the current folder. Using the button Prev (key 4) / Next (key 6) to move the cursor up/down to the target object, then press the button Play (key 1) to play the selected file.(i.e. play from the current folder which contains the selected file.). Press the button Menu (key 5) can abort browsing folder/file, and go back to the playback mode. Press button Play at a folder will go into that folder. www.ali.com.tw 11 M5661 User Manual Current opened folder Music file Only supported music file will be displayed on the LCD, such as MP3 and WMA files. 5.5 Select file Press the button Prev (key 4) / Next (key 6) to select previous / next file. User can select previous / next file in any status. 5.6 Fast backward/forward When the device status is in playback, long press the button Prev (key 4) / Next (key 6) will fast backward/forward the current file. Fast forward / backward will gradually speed up to 16 x when user doesn’t release the Prev / Next. FF can move to next file when reaching the end of file. FB doesn’t support this feature. 5.7 Playback Sub-Menu The topology of playback sub-menu function Layer 1 Playback Layer 2 Repeat Layer 3 Layer 4 Layer 5 No Repeat Single Repeat Repeat All Random Repeat All In Folder Play In Folder All www.ali.com.tw 12 M5661 User Manual In Folder Random EQ Normal Pop Rock Classic Jazz Bass User EQ 3D sound Adjustment On On www.ali.com.tw 13 M5661 User Manual Play Rate 1.00x 1.14x 1.33x 0.67x 0.80x Intro Adjustment Volume Show Off Wave Stereo When the device is in Playback mode, press the button Menu(key 5) will enter playback sub-menu. Press button Prev (key 4) / Next (key 6) to select an item, and press button Play (key 1) to select it. The items of sub-menu include: Repeat, Equalizer, 3D surround and Play rate, Inro. (1) Change Repeat Mode Go to the playback sub-menu and select Repeat mode, there are four repeat modes on the www.ali.com.tw 14 M5661 User Manual list: No Repeat: Just play the current file. Stop playback when done. Repeat All: Repeatedly play all files, (starting from current file) Single Repeat: Repeatedly play current file. Random repeat all: Repeatedly play a random file (randomly selected from all). In Folder Play: Just play the current file in certain folder. Stop playback when done. In Folder All: Repeatedly play all files in certain folder. In Folder Random: Repeatedly play a random file in certain folder. (2) Change Equalizer Mode Go to the playback sub-menu and select Equalizer mode, there are seven Equalizer modes on the list: Normal, Pop, Rock, Classic, Jazz, Bass, and User define. (3) Virtual 3D Surround Go to the playback sub-menu and select Virtual Surround mode, user can enable or Disable the Virtual Surround function. (4) Change Play Rate Go to the playback sub-menu and select Play Rate item, user can adjust the play rate. The options of play rate are 0.67x, 0.80x, 1.00x, 1.14x, 1.33x. (5) Intro playback Intro playback is to play just a short period of content, instead of the entire file, let user can quickly scan all audio content in the disk. User can set the Intro period 0 ~ 15 seconds. 0 second means disable this function. Intro-Period adjustment (6) Volume Show Go to the playback sub-menu and select Volume Show mode, user can select the volume display style when playback . There are three choices for this option, turn off, wave motion, stereo mode. 5.8 A-B Repeat During playback, press the button Rec (key 7) to set the start point of the A-B repeat section, and press this button again can set the end point of the A-B repeat section. The device will play the section repeatedly. After that, press the same button again will cancel the A-B repeat mode. 5.9 Adjust Volume In any playbackstate, press the button Vol- (key 2) to decrease the volume, or press the button Vol+ (key 3) to increase volume. (step: 0 ~ 31) www.ali.com.tw 15 M5661 User Manual 6 DVR (Digital Voice Recording) In DVR mode, user can record sound from Line In, MIC to digital files, and play the voice recording files. Playback mode: (4)(5) (1) (2) (3) (6) (8)(9) (7) (10) Recording mode(when pressing button Rec) (11) (1) Voice mode icon (2) Current file number/Number of total files (3) Filename (4) Status: Stop Playback Pause Record (blinking) (5) Time (6) Repeat: No repeat Single repeat All Repeat Random repeat Play in Folder Repeat All in Folder Random Repeat in Folder A-B repeat (7) Alarm (8) External memory card www.ali.com.tw 16 M5661 User Manual (9) Battery (10) Key hold (11) Recording Source Line In Mic 6.1 Record to a File (1) General Recording Function When the device status is stop or pause, press button Rec (key 7) will start recording. During recording, press button Rec (key 7) can pause it, and press the same button (key 7) again will continue recording. In the end, press button Menu (key 5) to stop recording and save the recording file. (2) The Recording Folder and Filename format The recording file will be saved in different folders, according to the recording quality and voice source. For example, the FM recording files will be saved in folder “\FMIN” . And, the recording filename will contain prefix to indicate the voice source, serial number, and file type. The unified filename format is, "MIC" / "LINE" / “FM” + series number + ".MP3" / ".WAV”. Such as, “MIC0001.WAV”, “MIC0002.MP3”, “LINE0003.WAV”, “FM00001.MP3” … (3) Auto Insert Recording Serial Number Name. The serial number of recording filename increases every time. When filename already exits, it will search for next available serial number to make up its filename. (4) VAD Recording Function When the recording voice is quieter than background sound, the device automatically pauses recording and the icon will disappear. Then, if the recording voice is louder than background sound, it will automatically record and Blink the item again. The background sound means that the first sound after pressing the button Rec (key 7). 6.2 DVR Recording Sub-Menu When the device status is stop, long press the button Rec (key 7) will enter the DVR sub-menu. Then press button Prev (key 4) or button Next (key 6) to move item, and press button Play (key 1) to select it or press button Menu (key 5) to exit it. The items of sub-menu are: Source, Quality and VAD. www.ali.com.tw 17 M5661 User Manual Layer 1 Layer 2 Layer 3 Source MIC Layer 4 Layer 5 DVR Playback DVR Record Line-In Quality Adjustment VAD Off On (1) Change the Source Go to the recording sub-menu and select source item. Under this item, user can select “Line In” or “Mic” as the source. Voice source MIC Line-In (2) Change the Quality Go to the recording sub-menu and select quality item. Under this item, user can select the quality degree. (4 degrees) Quality www.ali.com.tw Adjustment 18 M5661 User Manual (3) VAD Function Selection Go to the recording sub-menu and select VAD item. Under this item, user can select whether using VAD (voice active detection) function VAD Off On . 6.3 Play a recorded file. The operation of playback is similar to music playback mode. Press button Menu will go into DVR Playback Sub-Menu, to change Repeat mode, Intro Playback Period, and Play Rate ( see the Music Playback). 7 FM Radio Layer 1 FM playback Layer 2 Preset Edit Layer 3 Layer 4 Layer 5 7.1 Adjust Frequency Press button Prev (key 4) to decrease the frequency, and press button Next (key 5) to increase the frequency. Each step is 0.1 MHz. 7.2 Automatic Search Long press button Prev (key 4) will decrease the frequency and search a radio station automatically. Long press button Next (key 6) will search band will increase the frequency to search a radio station. 7.3 Edit Preset Frequency www.ali.com.tw 19 M5661 User Manual Long press function key (key 5) and the LCD panel will display preset number and frequency. 0 As the operation of “Adjust Frequency” or “Automatic Search”, to select a frequency, and press the button Rec (key 7) to save the frequency to current preset number. After that, the preset number will go to the next automatically, and let user to save next preset frequency. If user want to edit specific preset number, press button Play (key 1) to change the preset number. Finally, press the Button Menu (key5) to close the edit mode. 7.4 Select Preset Frequency After edit preset frequency, user can change the frequency directly by select the preset number. Just press the button Play (key 1) to select the preset number. 7.5 Adjust Volume In any state, press the button Vol- (key 2) to decrease the volume, or press the button Vol+ (key 3) to increase volume. 8 File Manager Layer 1 Layer 2 Layer 3 Source disk Partition Function File navigation Layer 4 Layer 5 Operation Select a source disk from menu Select a partition from the source disk Press button Play will enter file navigation, press button Menu will enter function menu www.ali.com.tw 20 M5661 User Manual File navigation: Button Next / Prev: move to the object Button Vol+: to check (select) the file object. Button Play: go into the folder in the current object is a folder Button Menu: go into function menu, to Copy / Delete / View file information. Press button Menu again will cancel the operation Press button Play will perform the selected function. 9 Setup In setup mode, user can change the system settings. The common operation of this mode is to press the button Play (key 1) to select, press the button Menu (key 5) to cancel, and press the button Prev (key 4) or the button Next (key 6) to move item. The topology of System Setup menu Layer 1 USB mode Layer 2 Layer 3 Layer 4 Layer 5 Layer 6 Pen drive (MSC mode) DRM download (MTP mode) Time www.ali.com.tw Set clock Adjustment Set alarm Edit alarm Adjustment On/Off Off 21 M5661 User Manual On Power saving Setting Language Chinese Tran Chinese Simp English Display Record Contrast Adjustment Backlight Adjustment Source Mic Line-In Quality www.ali.com.tw Adjustment 22 M5661 User Manual VAD Off On System Tool Delete File FileList No Yes Format Quick format No Yes Full format No Yes Default No Yes System Info www.ali.com.tw Information 23 M5661 User Manual User EQ Adjustment Storage Internal SD / MMC 9.1 Usb Mode (1) Pen Drive Select “USB ModeÆPen Drive”, the device will act as a USB pen drive when plugging into USB port. (2) DRM Download Select “USB ModeÆDRM Download”, the device will act as a MTP device when plugging into USB port. It is used to download the Janus-DRM-protected (Digital Right Management) media files and license through WMP 10(Windows Media Player 10), and it only supports Windows XP SP1 above. 9.2 Time (1) Adjust Select “TimeÆAdjust”, and the LCD panel will display current time. Press the button Prev (key 4) or button Next (key 6) to move cursor, and then press the button Vol- (key 2) / Vol+ (key 3) to change the value. The time is set while adjusting. In the end, press the button Play (key 1) or the Button Menu (key 5) to return to Setup menu. (2) Alarm Select “TimeÆAlarmÆAdjust”, and the LCD panel will display current alarm time. www.ali.com.tw 24 M5661 User Manual Press the button Prev (key 4) / Next (key 6) to move cursor, and then press the button Vol(key2) / Vol+ (key 3) to change the value. The alarm time is set while adjusting. In the end, press the button Play (key 1) / the Button Menu (key 5) to return to Setup menu. Select “TimeÆAlarmÆOn/OffÆOn” to enable the alarm function; or select ”TimeÆAlarmÆOn/OffÆOff” to disable the alarm function. When the alarm function is turned on, the LCD panel will display alarm icon 9.3 Power Select the power item, and the LCD panel will display as follows: Auto power off Auto-off timer Always on in playback Auto-Off: Auto Power Off setting Press button Prev (key 4) / Next (key 6) to move cursor, and then press the button Vol- (key 2) / Vol+ (key 3) to change the value. If user adjust the number to “020”, it means the device will power off automatically if the user doesn’t press any key in twenty minutes. When the Auto-Off timer expires, system will check the item ”Always on in playback”. If this item is checked and the device is playing songs, system won’t power off the device. This setting is useful for sleeping mode. When user wants to enjoy music while sleeping, and automatically power off the device when all songs are played out. He can set "Auto Off" timer, and checked the flag "Always on in playback" . 9.4 Language User can select language to change the system menu and information display. The current EV board supports 55 kinds of languages including English, Chinese (Trad.), Chinese (Simp) …exc. 9.5 Display (1) Contrast Select “DisplayÆContrast”; press button Prev (key 4) / Next (key 6) to change contrast, and then press the button Play (key 1) or the Button Menu (key 5) to return to Setup menu. www.ali.com.tw 25 M5661 User Manual (2) Backlight Select “DisplayÆBacklight”; press the button Prev (key 4) or button Next (key 6) to change the backlight time, and then press the button Play (key 1) or the Button Menu (key 5) to return to menu. 9.6 Recording (1) Recording Source Select “RecordÆSourceÆLine In” to set recording from “Line In” input; Or select “RecordÆSourceÆMIC” to set recording from device’s built-in microphone. (2) Record Quality Select “RecordÆQualityÆLong Time” for voice quality and smaller file size. Select “RecordÆQualityÆNormal Quality” for radio quality and normal file size. Select “RecordÆQualityÆHigh Quality” for CD quality and bigger file size. (3) VAD functional selection Select “RecordÆVAD” to turn on/off VAD function. 9.7 Sys Tools (2) Format Select “Sys ToolsÆFormatÆQuick” to quickly format; Select “Sys ToolsÆFormatÆComplete” to completely format as the FAT16 file system. (3) Reset Select “Sys ToolsÆ Reset” to reset the portable audio player to the default setting. (4) System Info Select “Sys ToolsÆSystem Info” to check the system information: Firmware version, Chip version, and free space of the internal memory. 9.8 Custom EQ Select the “Custom EQ” item to adjust the custom EQ. Press the button Prev (key 4) / Next (key 6) to move cursor, and then press the button Vol- (key 2) / Vol+ (key 3) to change the value. 9.9 Storage Select “StorageÆInternal” to playback from or record to device’s internal memory. Select “StorageÆSD/MMC Card” to playback from or record to device’s external SD/MMC card. When the device is selected to use the external memory card to playback or recording, the LCD panel will show a disk icon ( www.ali.com.tw ) to indicate that system is using external memory card. 26 M5661 User Manual 10 Firmware Upgrade (End-User) 10.1 “End-User Firmware Upgrade” utility User can upgrade the firmware binary by the “End-User Firmware Upgrade” utility 1. If there is no such device connected on the USB host port, a warning message will show . 2. If more than one device connected on the USB host, a warning message will show . 3. This tool only burning one device every time. Confirmation dialog box will ask user to begin firmware upgrade process. www.ali.com.tw 27 M5661 User Manual 4. After clicking the [Yes], the firmware upgrade will proceed. When the firmware upgrade process finishes, a message box will display. The new firmware won't take effect until user re-plugs the device to PC. 11 Firmware Upgrade (Engineering) www.ali.com.tw 28 M5661 User Manual This is a firmware Upgrade utility for engineering purpose (User can change some configurable information before burning the firmware binary to the M5661 device) Step1. 1. Select Config + FW or Upgrade ProgramModule only 2. Select Nandflash Type 3. Press it Step2. Select Source Code Press it www.ali.com.tw 29 M5661 User Manual Step3. www.ali.com.tw 30 M5661 User Manual www.ali.com.tw 31