1
User Guide • Benutzerhandbuch
Guide d’utilisation • Manuale per l’utente
Guía del usuario
ok
1
2
4
3
5
7
8
0
6
9
Wi Fi
Color Inkjet Multifunction
CJX-2000FW Series
All-in-One Printers • All-in-One Drucker • Imprimantes multifonctions
Stampanti multifunzione • Impresoras multifunción
SAMSUNG CJX-2000FW All-in-One Printer
Your SAMSUNG All-in-One Printer combines ease-of-use and affordable inks to provide
high-quality pictures and documents.
Resources
Support is available! Go to www.samsung.com/printer for:
■■ answers to questions
■■ software upgrades
■■ and more!
If you prefer, you can chat online, send us an e-mail, or call for technical support.
Go to www.samsung.com/printer.
EN
i
Contact SAMSUNG worldwide
If you have any comments or questions regarding Samsung products, contact the
Samsung customer care center.
Country / Region
Customer Care Center
Web Site
FRANCE
01 48 63 00 00
www.samsung.com/printer
GERMANY
01805 - SAMSUNG
(726-7864 € 0,14/min)
www.samsung.com/printer
ITALY
800-SAMSUNG (726-7864)
www.samsung.com/printer
EN
iii
ENGLISH
Contents
1 Printer Overview............................................................................ 1
Components.............................................................................................. 1
Control panel............................................................................................ 4
Print Manager Software............................................................................. 6
Configuring printer settings....................................................................... 6
Paper........................................................................................................ 8
Paper types.........................................................................................................8
Paper sizes..........................................................................................................8
Loading paper.....................................................................................................9
2 Networking Your Printer ...............................................................13
Connecting to a wireless network............................................................ 13
Before you connect...........................................................................................13
Connecting to a wireless network using the Wi-Fi Setup Wizard.........................13
Setting up an IP address....................................................................................18
Viewing the network configuration....................................................................19
Printing the network configuration....................................................................20
Changing the printer name................................................................................20
Adding a wireless network connection
to a USB-connected computer.................................................................. 21
Changing from USB to a wireless connection.....................................................21
iv
EN
ENGLISH
Contents
3 Basic Functions.............................................................................23
Loading originals..................................................................................... 23
Using the scanner glass.....................................................................................23
Using the Automatic Document Feeder (ADF).....................................................24
Printing................................................................................................... 26
Printing documents...........................................................................................26
Printing pictures................................................................................................28
Copying.................................................................................................. 38
Loading originals for copying.............................................................................38
Copying a document.........................................................................................38
Copying a photograph.......................................................................................44
Scanning................................................................................................. 49
Before you begin scanning................................................................................49
Loading originals for scanning...........................................................................60
Scanning from the computer..............................................................................60
Scanning from the control panel........................................................................62
Scanning from the Online Printer Management Tool...........................................65
Faxing..................................................................................................... 66
Before you begin faxing.....................................................................................66
Preparing a fax for transmission.........................................................................83
Sending a fax....................................................................................................85
Receiving a fax..................................................................................................87
Printing fax reports............................................................................................88
Canceling a fax.................................................................................................90
Ordering supplies.................................................................................... 90
EN
v
ENGLISH
Contents
4 Maintaining Your Printer...............................................................91
General care and cleaning....................................................................... 92
Cleaning the scanner glass and document backing............................................92
Replacing ink cartridges........................................................................... 95
Updating the software and printer firmware........................................... 100
Updating if your printer is connected to a computer with WINDOWS OS...........100
Updating if your printer is connected to a computer with MAC OS....................102
Monitoring and adjusting printer performance........................................ 103
Checking ink levels..........................................................................................103
Resetting factory defaults................................................................................103
Replacing the printhead......................................................................... 104
5 Troubleshooting..........................................................................111
Basic troubleshooting............................................................................ 111
Status lights.......................................................................................... 116
Power light ....................................................................................................116
Wi-Fi connectivity LED ....................................................................................117
6 Product and Safety Specification.................................................119
Features and Specifications.................................................................... 119
Print performance...........................................................................................119
Photo printing features....................................................................................119
Copy document features..................................................................................120
Copy photo features........................................................................................121
Scanning features............................................................................................122
Faxing features and specifications....................................................................122
Paper input tray...............................................................................................123
Automatic Document Feeder (ADF) for originals...............................................123
vi
EN
ENGLISH
Contents
Ink cartridges..................................................................................................123
Connectivity....................................................................................................125
Software support.............................................................................................125
Physical specifications.....................................................................................126
System requirements............................................................................. 127
Computer with WINDOWS OS.........................................................................127
Computer with MAC OS..................................................................................127
Paper types supported.....................................................................................128
Paper sizes supported......................................................................................129
7 Safety Information......................................................................131
Safety Information................................................................................. 131
LCD Screen Safety...........................................................................................134
Ink Cartridge Safety.........................................................................................134
Declaration of Conformity (European countries)...................................... 135
Correct Disposal of This Product
(Waste Electrical & Electronic Equipment)............................................... 137
ENERGY STAR® Qualified..................................................................... 138
EN
vii
1
Printer Overview
This printer lets you print, copy, scan, and fax pictures and documents.
Components
4
5
6
3
2
1
7
8
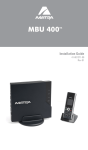
1 Control panel
5 Paper input tray
2 Automatic document feeder (ADF)
6 Right paper-edge guide
3 ADF paper-edge guides
7 Output tray
4 Left paper-edge guide
8 Output tray extender
EN
1
Printer Overview
9
10
11
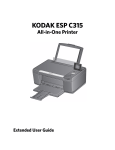
9 Memory card slot
10 Scanner lid
2
EN
11 Scanner glass
Printer Overview
16
12
18
19
210
13
14
17
15
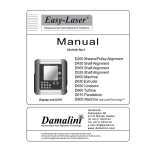
12 Access door
16 Line in phone port
13 Carriage
17 Ext out phone port
14 Printhead with ink cartridges installed
18 USB port (for connecting to computer)
15 Paper guard
19 Power cord connection port
EN
3
Printer Overview
Control panel
1
2
19 18
Feature
3
4
5
6
7 8
10 11
9
17 16 15 14
13
12
Description
1
LCD
Displays pictures, messages, and menus
2
Copy button
Displays the Copy Document menu
3
Fax button
Lets you enter a phone number for sending a fax, or
choose the Fax Options menu
4
Navigation buttons
Used to navigate menus and scroll through pictures
5
OK button
Selects a menu item, accepts a setting, or continues with
the current operation
6
Attention
light Blinks when an error occurs
7
Address Book
Displays the phonebook of fax numbers; lets you enter or
edit phone numbers
4
EN
Printer Overview
Feature
Description
8
Numeric keypad
Used to dial a phone number or a Quick Dial number
for faxing; to enter information and Quick Dial settings
into the fax phonebook; to specify a quantity for making
copies; and to enter information for accessing a network
9
Cancel button
Stops the current operation and returns to the menu;
clears certain errors to allow scanning or sending a fax
10 Start Black button
Starts the selected print, copy, scan, or fax in black and white
11 Power button
Turns the printer on or off
12 Wi-Fi connectivity
LED
When lit, signals that the printer is connected to a
wireless (Wi-Fi) network; blinks when searching for an
available Wi-Fi network or when the existing signal is too
weak to transmit or receive wireless signals
13 Start Color button
Starts the selected print, copy, scan, or fax in color
14 Redial button
Dials the last phone number dialed
15 Auto Answer button
/ LED
• Turns the fax auto answer feature on or off; when on,
the fax answers all incoming calls automatically
• Lights when the fax auto answer feature is on
16 Menu button
Displays the main menu
17 Back button
Displays the next higher screen in the menu structure
18 Photo button
Displays the Print Photo Options menu
19 Scan button
Displays the Scan Options menu
EN
5
Printer Overview
Print Manager Software
SAMSUNG Print Manager Software is installed with your SAMSUNG All-in-One Printer
Software unless you chose otherwise during installation. The Print Manager icon will
appear on your desktop.
On a computer with WINDOWS Operating System (OS), you can use Print Manager
Software to browse and edit pictures, print, copy, scan, order supplies, and configure your
all-in-one printer from your computer.
On a computer with MAC OS, you can use Print Manager Software to order supplies and
configure your printer from your computer.
Configuring printer settings
To set or change basic printer settings:
1 Press Menu.
2 Press
to select Printer Settings, then press OK.
3 Press
to select one of the following settings:
■■ Date and Time
–– Press OK, then press
to select Year, Month, Day, Hour, or Minute.
–– Press or to change the values; press OK when you are done making
changes.
–– Press Back to go back to the Printer Settings menu.
6
EN
Printer Overview
■■ Time to Low Power
To conserve energy, your printer will enter a low power (sleep) mode after being
idle for a default delay time of 1 hour. You can increase the delay time to low
power (in 0.5 hour increments) up to 4 hours. Increasing the delay time may
result in reduced energy savings.
■■
■■
■■
■■
–– Press to change the time to energy-saving sleep mode (select from 1 to 4
hours in 0.5 hour increments).
Tagged Images Printing (see Printing tagged pictures, page 37)
–– Press to select Off or On.
Language
–– Press OK, press
to select a language, then press OK.
Country/Region
–– Press OK, press
to select a country or region, then press OK.
Reset All Settings (see Resetting factory defaults, page 103)
NOTE: Resetting factory defaults does not change the date and time, language,
country/region, or network settings.
■■ Printer Info
–– Press OK to view the Firmware Version number; press OK when you are done.
4 Press Back to return to the Main Menu.
EN
7
Printer Overview
Paper
For the best photo printing results, use KODAK Photo Papers, which are optimized to
work with SAMSUNG All-in-One Printers.
For the best document printing results, use KODAK Document Papers or a paper with the
COLORLOK Technology logo on the package. Use only paper that is designed for inkjet
printers.
Paper types
You can print on:
■■
■■
■■
■■
■■
■■
■■
Plain paper — 16 to 24 lb / 60 to 90 gsm
Photo paper — up to 12 mils / 290 gsm
Card stock — 110 lb / 200 gsm, max
Envelopes — most standard types
Labels — all commercially available inkjet varieties on 8.5 x 11-in. or A4 sheets
Iron-on transfers — all inkjet varieties on 8.5 x 11-in. or A4 sheets
Transparencies — inkjet variety with white stripe on short edge
Paper sizes
You can print on the following paper sizes:
Minimum size
Maximum size
English units
4 x 6 in.
8.5 x 14 in.
Metric units
10 x 15 cm
22 x 36 cm
8
EN
Printer Overview
Loading paper
1 Lift the input tray.
2 Pull out the paper output tray and the extender until they are fully extended.
EN
9
Printer Overview
Loading plain paper
The input paper tray capacity is 150 sheets of plain paper.
To load plain paper:
1 Fan and stack the paper.
2 Make sure the left and right paper-edge guides are to the far left and far right, then
insert the paper (short side first) into the input tray.
3 Move the paper-edge guides until they touch the paper.
ok
1
2
4
8
0
10
EN
3
5
7
6
9
Wi Fi
Printer Overview
Loading photo paper
The input paper tray capacity is 20 sheets of photo paper.
To load photo paper:
1 Remove any paper from the input tray.
2 Insert the paper (short side first) into the input tray with the logo side facing
toward the tray and the glossy side toward you.
IMPORTANT: If the photo paper is loaded the wrong way, the image quality will be
affected.
3 Move the paper-edge guides until they touch the paper.
EN
11
2
Networking Your Printer
This section explains how to configure your wireless network settings.
Connecting to a wireless network
To connect your printer to an 802.11b/g/n wireless (Wi-Fi) network, refer to the following
information.
Before you connect
You need:
■■ a wireless router.
■■ to determine whether your wireless router supports Wi-Fi Protected Setup (WPS).
NOTE: If you have specific questions about your router, see your router manufacturer’s
documentation for more information.
Connecting to a wireless network using the Wi-Fi Setup Wizard
You can use the Wi-Fi Setup Wizard on the printer to connect to your wireless network.
Read the following procedures and use the one that is appropriate for your network
setup.
EN
13
Networking Your Printer
Connecting to a non-WPS wireless router
To connect your printer to your wireless network, you need to know the network name,
also called the Service Set Identifier (SSID). You can obtain your network name from the
wireless router.
If your network has security enabled, you also need to know the Security String
(passphrase or password).
Record your network information in the spaces below, using the correct uppercase and
lowercase letters.
Network Name (SSID): _______________________________________________
Security String (case-sensitive): _________________________________________
1 Press Menu.
2 Press
to select Network Settings, then press OK.
3 With Wi-Fi Setup Wizard selected, press OK.
NOTE: The Wi-Fi radio turns on when you select Wi-Fi Setup Wizard.
The Wi-Fi connectivity LED blinks as the printer searches for available wireless
networks within range, then displays the list in order of signal strength. For example:
Network1100%
14
EN
Networking Your Printer
If there are more networks than can be shown on the LCD, a
(page down)
symbol
the bottom
of the
display.
If there appears
are moreinnetworks
thanright
can be
shown
on the LCD, a
(page down) symbol
4. Press
select
your network,
then
press OK.
appears intothe
bottom
right of the
display.
If you don’t see your network in the list, or if you want to change your network,
4 Press to select your network, then press OK.
select Rescan for Wireless Networks, then press OK.
If you don’t see your network in the list, or if you want to change your network,
NOTE:
If the name
of your network
is not
listed,
select Rescan
for Wireless
Networks,
then
pressmake
OK. sure your wireless router
is turned on and within range. If the name of your network is still not
NOTE: If the listed,
name of
network is not listed, make sure your wireless
is turned
goyour
to www.kodak.com/go/inkjetnetworking
for morerouter
information.
on and within range.
5. If your network requires a password, use the LCD keyboard to enter your
5 Security
If your network
String. requires a password, use the LCD keyboard to enter your Security
String.
On the control panel, press
a
,
,
or
,
, or to
On
the control panel, press
to select the letters and numbers, using the
select
the
letters
and
numbers,
using
the correct
correct uppercase and lowercase letters.
uppercase
and lowercase
letters.When
Press OK
Press OK after
each character.
youafter
are
each
character.
When
you
are
done,
select
finished, select DONE, then press OK
DONE, then press OK.
6. When the confirmation message appears, press OK.
6 When the confirmation message appears, press OK.
When the printer is successfully connected, the Wi-Fi connectivity LED will stop
blinking and stay on steadily.
EN
15
Networking Your Printer
The printer with a wireless connection is listed as the name of the printer plus a
number (for example, Samsung CJX-2000FW+0034).
Connecting to a WPS wireless router
If your router supports Wi-Fi Protected Setup (WPS), you can use WPS Connect. WPS lets
you configure your printer for a wireless network by pressing buttons or entering a PIN.
To connect to a network using WPS:
1 Press Menu.
2 Press
to select Network Settings, then press OK.
3 With Wi-Fi Setup Wizard selected, press OK.
NOTE: The Wi-Fi radio turns on automatically when you select Wi-Fi Setup Wizard.
4 With WPS Connect selected, press OK.
WPS Connect
5 Select one of two methods of connecting:
IMPORTANT: Before you press OK on the printer, make sure you know where the
router’s push button is, or where to enter the generated PIN. If necessary,
consult your Internet service provider or router device manufacturer’s
documentation for more information.
16
EN
5. Select one of two methods of connecting:
IMPORTANT: Before you press OK on the printer, make sure you know where the
router's push button is, or where to enter the generated PIN. If
Networking
Your Printer
necessary, consult your Internet service provider
or router device
manufacturer’s documentation for more information.
Pressing
button
Pressing a a
button
Entering
PIN
Entering a a
PIN
NOTE:
will
have
aa.Press
NOTE:You
You
will
havetwo
twominutes
minutestoto
Press totoselect
selectGenerate
Generate WPS
press
selectthe
theWPS
WPS
button.
WPS
PIN,
thenOK.
press OK.
press
ororselect
button.
PIN,
then
press
maybebea abutton
buttonon
onthe
thedevice
device
b. In your wireless router’s software,
It Itmay
your wireless router’s software,
virtualbutton
buttonininthe
the device’s
device’s b Inlocate
the PIN screen.
orora avirtual
locate the PIN screen.
software.
c. Enter the PIN you received on the
software.
c Enter
LCDthe
intoPIN
theyou
PIN received
screen. on the
WithPush
PushButton
Button Configuration
Configuration
aa.With
LCD into the PIN screen.
selected,
press
OK.
selected, press OK.
b. Press or select the WPS button for
b Press
select router.
the WPS button for
youror
wireless
your wireless router.
6. When the confirmation message appears, press OK.
4 When the confirmation message appears, press OK.
When
connected,
thethe
Wi-Fi
connectivity
LED LED
stopsstops
blinking
When the
theprinter
printerisissuccessfully
successfully
connected,
Wi-Fi
connectivity
and
staysand
on stays
steadily.
blinking
on steadily.
The
asas
thethe
name
of of
thethe
printer
plusplus
a a
The printer
printerwith
withaawireless
wirelessconnection
connectionis islisted
listed
name
printer
number
CJX-2000FW+0034).
number (for
(forexample,
example,Samsung
KodakESPC315+0034).
NOTE: If you are unable to connect your printer, go to
www.kodak.com/go/inkjetnetworking for more information.
7. If you haven’t yet installed the KODAK All-in-One Printer Software:
a. Go to www.kodak.com/go/aiodownloads.
EN for
b. In the results list, click the link for KODAK All-in-One Printer Software
17
Networking Your Printer
Setting up an IP address
MPORTANT: You should only need to set up an IP address for your printer if you are
having a problem with connecting. Typically, it is not necessary to set up an
IP address. This procedure is for advanced users who know how to obtain
the IP address for the printer.
All IP address entries have the following format: 000.000.000.000. Within each threedigit grouping, the number must be right-justified. If an address or subnet mask has only
one or two characters between the periods, include one or two leading zeros in front of
that number. For example:
The address as it may appear in
your documentation
How to enter the address in the
printer menu
149.89.138.149
149.089.138.149
149.2.40.149
149.002.040.149
To set up your IP address on the printer:
1
2
3
4
18
Press Menu.
Press
to select Network Settings, then press OK.
Press
to select Advanced IP Address Setup, then press OK.
Press OK again to continue.
EN
Networking Your Printer
5 Select one of the following, then press OK:
■■ Dynamic (DHCP)
■■ Manual (Static)
6 If you selected Manual (Static), you are prompted to enter an IP address, a Subnet
Mask, a Gateway Address, and a DNS Server address. Press OK after each entry. Use
the navigation buttons to enter each digit of the numbers.
Consult your Internet service provider or network administrator for more information.
Viewing the network configuration
To view the network configuration and verify that you are connected to your wireless
network:
1 Press Menu.
2 Press
to select Network Settings, then press OK.
3 Press
to select View Network Configuration, then press OK.
The wireless or Ethernet network settings appear on the LCD, including:
■■ Printer Hostname
■■ Connection
■■ Speed
■■ IP Address
■■ IP Address Type
■■ Network Subnet
■■ Connected Network SSID
■■ Security
EN
19
Networking Your Printer
■■ Authentication
■■ Channel
■■ Region
■■ Radio (on/off)
■■ MAC Address
If the printer is connected to your network, you will see the network name and the
word CONNECTED.
4 To scroll through the information, press
5 When you are done, press OK.
.
Printing the network configuration
To print the current network configuration:
1
2
3
4
Load plain paper into the printer. (see Loading plain paper, page 10)
Press Menu.
Press
to select Network Settings, then press OK.
Press
to select Print Network Configuration, then press OK.
Changing the printer name
When the Online Printer Management Tool is displayed in the browser:
1 Select the Network tab.
2 Click General, then Friendly name, if necessary.
3 Highlight the text in the Friendly name field and type the name you want, then click Save.
20
EN
Networking Your Printer
Adding a wireless network connection
to a USB-connected computer
You can change the way you connect to your printer at any time.
Changing from USB to a wireless connection
To change the printer connection type from USB to a wireless (Wi-Fi) network:
If your printer is connected to a computer with WINDOWS OS:
1
2
3
4
Unplug the USB cable from your printer and computer.
On the printer control panel, press Menu.
Press
to select Network Settings, then press OK.
Press
to select View Network Configuration, press OK, then confirm that the IP
Address is not 0.0.0.0.
5 If you have not already done so, connect your printer to your wireless network.
6 Select Start > All Programs > Samsung > Samsung Printer Setup Utility.
■■ If your wireless all-in-one printer (example: Samsung CJX-2000FW+0034) is not
listed:
a Select No, my printer is not listed, then click Next.
b Select your printer from the list.
c Select Network - Wireless/Wi-Fi, then click Next.
When your printer is detected, driver installation begins.
EN
21
Networking Your Printer
■■ If your wireless all-in-one printer (example: Samsung CJX-2000FW+0034) is listed:
a Highlight the all-in-one printer that is connected to your network.
b Select Yes, my printer is listed, then click Next.
When your printer is detected, driver installation begins.
7 When driver installation is complete, click Done.
The printer with a wireless connection is listed as the name of the printer plus a number
(for example, Samsung CJX-2000FW+0034).
If your printer is connected to a computer with MAC OS:
1
2
3
4
Unplug the USB cable from your printer and computer.
On the printer control panel, press Menu.
Press
to select Network Settings, then press OK.
Press
to select View Network Configuration, press OK, then confirm that the
IP Address is not 0.0.0.0.
5 Select Apple > System Preferences.
6 Under Hardware, select Print & Fax.
7 In the Print & Fax dialog box, click +.
8 Select your printer from the list, then click Add.
The printer with a wireless connection is listed as the name of the printer plus a number
(for example, Samsung CJX-2000FW+0034).
22
EN
3
Basic Functions
Loading originals
You can place originals for copying, scanning, or faxing on the scanner glass or in the
ADF (automatic document feeder). The ADF automatically feeds the originals into the
printer when you begin copying, scanning, or faxing.
Using the scanner glass
To place an original on the scanner glass:
1 Remove any originals from the automatic document feeder (ADF).
2 Lift the scanner lid, and place the document or picture face down in the right-front
corner.
3 Close the scanner lid.
EN
23
Basic Functions
Using the Automatic Document Feeder (ADF)
You can load up to 25 originals (16 to 24 lb / 60 to 90 gsm plain paper) in the automatic
document feeder (ADF).
The ADF accepts originals from B5 (6.9 x 9.8 in. / 176 x 250 mm) to legal size
(8.5 x 14 in. / 216 x 356 mm).
IMPORTANT: Do not load photographs, cards, or any paper stock heavier than
24 lb / 90 gsm in the ADF.
1 Move the ADF paper-edge guides outward.
ADF paper-edge guides
ok
1
2
4
8
0
24
EN
3
5
7
6
9
Wi Fi
Basic Functions
2 Fan and stack the originals, then insert them face up in the ADF.
3 Move the ADF paper-edge guides until they touch the paper.
ok
1
2
4
3
5
7
8
0
6
9
Wi Fi
ok
1
2
4
3
5
7
8
0
6
9
Wi Fi
EN
25
Basic Functions
Printing
Printing documents
To print a document from your computer:
1
2
3
4
Open the document.
Select File > Print.
In the Print window, select your SAMSUNG Printer.
Choose the pages to print, number of copies, etc, then click OK (on a computer with
WINDOWS OS) or Print (on a computer with MAC OS).
Printing two-sided documents
You can print two-sided documents on any size paper that the printer accepts (see Paper
sizes, page 8) by rotating the paper manually as described below.
IMPORTANT: Two-sided printing can only be done on media that can absorb ink on
both sides, such as plain paper or two-sided photo paper. Two-sided
printing will not work on bar-coded photo paper (the bar code is on the
back side).
Printing two-sided documents from a computer with WINDOWS OS
To print two-sided documents from a computer with WINDOWS OS:
1 Load paper into the paper input tray.
2 Open the document you want to print, then select File > Print.
3 In the Print dialog box, make sure that SAMSUNG CJX-2000FW Series AiO (or for
26
EN
Basic Functions
a wireless connection, SAMSUNG CJX-2000FW+XXXX, where XXXX is a number)
is selected, then click Properties.
4 Select the Layout tab.
5 In the Two-sided printing field, select Manual (Instructions provided), then click OK.
6 Click OK.
7 When a message appears on your computer or printer LCD, remove the printed
pages from the output tray, and follow the instructions on the computer or LCD.
8 Turn the printed pages over, and place into the input tray (top edge down and
printed side away from you).
9 Press Start Black or Start Color on the printer.
NOTE: It does not matter which Start button you press; the print job will continue
printing in either color or black, depending on the document.
Printing two-sided documents from a computer with MAC OS
To print two-sided documents from a computer with MAC OS:
1 Load paper into the paper tray.
2 Open the document you want to print, then select File > Print.
3 In the Print dialog box, make sure that SAMSUNG CJX-2000FW Series AiO (or for
a wireless connection, SAMSUNG CJX-2000FW+XXXX, where XXXX is a number)
is selected.
4 In the Copies & Pages drop-down list, select Paper Handling.
5 In the Pages to Print drop-down list, select Odd Only.
6 In the Page Order drop-down list, select Reverse.
EN
27
Basic Functions
7 Click Print.
8 When the odd pages have finished printing, remove them from the output tray.
9 Turn the printed pages over, and place into the input tray (top edge down and
printed side away from you).
10 Select File > Print.
11 In the Copies & Pages drop-down list, select Paper Handling.
12 In the Pages to Print drop-down list, select Even Only.
13 In the Page Order drop-down list, select Normal.
14 Click Print.
Printing pictures
You can print pictures with your all-in-one printer from:
■■ A memory card inserted into a memory card slot
■■ A storage device (such as a flash drive)
You can also print pictures using Print Manager Software from your computer with
WINDOWS OS. Print Manager Software lets you edit and enhance your pictures quickly.
Open Print Manager Software, select Print Pictures, then follow the on-screen instructions.
On a computer with either MAC OS or WINDOWS OS, you can print pictures from any
picture-editing or photo-management software.
28
EN
Basic Functions
Viewing pictures on a memory card
When you insert a memory card into the memory card slot on your printer, the pictures on
the card appear on the LCD. Press or to scroll through the pictures.
If the printer is idle for more than two minutes, the LCD will revert to the status display.
To view the pictures again, press any button, then press or .
Finding pictures on a memory card
Your printer can help you locate pictures on a memory card by the date the picture was
taken or last saved.
To locate pictures:
1
2
3
4
5
Insert the memory card into the memory card slot.
Press Menu.
Press
to select View / Print Photos, then press OK.
Press
to select Find Photos, then press OK.
In the View by Date menu, press
to select Year, Month, or Day; press or to
select the specific year, month, or day.
The number of photos found for the date you specified appears under the menu
name. To view these pictures, press OK.
6 To view these pictures, press OK.
EN
29
Basic Functions
Printing pictures from a memory card
Your printer accepts the following memory cards:
■■
■■
■■
■■
■■
SD Card
SDHC Card
MMC Card
MEMORY STICK
Variations of the memory cards above that require an adapter (for example,
MEMORY STICK Duo, miniSD, and microSD)
IMPORTANT: If you use a memory card with an adapter, make sure you insert and
remove the adapter and the memory card as a unit; do not remove the
memory card while leaving the adapter in the printer.
memory card slot
30
EN
Basic Functions
Using default settings to print a picture
Unless you change the default settings, the default for printing pictures is one 4 x 6 in. /
10 x 15 cm picture.
To print a picture from a memory card.
1 Insert the memory card into the appropriate slot.
memory card slot
2 Press or to select the picture you want to print.
3 Press Start Black to print a black-and-white picture, or Start Color to print a color
picture.
The printer prints a single 4 x 6 in. / 10 x 15 cm picture.
IMPORTANT: To prevent loss of data from your memory card, do not remove it from the
printer while printing.
EN
31
Basic Functions
Changing the settings and printing pictures
You can change the print photos options for an individual picture or group of pictures, or
you can change the settings and save them as the default.
To print a picture or pictures using settings other than the default settings:
1 Load photo paper with the glossy side toward you (see Loading photo paper, page 11),
and move the paper-edge guides until they touch the paper.
2 Insert the memory card into the memory card slot. A picture appears on the LCD.
memory card slot
3
4
5
6
32
Press or to select the picture you want to print, then press OK.
Repeat step 3 for each picture you want to print.
Press Back for Print Photos Options.
Press
to select an option (see table below), then press or to change the
setting.
EN
Basic Functions
Print Photos Option
Settings
Description
View Photos
--
Scroll through the pictures on the
memory card; press OK to select
the picture for printing; press Back
to display the Print Photos Options
menu.
Find Photos
--
Press OK, then select a year, month,
and/or day to view photos by date
that they were taken; press OK to
view the photo(s); press Back to
display the Print Photos Options
menu.
Transfer All to PC
--
To transfer all the pictures on the
memory card to your computer,
press OK then press Start Black
or Start Color. (It does not matter
which Start button you press, but
your printer and computer must be
connected with a USB cable.)
Quantity
1 (default) to 99
The number of copies that print.
EN
33
Basic Functions
Print Photos Option
Print Size
Settings
2x3
3.5 x 5
4 x 6 (default)
Description
If the selected copy size is smaller
than the paper in the paper tray, the
printer automatically arranges the
pictures to best fit the paper size.
4x7
4x8
5x7
4 x 12
8 x 10
8.5 x 11 or A4
Plain Paper Quality
Photo Paper Quality
34
EN
Normal (default)
Good quality output; prints faster
than Best.
Best
The highest quality, but the slowest
print speed.
Draft
The fastest print speed, but the
lowest quality.
Auto. (default)
The printer detects photo paper in
the paper tray and sets Best quality
automatically.
Basic Functions
Print Photos Option
Scene Balance
Settings
On (default)
Off
Add Date to Prints
No (default)
Yes
Save as Defaults
No / Yes
Description
Adjusts the image brightness to
correct for underexposure and
reduces the variation in contrast in
different areas of the picture.
Prints the date of the picture(s) (the
date the picture was taken or last
edited) in a corner of the print.
To save the settings as the new
default, press OK. With Yes
selected, press OK.
NOTE: You can also adjust the print photo options using the Online Printer Management
Tool. When viewing the tool in your browser, select the Settings tab, then select
Copy & Print > Print Photo.
7 When you have finished changing settings, press Start Black to print a black-andwhite picture, or Start Color to print a color picture.
IMPORTANT: To prevent loss of data from your memory card, camera, or portable drive,
do not remove it from the printer while printing.
EN
35
Basic Functions
Printing panoramic pictures
To print a panoramic picture, load 4 x 12 in. / 10 x 31 cm paper, or US letter or A4 paper
in the main paper tray.
1 Insert the memory card into the memory card slot.
memory card slot
2
3
4
5
Press or to select the panoramic picture you want to print, then press OK.
Press Back for Print Photos Options.
Press
to select Print Size, then press to select 4 x 12.
Press Start Black to print a black-and-white picture, or Start Color to print a color
picture.
IMPORTANT: To prevent loss of data from your memory card, do not remove it from the
printer while printing.
36
EN
Basic Functions
Printing tagged pictures
Some digital cameras let you tag (or “mark”) pictures on the memory card for printing.
This creates a tag that is recognized by the printer. If you choose to print tagged pictures,
they will be printed according to the default settings on your printer (unless otherwise
specified by the tag from the camera).
NOTE: Refer to your camera user guide to determine whether your camera supports
tagged (also “marked” or “DPOF”) functionality.
To print tagged pictures:
1 Insert the memory card into the memory card slot.
memory card slot
2 When the “Print tagged images?” message appears, press Start Black to print a
black-and-white picture, or Start Color to print a color picture.
EN
37
Basic Functions
Copying
IMPORTANT: Do not load photographs, cards, or any paper stock heavier than
24 lb / 90 gsm in the ADF.
You can copy documents and photographs with your all-in-one printer. The printer
produces high-quality color or black-and-white copies on a variety of paper types
(see Paper types, page 8).
Loading originals for copying
To copy documents (up to 30 pages) on plain paper, load the original(s) in the automatic
document feeder (ADF).
To copy a photograph, documents on thick paper, or a document that is too small or too
large to fit in the ADF, place the original on the scanner glass. (The ADF accepts originals
from 6.9 x 9.8 in. / 18 x 25 cm to 8.5 x 14 in. / 22 x 36 cm.)
For more information on loading originals, see Loading originals, page 84.
Copying a document
You can copy a document using the default settings, or you can adjust the quantity, size,
quality, and brightness of your copies.
Using the default settings to copy a document
The default settings are either the factory default settings (see Resetting factory defaults,
page 103), or defaults that you have set on the printer (see Save as Defaults, page 35).
To copy a document using the current default settings:
38
EN
Basic Functions
1 Place the original document in the ADF or on the scanner glass.
2 Press Copy.
3 Press Start Black to make a black-and-white copy, or press Start Color to make a
color copy.
NOTE: If you load the original document in the ADF, the ADF automatically feeds the
document into the printer when you begin copying.
Adjusting the settings and copying a document
To copy a document using settings other than the default settings:
1 Place the original document in the ADF or on the scanner glass.
2 Press Copy.
The Copy Document Options menu appears on the LCD.
to select an option, then press or to change the setting.
3 Press
Copy Document
Option
Quantity
Settings
1 (default) to 99
Description
The number of copies that print.
EN
39
Basic Functions
Copy Document
Option
Copy Size
Plain Paper Quality
40
EN
Settings
Description
Same Size
(default)
The copy is the same size as the
original.
Fit to Page
The printer detects the size of the
original on the scanner glass and
the size of the paper in the paper
tray, and automatically reduces or
enlarges the original so that the
copy fits on the paper.
20% to 500%
Reduces down to 20% or enlarges
up to 500% of the original size.
Normal (default)
Good quality output; prints faster
than Best.
Best
The highest quality, but the slowest
print speed; eliminates the banding
effect that sometimes occurs when
printing Draft or Normal.
Draft
The fastest print speed, but the
lowest quality.
Basic Functions
Copy Document
Option
Settings
Description
Photo Paper Quality
Auto. (default)
The printer detects photo paper in
the paper tray and sets Best quality
automatically.
Brightness
Normal, -3 to
+3 (Normal is
default)
Lightens or darkens the copy.
Normal is no change from the
original; -3 is the darkest; +3 is the
lightest.
Save as Defaults
No / Yes
To save the settings as the new
default, press OK. With Yes
selected, press OK.
4 Press Start Black to make a black-and-white copy, or press Start Color to make a
color copy.
EN
41
Basic Functions
Changing the number of copies of a document
To change the number of copies:
1 Place the original document in the automatic document feeder (ADF) or on the
scanner glass.
2 Press Copy.
The Copy Document Options menu appears on the LCD.
3 Make sure Quantity is selected.
4 Press or to select a number, or use the numeric keypad to enter the number of
copies.
5 Press Start Black to make black-and-white copies, or press Start Color to make
color copies.
Enlarging or reducing a document
To enlarge or reduce the size of the copy:
1 Place the original document in the automatic document feeder (ADF) or on the
scanner glass.
2 Press Copy.
The Copy Document Options menu appears on the LCD.
3 Press to select Copy Size.
4 Press or to select an enlargement or reduction.
5 Press Start Black to make black-and-white copies, or press Start Color to make
color copies.
42
EN
Basic Functions
Darkening or lightening a copy
To darken or lighten the copy:
1 Place the original document in the automatic document feeder (ADF) or on the
scanner glass.
2 Press Copy.
The Copy Document Options menu appears on the LCD.
3 Press
to select Brightness.
4 Press to select a number below zero for a darker copy, or press to select a
number above zero for a lighter copy.
5 Press Start Black to make a black-and-white copy, or press Start Color to make a
color copy.
EN
43
Basic Functions
Copying a photograph
You can copy a photograph using the default settings, or you can adjust the quantity,
size, quality, and brightness of your copies.
Using the default settings to copy a photograph
The default settings are either the factory default settings (see Resetting factory defaults,
page 103), or defaults that you have set on the printer (see Save as Defaults, page 35).
To copy a photograph using the current default settings:
1 Place the original photograph face down on the scanner glass.
IMPORTANT: Do not load photographs in the automatic document feeder (ADF).
2 Press Menu.
3 Press
to select Copy Photo.
4 Press Start Black to make a black-and-white copy, or press Start Color to make a
color copy.
Adjusting the settings and copying a photograph
To copy a photograph using settings other than the default settings:
1 1. Place the original photograph face down on the scanner glass.
IMPORTANT: Do not load photographs in the automatic document feeder (ADF).
2 Press Menu.
3 Press
to select Copy Photo, then press OK.
4 Press
to select an option, then press or to change the setting.
44
EN
Basic Functions
Copy Photo Option
Settings
Description
Quantity
1 (default) to 99
The number of copies that print.
Copy Size
2x3
The printer enlarges or reduces the
original to make it the copy size you
select.
3.5 x 5
4 x 6 (default)
4x7
4x8
5x7
If the selected copy size is smaller
than the paper in the paper tray, the
printer automatically arranges the
pictures to best fit the paper size.
4 x 12
8 x 10
8.5 x 11 or A4
Plain Paper Quality
Normal (default)
Good quality output; prints faster
than Best.
Best
The highest quality, but the slowest
print speed; eliminates the banding
effect that sometimes occurs when
printing Draft or Normal.
Draft
The fastest print speed, but the
lowest quality.
EN
45
Basic Functions
Copy Photo Option
Settings
Description
Photo Paper Quality
Auto. (default)
The printer detects photo paper in
the paper tray and sets Best quality
automatically.
Brightness
Normal, -3 to
+3 (Normal is
default)
Lightens or darkens the copy.
Normal is no change from the
original; -3 is the darkest; +3 is the
lightest.
Preview
No (default)
To see a preview of the photograph
on the LCD, select Yes.
Yes
Save as Defaults
No / Yes
To save the settings as the new
default, press OK. With Yes
selected, press OK.
5 Press Start Black to make a black-and-white copy, or press Start Color to make a
color copy.
46
EN
Basic Functions
Changing the number of copies of a photograph
To change the number of copies:
1
2
3
4
5
Place the original photograph face down on the scanner glass.
Press Menu.
Press
to select Copy Photo, then press OK.
Make sure Quantity is selected.
Press or to select a number, or use the numeric keypad to enter the number of
copies.
6 Press Start Black to make black-and-white copies, or press Start Color to make
color copies.
Enlarging or reducing a photograph
To enlarge or reduce the size of the copy:
1
2
3
4
5
6
Place the original photograph face down on the scanner glass.
Press Menu.
Press
to select Copy Photo, then press OK.
Press
to select Copy Size.
Press or to select the copy size.
Press Start Black to make black-and-white copies, or press Start Color to make
color copies.
EN
47
Basic Functions
Darkening or lightening a photograph
To darken or lighten the copy:
1
2
3
4
5
Place the original photograph face down on the scanner glass.
Press Menu.
Press
to select Copy Photo, then press OK.
Press
to select Brightness.
Press to select a number below zero for a darker copy, or press to select a
number above zero for a lighter copy.
6 Press Start Black to make black-and-white copies, or press Start Color to make
color copies.
48
EN
Basic Functions
Scanning
IMPORTANT: Do not load photographs, cards, or any paper stock heavier than
24 lb / 90 gsm in the ADF.
Scanning digitizes documents and pictures, and sends the digital files to your computer.
When you scan, the digital file can:
■■ Open in Print Manager Software (when connected to a computer with WINDOWS OS)
■■ Open in a third-party scanner software
■■ Be saved in a format and location that you determine (see Changing the scan
settings for scanning from the control panel, page 50).
Scanning from a software program on the computer (such as Print Manager Software)
gives you more options, but you can also scan from the printer control panel.
Before you begin scanning
Make sure that the printer is connected to a computer using a USB cable or wireless
network (see Chapter 2, Networking Your Printer, page 13).
If you want to scan to an email address or to a shared network folder, you need to set up
profiles using the Online Printer Management Tool (see Adding a profile and address book
for Scan To Email, page 54 and Adding a profile for Scan To Network Folder, page 57).
EN
49
Basic Functions
Changing the scan settings for scanning from the control panel
Adjust the scan settings that the printer uses before you scan from the printer control
panel.
NOTE: The settings in the Print Manager Software only apply when Scanning to
Computer, Scanning to Memory Card, from the printer control panel.
1 Open the Printer Tools window.
■■ On a computer with WINDOWS OS, select Start > All Programs > Samsung >
Samsung AiO Printer Tools.
■■ On a computer with MAC OS, open Print Manager Software, then select the
Tools tab.
2 Under the Tools heading, select Printer Scan Settings.
3 Adjust settings for scanning documents and pictures:
a To select a program that scanned images or documents will appear in when you
scan from the printer control panel:
(1) Select the General tab.
(2) Under the Program List heading, click
next to the currently selected
program.
(3) From the drop-down list, select the program in which you want the scanned
files to open.
50
EN
Basic Functions
b To adjust settings for scanning documents, select the Document tab, then select
an option for each setting:
Setting
Options
File format
.pdf
.rtf (available only when connected to a computer
with WINDOWS OS)
.tif
.jpg
.bmp (available only when connected to a
computer with MAC OS)
Resolution (dpi)
75
150
200
300
File Save
Prompt for File Name and Location
Automatically Save - specify:
■■Base name; by default, scanned files are
names “scan1”, “scan2”, and so on.
■■Location (folder) where the scanned files will
be saved
EN
51
Basic Functions
c To adjust settings for scanning pictures, select the Picture tab, then select an
option for each setting:
Setting
Options
File format
.jpg
.bmp
.tif
Resolution (dpi)
75
150
200
300
600
Quality
When connected to a computer with WINDOWS
OS:
■■Best for E-mail
■■Normal
■■High
■■Maximum
52
EN
Basic Functions
Setting
Options
Quality
When connected to a computer with MAC OS, a
slider bar with:
■■Least
■■Medium
■■Best
When selected, multiple pictures placed on the
Automatically Detect
Pictures (when connected scanner glass are saved as separate files.
to a computer with
WINDOWS OS) or Auto
Crop (when connected to
a computer with MAC OS)
File Save
Prompt for File Name and Location
Automatically Save - specify:
■■Base name; by default, scanned files are
names “scan1”, “scan2”, and so on.
■■Location (folder) where the scanned files will
be saved
NOTE: Before you save a scanned file, you will be able to preview it in Print Manager
Software, crop and sharpen the image, and adjust color, if desired. On a computer
with WINDOWS OS, see the Print Manager Software Help (? icon) for instructions.
4 When you are finished making selections, click OK on the bottom right of the Printer
Scan Settings window.
EN
53
Basic Functions
5 Close the Printer Tools window.
Adding a profile and address book for Scan To Email
You can send one or more scans directly to an email recipient from the printer, but first
you need to set up a profile for yourself and define one or more email addresses.
1
2
3
4
54
Open the Online Printer Management Tool in a browser.
Select the Settings tab, then click Scan To Email > Email Profile.
Click Add New Outgoing Email Profile.
In the Profile Name field, type a name that has meaning to you; for example, your
initials and location, such as AZ Room 4.
This name will appear on the control panel for you to select when initiating a scan to
be sent through email.
EN
Basic Functions
5 For From Email Address, type your email address.
Although the email will be sent from the printer, any replies will go to your Inbox.
6 Enter your server information. This information can be obtained from the email
account properties fields in your email client application (Outlook Express, Outlook,
Eudora, etc) or directly from your ISP.
a In the SMTP Server field, type the address of your mail server.
b In the SMTP Port Number, type the port number of your mail server.
c Select the Always use a secure connection... check box.
EN
55
Basic Functions
7 If your SMTP server requires authentication when you connect from your email client
application:
a Select the The email server requires authentication for outgoing email
check box.
b Type the User ID and Password.
8 If you want to control who is able to use your profile for sending a scan using your
email account:
a Select the Enable Access Pin check box.
b Type a 4-digit numeric PIN (your choice). You will need to enter this PIN each
time you access your profile when scanning to an email address.
9 Click Test Profile to have the printer confirm that it can access your account on the
SMTP server.
10 Enter email addresses of people to whom you want to send scans by email.
a Click the Address Book selection in the menu to the left.
b For each person:
(1) Type the person’s Name.
(2) Type the person’s Email Address.
(3) Click Add.
56
EN
Basic Functions
You are now ready to send a scan to an email address from the printer control panel.
Adding a profile for Scan To Network Folder
You can scan documents or photos directly to a file in a shared folder on your network.
This saves time and allows you to keep a permanent record.
To add a network folder profile on your printer’s control panel, you first need to identify
or create a network shared folder on a computer connected to the same network as your
printer. Note the network name of the folder, including the path information, and the
name of the computer where it is located.
To learn more about sharing folders, see the information in the links below.
EN
57
Basic Functions
■■ For computers with WINDOWS XP OS, see
www.microsoft.com/windowsxp/using/networking/maintain/share.mspx
■■ For computers with WINDOWS VISTA OS, see
technet.microsoft.com/en-us/library/bb727037.aspx
■■ For computers with WINDOWS 7 OS, see
windows.microsoft.com/en-US/windows7/File-sharing-essentials
■■ For computers with MAC OS 10.5 or later, see support.apple.com/kb/ht1549
1 Open the Online Printer Management Tool in a browser.
2 Select the Settings tab, then click Scan to Network Folder > Network Folder
Profile.
3 Click Add New Network Folder Profile.
58
EN
Basic Functions
4 Type a Profile Name and a Folder Path.
5 If the computer where the folder is located requires authentication to access its
shared folders, type the network login User Name and Password.
6 If you want to control who is able to use your profile to scan documents to your
network folder, select the Enable Access PIN check box and type a 4-digit numeric
PIN.
7 Click Test Profile to have the printer confirm that it can access the network folder.
You are now ready to scan a document or photo to your network folder from the printer
control panel.
EN
59
Basic Functions
Loading originals for scanning
To scan documents on plain paper, load the original(s) in the automatic document feeder (ADF).
To scan a photograph, documents on thick paper, or a document that is too small or too
large to fit in the ADF, place the original on the scanner glass. (The ADF accepts originals
from 6.9 x 9.8 in. / 18 x 25 cm to 8.5 x 14 in. / 22 x 36 cm.)
Scanning from the computer
To scan a document or a picture on a computer:
1 Load the original.
2 Open Print Manager Software.
■■ On a computer with WINDOWS OS, double-click Scan Documents and
Pictures, then follow the on-screen instructions.
■■ On a computer with MAC OS and Print Manager Software, select the Tools tab,
click Scan Application, then follow the on-screen instructions.
NOTE: If you are not using Print Manager Software, open a program that allows you to
scan, then follow the instructions.
Scanning multiple pictures simultaneously
Using Print Manager Software, you can scan multiple pictures simultaneously and save
them as separate files.
When scanning multiple pictures, leave space between the pictures so that the printer
can detect the separate pictures. Any pictures that overlap are interpreted as a single
picture.
60
EN
Basic Functions
Scanning multiple pictures when connected to a computer with WINDOWS OS
To scan multiple pictures simultaneously, and save them as separate files:
1 Lift the scanner lid, and place the pictures face down on the glass, leaving space
between the pictures.
2 Close the lid.
3 Open Print Manager Software, then double-click Scan Documents and Pictures.
4 Make sure that Picture is selected and Collage - Combine all pictures is cleared,
then follow the on-screen instructions.
NOTE: Click the Help icon for additional instructions.
Scanning multiple pictures when connected to a computer with MAC OS
To scan multiple pictures simultaneously, and save them as separate files:
1 Lift the scanner lid, and place the pictures face down on the glass, leaving space
between the pictures.
Close the lid.
Open Print Manager Software, then select your printer.
Select the Tools tab.
Click Scan Application.
Select Color Picture or Black and White Picture.
Select Automatically detect multiple pictures, if it is not selected.
Click Preview or Scan All, then follow the on-screen instructions.
NOTE: Click the Help icon for additional instructions.
2
3
4
5
6
7
8
EN
61
Basic Functions
Scanning from the control panel
To scan a document or picture(s) from the control panel:
1 Load the original.
2 Press Scan.
The Scan Menu appears on the LCD with the following options:
■■ Scan to Computer - used to scan to a file or application on your computer
■■ Scan to Memory Card - used to scan to a memory card
■■ Scan to Email - used to scan to an email address
■■ Scan to Network Folder - used to scan to a shared network folder on another
computer
3 Press
to select an option, then press or to change the setting.
62
EN
Basic Functions
Scan Option
Scan To
Settings
Description
USB computer
(default)
The scanned file is sent to the
USB-connected computer.
Name of
computer (only
if a computer
is connected
by wireless
network)
The scanned file is sent to the
computer on the wireless or
Ethernet network.
Memory Card
The scanned file is sent to the
memory card in the memory card
slot
Email
The scanned file is sent to an email
address that you select from the
Email Profile you set up in the
Online Printer Management Tool
(see Adding a profile and address
book for Scan To Email, page 54).
Network Folder
The scanned file is sent to a shared
folder that you designated in the
Online Printer Management Tool
(see Adding a profile for Scan To
Network Folder, page 57).
EN
63
Basic Functions
Scan Option
Scan What
Destination
Save as Defaults
Settings
Description
Document
(default)
Sets the scan settings for scanning
a document (see Changing the
scan settings for scanning from the
control panel, page 50).
Photo
Sets the scan settings for scanning
a photograph (see Changing the
scan settings for scanning from the
control panel, page 50).
File (default)
Sends the scanned file in the format
and to the destination on your
computer that you designate (see
Changing the scan settings for
scanning from the control panel,
page 50).
Application
Sends the scanned file to Print
Manager Software.
No / Yes
To save the settings as the new
default, press OK. With Yes
selected, press OK.
4 Press Start Black to make a black-and-white scan, or press Start Color to make a
color scan.
The scanned file appears at the destination you specified.
64
EN
Basic Functions
Scanning from the Online Printer Management Tool
You can scan from the printer using the Online Printer Management Tool without having
any drivers installed.
1 When viewing the Online Printer Management Tool in a browser, select the Applica2
3
4
5
tions tab, then click Applications > Webscan.
Select the type of scan you want, and place the original on the scanner glass.
Click Preview to see what will be scanned.
■■ If needed, click Clear to reposition the image.
When you are satisfied with the image, click Scan to capture the image. It will
display in a new browser window.
In the new browser window, select File > Save As to save the image as a JPEG file
on your computer.
EN
65
Basic Functions
Faxing
Before you begin faxing
Before you can send or receive faxes, you must connect your printer and set up the fax
options on the printer.
Connecting the printer for faxing
Selecting the country/region
For the fax to work properly, the country or region selected on the printer must match
your location. This setting determines how your faxes are sent and received.
To set the correct country or region:
1
2
3
4
Press Menu.
Press
to select Printer Settings, then press OK.
Press
to select Country/Region, then press OK.
Press
to select your country or region, then press OK.
Determining your telephone system type
The instructions for setting up your printer for faxing differ depending on the type of
telephone service you have. Determine the type of telephone service you have, and
connect your printer accordingly.
IMPORTANT: Use the phone cord that was provided with the printer. If you use any
other phone cord, you may not be able to send or receive faxes successfully.
66
EN
Basic Functions
■■ Standard telephone service — telephone service that uses dedicated telephone
wiring to transmit only phone signals
■■ Cable telephone service — telephone service that is delivered by a cable television
service
■■ Digital Subscriber Line (DSL) — telephone service that uses the wires of a local
telephone network to transmit digital data over
cables
■■ Internet telephone service (Voice-Over-Internet-Protocol or VOIP) —
telephone service delivered by an Internet provider
Connecting the printer to a Standard or Cable telephone service
If you have Standard or Cable telephone service, connect one end of the phone cord that
came with the printer into the LINE IN port on the back of the printer and the other end
into the wall phone jack.
EN
67
Basic Functions
Connecting the printer to a Digital Subscriber Line (DSL)
If you have DSL telephone service, connect one end of the phone cord that came with the
printer into the LINE IN port on the back of the printer and the other end into the DSL
filter (available from your DSL provider), which is connected to the wall phone jack.
NOTE: You must use a DSL filter to transmit fax signals properly to your printer.
DSL Filter
68
EN
Basic Functions
Connecting to Internet telephone service (Voice-Over-Internet Protocol or VOIP)
If you have Internet telephone service, you should already have a cable modem/
router connected to the cable outlet with a coaxial cable. You will also need an Analog
Telephone Adapter (ATA) to connect your printer for faxing.
NOTE: Sometimes the cable modem/router has a built-in ATA. Contact your cable
telephone service provider for more information.
1 Connect an RJ-45 (also called CAT 5) cable from the cable modem/router to the
WAN port on the Analog Telephone Adapter (ATA).
2 Connect one end of the phone cord that came with the printer (RJ-11 telephone
cord) to one of the phone input ports on the ATA and the other end to the LINE IN
port on the back of your printer.
Cable
modem/router
Cable outlet
Analog Telephone
Adapter (ATA)
Coaxial cable
RJ-45 cable
(CAT 5 cable)
RJ-11telephone cord
EN
69
Basic Functions
Determining whether your phone line is dedicated or shared
To connect your printer for faxing correctly, you need to determine whether your phone
line is shared or dedicated
■■ A dedicated phone line is one that has only this printer and no other devices
connected to it. If you have a dedicated line, connect your printer as described
for your type of phone service (see Connecting the printer to a Standard or Cable
telephone service, page 67, Connecting the printer to a Digital Subscriber Line
(DSL), page 68, or Connecting to Internet telephone service (Voice-Over-Internet
Protocol or VOIP), page 69).
■■ A shared phone line is one that has several devices connected to it, such as a phone
and/or answering machine as well as the printer. If you have a shared line, connect
your printer in one of the following ways, based on the devices you have connected
to the same phone line.
If you share the line with an answering machine or telephone:
1 Connect one end of the phone cord that came with the printer into the LINE IN port
on the back of the printer.
2 Connect the other end of the phone cord into either a wall phone jack or a DSL filter,
depending on the type of telephone service you use.
3 Connect one end of the phone cord for your answering machine into the LINE EX
port on the back of the printer.
70
EN
Basic Functions
4 Connect the other end of the phone cord into the answering machine or telephone.
NOTE: If you have an answering machine, set the number of rings to answer on the
printer to a higher number than the rings to answer for the answering machine.
(see Rings to Answer, page 74)
Configuration for connecting an answering
machine with a standard telephone service
Phone with
answering machine
If you have an answering service:
If you have an answering service that uses a computerized system for recording messages
remotely for the same phone line that you use for your all-in-one printer, then you can set
up a distinctive ring to receive faxes automatically (see Distinctive Ring, page 76).
If you do not set up a distinctive ring, you can still receive faxes manually (see Receiving
a fax manually, page 87).
EN
71
Basic Functions
Entering fax sender information
Fax sender information is the name, fax, and phone number that appear in the header
of any fax that you send from your all-in-one printer. Typically this is your name or your
business name, your fax number, and your phone number.
NOTE: If you do not enter fax sender information, the header on faxes that you send will
be blank.
To enter fax sender information:
1
2
3
4
Press Menu.
Press
to select Fax Settings, then press OK
With Fax Sender Information highlighted, press OK.
Use the numeric keypad on the control panel to enter:
■■ your name or business name
■■ your fax number
■■ your phone number
(see Using the numeric keypad on the control panel to enter text, page 82)
5 When you are finished entering information in a field, press
. to move to the
next field.
6 Press OK to save the information.
72
EN
Basic Functions
Setting fax options
Before sending or receiving faxes, set up the fax options.
To set up fax options from the control panel:
1 Press Menu.
2 Press
to select Fax Settings, then press OK.
3 Press
to select an option, then press or to change the setting.
Fax Option
Fax Sender Information
Settings
--
Description
This information appears on the
faxes you send.
Press OK, then enter the fax sender
name (your name), your fax number,
and your phone number; press OK
to save (see Using the numeric
keypad on the control panel to enter
text, page 82).
EN
73
Basic Functions
Fax Option
Rings to Answer
Settings
1 to 6
(default is 4)
Description
The number of times that your
phone will ring before the printer
picks up the call.
If you use a dedicated phone line for
your printer, set the Rings to Answer
to any setting. If the printer shares
the phone line with an answering
machine, set the Rings to Answer to
a higher number (5 or 6) than the
rings to answer for the answering
machine (typically 4 rings). This
allows the answering machine to
pick up phone calls. The printer will
monitor the line after the answering
machine picks up, and, if set to Auto
Answer, will detect an incoming fax
and receive it.
Redial if No Answer
Yes (default)
/ No
If the number you call is busy, the
printer will redial the number once
automatically.
Busy Redial Attempts
0 to 12
(default is 5)
The number of times that the
fax will attempt to redial a busy
number.
74
EN
Basic Functions
Fax Option
Settings
Disable Call Waiting
No (default) /
Yes
Description
Yes If you have call-waiting service
on your phone line, you can disable
it so that an incoming call does not
interrupt your fax transmission.
Select Yes to disable call waiting,
then enter the call waiting disable
code (below).
Call Waiting Disable
Code
*70 (default)
The printer automatically dials the
call waiting disable code before
dialing the number to which you
are sending a fax. This code disables
call waiting for the duration of the
fax, preventing incoming calls from
interrupting your fax transmission.
The usual code to disable call
waiting is the default *70. If the call
waiting disable code is different in
your area, press OK, then press
to erase the current code. Use the
keypad to enter the correct code,
then press OK.
NOTE: You must enable call waiting
manually after your fax
transmission.
EN
75
Basic Functions
Fax Option
Distinctive Ring
Settings
Any ring
(default) / Single
Ring / Double
Ring / Triple Ring
Description
This service, available from most
phone companies, adds multiple
phone numbers to one phone line.
Each phone number then has a
distinctive ring pattern (single,
double, or triple ring) to let you
know which number is ringing.
Select the ring pattern assigned to
the phone number for the printer
so the printer can receive faxes
automatically.
Fax Speaker
On (default) / Off
The fax speaker allows you to hear
the dial tone and initial fax tones
when sending faxes.
Print Fax Confirmation
Page
Never (default)
/ Always / After
Failure Only
The Fax Confirmation Page contains
the time and date, the number you
called, the number you called from,
and whether the transmission was
successful.
76
EN
Basic Functions
Fax Option
Settings
Description
Print Fax Settings
--
To print the current fax settings,
press OK. Load letter or A4 paper,
then press Start Black or Start
Color.
Print Fax Cover Page
--
The Fax Cover Page shows the date
and headings for To and From information for your fax. Use this cover
page, if needed, when sending your
fax.
To print a Fax Cover Page, press OK.
Load letter or A4 paper, then press
Start Black or Start Color. (The Fax
Cover Page is black and white.)
Print Fax Activity Log
--
The Fax Activity Log contains
information (date, time, duration, to/
from, number of pages, and more)
about the last 30 faxes sent and/or
received.
To print a Fax Activity Log, press
OK. Load letter or A4 paper, then
press Start Black or Start Color.
EN
77
Basic Functions
Fax Option
Dialing Mode
Settings
Tone (default) /
Pulse
Description
Determines how the printer dials a
fax number.
Tone dialing (the more common
method) uses tones to dial a phone
number. It is faster and more
reliable than pulse dialing, which
uses a series of pulses to dial a
phone number.
Traditionally, pulse dialing was used
by rotary phones; tone dialing is
used by touch-tone phones.
Error Correction
On (default) / Off
Error correction is applied only when
sending black-and-white faxes. It
reduces the loss of data, which can
occur on poor phone lines.
Error correction increases the send
time on poor phone lines, but the
transmission is much more reliable.
(Error correction does not apply to
faxes being received.)
To adjust fax settings from the Online Printer Management Tool:
1 Open the Online Printer Management Tool in a browser.
78
EN
Basic Functions
2 Select the Settings tab, then click Fax > Settings.
3 Change the Sender Information and/or fax Settings as needed.
4 Click Save to update the settings on the printer.
Setting the answer mode (auto answer or manual)
The default setting is for Auto Answer to be on. When Auto Answer is on, the printer
picks up all incoming faxes automatically. The green Auto Answer LED is lit when Auto
Answer is on.
To answer calls manually, turn off Auto Answer by pressing the Auto Answer button so
that the green LED is off. (see Receiving a fax manually, page 87)
Working with the phonebook
You can enter up to 60 fax numbers in the phonebook.
You can create and manage the phonebook from the printer LCD, or if connected to a
computer with WINDOWS OS, you can use Print Manager Software.
You can also use the Online Printer Management Tool to edit the Fax Phone Book.
Using symbols in phonebook entries
The following symbols are used in phonebook entries:
Symbol
0-9
Description
Response by fax
Response by fax Dials number
0-9
EN
79
Basic Functions
Symbol
Description
Response by fax
*
star
Used for special features (for example, *70 is used to
deactivate call waiting)
,
comma
Causes a 2-second delay before dialing the
remaining numbers
#
pound
Used for special features (for example, # at the end
of a number signifies the completion of the number
sequence)
Adding a new phonebook entry
To add a new phonebooK entry:
1
2
3
4
5
6
7
Press PhonebooK.
Make sure Edit PhonebooK is selected, then press OK.
Make sure Add New Entry is selected, then press OK.
Make sure Number is selected, then press OK.
Use the numeric keypad on the control panel to enter a fax number, then press OK.
With Name selected, press OK.
Enter a name using the numeric keypad (see Using the numeric keypad on the
control panel to enter text, page 82).
8 When you are finished entering a name, press OK.
80
EN
Basic Functions
9 Optional: Assign a Quick Dial number.
Set up your ten most frequently used fax numbers as Quick Dial numbers. You will be
able to dial them quickly, and they will be displayed at the top of your phoneboOK.
a Press
to select Quick Dial, then press OK.
b Using the numeric keypad on the control panel, enter a number from 0 to 9, then
press OK.
10 Press
to select DONE, then press OK.
Editing a phonebook entry
To edit a phonebook entry:
1
2
3
4
5
6
Press Phonebook.
Make sure Edit Phonebook is selected, then press OK.
Press
to select Edit Entry, then press OK.
Press
to select the entry you want to edit, then press OK.
Press
to select the field you want to edit, then press OK.
Use the or the numeric keypad (see Using the numeric keypad on the control panel
to enter text, page 82) to make your change(s).
7 Press
to select DONE, then press OK.
Deleting a phonebook entry
To delete a phonebook entry:
1 Press Phonebook.
2 Make sure Edit Phonebook is selected, then press OK.
EN
81
Basic Functions
3 Press
4 Press
to select Delete Entry, then press OK.
to select the entry you want to delete, then press OK.
NOTE: If you do not want to delete the entry, press Cancel.
5 To delete the entry, press OK.
The entry is deleted from the phonebook.
6 Repeat steps 4 – 5 to delete more entries; when you are finished, press Back or
Cancel.
Using the numeric keypad on the control panel to enter text
The number keys on the numeric keypad represent a number and several characters. For
example, the number 2 key also represents the letters A, B, C and a, b, and c. You must
press the 2 key multiple times to enter a corresponding letter. For example, to enter the
letter “B” as the first letter of a name, press the 2 key two times; to enter the small letter
“b” at the beginning of a name, press the 2 key five times. If the small letter “b” is not at
the beginning of a name or word, press the 2 key two times.
If you need to use the same key for more than one letter in a row (for example, to type
“Cab”), you need to pause between letters. To type “Cab”, press the 2 key three times
to enter “C”, then pause 10 seconds; press the 2 key once to enter “a”, then pause 10
seconds; and press the 2 key two times to enter “b”.
Note that the Symbols (*) key and the Space (#) key also cycle through several different
symbols when you press the key multiple times.
To make a correction to your entry, press
erase the rightmost character.
82
EN
(navigation button) on the control panel to
Basic Functions
Using the Online Printer Management Tool to edit the Fax Phone Book
1
2
3
4
5
6
7
Open the Online Printer Management Tool in a browser.
Select the Settings tab, then click Fax > Phonebook.
For each entry, type a Name and Fax number. Select a Quick Dial as needed.
Click Add to update the printer.
Select the check box for an existing entry in the Phone Book.
Edit or delete the entry as needed.
Click Save to update the printer.
Preparing a fax for transmission
Before you send a fax, prepare a cover page (if needed), load the original(s), and change
the resolution and brightness (if needed).
Printing a fax cover page
If you need a fax cover page, you can print one with your printer, then manually complete
the information (person to whom you are sending, fax number, your name, etc).
To print a fax cover page:
1
2
3
4
Press Menu.
Press
to select Fax Settings, then press OK.
Press
to select Print Fax Cover page, then press OK.
Load letter or A4 paper, then press Start Black or Start Color to begin printing.
NOTE: It does not matter which Start button you press; the fax cover prints in black only.
EN
83
Basic Functions
Loading originals
To fax documents (up to 30 pages) that are on plain paper, load the original(s) in the
automatic document feeder (ADF).
To fax a photograph, originals on thick paper, or a document that is too small or too
large to fit in the ADF, place the original on the scanner glass. (The ADF accepts originals
from 6.9 x 9.8 in. / 18 x 25 cm to 8.5 x 14 in. / 22 x 36 cm.)
NOTE: You can fax only one page at a time from the scanner glass.
Changing resolution and brightness
Before sending your fax, change the resolution and brightness settings, as needed, based
on your original.
To modify settings before sending your fax:
1 Press Fax.
2 With Fax Options selected, press OK.
3 Press
to select Resolution.
The resolution setting determines the amount of detail that is transmitted.
Select:
■■ Standard (default) for most documents
■■ Fine for documents with fine print
■■ Photo for photographs
4 Press
to select Brightness.
Adjust the brightness setting according to how light or dark your original is.
Select:
84
EN
Basic Functions
■■ Normal (default) for most documents
■■ +1 to +3 to lighten dark originals
■■ -1 to -3 to darken light originals
NOTE: If you do not want to save these settings, send your fax. The settings will apply
only to the current transmission. If you want to save these settings as defaults:
a Press
to select Save as Defaults, then press OK.
b Select Yes, then press OK.
IMPORTANT: Do not load photographs, cards, or any paper stock heavier than
24 lb in the ADF.
Sending a fax
You can send your fax in several ways. You can use:
■■
■■
■■
■■
the phonebook
Quick Dial
the numeric keypad
the Redial button
Using the phonebook to send a fax
To send a fax to a number in the phonebook:
1 Press Phonebook.
2 Press
to select the desired number.
3 Press Start Black to send a black-and-white fax or Start Color to send a color fax.
EN
85
Basic Functions
Using Quick Dial to send a fax
To send a fax using Quick Dial:
1 Press Phonebook.
2 Press the number on the keypad that corresponds to the desired Quick Dial entry.
3 Press Start Black to send a black-and-white fax or Start Color to send a color fax.
Using the numeric keypad to send a fax
To send a fax from the numeric keypad:
1 Press Fax.
2 Enter a fax number using the numeric keypad.
3 Press Start Black to send a black-and-white fax or Start Color to send a color fax.
Using the Redial button to send a fax
To send a fax to one of the last numbers dialed:
1 Press Redial.
2 Press to select an entry.
3 Press Start Black to send a black-and-white fax or Start Color to send a color fax.
If there is no number to redial, the phonebook opens.
86
EN
Basic Functions
Receiving a fax
You can set up your printer to receive faxes automatically or manually. Even if your
printer is set up to receive faxes automatically, you can still receive them manually at any
time.
Receiving a fax automatically
To receive faxes automatically:
1 Load letter (8.5 x 11 in. / 22 x 28 cm) or A4 (8.3 x 11.7 in. / 21 x 30 cm) plain paper
into the paper tray (see Loading plain paper, page 10).
2 Make sure the Auto Answer LED is on. (If not, press Auto Answer to turn it on.) The
printer will receive all incoming faxes automatically.
IMPORTANT: Whenever there is an incoming fax, the printer LCD shows the message,
“Incoming Call. Press START to Answer.” If the Auto Answer LED is on, you
do not need to press START to receive the fax. The printer will automatically receive the fax after the number of rings that you selected for the fax
settings(see Rings to Answer, page 74). However, you may choose to
receive the fax sooner by pressing either START button. (Whether the fax is
color or black is determined by the sender.)
Receiving a fax manually
If Auto Answer is turned off for your printer, you can receive incoming faxes manually.
NOTE: You can receive any incoming fax manually, even if Auto Answer is turned on.
To receive a fax manually:
■■ When you hear the phone ring, press Start Black or Start Color.
EN
87
Basic Functions
NOTE: Pressing either Start button triggers the printer to receive the fax. It does not
matter which Start button you press; whether a fax is color or black and white is
determined by the sender.
If your printer is connected to the same phone line as another telephone and you are
using tone dialing (see Dialing Mode, page 78), you may receive an incoming fax
manually from another phone. When you hear the distinctive ring of your fax line or know
that the incoming call is a fax:
■■ Pick up any phone and dial 234 (the remote access code).
Printing fax reports
You can set up the printer to print certain reports automatically. You can also print
reports manually at any time. Fax Settings report
Fax settings report
To print the current fax settings:
1
2
3
4
88
Press Menu.
Press
to select Fax Settings, then press OK.
Press
to select Print Fax Settings, then press OK.
Load letter or A4 paper, then press Start Black or Start Color.
EN
Basic Functions
Fax confirmation page
The Fax Confirmation Page contains the time and date of transmission, the number that
you called and the number you called from, and whether the transmission was successful.
To print the Fax confirmation page, you must select the option to print before you
transmit the fax. The default setting is to never print the fax confirmation page.
To print the fax confirmation page for future faxes:
1
2
3
4
Press Menu.
Press
to select Fax Settings, then press OK.
Press
to select Print Fax Conf. Page.
Press or to select Always (to print a confirmation page after sending every fax) or
After Fail Only to print only if the fax transmission fails.
5 Press OK.
NOTE: The name and fax number of receivers will not appear on your confirmation page
if the receivers have not set up that information on their fax machines.
Fax activity log
The Fax Activity Log provides detailed information approximately the last 30 faxes sent
or received. The log contains the information such as date, time, duration of transmission,
to/from, and number of pages.
To print a Fax Activity Log:
1 Press Menu.
2 Press
to select Fax Settings, then press OK.
3 Press
to select Print Fax Activity Log, then press OK.
EN
89
Basic Functions
4 Load US Letter (8.5 x 11 in.) or A4 paper, the press Start Black or Start Color.
NOTE: The name and fax number of receivers will not appear on your fax activity log if
the receivers have not set up that information on their fax machines.
Canceling a fax
You can cancel a fax that you are sending or receiving at any time.
To cancel sending or receiving a fax:
■■ Press Cancel.
Ordering supplies
You can order ink cartridges online.
To order supplies, make sure that your computer is connected to the Internet, then:
1 Open Print Manager Software.
2 Select Order Supplies (on a computer with WINDOWS OS) or select the Tools tab,
then click Order Supplies (on a computer with MAC OS).
3 Select the item(s) you want to buy, then follow the on-screen instructions.
90
EN
4
Maintaining Your Printer
Your printer requires little maintenance. However, Samsung recommends cleaning the
scanner glass and lid regularly to remove dust and fingerprints, which affect the quality
and accuracy of scanning.
Except while cleaning the printer, keep the printer plugged into an AC power outlet. If
you use a power strip, don’t turn off the power strip. (The printer does not need to be
turned on but should be plugged in.)
For optimal performance, keep the printer connected to a computer that is powered on
and has the SAMSUNG Print Manager Software installed, or keep the printer powered on
and connected to the Internet through a wireless network.
Keep the printhead and ink cartridges in the printer at all times to help prevent damage
to the printhead.
For recycling and/or disposal information, contact your local authorities. In the US, go to
the Electronics Industry Alliance at www.eia.org.
EN
91
Maintaining Your Printer
General care and cleaning
CAUTION:
Always disconnect the power to the printer before cleaning it. Do not use harsh
or abrasive cleaners on any part of the printer.
■■
■■
■■
■■
■■
■■
To clean the printer, wipe the outside with a clean, dry cloth.
Keep the surrounding area vacuumed and litter-free.
Protect the printer from tobacco smoke, dust, and liquid spills.
Do not place objects on the printer.
Keep the input tray free of dust, dirt, and other foreign objects.
Keep the printer supplies away from direct sunlight and out of high-temperature
environments.
■■ Do not allow chemicals to come into contact with the printer.
Cleaning the scanner glass and document backing
The scanner glass can get smudged and minor debris can accumulate on the white
document backing under the scanner lid. Periodically clean the scanner glass and
document backing.
CAUTION:
Do not use harsh or abrasive cleaners on any part of the printer.
Do not spray liquid directly on the glass.
Do not use paper-based wipes on the document backing as they can scratch it.
92
EN
Maintaining Your Printer
To clean the scanner glass and document backing under the scanner lid:
1 Turn off the printer and unplug it from the power outlet.
2 Lift the scanner lid.
3 Wipe the glass with a soft cloth or sponge, slightly moistened with a nonabrasive
glass cleaner.
EN
93
Maintaining Your Printer
4 Dry the glass with a lint-free cloth.
5 Gently clean the document backing with a soft cloth or sponge, slightly moistened
with mild soap and warm water.
6 Dry the document backing with a chamois or lint-free cloth.
NOTE: If the document backing needs further cleaning, use isopropyl (rubbing) alcohol on
a soft cloth, then wipe thoroughly with a cloth moistened with water to remove
any residual alcohol.
7 When you finish cleaning, plug in the printer.
94
EN
Maintaining Your Printer
Replacing ink cartridges
Your printer uses both black and color ink cartridges. You can check the approximate ink
levels on the LCD (see Checking ink levels, page 103). When an ink cartridge is out of
ink, the printer LCD displays a message stating that the black or color ink cartridge needs
replacing. You can order ink cartridges online. Open Print Manager Software and select
Order Supplies.
IMPORTANT: Do not use refilled ink cartridges.
To replace an ink cartridge:
1 Make sure your printer is on.
2 Lift the printer access door, and wait for the carriage to move to a position where
21
0
you can access it.
EN
95
Maintaining Your Printer
21
0
3 The ink cartridges are located in the printhead.
Color ink cartridge
Black
ink cartridge
Printhead
21
0
4 Pinch the tab on the ink cartridge.
96
EN
Maintaining Your Printer
5 Lift the ink cartridge out of the printhead.
6 Remove the new ink cartridge from its bag.
IMPORTANT: To prevent the printhead from drying out, insert the ink cartridge into the
printhead immediately.
EN
97
Maintaining Your Printer
7 Remove the protective cap from the cartridge.
21
0
8 Insert the ink cartridge into the printhead.
98
EN
Maintaining Your Printer
21
0
9 Press down on the ink cartridge tab until you hear a click.
10 Close the printer access door.
EN
99
Maintaining Your Printer
Updating the software and printer firmware
Using the latest software and firmware helps ensure optimal performance of your printer.
NOTE: Firmware is the software that runs on your printer.
Although there is a background check for software and firmware updates, you may
update manually using the following procedure.
Updating if your printer is connected to a computer with WINDOWS OS
To update the software:
1 Make sure that your computer is connected to the Internet.
2 Select Start > All Programs > Samsung > Samsung AiO Printer Tools.
3 Under Printer Resources, click Check for Software Updates to check whether
software updates are available.
4 If there are updates, click Next and follow the on-screen instructions.
100
EN
Maintaining Your Printer
To update the printer firmware:
1 Make sure that your computer is connected to the Internet.
2 Connect the printer to the computer with a USB cable or wirelessly (if not currently
connected).
3 Select Start > All Programs > Samsung > Samsung AiO Printer Tools.
4 Make sure that Samsung CJX-2000FW+xxxx - Connected appears in the lower
left corner of the Printer Tools window.
NOTE: If Samsung CJX-2000FW+xxxx - Connected does not appear in the lower left
corner, click Select, then click Refresh List and choose your printer from the list;
click Install Samsung Printer and follow the on-screen instructions.
5 Under Printer Resources, click Check for Printer (Firmware) Updates.
6 If there are updates, click Next and follow the on-screen instructions.
IMPORTANT: Do not turn off or unplug your printer or your computer during the
update. Doing so may cause the printer to become inoperable. If the
printer is connected wirelessly, make sure you have a stable connection
when you perform the update.
EN
101
Maintaining Your Printer
Updating if your printer is connected to a computer with MAC OS
To update the software:
1
2
3
4
5
Make sure that your computer is connected to the Internet.
Open Print Manager Software.
Select the Tools tab.
Click Check for Softwate Updates.
If there are software updates, follow the on-screen instructions for updating your
software.
To update the firmware:
1 Make sure that your computer is connected to the Internet.
2 Connect the printer to the computer with a USB cable or wirelessly (if not currently
3
4
5
6
connected).
Open Print Manager Software.
Select the Tools tab.
Click Check for Printer (Firmware) Updates.
If there are updates, follow the on-screen instructions.
IMPORTANT: Do not turn off or unplug your printer or your computer during the
update. Doing so may cause the printer to become inoperable.
102
EN
Maintaining Your Printer
Monitoring and adjusting printer performance
From the control panel, you can perform tasks to help keep the printer functioning well.
Checking ink levels
To check the ink levels:
1 Press Menu.
2 Press
to select Maintenance, then press OK.
3 With Check Ink Levels selected, press OK.
The LCD shows approximate levels of ink in the cartridges so you know when it’s
time to order replacement cartridges.
NOTE: You can order ink cartridges online. Open Print Manager Software and select
Order Supplies.
Resetting factory defaults
To reset defaults to the factory default settings:
1
2
3
4
Press Menu.
Press
to select Printer Settings, then press OK.
Press
to select Reset All Settings, then press OK.
When you see the message, “This will reset printer settings to factory defaults,”
press OK.
NOTE: Resetting factory defaults does not change the date and time, language, country/
region, or network settings.
EN
103
Maintaining Your Printer
Replacing the printhead
IMPORTANT: Replacing the printhead is not a regular maintenance procedure. Replace
the printhead only if you receive a new printhead from Samsung.
To replace the printhead:
21
0
1 Make sure your printer is on.
2 Lift the printer access door, and wait for the carriage to move to the access position.
104
EN
Maintaining Your Printer
3 Remove both ink cartridges and set them aside.
21
0
210
4 Unlatch the used printhead by lifting the button in the center of the carriage.
EN
105
Maintaining Your Printer
5 Lift the used printhead out of the carriage.
6 Remove the new printhead from its bag.
CAUTION:
Do not touch the copper contacts on the pringhead, as doing so may damage the
pringhead.
106
EN
Maintaining Your Printer
7 Remove the plastic protective cap.
Copper contacts
IMPORTANT: Be careful not to scratch or touch the copper contacts while inserting the
printhead.
8 Place the new printhead into the carriage.
EN
107
Maintaining Your Printer
9 Push firmly against the target label of the printhead until you hear a loud snap.
10 Insert the black ink cartridge into the printhead.
210
108
EN
Maintaining Your Printer
21
0
11 Press down on the ink cartridge until you hear it click into position.
21
0
21
0
12 Repeat steps 10 - 11 for the color ink cartridge.
13 Close the printer access door.
The printer detects the new printhead. Follow the instructions on the LCD to calibrate
your printer.
EN
109
5
Troubleshooting
Basic troubleshooting
Some problems can be resolved quickly by power cycling the printer: Turn off your printer.
Wait five seconds. Turn on the printer.
Use the following information to help troubleshoot problems with your printer.
Problem
Possible Solutions
Wireless
connectivity
For wireless connectivity issues, go to
Wireless Networking Setup Guide
Printer does not
power on
■■Make sure you are using the power cord that came with your
printer.
■■Make sure the power cord is connected to the AC adapter
and is plugged into an outlet or power strip.
EN
111
Troubleshooting
Problem
Possible Solutions
Printer not
detected
■■Make sure that your printer is plugged in and turned on.
■■If you are using a USB cable, make sure that:
–– it is a USB 2.0 high-speed cable.
–– it is connected to both your printer and your computer.
–– you restart the computer if the USB cable was
disconnected from the printer then reconnected, or if
power to the printer was interrupted.
■■If you are using a wireless connection, make sure that:
–– the printer is connected to your wireless network.
To check:
a On the printer, press Menu.
b Press
OK.
to select Network Settings, then press
c Press
to select View Network Configuration,
then press OK.
d Make sure that the Active Connection Type is Wi-Fi,
and that the IP Address is not 0.0.0.0.
–– your router is transmitting data.
–– the firewall (excluding WINDOWS Firewall) is allowing
the services needed for your printer.
112
EN
Troubleshooting
Problem
Possible Solutions
Carriage jam
■■Open the printer access door and clear any obstructions.
■■Do not move the carriage by force or pull any cables.
■■Check that the printhead and ink cartridges are installed
correctly.
(The printhead and ink cartridges are installed correctly when
you hear them click into place.)
Print quality
■■For best results, use KODAK Paper or a paper with the
COLORLOK Technology logo on the package.
■■Make sure the paper is loaded correctly. See Loading plain
paper, page 9 and Loading photo paper, page 10.
■■Clean the printhead:
–– Press Menu.
–– Press
to select Maintenance, then press OK.
–– Press
to select Clean Printhead, then press OK.
■■Calibrate the printer:
–– Press Menu.
–– Press
to select Maintenance, then press OK.
–– Press
to select Calibrate Printer, then press OK.
EN
113
Troubleshooting
Problem
Possible Solutions
Ink cartridge
errors
■■Check that Ink Cartridge(s) are installed. Do not use refilled
ink cartridges.
■■Remove, then install the cartridges again. Make sure the
cartridges click into place.
Paper jam
■■Open the printer access door and gently remove any paper
from inside the printer.
■■Make sure the paper in the tray is free of tears or creases.
■■Make sure you do not overload the input paper tray.
■■If you cannot access the paper from the front, gently pull the
jammed paper up from the paper input tray.
114
EN
Troubleshooting
Problem
Possible Solutions
Cannot send or
receive a fax
■■Make sure that the wall phone line is plugged into the Line
in port.
■■Verify that the wall jack works by plugging in a phone and
checking for a dial tone.
■■Verify that Region is set to the correct country code.
a Press Menu.
b Press
c Press
d Press
or
to select Printer Settings, then press OK.
to select Country / Region, then press OK.
or
to select your country, then press OK.
■■If you are connected to a DSL phone line, make sure you have
a DSL filter connected to the phone jack.
Error codes/
messages
Go to
http://www.samsung.com/uk/support/download/
supportDownloadMain.do
EN
115
Troubleshooting
Status lights
The status lights indicate the condition of the printer. There are two status lights on the
printer: one on the on/off button that indicates power, the other indicates Wi-Fi status.
Power light
Power light
What it means
Off
■■The printer is turned off.
–– Press the on/off button to turn on power.
■■The printer does not have power.
–– Make sure that the power cord is plugged into the back
of the printer and into an electrical outlet, and that the
electrical outlet has power.
Blinking
■■The printer is busy.
–– Wait for the printer to finish the task.
On
The printer is ready.
116
EN
Troubleshooting
Wi-Fi connectivity LED
Wi-Fi connectivity LED
What it means
Off
The Wi-Fi radio is either turned off or is turned on but not
connected to a wireless network.
Blinks continuously
The Wi-Fi radio is turned on, and the printer is searching for
available wireless networks within range.
Blinks intermittently
The Wi-Fi radio is turned on and the printer cannot find any
available wireless networks within range, or the Wi-Fi radio
connection has been interrupted, or is too weak to send signals
to and from the printer.
To find and connect to an available wireless network within
range, press OK, turn the Wi-Fi radio off, and run the Wi-Fi Setup
Wizard (see Connecting to a wireless network, page 13).
On
The Wi-Fi radio is turned on, and there is a working connection
between the printer and a wireless network.
EN
117
6
Product and Safety Specification
The following specifications are subject to change without notice.
Features and Specifications
Print performance
Black print speed 7 images per minute
Color print speed 4.6 images per minute
Print technology Continuous-tone, thermal inkjet
Print quality modes Draft, Normal, and Best on plain paper Photo quality
mode on photo paper
Photo printing features
Quantity 1 to 99
Print sizes 2 x 3 in. / 5 x 8 cm
3.5 x 5 in. / 9 x 13 cm
4 x 6 in. / 10 x 15 cm
4 x 7 in. / 10 x 18 cm
4 x 8 in. / 10 x 20 cm
4 x 12 in. / 10 x 30 cm (Panoramic)
EN
119
Product and Safety Specification
Print sizes 5 x 7 in. / 13 x 18 cm
8 x 10 in. / 20 x 25 cm
US Letter - 8.5 x 11 in. / 22 x 28 cm
A4 - 8.3 x 11.7 in. / 21 x 30 cm
Quality Best, Normal, Draft modes on plain paper
Photo quality mode on photo paper
Auto-detect media Auto-detect plain paper and photo papers Optimize
image quality for KODAK Photo Papers with barcode
Image enhancement Image Enhancement Technology with Print Manager
Software (from the computer only)
Color Black-and-white or color
Scene balance On (default), Off
Copy document features
Color Black-and-white or color
Quantity 1 to 99 copies
Copy sizes Same Size, Fit-to-Page, 20% to 500%
Plain paper quality Best, Normal, Draft
Brightness – 3 to + 3
120
EN
Product and Safety Specification
Copy photo features
Color Black-and-white or color
Quantity 1 to 99 copies
Copy sizes 2 x 3 in. / 5 x 8 cm
3.5 x 5 in. / 9 x 13 cm
4 x 6 in. / 10 x 15 cm
4 x 7 in. / 10 x 18 cm
4 x 8 in. / 10 x 20 cm
4 x 12 in. / 10 x 30 cm (Panoramic)
5 x 7 in. / 13 x 18 cm
8 x 10 in. / 20 x 25 cm
US Letter - 8.5 x 11 in. / 22 x 28 cm
A4 - 8.3 x 11.7 in. / 21 x 30 cm
Quality Automatic
Brightness – 3 to + 3
EN
121
Product and Safety Specification
Scanning features
Scanner type Contact Image Sensor (CIS)
Scan size Maximum size of original scanned from platen:
8.5in. / 22 cm wide; 11.7 in. / 30 cm long
Sizes of originals scanned from ADF:
B5 (6.9 x 9.8 in. / 18 x 25 cm)
US Executive (7.3 x 10.5 in. / 18 x 27 cm)
US Letter (8.5 x 11 in. / 22 x 28 cm)
A4 (8.3 x 11.7 in. / 21 x 30 cm)
US Legal (8.5 x 14 in. / 22 x 36 cm)
Functions Segmentation scanning
Auto-destination
Optical Character Recognition (OCR)
Faxing features and specifications
Fax transfer rate 9600, 14400, or 33600 (default) baud
Fax memory 100 pages at 96 dpi text
Speed dials Up to 60
Resolution Standard: 200 x 100
Fine: 200 x 200
Photo: 300 x 300
122
EN
Product and Safety Specification
Paper input tray
Paper capacity 150 sheets of 20 lb plain paper
20 sheets of photo paper, up to 12 mil (290 gsm)
20 envelopes
Tray size 4 x 6 in. to 8.5 x 14 in. / 10 x 15 cm to 22 x 36 cm
Automatic Document Feeder (ADF) for originals
Paper capacity 30 sheets (20 to 24 lb / 75 to 90 gsm) plain paper
Paper size limits 6.9 x 9.8 in. to 8.5 x 14 in. / 18 x 25 cm to 22 x 36 cm
Ink cartridges
Ink life The number of pages may be affected by operating
environment, printing interval, media type, and media size.
Based on ISO 24712 5% COVERAGE PATTERN
- See A sample of 5% COVERAGE PATTERN (reduced to
33%), page 124.
(supplied with the machine; INK-M210): About 250 sheets
(supplied with the machine; INK-M215): About 430 sheets
(supplied with the machine; INK-C210): About 250 sheets EN
123
Product and Safety Specification
A sample of 5% COVERAGE PATTERN (reduced to 33%)
Stephen J. Singel
Fabanda Sinpat Abarress
Tendar, BSF
URANGLE
{|}
Funtres Solber Netener
30 November 2005
Johnathan Q. Maderia
Inpert Mampem Abaress
2343 Stantin Dawer Lank
Benhibe, SDF
Mr. Maderia:
Nam liber tempor cum soluta nobis eleifend ption cogue nihil consequat, velillum. Dolore eu zril feugiat
nulla acilisis at vero eros accumsan et iust odio dignis sim qui blandit praesent lutatum ril lobortis nisl ut
aliquip exea commodo consequat. Duis autem vel eum irure dolor in hendreritin ulputate velit esse
molestie tincidunt ut laoreet dolore magna aliquam erat volutpat. Ut wisi enim ad minim vhniam, quis
nostrud exerci tation ullam corpersus cipit tis nisl
Amet, Amet, consectetuer adipiscing elit, sud diam nonummy nibh veniam,
ecneps adipiscing elit, sed diam nonummy nibtil laoreet dolore magmana aliam
erat volutpat. Ut wisi enim minim veniam, quisient nostrud. Solyom uta nobis
eleifendoptn cogue nihil imerdiet domg id quod mzim plerat facer posim aum.
Lorem ipsm dolor sit amet, consectuer. Duis autem vel eum iriure dolor in
hendreritin vulputate velit cesse ea commodo molestie. Nam liber tempor cum
soluta nobis eleifend option cogue nihil consequat, velillum. Dolore eu zril
feugiat nulla facilisis at vero eros accumsan et iusto odio dignissim qui blandit
praesent domg id quod mzim plerat facer posim aum.
A
B
C
D
E
Integer sagittis lacus vel nulla. Morbi convallis hendrerit risus. Nullam interdum, enim non gravida
feugiat, quam ante consequat metus, sed molestie dolor tortor eu ipsum. Phasellus semper risus sit amet
diam. Cras wisi arcu, pulvinar nec, molestie fringilla, vestibulum iaculis, mi. Praesent nonummy pulvinar odio.
Stnecerp Balrecneps
Duis vitae eros. Fusce suscipit. Etiam justo massa, semper feugiat, porttitor sit amet, nonummy in, quam.
Aenean nulla magna, elementum ut, eleifend ac, aliquam ut, risus. Morbi laoreet elementum dui.
Vestibulum nibh sapien, rhoncus non, lobortis nec, ullamcorper a, enim. Praesent ultricies enim non
lorem. Curabitur consectetuer, diam et nonummy convallis, quam quam tristique nulla, pulvinar blandit
ipsum arcu a tellus. Phasellus dolor. Ut ullamcorper venenatis quam. Quisque egestas erat.
Singabet,
Stephen J. Singel
Demperta Aminerimum
Fabanda Sinpat Abarress
SJS:dwg
124
EN
Product and Safety Specification
Connectivity
Protocols supported USB 2.0 High Speed; DPOF
Devices supported WINDOWS OS-based and MACINTOSH Computers,
memory cards (SD, MS/Duo, MMC, SDHC)
Image Formats supported Image printing supports JPEG (EXIF v2.21
non-progressive); does not support progressive JPEG
format; image scanning supports scanning to JPG and
non-searchable PDF
Number of USB ports One USB 2.0 high-speed device port on the back of
the printer
Wi-Fi Technology 802.11b/g/n, WPA/WPA2, WPS, and WEP
supported
Software support
Application support Third-party image management applications; optical
character reader (OCR) support for documents
Media support Plain paper, photo paper, envelopes, greeting cards,
and labels
Scanner support TWAIN and WIA, WIA2 (WINDOWS 7 and VISTA OS),
ICA (MAC OS) and TWAIN (on MAC OS and 10.5),
including segmentation scanning
Update support Software and firmware updates available through Web
support
EN
125
Product and Safety Specification
Physical specifications
Power Input: 100–240 V AC, 50–60 Hz
The printer shall only be used with the provided
certified external power supply.
Manufacturer and model:
Chicony Power Technology Co., Ltd.
model CPA09-020A
Flextronics Sales & Marketing (A-P) Ltd.
model KOD-A-0040ADU00-101
Output: 36 V DC at 1.1 A
Storage dimensions 45.5 cm (17.9 in.) wide x 41.5 cm (16.3 in.) deep
x 23.0 cm (9.1 in.) tall with input and output trays
closed
Weight 6.9 kg (15.2 lb) without power supply, printhead, or
ink cartridges
Operating range 5°C (41°F) to 35°C (95°F), 15 to 85% RH
Full image quality environ- 15°C (59°F) to 30°C (86°F), and 20 to 80% RH.
mental range
Energy efficiency ENERGY STAR® Qualified
126
EN
Product and Safety Specification
System requirements
Computer with WINDOWS OS
Computer Minimum
Operating system WINDOWS 7, VISTA, or XP (SP2 or later)
CPU INTEL CELERON Processor
Clock speed 1.2 GHz
Memory 512 MB RAM
Available hard disk space 500 MB available
Interface USB 2.0 High Speed
Removable drive CD-ROM
Computer with MAC OS
Computer Minimum
Operating system MAC OS X 10.5 or later
CPU PowerPC G4, G5, or INTEL-based MAC
Clock speed 1.2 GHz
Memory 512 MB RAM
Available hard disk space 200 MB available
EN
127
Product and Safety Specification
Computer Minimum
Interface USB 2.0 High Speed
Removable drive CD-ROM
Paper types supported
Plain paper 16 to 24 lb (60 to 90 gsm)
Photo paper 6.5 to 12 mil
Card stock 110 lb index max (200 gsm)
Envelopes 20 to 24 lb (75 to 90 gsm)
Labels All commercially available inkjet varieties on 8.5 x 11
in. and A4 size sheets
Iron-on transfers All commercially available inkjet varieties on 8.5 x 11
in. and A4 size sheets
128
EN
Product and Safety Specification
Paper sizes supported
Plain paper A4 (8.3 x 11.7 in. / 21 x 30 cm)
A5 (5.8 x 8.3 in. / 15 x 21 cm.)
A6 (4.1 x 5.8 in. / 11 x 15 cm)
B5 (6.9 x 9.8 in. / 18 x 25 cm)
US Executive (7.3 x 10.5 in. / 18 x 27 cm)
US Letter (8.5 x 11 in. / 22 x 28 cm)
US Legal (8.5 x 14 in. / 22 x 36 cm)
Custom sizes from 4 to 8.5 in. / 10 to 22 cm wide and
6 to 14 in. / 15 to 36 cm long
Labels A4 (8.3 x 11.7 in. / 21 x 30 cm)
US Letter (8.5 x 11 in. / 22 x 28 cm)
Index card stock 4 x 6 in. / 10 x 15 cm cards
5 x 7 in. / 13 x 18 cm index cards
Iron-on transfers A4 (8.3 x 11.7 in. / 21 x 30 cm)
US Letter (8.5 x 11 in. / 22 x 28 cm)
EN
129
Product and Safety Specification
Envelopes C5 (6.4 x 9 in. / 16 x 23 cm)
C6 (4.5 x 6.4 in. / 11 x 16 cm)
DL (designated long) (4.3 x 8.7 in. / 11 x 22 cm)
US #10 (4.1 x 9.5 in / 11 x 24 cm)
US #7¾ (3.9 x 7.5 in. / 10 x 19 cm)
US #9 (3.9 x 8.9 in. / 10 x 23 cm))
Photos 4 x 6 in. / 10 x 15 cm
4 x 7 in. / 10 x 18 cm
4 x 8 in. / 10 x 20 cm
4 x 12 in. / 10 x 31 cm
5 x 7 in. / 13 x 18 cm
7 x 10 in. / 18 x 25 cm
8 x 10 in. / 20 x 25 cm
US Letter (8.5 x 11 in. / 22 x 28 cm)
A4 (8.3 x 11.7 in. / 21 x 30 cm)
130
EN
7
Safety Information
Safety Information
SAMSUNG CJX-2000FW All-in-One Printers are Class 1 LED Products.
When using this machine, these basic safety precautions should always be followed to
reduce risk of fire, electric shock, and injury to persons:
1 Read and understand all instructions.
2 Use common sense whenever operating electrical appliances.
3 Follow all warnings and instructions marked on the product and in the literature
accompanying the product.
4 Use only the power source provided with the printer.
5 Use only the power cord that comes with the product (or an approved power cord
6
7
8
9
greater or equal to H05W-F, 2G, 0.75mm2). Using another power cord may cause fire
and/or shock. Do not use the included power cord with any other equipment.
If an operating instruction appears to conflict with safety information, heed the
safety information. You may have misunderstood the operating instruction. If you
cannot resolve the conflict, contact your sales or service representative for assistance.
Unplug the machine from the AC wall socket and telephone jack before cleaning. Do
not use liquid or aerosol cleaners. Use only a damp cloth for cleaning.
Do not place the machine on an unstable cart, stand, or table. It may fall, causing
serious damage.
Your machine should never be placed on, near, or over a radiator, heater, air conditioner, or ventilation duct.
EN
131
Safety Information
10 Do not allow anything to rest on the power or telephone cords. Do not locate your
machine where the cables may be damaged by people walking on them. Do not
place the machine where the power or telephone cord may be bent. Any case of
above may cause the hazardous result or malfunction.
11 Do not overload wall outlets and extension cords. This can diminish performance, and
may result in the risk of fire or electric shock.
12 Do not allow pets to chew on the AC power, telephone, or PC interface cords.
13 Never push objects of any kind into the machine through case or cabinet openings.
They may touch dangerous voltage points, creating a risk of fire or shock. Never spill
liquid of any kind onto or into the machine.
14 To reduce the risk of electric shock, do not disassemble the machine. Take it to a
qualified service technician when repair work is required. Opening or removing
covers may expose you to dangerous voltages or other risks. Incorrect reassembly
could cause electric shock when the unit is subsequently used.
15 Unplug the machine from the telephone jack, PC, and AC wall outlet, and refer
servicing to qualified service personnel under the following conditions:
•
•
•
•
•
•
When any part of the power cord, plug, or connecting cable is damaged or frayed.
If liquid has been spilled into the product.
If the product has been exposed to rain or water.
If the product does not operate properly after instructions have been followed.
If the product has been dropped, or the cabinet appears damaged.
If the product exhibits a sudden and distinct change in performance
16 Adjust only those controls covered by the operating instructions. Improper
adjustment of other controls may result in damage, and may require extensive work
by a qualified service technician to restore the product to normal operation.
132
EN
Safety Information
17 Avoid using this fax machine during a lightning storm. There may be a remote risk of
electric shock from lightning. If possible, unplug the AC power and telephone for the
duration of the lightning storm.
18 Do not install the machine on a wet place. This may raise a risk of fire or shock.
19 CAUTION: For electrical safety reasons disconnect from telecommunications network
before touching metal / conductive parts.
20 CAUTION: Use only the cords and other accessories supplied with the product. Using
others may cause the hazardous result or malfunction.
21 SAVE THESE INSTRUCTIONS.
CAUTION:
To reduce the risk of fire, use only No. 26 AWG or larger telecommunication line
cord.
For Service Personnel only:
CAUTION:
Risk of explozion if battery is replaced by an incorrect type. Dispose of used batteries
according to local instructions.
EN
133
Safety Information
LCD Screen Safety
■■ Use only a dry, soft cloth to clean the LCD screen. Do not use any liquid or chemical
cleaners.
■■ If the LCD screen is damaged, contact SAMSUNG immediately. If any of the solution
from the display gets on your hands, wash them thoroughly with soap and water.
Ink Cartridge Safety
■■ Keep all ink cartridges out of the reach of children.
■■ If ink gets on your skin, wash with soap and water. If ink gets into your eyes, flush
immediately with water. If any discomfort or change in vision persists after washing,
seek medical attention immediately.
134
EN
Safety Information
Declaration of Conformity (European countries)
Approvals and Certifications
The CE marking applied to this product symbolises Samsung Electronics Co., Ltd.
Declaration of Conformity with the following applicable 93 / 68 / EEC Directives of the
European Union as of the dates indicated:
January 1, 1995: Council Directive 73 / 23 / EEC Approximation of the Member States
related to low voltage equipment.
January 1, 1996: Council Directive 89 / 336 / EEC (92 / 31 / EEC), approximation of the
Member States related to electromagnetic compatibility.
March 9, 1999: Council Directive 1999 / 5 / EC on radio equipment and telecommunications terminal equipment and the mutual recognition of their conformity.
A full declatation, defining the relevant Directives and referenced
standards can be obtained from your Samsung Electronics Co., Ltd.
representative.
EC Certification
Certification to 1999 / 5 / EC Radio Equipment & Telecommunications
Terminal Equipment Directive (FAX)
This Samsung product has been self-certified by Samsung for pan-European single
terminal connection to the analogue public switched telephone network (PSTN) in
accordance with Directive 1999 / 5 / EC. The product has been designed to work with the
EN
135
Safety Information
national PSTNs and compatible PBXs of the European countries:
In the event of problems, you should contact the Euro QA Lab of Samsung Elecronics Co.,
Ltd. in the first instance.
The product has been tested against ES 203 021 and TBR 21.
German compliance statement
CAUTION:
This device is not intended for use in the direct field of view at visual display
workplaces. To avoid incommoding reflections at visual display workplaces this
device must not be placed in the direct field of view.
CAUTION:
Das Gerät ist nicht für die Benutzung im unmittelbaren Gesichtsfeld am Bildschirmarbeitsplatz vorgesehen. Um störende Reflexionen am Bildschirmarbeitsplatz zu
vermeiden, darf dieses Produkt nicht im unmittelbaren Gesichtsfeld platziert verden.
Noise emissions for this equipment do not exceed 70 dBa.
This equipment is not intended for use in the workplace in accordance with BildscharbV
regulations.
“Das GerŠt ist nicht fŸr die Benutzung am Bildschirmarbeitsplatz gemŠß BildscharbV
vorgesehen.”
136
EN
Safety Information
Correct Disposal of This Product
(Waste Electrical & Electronic Equipment)
(Applicable in the European Union and other European countries with separate collection
systems)
This marking shown on the product or its literature, indicates that it
should not be disposed with other household wastes at the end of its
working life. To prevent possible harm to the environment or human
health from uncontrolled waste disposal, please separate this from
other types of wastes and recycle it responsibly to promote the
sustainable reuse of material resources.
Household users should contact either the retailer where they
purchased this product, or their local government office, for details of where and how
they can take this item for environmentally safe recycling.
Business users should contact their supplier and check the terms and conditions of the
purchase contract. This product should not be mixed with other commercial wastes for
disposal.
EN
137
Safety Information
ENERGY STAR® Qualified
To conserve energy, this printer will enter a reduced power (sleep) mode automatically after 1 hour. You can adjust the delay time (in 0.5 hour increments) up to 4 hours.
Increasing the delay time may result in reduced energy savings.
ENERGY STAR and the ENERGY STAR mark are registered U.S. service
marks. As an ENERGY STAR partner, SAMSUNG has determined that this
product meets ENERGY STAR Guidelines for energy efficiency. For more
information on the ENERGY STAR program, see www.energystar.gov.
138
EN
www.samsung.com/printer