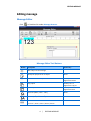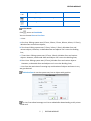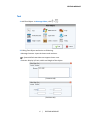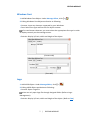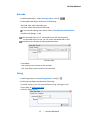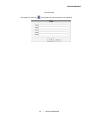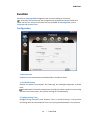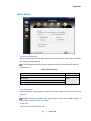
1
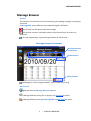
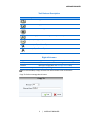
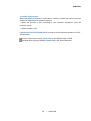
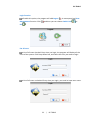
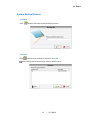
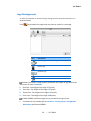
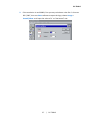
User Manual
ANSER CODING INC. (TAIWAN)
HEADQUARTERS & R&D CENTER
7F, NO.23 LUNG CHIANG RD. TAIPEI, TAIWAN 10492
TEL:+886-2-2777-3488
FAX:+886-2-2752-7496
ANSER CODING INC. (CHINA)
GLOBAL BUSINESS CENTER & MANUFACTURING BASE
7F, NO.52 HULI DADAO XIAMEN 361006, CHINA
TEL: +86-0592-571-8888
FAX: +86-0592-571-0888
www.anser-u2.com
CONTENT
Content
1. OPERATING INSTRUCTIONS
1
2. MESSAGE BROWSER
2
3. EDITING MESSAGE
4
MESSAGE EDITOR .................................................................................. 4
TEXT .................................................................................................. 6
WINDOWS FONT ................................................................................... 7
LOGO ................................................................................................. 7
PRODUCTION DATE ................................................................................ 8
EXPIRY DATE ........................................................................................ 9
SHIFT ................................................................................................. 9
SINGLE COUNTER................................................................................. 10
LOT-BOX COUNTER .............................................................................. 11
BARCODE .......................................................................................... 12
STRING ............................................................................................. 12
4. FUNCTION
14
CONFIGURATION ................................................................................. 14
1. Measurement ................................................................................... 14
2. LCD Backlit Saving ............................................................................ 14
3. Daylight Saving Time ........................................................................ 14
ALARM OPTION .................................................................................. 15
1. Alarm-kit (Optional).......................................................................... 15
2. Counter Alarm .................................................................................. 15
3. Key Tone ........................................................................................... 15
EDITING OPTION ................................................................................. 16
1. Customer Year .................................................................................. 16
2. Rollover Hour ................................................................................... 16
3. Message Name................................................................................. 16
4. Counter Reset ................................................................................... 17
5. Pre-Zero ........................................................................................... 17
6. Shift ................................................................................................. 17
7. Date/Time Format............................................................................ 17
PRINTING SETUP ................................................................................. 19
1. PrintHead ......................................................................................... 19
2. Pre-purge ......................................................................................... 19
I
|
CONTENT
CONTENT
3. Photocell .......................................................................................... 19
4. Encoder and Conveyor ...................................................................... 20
5. PC-TOOLS
21
USER ACCOUNT .................................................................................. 21
1. Login Option ..................................................................................... 21
2. User Management............................................................................ 23
SYSTEM BACKUP/RESTORE ..................................................................... 25
1. Backup ............................................................................................. 25
2. Restore ............................................................................................. 25
LOGO ............................................................................................... 26
II
| CONTENT
OPERATING INSTALLATION
Notes and Warning
NOTE: Indicating important information that helps you make better use of U2.
WARNING: Indicating either potential damage to hardware or loss of data and
telling you how to avoid the problem.
Operating Installation
1. Get “U2 Message PRO Setup_x.x.x.x.exe” from your disk; double click
to
install the Message PRO software.
2. Select the language that you want to install; the system will display all the
corresponding languages that PC supported.
3. Click Next to install the U2 Message PRO.
4. Click Next to choose installs location.
5. Click Browse you can customize the destination folder and then Click Install, to
finish the installation procedure.
6. After installing successfully, the program will create icon on your desktop, double
click to start the program.
1 |
OPERATING INSTALLATION
MESSAGE BROWSER
Message Browser
SD card
The SD card is the ultimate source of transferring any editing message or setting for
U2 printer.
In MessagePRO, three different icons representing SD card Status.
: No SD card, but still able to edit the message.
: SD card has not been initialized; please insert the card into U2 printer for
activation.
: SD card is good to go; synchronizing between pc and SD card.
Message Browser Screenshot
Message Browser
Tool Buttons
Zoom Buttons
SD Card Status
Message list: The message marked ★ means ready for printing.
Menu Panel:
Take you back to Message Browser anytime.
Manage different setting for U2 printer. See Function for detail.
Manage different setting for MessagePRO. See PC-Tools for detail.
2 |
MESSAGE BROWSER
MESSAGE BROWSER
Tool Buttons Description
Icons
Description
Create a new message
Edit selected message;
Delete the selected message
Search message (When the Message Name option is ON)
Setup the printing delay
Zoom out (200%, 175% … 20%)
Zoom in (25%, 50% … 200%)
Right click menu
Copy to
Ink Report
Copy the whole message content to different message No.
Get the Ink Report of selected message
Rename
Select Print Message
Rename message (When the Message Name is ON)
Ready for printing
For left-handed, simply reverse the mouse button with its function.
Copy To: Select message # and name.
3 |
MESSAGE BROWSER
EDITING MESSAGE
Editing message
Message Editor
Click
or Double-click under Message Browser.
Message Editor Tool Buttons
Button
Description
Access Key
Add a object to the message
None
Modify the properties of an object
None
Delete the selected objects
Hotkey: Delete
Right Click: Delete
Copy object
Hotkey: Ctrl + C
Right Click: Copy To
Paste object
Zoom out (200%, 175% … 20%)
Hotkey: Ctrl + V
Right Click: Paste
None
Zoom in (25%, 50% … 200%)
None
Line Mode:
Line Free \ 1Line \ 2Lines \ 3Lines \ 4Lines
None
4 |
EDITING MESSAGE
EDITING MESSAGE
Setup message delay
None
Save editing message and exit to Message Browser
None
Cancel Message Editor
None
Line Mode
, access to Line Mode.
Click
You can choose Lines or Line Free.
• Lines:
a. One Line: Editing system text (2.7mm, 3.6mm, 5.5mm, 8.0mm, 10mm, 12.7mm),
Window Font and various objects;
b. Two Lines: Editing system text (2.7mm, 3.6mm, 5.5mm), Window Font and
various objects, However, no barcode allow and objects can’t cross the dividing
line;
c. Three Lines: Editing system text (2.7mm, 3.6mm), Window Font and various
objects. However, no barcode allow and objects can’t cross the dividing lines;
d. Four Lines: Editing system text (2.7mm), Window Font and various objects.
However, no barcode allow and objects can’t cross the dividing lines;
• Line Free: No restriction of creating any combination of objects and texts in any
way you desired.
Window Font is not the system text, but an object with graphics.
A Line Free edited message can’t be re-edited after downloading to U2 printer
via SD card.
5 |
EDITING MESSAGE
EDITING MESSAGE
Text
1. Add Text Object: In Message Editor, click
>
.
2. Editing Text Object attribution as following:
• Message Content: Input the letters and numbers.
System default text does not support lower case.
• Position: Display X/Y-axis, width and height of the object.
(Content tab)
(Position tab)
6 |
EDITING MESSAGE
EDITING MESSAGE
Windows Font
1. Add Windows Font Object: Under Message Editor, click
>
.
2. Editing Windows Font Object attribution as following:
• Content: Input any character supported by your Windows.
• Font: Select font type and font size for object content.
For non-Roman character, you must select the appropriate font type in order
to display correctly on the message screen.
• Position: Display X/Y-axis, width and height of the object.
(Content tab)
(Font tab)
Logo
1. Add LOGO Object: Under Message Editor, click
>
.
2. Editing LOGO Object attribution as following:
• Content: Open a logo file.
You can only open logo file through designed folder. (Refer to Logo
Management)
• Position: Display X/Y-axis, width and height of the object. (Refer to Text)
7 |
EDITING MESSAGE
EDITING MESSAGE
(Content tab)
Production Date
1. Add Production Date Object: Under Message Editor, click
>
.
2. Editing Production Date Object attribution as following:
• Content: Current Date.
It can’t be edited as current date reflects to the date of your window system.
• Font: Select font size for object content. (Refer to Text)
For font size editing availability, please see line mode.
• Position: Display the X/Y-axis, width and height of object. (Refer to Text)
(Content tab)
• Parameters: Click
and select the Date/Time Format from drop-down menu.
If the Data/Time Format you desired doe not exist in the system, you can simply
add /edit the format template accordingly.
8 |
EDITING MESSAGE
EDITING MESSAGE
3. Format Editing.
If the data/time format you need does not exist in system, please click
button
to add/delete/modify data/time format. (Refer to Message Editor-> Date/Time
Format)
Expiry Date
1. Add Expiry Date Object: Under Message Editor, click
>
.
2. Editing Production Date Object attribution as following:
• Content: Expiry Date.
It can’t be edited as current date reflects to the date of your window system.
• Parameters: Refer to Production Date.
• Font: Refer to Production Date.
• Position: Refer to Text.
(Content tab)
Shift
1. Add Shift Object: Under Message Editor, click
>
2. Editing Counter Object attribution as following:
• Content: Shift Code.
• Font: Refer to Production Date.
• Position: Refer to Text.
(Content tab)
9 |
EDITING MESSAGE
.
EDITING MESSAGE
• Parameters: Click the
, access to the Shift interface.
Allow user records all operators and their starting time.
The print content is depended on the actual printing time, not editing time.
(Refer to U2 PRINTER USER MANUAL)
Single Counter
1. Add Single Counter Object: Under Message Editor, click
>
.
2. Editing Counter Object attribution as following:
• Content: Display the minimum value of Single counter.
• Font: Refer to Production Date.
• Position: Refer to Text.
(Content tab)
• Parameters: Click the
, and input the Minimum, Maximum and Step value.
10 |
EDITING MESSAGE
EDITING MESSAGE
Minimum--the first value of counter.
Maximum--the last value of counter without restart.
Step--difference between two adjacent values.
To count up: input positive step value.
To count down: input negative step value with minus sign (-).
Lot-Box Counter
1. Add Box/Lot Counter Object: Under Message Editor, click
>
.
2. Editing Counter Object attribution as following:
• Content: Display the minimum value of Lot-Box.
Depends on the field name you selected. You need add two Box/Lot Counter
Objects as Box and Lot.
• Font: Refer to Production Date.
• Position: Refer to Text.
(Content tab)
• Parameters: Click the
, and input the Lot and Box Counter value.
Definition Function: Box and lot should be used together, when the box prints
over the max value, the box will reset to minimum value and lot will advance a step
value. Input each field value of counter according to your needs. (Refer to U2
PRINTER USER MANUAL)
11 |
EDITING MESSAGE
EDITING MESSAGE
Barcode
1. Add barcode object: Under Message Editor, click
>
.
2. Editing Barcode Object attribution as following:
• Barcode Type: Select barcode type.
• Content: Input the content of barcode.
For barcode editing rules, please refer to U2 PRINTER USER MANUAL.
• Width-Level (Range: 1~10)
At the width-level 1 or 2, Text Mode turns OFF automatically.
At the width-level 3 to 10, you can select Text Mode ON or OFF.
Width-level indicates the spacing between bars.
(Content tab)
• Text Mode:
ON: Display input content of the barcode.
OFF: Not display input content of the barcode.
String
1. Add String Object: Under Message Editor, click
>
.
2. Editing String Object attribution as following:
• Content: String 1, you can select deferent string. (String No.1~5)
• Font: Refer to Production Date.
• Position: Refer to Text.
12 |
EDITING MESSAGE
EDITING MESSAGE
(Content tab)
• Parameters: Click the
, and input the text string into a string field.
13 |
EDITING MESSAGE
FUNCTION
Function
Function on MessagePRO configurates the function setting to U2 printer.
U2 printer will synchronize the configurations automatically when the SD card
insert into the U2. Some U2 functions are not available for MessagePRO, such as
Language and System Clock.
Configuration
1. Measurement
Choose the unit measurement between Metric and British Units.
2. LCD Backlit Saving
Reduce the power consumption by enhancing the backlight brightness to black
level.
Enable both LCD Backlit and password, while the backlit reaches the set-timing
and turns into back screen, the system also log off simultaneously.
3. Daylight Saving Time
Daylight saving time (DST), and "Summer Time" in much of Europe, is the practice
of moving local time forward one hour in the spring and backwards in the autumn.
14 |
FUNCTION
FUNCTION
Alarm Option
1. Alarm-kit (Optional)
When external Alarm kit has been connected to your system, the printer will detect
the Alarm-kit automatically.
The following form will tell you how Alarm LED will show due to all kinds of
malfunction!
Alarm LED Instruction
Ink Low
Normal Work
Ink Empty
Ink error: Ink Cartridge area code or sales code error
No Cartridge
Orange
Green
Red
2. Counter Alarm
Allow the printer making alarm sound when the pre-setup counter value has been
reached.
When COUNTER ALARM is ON, you are able to turn the ALARM ON/OFF in
every single Counter with in a message.
3. Key Tone
Turn key tone of the U2 ON or OFF.
15 |
FUNCTION
FUNCTION
Editing Option
1. Customer Year
Allow you to print customized year despite of the system year.
2. Rollover Hour
Allow you to print different date base on your production shift schedule.
At 24 hour time convention, input time in the morning or afternoon reflects
different printing date as following diagram presented:
For example: System Date: 2010/09/21 and separate input time as ①②③.
00:01
12:00
23:59
①
②
③
06:00
System Time
11:00
20:00
① Since the system time already ahead of input time, before system time reaches
06:00 the next day, Printing Date: 2010/09/22.
After system time reaches 06:00 the next day, Printing Date: 2010/09/23.
② Before system time reaches 11:00 at same day, Printing Date: 2010/09/20. After
11:00 at same day, Printing Date: 2010/09/21.
③ Before system time reaches 20:00 at same day, Printing Date: 2010/09/21.
After 20:00 at same day, Printing Date: 2010/09/22.
16 |
FUNCTION
FUNCTION
When both input times ahead of system time but ② in the morning and ③ in
the afternoon, notice the differences printing date between two scenarios.
3. Message Name
Allow you to name/rename any message as your desire.
4. Counter Reset
To reset the counter before printing the message
5. Pre-Zero
Displays a digit or nothing! If the expression has a digit in the position where the #
appears in the format string, display it; otherwise, display nothing in that position.
This symbol works like the 0 digit placeholder, except that leading and trailing zeros
aren't displayed if the number has the same or fewer digits than there are #
characters on either side of the decimal separator in the format expression.
6. Shift
Allow user records all operators and their starting time.
Enter shift name and time. (Refer to Message Editor-> Shift)
7. Date/Time Format
This option allows you to customize time notation.
To create a new format:
a. Click
or
to personalize Data/time Format.
17 |
FUNCTION
FUNCTION
: Represent default format that can’t be deleted or modified.
: Represent user-defined format that can be deleted or modified.
b. Editing Data/Time Format:
Format Buttons
Click the format buttons as you desired! For some symbol
such as (> / :), just input from your keyboard directly.
18 |
FUNCTION
FUNCTION
Printing Setup
1. PrintHead
• Direction: Switch the direction of printing.
: Left to right from the direction of conveyor.
: Right to left from the direction of conveyor.
: Left to right from the direction of conveyor and rotate 180°.
: Right to left from the direction of conveyor and rotate 180°.
• Nozzle: Switch left (Default)、right or dual.
• Resolution: user can adjust resolution from 50~600, when the encoder is OFF.
User can only adjust horizontal resolution.
2. Pre-purge
Enable Pre-purge function, the Printer will output ink dots periodically, preventing
the ink solidified on the nozzle in a dry environment or long printing gap time.
Pre-Purge is an important attribution to the printing quality, especially with
different semi-porous and none-porous ink, it is critical to adjust parameter for
different environments due to the unique ink character and de-cap time.
3. Photocell
A sensor targets to objects and triggers the print timing. Select different photocell
prior to you need.
INTERNAL: Default internal photocell of U2 printer.
EXTERNAL: Connect an external photocell via external device interface.
19 |
FUNCTION
FUNCTION
4. Encoder and Conveyor
When the speed of conveyor is inconsistent, install an encoder can ensure the print
perfection regardless the speed of conveyor.
• When the Encoder is OFF, according to your conveyor equipment, input the
conveyor speed.
• When encoder is ON
Input PULSE/CYCLE and DIAMETER of encoder and the software calculates the DPI
automatically.
Don’t recommend modify PULSE/CYCLE, and default value is 2500.
ANSER offers optional 400DPI encoder with 1.98” wheel diameter.
20 |
FUNCTION
PC-TOOLS
PC-Tools
The setting in this section only reflects to MessagePRO.
User Account
1. Login Option
Click
and select its properties.
21 |
PC-TOOLS
PC-TOOLS
Login function.
Enable this option; the program will add Logout
Management function. Click
Exit
in menu panel and User
and then you can choose Switch User
or
.
List all users
List of all users checked: Every time you login, the program will display all the
users of the system. Click Drop-Down box, and select the user you want to login.
List of all users unchecked: Every time you Login, you need to input user name.
22 |
PC-TOOLS
PC-TOOLS
2. User Management
Click
to setup each user’s accessibility..
User Operation button
Icon
Description
Add a new user
Delete the selected user
Copy a new user which has the same password/authority;
Modify the selected user
Buttons/fields of user operation
Icon
Description
User name
Input user’s name. (except the default user Admin)
Password
Input password
Confirm password
Input password again
Select all authority
23 |
PC-TOOLS
PC-TOOLS
Unselect all authority
24 |
PC-TOOLS
PC-TOOLS
System Backup/Restore
1. Backup
Click
button and input a new backup file name.
2. Restore
Click
, and select a backup file and then click OK.
All settings will be restoring to factory default value.
25 |
PC-TOOLS
PC-TOOLS
Logo Management
In order for U2 printer to locate the logo, all logo must be centralize and store to a
dedicated folder.
Click
, and import the Logos that you want to create in a message.
Icon
Description
Import logo files (*.bmp, *.alg)
Delete logo
Rename logo
Zoom out
Zoom in
When you import a Logo, please awareness the height of logo due to the
restriction by each Line Mode.
1.
2.
3.
4.
One Line: The height of the logo ≤ 75 pixels;
Two Lines: The height of the logo ≤ 37 pixels;
Three Lines: The height of the logo ≤ 25 pixels;
Four Lines: The height of the logo ≤ 18 pixels;
Under 300DPI condition logos can be printed with original size.
1. If you do not use encoder, go to Function > Printing Setup > PringHead >
Resolution and choose 300DPI;
26 |
PC-TOOLS
PC-TOOLS
2. If the resolution is not 300DPI, first you may calculate a value like “x=Current
DPI / 300”, then use Paint software to open the logo, choose Image >
Stretch/Skew…and input the value of ‘x’ to “Horizontal” row.
27 |
PC-TOOLS