Transcript
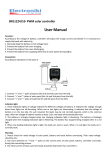
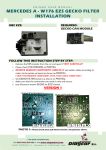
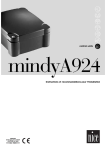
Solar Charge Controller CMP12(5A-12A)User’s Manual
CMP12(5A-12A)12/24V
Indicator light:
According to the voltage of battery,
controller will adjust the charging
current and decide if to supply power to the loads.
1.Generally keep the battery on full voltage condition.
Photo1
2.Prevent the battery from over-charging.
3.Prevent the battery from over-discharging.
4.Prevent the battery from supplying power to solar panels during nights.
1. There are 3 red LEDs indicating the voltage level of battery. The battery is
full when all 3 LEDs are lighting. When 1 or 2 LEDs are lighting, it means the
battery is on the low level, where the loads may not working properly. As the
voltage of battery reaches 12.6, the loads will automatically resume working.
2. The battery is being strongly charged when the “Charge LED” is lighting.
The battery is floatingly charged when this LED is flickering, and the battery
has stopped charging when the LED is off.
3. The “Load LED” indicates the working condition of loads. When it lights, it
means the load may work; when it’s off, it means the load may not work.
Connection:
Notice:
As indicated in diagram:
1. Connect “+” and “-“ poles of solar panels with the correct ports on the
controller (the first and second from the left).
2. Connect”+” and “-“ poles of battery with the correct ports on the controller
(the third and fourth from the left).
3. Connect “+” and “-“ poles of load with the correct ports on the controller
(the fifth and sixth from the left).
1.Please check the rated voltage of solar panels, battery, and load before
connecting. Their rated voltage should be same (12v).
2.Pay more attention to “+” and “-“ poles of solar panels, battery, controller
and loads during the process of connection.
3.The rated current of solar panels and loads must be less than the one of
controller.
Function:
photo2