1
(5) Adjusting the auxiliary thread tension control assembly
(automatic trimming type)
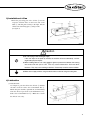
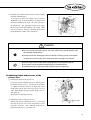
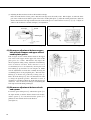
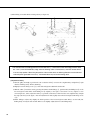
As in figure 28, when the auxiliary thread tension
adjustment nut ① is turned clockwise, the length of the
thread after trimming gets short. The other way makes
the thread long. The appropriate length of the upper
thread on the needle after trimming is 35~45mm. (This
can also be done by using the remaining upper thread
length adjustment volume of the control box.)
Short
Long
①
[Figure 28]
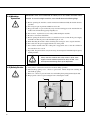
Caution
▶Be sure to place back safety devices and check whether they function properly, after
disassembling and adjustments.
▶Use both hands when bending the machine backwards or returning it to the normal position.
Using only one hand can lead to severe hand injuries due to the weight of the machine.
▶Be sure to pay caution to safety when making adjustments with the power switch on.
▶The machine must be repaired and inspected only by trained technicians.
▶Qualified technicians or agent must perform electrical repairs or inspections.
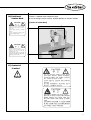
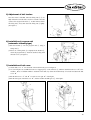
8) Adjusting height and pressure of the
presser foot
(1) Adjusting the height of the presser foot
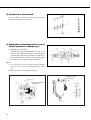
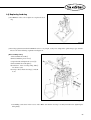
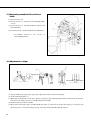
Loosen the pressure adjustment screw ① and the presser
bar bracket clamp screw ②. Lift the presser bar lifter
③. Make the distance between the upper side of the
needle plate and the lower side of the presser foot ④
7mm. Then, tightly fasten the bracket clamp screw ②.
(See figure 29)
Be careful not to turn the presser bar.
(2) Adjusting the tension of the presser foot
Turning the pressure adjustment screw ① to the right
increases the presser foot tension, and turning it to the
left makes it weaker. After adjusting, make sure to
tighten the fixing nut ⑤. (See figure 29)
①
⑤
②
③
④
About 7 mm
[Figure 29]
21