1
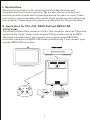
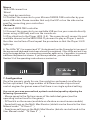
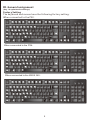
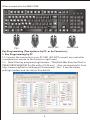
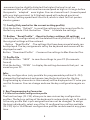
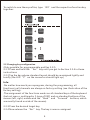
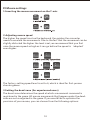
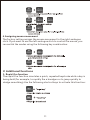
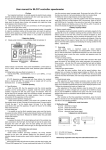
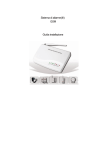
Multi Max Shooter
Mouse/ Keyboard Converter For PS3/PS4/XBOX 360/XBOX ONE
User manual
I.Introduction
1
II . Quick start
1
Brief Guide
Quick Start for PS3
Quick Start for PS4
Quick Start for XBOX 360
Quick Start for XBOX ONE
LEDs and Configuration
2
2
2
3
3
4
III. General assignment
5
Factory Setting
Key programming
1. Key Programming by PC
2. Key Programming by Converter
5
6
6
8
IV Mouse settings
10
1.Inverting the mouse movement on the Y-axis
10
2.Adjusting mouse speed
10
3.Setting the dead-zone (for experienced users)
4.Assigning mouse movement
10
11
V. Additional functions
11
1.Rapid-fire function
11
2.Auto-fire function
3.Constant-fire function
4.Add-On for circular menus
12
12
12
VI. Trouble shooting
13
1.Reset to factory settings
13
2.Update the software
3.Driver update installation instructions
13
13
VII. Safety instructions
14
I. Introduction
We want to say thank you for choosing the Multi Max Shooter and
congratulation you on your decision. We are sure that our product will
provide you with a great deal of gaming pleasure for years to come. These
instructions contain valuable information about operating and configuring
the converter. Please keep this manual in a safe place for future reference.
II. Quick start for PS3, PS4, XBOX 360 and XBOX ONE
1.Brief Guide:
The default mode of this converter is PS3. This converter works as PS4 mode
automatically if you connect your original PS4 controller, works as XBOX
360 mode automatically if you connect your original wired XBOX 360
controller, and works as XBOX ONE mode automatically if you connect your
original XBOX ONE controller.
Controller
1
2. Quick Start for PS3
2.1 Connect your mouse and keyboard to the USB port on the converter.
Recommended hardware:
Keyboard
· With USB connection
· Wired
· Without macro- or hub function
· Without mouse function
Mouse
·With USB connection
·Wired
·Ver y high dpi resolution
2.2 Connect the converter to an available USB port on your console and turn
the console on.
2.3 To connect the PS3 version, push the Home button in the middle of the
adapter similar to how you would on the controllers. If the PS3 adapter
doesn’t connect to channel 1, you can reassign the converter under
Accessor y Settings in the PS3 menu.
3. Quick Start for PS4
3.1 First switch off your Sony DualShock 4 controller.
Connect your mouse and keyboard only to one of the both front USB
bushings. The USB port on the side is designed for connecting Sony
DualShock 4 controllers only.
Keyboard
·With USB connection
·Wired
·Without macro- or hub function
·Without mouse function
Mouse
·With USB connection
·Wired
·Ver y high dpi resolution
3.2 Connect the converter to your Sony DualShock 4 controller by your
micro USB cable. Please consider that only the USB port on the side can be
used for connecting your controllers.
Controller
·Sony DualShock 4 controller
3.3 Connect the converter to an available USB port on your console directly
(never using a USB hub) and turn the console on.
2
3.4 Next, press the home button in the middle of the converter to start up
the converter.
3.5 Pay attention to the Player LEDS (1-4). The converter will connect to next
available channel on the PS4. If you want to play as Player 1, switch the
other controllers off and repeat the procedure so that the Player 1 LED
lights up.
4. Quick Start for XBOX 360
4.1 Connect your mouse and keyboard to the USB port on the converter.
Recommended hardware:
Keyboard
·With USB connection
·Wired
·Without macro- or hub function
·Without mouse function
Mouse
·With USB connection
·Wired
·Ver y high dpi resolution
4.2 Connect your wired XBOX 360 controller. Required hardware:
Controller
·Wired
·Licensed by Microsoft
4.3 Connect the converter to an available USB port on your console directly
(never using a USB hub) and turn the console on.
4.4 Pay attention to the Player LEDS (1-4). The converter will connect to next
available channel on the XBOX 360. If you want to play as Player 1, switch
the other controllers off and repeat the procedure so that the Player 1 LED
lights up.
5. Quick Start for XBOX ONE
5.1 First switch off your Microsoft XBOX ONE controller.
Connect your mouse and keyboard only to one of the both front USB
bushings. The USB port on the side is designed for connecting Microsoft
XBOX ONE controllers only.
Keyboard
·With USB connection
·Wired
·Without macro- or hub function
·Without mouse function
3
Mouse
·With USB connection
·Wired
·Ver y high dpi resolution
5.2 Connect the converter to your Microsoft XBOX ONE controller by your
micro USB cable. Please consider that only the USP ort on the side can be
sued for connecting your controllers.
Controller
·Microsoft XBOX ONE controller
5.3 Connect the converter to an available USB port on your console directly
(never using a USB hub) and turn the console on.
5.4 Pay attention to the Player LEDS (1-4). The converter will connect to next
available channel on the XBOX ONE. If you want to play as Player 1, switch
the other controllers off and repeat the procedure so that the Player 1 LED
lights up.
6. The LEDs “M” ( for mouse) and “K” (for keyboard) on the Converter let you see if
the mouse and keyboard have been correctly recognized. If the LEDs are not lit up
as in the image below, try connecting converter again or try, if possible, to connect
a different keyboard or mouse. If you have problems, you can either consult
Section VI of the operating instructions or contact us
7. Configuration
Once the mouse is ready for use, the resolution and speed can often be
further optimized. The large number of different mouse chip sets and
control engines for games means that there is no single optimal setting.
You can set your own personalized, optimal resolution/speed by adjusting the
following 4 parameters:
- Mouse speed in the Options menu of the individual game (see the
operating instructions for the game)
- DPI switch on the mouse (available as a feature on most mouse models)
- Speed settings on the Multi Max Shooter (details can be found in the User
Manual under “IV. Item 2”)
- Dead zone settings on the Multi Max Shooter (details can be found in the
User Manual under “IV. Item 3” )
4
III. General assignment
(key - & optimization settings)
Factor y Setting
The keyboard and mouse have the following factor y setting:
When connected to the PS3:
When connected to the PS4:
When connected to the XBOX 360:
5
When connected to the XBOX ONE:
PS3
PS4
XBOX 360
XBOX ONE
Key Programming (Two options: by PC, or by Converter ):
1. Key Programming by PC
1.1 Connect the converter to your PC USB. (DO NOT connect any controller
or keyboard or mouse to the converter right now.)
1.2 Install the key programming firmware “Mayflash Max Shooter Plus for
PS3&4 XBOX360&ONE Profile editor V1.00.exe”. (You can download it from
http://www.mayflash.com/Support/Download/). You’ll see the below
setting interface and the instruction details.
6
*① Mode Menu
Select any of PS3, PS4, XBOX 360 or XBOX ONE that you wish to set for on
the Mode menu.
*②Select an available configuration profile
The function keys (F1-F12) allow you to save various key configuration
profiles. The factor y setting of the keyboard is automatically set to F1,
which is the only profile that is pre-assigned and can not be changed. To
assign the keys individually, select one of the 11 configuration profiles
available (F2-F12). Up to 11 different configuration profiles can be saved at
any given time.
*③⑤⑥⑦⑧⑨ Key Programming
The buttons of ③⑤⑥⑦⑧⑨ can be programmed as you need. Simply click
the button you want to set and type the desired target key on your keyboard
or mouse.
For example, if you want to set the button “L2” to the key “B” instead of
the default key “V”, just click the button “V” firstly, and type the button
“B” on your keyboard. Now click the button “Download Profile”(⑫) to
save the settings to the converter or click the button “SAVE” (⑬) to save
the settings to your PC (Documents format).
This setting method works for all buttons of ③⑤⑥⑦⑧⑨.
*④ Turbo and Auto Fire
Select the Turbo or Auto Fire function for the buttons listed on ③
*⑩ Mouse Settings
Control: The factor y setting assigns the mouse movement to the right
analogue stick . You can switch to the left analogue stick to control the
mouse by this Control Menu.
Mouse Y: Inverting the mouse movement on the Y-axis. Reverse (Inverted
Y-axis), or Normal (Deactivates inverter Y-axis)
DeadZone: The dead-zone determines the speed at which a movement
command is registered in the game. If you would like to optimize the
precision of your mouse, you can choose from 1 (Minimum dead-zone,
suitable for high-resolution mouse devices) to 10 (Maximum dead-zone,
ideal for ver y low-resolution mouse devices)
The factor y-setting speed level is set to 7
Sensitivity: The higher the speed is set on the keyboard, the quicker the
converter needs to emulate the movements. Due to the fact that the
7
movement can be slightly distorted the higher the level is set, we
recommend that you first raise the mouse speed as high as it can go before
the speed is ‘adapted’ even higher. You can choose from 1 (Lowest speed
with ver y high precision) to 9 (Highest speed with reduced precision)
The factor y-setting speed level is set to 6, which is ideal for first-person
shooter games.
*⑪ Config (Only works for the current setting profile)
Click the button “Default” to reset the settings on the current profile to
the factor y mode. Click the button “Clear ” to delete the settings.
*⑫ Button “Reset Profile” : Reset to factor y settings. All settings
(including key configuration) will be deleted from all profiles (F2~F12) and
the original settings will be restored.
Button “Read Profile” : The settings that have been saved already can
be displayed. The key assignments set by the keyboard and mouse will be
displayed as well.
Button “Download Profile” : Conser ve the settings to Max Shooter Plus.
*⑬ Profile file
Click the button “SAVE” to save the settings to your PC (Documents
format)
Click the button “OPEN” to display the setting documents that you’ve
saved on your PC.
Info:
The key configuration (only possible for programmable profiles F2~F12)
changed by the keyboard and mouse (see the Instructions for the Key
Programming by converter in this manual) will be displayed on PC once you
run this firmware. You can change and save the key configuration again on
PC.
2. Key Programming by Converter
2.1 Select an available configuration profile
The function keys (F1-F12) allow you to save various key configuration
profiles. The factor y setting of the keyboard is automatically set to F1,which
is the only profile that is pre-assigned and can not be changed. To assign
the keys individually, select one of the 11 configuration profiles available
(F2-F12) Up to 11 different configuration profiles can be saved at any given
time.
8
To switch to one these profiles, type “Alt” and the respective function key
together :
2.2 Changing key configuration
(Only possible for programmable profiles 2-12)
2.2.1 Press and hold the “ Esc” key until you get to Section 2.2.4 in these
instructions
2.2.2 Tap the key whose standard layout should be reassigned lightly and
briefly (the LED “P” on the converter should light up)
Info:
·No matter how much you reprogram, during the programming, all
functions in all channels are always on factor y setting (see illustration of the
factor y setting).
·The assignment of the functions works on all standard keys of the keyboard
(but not macro, multimedia, F-keys of ESC) and on standard buttons of the
mouse (left, right, middle and the “Back” and “For ward” buttons, which
are mostly found on side of the mouse).
2.2.3 Press the desired target key
2.2.4 Now release the “Esc” key. The key is now re-assigned.
9
IV Mouse settings
1.Inverting the mouse movement on the Y-axis
2.Adjusting mouse speed
The higher the speed is set on the keyboard, the quicker the converter
needs to emulate the movements. Due to the fact that the movement can be
slightly distorted the higher the level is set, we recommend that you first
raise the mouse speed as high as it can go before the speed is ‘adapted’
even higher.
!
1
@
2
*8
(
9
The factor y-setting speed level is set to 6, which is ideal for first-person
shooter games.
3.Setting the dead-zone (for experienced users)
The dead-zone determines the speed at which a movement command is
registered in the game. All mouse movements that happen under the deadzone are not recognized in the game. If you would like to optimize the
precision of your mouse, you can choose from the following options:
10
!
1
*8
@
2
(
9
4.Assigning mouse movement
The factor y setting assigns the mouse movement to the right analogue
stick . If you want to use the left analogue stick to control the mouse, you
can switch the modes using the following key combination:
V. Additional functions
1. Rapid-fire function
The rapid-fire function simulates a quick , repeated keystroke while a key is
being held (for example, to rapidly fire a handgun or to jump quickly to
dodge something) Use the following stortcut keys to activate this function:
11
2. Auto-fire function
The auto-fire function simulates a quick , repeated keystroke without having
to press the key. Once auto-fire is activated using the key combination, the
quick repetition of the keystroke will be simulated until the respective key
combination deactivates the function。
3. Constant-fire function
The Constant-fire function simulates a constant pressing of a button, even
though you only tip on the button shortly. For instance, your game
character can walk through the entire game world, by pressing only one
button shortly.
Pressing “ Target Key” again
- Deactivates the Constant-fire until the button is pressed again
4. Add-On for circular menus
In many console games (e.g. Mass Effect, Red Dead Redemption, Deus Ex)
the gaming menus work on base of circular menus. Using these circular
menus with a keyboard and mouse, is often a tricky issue. With the preinstalled Add-On it is possible though, to start a control stick rotation in
circular menus by only keeping one button pressed.
If the games circular menu is controlled with the left stick :
12
If the games circular menu is controlled with the right stick :
VI. Trouble shooting
If you are having problems with the converter, you have the following
options:
1.Reset to factor y settings
All settings (including key configuration) will be deleted from all profiles
and the original settings will be restored
Important!
Wait at least 10 seconds after resetting to be sure that all of the data has
been reset. Disconnecting the adapter too soon may head to malfunctions.
2. Update the software
2.1Go to http://www.mayflash.com/Support/Download/
2.2Download the driver and install it on your converter as follows:
3. Driver update installation instructions
3.1Double click on the driver and leave the driver window open on your scr
een.
3.2Press and hold the Home button in the middle of the converter.
3.3Connect the converter directly to a USB interface on your PC, still holdi
ng the Home button the entire time.
3.4As soon as the driver window indicates under “Device” that the adapt
er has been recognized, you may release the Home button.
3.5Select “UPGRADE”.
3.6Donot disconnect the device until you are informed that the updated w
as completed successfully.
13
VII. Safety instructions
1.Do not attempt to ser vice or repair the device yourself. Leave any ser vice
work to qualified technicians.
2.Do not modify the device in an way. Doing so voids the warranty.
14