1
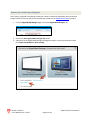
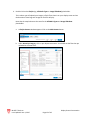
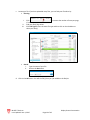
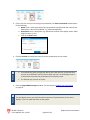
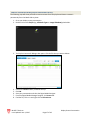
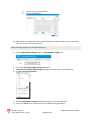
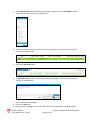
Display Screen User Guide Last Updated: June 1, 2015 Table of Contents Before you Begin ................................................................................................2 Create content in Microsoft PowerPoint .................................................................................... 2 Convert your content in Microsoft PowerPoint to images ......................................................... 3 Convert your content in Microsoft PowerPoint to SWF files ...................................................... 3 Log into the Digital Media Manager (DMM) ........................................................ 4 Upload file(s) to the Media Library .....................................................................5 To Add, Edit, View and Delete Asset ........................................................................................... 7 Display Screen Presentation ...............................................................................8 Design your display screen presentation .................................................................................... 8 Import your content into the playlist ........................................................................................ 12 Remove content from the playlist and Media Library .............................................................. 17 Find existing display screen presentation ................................................................................. 18 Delete existing display screen presentation ............................................................................. 19 Publish your display screen presentation .......................................................... 20 Reboot the Digital Media Manager System ....................................................... 22 McGill IT Services Last Updated: June 1, 2015 Page 1 of 18 Table of Contents Before you Begin Before you begin to use the Digital Media Manager web application, you need to: • • Request access to manage display screens: a. For new user, go to http://www.mcgill.ca/it/forms/request-display-screen-acct b. For existing user who forgot the username and password and/or would like to change users, contact IT Service Desk at 514-398-3398. Create your display screen content in Microsoft PowerPoint and convert it to an image or SWF file. Create content in Microsoft PowerPoint The display screen standard Microsoft PowerPoint size is 20 x 11.25 inches. To set the size in Microsoft PowerPoint 2013: 1. Click Design tab. 2. Click Slide Size drop down arrow > click Custom Slide Size. 3. The Slide Size window opens, fill out the following information: a. Slides sized for: select Custom. b. Width: enter 20. c. Height: enter 11.25. 4. Click on the OK button. 5. The next step is to create your content in PowerPoint. Note When creating the content in Microsoft PowerPoint, the recommended font size is 16 and up. McGill IT Services Last Updated: June 1, 2015 Page 2 of 18 Before you Begin Convert your content in Microsoft PowerPoint to images Once you have finished designing your content in Microsoft PowerPoint, you can convert your slides as images. To convert the content in Microsoft PowerPoint 2013 to JPG: Click File tab. Click Save As. Click Browse. The Save As window opens. Do the following steps: a. File name: Enter a name. b. Save as type: select JPEG File Interchange Format (*.jpg). c. Click on the Save button. d. A dialogue box will appear and then click on the All Slides button to export all of the slides. e. Another dialogue box appears and indicates the location of where each slide will be saved. Click on the OK button. 5. Now, you are ready to use the Digital Media Designer web application. Go to Create your Presentation on page 9. 1. 2. 3. 4. Convert your content in Microsoft PowerPoint to SWF files The two recommended software that you can use are: 1. FlashPoint for Microsoft PowerPoint 2010: a. To buy: http://www.flashdemo.net/powerpoint-to-flash/buynow.html b. Steps on how to use it: http://knowledgebase.mcgill.ca/media/pdf/AV/UsingFlashPoint.pdf 2. iSpring Pro 7 for Microsoft PowerPoint 2013: a. To buy: http://www.ispringsolutions.com/ispring-pro McGill IT Services Last Updated: June 1, 2015 Page 3 of 18 Before you Begin Log into the Digital Media Manager (DMM) You need to get your display screen credential before you could log into the Digital Media Manager. If you do not have one, go to: http://www.mcgill.ca/it/forms/request-display-screen-acct. 1. Open up a browser and go to the URL below: https://pds.campus.mcgill.ca:8443/ Note: For Internet Explorer users, if you see the following website security certificate warning, click Continue to this website (not recommended). 2. Enter the username and password (provided by the IT Service Desk). 3. You will see the Digital Media Manager home page. The next step is to Upload file(s) to the Media Library section on page 5. To go back to the Digital Media Manager home page, click Digital Media Manager. Tip McGill IT Services Last Updated: June 1, 2015 Page 4 of 18 Log into the Digital Media Manager (DMM) Upload file(s) to the Media Library 1. From the Digital Media Manager home page, click Content Management. 2. Click Media Library tab (located at the top). 3. Find and click your group folder name from the left of the screen (e.g. ICS) under Assets tab > Categories > Media. 4. Click on the Add Media Asset button at the bottom of the screen. 5. The Add Asset window opens. Fill out the following: a. Source: choose Local File and click Browse to upload the file. b. Title: enter a name (e.g. May15_688_Display). c. Asset Type: it will automatically detect the file; if not, select the type. d. Click on the Save button. McGill IT Services Last Updated: June 1, 2015 Page 5 of 18 Upload file(s) to the Media Library e. The View Asset window will display. Review the information. f. Click on the Close button. 6. You should now see your new file under the Asset Title section. McGill IT Services Last Updated: June 1, 2015 Page 6 of 18 Upload file(s) to the Media Library To Add, Edit, View and Delete Asset 1. 2. 3. 4. On the Digital Media Manager page, click the Media Library tab at the top. Find and click your group folder name (e.g. ICS) under Assets tab > Categories > Media. Under the Asset Title section, click on the file. It will highlight in green. Right click on the selected file and you will see a list of action items. Select one of the action items. a. Add Asset: This is another way to add a file to the Asset Title list. b. Edit Asset: It allows you to change the picture, and/ or modify the file name. c. View Asset: It allows you to see where this image is being used. Click Usage tab > Presentation. You will see the name of the presentation. d. Delete Asset: It will permanently delete the file(s) that have not been used in the presentation. You can find where it is being use by clicking View Asset > Usage tab > Presentation and then you have to go to that presentation and remove the file from the playlist Note You can delete many files by pressing on the Ctrl keyboard and clicking on the file(s), but you can only add, edit and view one file at a time. We recommend that you always delete unused images and/or files to avoid slow down on the system. McGill IT Services Last Updated: June 1, 2015 Page 7 of 18 Upload file(s) to the Media Library Display Screen Presentation Make sure you have uploaded your file(s) in the Media Library (see Upload file(s) to the Media Library on page 5) before you design your display screen presentation. Here are the steps to create your display screen presentation: Design your display screen presentation 1. From the Digital Media Manager page, click on the Digital Media Designer tab. 2. Click on the Start Digital Media Designer 2.0 button. 3. A Welcome to the Digital Media Designer dialogue box opens. Click Start with a Blank Presentation. 4. The Digital Media Designer window opens. Set the canvas properties: McGill IT Services Last Updated: June 1, 2015 Page 8 of 18 Display Screen Presentation a. Size: It is important that you set the correct size for your screen display: 1920 for the width and 1080 for the height. I. Select Custom from the drop down list. II. Enter 1920 for the Width and 1080 for the Height. b. Orientation: allows you to select portrait or landscape. I. Select landscape. c. Show safe area margins: should be set the same size as the Size section, which is 1920 for the width and 1080 for the height. Click Custom and set the size. d. Fill: allows you to choose the desired background color. I. Click to choose the desired color. McGill IT Services Last Updated: June 1, 2015 Page 9 of 18 Display Screen Presentation 5. Design your presentation layout by deciding which use: placeholder you would like to a. All Media Types: Allows you to display all types of files. If you created your content in PowerPoint and converted to a SWF file, you should use this. b. Image Slideshow: Only allows you to upload picture format files such as JPEG, PNG, and GIF. c. Audio Only: Only allows you to upload audio file format. 6. Once you have decided type of Playlist, you will see it on the content layout. For each type of Playlist, you can: • Move an item: Click and drag to move it to the desired area. • Make an item bigger or smaller: Click on the item and you will see all the corners highlighted. Click on the corner to make it bigger or smaller. McGill IT Services Last Updated: June 1, 2015 Page 10 of 18 Display Screen Presentation Note: Make sure you use all the space 1920 X 1080 and it should look like this: 7. Next step is to import your content into the playlist on page 12. McGill IT Services Last Updated: June 1, 2015 Page 11 of 18 Display Screen Presentation Import your content into the playlist At this point, you would have already created your content in Microsoft PowerPoint and converted as images or flash file. Ensure that you have upload your content to the Media Library Asset on page 5. 1. From the Digital Media Manager page, click on the Digital Media Designer tab. 2. Click on the Start Digital Media Designer 2.0 button. 3. A Welcome to the Digital Media Designer dialogue box opens. Find your presentation either from Open Last Modified or Open existing. McGill IT Services Last Updated: June 1, 2015 Page 12 of 18 Display Screen Presentation 4. Double click on the Playlist (e.g. All Media Types or Image Slideshow) placeholder. This is where you will upload your images or flash file to show it on your display screen and set the duration of how long each images or flash file will play. Note that the steps below are the same for the All Media Types and Image Slideshow placeholder: a. A Playlist Content window appears. Click on the Add Content button. b. Under Assets By Category, click on your department name. You should see the files that you uploaded in the Asset Title. McGill IT Services Last Updated: June 1, 2015 Page 13 of 18 Display Screen Presentation c. Locate your file. If you have uploaded many files, you can find your file either by: • Filtering: I. II. III. • Click to increase the number of items per page, if needed. Find your file(s) bye either: Click File Type to filter the same file type and then click on the checkbox to select your file(s). Search: I. Type the name of your file. II. Click on the Go button. d. Click on the OK button. You will the file(s) that you just added on the Playlist. McGill IT Services Last Updated: June 1, 2015 Page 14 of 18 Display Screen Presentation e. Set the duration of how long each file will play and loop (minimum of 10 seconds for images and 0 for SWF files). Two ways to set the duration: • To set for all of the images or flash file: set the duration and then click on the Apply button. • To set an image or flash file individually: double on the field under Planned Duration and then enter the duration. f. Click on the OK button, when you are done. 3. Now, save the presentation by clicking on the Save icon. McGill IT Services Last Updated: June 1, 2015 Page 15 of 18 Display Screen Presentation 4. If this is the first time you are saving your presentation, the Save Presentation window opens. Do the following: a. Name: enter a name (the name of your presentation should include the name of your department + date of last modified - e.g. EducationSept2014) b. Description: enter a description (e.g. indicate the location of the display screen, which display screen it is, etc.) c. Click on the Save button. • Note 5. Click the Preview icon below the menu to see the presentation you just saved. • The Preview only gives you a general idea of how it will look like. Sometimes what you see on the preview is not the same as when you see it on the display screen. It is always best to preview the presentation on the display screen. The Preview may not work in Firefox. 6. Close the Digital Media Designer window. The next step is to Publish your presentation on page 20. Note For each display screen, you should create a maximum of 2 presentations (1 main and 1 backup). This is to avoid slow down on the system. McGill IT Services Last Updated: June 1, 2015 Page 16 of 18 Display Screen Presentation Remove content from the playlist and Media Library The following step will show you how to remove content from the playlist and how to remove it permanently from the Media Library Asset. 1. Go to your display screen presentation. 2. Double click on the Playlist (e.g. All Media Types or Image Slideshow) placeholder. 3. The Playlist Content will dialogue box opens. Click the file that you want to delete. 4. 5. 6. 7. 8. Click on the Delete button, located at the top. Click OK. Save your presentation and close the Digital Media Designer. From the Digital Media Manager Designer, click Assets tab. Find the file, click on it and right-click on Delete Asset. McGill IT Services Last Updated: June 1, 2015 Page 17 of 18 Display Screen Presentation 9. Click OK to confirm it. Find existing display screen presentation The following are steps on how to find your presentation and edit it: 10. From the Digital Media Manager page, click Digital Media Designer tab. 11. Click on the Start Digital Media Designer 2.0 button. 12. A Welcome to the Digital Media Designer dialogue box opens. You can either: a. Click on the presentation next to Open Last Modified. b. Or click on Open Existing and do the following steps: I. Change the filter to show 100 per page. II. Use the scroll bar to find your presentation. McGill IT Services Last Updated: June 1, 2015 Page 18 of 18 Display Screen Presentation III. IV. Click to select your presentation. Click on the OK button. 13. Begin editing your presentation. Don’t forget whenever you make changes to your presentation, you have to save it before you publish it. Delete existing display screen presentation 1. From the Digital Media Manager page, click Digital Media Designer tab. 2. Click on the Start Digital Media Designer 2.0 button. 3. A Welcome to the Digital Media Designer dialogue box opens. Open your presentation. 4. Click File > Delete Presentation. 5. The Cisco Digital Media Designer dialogue box opens. Click on the Yes button. 6. Click on the OK button to confirm that you have deleted your presentation. McGill IT Services Last Updated: June 1, 2015 Page 19 of 18 Display Screen Presentation Publish your display screen presentation Note Every time you make changes to your content, you have to: 1. Upload the new file(s) to the Media Library 2. Delete the old file(s), upload new file(s) in your presentation and save it 3. Republish your presentation. 1. Go to the Digital Media Manager page, click Digital Media Manager to go back to the menu page. 2. Click Network and Endpoints. McGill IT Services Last Updated: June 1, 2015 Page 20 of 18 Publish your display screen presentation 3. Under DMP Groups column (located on the left side), click arrow next to ALL DMPs to expand the list and then click to select your department. 4. You will see the name of your display screen on the right side. Click to put a check next to the name of your display screen. 5. Click on the Run Task button. 6. The Run Task window opens. Find your presentation by typing the name of your presentation and click on the Go button. 7. Click to select your presentation. 8. Click on the OK button. 9. Now, go check your display screen and make sure the new presentation is showing properly. McGill IT Services Last Updated: June 1, 2015 Page 21 of 18 Publish your display screen presentation Reboot the Digital Media Manager System Whenever there is an electrical shutdown, your content on the display screen may not appear. When this happens, you should first check that your display screen is plugged and the screen is on. After verifying this, do the following steps to reboot the system: 1. 2. 3. 4. 5. Go to Network and EndPoints. Under ALL DMPs, select your department. Put a check on your display screen name. Click on the Run Task button. The Run Task window opens. a. Click System Tasks. b. Click Reboot. 6. Click OK. 7. Go check your display screen. If all fails, contact IT Service Desk at 514-398-3398 and explain to them what happened. McGill IT Services Last Updated: June 1, 2015 Reboot the Digital Media Manager System Page 22 of 18