1
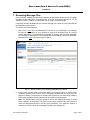
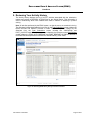
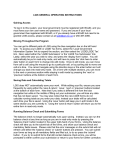
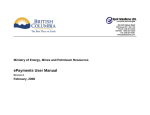
EMPLOYMENT DATA
& ANALYSIS SYSTEM (EDAS)
USER GUIDE
Version: 0.7
For technical assistance, please contact the EDAS Help Desk at 604-730-4525 or [email protected]
EMPLOYMENT DATA & ANALYSIS SYSTEM (EDAS)
USER GUIDE
Table of Contents
TABLE OF CONTENTS ................................................................................................................................ 2
1. INTRODUCTION..................................................................................................................................... 3
1.1.
1.2.
1.3.
DOCUMENT PURPOSE........................................................................................................................ 3
INTENDED AUDIENCE ......................................................................................................................... 3
BROWSER SUPPORT.......................................................................................................................... 3
2. EDAS OVERVIEW .................................................................................................................................. 4
2.1.
BENEFITS OF THE EDAS SYSTEM ...................................................................................................... 4
3. GENERAL EDAS PROCESS ................................................................................................................. 5
3.1.
REPORTING PERIODS & SUBMISSION WINDOWS ................................................................................. 6
4. EDAS DX2 ROLES ................................................................................................................................. 7
5. GETTING STARTED .............................................................................................................................. 8
5.1.
5.2.
LOGGING INTO THE DATA EXCHANGE PLATFORM (DX2) AS AN EDAS USER ......................................... 8
VIEWING THE EDAS SUBMISSION STATUS ........................................................................................ 12
6. SUBMITTING A FILE ........................................................................................................................... 14
7. REVIEWING MESSAGE FILES ........................................................................................................... 17
8. RELEASING FILES TO THE MINISTRY ............................................................................................. 18
9. REVIEWING YOUR ACTIVITY HISTORY ........................................................................................... 19
10. LOGGING OFF ..................................................................................................................................... 20
11. GLOSSARY .......................................................................................................................................... 21
Last revised: 13/12/2012
Page 2 of 21
EMPLOYMENT DATA & ANALYSIS SYSTEM (EDAS)
USER GUIDE
1. Introduction
1.1. Document Purpose
The purpose of this document is to provide BC school districts with guidelines for the
submission and release of EDAS data on a quarterly basis to the Ministry of Education and
BCPSEA using the Ministry’s Data Exchange Platform (DX2). This User Guide does not
include details of the process used to create the data extract to be uploaded by the school
districts. A glossary is included to assist in understanding the technical terminology used.
1.2. Intended Audience
The primary audience for this document are the administrative personnel in each school
district responsible for submitting and releasing employment data via the Data Exchange
Platform (DX2).
1.3. Browser Support
The following supported web browsers are supported for EDAS. Other web browsers may
also work, but technical support may be limited.
•
Microsoft Internet Explorer (Windows) 6.x and 7.x.
•
Firefox (Windows) 2.x and 3.x.
Last revised: 13/12/2012
Page 3 of 21
EMPLOYMENT DATA & ANALYSIS SYSTEM (EDAS)
USER GUIDE
2. EDAS Overview
School districts across British Columbia are experiencing ever-increasing workforce
challenges as they attempt to attract, recruit and retain employees in a changing labour
market. A lack of data makes it difficult for districts to adequately assess their current
workforce needs or make forecasts about expected retirement and attrition rates. In addition,
employment related data is required for the development and costing of collective agreement
bargaining proposals. In order to address these challenges, the Ministry of Education
together with BCSPEA has developed a complete set of business and technology processes
required to collect, validate, release and report on this data. The system is known as the
Employment Data & Analysis System (EDAS) and makes use of the Data Exchange Platform
(DX2), the Ministry’s new platform for submitting, validating and releasing data.
The purpose of this data collection project is to streamline employment data collection
requirements for school districts, and to develop common baseline information to be used for
collective bargaining with the various employee groups in the K-12 public education sector.
This information will also guide BCPSEA in its development of a strategic workforce plan for
employees in the sector and will serve as a driver of best HR practices.
EDAS data is collected under the School and Student Data Collection Order (M152/89).
Under this order, school boards are responsible for collecting and submitting the information
to the Ministry.
2.1. Benefits of the EDAS System
The key benefits of EDAS and the rollout of the DX2 to school districts are as follows:
•
Eliminate multiple data collections: Establish a single common data set which can be
extracted once at regular intervals and used for multiple purposes.
•
Simplify the data collection process: School Districts will be able to satisfy multiple
reporting requirements - both to BCPSEA and the Ministry of Education - with one
automated extract and submission each quarter. EDAS will replace several existing
forms: Forms 2001, 2003, and parts of Form 1601 and others in the future, as the
process and quality of data are in place.
•
Single, consistent upload process: DX2 will support multiple data exchanges,
establishing a single place for school districts to securely sign on, upload, validate and
release their extracts, using a consistent process.
•
Data quality at source: School districts will have control and responsibility for the quality
of their source data ensuring that it is (1) complete; (2) in the correct format; and (3)
consistent with defined standards prior to releasing it to the Ministry.
The end result will be simpler and more consistent data collection processes, improved data
quality, and better data for School Districts, the Ministry and BCPSEA, ensuring improved
decision making and a reduction in the duplication of effort required to obtain accurate
information.
Last revised: 13/12/2012
Page 4 of 21
EMPLOYMENT DATA & ANALYSIS SYSTEM (EDAS)
USER GUIDE
3. General EDAS Process
The collection and processing of EDAS data follows five steps:
1) Extract: School districts will extract a copy of their EDAS data from their payroll and
human resource information systems (e.g. SDS or TSC/SRB) using the tools developed
by the respective software vendors ready for loading into the EDAS system via the DX2.
(Please see the EDAS Data Extraction Design Guide posted on the BCPSEA EDAS
SharePoint for details).
2) Review: School districts should use the tools provided by their software vendor to review
and verify the data extracted. These tools may replicate some or all of the validation
implemented on the Data Exchange Platform and found in the EDAS Data Definitions
Guide posted the BCPSEA EDAS SharePoint.
3) Submit: Log on to the DX2, browse for the EDAS file, and submit the file for validation.
4) Check: Review the resulting message file for error and/or warning messages. Make any
necessary corrections in the source system and repeat above steps 1 through 3. If no
errors are found during validation you may move on to the final step.
5) Release: Inform the individual responsible for releasing the EDAS information for the
school district that the data is ready to be released. The responsible individual can review
the message file and release the data. This action electronically signs off and officially
delivers the data from the school district to the Ministry.
Data Exchange (DX2) Platform (EDAS)
2
3
Validate
Release
Notification
Submit
File Contents
Single
File Name
Authentication
& Authorization
Delete File
File Format
•School Districts
Validate
Validate
Validate
File Processing
UI
Errors
Log File
Code
Tables
Processing (Hash, Conversion, Dups, etc)
Error
Notification
Submitter
Release
Releaser
•School Districts
Retrieve
(Pull/Push)
Single
Retain/Delete
1
Release
Single
Multiple
UI
Retain/Delete
Receiver
Submit/Resubmit
•BCPSEA
Retrieval
Notification
System
Administrator
•MoEd
SDS,
TCS,
CIMS,
etc.
4
Retrieve
Figure 1. The EDAS process
Last revised: 13/12/2012
Page 5 of 21
EMPLOYMENT DATA & ANALYSIS SYSTEM (EDAS)
USER GUIDE
3.1. Reporting Periods & Submission Windows
Reporting Period
The Reporting Period is the time period for which data may be extracted prior to submission
to the DX2. All records for employees that were actively employed by the school district within
the Reporting Period must be extracted and submitted for validation and release. Each
collection is cumulative back to the beginning of the school year according to the following
table:
REPORTING PERIOD
QUARTER
START DATE
END DATE
July YY – September YY
Q1
1 July
30 September
July YY – December YY
Q2
1 July
31 December
July YY – March YY
Q3
1 July
31 March
July YY – June YY
Q4
1 July
30 June
Submission Window
The Submission Window is the data collection window during which EDAS data may be
submitted and released via the DX2. The Submission Window will generally be open for 15
days following the close of each reporting period i.e. the first 15 days of October, January,
April, and July. The actual dates of the Submission Window may vary depending on holidays,
weekends, technical changes, etc. The dates for each Submission Window will be posted on
the Ministry’s data collection website (http://www.bced.gov.bc.ca/datacollections/) or can be
found on the BCPSEA SharePoint site.
Last revised: 13/12/2012
Page 6 of 21
EMPLOYMENT DATA & ANALYSIS SYSTEM (EDAS)
USER GUIDE
4. EDAS DX2 Roles
There are three roles required for the setting up of the DX2 to accept and manage EDAS data
submissions within the school district:
ROLE
DESCRIPTION
EDAS User
Administrator
The primary contact responsible for authorizing Submitters and
Releasers within the Data Exchange Platform (DX2). This person
should be familiar with the staff and their responsibilities, and
should be the EDAS contact person for when staff changes
occur.
This individual may be the same as the person responsible for
creating and assigning Business BCeIDs within the school district
or a person delegated by them to authorize EDAS users. This
role may be filled by someone who has a BCeID role of Business
Profile Manager (BPM) or Business Account Manager (BAM).
The User Administrator is responsible for subsequently setting up
all Submitters and Releasers for the school district. For guidelines
on how to do this, please see the EDAS User Administration
Guide.
Submitter
The person(s) responsible for submitting the school district’s
employment data to the Ministry via the EDAS system. Persons
filling this role have access to all message files created by the
EDAS validation routines and should be able to make corrections
to their data in the source system prior to re-extracting and
resubmitting.
Releaser
The Superintendent or delegate for the school district with the
knowledge and authority to release the school district’s
employment data to the Ministry.
Last revised: 13/12/2012
Page 7 of 21
EMPLOYMENT DATA & ANALYSIS SYSTEM (EDAS)
USER GUIDE
5. Getting Started
School district staff designated to perform the tasks associated with the EDAS data collection
will access the system using their Business BCeID. Prior to attempting to log on and use the
DX2, please obtain your BCeID provided by the Business Profile Manager or Business
Account Manager for your school district.
5.1. Logging into the Data Exchange Platform (DX2) as an EDAS User
Navigate
to
the
Ministry
of
Education’s
K-12
Data
Collection
website
(http://www.bced.gov.bc.ca/datacollections/) and click on the DX2 Application link in the left
hand column.
Figure 2. K-12 Data Collections DX2 Launch Page
Last revised: 13/12/2012
Page 8 of 21
EMPLOYMENT DATA & ANALYSIS SYSTEM (EDAS)
USER GUIDE
The system will redirect you to the BCeID Common Logon Page (CLP) where you will be
prompted to enter your unique BCeID and password.
Figure 3. BCeID Common Logon Page
Note: If you receive the prompt depicted in Figure 4 prior
to being taken to the BCeID CLP, simply click on the
Cancel button and you will be taken to the BCeID CLP.
Figure 4. Government Logon Prompt
Last revised: 13/12/2012
Page 9 of 21
EMPLOYMENT DATA & ANALYSIS SYSTEM (EDAS)
USER GUIDE
If you are authorized to access more than one application using the DX2 platform you will be
asked to choose the application you wish to access. Click on the Employment & Data
Analysis System (EDAS) link. If you only have access to EDAS, you will bypass this screen
and be taken directly to the EDAS Information Board.
(Sm ith, John)
Figure 5. Page for Choosing from Multiple DX2 Applications
Last revised: 13/12/2012
Page 10 of 21
EMPLOYMENT DATA & ANALYSIS SYSTEM (EDAS)
USER GUIDE
The Information Board displays important information regarding EDAS collections and status
of the DX2. Please review this information carefully before pressing “Continue”.
Figure 6. The EDAS Information Board
Last revised: 13/12/2012
Page 11 of 21
EMPLOYMENT DATA & ANALYSIS SYSTEM (EDAS)
USER GUIDE
5.2. Viewing the EDAS Submission Status
Once you press “Continue”, you will be taken to your Home screen which indicates the
EDAS Submission Status for your school district for the current reporting period (defined as
the Reporting Period for which a Submission Window is currently open, or, if no Submission
Window is currently open, the Reporting Period most recently closed).
If no EDAS file has been submitted for the current reporting period, all columns will be blank.
Richardson, Sebastian
Richardson, Sebastian
Figure 7. Submission Status Screen for Submitters & Releasers
The Reporting Period filter may be used to view the status of EDAS submissions for previous
reporting periods. The following information is displayed on the Submission Status screen:
Status
The status flag indicates the status of the submitted EDAS file. They are as follows:
FLAG
U
S
SF
V
DESCRIPTION
USER ACTION
File Successfully Uploaded (not submitted)
File Successfully Submitted (validation not
complete)
Submission Process Failed (technical reason;
file was not validated)
File Successfully Validated (validation
completed with zero errors and with or without
warnings)
Submit file when ready
Wait for validation to complete;
refresh screen periodically
Last revised: 13/12/2012
Upload and resubmit file
The Releaser will be notified via
email that the submission is ready
for release
Page 12 of 21
EMPLOYMENT DATA & ANALYSIS SYSTEM (EDAS)
USER GUIDE
FLAG
VF
R
DESCRIPTION
USER ACTION
Validation Failed (validation completed with
errors and with or without warnings)
Authorized for Release i.e. business release
approved
Correct data in source system, reextract and resubmit
None
Submission Type (Sub Type)
The valid submission types are as follows:
FLAG
S
E
DESCRIPTION
Standard Submission (as required for each reporting period)
EDAS Exception Submission (this option is only available if requested by BCPSEA
and authorized by the Ministry EDAS Administrator)
# of Records
The number of records submitted by the school district for the reporting period.
# of Errors
The number of errors found during validation for the submitted EDAS data for the reporting
period. If the number of errors is greater than zero the status will always be set to VF
(Validation Failed). The EDAS data must be corrected in the source system, re-extracted and
resubmitted. The EDAS data can only be released if no errors are found during validation.
# of Warnings
The number of warnings found during validation for the submitted EDAS data for the reporting
period. Warnings are non-critical and the EDAS data may still be released to the Ministry.
Message File
A link to view the message files (errors and warnings) in Comma Separated Format (csv).
Date Submitted
The date the EDAS data was submitted by the school district for the reporting period.
Submitted By
The name of the individual who submitted the EDAS data based on their BCeID.
Note: Each user is able to view activities of other users within the school district e.g. a
user authorized to submit EDAS data is able to see whether anyone else within the
school district has already submitted data for the school district for the reporting period.
Date Released
The date the EDAS data was released by the school district.
Released By
The name of the individual who released the EDAS data based on their BCeID.
Last revised: 13/12/2012
Page 13 of 21
EMPLOYMENT DATA & ANALYSIS SYSTEM (EDAS)
USER GUIDE
6. Submitting a File
All users authorized to submit data will be able to choose the Data Submission link in the left
hand menu. This link will only be displayed if you have Submit authorization.
Figure 8. Data Submission Screen
To begin a new submission:
1. Click on the Data Submission link on the left hand side of the screen. The Data
Submission screen will be displayed.
2. The Submission Type, Reporting Period and School District are prefilled for the school
district’s standard, quarterly EDAS submission.
Note: Only if you have been requested by BCPSEA to submit data on an exception basis
and authorized by the Ministry’s EDAS Administrator to do so, will you have the option of
choosing the Submission Type and Reporting Period.
3. Next to Source File, click on the “Browse …” button to search your computer for the file
you wish to submit. A Choose File window will appear. Find the folder in which you have
stored your EDAS file. Select the file and either double click on the file name or click on
the Insert or Open button at the bottom of the window.
Note: In order to be accepted for validation, all EDAS files must comply with the standard
file naming convention EDASsssYYYYQnJnnn.csv.
• Char 1-4: EDAS;
• Char 5-7: Number of the school district e.g. 005;
• Char 8-11: School year e.g. 0809 or 0910;
Last revised: 13/12/2012
Page 14 of 21
EMPLOYMENT DATA & ANALYSIS SYSTEM (EDAS)
USER GUIDE
• Char 12-13: Quarter of the EDAS Reporting Period e.g. Q1, Q2, Q3 or Q4; and
• Char 14-17: A unique job number e.g. Jnnn.
• Char 18: A period i.e. “.”.
• Char 19-21: The file type i.e. “csv”.
Note: Files uploaded to EDAS are checked against previous uploads to ensure filename
uniqueness. EDAS will reject a file during the data validation process if matching
filenames are found.
4. Once you have chosen the EDAS file you wish to submit, click the “Add Submission”
button. Your file will be uploaded from your computer to EDAS and an entry added to the
“Submit Data for Validation” list.
Note: If you subsequently choose another file and click the “Add Submission” button, a
warning will appear requesting confirmation that you wish to overwrite the previously
uploaded file. If you answer “OK”, your previous file will be overwritten by the latest
upload. If you attempt to submit a file outside of the Submission Window for the
Reporting Period the system will prevent you from doing so.
Figure 9. Data Awaiting Submission in the Submission Queue
5. Once your EDAS file is uploaded and an entry appears in the submission queue, you
have the choice of either deleting the upload or submitting it for validation.
• Delete File: To delete the file, click on the Check Box for the uploaded file and press
the “Delete Submission” button.
Last revised: 13/12/2012
Page 15 of 21
EMPLOYMENT DATA & ANALYSIS SYSTEM (EDAS)
USER GUIDE
• Submit File: To submit the file, click on the Check Box for the uploaded file and press
the “Submit” button. If you wish to submit the file for validation, click on the check box
and press the “Submit” button.
The EDAS file will be submitted for validation and you will be returned to the
Submission Status screen where your submission will appear with a status of “S” for
File Successfully Submitted. Refresh the screen periodically using your browser
controls or by clicking on the Home link in the left hand column. Depending on the size
of the file submitted and current system load, validation may take between a few
minutes and an hour to complete. If you wish, you may log out of EDAS and check
back later to view the data validation results.
Once validation is complete the status will be changed to either “V” for File Successfully
Validated or “VF” for Validation Failed. If the validation failed, you as the Submitter will
receive an email informing you of the status of the submission. The email is sent to the
email address recorded in the BCeID authorization system. All Submitters and
Releasers authorized for the school district will be notified via email if the submission
was validated without errors.
Richardson, Sebastian
Figure 10. Verifying the Submission Status of Your File
Note: If your submission is successfully validated with zero errors and you subsequently
resubmit data for the reporting period, a warning will appear requesting confirmation that
you wish to overwrite the previously submitted file. If you answer “OK”, your previous file
will be deleted from the system and replaced by the latest submission. If the data has
already been released for the Reporting Period, the system will prevent you from
attempting to resubmit.
Last revised: 13/12/2012
Page 16 of 21
EMPLOYMENT DATA & ANALYSIS SYSTEM (EDAS)
USER GUIDE
7. Reviewing Message Files
Once the EDAS validation process has completed, the Submission Status screen will update
the status of your submission. This will be either “V” for File Successfully Validated or “VF” for
Validation Failed. In order to view the status you will need to refresh the page.
If the EDAS file was validated with errors and/or warnings, the number of each is identified on
the Submission Status screen.
To view the errors and warnings:
1. Click on the “View” link in the Message File column for your submission. The message
file may be either saved to your computer or opened in Microsoft Excel for viewing,
sorting, and printing. The message file is available for viewing until it is either overwritten
by a subsequent submission or the released data is successfully retrieved by BCPSEA.
At that time the “View” link will no longer be active.
Richardson, Sebastian
Figure 11. Submission Status Screen Displaying EDAS Submission Results
2. If errors exist, you will need to correct the data in your source system, re-extract it and
resubmit it to EDAS. Only once the file is successfully validated with zero errors will it be
staged for release. The presence of warnings will not prevent a file from being released,
but they are present to identify data that may be outside of normal ranges.
Note: The EDAS system limits the number of errors and warnings that may be found
before validation is terminated. This does not necessarily represent the total number of
errors and warnings that may be found in your submission. If the maximum number is
reached, you will be notified by a message included in the message file.
Last revised: 13/12/2012
Page 17 of 21
EMPLOYMENT DATA & ANALYSIS SYSTEM (EDAS)
USER GUIDE
8. Releasing Files to the Ministry
If you are authorized to release EDAS data to the Ministry, you will be able to choose the
Data Release link in the left hand menu. This link will only be displayed if you have Release
authorization. Click on the Data Release link to release data. The Data Release page will be
displayed.
Richardson, Sebastian
Figure 12. Releasing EDAS Submissions
The release function in EDAS is an authorization step that indicates that you are confident the
data submitted is complete and accurate, and that you are officially releasing this data to the
Ministry. In order to ensure personal privacy of employee information, the SIN data is
automatically scrambled by means of a hashing algorithm prior to being staged for release.
To authorize the release of data:
1. Select the EDAS data you want to release by clicking on the relevant Check Box and
press the “Release” button. A message will be displayed requesting confirmation to
release the data. Click on the “OK” button to confirm the release of the data.
2. You will be returned to the Submission Status screen and the newly released file will be
listed with a Status of “R” for Authorized for Release and the released date filled in.
Note: Once released, EDAS data for the school district cannot be resubmitted for the
Reporting Period. If you subsequently realize that your released data was inaccurate or
incomplete, please contact BCPSEA at 604-730-4525 or [email protected] to
confirm if corrective actions are required.
Last revised: 13/12/2012
Page 18 of 21
EMPLOYMENT DATA & ANALYSIS SYSTEM (EDAS)
USER GUIDE
9. Reviewing Your Activity History
The Activity History displays the log of all DX2 activities associated with the submission,
release and retrieval by BCPSEA of EDAS files for the School District. This information is
useful in determining which user initiated which tasks in addition to assisting in problem
solving.
Note: All activities performed by the EDAS system, not just the users, are recorded in the log.
The Submitter initiated Add Submission process on the Data Submission screen initiates the
EDAS UPLOAD and IMPORT activities or tasks. The Submit process initiated by the
Submitter from the Data Submission screen includes the VALIDATION and
POST_VALIDATE tasks. The Release process initiated by the Releaser on the Data Release
screen initiates the EDAS AUTH_RELEASE and POST_RELEASE. BCPSEA’s retrieval of
the EDAS data encompasses the RETRIEVAL and RETRIEVE_CONF tasks.
Richardson, Sebastian
Richardson, Sebastian
Richardson, Sebastian
Richardson, Sebastian
Richardson, Sebastian
Richardson, Sebastian
Richardson, Sebastian
Richardson, Sebastian
Richardson, Sebastian
Richardson, Sebastian
Richardson, Sebastian
Richardson, Sebastian
Figure 13. Reviewing EDAS Activity History for the School District
Last revised: 13/12/2012
Page 19 of 21
EMPLOYMENT DATA & ANALYSIS SYSTEM (EDAS)
USER GUIDE
10. Logging Off
To logoff EDAS:
Click the Logoff link in the left hand menu and you will be taken to the logoff screen. You
may now close your browser.
Figure 14. Logoff Confirmation Screen
Note: If your EDAS session is idle for more than 60 minutes, EDAS will automatically log
you off the system. You will have to log in again to continue your session.
Last revised: 13/12/2012
Page 20 of 21
EMPLOYMENT DATA & ANALYSIS SYSTEM (EDAS)
USER GUIDE
11. Glossary
TERM
DEFINITION OR SYNONYM
BCeID
A common method for secure authentication of users for accessing
participating BC Government Online Services.
CSV
Comma Separated Values: A common, platform independent data
format. CSV data is viewable using tools like Windows Notepad,
Windows WordPad or Microsoft Excel.
DX2
Data Exchange Platform: The Ministry’s strategic initiative for
validating and transferring data between interested parties.
EDAS
Employment Data and Analysis System
Reporting
Period
The time period for which active employee data is extracted by the
tool vendors prior to submission to EDAS.
Submission
Window
The time period during which data may be submitted to EDAS
following the close of a reporting period. The Submission Window
usually begins one day after the end of a reporting period.
Last revised: 13/12/2012
Page 21 of 21