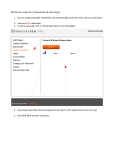
1
User guide
Version 2.1
®
For email campaigns, newsletters and promotional messages.
Designed for professionals
®
Key Concepts New
4
Recipient Lists
5
Create a Recipient List
5
Upload a CSV file
7
Insert Contacts Manually
10
Managing Folders
11
Creating a Folder
11
Moving an item to a Folder
12
Delete a Folder
13
Dashboard
14
Step 1- Mailout information
15
Step 2 - Select recipients
16
Step 3 - Create the message
17
Create a newsletter article
18
Create a promotional message
20
Inserting a PDF file in the Text Editor
21
Text editor features
23
Use an existing message
25
Step 4 - Sending properties
26
Sending Tests Manually
28
New
Send Final
29
Editing Content on the Fly
30
New
Mailout Resend Approval Request
31
New
Mailout Reports
32
Exporting a report
34
New
Behavioural Data
35
Content Creation
36
!2
®
Manage Content
38
Create a Message
39
Manage Messages
40
Updating Newsletter Content
41
Lists Management
42
Add a Contact
43
Modify or Delete a Contact
44
Exporting a Contact List
45
New
Consent Details
46
Types of Content StatusNew
47
Obtaining Consent for Promotions New
48
Obtaining consent for newsletters
49
New
Users Management
50
Profile picture
51
Sidebar Personalization
52
!3
®
Key Concepts
1. Content: This is the article of text you copy from MS Word or where you insert your link to a
PDF. This where you format your E-mail.
2. Message: This is the virtual envelope where you are placing your content. This is what you
attach to the Newsletter.
3. Mailout: This is the E-mail in its entirety with a Banner template (Newsletter) or without the
template (Promotion).
Did you know ?
The User Guide is embedded on the top right of the menu. To edit the content of your Newsletter quickly
while sending Tests follow the breadcrumb from Step 4 back to Step 3, refer to page 30.
!4
®
Recipient Lists
You can access your recipient lists from the Lists Menu on the main navigation bar.
Create a Recipient List
To create a new recipient list, click on the Create subsection of the Lists menu
1. Enter the List name (no spaces or hyphens)
2. Select a List type and a Default language as well as a Save folder
3. Click on Save and Continue to go to the next step
!5
®
In an effort to maintain compliance with anti spam laws, the following fields are automatically
added to each list created or imported in Konversation Agent.
Field
Description
Email
Subscriber's email, no double entries allowed
Date_Added
Specifies date of subscription
Date_Updated
Specifies date of last update
last_action
Specifies last action from subscriber
Last_action_date
Specifies the date of the last action from
subscriber
Insert
additional
fields here
If you need to work with more information, you can add custom fields at the second step of the
List creation process.
!6
®
After having specified the list properties, you can add contacts to the newly created list :
• By importing your contacts from a .CSV file (Option A)
• By adding your contacts manually (Option B)
Upload a CSV file
By selecting the Option A, you can import your own recipient list (saved in the CSV format).
1. Click on the Browse button to select the CSV file from your computer
2. Click on the Upload button to import your list
3. Click on the Save and Continue button to go to the next step
Did you know ?
CSV is a comma separated values file format that can be used in any spreadsheet program and takes the
form of a text file containing information separated by commas.
!7
®
Convert your Excel file to CSV
In order to import your recipient list saved in Microsoft Excel format, you must first convert them
to the .CSV format.
To convert your recipient list from Microsoft Excel :
1. Open your recipient list in Microsoft Excel
2. Click the File tab, and then click Save As
3. In the Save as type box, choose the CSV format for the worksheet
4. Browse to the location where you want to save the new text file, and then click Save
!8
®
Matching file columns with list fields
After importing your CSV file, match the columns from your file to the mandatory fields and the
custom fields of your list. You can choose to skip some custom fields.
After mapping the fields, click on Save and Continue to finalize the contact list creation.
Match your CSV
file’s columns with
Konversation
agent’s list fields
!9
®
Insert Contacts Manually
Konversation agent offers a fast and easy way to create test lists or small subscriber lists by
inserting contacts manually :
1. Click on the option B) Insert manually
2. Fill in the information fields for each new contact
3. Click on the Save and Continue to save the list
!10
®
Managing Folders
By default, Konversation agent stores your Lists, Mailout, Content and Messages in a personal
folder. You can organize any of those items in additional folders.
Creating a Folder
To create a folder :
1. Click on the Create folder button available at the bottom of each page:
2. Enter the Folder name of your folder and select a folder content type (Lists, Message,
Content, Mailouts)
3. Click on the Save button to create the folder
!11
®
Moving an item to a Folder
To move an item to a specific folder:
4. Click on its move to button (red folder icon).
5. Select a destination folder
6. Click on the Save button to move the folder
Note
The move to button will appear greyed out until you create a folder of the appropriate type.
!12
®
Delete a Folder
To delete a folder click on the Manage folders subsection under the More menu of the
navigation bar
1. Click on the delete button of the folder to remove
2. A message will warn you that the content of this folder will be deleted along with the folder.
Click on ok to continue and delete the folder
Important
By deleting a folder, you will also delete all the information it contains.
!13
®
Dashboard
To launch a new promotional message or a new newsletter, click on the corresponding button
on the dashboard.
Note
The dashboard is accessible at any time via the More menu on the main navigation bar.
!14
®
Step 1- Mailout information
After having selected a new promotion or a new newsletter, enter your mailout information:
1. Fill in the Name of your campaign (no spaces or hyphens)
2. Specify your message subject line by filling in the Subject field
3. Select a save folder
4. Click on the Save and continue button to go to the next step
Note
You can launch a promotional message or a newsletter at any time via the Get started menu on the main
navigation bar.
!15
®
Step 2 - Select recipients
This step allows you to select a subscribers list :
1. Select a list
2. Click on Save and Continue to go to the next step
Select a List
Note
At any step before sending your message, you can manage and create subscribers lists via the Lists menu
on the main navigation bar (go to page 42 for more details).
!16
®
Step 3 - Create the message
Konversation agent offers you two options to create your messages :
•
Create a new message with the text editor (Option A)
•
Use an existing message (Option B)
!17
®
Create a newsletter article
1. Click on Option A) Create a new message
2.
Fill in the name of your new message (no spaces or hyphen)
3.
Select the Message language
4.
Click on Create new article
5.
Write the article in the text editor
!18
®
6.
Select a save folder
7. To view your message before saving it, click on the Quick Preview button
8. Click on the Save and Save and Continue buttons to go to the next step
!19
®
Create a promotional message
To write a promotional message with the text editor :
1. Click on Option A) Create a new message
2. Fill in the name of your new message (no spaces or hyphens)
3. Select the Message language
4. Write your message in the text editor
5. Select a Save folder
6. To view your message before saving it, click on the Quick Preview button
7. Click on the Save and Save and Continue buttons to go to the next step
!20
®
Inserting a PDF file in the Text Editor
To insert in your message a link to a pdf file :
1. Click on the insert button and select the Insert link option
2. Click on the folder icon located in the Url line
3. Click on the Browse button to select the file from your computer and click on the Upload
button
4. Konversation Agent will generate a URL to your pdf file
!21
®
5. Type in the text to display to specify the visible, clickable text that will be displayed to
your subscribers instead of the URL generated by Konversation Agent
Type in the text
to display to your
subscribers
6. Click on the ok button to add your link
Note
The Title field allows you to enter additional text that pops up when subscribers hover over the link
The Target field specifies where to open the linked document in a new window or a new tab (none option)
!22
®
®
Texteditor
editorfeatures
features
Text
Hereisisananexhaustive
exhaustivelist
listofofthe
theeditor’s
editor’sfeatures
features: :
Here
!
Cut selected text
!
Copy selected text
!
Paste from clipboard
!
Preview message
!
Bold highlighted selection
!
Italic highlighted selection
!
Text color
!
!
Background color
!22!23
®®
!
Insert a hyperlink
!
Insert or modify a picture
Increase indent
!
Decrease indent
!
Numbered list
!
Bullet list
!
Justify text
!
Align right
!
Align left
!
Align center
!
Underline text
!
Clear formatting
!
strikethrough text
!
Insert table
!
!
Source code
!
!
!
!
!23
!24
®
Use an existing message
To use an existing message :
1. Click on the Option B) Use an existing message
2. Select a folder
Select a
folder
3. Select a message
Select a
message
4. Click on the Save and Continue button to go to the next step
Note
You can access and edit your messages at any step before the final send by clicking on Manage
messages under the Message menu on the main navigation bar (go to page 40 for more details).
!25
®
Step 4 - Sending properties
This step allows you test the rendering of your final layout and send an approbation request for
your mailout.
Preview your message
3. Click on the Preview button for a final review of your message. To edit your message, click
on the Content menu located on the navigation bar.
4. If you are satisfied with your message layout, click on the Send a test button to send your
message to a test list.
Note
You can access and edit your messages at any step before the final send by clicking on Messages on this
page which brings you back to step 3, (go to page 30 for more details).
!26
®
Send a Test
1. Click on the send a test button
2. Click on the Send a test to the following list option to send a message to the list of your
choice
3. If you are satisfied with your test, click on the Send final button to go to the final step
!27
®
Sending Tests Manually
To enter the recipients of your test directly without using a test list :
1. Click on Send test to the following recipients.
2. Type in all desired E-mail adresses
!28
®
Send Final
This final step allows you to send a validation request to have your message sent to your
contact list
1. Click on the campaign launch approbation box
2. Confirm by typing the number of recipients
3. Click on the Confirm and Launch button to send your campaign validation request
Tick the box to
approve the
mailout launch
Confirm the
number of
recipients
Note
After clicking on the button Confirm and Launch, an E-mail will be sent to your Compliance Officer for approval.
!29
®
Editing Content on the Fly
Konversation agent offers the option of quickly editing your message after previewing simply by
clicking on the previous step.
1. Click on the message breadcrumb to go back to step 3
2. Click on option A) Create a new message
3. Reselect your articles, and click on the View and Edit button of the articles to modify
!30
®
Mailout Resend Approval Request
To access your mailout reports :
1. Click on the Manage subsection under the Mailouts menu of the navigation bar.
2. Click on Resend Approval Request
!31
®
Mailout Reports
To access your mailout reports, click on the Manage subsection under the Mailouts menu of
the navigation bar.
• To visualize a specific mailout’s report click on its Mailout report button
Mailout report
!32
®
Konversation Agent offers you 3 types of reports :
1. Summary: Shows a Pie-Chart displaying the mailout’s delivery performance
Field
Description
Delivered
Emails successfully delivered to an inbox.
Permanent bounce
Emails that permanently bounced back to the
sender (invalid Email address etc.).
Temporary bounce
The recipient’s mail server is temporarily
unavailable (inbox full etc.).
Spam filtering bounce
The message has been blocked by a spam filter.
2. Engagement: Displays the total (blue) and unique (red) opens, clicks and the % unique
opens and unique clicks. Number of clicked links (orange).
!33
®
3. Statistics: Shows each contact’s actions (clicks, opens, etc.). The search function allows
you to quickly find a contact and view his behavioural data.
Each field is sortable by Email, actions, date or URL. The date by default is sorted from newest
to oldest, click once and they will be sorted from oldest to newest.
Exporting a report
The mailout reports can be exported and converted from .csv to Excel file for easy viewing.
!34
®
Behavioural Data
Konversation agent give you an in depth look at your mailout’s performance with behavioural
data for each of your list member.
1. Click on the Manage subsection of the Lists menu.
2. Click on a list’s View & Edit
button
3. Click on the List members option then click on the contact’s View and Edit
to access his profile
4. Scroll to the bottom of the page, then click on Behavioural Data.
!35
button
®
Content Creation
To create a new content, click on the Create content subsection under the Content menu of
the navigation bar.
1. Fill in the Name of your content (without spaces or hyphens)
2. Select a Content type
Konversation Agent enables you to create 3 types of content:
• Article to incorporate within newsletters
• Dynamic content
• Generic content
!36
®
3. Insert the english version or the french version of your text in the corresponding editor
Insert the
english
version of
your content
Insert the
french
version of
your content
4. Click on the Content preview button for a rendering of your content as it will be seen by
your recipients
5. Select a save folder
6. Click on Save to save your new content in the specified folder
!37
®
Manage Content
To manage your content, click on the Manage content subsection of the Content menu.
• To modify a content, click on its View & Edit button
• To delete a content, click on its Delete button
Delete the
content
View & Edit
the
content
!38
®
Create a Message
To create a message, click on the Create message subsection of the Content menu.
1. Fill in the name of your new message (no spaces or hyphens)
2. Select the Message language and a Template type (promotion or newsletter)
3. Enter your message in the text editor
4. Select a save folder
5. To view your message, click on the Preview button
6. Click on the Save button to go to the next step
!39
®
Manage Messages
To manage your messages, click on the Manage messages subsection of the Content
menu.
• To modify a message, click on its View & Edit button
• To delete a message, click on its Delete button
Delete the
message
View & Edit
message
!40
®
Updating Newsletter Content
To update Newsletters in which the content has been modified, reattach the modified content in
the Newsletter to refresh it with the modified content:
1.
Click on the Manage messages subsection of the Content
2.
Click on the View and Edit button of the newsletter to update
View &
Edit
3. In the Select existing articles section, click on the modified content to reattach it to your
newsletter
4. Click on Quick Preview to inspect your message
5. Click on Save to finalize the newsletter content update
!41
®
Lists Management
To manage your recipient lists, click on the Manage subsection of the Lists menu.
• To modify a list, click on its View & Edit button
• To delete a list, click on its Delete button
View & edit
the list
Create
mailout
Delete the
list
Manage
the list
!42
®
Add a Contact
You can add contacts to your list from the Lists management menu.
1. Click on the View & Edit button of the list you need to modify (see page 41)
2. Click on the Add subscribers button
3. Add your contacts manually of from a cvs file (see page 5)
!43
®
Modify or Delete a Contact
it is possible to modify or delete contacts via the View & Edit option under the List
management menu.
1. Click on the View & Edit button of the list you need to modify (see page 29)
2. Click on the List members option and select one of the two available Actions for the
members you need to delete or modify
View & Edit
the contact
Remove the
contact
!44
®
Exporting a Contact List
It is possible to export your list via the List Members screen under the List Management
menu.
Click on Export to CSV, and your list will be transferred to a CSV format.
!45
®
Consent Details
To view the consent details of your contacts :
1. Click on the consent details after clicking on the View & edit
your choice.
button of the list of
"
2. The search box allows you to quickly find a specific contact. Click on the export to CSV
button to export this list for easy viewing and sorting in Microsoft Excel.
!46
®
Types of Content Status
Your contacts can fall within three categories for promotions or for newsletter, or both :
For promotions
Consent status
Description
With consent
The contact gave his consent
Without consent
The contact did not give his consent yet
Withdrawal
The contact removed his consent
For newsletters
Consent status
Description
With consent
The contact gave his consent
Without consent
The contact did not give his consent yet
Withdrawal
The contact removed his consent
!47
®
Obtaining Consent for Promotions
For Promotion Mailouts, it is important to first obtain informed consent form your contacts
before the mailout to ensure it is fully CASL compliant.
Please use the form below to request your contact’s consent.
https://www.nbccommunications.ca/fbn/consent
Note
After filing out the form, the status of your contact will change to with consent. You will be able to send
your promotions without the risk of having your recipients blocked due to not having informed consent.
!48
®
Obtaining consent for newsletters
In order to give their consent and subscribe to your newsletter, your contacts must fill in the
sign up form. To access this form, follow the steps below. :
1. Click on the Manage subsection of the Lists menu.
2. Click on the list’s View & Edit button
3. Click on the Sign up link
Note
After filing out the form, the status of your contact will change to with consent.
!49
®
Users Management
To manage your user profile, click on the Profile subsection of the More menu.
Konversation Agent’s user management allows you to manage the following information :
• Basic information
• Login and password
• Public information
• Language preferences
• Profile photo
Click on Save & Continue to apply the modifications to your profile.
!50
®
Profile picture
To upload or modify the main photo on your Newsletter’s sidebar :
1. Click on the Profile subsection of the More menu.
2. Scroll to the bottom of the page and click on Profile Photo.
The Profile picture can be uploaded in the following formats: .jpg, .png & .gif with a 2mb
maximum size. It can be deleted by clicking on the red link titled Remove profile photo:
Note
If you work in a team and need help uploading and resizing a group photo, Technical Support can assist
you.
!51
®
Sidebar Personalization
Konversation Agent allows you to personalize your newsletter’s sidebar with photos and
contact information of your associates, links to files and websites and additional sections.
Associates picture
Associates contact information
1. Click on the Create content subsection under the Content menu
2. Type in extra (lowercase) in the content name field then select dynamic content as a
content type
Enter "extra" as a
content name
Select « Dynamic
content"
!52
®
3. Enter in the Text editor the pictures, text and links to include in the sidebar
Note
You can specify a french and an english version of your sidebar content via the English content and
French content text editors. Call Technical Support at any time, 514-861-1881 ex 3206.
!53