1
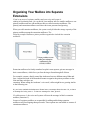
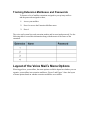
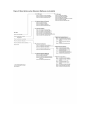
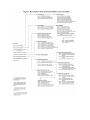
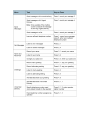
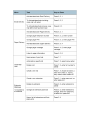
Voice Mail User's Guide Software Release 2.4, Document Issue 2.0 Contents Before You Start... ..1 Introducing the Voice Mail System... ..1 Activating your Mailbox... ..3 Accessing your Mailbox ... .3 Accessing Your Mailbox through a Central Voice Mail Telephone Number ... Accessing Your Mailbox through Your Telephone Number ... ..4 Using the Main Menu ... ...4 Setting Up and Maintaining Your Mailbox ... ..5 Recording your Name ... .5 Changing Your Password... ..6 Setting Up your Greetings... .6 Recording Your Greetings ... ...6 Listening to your Greetings ... ..7 Selecting which Greeting to Use... ...7 Setting Up How the System Will Notify You of New Messages ... .8 Using Email to Notify You of New Messages ... ...8 Using a Pager to Notify You of Messages ... ...9 Setting up your Pager Information for the First Time... ..10 Activating and Deactivating Pager Delivery... .10 Activating and Deactivating Urgent Delivery... ..11 Changing Your Pager Telephone Number ... .11 Changing Your Pager PIN ... .12 Changing Your Pager Message ... ...12 Listening to Your Pager Setup Information ... ..12 Setting Up How the System Will Deliver Your Messages ... ...13 Having Voice Mail Deliver Your Messages to Your Mailbox ... ...14 Having Email Deliver Your Messages... .15 Including Voice Mail with Email... ...15 Removing Voice Mail After You have Read Email ... .15 Activating and Deactivating Email Delivery ... ...16 Administering Operator Settings for Your Mailbox ... .17 Specifying an Operator Telephone Number... ..17 ...3 Hearing the Set Operator Telephone Number... ..17 Administering Voice Mail Lists... ..18 Creating Voice Mail Lists ... ..18 Administering Voice Mail Lists.....18 Changing the Name of the List ... ...19 Adding New Entries in a Voice Mail List... ..19 Deleting Entries from a Voice Mail List ... .19 Hearing Entries in a Voice Mail List ... ...20 Deleting Voice Mail Lists ... ..20 Hearing Names of Your Voice Mail Lists ... .21 Getting Messages ... ...21 Sending Messages to a List ... ...23 Transferring Messages to Your Email ... .23 Transferring Messages to Another Mailbox ... .24 Saving Messages ... .25 Deleting Messages ... .25 Manually Deleting Messages ... ...26 Automatically Deleting Messages after they are Emailed ... .26 Sending Messages ... .27 Sending Messages without Logging In to your Mailbox ... ...28 Sending a Message Through Your Mailbox ... .28 Accessing another Mailbox ... ..29 Organizing Your Mailbox into Separate Extensions... .30 Adding Extension Mailboxes... ...31 Changing Passwords for Extension Mailboxes... ...32 Deleting Extension Mailboxes ... .32 Tracking Extension Mailboxes and Passwords... ...33 Layout of the Voice Mail’s Menu Options ... .33 Shortcuts for Using Voice Mail ... ...36 Appendix A: Using Your Bulletin Board Account ... ...39 Activating your Mailbox ... .40 Accessing your Mailbox ... .40 Accessing Your Mailbox through a Central Voice Mail Telephone Number ... .40 Accessing Your Mailbox through Your Telephone Number ... ...41 Using the Main Menu ... ..41 Recording your Name ... ..42 Changing Your Password... ...42 Setting Up your Bulletin Board Greetings ... .43 Recording Your Bulletin Board Greetings... .43 Listening to your Bulletin Board Greetings ... ..44 Selecting which Greeting to Use... .44 Working with Your Bulletin Board Messages ... .44 Recording Your Bulletin Board Messages... .45 Listening to Your Bulletin Board Messages ... .45 Saving Bulletin Board Messages ... ...46 Deleting Bulletin Board Messages ... .47 Accessing another Mailbox... ...47 Shortcuts for Using Your Bulletin Board Mailbox ... ...48 Bulletin Board QuickCard ... .49 Appendix B: Using Your Extension Mailbox ... ..51 Activating your Extension Mailbox ... ..52 Accessing Your Extension Mailbox ... .52 Accessing Your Mailbox through a Central Voice Mail Telephone Number ... .52 Accessing Your Mailbox through Your Telephone Number ... ...53 Using the Main Menu in Your Extension Mailbox ... ..53 Recording Your Name ... .53 Setting Up Your Greeting ... ..54 Recording Your Greeting ... ...55 Listening to Your Greeting ... ...55 Getting Your Messages ... ...55 Saving Messages ... .57 Deleting Your Messages ... .58 Accessing Another Mailbox ... .58 Extension Mailbox Menu Layout ... ..58 Shortcuts for Using Your Extension Mailbox ... .60 Extension Mailbox QuickCard ... ...61 Index ... ...62 List of Figures Figure 1: Sample Email from the Voice Mail System ... .13 Figure 2: Menu Options when Extension Mailboxes are Available ... Figure 3: Menu Options when Extension Mailboxes are Unavailable ... Figure 4: Voice Mail QuickCard ... ...38 .34 ...35 Before You Start Your voice mail account is either a standard voice mail account or a bulletin board account. Standard voice mail accounts are the typical type of account where customers have a mailbox they access to get and send their messages. Bulletin board accounts provide callers with information rather than record their voice messages. Customers with bulletin board accounts can remotely call in to their mailboxes and record a message that callers will hear when they reach the mailbox. Callers hear the outgoing message but cannot leave a message of their own. If you have a standard voice mail account, begin with the following section titled “Introducing the Voice Mail System.” If you have a bulletin board account, go to “Appendix A: Using Your Bulletin Board Account.” Introducing the Voice Mail System The voice mail system is a flexible and powerful service that records messages that callers leave you when you are unavailable. Likewise, you can use the voice mail system to leave messages to other people that have voice mail account on the system when they are unavailable. You have a mailbox on the system that holds your messages. Your mailbox has an ID and a password that protects the contents of your mailbox. To access your mailbox, you must enter the mailbox ID and password. Once the voice mail system has placed a message in your mailbox, you can get and listen to it save or delete it send it to a list, your email account, or another mailbox When listening to your messages, you can fast-forward, pause, or rewind them. You can customize your mailbox to play a main or alternate greeting callers will hear when you are unavailable. One of the most convenient features of the voice mail system is that it can notify you if you have new messages. As a mailbox owner, you can choose from two types of notification: Email—has the voice mail system email you a notification that you have new messages Pager—has the voice mail system page you with a designated code to notify you of new messages. You can then call your mailbox to retrieve the new messages. As added flexibility, Pager notification includes an Urgent Delivery feature you can use to have the voice mail system send only urgent pages. Note: Your system administrator determines the notification methods you can use. Another convenient feature of the voice mail system is its flexibility in delivering your messages. As a mailbox owner, you can have the voice mail system deliver your messages in two ways: Voice Mail Delivery—the standard method of delivery where the voice mail system delivers new messages to your mailbox. You then can call your mailbox and use the menu options to listen to new or saved messages. Email Delivery—has the voice mail system email you an audio file of your new messages. Email Delivery is especially helpful if you are going out of town and want to get your messages without making a long-distance call. Note: Your system administrator determines the methods of delivery you can use. You can combine methods of notification and delivery, if those options are available. For example, you can have the system deliver your messages to your mailbox and also have it send you a notification of the messages. Or, you can have the system deliver your messages to your mailbox and have it email them to you. One option the voice mail system offers is to add up to four additional mailboxes to your primary mailbox. These additional mailboxes, called extension mailboxes, each have their own extension and password. This option is intended for voice mail systems running in a residential setting. See “Organizing Your Mailbox into Separate Extensions” for information on Extension Mailboxes. Activating your Mailbox The voice mail system prompts you to activate your mailbox the first time you try to access it. You can still receive messages if you haven’t activated your mailbox but you will be unable get and listen to your messages. The activation process guides you through the three short steps to activating your mailbox: recording your name, setting up your password, and recording your greeting. You are only required to activate your mailbox once. Note: If you fail to complete the activation process, you will have to restart the activation process from the beginning the next time you try to access your mailbox. Accessing your Mailbox You must access your mailbox to listen to your messages or to administer your voice mail account. Once you have accessed your mailbox, you hear the main menu and can begin using the voice mail system. Depending on how your system administrators have setup the voice mail system, access your mailbox in one of two ways: by dialing a separate telephone number that has been configured to go directly into voice mail administration by dialing your personal telephone number. That is, dial the same telephone number people dial to leave you messages. The voice mail system prompts you to activate your mailbox the first time you access it. See “Activating your Mailbox” for details. Accessing Your Mailbox through a Central Voice Mail Telephone Number To access your mailbox through a central voice mail telephone number, 1 Dial your voice mail administration telephone number. 2 Enter your mailbox ID and press the pound key (#). 3 If prompted, enter your password and press the pound key (#). You have accessed your Voice Mail mailbox. You hear the main menu options. Press the appropriate key to select the options you want to use. Accessing Your Mailbox through Your Telephone Number To access your mailbox through your telephone number, 1 Dial your voice mail telephone number. 2 Press star (*) when you hear your voice mail greeting. 3 If prompted, enter your password and press the pound key (#). You have accessed your Voice Mail mailbox. You hear the main menu options. Press the appropriate key to select the options you want to use. Send Messages—record messages, listen to recorded messages, and send messages. Get Messages—listen to, save, and delete messages. Administer Your Name and Password—record your name, listen to your name, and change your password. Administer Your Greeting—change, listen to, activate, and deactivate your main and alternate greetings. Access Another Mailbox. Administer Notifications—set notification and delivery methods and activate and deactivate them. Administer Voice Mail Lists—hear, administer, create or delete lists of voice mail recipients Only available when Voice Mail is in Residential mode Administer Extension Mailboxes—add or remove extension mailboxes to your primary mailbox and assign them passwords. Exit Your Voice Mail service. Setting Up and Maintaining Your Mailbox Your mailbox has the following information you must set up and maintain: recording of your name password main and alternate greeting message notification and delivery settings operator settings voice mail lists Recording your Name Depending on how your system administrator sets up the voice mail system, the system can play a recording of your name. For example, the system could send the recording of your name along with your messages to other mailbox owners on the system. To record your name, 1 Access your mailbox. 2 Press 3 to access the Name and Password Administration menu. 3 Press 1 to record your name. 4 At the prompt, say your name and press the pound key (#). Once you have recorded your name, F Press 2 to listen to the recording. Once you have recorded your name, the system applies it to your mailbox. You can then rerecord your name at anytime. Changing Your Password To secure the contents of your mailbox, Voice Mail requires you to enter a password to access your mailbox. Your password can be four to ten digits in length. Usually, your system administrator assigns you a temporary password. Change your password periodically to secure the contents of your mailbox. To change your password, 1 Access your mailbox. 2 Press 3 to access the Name and Password Administration menu. 3 Press 3 to change your password. 4 At the prompt, enter your new password and press the pound key (#). 5 The system prompts you to re-enter the password to confirm you have correctly entered your new password. Note: If you fail to enter the same password at the confirmation prompt, Voice Mail informs you that the passwords are different and lets you enter a new password. Currently, your old password is still active. Voice Mail only applies a new password if you enter the new password successfully. Setting Up your Greetings You can have a main greeting to use for most situations and an alternate greeting to use in special situations. For example, if you are going to be out of town for some reason, you could record an alternate greeting explaining where you are and when you’ll be back, without having to change your main greeting. Once you have recorded your greetings, you can listen to them and select which greeting to use. Recording Your Greetings To record your main greeting, 1 Access your mailbox. 2 Press 4 to access the Greetings Administration menu. 3 Press 1 to record your main greeting. 4 At the prompt, say your main greeting and press the pound key (#). Once you record your main greeting, the system applies it to your mailbox. You can change your main greeting anytime. To record your alternate greeting, 1 Access your mailbox. 2 Press 4 to access the Greetings Administration menu. 3 Press 2 to record your alternate greeting. 4 At the prompt, say your alternate greeting and press the pound key (#). You can change your alternate greeting anytime. Listening to your Greetings To listen to your greetings, 1 Access your mailbox. 2 Press 4 to access the Greetings Administration menu. 3 Do one of the following steps: Press 3 to listen to your main greeting. Press 4 to listen to your alternate greeting. Selecting which Greeting to Use Selecting a greeting requires you to call your mailbox and activate the greeting that is inactive. Activating a greeting automatically deactivates the active greeting. For example, if your main greeting is active and you activate your alternate greeting, the main greeting automatically deactivates. Caution: If your primary mailbox has extension mailboxes and you activate your alternate greeting, the alternate greeting will not offer callers the option of selecting an extension. When you go to activate a greeting, Voice Mail knows which greeting is active and prompts you to activate whichever greeting is currently inactive. Once you record your main greeting, the system applies it to your mailbox. You can change your main greeting anytime. To record your alternate greeting, 1 Access your mailbox. 2 Press 4 to access the Greetings Administration menu. 3 Press 2 to record your alternate greeting. 4 At the prompt, say your alternate greeting and press the pound key (#). You can change your alternate greeting anytime. Listening to your Greetings To listen to your greetings, 1 Access your mailbox. 2 Press 4 to access the Greetings Administration menu. 3 Do one of the following steps: Press 3 to listen to your main greeting. Press 4 to listen to your alternate greeting. Selecting which Greeting to Use Selecting a greeting requires you to call your mailbox and activate the greeting that is inactive. Activating a greeting automatically deactivates the active greeting. For example, if your main greeting is active and you activate your alternate greeting, the main greeting automatically deactivates. Caution: If your primary mailbox has extension mailboxes and you activate your alternate greeting, the alternate greeting will not offer callers the option of selecting an extension. When you go to activate a greeting, Voice Mail knows which greeting is active and prompts you to activate whichever greeting is currently inactive. To activate a greeting, 1 Access your mailbox. 2 Press 4 to access the Greetings Administration menu. 3 Press 5 to activate the greeting that is currently inactive. Note: If you need to hear your greetings, press 3 to hear your main greeting or 4 to hear your alternate greeting. Setting Up How the System Will Notify You of New Messages You can have the voice mail system notify you of new messages in two ways: Email—has the voice mail system email you a notification that you have new messages Pager—has the voice mail system page you with a designated code to notify you of new messages. You can then call your mailbox to retrieve the new messages. When using Pager notification, you can have the voice mail system deliver only urgent pages to you by using the Urgent Delivery feature under the Pager Delivery menu. Note: Your system administrator determines which methods you can use. You can use these methods of notification along with Voice Mail Delivery and Email Delivery. For example, you can use Pager notification and Voice Mail Delivery. You can choose Email notification or Email delivery, but you cannot have both methods active at the same time. Using Email to Notify You of New Messages You can choose whether you want the voice mail system to include your voice mail with your email or send only a notification. To receive only a notification, you must deactivate the “Including Voice Mail with Email” feature in the Email Delivery menu. If you activate the feature, the system will include a voice mail message file with the email. When you call your mailbox to activate or deactivate “Including Voice Mail with Email,” the prompt you hear depends on whether “Including Voice Mail with Email” is active. If active, the system prompts you to deactivate. If deactivated, the system prompts you to activate. To activate/deactivate “Including Voice Mail with Email” so that you will receive only notifications of new messages in your email, 1 Access your mailbox. 2 Press 6 to access the Notification menu. 3 Press 2 to access the Email Delivery menu. Note: Email Delivery is only available if your system administrator has allowed you to use it. 4 Press 2 to activate/deactivate “Including Voice Mail with Email,” depending on whether the feature is currently active. If you activate Include Voice Mail with Email, the system will email your messages to you. If you deactivate Include Voice Mail with Email, the system will email only a notification of new messages. In the later case, you will have to call your mailbox to get your messages. Using a Pager to Notify You of Messages Pager Notification has the voice mail system page you when you receive new messages. Note: Pager Notification is only available if your system administrator has allowed you to use it. Setting up your mailbox to page you when you receive new messages requires you to set up the following information: PIN (optional unless your Pager system requires a PIN)—the PIN the voice mail system sends along with the telephone number to page you. Your PIN can have one to ten digits. Telephone Number—the telephone number the voice mail system calls to page you of new messages. Your pager telephone number can have seven to eleven digits. Pager message—the numeric code the voice mail system sends to notify you of new messages. Pager messages can have two to ten digits. Once you have set up this information, you can call your mailbox and listen to or change the pager setup information. Setting up your Pager Information for the First Time To set up your pager information for the first time, 1 Access your mailbox. 2 Press 6 to access the Notification menu. 3 Press 3 to access the Pager Delivery menu. 4 Press 1 to activate or deactivate Pager Notification. 5 Press 2 to change your pager telephone number. 6 At the prompt, enter your pager telephone number. 7 (Optional) Press 3 to change your pager PIN. 8 (Optional) At the prompt, enter your pager PIN or press star (*). 9 (Optional) Press 4 to activate/deactivate Urgent Delivery, depending on whether the feature is currently active. 10 Press 5 to change your pager message. 11 At the prompt, enter the code you want to use to notify you of new messages. 12 Press 6 to hear your pager information. Once you set up your pager information, you can listen to and change it anytime. Activating and Deactivating Pager Delivery When you call your mailbox to activate or deactivate Pager Delivery, the prompt you hear depends on whether Pager Delivery is active. If active, the system prompts you to deactivate. If deactivated, the system prompts you to activate. Note: If you have activated Urgent Delivery in your pager setup, the voice mail system will deliver urgent pages even though Pager Delivery is deactivated. See the following section for steps on activating and deactivating the Urgent Delivery feature. To activate or deactivate Pager Delivery, 1 Access your mailbox. 2 Press 6 to access the Notification menu. 3 Press 3 to access the Pager Delivery menu. 4 Press 1 to activate or deactivate the Pager Delivery, depending on its current state. Activating and Deactivating Urgent Delivery If Urgent Delivery is active, callers can choose to send their message with “urgent delivery.” If a caller sends a message with urgent delivery, the voice mail system pages you to inform you of the new message, regardless of whether the Pager Delivery is active. When you call your mailbox to activate or deactivate Urgent Delivery, the prompt you hear depends on whether Urgent Delivery is active. If active, the system prompts you to deactivate. If deactivated, the system prompts you to activate. To activate or deactivate Urgent Delivery, 1 Access your mailbox. 2 Press 6 to access the Notification menu. 3 Press 3 to access the Pager Delivery menu. 4 Press 4 to activate/deactivate Urgent Delivery, depending on its current state. Changing Your Pager Telephone Number To change you pager telephone number, 1 Access your mailbox. 2 Press 6 to access the Notification menu. 3 Press 3 to access the Pager Delivery menu. 4 Press 2 to change your pager number. 5 At the prompt, enter your pager telephone number. Your pager telephone number can have seven to eleven digits. Changing Your Pager PIN Perform this operation if your paging system requires a PIN. To change your PIN, 1 Access your mailbox. 2 Press 6 to access the Notification menu. 3 Press 3 to access the Pager Delivery menu. 4 Press 3 to change your pager PIN. 5 At the prompt, enter your new pager PIN or press the star key (*). Your pager PIN can have one to eleven digits. Note: The star (*) key nulls the PIN field for those Pager systems not requiring a PIN. Changing Your Pager Message To change the numeric code that will notify you of new messages, 1 Access your mailbox. 2 Press 6 to access the Notification menu. 3 Press 3 to access the Pager Delivery menu. 4 Press 5 to change your pager message. 5 At the prompt, enter the numeric code that will notify you of new messages. Your pager message can have two to ten digits. Listening to Your Pager Setup Information You can call your mailbox to listen to your pager PIN, pager telephone number, and pager message. To listen to your pager setup information, 1 Access your mailbox. 2 Press 6 to access the Notification menu. 3 Press 3 to access the Pager Delivery menu. 4 Press 6 to hear your pager setup information. Setting Up How the System Will Deliver Your Messages You can set up your mailbox to deliver your new messages in two ways: Voice Mail Delivery Email Delivery Note: Your system administrator determines which methods of delivery you can use. Voice Mail Delivery is the standard method of delivery where the voice mail system delivers new messages to your mailbox. Then, you can call your mailbox and use the menu options to listen to new or saved messages or to set what operator station Voice Mail transfers callers to when they press the pound key (#) to request an operator. You can also listen to the telephone number currently set for the operator. Email Delivery has the voice mail system email an audio file of your new message to you. You also have the option of having the voice mail system delete a message from your mailbox once it has emailed the message to you. Figure 1 shows an example of what an email with an attached audio file from the voice mail system would look like. When you receive an email from the voice mail system, click the attachment to listen to your message. For example, in Figure 1, you would click “Attachment 0-939464061.wav.” You can choose to use both methods of delivery. For example, you can have the system deliver messages to your mailbox (by activating Voice Mail Delivery) and your email account (by activating Email Delivery), or to one or the other. You can also use Pager Notification with these forms of delivery. You cannot, however, have the system email notifications and messages to you. With email, you can choose to use Email Notification or Email Delivery, but not both simultaneously. Having Voice Mail Deliver Your Messages to Your Mailbox Voice Mail Delivery is the standard method for getting your messages. When you activate Voice Mail Delivery, the voice mail system delivers new messages to your mailbox, where you can then call in and listen to them. Note: Voice Mail Delivery is only available if your system administrator has allowed you to use it. If Voice Mail Delivery is the only method you’re using to get your messages, you cannot deactivate Voice Mail Delivery. However, if you you’re using Email Delivery, you can deactivate Voice Mail Delivery and use only email to get your messages. When you call your mailbox to activate or deactivate Voice Mail Delivery, the prompt you hear depends on its current state. If Voice Mail Delivery is active, the system prompts you to deactivate Voice Mail Delivery. If Voice Mail Delivery is deactivated, the system prompts you to activate Voice Mail Delivery. Note: The voice mail system warns you if you try to deactivate Voice Mail Delivery while Email Delivery is inactive. To activate or deactivate Voice Mail Delivery, 1 Access your mailbox. 2 Press 6 to access the Notification menu. 3 Press 1 to access the Voice Mail Delivery menu. 4 Press 1 to activate or deactivate Voice Mail Delivery, depending on its current state. Having Email Deliver Your Messages Email Delivery gives you the option of having the voice mail system email audio files of your new messages to you or a notification of new messages. You also have the option of having the voice mail system delete messages from your mailbox once it has emailed them. Note: Email Delivery is only available if your system administrator has allowed you to use it. If your system administrator has allowed you to use Email Delivery, you can activate or deactivate it anytime. Including Voice Mail with Email If you have activated email delivery, you can have your voice messages sent to your email in-box. To have the voice mail system email your voice mail messages to you, 1 Access your mailbox. 2 Press 6 to access the Notifications menu. 3 Press 2 to access the Email Delivery menu. 4 Press 2 to activate or deactivate the “Including Voice Mail with Email” feature, depending on its current state. Note: If you deactivate the “Including Voice Mail with Email” feature, you will get only notifications of new messages with your email, not the messages themselves. Removing Voice Mail After You have Read Email One way to maintain your mailbox and ensure that it does not get too full is to have the system remove the voice mail messages from your voice mail mailbox once it emails them. To take advantage of this feature, you must activate the “Removing Voice Mail After Forwarded by Email” feature in the Email Delivery menu. When you call your mailbox to activate or deactivate the “Removing Voice Mail After Email has been Read” feature, the prompt you hear depends on the current state of the feature. If the feature is active, the system prompts you to deactivate the feature. If the feature is deactivated, the system prompts you to activate the feature. To activate the “Removing Voice Mail After Email has been Read” feature so that the system deletes messages from your mailbox once it emails them to you, 1 Access your mailbox. 2 Press 6 to access the Administer Notifications menu. 3 Press 2 to access the Email Delivery menu. Note: Email Delivery is only available if your system administrator has allowed you to use it. 4 Press 3 to activate/deactivate “Removing Voice Mail After Email has been Read,” depending on its current state. Note: If you deactivate “Removing Voice Mail After Email has been Read,” the system will leave messages in your mailbox after it emails them. Activating and Deactivating Email Delivery Email Delivery controls whether the system will email notifications of new messages or the messages themselves. If you deactivate Email Delivery, you will be unable to receive email notifications or email deliveries. When you call your mailbox to activate or deactivate Email Delivery, the prompt you hear depends on its current state. If Email Delivery is active, the system prompts you to deactivate Email Delivery. If Email Delivery is deactivated, the system prompts you to activate Email Delivery. Note: The voice mail system warns you if you try to deactivate Email Delivery and Voice Mail Delivery is already deactivated. If you ignore this warning and deactivate Email Delivery while Voice Mail Delivery is deactivated, the voice mail system will deliver new messages to your mailbox as a failsafe mechanism. To activate or deactivate Email Delivery, 1 Access your mailbox. 2 Press 6 to access the Administer Notifications menu. 3 Press 2 to access the Email Delivery menu. Note: Email Delivery is only available if your system administrator has allowed you to use it. 4 Press 1 to activate or deactivate Email, depending on its current state. Administering Operator Settings for Your Mailbox Callers can transfer to an operator if they need help when calling your mailbox. As a mailbox owner, you can set what operator station Voice Mail transfers callers to when they press the pound key (#) to request an operator. You can also listen to the telephone number currently set for the operator. Specifying an Operator Telephone Number To specify an operator telephone number to handle operator requests that callers make while calling your mailbox, 1 Access your mailbox. 2 Press 6 to access the Administer Notifications menu. 3 Press 1 to access the Administer Voice Mail Delivery menu. 4 Press 2 to specify an operator telephone number. 5 Enter the operator’s station telephone number to which you want operator requests to go. Hearing the Set Operator Telephone Number To hear the number currently set as the operator telephone number, 1 Access your mailbox. 2 Press 6 to access the Administer Notifications menu. 3 Press 1 to access the Administer Voice Mail Delivery menu. 4 Press 3 to hear the current operator telephone number. Administering Voice Mail Lists Voice Mail lists are lists of mailbox numbers to which you can send a copy of a voice mail message. Use voice mail lists to send a copy of a message to many mailboxes at one time. Creating Voice Mail Lists You associate a name with each voice mail list you create. Once you name the list, you can begin adding mailbox IDs to the list. When you are done creating the list, Voice Mail assigns the list a number according to how many lists you have created. For example, if you have created three lists and create a fourth, Voice Mail assigns the newest list an identifier of four. To create a voice mail list, 1 Access your mailbox. 2 Press 7 to access the Administer Voice Mail Lists menu. 3 Press 4 to create a list. 4 Record the name you want to associate with the voice mail list. You have now created a voice mail list. The voice mail system returns you to the Administer Voice Mail menu. See “Adding Entries to a Voice Mail List” in the following section to learn how to add entries to the list. Administering Voice Mail Lists You can administer a voice mail list in the following ways: change the name of the list add entries to the list delete entries from the list You can also listen to the entries that comprise a list. Changing the Name of the List To change the name of a voice mail list, 1 Access your mailbox. 2 Press 7 to access the Administer Voice Mail Lists menu. 3 Press 2 to access the List Entry Administration menu. 4 Press 4 to record a new name for the list. 5 Record the new name. The number of the list remains the same. Adding New Entries in a Voice Mail List To adding a new entry to a voice mail list, 1 Access your mailbox. 2 Press 7 to access the Administer Voice Mail Lists menu. 3 Press 2 to access the List Entry Administration menu. 4 Enter the number of the list to which you want to add an entry. 5 Press 3 to create a new entry. 6 Record the name you want to associate with the entry, such as the mailbox owner’s name. 7 8 Enter the mailbox ID to assign to the entry. You return to the Administer Voice Mail menu. Repeat steps 4 through 7 to add other entries to the voice mail list. You can add a maximum of 255 mailboxes to a voice mail list. Deleting Entries from a Voice Mail List When deleting an entry, you must enter the number of the entry to delete. For this reason, listening to the entries before you start the deletion steps is a good idea. See “Hearing Entries in a Voice Mail List” for details. To delete an entry from a voice mail list, 1 Access your mailbox. 2 Press 7 to access the List Administration menu. 3 Press 2 to access the List Entry Administration menu. 4 5 6 Enter the number of the list owning an entry you want to delete and press the pound key (#). Press 2 to delete an entry. Enter the number of the entry you want to delete and press the pound key (#). Hearing Entries in a Voice Mail List To listen to the entries that comprise a voice mail list, 1 Access your mailbox. 2 Press 7 to access the List Administration menu. 3 Press 2 to access the List Entry Administration menu. 4 5 Enter the number of the list owning entries you want to hear and press the pound key (#). Press 1 to hear the entries in the list. Deleting Voice Mail Lists To delete a voice mail list, 4 1 Access your mailbox. 2 Press 7 to access the List Administration menu. 3 Press 3 to delete a list. Enter the number of the voice mail list you want to delete. Hearing Names of Your Voice Mail Lists To hear a list of the names of your voice mail lists, 1 Access your mailbox. 2 Press 7 to access the List Administration menu. 3 Press 1 to hear the names of your voice mail lists. Getting Messages You can get and listen to two types of messages: new messages saved messages New messages are messages that you have not saved but that are still on the system, regardless of whether you have listened to them. While listening to a message, you can rewind it, fast-forward through it, or pause it. Once you have listened to a message, you can save it, delete it, send it to a list, or transfer it to your email account or another mailbox on the system. If you choose to transfer a message, you have the option of adding an annotation to it. An annotation is a message you “attach” to the voice mail. For example, you might send a message with an annotation to explain why you’re transferring it. To get your messages, 1 Access your mailbox. 2 Press 2 to access options for getting your messages. 3 Do one of the following steps: Press 1 to get new messages. Press 4 to get saved messages. Once Voice Mail begins playing the message, do any of the following steps: Press *1 to restart the message. Press *4 to rewind the message ten seconds. Press *5 to pause the message. Note: Press 5 again to resume listening to the message. Press *6 to fast-forward ten seconds into the message. Once you have listened to a message, do any of the following steps: Press 1 to replay the message. Press 2 to play the next message if one exists. Press 3 to delete the message. Press 4 to send the message to a list. At the prompt, enter the number of the list to which you want to send the message. Press 6 to transfer the current message to your Email. This action sends the message to your Email and deletes it from your current voice mail mailbox. Press 7 to save the message. Note: If your mailbox becomes full, callers will be unable to leave messages in your mailbox. Delete some messages to free up storage space. If you are using Email Delivery, you can have the system automatically delete a message from your mailbox once it emails the message to you. See “Deleting Messages” for steps on deleting messages using either of these methods. If allowed, press 8 to transfer the message to another mailbox: 1 Enter the new mailbox ID and press #. 2 Do one of the following actions: _ To send the message with an annotation, press 1 and record the annotation. _ To send the message without an annotation, press 2. _ To cancel, press 3. If you transferred the message, Voice Mail sends it to the other mailbox and deletes it from the current mailbox. Sending Messages to a List If you own a primary mailbox on the system and your mailbox is supporting no extension mailboxes, you can send your new and saved messages to many contacts at one time by sending the messages to a voice mail list. You must have added at least one voice mail list with entries for this option to be available. See “Creating Voice Mail Lists” for details. To send a message to one of your voice mail lists, 1 Access your mailbox. 2 Press 2 to access options for getting your messages. 3 Do one of the following steps: Press 1 if the message you want to send to a list is new. Press 4 to if the message you want to send to a list is saved. 4 When the message you want to send to a list plays, press 4. 5 Enter the number of the list to which you want to send the message. The voice mail system announces the number recipients in the list that received the message. Transferring Messages to Your Email If you own a primary mailbox on the system, you can transfer your new and saved messages to your email in-box. Your mailbox must be set up to deliver messages to your email in-box for this option to be available. See “Having Email Deliver Your Messages” for details. To transfer a message to your email in-box, 1 2 Access your mailbox. Press 2 to access options for getting your messages. 3 Do one of the following steps: Press 1 if the message you want to send to email is new. Press 4 to if the message you want to send to email is saved. 4 When the message you want to transfer to your email in-box plays, press 6. Transferring Messages to Another Mailbox If you own a primary mailbox on the system and your mailbox is supporting no extension mailboxes, you can transfer your new and saved messages to another mailbox on the system. Note: If your mailbox is part of a group, you can transfer messages only to other mailboxes in your group. To transfer a message to another mailbox, 1 Access your mailbox. 2 Press 2 to access options for getting your messages. 3 Do one of the following steps: Press 1 if the message you want to transfer is new. Press 4 to if the message you want to transfer is saved. 4 When the message you want to transfer to another mailbox plays, press 8. 5 Enter the ID of the mailbox to which you want to transfer the message and press #. 6 Do one of the following actions: Press 1 to send your message with an annotation. Say the message you want to include as an annotation and press #. Press 2 to send your message without an annotation. Saving Messages You can have two types of messages in your mailbox: New Saved New messages are messages that you have not saved but that are still on the system, regardless of whether you have listened to them. If you have a message stored on the system and want to save it, 1 Access your mailbox. 2 Press 2 to access options for getting your messages. 3 Press 1 to listen to your new messages. Remember, new messages are also messages you have listened to but not saved. 4 Once you get to the message you want to save, press 7 to save it. Note: If your mailbox becomes full, callers will be unable to leave messages in your mailbox. Delete some messages to free up storage space. If you are using Email Delivery, you can have the system automatically delete a message from your mailbox once it emails the message to you. See “Deleting Messages” for steps on deleting messages using either of these methods. Deleting Messages Your mailbox has a limit to the number and size of messages it can hold. Callers will not be able to leave messages if your mailbox is full. To help you limit the number of messages your mailbox has, the system automatically deletes unsaved messages after a set amount of time. Your system administrator determines this “expiration date.” One way to ensure you have room in your mailbox for new messages is to manually delete messages you no longer need. If you are using Email Delivery, you can have the voice mail system automatically delete messages from your mailbox once it emails them to you. Manually Deleting Messages To delete new or saved messages from your mailbox, 1 Access your mailbox. 2 Press 2 to access options for getting your messages. 3 Do one of the following steps: Press 1 to listen to new messages if the message you want to delete is a new message. Press 4 to listen to saved messages if the message you want to delete is a saved message. 4 If necessary, press 2 to listen to the next message. 5 Once you get to the message you want to delete, press 3 to delete it. Automatically Deleting Messages after they are Emailed To have the voice mail system automatically delete messages once it emails them to you, 1 Access your mailbox. 2 Press 6 to access the Administer Notifications menu. 3 Press 2 to access the Email Delivery menu. Note: Email Delivery is only available if your system administrator has allowed you to use it. 4 Press 3 to activate/deactivate “Removing Voice Mail After Email Delivery,” depending on its current state. Remember, activating “Removing Voice Mail After Email Delivery” causes the system to automatically delete messages from your mailbox once it emails them to you. Deactivating the feature will cause the system to leave the messages in your mailbox after it emails them. Sending Messages You can send messages in two ways : by calling someone without logging in to your mailbox and leaving them a message if they’re unavailable by recording a message while logged in to your mailbox and sending it directly to another mailbox on the system The first option is for those occasions where you would rather speak to the owner , but if he or she is unavailable , leaving a message will do . The second option is for those occasions where you are in your mailbox and want to send a message without exiting, or for those occasions where you do not need to speak to the owner , but would rather leave him or her a message . When sending messages , if the mailbox owner you want to leave a message with has set his or her Pager settings to allow Urgent Delivery, you can send your message with an Urgent Delivery priority. When you send a message with urgent delivery, the voice mail system delivers the message to the owner ’s mailbox and pages the owner to notify him or her of the new message , regardless of whether he or she is using Pager Delivery. The voice mail system plays urgent messages before it plays messages sent with normal delivery. If the mailbox owner is not allowing Urgent Delivery, you will not be prompted to send a message with Urgent Delivery. You also have the option of leaving a callback number when leaving messages . Callback Numbers identify the telephone number where the called party can reach you . When you leave a callback number with your messages , the called parties hear the callback number when retrieving their messages . Sending Messages without Logging In to your Mailbox If you call someone who owns a mailbox on the voice mail system and they do not answer, you hear the owner’s greeting and the system prompts you to record a message. Once you record a message, do one of the following steps: Hang-up and the system automatically sends your message. Press 1 to re-record your message. Press 2 to listen to your message before you send it. Press 3 to send your message with normal delivery. If available, press 4 to send your message with Urgent Delivery, provided the mailbox owner is allowing Urgent Delivery. If available, press 5 to send your message to a list and then enter the list number. To leave a callback telephone number, press 6 and enter the telephone number to which the recipient should call. Note: The length of your callback number can be from 2 to 11 digits. The 11-digit limit allows you to enter 1 + area code + your local phone number. Press # to be transferred to an operator, if operator service is available. Sending a Message Through Your Mailbox To send a message through your mailbox, 1 Access your mailbox. 2 Press 1 to access the Send Message menu. 3 4 Press 1 to record your message. Record your message and press #. Once you have recorded your message, do one of the following steps: Press 1 to rerecord your message. Press 2 to listen to your message before you send it. Press 3 to send your message with normal delivery and then enter the extension that is to receive the message. If available, press 4 to send your message with Urgent Delivery and then enter the extension that is to receive the message. Once you enter the extension, the voice mail system sends the message to the mailbox of the extension you entered. If you enter an invalid extension, you will hear that Voice Mail will not deliver the message. To send your message to a list press 5 and enter the list number. To leave a callback telephone number, Press 6 and enter the telephone number to which the recipient should call. Note: The length of your callback number can be from 2 to 11 digits. The 11-digit limit allows you to enter 1 + area code + your local phone number. Press # to be transferred to an operator, if operator service is available. Press 9 to return to the previous menu. Accessing another Mailbox If you have multiple voice mail accounts or another account that serves as a bulletin board account and need to access it, 1 Access your mailbox. 2 Press 5 to access another mailbox box. 3 At the prompt, enter your mailbox ID. 4 At the prompt, enter your password and press the pound key (#). The system informs you of the number of new and saved messages the other mailbox has and then plays the main menu. 5 Choose a menu option depending on what you want to do in the other mailbox. Organizing Your Mailbox into Separate Extensions If you’re an owner of a primary mailbox and your voice mail system is running in Residential mode, you can divide your mailbox into five smaller mailboxes: one primary mailbox and four sub-mailboxes that are called extension mailboxes. The primary and extension mailboxes each have their own password and greeting. When you add extension mailboxes, the system evenly divides the storage capacity of the primary mailbox among the extension mailboxes. The following example illustrates a primary mailbox organized to include four extension mailboxes. Extension mailboxes let family members keep their own separate, private messages in their own mailboxes, which frees you from having to listen through all of them. For example, assume a family named the Andersons has two children named John and Jane. Assume the head of the household wants to organize the primary mailbox so that John and Jane each have an extension. When calling the Anderson’s voice mail, callers might hear a greeting similar to the following one: Hi, you have reached the Andersons. Please leave a message after the tone. Or, to leave a message for John, press 1. To leave a message for Jane, press 2. If a caller presses 1, the voice mail system will store the message in John’s extension mailbox (extension 1). Owners of a primary mailbox are responsible for adding and deleting extension mailboxes and for assigning them passwords. These options are unavailable to owners of extension mailboxes. Once owners of extension mailboxes activate their mailbox, the voice mail system automatically adds prompts for leaving messages to the extension mailboxes in your main greeting. Owners of extension mailboxes are able to do the following administration activities within their extension mailboxes. get and save messages record their name and greeting access another mailbox Adding Extension Mailboxes Extension mailboxes have an extension number of 1 through 4, depending on which extensions are available. The mailbox ID of the primary mailbox serves as the ID for its extension mailboxes. The password assigned to the extension mailbox differentiates the mailbox from the primary mailbox. For example, assume you own a primary mailbox that has an ID of 9999 and you add an extension mailbox. If you assign the extension mailbox ID a password of “1234,” the owner of the extension mailbox would login by entering 9999 as the mailbox ID and 1234 as the password. To add an extension mailbox, 1 Access your mailbox. 2 Press 8 to access the Extension Mailbox menu. 3 Press 1 to indicate you want to create an extension mailbox. 4 Enter the password to assign the extension mailbox. The password can be four to ten digits long. Note: The extension will appear as an option in your main greeting as soon the owner of the extension mailbox has activated his or her mailbox. The voice mail system walks the extension mailbox owners through the activation process the first time they try to access their mailboxes. Changing Passwords for Extension Mailboxes As the owner of the primary mailbox, you are the only person that can change a password assigned to an extension mailbox. To change the password of an extension mailbox, 1 Access your mailbox. 2 Press 8 to access the Extension Mailbox menu. 3 Press 3 to indicate you want to change a password. 4 Enter the extension number of the mailbox you want to change. 5 Enter the new password. Note: The password must be at least four digits long. 6 Re-enter the password to verify it. Deleting Extension Mailboxes Deleting an extension mailbox not only deletes the mailbox from the system but also deletes the mailbox’s greeting and any messages saved in it. Caution: Always verify you are deleting the correct extension mailbox. Use the table in the following section to record and verify information about the extension mailboxes in your mailbox. To delete an extension mailbox, 1 Access your mailbox. 2 Press 8 to access the Extension Mailbox menu. 3 4 Press 2 to indicate you want to delete an extension mailbox. Enter the extension number of the mailbox you want to delete. Tracking Extension Mailboxes and Passwords To listen to a list of mailbox extensions assigned to your primary mailbox and the passwords assigned to them, 1 Access your mailbox. 2 Press 8 to access the Extension Mailbox menu. 3 Press 4. The voice mail system lists each extension number and its associated password. Use the following table to record this information along with the name of the owner of the extension. Layout of the Voice Mail’s Menu Options When logged in to your mailbox, the menu options available depend on whether you can organize your mailbox into extension mailboxes. Figure 2 and Figure 3 show the layout of menu options based on whether extension mailboxes are available. Shortcuts for Using Voice Mail The voice mail system lets you enter menu options without having to listen to prompts. The following table lists the sequence of keys to press after you have accessed your mailbox. These sequences let you quickly use an option of the voice mail system without having to listen to its prompts. Use the Voice Mail QuickCard to take these shortcuts with you.