1
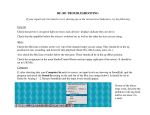
Master Tuner
Demonstration version
User’s Guide
Master Tuner™
Demonstration version
User’s Guide
Copyright
© 1989—1996 Andromeda Computer Systems Ltd. All rights reserved. No part
of this publication may be reproduced, transmitted, transcribed, stored in a
retrieval system, or translated into any language in any form by any means
without the written permission of Andromeda Computer Systems Ltd.
Software License Notice
Read the following license agreement carefully before using the software. By
using the software you accept the terms of this agreement. If you do not accept
the terms of this agreement, promptly return the entire package to Andromeda
License
The Master Tuner software, User’s Guide, and related documentation (the
“Software”) are licensed to you on a non-exclusive basis by Andromeda
Computer Systems Ltd. (“Andromeda”). Andromeda retains title to the
Software. This License allows you to use the Demonstration Software on any
computers you own. You may make copies of the Software, but you must
reproduce on each copy the Andromeda copyright notice. You may not charge
a fee for distribution of the Demonstration software.
Restrictions
The Software contains trade secrets and in order to protect them you may not
decompile, reverse engineer, disassemble or otherwise reduce the Software to a
human-perceivable form. You may not modify, network, rent, lease, loan, sell,
distribute, sub-license or otherwise impart any rights in the Software. You may
not create derivative works based upon the Software in whole or in part.
Termination
This License is effective until terminated. You may terminate this License at
any time by destroying the Software and all copies thereof, or by returning
them to Andromeda. This License will terminate without notice from
Andromeda if you fail to comply with any provision of this License. Upon
termination you must destroy the Software and all copies thereof.
Limited Warranty
Andromeda warrants that the disks on which the software is distributed will be
free from defects in materials and workmanship and that the software will
substantially conform to the specifications established by Andromeda.
Andromeda does not warrant that the software is free from all bugs, errors, and
omissions. You expressly acknowledge and agree that use of the Software is at
your sole risk. Andromeda does not warrant that the functions contained in the
Software will meet your requirements, or that the operations of the Software
will be uninterrupted or error-free, or that defects in the Software will be
corrected.
If any of the software fails to comply with the warranties set forth above,
Andromeda will replace the disk, or at Andromeda’s option, make a reasonable
effort to correct the program errors. You must however return all copies of the
software, along with a copy of your paid invoice to your authorized Andromeda
dealer within 90 days of the date you received the software. If Andromeda is
unable to correct defective disks or program errors, Andromeda will refund all
or a fair portion of the price you paid for this package, at Andromeda’s option.
The refund will fully satisfy your claims for software or disk failure.
The duration of any implied warranties shall be limited to the duration of the
warranty period described above.
Limitation of Liability
Under no circumstances including negligence shall Andromeda be liable for
any incidental, special or consequential damages that result from the use or
inability to use the software or related documentation, even if Andromeda or an
Andromeda authorized representative has been advised of the possibility of
such damages.
In no event shall Andromeda’s total liability to you for all damages, losses, and
causes of action (whether in contract, tort (including negligence) or otherwise)
exceed the amount paid by you for the Software.
Controlling Law and Severability
This license shall be governed by and construed in accordance with the laws of
the Province of Alberta. If for any reason a court of competent jurisdiction
finds any provision of the License, or portion thereof, to be unenforceable, that
provision of the License shall be enforced to the maximum extent permissible
so as to effect the intent of the parties, and the remainder of this License shall
continue in full force and effect.
Licenses and
Trademarks
Master Tuner is a registered trademark of Andromeda Computer Systems Ltd.
Apple and Macintosh are registered trademarks of Apple Computer Inc.
MacRecorder and SoundEdit are registered trademarks of Farallon Computing
Inc.
Andromeda Computer Systems Ltd.
26 Sleigh Drive
Redwood Meadows, AB
Canada T3Z 1A1
(403) 949-2030
Contents
About Master Tuner ..................................................................... 5
Getting Started ............................................................................. 6
Using Master Tuner ..................................................................... 9
Built-in Sound Input ..............................................................9
The Farallon MacRecorder....................................................9
Waveform Graph ................................................................. 11
Calibrating Sound Input....................................................... 13
Selecting Notes ....................................................................14
Different Temperaments...................................................... 15
Instrument Menu.................................................................. 16
Smoothing............................................................................16
Save Preferences ................................................................17
Wind and Voice.......................................................................... 19
Working with Recordings .......................................................... 20
About Temperaments ................................................................. 22
Customizing Master Tuner ........................................................23
When Things Go Wrong… ........................................................28
Installing Master Tuner .............................................................. 32
About Master Tuner
Master Tuner turns your Macintosh computer into a
sophisticated tuning meter, letting you quickly and accurately
tune almost any acoustic instrument.
It features “hands-off” operation. Just play a note — Master
Tuner listens to the pitch, and displays a tuning graph for the
note you played. As you tune, a trace line on the screen tells how
sharp or flat you are.
Temperaments
Master Tuner understands the important historical temperaments,
as well as stretched temperaments for pianos. With our optional
Temperament Designer, you can build your own temperaments
and import them into Master Tuner.
The base pitch can be varied from A=390 Hz to A=466 Hz in
any of the temperaments.
Screen Keyboard
Play a few notes using the screen keyboard to see if you like a
temperament before committing your instrument to it. The
reference tones use sampled instrument sounds to let you hear
how real instruments sound in each temperament.
Wind Players
A major advantage of Master Tuner over traditional electronic
tuners is that the tuning trace lets you see how a pitch varies over
time.
This is particularly valuable for wind players, singers and other
people whose instruments can vary their pitch continuously.
You can use Master Tuner to check your intonation, or to find
the “natural” pitch of your instrument. You can also see how
accurately you sustain a note, how even your vibrato is, and how
cleanly and consistently you play intervals.
This Demonstration
Version
This demonstration version of Master Tuner is just like the real
thing, except that:
•
You can only tune standard pitch (A=440 Hz)
•
You can only tune the Kirnberger III temperament (a
baroque temperament, or way of splitting an octave into 12
notes).
•
You can’t save your conveniences settings or calibration.
•
The User’s Guide has been adbridged.
Getting Started
5
Getting Started
Let’s get started with an example. We’ll use Master Tuner to
tune a stringed instrument to standard pitch.
Don’t worry if some of the terms are unfamiliar — we’ll go over
everything in more detail later on.
Start by making a backup copy of your Master Tuner disk. Put
the original disk in a safe place, and use the backup disk as your
working disk. If you are using a hard disk, you can copy Master
Tuner to any convenient folder.
If you are using Master Tuner on a single-diskette Macintosh, or
if you’re not familiar with the process of making a backup copy,
please refer to Installing Master Tuner, at the end of this Guide.
Plug a microphone into your Macintosh, and place it two or three
feet away from your instrument.
Start Master Tuner by double-clicking on its Finder icon. Master
Tuner displays its main tuning screen (it’s automatically made as
large as will fit on the primary monitor):
File Edit Instrument Options Recordings
Master Tuner
Screen keyboard
A = 440 Hz
Temperament:
Equal Temperament
These scale lines are 5.5 cents apart
The center line shows “in tune”
If you like, you can play a few notes by clicking in the screen
keyboard. The lower part of the screen is a tuning graph.
Between the screen keyboard and the tuning graph are two popup menus, which you can’t change in the demonstration version
of Master Tuner).
Getting Started
6
Options
Color Screen
√ Smoothing
√ Auto Note Selection
Waveform Graph
Tune Continuously
S
T
Next, select your instrument from the Instrument menu.
To start tuning, select “Tune Continuously” from the Options
menu, or else press the space bar. A tuning indicator appears to
the right of the tuning graph.
From now until we choose another option, Master Tuner listens
to the sounds around it. When you play a note, Master Tuner
determines what note you are closest to, and highlights that note
on the screen keyboard. The name of the note is also displayed to
the left of the tuning graph:
File Edit Instrument Options Recordings
Master Tuner
Calibrate Sound Input…
Edit Instrument…
H
A = 440 Hz
Temperament:
Equal Temperament
C
Tuning
Indicator
As you continue to play the note, Master Tuner shows how flat
or sharp you are with a tuning trace line which starts at the left of
the graph and gradually moves to the right.
If you raise the pitch of your instrument (for instance by turning
a tuning pin) the tuning trace moves up. Lowering the pitch
moves the tuning trace down.
The center line on the graph shows “in tune”. The dashed
horizontal lines are each about 5.5% of a semitone apart.
Generally, it takes between 10 and 40 seconds for the tuning
trace to cross the graph (you can change this using “Edit
Instrument”). When it reaches the end, it starts off again at the
left side.
Getting Started
7
File Edit Instrument Options Recordings
Master Tuner
A = 440 Hz
Name of the note being tuned
Temperament:
Equal Temperament
C
Tuning trace
In this example the note started off flat, was raised until it was a
bit sharp, and then lowered until it was right in tune (the center
line on the graph shows “in tune” for middle C).
Changing Notes
You don’t have to tune the notes on your instrument in any
particular order. When you play a new note, Master Tuner
highlights the note and starts the tuning trace over again at the
left side of the graph.
If you play a note that’s so badly out of tune that Master Tuner
highlights the wrong note on the screen keyboard, just keep
tuning until you are within range of the correct note. When the
tuning trace moves out of the range of the current note, a fresh
tuning graph is displayed for the new note.
Finishing Up
When your instrument is completely tuned, you can quit Master
Tuner by selecting “Quit” from the File menu, or by clicking in
the close box in the tuning window.
If you wish to use Master Tuner’s other tools, select “Tune
Continuously” on the Options menu again to uncheck it (or else
press the space bar), and proceed as shown in the remainder of
this Guide.
Select “Show Balloons” from the help menu at the upper right
hand corner of your screen. When you point to an object on the
screen, a help balloon explains how to use it.
Getting Help
Getting Started
8
Using Master Tuner
This section explains how to use Master Tuner in more detail.
We suggest that you read through this section of the Guide in
order. If you wish to obtain information about a specific
function, the index at the end of this Guide should give you an
idea where to look.
Built-in Sound Input
Most newer Macintosh models come with built-in Sound Input.
To use it, just plug in the microphone that came with your
Macintosh. On some models, such as the PowerBook Duo, the
microphone is built into the screen, so you don’t have to plug it
in.
Master Tuner works more quickly with built-in sound input than
with a MacRecorder, so you should normally use it if you have
the choice (this is because the sound chips collect sound samples
asynchronously).
The Farallon
MacRecorder
er
cR
rd
eco
Ma
n
allo g
A
far putin
,C g
leyPendin
com
k
r
e
B atents
P
The Macromedia MacRecorder plugs into the modem port on the
back of your Macintosh. There is a volume level control located
on one side of the MacRecorder.
Using Master Tuner
9
Adjusting the Volume
It’s usually best to position the microphone between two and six
feet away from your instrument, unless your instrument is
relatively quiet, in which case you may need to place the
microphone closer.
The built-in sound circuitry includes an automatic gain control,
so you don’t need to adjust the volume. If you’re using a
MacRecorder, the volume level control should be adjusted so
that the screen low volume indicator is highlighted when you are
not playing your instrument, but neither the high nor the low
volume indicator is highlighted when you play a note.
You can plug an external microphone into your Macintosh, or
into the MacRecorder’s microphone input if desired. If the sound
from your instrument is particularly faint, an inexpensive
microphone may help (the more inexpensive microphone types
may actually work better than expensive microphones for this
purpose).
File Edit Instrument Options Recordings
Master Tuner
A = 440 Hz
Temperament:
Equal Temperament
High Volume Indicator
C
Low Volume Indicator
For the most accurate volume setting with a MacRecorder, you
can select “Waveform Graph” on the Options menu (see the next
page), and adjust the MacRecorder’s level control so the
waveform is as large as possible without clipping. (Clipping
means that the waveform is larger than the MacRecorder can
record, so the tops and bottoms of the waveform are flattened
instead of rounded).
Using Master Tuner
10
An unclipped waveform
A clipped waveform
On some instruments, you may find that you need to change the
volume level when you play the highest and lowest notes. It’s
occasionally helpful to place the MacRecorder right inside your
instrument.
The Waveform Graph is an oscilloscope display of the sounds
being picked up by your microphone.
Waveform Graph
Options
Color Screen
√ Smoothing
√ Auto Note Selection
Waveform Graph
Tune Continuously
File Edit Instrument Options Recordings
Master Tuner
S
T
A = 440 Hz
Temperament:
Equal Temperament
Calibrate Sound Input…
Edit Instrument…
H
When a clear note is being played, the display will show a stable
waveform like the one shown above. The height of the waveform
shows the volume of the sound. The width of each individual
“wave” is related to the pitch of the sound. In this example, the
note is A2.
If you are using the Waveform Graph to set the sound level,
adjust the microphone distance or gain so that the height of the
waveform is as large as possible without touching the upper or
lower borders of the box around the graph. Tuning will work
perfectly well with lower volume levels, but it is best to ensure
that the waveform height is at least 25% of the height of the box.
You can also use the Waveform Graph to examine the spectral
characteristics of your instrument’s sound. A sound with no
Using Master Tuner
11
A Technical Note
harmonics will appear as a sine wave. Each harmonic adds to the
complexity of the waveform.
Click the mouse to remove the Waveform Graph.
The Waveform graph normally appears to be a single line which
moves as you change the input sound. In reality the picture is
redrawn several times a second, providing the illusion of motion.
Under certain conditions, the Waveform Graph can waver or be
unstable. Here’s why:
Master Tuner attempts to synchronize each trace on the display
with the previous trace, using the method of positive zero
crossings. This means that each new trace is begun when the
signal from the microphone meets the following conditions:
• It previously passed a preset “trigger point”,
• It is currently increasing, and
• It crosses the zero (middle) point on the graph.
If the waveform contains multiple zero crossings, the display
may oscillate between two starting points. Usually the solution is
to raise or lower the volume a bit.
Please note that this does not affect tuning performance —
Master Tuner does not use zero crossings in any way when it is
tuning.
If you have a color or grayscale screen, the number of times the
Waveform Graph is redrawn each second depends on how many
colors your monitor is set to. To redraw the Waveform Graph
more rapidly, use the Control Panel to set your monitor to two
colors.
Using Master Tuner
12
Calibrating Sound Input
Options
Color Screen
√ Smoothing
√ Auto Note Selection
Waveform Graph
Tune Continuously
S
T
Calibrate Sound Input…
Edit Instrument…
H
For the most accurate tuning results, you should calibrate your
sound input hardware.
Although this hardware is generally well constructed, the
internal clocks of different hardware may run at slightly different
speeds (the difference rarely amounts to more than 5 cents in the
absolute accuracy of a note when you use Master Tuner).
You can calibrate your sound input hardware against the realtime clock of your Macintosh by selecting Calibrate Sound
Input… from the Options menu.
A dialog box appears on the screen, telling you that the
calibration process requires about 17 minutes and cannot be
interrupted once it is begun. Click the Calibrate button to
proceed. Another dialog box appears, telling you that Master
Tuner is calibrating your hardware.
To save the calibration settings, select Save Preferences from the
File menu. The calibration setting will be saved along with your
preferences (the save function is disabled on this demonstration
version of Master Tuner).
You should only have to calibrate your hardware once.
The calibration procedure depends on the accuracy of the realtime clock in your Macintosh. If the time shown in the
Macintosh Control Panel is accurate to within 20 seconds per
day, the absolute accuracy of Master Tuner should be within
0.5% of a semitone (half a cent).
If absolute accuracy is very important to you, we suggest you
check the accuracy of Master Tuner against a reliable reference
source.
You should avoid running communications or network programs
in the background while you are calibrating your sound input
hardware.
Using Master Tuner
13
Selecting Notes
Options
Color Screen
√ Smoothing
√ Auto Note Selection
Waveform Graph
Tune Continuously
S
T
Calibrate Sound Input…
Edit Instrument…
H
When Auto Note Selection is turned on, Master Tuner automatically determines which note you are playing.
The time required to select a note is dependent on the range of
your instrument, and the Macintosh model you are using.
If the sound of your instrument decays rapidly, or if you are
using an older Macintosh model with a MacRecorder, you
should probably turn automatic note selection off.
Select Auto Note Selection from the Options menu to uncheck it.
A triangle appears under the keyboard:
File Edit Instrument Options Recordings
Master Tuner
A = 440 Hz
Temperament:
Equal Temperament
You can select the note to be tuned in several ways:
• Drag the triangle to the note you wish to tune. To select an
accidental, drag the triangle midway between two white notes.
• Click under the note you wish to tune. The triangle snaps to
the new note position.
• Press the keyboard arrow keys to move the triangle up or
down a semitone at a time.
There’s an even easier way — just play a note within a tone of
the currently selected note. Master Tuner switches notes
automatically within a full tone of the currently selected note.
As long as you continue to play notes within a tone of each
other, Master Tuner will switch notes automatically over the full
range of your instrument.
Note: Even when automatic note selection is turned on, Master
Tuner will switch to a new note within a tone of the current note
Using Master Tuner
14
much more quickly than it will switch to a note outside of this
range.
The setting of Auto Note Selection is saved along with your
other preferences when you select Save Preferences from the
File menu.
Different Temperaments
Master Tuner is shipped with most of the significant historical
temperaments. To use a new temperament, simply make a
selection from the Temperament pop-up menu:
File Edit Instrument Options Recordings
Master Tuner
Base Pitch pop-up menu
A = 440 Hz
Temperament:
Equal Temperament
Temperament
pop-up menu
C
You can play a few notes on the screen keyboard to see if you
like a temperament before committing your whole instrument to
it.
If you would like more information about temperaments in
general, please refer to About Temperaments, in the Master
Tuner User’ Guide.
In this demonstration version of Master Tuner, you can only
select Kirnberger III, a baroque temperament.
Kirnberger III is close enough to Equal Temperament (the
standard temperament used by most modern instruments) that
you may well prefer it if you play in key signatures with less
than three accidentals.
Using Master Tuner
15
Base Pitch
The pitch of A can be varied from 390 Hz to 466 Hz in the
regular version of Master Tuner.
In this demonstration version, you can only select A=440 Hz —
standard pitch.
Instrument Menu
For best results, you should select the type of instrument you will
be tuning from the Instrument menu. If your instrument is not
listed, pick the instrument which is closest to yours.
Making a selection from this menu engages a set of heuristics
which optimize Master Tuners’ performance for your instrument.
Some of the items which are set by this menu include:
• The sampled sound recording used to play notes when you
click in the screen keyboard.
• The highest and lowest notes which will be tuned (notes
outside of this range are grayed out on the screen keyboard).
• Information relating to harmonic progressions, note attack
characteristics, and so forth.
Instruments are all unique, and it is possible that Master Tuner
will work best with your instrument if you select a different item
from this menu, or if you customize the instrument
characteristics to fit your particular instrument. Customizing
Master Tuner, later in this Guide, has more details.
If you encounter difficulties, we would appreciate receiving a
recording of a few notes played on your instrument, along with a
note outlining your experiences.
Smoothing
On certain instruments, the tuning trace can be somewhat jagged,
making it hard to tell when you are exactly in tune. Smoothing
out the tuning trace can be helpful in these cases.
Sometimes you may want to make the tuning trace more
“sensitive”, for instance to look at your vibrato. If you are tuning
a stringed instrument such as a guitar or harpsichord, you may
also prefer to turn Smoothing off so that the effects of the pluck
are clearly separated from the string decay.
A check mark indicates that smoothing is turned on.
Options
Color Screen
√ Smoothing
√ Auto Note Selection
Waveform Graph
Tune Continuously
S
T
Calibrate Sound Input…
Edit Instrument…
H
Using Master Tuner
16
Save Preferences lets you save some of Master Tuner’s settings
from one session to another. Here is a list of the settings which
are saved:
• Auto Note Selection
• Base Pitch
• Calibration
• Color Screen
• Instrument
• Smoothing
• Temperament
In this demonstration version of Master Tuner, you cannont save
your preferences.
Save Preferences
File
Save Preferences
Quit
Q
Quit ends your Master Tuner session and returns you to the
Finder. Clicking in the close box of the main tuning window
does the same thing.
Quit
File
Save Preferences
Quit
Q
Color Screen
Options
Color Screen
√ Smoothing
√ Auto Note Selection
Waveform Graph
Tune Continuously
S
T
If you have a color screen, you can display the tuning graph in
color (if your Macintosh does not have a color screen, this item
will be dimmed).
Although you’ll normally use the Color option, you should be
aware that the tuning graph is displayed a bit faster when the
screen is set to black and white (use the Control Panel to set your
monitor to 2 colors).
If you are looking at transient behavior in your instrument, such
as the effect of plucking a string, you may wish to turn Color off.
Calibrate Sound Input…
Edit Instrument…
H
Using Master Tuner
17
The Edit Menu
The Edit menu is provided for compatibility with desk
accessories.
Although you can use desk accessories with Master Tuner,
please remember that desk accessories may slow down Master
Tuner’s performance.
System Compatibility
Master Tuner is fully compatible with all versions of System 7 ,
but won’t give very much time to background tasks while you
are tuning.
If background applications are active, Master Tuner may
temporarily stop tuning to allow a background task to complete.
We suggest you avoid using your Macintosh as a file server
while using Master Tuner.
Under System 7 and higher, Balloon Help is available.
BalloonHelp
menu on the upper right hand side of the menu bar can
The
give you specific information about objects on the screen:
When the cursor is over a screen object, a balloon pops up with
information about the object.
Note Names
To indicate which octave a note is in, Master Tuner gives each
note a unique name. Middle C is called “c”, and the C an octave
below middle C is called “C”.
From the bottom of the screen keyboard to the top of the
keyboard, the C’s are called:
C2
C1
Using Master Tuner
C
c
c1
c2
c3
c4
18
Wind and Voice…
Wind players and singers tune every note as it is sung or played.
Master Tuner can help you analyze your playing.
Sustaining a note
See how evenly you sustain a long note.
Select Tune Continuously from the Options menu, and make an
appropriate selection from the Instrument menu.
While you are looking at the trace line, you will see your vibrato
as a regular undulation of the tuning trace.
Wind players can see what the natural intonation for their
instrument is at each note. If your instrument is old, this can give
you an indication of what temperament it was originally
designed for. Try different temperaments to find one that
complements the natural tendencies of your instrument.
Intervals
Start by playing a note and then jumping to a new note. The
tuning trace will start over for the new note — see how close you
are to the “in-tune” line in the center of the tuning graph.
To see both notes in the interval on the screen at once, select
Record from the Options menu. This will immediately make a
short recording, and playback a tuning trace for all notes in the
recording. You can playback the recording as often as you wish
(see the next section of this Guide).
Voice
The spectral characteristics of the human voice can vary quite a
bit from person to person. In particular, the overtones in the
human voice are influenced by the resonating chambers in the
throat and mouth, and may not be harmonically related to the
fundamental tone.
If Master Tuner’s default voice characteristics don’t work for
you, you may need to adjust the frequency recognition
parameters as outlined in Customizing Master Tuner, later in this
Guide.
Wind and Voice
19
Working with Recordings
Master Tuner lets you record a sound for later analysis. You can
play back the recording to display a tuning trace, or click in the
screen keyboard to hear your recording at different pitches.
You can also examine the waveform of the recording, or
examine the relative strengths of the first few harmonics.
Record
Recordings
Record
Playback
Waveform
R
P
Playback
Recordings
Record
Playback
Waveform
R
P
When you select Record, Master Tuner lets you record a sound.
Immediately after making the recording, Master Tuner will
playback the recording (see the next command).
You can also select this command from the keyboard by pressing
“R” (it’s not necessary to hold the Command key down while
you do so).
The recording you make becomes the current sound. You can
click on the screen keyboard to hear your recording at different
pitches if you like.
To erase your recording, just make a selection from the
Instrument menu, or make a new recording.
When you select Playback, Master Tuner plays the recording
back through the Macintosh speaker and displays a tuning trace
for the recording.
Please note that the tuning trace is slower than the audio
playback, so the sound you hear may not end up in synch with
the tuning trace.
For your convenience, you can just press the “P” key to hear a
playback.
There are a few differences from Tune Continuously:
• The recording you made is sound-activated. Silent or quiet
passages are simply removed from the recording, and do not
appear on the tuning trace.
• If the recording spans more than one note, you’ll see a vertical
bar at the beginning of each new note. The note names appear
near the bottom of the tuning graph.
Recording yourself playing an interval or ornament is a handy
way to see the relative pitch of all notes on the screen at the same
time.
Working with Recordings
20
If your instrument has a particularly short decay period, you may
be able to determine the pitch more accurately with a recording
than with Tune Continuously.
Incidentally, you can also playback Master Tuner’s built-in
sounds for each instrument.
When you have finished working with recordings, you should
reselect your instrument from the Instrument menu to restore the
standard reference sound.
To see the waveform of a portion of your recording, select
Waveform from the Recordings menu. The waveform you see is
from a point near the beginning of your recording.
Waveform
Recordings
Record
Playback
Waveform
R
P
File Edit Instrument Options Recordings
Master Tuner
A = 440 Hz
Working with Recordings
Temperament:
Equal Temperament
21
About Temperaments
The regular version of the Master Tuner User’s Guide discusses
the origins of temperaments, and how they’re built — this
chapter, as well as a chapter discussing the temperaments built
into Master Tuner have been removed from this demonstration
version..
The Temperaments22
Customizing Master Tuner
Master Tuner includes Instrument selections for most common
instruments. As a general rule, one of these selections should
work well for you.
In some cases however, you may wish to change the characteristics of an Instrument selection. For example, you might wish
to record your own instrument and use it as the reference sound.
Or your instrument might have a different range than the
standard instrument.
In some cases you may even wish to adjust Master Tuner’s
frequency recognition parameters. This is most likely to be true
for singers, because the spectral characteristics of the human
voice can vary quite a bit from person to person. The overtones
in the human voice are influenced by various resonating
chambers in the throat and mouth, and may not be harmonically
related to the fundamental tone.
Edit Instrument…
You can change some of the characteristics of an Instrument
menu selection by choosing Edit Instrument… from the
Options menu. The Instrument Characteristics window appears:
Instrument Characteristics
Instrument name
Reference sound
Confirm notes?
Harpsichord
Cancel
Harpsichord
Low
OK
Save
High
Adjust pitch
Save as…
Lowest note
F2
Highest note
c3
Selection threshold
300
Harmonic rejection
400
Silence rejection
256
Noise rejection
4
Window size
256
Sample size
300
Smoothing
Delete
48
If your screen is large enough, you can move this window
around, and continue tuning as you adjust each item. As you
adjust the Instrument Characteristics, your changes are applied
immediately.
Customizing Master Tuner
23
The Instrument name is the current selection from the Instrument
menu. You can work on a new Instrument by making a new
selection from this menu.
Installing a New
Reference Sound
The Reference sound is a pop-up menu which shows all of the
sounds which have been installed into your copy of Master
Tuner. To change the reference sound, select a new sound and
click OK (if you want to make the selection permanent, click
Save).
You can also install a recording of your own instrument as a
reference sound. You’ll need to use a sound editor, such as
Macromedia’s SoundEdit.
Although these instructions assume that you are using
SoundEdit, you can use just about any sound editor. Here’s how:
1.
Using SoundEdit, make a clear recording of a note. We
suggest you use A=440 Hz, because this note is the same
frequency in any temperament.
2.
Trim the recording to about 40,000 samples in length. You
can use a longer recording if you wish, but your recording
must be at least 32,000 samples long.
3.
Add about 1500 samples of silence to the beginning of the
recording, or else reduce the volume of the first 1500
samples to zero.
4.
Select the “Pitches” command, and highlight the note you
recorded (normally this should be the A above middle C).
5.
Save your recording as a “resource” in your working copy
of Master Tuner. If you are using a different sound editor,
save your recording as a “Type 1” sound resource.
The next time you start Master Tuner, your recording will appear
in the Reference sound menu.
You can playback your recording to see if it is in tune (see
Working with Recordings). If it’s a little off pitch, use the Adjust
Pitch scroll bar to correct it, and click Save.
Customizing Master Tuner
24
Speeding up
Auto Note Selection
Before Master Tuner selects a note, it double checks to be sure it
has the right one. You can speed note selection up a bit by
unchecking the “Confirm notes” checkbox, although Master
Tuner may sometimes select the wrong note as a result. You
should normally leave this box checked.
It’s more effective to restrict the note range of an instrument.
There are two scroll bars to let you do this — one to select the
lowest note which Master Tuner will recognize, and one to select
the highest note.
Each click in a scroll bar arrow changes the note range by one
semitone. The note name is shown to the right of the scroll bar.
Noise and
Silence Rejection
When Master Tuner recognizes a note, it tries to follow it across
the screen. As the tuning trace is drawn, Master Tuner keeps
track of how many times it was unable to recognize the note
(either because you weren’t playing anything, you changed
notes, or background noise interfered). After a certain number of
times (set with these controls), Master Tuner gives up and tries
to start a new tuning trace.
If Noise Rejection is set to a particularly low value, Master
Tuner will switch notes very quickly when you play a new note,
but extraneous noise may fool it into starting a new tuning trace
unnecessarily.
Silence Rejection determines how long Master Tuner will leave
the tuning trace on the screen in the absence of any sound. The
value to the right of the scroll bar is measured in tenths of a
second.
The value these controls should have is largely a matter of
personal preference. Experiment to determine what values are
most convenient for you.
Frequency Recognition
You can also change some of the parameters which Master
Tuner uses to recognize and track notes. These parameters
interact with each other, so you will probably need to experiment
a bit to get the best results.
Each parameter has a numeric value, which is displayed to the
right of the scroll bar.
The most important setting is the Selection threshold, which
Master Tuner uses to recognize and track notes. Before you
adjust the selection threshold, we suggest you move the
Harmonic rejection scroll bar to the far right.
The Selection threshold should be set as low as possible while
still reliably recognizing notes. If it is set too low, notes won’t be
Customizing Master Tuner
25
recognized. It it’s set too high, Master Tuner may mistake a
harmonic of a note for the note itself, or else refuse to recognize
notes altogether. Be sure you try both high and low notes on
your instrument, as they may have quite different harmonic
characteristics.
After you have been tuning for a while, you may find that this
value has changed. This is normal — Master Tuner will make
some adjustments by itself.
If you find that Master Tuner mistakes a harmonic of a note for
the note itself, you should lower the Harmonic rejection value. If
this value is set too low, notes won’t be selected (this parameter
does not affect note tracking).
The other two aspects of frequency recognition which you can
change are the Window size and the Sample size. These two
characteristics help to determine the stability of Master Tuner’s
frequency recognition. In general, larger values make Master
Tuner more stable but slower. Beyond a certain point making
these values larger will do no good, and may even degrade
Master Tuner’s ability to recognize note changes.
As a rule, the Sample size should be a bit higher than the
Window size. The value of both parameters also depends on the
frequency range of your instrument. The Window size can be
reduced for high notes, but must be increased for low notes.
If the tuning trace for your instrument is particularly jagged,
increasing the Sample size may help.
Smoothing
Master Tuner normally averages several frequency samples
together when it displays a tuning trace. This keeps the tuning
trace from being affected by the minute changes in pitch which
most instruments produce.
You can set this number from 1 (no smoothing) to 256 (the
number of previous tuning trace values which are averaged with
the current frequency).
The human voice can have a very large frequency variation if
you sing with a strong vibrato (over a semi-tone), so you would
normally set this slider to a relatively high value for voice.
Other instruments will work better with a lower smoothing value
— the best approach is to experiment with your particular
instrument to see what you like.
Customizing Master Tuner
26
The Buttons
There are several buttons on the right hand side of the Instrument
Characteristics window:
Cancel returns the Instrument Characteristics to the values they
had when you selected Edit Instrument…
OK dismisses the Instrument Characteristics window. The
Instrument Characteristics remain set until you make a new
Instrument selection, or quit the program.
Save permanently changes the Instrument Characteristics for the
current Instrument. Please make any changes to your working
copy of Master Tuner, rather than the original disk.
Save as… lets you add a new Instrument, or replace an existing
Instrument. The new Instrument is permanently added to the
Instrument menu.
Delete permanently deletes an Instrument (please note that you
cannot delete the General instrument).
Customizing Master Tuner
27
When Things Go Wrong…
This section describes some of the problems you might
encounter using Master Tuner, and how to correct them.
Sound Input
A dialog box says my MacRecorder isn’t connected to the
modem port.
You must use a Macromedia MacRecorder, or a compatible
audio digitizer, and it must be connected to the modem port on
the back of your Macintosh (the modem port has a higher
interrupt priority than the printer port, making it better for high
speed data transfers).
Check to see that the MacRecorder is plugged in firmly. If you
continue to receive this message, your MacRecorder may have
been damaged.
Nothing happens when I select Tune Continuously.
The most common problem when using Master Tuner is that the
microphone level is too high or too low for your instrument.
Look at the high and low volume indicators to the left of the
tuning graph. The microphone should be positioned so that
neither indicator is highlighted when you are playing a note.
In some cases, you may need to amplify your microphone signal.
An easy way to do this is with a portable tape recorder: plug the
microphone into the tape recorder, and plug the line-out signal
from the tape recorder into the microphone input of your
computer. Set the tape recorder to Record (you can press Pause
at the same time, so you don’t actually make a recording), and
adjust the recording level so that Master Tuner sees a strong
signal.
Instruments
Most notes seems to work fine, but the very top or bottom notes
don’t register.
When you make a selection from the Instrument menu, you
select a package of heuristics (rules of thumb) which tell Master
Tuner about the characteristics of your instrument, including the
highest and lowest notes that the instrument can produce. Notes
which are outside the tuning range of the Instrument are grayedout on the screen keyboard.
When Things Go Wrong…
28
See Customizing Master Tuner for information about changing
the note range of your instrument.
It may also be that the position of your microphone needs to be
adjusted for the top or bottom notes. Check that neither the high
nor the low volume indicator is highlighted when you play a
note.
The screen keyboard shows the correct note, but a tuning trace
doesn’t appear.
The Noise Rejection parameter is probably set too low. See
Customizing Master Tuner. The volume could also be set too
high or low.
Octaves
Sometimes Master Tuner shows the correct note, but in the
wrong octave.
This indicates that the Instrument characteristics aren’t
distinguishing between the note and the harmonic an octave
above it.
Unless you are tuning a piano, this isn’t a problem, and you can
ignore it. If you are tuning a piano, you may find that
repositioning the MacRecorder or adjusting the level control will
help.
If Master Tuner selects the note an octave below the correct note
you may need to lower the Selection threshold. If it selects a note
an octave too high, you should either raise the Selection
threshold or reduce the Harmonic rejection threshold. For
information about these adjustments, please refer to Customizing
Master Tuner.
If you continue to have problems, please contact us.
Recordings
When I playback a recording, the tuning trace keeps going after
the sound has finished playing.
This is normal. When you playback a recording, the tuning trace
is updated more frequently than when you are tuning
continuously. This is one of the reasons why it takes longer to
produce the tuning trace for a recording that it takes to play the
recording back through the Macintosh’s speaker. Although the
sound playback starts at the same time as the tuning trace, the
sound playback will finish earlier than the tuning trace (this
effect is quite pronounced on slower Macintosh models).
When Things Go Wrong…
29
Performance
Master Tuner seems slower than usual. It takes a while to
recognize a new note.
You’ve probably changed your selection from the Instrument
menu. Some of the options, such as the General instrument, are
not as responsive as those which are optimized for a particular
type of instrument.
Restricting the range of tunable notes for a particular instrument
lets Master Tuner determine what note is being played more
rapidly (see Customizing Master Tuner).
If you are using an older Macintosh model, or if the sound of
your instrument decays relatively rapidly, you should turn Auto
Note Selection off.
When Things Go Wrong…
30
Installing Master Tuner
This section explains how to set up Master Tuner on your
Macintosh. If you are already familiar with the Macintosh and
have a hard disk or two diskette drives, you can skip to
QuickStart, at the end of this section.
Installation
If you have a Macintosh with only one diskette drive and no hard
disk, you should make a new startup disk and copy Master Tuner
to your new startup disk.
Before you do anything else, follow the instructions in your
Macintosh Owner’s Guide to make a copy of your Master Tuner
disk. Place the original disk in a safe place.
Remember — you are not permitted to make more than one
copy of Master Tuner, or to give copies to anyone else.
Next, copy the file Master Tuner from your original disk to your
hard disk (or any other convenient disk).
To start tuning, turn to Getting Started, at the beginning of this
Guide.
QuickStart
If you have a hard disk, start by copying Master Tuner to any
convenient folder. If you have two diskette drives, leave your
Startup disk in the internal drive, and place Master Tuner in the
external drive.
If you run Master Tuner from a floppy disk, please be sure to
make a working copy first.
Plug a microphone into the microphone port in the back of your
Macintosh, and double click on the Master Tuner icon to start.
Place the microphone reasonably close to your instrument and
select “Tune Continuously” from the Options menu.
Play a note. Master Tuner highlights the note you’re closest to on
the screen keyboard, and tracks how sharp or flat you are over
time.
If Master Tuner doesn’t highlight a note or track it reliably
across the screen, you may have to adjust the position of the
microphone. There are two small boxes to the left of the tuning
graph — the upper box is highlighted if the volume is set too
high, and the lower box if the volume is too low.
You can find more information on tuning in Getting Started, at
the beginning of this Guide.
Auto Note Selection, 14
background applications, 18
Balloon Help, 18
base pitch, 5
calibrate, 13
clipping, 10
Color, 17
Edit menu, 18
Harmonic, 16, 26, 29
heuristics, 16, 28
Instrument menu, 16
interval, 20
MacRecorder, 9, 28, 29
Middle C, 18
piano, 5, 29
Pitch, 16
Playback, 20
Quit, 8
Quit, 17
Record, 20
Save Preferences, 13, 15, 17
semitone, 14, 25
semitone, 7
Smoothing, 16
System 7, 18
System 7+, 18
Temperament Designer, 5
Temperament Menu, 15
triangle, 14
Tune Continuously, 7, 8, 19, 20,
21, 31
tuning trace, 7, 8
voice, 19, 23
volume, 11, 24, 29, 31
volume, 9, 10