1
8
Chapter 8
TROUBLESHOOTING AND
MAINTENANCE
Problems related to general use of the machine, the copy function, and software
setup are explained here. Be sure to check the problem carefully before calling for
service, as many problems can be solved by the user.
If you are unable to solve the problem, turn off the main switch, unplug the power
cord from the outlet, and contact your dealer.
Note
For problems related to the printer and scanner functions, see the
online manual.
DISPLAY MESSAGES
When the following indicators light up or blink on the operation panel or the following
alphanumeric codes appear in the display, solve the problem immediately referring
to both the table below and the indicated page.
Note
Be sure to use only genuine TOSHIBA parts and supplies.
Indication
Lamp indicator
Display
BYPASS : ADD
PAPER
Tray
: ADD
location Blinks TRAY<*>
PAPER
indicator
CLOSE PAPER
TRAY<*>
CLEAR PAPER
JAM.
ADF/RADF JAM.
FRONT OR SIDE
COVER OPEN.
CLOSE COVERS.
CLOSE THE ADF/
RADF COVER.
Error indicator
Blinks
Cause and remedy
Page
The indicated paper tray is not
attached, is attached incorrectly, or has
run out of paper. (The tray is indicated
in <*>.)
15
A paper misfeed has occurred.
Remove the misfeed as explained in
"MISFEED REMOVAL".
70
The cover is open. Close the cover.
-
The document feeder cover is open. Close
the document feeder cover.
The toner cartridge is empty. Replace
REPLACE THE
the toner cartridge with a new
TONER
cartridge. (When the indicator blinks,
CARTRIDGE.
the machine does not operate.)
When [L1-00] appears, the scan head
locking switch is locked. Turn off the
power, release the scan head locking
switch, and turn the power back on.
When [F2-02] appears, check the toner
and make sure that the seal
SYSTEM ERROR cartridge
[XX - XX] REFER is not still affixed.
TO USER GUIDE The machine will not function. Turn the
power switch off, wait about 10
seconds, and then turn on the switch
again. If this does not clear the error,
remove the power cord from the outlet,
and contact your authorised service
representative.
74
76
8
-
-
61
TROUBLESHOOTING AND MAINTENANCE
Indication
Lamp indicator
Display
INSTALL A NEW
Blinks TONER
CARTRIDGE
TONER
Error
CARTRIDGE IS
indicator
Steadily NEAR EMPTY.
lit
MAINTENANCE
REQUIRED CALL
FOR SERVICE
MEMORY FULL, PRESS START TO
RESUME.
NO 2-SIDED COPY FROM BYPASS
TRAY.
Cause and remedy
Page
The toner cartridge is not installed
correctly. Reinstall the toner cartridge.
74
Replacement of toner cartridge will be
needed soon. Prepare a new cartridge.
74
Service by an authorized TOSHIBA
service technician is required.
Data is being held in memory. Print the
data or clear it from memory.
Two sided printing or 2 IN 1 copying is
selected when the bypass tray is
already selected ,or the bypass tray is
selected when two-sided printing or 2
IN 1 copying is already selected.
NO 2IN1 COPY FROM
The bypass tray cannot be used. Press
BYPASS TRAY.
the [TRAY SELECT] key ( ) to select
a paper tray.
2 IN 1 copy and margin shift cannot be
NO 2IN1 COPY WITH MARGIN SHIFT. used in combination. Cancel the
function what was selected last.
COPY RATIO CAN NOT BE
Copy ratio can not be changed in 2 IN 1
CHANGED IN 2IN1.
copy.
This appears if you attempt to change
THIS MENU IS NOT SELECTABLE
a user program setting while a copy or
WITH DATA.
print job is in progress.
There is no paper for printing. Press
the [MODE SELECT] key to switch to
printer mode and follow the instructions
NO XXXX SIZE TRAY
in the display.
("XXXX" indicates paper size)
An original remains on the document
glass, or the original is too thick to
scan. Remove the original.
If the message is no cleared when
CHECK ADF/RADF.
there is not original on the document
START TO RESUME.
glass, the underside of the RADF is
dirty. Clean the underside of the RADF.
(especially areas where black lines
appear.)
Printing is not possible if the paper size
setting is different from the size of
paper loaded in the tray. Load the
LOAD XXXX PAPER INTO TRAY<*>. same size of paper as the paper size
setting and then press the [START] key
( ). Printing will begin.
("XXXX" indicates paper size. The tray
is indicated in <*>.)
The machine is not correctly connected
NO PC COMMUNICATION; CHECK
to the computer. Check the cable
CABLE.
(when using the scanner function).
62
30
26
31
31
34
25
31
54
-
21
78
15
42
TROUBLESHOOTING THE MACHINE
The following problems are related to the general operation of the machine and
copying.
Problem
Cause and solution
Page
The machine is not plugged into a
power outlet.
→ Plug the machine into a grounded outlet.
-
Power switch OFF.
→ Turn the power switch ON.
The machine does not
operate.
Copies are too dark or
too light.
Blank copies.
12
The power save indicator is blinking.
Indicates that the machine is warming
up.
→ Copies cannot be made until the
machine has finished warming up.
-
The front cover or the side cover is not
completely closed.
→ Close the front cover or the side cover.
-
The machine is in auto power shut-off
mode.
→ In auto power shut-off mode, all lights
are off except the power save indicator.
Press the [START] key (
) to resume
normal operation.
13
The scan head locking switch is locked.
→ Unlock the scan head locking switch.
76
Select the correct original type for the
original.
→ Select AUTO (
) with the
[EXPOSURE (
)] key or press the
[
] key (
) or [
] key (
) to
manually select an appropriate
exposure.
→ If the copy is too light or too dark even
though AUTO (
) was selected with
the [EXPOSURE (
)] key, adjust the
automatic exposure level.
24
56
8
The original is not placed face up in the
RADF or face down on the document
glass.
→ Place the original face up in the RADF
or face down on the document glass.
20, 21
The scan head locking switch is locked.
→ Unlock the scan head locking switch.
76
63
TROUBLESHOOTING AND MAINTENANCE
Problem
Cause and solution
The original was not placed in the
correct position.
→ Place the original correctly.
Part of the image is cut
off or there is too much
blank space.
Wrinkles appear in the
paper or the image
disappears in places.
Copies are smudged or
dirty.
64
Page
20, 21
An appropriate ratio was not used for
the size of the original and the size of
the paper.
→ Press the [ZOOM] key to change the
ratio to a setting that is suitable for the
original and the copy paper.
25
The size of paper loaded in the tray was
changed without changing the tray's
paper size setting.
→ Be sure to change the tray's paper size
setting whenever you change the size
of paper loaded in the tray.
19
The paper is outside of the specified
size and weight range.
→ Use copy paper within the specified
range.
14
Paper curled or damp.
→ Do not use curled or crimped paper.
Replace with dry copy paper. During
periods when the machine is not used
for a long time, remove the paper from
the tray and store it in a dark place in a
bag to prevent moisture absorption.
-
The document glass or the underside of
the RADF is dirty.
→ Clean regularly.
78
Original smudged or blotchy.
→ Use a clean original.
-
Images rub off the copy
easily.
The fusing temperature is not
appropriate.
→ In the user programs, set "PAPER
TYPE" (program 29) to "2 (HEAVY
PAPER)".
57
Printing is not uniform
between the edges of
the paper and the
center.
The fusing temperature is not
appropriate.
→ In the user programs, set "PAPER
TYPE" (program 29) to "1 (PLAIN
PAPER)".
57
TROUBLESHOOTING AND MAINTENANCE
Problem
Cause and solution
Page
Misfeed occur.
→ To remove the misfeed, see "MISFEED
REMOVAL".
70
The paper is outside of the specified
size and weight range.
→ Use copy paper within the specified
range.
14
Paper curled or damp.
→ Do not use curled or crimped paper.
Replace with dry copy paper. During
periods when the machine is not used
for a long time, remove the paper from
the tray and store it in a dark place in a
bag to prevent moisture absorption.
Paper misfeed.
White or black lines
appear on copies.
-
Paper is not loaded properly.
→ Make sure that the paper is properly
loaded.
15
Pieces of paper inside machine.
→ Remove all pieces of misfed paper.
71
Too much paper is loaded in the tray.
→ If the stack of paper is higher than the
indicator line on the tray, remove some
of the paper and reload so that the
stack does not exceed the line.
15
Some sheets of paper stick together.
→ Fan the paper well before loading it.
15
The guides on the bypass tray do not
match the width of the paper.
→ Adjust the guides to match the width of
the paper.
18
The bypass tray extension is not
opened.
→ When loading a large size of paper,
open the extension.
18
The scanner glass for the RADF is dirty.
→ Clean the long, narrow scanning glass.
78
The transfer charger is dirty.
→ Clean the transfer charger.
79
8
65
TROUBLESHOOTING AND MAINTENANCE
Problem
Cause and solution
Copying or printing is performed.
→ Set the paper size after copying or
printing is complete.
Paper size for a paper
tray cannot be set.
Output does not stack
neatly in the paper
output tray.
A copy job stops before
it is finished.
The power save
indicator is lit.
Error indicator (
lit or blinking.
) is
Lighting fixture flickers.
66
Page
-
The machine has stopped temporarily
due to running out of paper or a
misfeed.
→ Load paper or remove the misfeed, and
then set the paper size.
15, 19,
70
Both ends of the paper are curled
upward.
→ Turning the paper over in the paper tray
may help.
15
"MEMORY FULL, PRESS START TO
RESUME." appears in the display.
→ The memory became full during sort
copy. Copy only the originals that have
been scanned to that point, or cancel
the job and clear the data from memory.
30
The tray is out of paper.
→ Load paper.
15
Other indicators are lit.
→ If other indicators are lit, the machine is
in preheat mode. Press any key on the
operation panel to resume normal
operation.
13
Only the power save indicator is lit.
→ If only the power save indicator is lit, the
machine is in auto power shut-off
mode. Press the [START] key (
) to
resume normal operation.
13
See "DISPLAY MESSAGES" to check the
meaning of the error indicator and error
message in the display, and take
appropriate action.
61
The same power outlet is used for the
lighting fixture and the machine.
→ Connect the machine to a power outlet
which is not used for other electric
appliances.
-
PROBLEMS DURING SETUP OF THE SOFTWARE
If the software does not install correctly, check the following items on your computer.
To remove the software, see "Removing the software" (p.69).
MFP driver cannot be installed (Windows 2000/XP)
If the MFP driver cannot be installed in Windows 2000/XP, follow these steps to
check your computer's settings.
1
Click the "start" button and then click "Control Panel".
On Windows 2000, click the "Start" button, select "Settings", and then click
"Control Panel".
2
Click "Performance and Maintenance", and then click
"System".
On Windows 2000, double-click the "System" icon.
3
Click the "Hardware" tab and then click the "Driver Signing"
button.
4
Check "What action do you
want Windows to take?" ("File
signature verification" in
Windows 2000).
If "Block" has been selected, it will
not be possible to install the MFP
driver. Select "Warn" and then
install the MFP driver as explained
in "INSTALLING THE
SOFTWARE".
8
67
TROUBLESHOOTING AND MAINTENANCE
Plug and play screen does not appear
If the Plug and Play screen does not appear after you connect the machine to your
computer with a USB cable and turn on the machine, follow the steps below to verify
that the USB port is available.
1
Click the "start" button, click "Control Panel", and then click
"Performance and Maintenance".
• On Windows Vista, click the "Start" button, select "Control Panel", and
then click "System and Maintenance".
• On Windows 98/Me/2000, click the "Start" button, select "Settings", and
then click "Control Panel".
2
Click "System", click the "Hardware" tab, and click the "Device
Manager" button.
• On Windows Vista, click the "Device Manager", and if a message screen
appears asking you for confirmation, click "Continue".
• On Windows 2000, double-click the "System" icon, click the "Hardware"
tab, and click the "Device Manager" button.
• On Windows 98/Me, double-click the "System" icon and click the "Device
Manager" tab.
• "Universal Serial Bus controllers" will appear in the list of devices.
Note
3
If the "System" icon does not appear in Windows Me, click "view all
Control Panel options".
Click the
icon beside "Universal Serial Bus controllers".
Two items should appear: your controller chipset type and Root Hub. If
these items appear, you can use the USB port. If the "Universal Serial Bus
controllers" shows a yellow exclamation point or does not appear, you must
check your computer manual for USB troubleshooting or contact your
computer manufacturer.
4
68
Once you have verified that the USB port is enabled, install the
software as explained in "INSTALLING THE SOFTWARE".
TROUBLESHOOTING AND MAINTENANCE
The MFP driver cannot be correctly installed by Plug and
Play (Windows 2000/XP/Vista)
In Windows 2000/XP/Vista, if the MFP driver cannot be correctly installed by Plug
and Play (for example, Plug and Play takes place without copying the required files
for the MFP driver installation), follow these steps to remove unneeded devices and
then install the MFP driver as explained in "INSTALLING THE SOFTWARE" (p.36).
1
Click the "start" button, click "Control Panel", and then click
"Performance and Maintenance".
• On Windows Vista, click the "Start" button, select "Control Panel", and
then click "System and Maintenance".
• On Windows 2000, click the "Start" button, select "Settings", and then
click "Control Panel".
2
Click "System", click the "Hardware" tab, and click the "Device
Manager" button.
• On Windows Vista, click the "Device Manager", and if a message screen
appears asking you for confirmation, click "Continue".
• On Windows 2000, double-click the "System" icon, click the "Hardware"
tab, and click the "Device Manager" button.
3
Click the
devices".
icon beside "Other
If "e-STUDIOXXXX" and "TOSHIBA
e-STUDIOXXXX" appear, select and
delete both of these items.
Note
4
If "Other devices" does not appear, close the "Device Manager" window.
Install the software as explained in "INSTALLING THE
SOFTWARE".
Removing the software
If you need to remove the software, follow these steps.
1
Click the "start" button and then click "Control Panel".
On Windows 98/Me/2000, click the "Start" button, select "Settings", and
then click "Control Panel".
2
8
Click "Add or Remove Programs".
• On Windows Vista, click the "Uninstall a program".
• On Windows 98/Me/2000, double-click the "Add/Remove Programs" icon.
3
Select "TOSHIBA e-STUDIO203S Series MFP Driver" and
Button Manager from the list, and remove the software.
For more information, refer to your operating manual or to the help files for
your operating system.
69
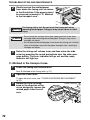
MISFEED REMOVAL
When a misfeed occurs, the error indicator blinks, "CLEAR PAPER JAM" appears in
the display, and the machine stops operating. If a misfeed occurs when using the
RADF, "RETURN X ORIGINAL(S) START TO RESUME" will appear in the display.
("X" indicates the number of pages to be returned.). This indicates the number of the
originals that must be returned to the document feeder tray after a misfeed. Return
the required number of originals. This number will be cleared when copying is
resumed or the [CLEAR] key (
) is pressed. If an original misfeed occurs in the
RADF, the machine will stop and the error indicator will blink. To remove a misfeed
from the RADF, see "D: Misfeed in the RADF (Option)" (p.73).
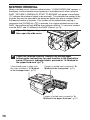
1
Open the bypass tray, and
then open the side cover.
2
Check the misfeed location. Remove the misfed paper
following the instructions for each location in the illustration
below. If the error indicator blinks, proceed to "A: Misfeed in
the paper feed area" (p.71).
If the misfed paper is seen from
this side, proceed to "C: Misfeed
in the transport area". (p.72)
If paper is misfed here, proceed to "B:
Misfeed in the fusing area". (p.71)
If paper is misfed here, proceed to "A:
Misfeed in the paper feed area". (p.71)
70
TROUBLESHOOTING AND MAINTENANCE
A: Misfeed in the paper feed area
1
Gently remove the misfed paper from the paper feed area as
shown in the illustration. If the error indicator blinks and the
misfed paper is not visible in the paper feed area, pull out the
paper tray and remove the misfed paper. If the paper cannot be
removed, proceed to "B: Misfeed in the fusing area".
The fusing unit is hot. Do not touch the fusing unit when
Warning removing misfed paper. Doing so may cause a burn or other
injury.
Caution
2
• Do not touch the surface of the drum (green portion) of the
photoconductive drum when removing the misfed paper. Doing so
may damage the drum and cause smudges on copies.
• If the paper has been fed through the bypass tray, do not remove the
misfed paper through the bypass tray. Toner on the paper may stain
the paper transport area, resulting in smudges on copies.
Close the side cover by pressing the round projections near
the side cover open button. The error indicator will go out and
the ready indicator will light up.
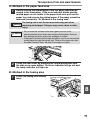
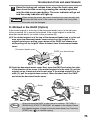
B: Misfeed in the fusing area
1
Lower the fusing unit release
lever.
Fusing unit release lever
8
71
TROUBLESHOOTING AND MAINTENANCE
2
Gently remove the misfed paper
from under the fusing unit as shown
in the illustration. If the paper cannot
be removed, proceed to "C: Misfeed
in the transport area".
The fusing unit is hot. Do not touch the fusing unit when
Warning removing misfed paper. Doing so may cause a burn or other
injury.
Caution
3
• Do not touch the surface of the drum (green portion) of the drum
cartridge when removing the misfed paper. Doing so may cause
smudges on copies.
• Do not remove the misfed paper from above the fusing unit. Unfixed
toner on the paper may stain the paper transport area, resulting in
smudges on copies.
Raise the fusing unit release lever and then close the side
cover by pressing the round projections near the side cover
open button. The error indicator will go out and the ready
indicator will light up.
C: Misfeed in the transport area
1
Lower the fusing unit release lever.
See "B: Misfeed in the fusing area" (p.71).
2
Open the front cover.
To open the front cover, see "TONER CARTRIDGE REPLACEMENT"
(p.74).
3
72
Rotate the roller rotating
knob in the direction of the
arrow and gently remove the
misfed paper from the exit
area.
Roller rotating
knob
TROUBLESHOOTING AND MAINTENANCE
4
Raise the fusing unit release lever, close the front cover and
then close the side cover by pressing the round projections
near the side cover open button. The error indicator will go out
and the ready indicator will light up.
When closing the covers, be sure to close the front cover securely and
Caution then close the side cover. If the covers are closed in the wrong order,
the covers may be damaged.
D: Misfeed in the RADF (Option)
If the misfed original is at the top of the document feeder tray or in the exit area,
follow procedure (A) to remove the misfeed. If the misfed original is inside the
document feeder and is not visible, follow procedure (B).
(A) If the misfed original is at the top of the document feeder tray or in the exit
area, open the document feeder cover and pull out the original. If the
original resists your pulling, press down on the RADF jam release lever
while pulling out the original. When finished, close the document feeder
cover.
Document feeder cover
RADF jam release lever
(B) Open the document feeder cover. Next, open the RADF and rotate the roller
in the direction of the arrow. If the misfed original is in the state (X), pull the
original out as it feeds out into the exit area. If the misfed original is in the
state (Y), pull the original down and out. When finished, lower the RADF
and close the document feeder cover.
Roller
8
(X)
(Y)
Note
Open and close the RADF to clear the error indicator. "RETURN X
ORIGINAL(S) START TO RESUME" will appear in the display. Return
the indicated number of pages to the document feeder tray. Press the
[START] key (
) to resume copying.
73