Transcript
Operating Instructions
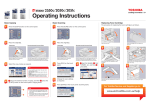
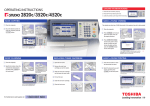
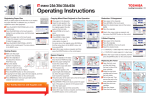
Registering Paper Size
Copying Mixed Sized Originals in One Operation
When original widths are the same
1
the paper with that of a different size, you need to
register the size to this equipment.
1
2
3
4
2
Press the [USER FUNCTIONS] button on the
control panel.
Press the [USER] tab on the touch panel to
display the user setting menu, and then press
[DRAWER].
Select the paper size on the touch panel.
1) Select the drawer in which you placed paper.
2) Select the paper size.
Press the [USER FUNCTIONS] or [COPY]
button on the control panel. The menu returns
to the BASIC menu.
3
4
5
6
Making Copies
1
2
RADF
optional
Make sure that paper
placed in the drawer(s).
Place the original(s) on
the Glass (Face Down) or
RADF (Face Up).
Key in the desired
1
number of copies if you
want more than one copy.
4
Select the copy modes as required.
Press the [START] button on the control panel.
If copying from the Glass, place the next originals, and then
press the [START] button on the control panel.
Press [FINISHED] on the touch panel after all the
originals have been scanned.
Place paper in the drawer(s).
Adjust the side guides to the
widest original, and then align
the originals against the side
guide on the front side.
Press [ZOOM] on the touch
panel.
Press [MIXED SIZE].
Press [AMS] to make copies
on paper in one size. To
make copies on paper of
the same size as the originals, press [CLOSE] so
that the menu returns to the BASIC menu, and
then press [APS].
Select other copy modes as required, and then
press the [START] button on the control panel.
Reduction / Enlargement
When original widths are not the same
1
2
3
4
5
3
4
5
6
7
1
2
3
4
Place paper in the drawer(s).
Place the original(s).
Press [2-SIDED] on the touch panel.
Select the desired mode.
[1 -> 2 DUPLEX]: 1-sided original to 2-sided copy
[2 -> 2 DUPLEX]: 2-sided original to 2- sided copy
Original glass
is
5
Bypass Copying
1
2
5
3
3
4
5
For Toshiba Service and Supplies go to:
6
www.eid.toshiba.com.au\help
Select other copy modes as required, and
then press the [START] button on the control
2-Sided Copying
OR
2
Place paper in the drawer(s).
Press [ZOOM] on the touch panel.
Select the desired paper size and then press
[AMS].
Place the original(s).
7
1
Place the original(s) on the Glass
(Face Down) or RADF (Face Up).
Move the paper holding lever
toward the outside. Place
2
paper with its copy side down
on the bypass tray.
Align the side guides to the
paper length while holding the
tab. Move the paper holding
lever toward the equipment.
Press the button of the same size as that of the paper
you placed on the bypass tray.
Press [PAPER TYPE] on the touch panel if the paper
type of the paper you placed on the bypass tray is
other than plain paper.
Select the paper type and then press [OK].
Select other copy modes as required, and then press
the [START] button on the control panel.
Select other copy modes as required, and then
press the [START] button on the control panel.
Replacing the Toner
1
2
1
2
3
4
5
6
Open the front cover
and then hold down
the lever to take off the
toner cartridge.
Shake the new toner
cartridge well to loosen
the toner inside.
Pull out the seal. Then
remove the seal on the
toner cartridge board.
Install the new toner
cartridge.
Clean the charger.
Close the front cover.
1
2
2
10
3
3
1
4
1
2
5
6