Transcript
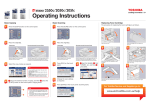
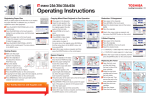
Operating Instructions
Copying From Glass
1
2
3
4
5
Raise the Platen Cover (optional) or the
Document Feeder (optional).
Place the original face down on the original glass
and align it against the left rear corner of the glass.
When copying highly transparent originals such
as overhead transparencies or tracing paper,
place a blank sheet of paper (A), the same size
as the original or larger, over the original (B).
Lower the Platen Cover (optional) or the
Automatic Document Feeder (optional) carefully.
Set the number of copies.
Press the [START] key.
Alternating Copying
2
3
Replacing Toner Cartridge
When you make several sets of copies, the copies
can be sorted and made to exit alternately one set
by one. This is called alternation. You need to place
copy paper in one drawer in a landscape direction
and place that of the same size in another drawer in
FINISHIN G DUPLEX 2IN1/4IN1
a portrait direction in advance.
IMAGE SHIFT DUAL PAGE ID CARD
EDGE ERASE ANNOTATION XY ZOOM
1 Place the original on the Glass or Document
3 PAPER TYPE JOB BUILD JOB MEMORY
Feeder.
FINISHING
SORT
2 Select “FINISHING” in the copy menu, and then
NONSORT
ALTERNATION
press the [ENTER] button.
4
3 Select “ALTERNATION”, and then press the
[ENTER] button.
4 Select the other copy modes as required, and then press the START key.
2
3
4
5
Place and align all the originals in the ADF/RADF.
Place them face up and align the side guides to
the original length.
When placing a large amount of originals with a
long width. Pull out the original stopper so that
the exiting originals will not fall. When replacing
this stopper, lift it slightly and push it in.
Set the number of copies.
Press the [START] key.
Copying on Both Sides Using RADF
2
3
3
4
5
6
7
You can copy 1-sided or 2-sided originals on both
sides of the paper.
1 Place the original in the RADF.
2 Select “DUPLEX” in the copy menu, and then press
the [ENTER] button.
3 Select the duplex copying mode, and then press the
[ENTER] button.
1 > 2 DUPLEX: 1-sided original to 2-sided copy
2 > 2 DUPLEX: 2-sided original to 2-sided copy
FINISHIN G DUPLEX 2IN1/4IN1
IMAGE SHIFT DUAL PAGE ID CARD
EDGE ERASE ANNOTATION XY ZOOM
3 PAPER TYPE JOB BUILD JOB MEMORY
DUPLEX
4
1>1 SIMPLEX
1>2 DUPLEX
2>2 DUPLEX
9
DUPLEX
5
10
BOOK TYPE
TABLET TYPE
11
4
Selecting Image Mode
You can select the most suitable quality of the
copied image in the following three modes
depending on the originals:
TEXT/PHOTO: Originals with text and
photographs mixed
PHOTO: Originals with photographs
TEXT: Originals with text only or with text and
fineillustrations only
1 Place the original in the glass or ADF.
2 Press the original mode button until the lamp of
the desired mode is lit.
3 Press the [START] key.
2
8
Using the ADF/RADF
1
1
5
BOOK TYPE: Open to left
TABLET TYPE: Open to top
Select the other copy modes as required, and then press the START key.
12
* Optional ADU is required.
13
Interrupting Copying
1
2
3
Press the INTERRUPT button.
Replace the original with the new document.
Select the copy modes as required, and then press
the START key.
14
15
5
6
1
2
10
3
4
5
6
7
8
9
10
12
11
13
For Toshiba Service and Supplies call:
4
3
Open the front cover.
Hold down the green lever.
Pull out the toner cartridge.
Shake the new toner cartridge
strongly with the label surface
down to loosen the toner inside.
Remove the protective sheet
from the end of the cartridge.
Remove the protective sheet
from the end of the cartridge.
Insert the toner cartridge along
the rail.
Clean the charger. Hold the
cleaning knob of the charger
and pull it out toward you
carefully until it comes to a stop.
Then reinsert it in its original
position carefully. Repeat this
procedure two or three times.
Open the side cover.
Pull the transfer unit toward you
carefully to lay it down while
holding the green lever.
Take out the transfer charger
cleaner out of the front pocket
of the transfer unit.
Wipe the transfer charger
wire with the transfer charger
cleaner.
Return the transfer charger
cleaner into the cleaner pocket,
and then close the transfer unit.
Close the side cover.
Close the front cover.
INTERRUPT button.
Place the old original back.
Press the START key to resume the interrupted job.
1
Job interrupted
100%
ZOOM
NONSORT
FINISHING
EDIT
1300 887 600
www.eid.toshiba.com.au