1
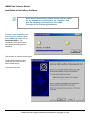
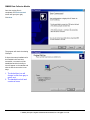
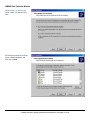
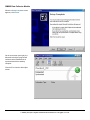
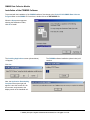
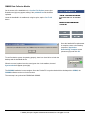
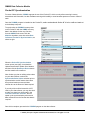
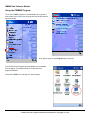
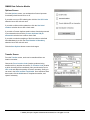
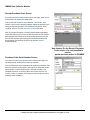
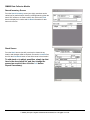
Kornyk Computer Solutions International, Inc.
31157 Creekside Drive,
Tel: 604-504-7936
Website: www.kcsi.ca
Abbotsford, BC V2T 5J9
Fax: 604-504-7976
Email: [email protected]
SIMMS
Inventory Management Software
Data Collector Installation Manual
PSIMMS User Guide
Version 5.1
SIMMS Data Collector Module
Installation of ActiveSync Software......................................................................................................................................... 1
Installation of Embedded Visual Basic Runtime only for Pocket PC 2003 ............................................................................. 7
SIMMS Mobile Setup .............................................................................................................................................................. 9
Installation of the PSIMMS Software .................................................................................................................................... 10
Pocket PC Synchronization................................................................................................................................................... 12
Using the PSIMMS Program ................................................................................................................................................. 13
Options Screen...................................................................................................................................................................... 16
Transfer Screen..................................................................................................................................................................... 16
Search for Sales Orders Screen ........................................................................................................................................... 17
Sales Order Screen............................................................................................................................................................... 17
New Receipt Screen ............................................................................................................................................................. 18
Issue Screen ......................................................................................................................................................................... 18
Receipt Purchase Order Screen ........................................................................................................................................... 19
Purchase Order Serial Number Screen ................................................................................................................................ 19
Search Inventory Screen....................................................................................................................................................... 20
Stock Screen ......................................................................................................................................................................... 20
Updating Inventory from Device to Desktop ......................................................................................................................... 21
Windows Mobile Options....................................................................................................................................................... 22
Initializing a New Session for the Handheld Device.............................................................................................................. 22
Blue Tooth and Network Printer Setup ................................................................................................................................. 24
Troubleshooting the Data Collectors..................................................................................................................................... 25
MC70 – Installation Instructions ............................................................................................................................................ 28
Version 5.1
i
© 2006 by Kornyk Computer Solutions International. All rights reserved.
November 29, 2006
SIMMS Data Collector Module
Installation of ActiveSync Software
Note: Before proceeding, please ensure that the cradle
for the handheld is connected to the computer, and
that the handheld unit remains in the cradle
throughout the following procedures.
From the Pocket PC Kit/Microsoft
Synchronization Software folder
on the SIMMS CD, double click on
MSASYNCH.EXE file. The
installation will extract files (as at
right) before proceeding with the
installation.
Files will then be copied to the hard drive.
The Microsoft ActiveSync setup
screen will open when the files
have finished copying.
To proceed, click Next.
Version 5.1
1
November 29, 2006
© 2006 by Kornyk Computer Solutions International, Inc. All rights reserved.
SIMMS Data Collector Module
A Select Installation Folder screen
will appear (see right).
Click Next.
Files will be copied to the computer
(see right).
Version 5.1
2
November 29, 2006
© 2006 by Kornyk Computer Solutions International, Inc. All rights reserved.
SIMMS Data Collector Module
Once the copying files is
completed, the Get Connected
screen will open (see right).
Click Next.
The program will check the existing
COM port.
If all previous setup installations for
the handheld unit have been
successful, a connection will be
established and the ActiveSync
icon will appear on the startbar and
show its actual connection in two
ways:
1. The ActiveSync icon will
change in color from gray to
green, and,
2. The handheld unit will emit
a series of tones.
Version 5.1
3
November 29, 2006
© 2006 by Kornyk Computer Solutions International, Inc. All rights reserved.
SIMMS Data Collector Module
The program may now ask if any
partnerships are to be set with the
handheld device.
Select the Standard partnership
radio button to synchronize data
between the device and the
computer.
Select the Guest Partnership
radio button to copy and move
information between the device
and computer, or add and remove
programs, but NOT to synchronize
data.
Select Synchronize with this
desktop computer.
Click Next.
Version 5.1
4
November 29, 2006
© 2006 by Kornyk Computer Solutions International, Inc. All rights reserved.
SIMMS Data Collector Module
On the Number of Partnerships
screen, select Yes and then click
Next.
On the Synchronization Settings
screen, deselect all boxes, and
then click on Next.
Version 5.1
5
November 29, 2006
© 2006 by Kornyk Computer Solutions International, Inc. All rights reserved.
SIMMS Data Collector Module
When the Setup Complete screen
appears, click Finish.
On the next screen (see right), the
Microsoft ActiveSync program will
confirm that the handheld unit is
synchronized with the desktop
computer.
Click the X to close the ActiveSync
screen.
Version 5.1
6
November 29, 2006
© 2006 by Kornyk Computer Solutions International, Inc. All rights reserved.
SIMMS Data Collector Module
Installation of Embedded Visual Basic Runtime only for Pocket PC 2003
Note: Before proceeding, please ensure that the cradle
for the handheld is connected to the computer, and
that the handheld unit remains in the cradle
throughout the following procedures.
You should not download the eVB Runtime unless you
have a Pocket PC 2003 device since it does not work
on other versions of Pocket PC.
Download the embedded visual basic
runtime from the following URL:
www.kcsi.ca/download_demokcsi/embeddedppc2003.zip, and
un-compress the zipped archive to a
directory on your computer The
image on the right shows you what
should be in the archive
Double click on the My computer icon
and proceed to the Mobile Device
object as in the illustration to the right
Copy the msbbppc.armv4.cab file to
the mobile device directory; you will
receive the message on the right, just
select OK to continue.
Version 5.1
7
November 29, 2006
© 2006 by Kornyk Computer Solutions International, Inc. All rights reserved.
SIMMS Data Collector Module
You will see the screen on the right
appear, once complete, proceed to
the data collector, and click on
start/programs/file explorer and click
on the msbbppc.armv4.cab file to
complete the embedded visual
basic runtime installation
Version 5.1
8
November 29, 2006
© 2006 by Kornyk Computer Solutions International, Inc. All rights reserved.
SIMMS Data Collector Module
SIMMS Mobile Setup
Go to the Windows Mobile device and click Start>Settings>System>Add or Remove Programs
then remove KCSI SIMMS Mobile.
Put data collector in the cradle.
Click the Explorer button in the Active Sync and click the My Windows Mobile-based Device
button.
Then navigate to Program Files, and delete the whole SIMMS Mobile folder.
Copy the setupSimmsMobile.CAB file to the data collector.
Install by navigating to it on the data collector and clicking it. Follow the instructions on the
device if prompted. NOTE: Use the /device location.
Go to SIMMS.
Launch the Modules/Data Collectors/Windows Mobile Synchronization.
Make sure data collector is in the cradle and click Connect.
Click Transfer Information to Device.
When done, go to the device and navigate to Program Files/SIMMS Mobile and click the
SIMMS Mobile application.
Click Initialize. This copies all data from Sync to the SQL tables on the data collector (this
process can take quite several minutes).
Once done, click Physical Count (if you receive an error message, re-click.)
Set your Options (click Menu>Enable and make sure there is a check mark on Mfg Lot and no
check mark on Qty.
Set more Options (click Search By, then select UPC and Mfg Lot. This enables your apparel
usage.
To use the Physical Count screen, select a Location, click in the Search field and scan, then
go to the next item and scan again, etc., until your Physical Count is done (please do a sample
test of this process before going live).
When done, ‘X’ out to close the screen, then at the Main Screen click Settings and prepare for
the download.
Go to SIMMS.
Launch the Modules>Data Collectors>Windows Mobile Synchronization.
Make sure the data collector is in the cradle and click Connect.
Click Transfer Information from Device.
Click on Import to SIMMS to move the physical counts into SIMMS.
Version 5.1
9
November 29, 2006
© 2006 by Kornyk Computer Solutions International, Inc. All rights reserved.
SIMMS Data Collector Module
Installation of the PSIMMS Software
To proceed with the installation of the PSIMMS software, first change to the Pocket PC Kit/SIMMS Data Collector
Program folder on the SIMMS CD. Once there, double click on the SETUP.EXE file.
When the Setup screen appears
showing the Destination Folder,
click OK to install.
The Installing Applications screen (shown below)
will appear.
The PSIMMS software installation (shown below) will
continue.
Click Yes.
Next, the Application Downloading
Complete screen (see right) will
appear. Leave this screen as is for
the moment, and proceed to the
display screen of the handheld unit.
Version 5.1
10
November 29, 2006
© 2006 by Kornyk Computer Solutions International, Inc. All rights reserved.
SIMMS Data Collector Module
On the screen of the handheld unit, a Confirm File Replace screen (see
illustration at right) may appear, asking if the pvbbload.exe file should be
replaced.
Leave the handheld in its cradle and, using its stylus, tap the Yes To All
button.
Once the handheld file replacement
is complete, return to the desktop
computer’s Application
Downloading Complete screen
(shown at right) and click OK.
To confirm that the system is operating properly, there is a visual aid to on both the
desktop and the handheld device.
When the mouse is placed over the round green icon in the taskbar, the word
Synchronized will appear (as at right).
The PSIMMS installation is now complete. Once the Pocket PC is synchronized with the desktop with to SIMMS, the
PSIMMS software can be run for the first time.
The next step is to synchronize PSIMMS with SIMMS.
Version 5.1
11
November 29, 2006
© 2006 by Kornyk Computer Solutions International, Inc. All rights reserved.
SIMMS Data Collector Module
Pocket PC Synchronization
For ease of data collection, SIMMS supports the use of the Pocket PC, which not only allows entering inventory
transactions and information, but also facilitates entering with its ability to scan barcodes present on items or cases of
stock.
Once the PSIMMS program is installed on the Pocket PC, make certain that the Pocket PC is in its cradle and attached
to the desktop computer.
To synchronize the PSIMMS inventory data
on the Pocket PC with the SIMMS inventory
data in the desktop for the very first time,
from the SIMMS main screen click the
Modules dropdown menu then select Data
Collectors/ Pocket PC Synchronization, as
shown at right.
When the Pocket PC Synchronization
screen opens (see right), check both the
Update Items and the Update Stock buttons
and then click the Desktop to Device button
and the transfer will commence.
Note: Unless you plan on editing sales orders
on your data collector uncheck the
Synchronize Sales Orders selection prior to
synchronization as this feature slows down
the synchronization process and data
collector due to the amount of data required.
If you only wish to utilize items with a UPC
code in your data collector you may also wish
to make sure there is a check mark in the
Just Items with UPC selection, this will
speed up the synchronization process and
data collector due to the fact that less data is
required.
Once this is complete, proceed to the PSIMMS program on the data collector.
Version 5.1
12
November 29, 2006
© 2006 by Kornyk Computer Solutions International, Inc. All rights reserved.
SIMMS Data Collector Module
Using the PSIMMS Program
To use the PSIMMS program on the handheld unit, begin at the
main screen of the Pocket PC. Next, tap the Start button with the
stylus (see right).
Next, tap the stylus on the Programs group (see left).
The contents of the Programs group available on the handheld
will now appear. The sample screen in at right shows all
programs available.
Locate the PSIMMS icon, and tap on it with the stylus.
Version 5.1
13
November 29, 2006
© 2006 by Kornyk Computer Solutions International, Inc. All rights reserved.
SIMMS Data Collector Module
The figure at right shows the main PSIMMS screen, with the nine
options, which are to:
Delete Previous Operations on the Data Collector,
Access the New Receipt screen,
Access the New Issue screen,
Access the Transfer screen,
Access the Receipt Purchase Order screen,
Access the Stock screen,
Access the Sales Orders screen,
Access the Search screen.
Access the Options screen
To choose an option, simply tap the screen with the stylus.
Warning:
Once a session of PSIMMS has begun on the handheld device, please be
aware that there is a limit to one of two particular types of activities:
1. Any number of receipts and/or issues and/or sales order transactions, or,
2. Any number of transfers and/or stock transactions.
One session can contain only one of the above types. To conduct
transactions of the opposite type on the handheld, transfer all data from
the handheld to the desktop, then reinitialize the handheld unit before
proceeding.
Warning:
To use the UPC scanning capabilities of handheld devices with
SIMMS/PSIMMS programs, all item UPC numbers must be entered/scanned
into the desktop’s copy of the SIMMS database before the handheld’s
version of PSIMMS will be able to recognize the numbers. Once all UPC
codes have been entered into the SIMMS database, the handheld will
recognize the UPC numbers. To use the scanning feature of the handheld,
simply place the cursor in the UPC field on any PSIMMS screen, and scan
the barcode of the item.
Version 5.1
14
November 29, 2006
© 2006 by Kornyk Computer Solutions International, Inc. All rights reserved.
SIMMS Data Collector Module
Version 5.1
15
November 29, 2006
© 2006 by Kornyk Computer Solutions International, Inc. All rights reserved.
SIMMS Data Collector Module
Options Screen
From the Options screen, you can determine if some important
functionality should be turned on or off
If you wish to turn on UPC Indexing then click the Use UPC Index
selection box to affix a check mark
If you wish to utilize serial numbers then click the Use Serial
numbers selection box to affix a check mark
If you wish to Prevent duplicate serial numbers from being scanned
in per transaction then click the Prevent duplicate S/N per
transaction selection box to affix a check mark
If you wish to make the assigning of Serial numbers to serialized
items Mandatory then click the Serial Number is Mandatory
selection box to affix a check mark
Click the Save Options button to save the changes.
Transfer Screen
From the Transfer screen, stock can be transferred from one
location to another.
Choose the From Location Code (location goods are being
transferred from), and then choose the To Location Code (location
to which inventory will be transferred). Next, scan/enter the item’s
UPC code and adjust the quantity of items if necessary, finally you
can scan in the Serial number if applicable. Once selections have
been made, click the Add button to complete the transfer, and
repeat if necessary.
Version 5.1
16
November 29, 2006
© 2006 by Kornyk Computer Solutions International, Inc. All rights reserved.
SIMMS Data Collector Module
Search for Sales Orders Screen
From the Search for Sales Orders screen, You can find a sales
order you wish to open one of three ways:
1) By Customer Number by selecting the Customer Number
drop down box selecting a customer number then clicking
on Search button to the right of the applicable drop down
field
2)
By Customer Name by selecting the Customer Name
drop down box selecting a customer name then clicking
on Search button to the right of the applicable drop down
field
3) By Sales Order Number by selecting the Sales Order
Number drop down box selecting a Sales Order number
then clicking on Search button to the right of the
applicable drop down field
Sales Order Screen
From the Sales Order screen, you can adjust existing Sales orders.
You can add items to the sales order by clicking the add button,
selecting a location, then scanning in the UPC code for the item
you wish to add, then you can override the Qty and price and click
save.
You can delete items from the sales order by clicking the delete
button, selecting a location, then scanning in the UPC code for the
item you wish to delete, and click save.
Version 5.1
17
November 29, 2006
© 2006 by Kornyk Computer Solutions International, Inc. All rights reserved.
SIMMS Data Collector Module
New Receipt Screen
From the New Receipts screen stock can be added to inventory. First
choose Vendor, Location, and then enter/scan in the item’s UPC
number. The quantity of the item can be adjusted, and finally you can
scan in the Serial number if applicable. Once any adjustments have
been made, simply click the Add button to complete the transaction,
and repeat if necessary.
Issue Screen
From the Issue screen, stock can be issued from the inventory.
Choose the Customer, Location, and then enter/scan in the
item’s UPC number. The quantity of the item can be adjusted, and
finally you can scan in the Serial number if applicable. Once any
adjustments have been made, simply click the Add button to
complete the transaction, and repeat if necessary.
Version 5.1
18
November 29, 2006
© 2006 by Kornyk Computer Solutions International, Inc. All rights reserved.
SIMMS Data Collector Module
Receipt Purchase Order Screen
From the Receipt Purchase Order screen (see right), stock can be
received from an existing Purchase Order.
First, choose the Purchase Order Number. The Vendor, Item
number, and Location will auto-populate. Adjust the quantity of the
item(s) as required, and then click the Modify Qty button. Once
complete, click the This PO has been received checkbox.
Note: If you have the option on making serial numbers mandatory
on the data collector you will not be able to receive the PO until you
have assigned serial numbers to all items that require them, to do
this click the line item that requires serial numbers and then click
the SN button to proceed to the PO Serial Number screen
mentioned below.
New feature: On the Receipt Purchase
Order screen, it is now possible to
receive
partial purchase orders in PSIMMS.
Purchase Order Serial Number Screen
From the Purchase Order Serial Number screen (see right), you
can assign serial numbers to the items as required.
In the S/N field scan in the required serial number then click the Add
button to insert the serial number, repeat until you have entered the
same number of serial numbers as line item qty received, once
complete click the X on the top right to return to the Receive PO
screen in order to complete your receipt or select another line item
to assign serial numbers to.
Version 5.1
19
November 29, 2006
© 2006 by Kornyk Computer Solutions International, Inc. All rights reserved.
SIMMS Data Collector Module
Search Inventory Screen
From the Search Inventory screen (see right), searches can be
carried out for particular stock items by entering/scanning either the
item’s UPC number or its Code number, then click on the Find
button to display the Location and On Hand information for that
item on the screen.
Stock Screen
From the Stock screen (see left), stock can be viewed in any
location and changes made as required. Choose the Location first,
the click the View Stock button to see all the Items in that location.
To add stock or to adjust quantities, simply tap that
item in the description list, and then change the
amount as required, then click the Add button.
Repeat if necessary.
Version 5.1
20
November 29, 2006
© 2006 by Kornyk Computer Solutions International, Inc. All rights reserved.
SIMMS Data Collector Module
Updating Inventory from Device to Desktop
Once all transactions are complete on the handheld device, place the device in its cradle. The Microsoft ActiveSync
program will reestablish the connection between the device and the desktop computer. Once the connection is
established, the transactions and changes can now be transferred from the handheld to the desktop database.
Open SIMMS on the
desktop. Select the
Modules dropdown
menu, then Data
Collectors and then
Pocket PC
Synchronization.
After ensuring that
the Synchronize
Items and
Synchronize Stock
checkboxes are
selected, click the
Device to Desktop
button.
Note: if you are
editing Sales orders
on the data collector
then make sure the
and Synchronize
Sales Orders
checkbox is
selected as well
An Operation Information screen shows the progress of the
data transfer, and advises when completed (see right).
Once the information is received from the device, the
transaction links (Receipts, Issues, Purchase Order Received,
Stock Count, Sales Order Item Changes or Transfers) will
appear to the left of the Update buttons. Clicking on the links
will display the detailed contents of each type of transaction.
Click the Update Transactions button and/or the Update
Transfer button and/or the Receive PO button and/or the
Update Stock button and/or the Update Sales Orders button
(each as required) to complete updating the database on the
desktop computer.
Version 5.1
21
November 29, 2006
© 2006 by Kornyk Computer Solutions International, Inc. All rights reserved.
SIMMS Data Collector Module
Windows Mobile Options
With Windows Mobile, you can set the stock count to zero for all items for a selected location
prior to doing a physical count. You can also set the stock count to zero for a selected item.
If you have SIMMS Windows Mobile (not POCKET PC) you should upgrade to the new version
by doing the following, never forgetting to make sure all data to be synchronized from the data
collector is already sync'd to SIMMS prior to upgrading SIMMS or moving forward with any
Windows Mobile upgrade.
Initializing a New Session for the Handheld Device
Once a previous session of transactions on the handheld device
has been transferred successfully to the desktop, the handheld
device must be reinitialized (cleared) for its next session.
To do this, access the PSIMMS main screen on the handheld
device and then choose Delete Previous Operations.
Prior to using the data collector the next time, update the information in the handheld.
Version 5.1
22
November 29, 2006
© 2006 by Kornyk Computer Solutions International, Inc. All rights reserved.
SIMMS Data Collector Module
On the desktop version of SIMMS, select
Data Collectors and then Pocket PC
Synchronization to open the Pocket PC
Synchronization screen.
Click the Desktop to Device button. Once
this phase is complete, the handheld device
is ready to be removed from its cradle and
used for a portable session.
Note: Unless you plan on editing sales orders
on your data collector uncheck the
Synchronize Sales Orders selection prior to
synchronization as this feature slows down
the synchronization process and data
collector due to the amount of data required.
If you only wish to utilize items with a UPC
code in your data collector you may also wish
to make sure there is a check mark in the
Just Items with UPC selection, this will
speed up the synchronization process and
data collector due to the fact that less data is
required.
Version 5.1
23
November 29, 2006
© 2006 by Kornyk Computer Solutions International, Inc. All rights reserved.
SIMMS Data Collector Module
Blue Tooth and Network Printer Setup
Blue Tooth Printer installation instructions:
On the device - install the BTEXPLORER program from Zebra.
Create a new connection to the printer by:
Launching the BTEXPLORER program that you installed on the device.
Proceed to the Tools menu and select Tools>Settings>Virtual Com Port and set COM4 as Blue
Tooth.
IMPORTANT: Do not connect to this port, but leave it disconnected as the program does the
connection as required.
On the device start SIMMS Mobile.
Select Items.
Select Print from the menu.
Select Options.
Please make sure to select the appropriate row you wish you selections to be in Also for upc
select field as barcode and select a barcode type.
Under the menu option you can select to Save as Template if this is the format you wish to
use all the time. To select the template, just choose Menu>Load Template.
Click Next.
Select the printer (Zebra RW, QL …).
Select the COM port you configured.
Select Monochrome.
Select Custom Paper Size.
Enter 6cm x 11 cm.
Click Start Printing.
IP Printer:
Plug the printer into the computer’s serial port.
Load the Label Vista on a computer connected to the printer via serial.
Launch the Label Vista program on the computer.
Click Printer>Network Setup (Network Setup with Encryption if you have an encrypted
network), complete the setup, and click test if successful. Write down the assigned IP and
note the port used as you will need it on the data collector.
On the device, start SIMMS Mobile.
Select Items.
Select Print from the menu.
Select Options.
Version 5.1
24
November 29, 2006
© 2006 by Kornyk Computer Solutions International, Inc. All rights reserved.
SIMMS Data Collector Module
Please make sure to select the appropriate row your wish you selections to be in. In addition,
for UPC, select Field as barcode and select a barcode type.
Under the Menu option, you can select to Save as Template if this is the format you wish to
use all the time. To select the template, just choose Menu and Load Template.
Click Next.
In the printer selection area, select the network printer.
Click More Settings in the printer selection area and make sure Scroll is selected.
Select Monochrome.
Select Custom Paper Size.
Enter 6cm x 11 cm.
Click Start Printing.
Troubleshooting the Data Collectors
It may be possible that several other issues could arise to prevent the optimum (or correct) usage of handheld data
collectors. They are listed below:
1. Microsoft Jet database engine is not installed on the system.
Since its introduction in 1992, the Microsoft Jet database engine has not been a stand-alone product — it cannot be
purchased at a local software retailer. Most users, however, have learned about it, in a secondhand way, from
applications such as Microsoft Access, Microsoft Office, Microsoft Visual Basic, Microsoft Visual C++, or Microsoft
Visual J++.
Should a system have none of these applications installed, the Microsoft JET engine will have to be installed in order
to run the SIMMS software on a handheld data collector.
To install JET on a desktop computer:
(a) If SIMMS is currently running close it completely. Click My Computer and access the
contents of the SIMMS CD.
(b) Proceed to viewing the contents of the Pocket PC KIT\Jet 4.0 folder.
(c) Run the Jet40Sp3_Comp.exe file.
(d) Once installation of Microsoft JET is complete, open SIMMS and initialize and use the
handheld data collectors.
2. The data collector experienced a Hard Boot/power interruption.
Should the data collector have experienced a hard boot or some semblance of power interruption and not reinitialized
properly with SIMMS, check two specific things:
(a) On the handheld device, click the Startup folder within the Programs\File Explorer\My
Device\Windows folder to confirm that a file called ScanWedge.exe (for the PPT 2800) or
ScanWedge1.exe (for the PDT 8100) exists there.
Version 5.1
25
November 29, 2006
© 2006 by Kornyk Computer Solutions International, Inc. All rights reserved.
SIMMS Data Collector Module
If the appropriate file exists in the Startup folder, then proceed to Section b below.
If the appropriate file in not in the Startup folder, then proceed with the following steps to install it:
(b) Access the SIMMS CD by clicking on the My Computer icon on the desktop. Display the
contents of the Pocket PC Kit/Wedge subfolder on the CD then the subfolder inside it
which corresponds to the model of the data collector (ppt2800, sps3000 or pdt8100).
Right-click on the ScanWedge executable and click Copy.
(c) With the data collector in its cradle, double-click the ActiveSync icon (the round green
one) on the desktop computer’s taskbar.
(d) On the ActiveSync main screen, click the Explore icon to display the contents of the
root folders of the data collector. Now click on the My Pocket PC (or My Device) icon
showing there, and then click through to the Windows\Startup folder and paste the file
there.
A screen like the following will appear:
Once this is complete, proceed to Section 2b below to.
(e) Test the data collector’s scanning ability
(f) If the data collector is not emitting the red beam which enables it to scan barcodes,
proceed to the Programs\File Explorer\My Device\Windows\Startup folder on the data
collector.
(g) Click on the version of the ScanWedge executable file that is there. On the lower-right
side of the data collector screen, a menu screen will appear.
(h) Once there, click on Scanner and then on Enable.
(i) Press one of the triggers on the data collector to confirm that the collector now emits
the beam required to scan.
The data collector is now prepared for use with SIMMS software.
Version 5.1
26
November 29, 2006
© 2006 by Kornyk Computer Solutions International, Inc. All rights reserved.
SIMMS Data Collector Module
3. There is an access problem with the SIMMS.MDB file.
Open Windows Explorer and locate the SIMMS.MDB file. Right click on the file, choose
Properties, and deselect the file’s read-only status, then click the Apply button. The file should
allow access from this point forward.
Version 5.1
27
November 29, 2006
© 2006 by Kornyk Computer Solutions International, Inc. All rights reserved.
SIMMS Data Collector Module
MC70 – Installation Instructions
For the Symbol MC70 data collector, please use the following steps for installation:
1. Install Active Sync 4.1 on your computer.
2. Synchronize the Windows Mobile Device with the computer.
3. Be certain that the device is using the Windows Mobile 2005 platform.
4. Synchronize the device with the computer and install "dotNET Compact Framework v2 Redistributable" on your
computer. As soon as this is done an installation will begin on the device. On the MC70, select the device location and
click Install.
5. Copy using Active Sync and install on the device the sqlce30.wce5.armv4i.CAB, using the "on device" option.
6. Copy using Active Sync and install on the device the setupSimmsMobile.CAB, using the "on device" option.
7. Log into SIMMS and proceed to Modules menu>Data Collectors>Windows Mobile Synchronization.
8. Connect and synchronize to the device - Click Connect, then click the button labeled "Transfer Information to Device".
9. Use SIMMS Mobile by accessing Device\Program Files\Simms Mobile and clicking the SIMMS Mobile executable.
10. On the device, click the Initialize button to bring all the transferred data from SIMMS into the Windows Mobile SQL
tables. Wait until the information is imported.
11. Use SIMMS Mobile.
12. When you want to synchronize back to the computer, proceed to the device and go to the Settings menu and choose
"Prepare for download". Then login to SIMMS and from the Modules menu>Data Collectors>Windows Mobile
Synchronization screen select "Transfer Information to Computer".
13. Once you have confirmed the information, click “Import into SIMMS” to finalize the import.
Version 5.1
28
November 29, 2006
© 2006 by Kornyk Computer Solutions International, Inc. All rights reserved.
Kornyk Computer Solutions International, Inc.
31157 Creekside Drive,
Tel: 604-504-7936
Website: www.kcsi.ca
Abbotsford, BC V2T 5J9
Fax: 604-504-7976
Email: [email protected]
Important SIMMS Software Contact Information
Address
31157 Creekside Drive
Abbotsford, BC V2T 5J9 Canada
Sales
Phone
e-mail
604-504-7936
[email protected]
Support
Phone
e-mail
Fax
604-504-7936
[email protected]
604-504-7976
Accounting Phone
604-504-7936
[email protected]
e-mail
Version 5.1
29
November 29, 2006
© 2006 by Kornyk Computer Solutions International, Inc. All rights reserved.