1
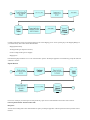
201-31234 Wheel Avenue, Abbotsford, BC V2T 6G9
Tel: 604-504-7936
Fax: 604-504-7976
Website: www.kcsi.ca
Email: [email protected]
Amazon/Omnibus EDI
For SIMMS Software
User Manual
Table of Contents
INTRODUCTION
INSTALLATION AND SET-UP
SIMMS SOFTWARE INSTALLATION
SIMMS DATA MANAGEMENT
PASSPORTXCHANGE SOFTWARE INSTALLATION
TRANSACTION PROCESSING
INTRODUCTION
TRANSACTION PROCESS FLOW
ENTER AMAZON PO (850) AS SIMMS SALES ORDER
CREATE PACKING SLIP AND ASN (856)
EXPORT INVOICES
PROCESSING THE 850 AND 855 – AMAZON PURCHASE ORDER
BACKGROUND
LAUNCH ACKNOWLEDGE POS
PREVIEW ACKNOWLEDGEMENTS
DO NOT EDIT SALES ORDERS
VIEW PREVIOUSLY CREATED PO ACKNOWLEDGEMENTS
PROCESSING THE 856 – ADVANCED SHIPMENT NOTICE (ASN)
BACKGROUND
SHIPPING DETAIL SCREEN
CREATING THE ASN
SHIP FULL SALES ORDER ONLY
VIEWING PREVIOUSLY CREATED ASNS
PROCESSING THE 810 – OMNIBUS INVOICE TO AMAZON
BACKGROUND
EXPORTING INVOICES
DO NOT EDIT INVOICES
VIEWING PREVIOUSLY EXPORTED INVOICES
Introduction
This document serves as the user manual to explain how to set-up and execute EDI transactions between Amazon.ca (Amazon) and Omnibus Distribution
(Omnibus) in the SIMMS Inventory Control Software.
There are 5 documents that are transferred back and forth between Amazon and Omnibus:
·
850 – Purchase Order from Amazon
·
997 – Acknowledgement that the 850 was received
·
855 – Purchase Order Acknowledgement on what we can deliver
·
856 – Advanced Shipment Notice (ASN) based on packing slip
·
810 – Omnibus invoice to Amazon
SIMMS Software Installation
There are three software components to the SIMMS EDI installation.
Any SIMMS version above and including 6.2.
An EDI plugin.
Run EDI scripts.
Install SIMMS
Install SIMMS Software.
Install EDI Plugin
Copy the EDI plugin called KCSI.Simms.PlugIn.AmazonEdi.dll into the SIMMS program folder, usually found at C:\Program
Files\KCSI\SIMMS X.x.
Upgrade Database
Launch SIMMS and accept the upgrade notification to the database.
Run Script
Once the upgrade is complete, launch the SIMMS SQL Assistant and run the following script:
CASE-01098 amazon edi.sql
SIMMS Data Management
There are five data components that need to be set-up before EDI transactions can be executed.
Amazon customer code
ISBN item codes
Shipping Method
Shipping Method of Pay
Invoice Payment Terms
Amazon Customer Name
Amazon Customer Code
You must create a customer record for Amazon in the Contact Manager in SIMMS. When this record is saved, you will see an auto-generated
Account Number on the Information tab of the Contact Manager. This account number must be substituted into the following script and run in
the SQL Assistant.
insert into amazonSettings (AmazonClientID) Values (AccountNumber)
The purpose of this script is to identify this customer record as an Amazon EDI customer account which will ensure that ASNs are created
from the Shipping Manager and Invoices are created from the EDI plugin module.
ISBN Item Codes
items, that Amazon is aware that they can purchase from you, MUST have an ISBN number recorded in the TextBox2 field of the User
Defined fields in the Item Manager. You can rename this field via Set-up>Settings>User Defined Fields in the Item Manager section.
Import ISBN via VIM
You can import these codes via the Visual Import Manager (VIM).
You will need three columns in your import file: Item_code, Item_Description and ISBN.
When you are mapping the fields, map the ISBN field to userDefinedText2 field and mark a check in the update box (you will need to expand
the width of the SIMMS_Field colum to see the full field name). This way the VIM will try to update the userDefinedText2 field instead of
trying to insert new item records.
Save the mapping as a template for subsequent imports. You do this by selecting Save Template from the File menu.
Click the Import button.
You will get an error message saying, “You need to assign a correspondent for each <Nullable=’No’>…” You can click “Yes” to continue.
Repeat for additional files.
Shipping Method
Your shipping method to Amazon is via FedEx. You must set-up FedEx as a Shipping Method and enter the SCAC code specific to FedEx
which was used during tests successfully.
You cannot use the Shipping Methods session from the Set-up menu. You must access it via the Shipping Manager.
Launch the Shipping Manager and start a new shipment.
Click the dotted button to the right of the Shipping Method field.
If you already have a Fedex record, select it and click the Edit button, else, click the Add button. The four digit SCAC code for FedEx is
FDCC.
Shipping Method of Pay
This is a new field required by Amazon. You need to create two records for this session. Again you will access this set-up session from the
Shipping Manager.
Launch the Shipping Manager and start a new shipment.
Click the dotted button to the right of the Shipping Method of Pay field.
Click the Add button to create the following two fields. When entering shipments, you will select the appropriate value.
Code = CC
Description = Collect All
Code = PO
Description = Prepaid Only
Invoice Payment Terms
Invoice payment terms must use a code of ‘01’. Current settings in SIMMS for payment terms with Amazon are:
- Description = 01
- Overdue Days = 10
- Interest = 10%
- Discount Days = 5
- Discount = 2%
Amazon Customer Name (TextBox6 in Contact Manager UDF fields)
The customer name used in the Amazon EDI 850 must be entered in TextBox6 of the Contact Manager on the Other tab. Currently the Amazon
customer name is ‘AMAZON’.
PassportXChange Software Installation
Need to install PassportXChange which includes the translation and automated FTP software and mySQL installation which is the operating
database for the Passport software.
Copy maps.
Set-up ODBC connection.
Transaction Processing
Introduction
The transfer of EDI transaction documents will be done via File Transfer Protocol (FTP).
The credentials (login name & password) for accessing the FTP site are available from your KCSI Support Department.
Amazon will be sending 850s to a folder called \outbound for pick by our Passport application. We will drop off all other EDI documents (855,
856, 810, 997) in the \incoming folder of the FTP site. The Passport application will be set-up to automatically look for and drop off files on
the Amazon FTP site periodically.
See the flowchart on the next page for an overview of the transaction processes.
Transaction Process Flow
Enter Amazon PO (850) as SIMMS Sales Order
SIMMS Sales Orders (SOs) are automatically created when Amazon POs are acknowledged in the SIMMS EDI Module. Since Amazon gives
90 days to fulfill an order, all POs are considered “fillable” and therefore reported without backorder values even if there is not enough
inventory to fulfill the order at the time of the PO Acknowledgement. However, on the Sales Order, any shortage is reported as a backorder so
that appropriate POs can be created. This is based on the understanding that 90 days is more than enough time to fulfill an Amazon order and
thus save a lot of complication from requiring EDI backorder management transactions.
Create Packing Slip and ASN (856)
Creating an ASN doesn’t require any significant changes to the current shipping process. Create a packing slip via the Shipping Manager as
you would normally. Enter values for the additional fields:
·
Shipping Method of Pay
·
Tracking Number (per shipment of X boxes)
·
Carrier Tracking Number (per box shipped)
·
Shipping Time
Print the Packing Slip and indicate “Yes” to the “Generate ASN” question. The Passport application will automatically pick up the ASNs and
send them to Amazon.
Export Invoices
Invoices are created per your normal process. Then periodically, export invoices to the EDI tables which will be sent to Amazon.
Processing the 850 and 855 – Amazon Purchase Order
Background
Amazon will be sending 850s to their outbound folder for pick by our Passport application. The 850 represents Amazon’s purchase order to
Omnibus.
Launch Acknowledge POs
Launch the Acknowledge POs session via the Amazon EDI menu item in the Modules menu. See the screen below.
The top grid lists all Purchase Orders that have been received from Amazon but which you have not acknowledged yet. When a PO is not
acknowledged, it means that Amazon doesn’t know if you received the PO yet and SIMMS doesn’t have the PO recorded as a Sales Order yet.
The bottom grid lists the line items of the selected POs.
To acknowledge the PO, select the PO first in the top grid and then click the Acknowledge button. See an example of acknowledgement results
below. Notice that the Quantity On Hand equals the Quantity Ordered. This will always be the case unless you don’t carry a particular ISBN, in
which case the line item will be rejected.
Preview Acknowledgements
Before you do that, it is a good idea to see what the acknowledgement will look like. To do that, click on the Preview Acknowledge tab in the
bottom grid. Here you will see if you have the ISBN in your SIMMS database and if you have enough in stock. If you do not have the item in
stock (as reported by the Line Item Status Description column), when you acknowledge, it will reject the line item. However, if you can get
that item after calling your suppliers, then exit the Acknowledge PO session, add the ISBN to the SIMMS Item Manager and then continue
with the Acknowledge PO session.
Quantity Ordered and the Quantity On Hand are identical in most cases even if the actual quantity on hand is not enough as indicated by the
Line Item Status Reason code. This is due to the fact that Amazon allows 90 days for delivery and so for any item that exists in the SIMMS
Item Manager, full quantities will be acknowledged even if quantities are short. Though short quantities will be reported as back ordered on the
subsequent Sales Order that is generated.
Do Not Edit Sales Orders
After PO Acknowledgements have been sent/created, DO NOT edit the related Sales Order. Amazon will be comparing the PO
Acknowledgement to the ASN. If you edit the quantity or items on the Sales Order that was generated when the PO Acknowledgement was
sent, you will end up with a discrepancy and Amazon will use these negative results to grade Omnibus as a vendor.
View Previously Created PO Acknowledgements
You can view PO Acknowledgements that had been created earlier by opening the View POs Acknowledged from the Amazon EDI menu item
in the Modules menu. Once the Passport application sends these PO Acknowledgements to Amazon they will not be visible here any longer.
Processing the 856 – Advanced Shipment Notice (ASN)
Background
You will be sending ASNs to Amazon by creating Packing Slips in the Shipping Manager which has been modified to include the following
additional fields required by Amazon.
·
Shipping Method of Pay
·
Tracking Number (per shipment of X boxes)
·
Carrier Tracking Number (per box shipped)
·
Shipping Time
Shipping Detail Screen
The process begins as usually by launching the Shipping Manager and selecting the Sales Order you want to process.
Omnibus has reported to Amazon that they will ship full sales orders and not partials. The shipping manager will not stop you from partial
shipping, so this needs to be a business process.
Enter all header information, including the Tracking Number for the shipment, the Shipping Method (Fedex per initial setup) and the Shipping
Method of Pay. If you want to use a different Shipping Method, you will need to find from Amazon what the SCAC code of your alternate
Carrier is and record it in the Shipping Method screen.
Open up the sales order details in the Unshipped Items section. Select each item and enter a Carrier Tracking Number in the Box Label field.
See an example below of the Shipping Detail screen with values entered.
Creating the ASN
To create the ASN, simply save the Shipping Detail screen, you will be prompted as usual, whether you want to print the packing slip. You
must answer yes to this in order to proceed to creating the ASN.
There will be a second prompt asking if you want to generate the ASN. Again you answer yes to this. At this point you will get a prompt that
indicates the ASN is generated. It will disappear on its own. You can now print the packing slip for your records or simply close the report.
Ship Full Sales Order Only
Amazon will be comparing the PO Acknowledgement to the ASN. If you deliver anything different in item or quantity from what is on the
Sales Order that was generated when the PO Acknowledgement was sent, you will end up with a discrepancy and Amazon will use these
negative results to grade Omnibus as a vendor.
Viewing Previously Created ASNs
You can view ASNs that were created by opening the View ASNs Exported under the Amazon EDI menu item in the Modules menu. Once the
Passport application sends these ASNs to Amazon they will not be visible here any longer.
Processing the 810 – Omnibus Invoice to Amazon
Background
You will be sending invoices to Amazon by accessing a new module, called Export Invoices, in the Amazon EDI menu item under the
Modules menu. Invoices must be created SIMMS as you normally would for any other customer. However, invoices created for Amazon and
not yet sent via EDI to Amazon will show up in the Export Invoices module.
Exporting Invoices
Launch the new session called Export Invoices from the Amazon EDI menu item under the Modules menu. Select the invoices that you want to
send to Amazon and click the Generate button. See an example of the screen below.
Do Not Edit Invoices
Amazon will be comparing the PO Acknowledgement to the ASN and the Invoice. If you invoice anything different in item or quantity from
what is on the Sales Order that was generated when the PO Acknowledgement was sent, you will end up with a discrepancy and Amazon will
use these negative results to grade Omnibus as a vendor.
Viewing Previously Exported Invoices
You can view Invoices that were exported by opening the View Invoices Exported under the Amazon EDI menu item in the Modules menu.
Once the Passport application sends these invoices to Amazon they will not be visible here any longer.
Passport Processing (Manual Method)
For purposes of testing the creation of EDI transaction documents, the following section describes how to manually process them.
Step 1 – Open Passport Application
The PassportXChange (Passport) application is the software that translates SIMMS data into EDI compliant documents. You can access it by
selecting PassportXChange from the Program menu. You will see a screen similar to the example below.
Step 2 – Open the Translation Session
Click on the red checkmark
to open the translation session. This is the Receive tab. Ensure all checkboxes are selected.
This is the Send tab. Ensure all checkboxes are selected.
Step 3 – Translate SIMMS Data
Click the Translate button. This will look into the SIMMS tables for all available data, translate that data into EDI documents and place those
documents into the respective Send folders in the C:\Program Files\dsr\Passport folder. It will also look in the recvEDI folder for any 850
documents from Amazon, translate them and post all records into the SIMMS EDI tables.
Important SIMMS Software Contact Information
201-31234 Wheel Avenue, Abbotsford, BC V2T 6G9
Tel: 604-504-7936
Fax: 604-504-7976
Website: www.kcsi.ca
Email: [email protected]
Sales
Support
Accounting
Phone
e-mail
Phone
e-mail
Fax
Phone
e-mail
604-504-7936
[email protected]
604-504-7936
[email protected]
604-504-7976
604-504-7936
[email protected]