1
6.3. Cutting the hole in the wall for the
connecting piping
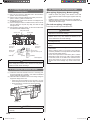
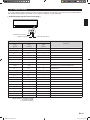
(1) Cut a 65 mm (2-9/16 in.) diameter hole in the wall at the
position shown in the following.
(2) Cut the hole so that the outside end is lower (5 to 10 mm
(3/16 to 13/32 in.)) than the inside end.
(3) Always align the center of the wall hole. If misaligned, water leakage will occur.
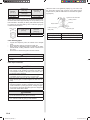
(4) Cut the wall pipe to match the wall thickness, stick it into the
wall cap, fasten the cap with vinyl tape, and stick the pipe
through the hole.
(5) For left piping and right piping, cut the hole a little lower
so that drain water will flow freely.
Wall hook bracket
Center mark
65 mm
(2-9/16 in.)
dia. hole
65 mm
(2-9/16 in.)
dia. hole
5 to 10 mm
(3/16 to 13/32 in.) low
Wall pipe*
(Inside)
Wall cap*
(Outside)
Wall
[Rear piping, Right piping, Bottom piping]
•
•
•
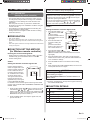
Install the indoor unit piping in the direction of the wall
hole and bind the drain hose and pipe together with vinyl
tape.
Install the piping so that the drain hose is at the bottom.
Wrap the pipes of the indoor unit that are visible from the
outside with decorative tape.
[For Left rear piping, Left piping]
Interchange the drain cap and the drain hose.
CAUTION
• Insert drain hose and drain cap securely. Drain should
slope down to avoid water leakage.
• When inserting, be sure not to attach any material
besides water. If any other material is attached, it will
cause deterioration and water leakage.
• After removing drain hose, be sure not to forget
mounting drain cap.
Center mark
Fasten with
vinyl tape
6.5. Forming the drain hose and pipe
*Field supplied
WARNING
If the wall pipe is not used, the cable interconnecting the
indoor unit(s) and outdoor unit or branch box may touch
metal and cause electric discharge.
• Be sure to fix the drain hose with tape to the bottom of
piping.
• Prevent drain water freezing under low temperature
environment.
When installing indoor unit’s drain hose outdoors,
necessary measure for frost protection should be taken
to prevent drain water freezing.
Under low temperature environment (when outdoor
temperature under 32°F (0°C), after cooling operation
is executed, water in the drain hose could be frozen.
Once drain water is frozen, the drain hose will be
blocked and water leakage may result at the indoor
unit.
6.4. Installing the wall hook bracket
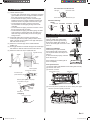
(1) Install the wall hook bracket so that it is correctly positioned horizontally and vertically. If the wall hook bracket
is titled, water will drip to the floor.
(2) Install the wall hook bracket so that it is strong enough to
support the weight of the unit.
• Fasten the wall hook bracket to the wall with 5 or more
screws through the holes near the outer edge of the bracket.
• Check that there is no rattle at the wall hook bracket.
Wall hook bracket
Tapping screw
CAUTION
• Install the wall hook bracket level, both horizontally and
vertically.
En-6
9332622027_IM.indb 6
2012-9-29 8:36:49