1
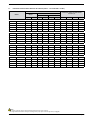
For higher lengths or different
types of cable installation, it will
be the DESIGNERS responsibility
to carefully measure the line main
switch, the supply power line and
the earthing protection connection, and the working connection
cables:
−
−
−
the length
the type of cable
Absorption of the unit and its
physical position, and room
temperature.
WARNING:
Check that all power cables
are correctly secured to the
terminals when switched on for
the first time and after 30 days
of use. Afterwards, check the
connection of the power cables
every six months.
Slack terminals could cause
the cables and components to
overheat.
6.2.
−
CONNECTION
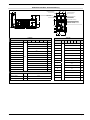
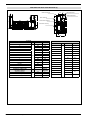
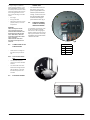
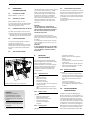
− For the functional connection of the unit, run the
power supply cable to the
electrical panel inside the
unit fig. 1 and connect it to
the disconnecting switch
terminals observing the
phase and the earth. fig. 2
6.4.
AUXILIARY CONNECTIONS AT THE USER/
INSTALLER EXPENSE
For installation requirements, refer
to the wiring diagram supplied
with the unit. The wiring diagram
together with the manuals must be
kept in good conditions and readily
ACCESSIBLE FOR FUTURE OPERATIONS ON THE UNIT.
Fig.2
CONNECTION TO THE
POWER SUPPLY
Key fig. 2
Check there is no voltage on
the electric line you want to
use.
L1
Line 1
L2
Line 2
L3
Line 3
PE
Earth
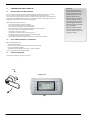
6.2.1. To access the electric
box:
−
−
Turn the electrical panel
screws ¼ in counter-clockwise
direction
Turn the handle of the doorblock disconnecting switch to
OFF (see figure). In this way,
the electrical panel can be
accessed
6.3.
ELECTRICAL POWER
Fig.1
INXWPY. 1403. 4437830_02 15