1
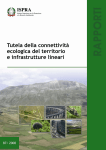
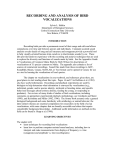
SAR – Species At Risk
User’s Manual
Version 2.2, December 2007
Williamson’s Sapsucker (bird)
Photo courtesy of Stuart Healy
Northern Long-eared Myotis (bat)
Photo courtesy of Tim Carter
This Page left intentionally blank.
SAR – Species At Risk
v2.2 Users Manual
12/11/2007
Table of Contents:
1
Overview...................................................................................................................................................1
2
Installation ................................................................................................................................................2
2.1
Data Base Installation Options ..........................................................................................................2
2.1.1
Installing on a single PC.............................................................................................................2
2.1.2
Installing on a multiple PC’s – Single database instance ...........................................................2
2.2
System Requirements .......................................................................................................................2
2.3
Installing Microsoft Access 2000 Runtime .........................................................................................3
2.4
Installing SAR v2.2 ............................................................................................................................4
2.4.1
3
Connecting to the SAR Data Store.............................................................................................5
2.5
Replacing the MSAccess data store..................................................................................................6
2.6
Changing the SAR Data Store Location ............................................................................................6
SAR – Species At Risk .............................................................................................................................7
3.1
Launching SAR..................................................................................................................................7
3.2
Navigation..........................................................................................................................................7
3.3
Searching the Database ....................................................................................................................8
3.3.1
Search Criteria ...........................................................................................................................8
3.3.2
Retrieving all SAR Database Records........................................................................................8
3.3.3
Retrieving Selected SAR Database Records by Search Criteria..............................................10
3.3.4
Clearing a Search.....................................................................................................................11
3.4
Display Grid Data Views ..................................................................................................................11
3.4.1
Fixed vs. Scrollable Data Columns...........................................................................................11
3.4.2
Current View.............................................................................................................................11
3.4.3
Display Grid Properties.............................................................................................................12
3.5
Reports............................................................................................................................................16
3.5.1
Field Card Report .....................................................................................................................16
3.5.2
Key Topographic Features Report ...........................................................................................16
3.6
Database Version ............................................................................................................................17
3.6.1
Date last Updated.....................................................................................................................17
3.6.2
SAR Version.............................................................................................................................17
3.7
Menu & Functions............................................................................................................................18
3.7.1
File Menu..................................................................................................................................18
3.7.2
View Menu................................................................................................................................18
3.7.3
Links Menu ...............................................................................................................................18
3.7.4
Maintenance Menu...................................................................................................................19
3.7.5
Window Menu...........................................................................................................................19
3.7.6
Search......................................................................................................................................19
3.7.7
Add Record ..............................................................................................................................19
i
SAR – Species At Risk
3.7.8
v2.2 Users Manual
12/11/2007
Delete Record ..........................................................................................................................19
Appendix A.
Field Card Report Example...................................................................................................20
Appendix B.
Key Topographic Features
Report Example ......................................................................22
ii
SAR – Species At Risk
v2.2 Users Manual
12/11/2007
1 Overview
Cascadia Natural Resource Consultants (Cascadia) in cooperation with Tolko Industries Ltd. Heffley Creek
division and Canfor have developed a Species at Risk (SAR) database application to assist licensees in the
Kamloops, Merritt and Okanagan TSA’s make informed decisions regarding sensitive wildlife habitats and
Species at Risk during strategic and operational planning exercises.
The application allows users to navigate through the custom SAR database and identify species at risk in by
unique BEC zones and other criteria. Navigation results can be viewed in their entirety or as Field Card
Reports of key SAR attributes for each BEC Variant in a TSA.
Cascadia Natural Resource Consultants have been identified as the initial data custodian for the SAR
database and will be active in updating the SAR database annually for TSA users.
To meet both of these needs the application is deployed two modes;
•
Read only for the general user base and;
•
Read / Write / Delete for the data custodian (password protected).
SAR Version 2.2 has been developed to address a number of recommendations made since the initial user
workshop held in October 2006 and to update the application to allow server installation of the backend
database permitting a single instance of the data source in networked environments.
1
SAR – Species At Risk
v2.2 Users Manual
12/11/2007
2 Installation
Installation files:
2.1
DATA BASE INSTALLATION OPTIONS
The SAR v2.2 application is a Microsoft Visual Basic application utilizing an MS Access data store. The
modular design of the applications will allow the application to be installed on a single PC or on many PC’s
in a networked environment.
In a single PC install the SAR data store (sar_be.mdb) must be copied to a location on the local PC. Once
installed, SAR will request the use to connect to the data store in a one time operation. In the network
installation the SAR back end data store is placed on a network server location accessible by all PC’s
running the SAR application. Once installed on any given networked PC, SAR will request the use to
connect to the data store in a one time operation.
2.1.1
Installing on a single PC
1.
1. Create a folder on your local machine
example: SAR Database
2.
Copy the sar_be.mdb to the new data base folder
3.
Follow the SAR installation instructions.
It is recommended that the SAR application be installed under the standard Windows ‘Program
Files’ directory.
2.1.2
2.2
Installing on a multiple PC’s – Single database instance
1.
1. Create a folder on your network server that is accessible by all machines running the SAR
application.
example: SAR Database
2.
Copy the sar_be.mdb to the new data base folder
3.
Follow the SAR installation instructions.
It is recommended that the SAR application be installed under the standard Windows ‘Program
Files’ directory.
SYSTEM REQUIREMENTS
Minimum Requirements:
•
Operating System:
Windows 2000 or better
•
Applications:
MSAccess 2000 or better or Microsoft Access 2000 Runtime
The application has been designed to run on systems that may or may not have MS Access 2000 (or better)
installed locally.
If you do not have MS Access 2000 (or better) installed locally proceed to 2.3 Installing Microsoft Access
2000 runtime.
If you have MS Access 2000 (or better) installed on your local machine proceed to 2.4 Installing SAR v2.2
2
SAR – Species At Risk
2.3
v2.2 Users Manual
12/11/2007
INSTALLING MICROSOFT ACCESS 2000 RUNTIME
Microsoft 2000 Runtime support has been delivered in a zip file format.
To install:
4.
Unzip the Access 2000 Runtime .zip to a temporary location on your local machine
5.
Navigate to the …..temp folder\Access 2000 Runtime\min location where the zip file was
extracted and select setup.exe
6.
On the installation screen select Install Now and follow the remaining prompts
3
SAR – Species At Risk
v2.2 Users Manual
12/11/2007
2.4 INSTALLING SAR V2.2
The SAR v2.2 data base application is delivered in an installation package called SAR_setup.exe. The back
end database is delivered
To install SAR v2.2:
1.
Create a folder on your Copy the SAR_setup.exe file to a location on your local machine
2.
Double click the SAR_Installer.exe and follow the prompts using the Next button
Use the following settings for optimum installation.
3.
Select Install after confirming install location and start menu folder.
Once the installation has completed select Next
Install Location:
4
SAR – Species At Risk
4.
v2.2 Users Manual
12/11/2007
On the SAR Setup Completion screen select Finish.
Note: The Run SAR check box is selected by default. Selecting Finish will start the SAR application
and prompt you to connect to the SAR data store
Once installed SAR v2.2 will be available from your Windows Start Menu and a desktop Icon.
2.4.1
Connecting to the SAR Data Store
On your initial startup, the SAR v2.2 the application will attempt to locate the SAR Data Store (sar_be.mdb)
and display the following message
1.
Select OK to locate the SAR Data Store
5
SAR – Species At Risk
2.
2.5
v2.2 Users Manual
12/11/2007
Navigate to the SAR Data Store location on your local PC or network server and select the
sar_be.mdb
•
Note 1: For network data Store installations each PC with a new install of SAR will be required
to connect to the centrally located sar_be.mdb.
•
Note 2: If the sar_be.mdb is removed or deleted from the initial location on your PC or server
the SAR application will ask you to located the sar_be.mdb data base when the SAR
application is started.
REPLACING THE MSACCESS DATA STORE
Periodically the data custodian will release an updated SAR database. To update your SAR
database simply copy the new SAR_be.mdb to the SAR Data Store location on your local PC or
network server overwriting the previous database instance.
•
2.6
Note: Some users may want to archive the previous SAR_be.mdb database prior to replacing
it with the new database.
CHANGING THE SAR DATA STORE LOCATION
You may change the local or network server location of the SAR Data Store by following these
steps:
1.
Copy the sar_be.mdb file to a new location on your local PC or network server
2.
Delete the sar_be.mdb from it’s previous location
3.
Start the SRA v2.0 application.
4.
Follow the steps in section 2.4.1 Connecting to the SAR Data Store above
6
SAR – Species At Risk
v2.2 Users Manual
12/11/2007
3 SAR – Species At Risk
3.1 LAUNCHING SAR
To open the SAR database:
1.
Select the Windows Start Menu Programs Group
2.
Select the SAR Database from the SAR Program Group
3.2 NAVIGATION
Navigation in the SAR database is contained in a single navigation interface.
The interface contains standard windows controls for drop down selection, window scrolling,
minimize, maximize and close.
7
SAR – Species At Risk
v2.2 Users Manual
12/11/2007
3.3 SEARCHING THE DATABASE
3.3.1
Search Criteria
Searching for Species at Risk is achieved through primary and secondary or optional
search criteria. The primary search criteria are BioGeoClimatic (BEC) zone, sub-zone and
variant. The secondary search criteria are TSA, Species at Risk Provincial Status, Sec 7
Notification and Maximum Elevation.
Note: The data base has been modeled to allow only valid BEC zone, sub-zone and
variant combinations.
3.3.2
Retrieving all SAR Database Records
To Retrieve all SAR Records:
1.
Select the Search button without selecting primary or optional search criteria
This search will return the entire contents of the database in a display grid
8
SAR – Species At Risk
v2.2 Users Manual
12/11/2007
Note: The total number of records returned is displayed in the bottom left of the
application window.
Executing a Search minimizes the search criteria panel when records are returned. This is
done to maximize screen real estate.
To re-open the Search Criteria panel:
1.
Select the Search icon from the main SAR panel.
9
SAR – Species At Risk
3.3.3
v2.2 Users Manual
12/11/2007
Retrieving Selected SAR Database Records by Search Criteria
To retrieve selected SAR Records:
1.
Select the desired Search Criteria using the dropdowns for Recommended Search
BEC and Optional Search. Any combination of criteria can be used.
2.
Select the Search button. Results will be displayed in the display grid.
In the example above 15 records were returned meeting the selected criteria.
Note that the returned records include BEC zone and sub-zone as per the criteria. All
variants were returned as well as there was no variant specified in the search.
10
SAR – Species At Risk
3.3.4
v2.2 Users Manual
12/11/2007
Clearing a Search
To clear a search:
1.
Select the Clear button located on the Search Criteria panel. Clearing the search will
remove all criteria from the Search Criteria panel and remove the record display grid.
2.
Individual criteria can be removed by highlighting the field with the cursor and
selecting Delete from the keyboard.
3.4 DISPLAY GRID DATA VIEWS
3.4.1
Fixed vs. Scrollable Data Columns
In all display modes the SAR data base display grid has fixed and scrollable horizontal
data columns. The key SAR entities are displayed in the fixed columns. All other SAR
attributes are displayed in the horizontal scrollable columns. This configuration maintains
the key SAR entities in the view for species and location identification. All columns scroll
vertically.
Key SAR entities:
Record (System)
Species (Common and Latin names)
TSA
BEC Unit
Fixed View Columns
3.4.2
Scrollable Columns
Current View
The SAR data base display grid can display database records in 2 modes;
•
Details
•
Field Card
The Details view displays all data columns for records displayed in current view. The SAR
Field card view is a specific subset of the SAR database columns implemented to assist
planners and biologists in the field.
11
SAR – Species At Risk
v2.2 Users Manual
12/11/2007
The Details view is the default display mode.
To switch to Field Card view:
1.
Select Show Field Card
the Current View display will change to Field Card. Note that the Print Field Card
Button becomes active in Field Card View and the current view changes to Field
Card.
Note: If a record in the grid has been selected prior to selecting Show Field Card, only the
selected record will display in Field Card View. Use Ctrl/Click to deselect records
To switch to Details view:
2.
Select Show Detail Card
the Current View display will change back to Details.
Note: Clearing the search and re-querying the SAR records will reset the current view to
Details.
3.4.3
Display Grid Properties
The Display Grid has three distinct properties for altering the data view
•
Ascending Sort
•
Column Order
•
Drag and Drop Grouping
Ascending/Descending Sort
Each column can be sorted in an ascending/descending alphabetical or numeric order.
Only one column can be sorted. Sorts cannot be combined across columns
To sort a column:
1.
Use your left mouse button and single click a column header. The sort will alternate
between ascending and descending order.
12
SAR – Species At Risk
v2.2 Users Manual
12/11/2007
Column Order
Column order can be modified by simply selecting the column header and moving it to a
new location in the grid.
To reposition a column in the grid:
1.
Use your left mouse button to select the column header to move
2.
Drag the column header to the new location as indicated by the yellow placement
arrows
3.
Release the mouse button
In the following example, Sec 7 is currently selected for repositioning in the Grid. As your
cursor drags the column header across the header portion of the grid yellow arrows
appear at each location that will accept the column header placement.
Sec 7 has been successfully moved to a new position in the grid.
Note: Clearing the search and re-querying the SAR records will reset the column order to
the default order.
13
SAR – Species At Risk
v2.2 Users Manual
12/11/2007
Drag and Drop Grouping
Drag and Drop Grouping allows the data grid to be arranged in a summarized,
hierarchical tree structure. This is an extremely powerful data viewing function that allows
any data element in the SAR data base to become the focus or primary data element in
view.
In the following example the SAR databases has been searched with specific criteria
resulting in 62 records returned. The Species, Likelihood and TSA columns have been
grouped summarizing each grouped column by grouping level. In this example Species
resides at the highest grouping level the resulting grid display shows only one occurrence
of each species returned by the search criteria. As an example the species, “Interior
Western Screech-Owl” appears only once in the grid.
14
SAR – Species At Risk
v2.2 Users Manual
12/11/2007
Double clicking a single species reveals the next group item, Likelihood. In this example
there are three likelihood categories available indicating the there at least three distinct
“Interior Western Screech-Owl” records in the SAR database that matched the search
criteria.
Double clicking the Likelihood: Moderate indicator drills down further and reveals that the
“Interior Western Screech-Owl” has a moderate likelihood of being present in the Lillooet
and Merritt TSA.
The lowest level of the example grouping is TSA. Double clicking a TSA indicator reveals
all remaining columns not included in the grouping.
Note: There is no limitation to the number or order of columns in the group.
15
SAR – Species At Risk
v2.2 Users Manual
12/11/2007
To create a Data Group:
1.
Use your left mouse button to select the column header to group
2.
Drag the column header to the drag an drop location in the grid
3.
Release the mouse button to add the column header to the grouping.
4.
Repeat for the desired columns
Note: Clearing the search and re-querying the SAR records will remove the Data Group
and reset the grid order to the default order.
3.5 REPORTS
3.5.1
Field Card Report
The Field Card view can be printed to a formatted report containing a single or multiple
SAR record sets.
To print a single SAR record set:
3.5.2
1.
Use the Search functionality to locate SAR records of interest
2.
Use your left mouse button to select the record(s) to print. The record(s) can be
selected anywhere in the grid
3.
Select Show Field Card to switch to Field Card View
The Current View display will change to Field Card and only the selected record will
display.
4.
Select Print Field Card
See Appendix A for sample Field Card report
5.
Select the printer icon from the Field Card Report window to send the report to your
local printer.
Key Topographic Features Report
The Key Topographic Features Report has been designed to provide critical attributes
from the database to support Species at Risk assessment required under FRPA for forest
operations. This report provides quick access to common habitat attributes and
management strategies by BEC Unit and TSA allowing forest technicians to focus in on
those habitat attributes during planning to ensure the appropriate management strategies
are addressed.
16
SAR – Species At Risk
v2.2 Users Manual
12/11/2007
To generate the Key Topographic Features report:
6.
Select the Key Topographic Report button bar from the main SAR page
7.
Select the desired search criteria in the report criteria dialog. You must select at least
one required criteria to generate the report. Selection of optional report criteria
requires the selection of at least one required criteria.
8.
Select Generate Report to create the report.
9.
Select the printer icon from the Key Topographic Report window to send the report to
your local printer. See Appendix B for sample Key Topographic Features Report
10. Select Close to close the Key Topographic Report search panel.
3.5.2.1 Clearing Report Criteria
To clear a search:
1.
Select the Clear button located on the Search Criteria panel. Clearing the search will
remove all criteria from the Key Topographic Report search panel.
2.
Individual criteria can be removed by highlighting the field with the cursor and
selecting Delete from the keyboard.
3.6 DATABASE VERSION
3.6.1
Date last Updated
The Date Last Updated displays the last SAR Database edit date. Periodically the data
custodian will release an updated SAR database. Once the update database has replaced
the previous database the new date of the last database update will be displayed.
3.6.2
SAR Version
The Version displays the current SAR application Version
17
SAR – Species At Risk
v2.2 Users Manual
12/11/2007
3.7 MENU & FUNCTIONS
3.7.1
File Menu
The file menu contains a generic Print function and Exit. At present the Print function only
allows for printing of the entire database. Users will find this problematic in that the page
size required to print all fields exceeds that of most desktop printers. The Print function
may be enhanced in future releases.
3.7.2
View Menu
The view menu has three functions; Detail, Field Card and Show Field Descriptions.
Detail / Field Card
Detail and Field Card are toggles that can be used to switch between Details and Field
Card views of the data grid. These functions will automatically execute a global database
search if there the data grid is not displayed.
Show Field Descriptions
The Show Field Descriptions menu item activates the field descriptions display in the SAR
application interface
Each field in the SAR database application has metadata that describes the purpose and
content of the field.
This feature can be toggled on and off using from the View menu or by using the F1 key.
3.7.3
Links Menu
The Links menu provides hot links to four key BC Ministry of Environment Species at Risk
websites under 2 categories
MOE
BC Species and Ecosystem Explorer
WHA - Approved Wildlife Habitat Areas
18
SAR – Species At Risk
v2.2 Users Manual
12/11/2007
Sightings
3.7.4
Frog Watch
CDC Data Contribution
Maintenance Menu
The Maintenance mode menu provides access to the editing functions in the SAR
database. This functionality is password protected. See the SAR Administrator Manual
v2.0 for detailed information.
3.7.5
Window Menu
The Window menu displays all opens forms. This function is standard Windows menu
item.
3.7.6
Search
The Search button displays and hides the Search Criteria panel.
3.7.7
Add Record
The Add Record button adds a new record to the SAR database. This function is available
in Maintenance mode only.
3.7.8
Delete Record
The Delete Record button permanently removes a record from the SAR database. This
function is available in Maintenance mode only.
19
SAR – Species At Risk
v2.2 Users Manual
12/11/2007
Appendix A. Field Card Report Example
This Page left intentionally blank.
Example on next page
20
SAR
Species
FIELD CARD
Species at Risk
Great Basin Spadefoot (Spea intermontana)
Prov Status Blue-listed
TSA
Kamloops
BEC Unit
IDFxh2-
Likelihood Moderate
Sec 7
Feature Identifiers
Soil moisture regime
Hydric, Hygric, Sub-hygric, Mesic, Xeric
Lead species
Unknown
Slope range
0-15
Crown closure
<30%
Age class
Unknown
Critical aspect 2
W ()
Sub-dominant species
Py
Structural stage
1-7
Critical aspect 1
S, SE, SW ()
Co-dominant species
Py
Key microsite topo features
Shallow and ephemeral water: River/Stream, Flooded land, Lake, Pond
Management Guide
Clear cut or partial cut
Partial cut
Patch species retention
Unknown
Single tree retention species
Not Available
Patch retention size
250m core incl aquatic breeding and suitable upland
Single tree retention size
Not Available
Stand structure for retention
open parkland
Buffer around single tree
Not Available
Stand density for retention
Open
Wildlife tree class
8-9
Key stand features for retention
Uncompacted soils adjacent/nearby aquatic systems, CWD and vets
(CWD recruitment)
Additional Management Considerations
Confirm breeding by tadpole identification in Jun-Jul; breeding typically < 600m elevation, aquatic habitat; foraging and hibernation in xeric, upland
sites; frequent valley bottoms.
11-Dec-07
Page 1 of 1
SAR – Species At Risk
v2.2 Users Manual
12/11/2007
Appendix B. Key Topographic Features
Report Example
This Page left intentionally blank.
Example on next page
22
SAR
Key Topographic or Distinguishing Features
Species at Risk
Report Criteria
TSA:
BEC:
Kamloops
IDF
xh
Species
Prov Stat:
Sec7
Prov
Status
Key Stand Features
Crown
Critical
Closure Aspect 1
Slope
Range
Age
Class
Topographic or
Min
Max
Lead
Distinguishing Elevation Elevation Species
Feature
Additional Management Considerations
Likelihood
"Interior" Western ScreechOwl (Otus Kennicottii
macfarlanei)
Redlisted
Large diameter trees in
riparian forest, particularly
with cavities, incl Act, At,
Ew and mixed conif-decid,
large snags, shrub
understory
<75%
N/A
Not
Applicable
4-9
River/stream
0
1000
Act, At,
Fd
Consider nesting requirements of Pileated and Northern Flickers since
woodpecker holes are most commonly used for roosting; most occupied
territories have at least 2 cavities (nesting & roosting)
Moderate
"Interior" Western ScreechOwl (Otus Kennicottii
macfarlanei)
Redlisted
Not Applicable
Not
Applicable
N/A
Not
Not
River/stream
Applicable Applicable
0
1000
Act, At,
Fd
Consider nesting requirements of Pileated and Northern Flickers since
woodpecker holes are most commonly used for roosting; most occupied
territories have at least 2 cavities (nesting & roosting)
Moderate
American White Pelican
(Pelecanus erythrorhychos)
Redlisted
Riparian/wetland
Not
vegetation/forest that
Applicable
provides isolation to aquatic
system
Not
Available
Flat
Not
Slow flowing
Applicable aquatic systems,
lakes with islands
Not
No traffic (vehicular or aircraft) near, on, in, or over lakes/aquatic systems used
Applicable for nesting, foraging, loafing/roosting (no roads within 1-8km of foraging lakesconsult MoE where foraging is confirmed); no change in water levels; Apply
largest reserve
Moderate
American White Pelican
(Pelecanus erythrorhychos)
Redlisted
Riparian/wetland
vegetation/forest that
provides isolation to aquatic
system
Not
Available
Not
Available
Flat
Not
Slow flowing
Applicable aquatic systems,
lakes with islands
Not
No traffic (vehicular or aircraft) near, on, in, or over lakes/aquatic systems used
Applicable for nesting, foraging, loafing/roosting (no roads within 1-8km of foraging lakesconsult MoE where foraging is confirmed); no change in water levels; Apply
largest reserve
Moderate
American White Pelican
(Pelecanus erythrorhychos)
Redlisted
Riparian/wetland
Not
Not
vegetation/forest that
applicable; Available
avoid
provides isolation to aquatic
system
road
constructio
n
Flat
Not
Slow flowing
applicable; aquatic systems,
avoid
lakes with islands
road
constructio
n
Not
applicable
; avoid
road
constructi
on
No traffic (vehicular or aircraft) near, on, in, or over lakes/aquatic systems used
for nesting, foraging, loafing/roosting (no roads within 1-8km of foraging lakesconsult MoE where foraging is confirmed); no change in water levels; Apply
largest reserve
Moderate
American White Pelican
(Pelecanus erythrorhychos)
Redlisted
Riparian/wetland
vegetation/forest that
provides isolation to aquatic
system
Flat
Not
Slow flowing
Applicable aquatic systems,
lakes with islands
Not
No traffic (vehicular or aircraft) near, on, in, or over lakes/aquatic systems used
Applicable for nesting, foraging, loafing/roosting (no roads within 1-8km of foraging lakesconsult MoE where foraging is confirmed); no change in water levels; Apply
largest reserve
Moderate
11-Dec-07
Not
Available
Not
Available
Page 1 of 12