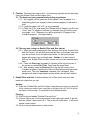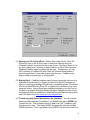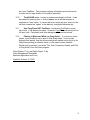
1
CowBoss User Guide
1. How to Enter Data:
1.1. Open a blank “CowBoss” file.
1.2. Use File, Save as to save this CowBoss file under another name, such as
“CowBoss Spring 2002.” Use a name that describes the data for your own
purposes, perhaps by year, management group or otherwise.
1.3. Fill in the Producer Name in Cell O2 (column O, row 2).
1.4. Birth Information: Starting at row 15, fill in each “entry” cell, using the Tab
key to move from “entry” cell to “entry” cell. Using Tab ensures that you
skip over the “protected” or “calculated” cells and move directly to the next
entry cell.
1.4.1. You must enter “b” for bull, “s” for steer or “h” for heifer.
1.4.2. If you do not have a birth weight, enter “n/a” for birth weight.
1.4.3. If you do not have Actual Weights for weaned calves or yearlings,
leave the cells blank, for now. However, you must have entered an
actual weaning or yearling weight in order for the weaning or yearling
analysis to work.
1.5. If you make a mistake on entering information, you can always come back
to that cell and over-write it with the correct information.
1.6. Weaning Information: In the column labeled “Sex” under Weaning
Information, you can choose to change bulls (b) to steers (s) or change
heifers (h) to feedlot heifers (fh). The “Sex” column is yellow indicating that
it will carry the sex over from the Birth Information section, but will allow you
to over-write it. (Whereas, columns with a blue background will not allow
you to over-write.)
1.7. Enter a “Weaning Date” in cell O5 and Actual Weights in column N.
1.8. Warning:
1.8.1. Do not attempt to “unprotect” blue columns and over-write calculated
values. This will corrupt your data.
1.8.2. NEVER Cut/Paste data from one cell to another. Copy/Paste,
however, is permissible. Cut/Paste will corrupt equations and destroy
your data.
1
2. Printing: There are two ways to print – the hard way (typical) and the easy way
(using our Enable Filter and Sort macro first.)
2.1. The hard way (using conventional printing procedures):
2.1.1. We suggest you first press the “print preview” icon (a graphic of a
magnifying glass over a page) to see how many pages you will want to
print.
2.1.2. Legal size paper (8.5 X 14”) is recommended.
2.1.3. Press File, Print, and under Print Range click on Page(s) and fill in the
“From” and “To” spaces to indicate, for example, that you want to print
from page 1 to 3. Otherwise, you will be printing All 10 pages of the
CowBoss program. See figure below.
2.2. The easy way (using our Enable Filter and Sort macro):
2.2.1. When you have entered some data and you click on the “Enable Filter
and Sort” button, this will filter automatically filter out the blank rows and
you will not have to use the above procedure. At that point printed
pages will contain only non-blank rows. Caution: You don’t want to
click on the “Enable Filter and Sort” button until you have entered some
data.
2.2.2. Press the Print icon (a graphic of a printer) at the top-left corner of
the screen, or select File, Print. They have the same effect.
2.2.3. After printing, press the Reset button in the top-left corner of the
CowBoss program to disable the Filter and Sort feature and restore the
blank rows. This very important; otherwise, the “calculated” (blue
background) cells be unprotected and the blank rows will be invisible.)
3. Enable Filter and Sort: CowBoss allows you to filter and/or sort your data
based on criteria that you set.
Sorting:
3.1. Press the “Enable Filter and Sort” button, then place your cursor on any cell
in the column you wish to sort, and click on the sort icon (A-Z or Z-A) at the
top-center of the screen. It is possible to sort filtered records.
Filtering:
3.2. Click the button labeled “Enable Filter and Sort.”
3.3. Column titles in row 14 show a gray box in the lower-right corner of the cell
that has a black “down-arrow” in it. This is the pull down menu. It will list all
entries in that column.
3.4. Click on the pull down menu to view entries.
2
3.5. Select the value or entry you are filtering for, i.e.) that you are choosing to
keep. This will return all records that match the selected criteria. Once a
criterion is selected, the down arrow will turn blue.
3.6. In addition to the available entries in the column, the filtering, pull-down
menu contains 5 additional options. They are:
3.6.1. All – which removes the filter from this column and returns previously
hidden records.
3.6.2. Top 10 – which returns the top 10 (or however many you choose)
records. You could also use it to return the bottom 10 (or X) records.
This option works best with numerical columns when searching for
records that are highest or lowest in the category. You can specify the
number of records you want returned, it does not have to be 10. It will
also work alphabetically.
3.6.3. Custom – used for more specific filtering operations. Useful when
searching for multiple values or range of values.
3.6.4. Blanks – Returns records that do not have entries in the selected
columns.
3.6.5. NonBlanks – Returns all records that have entries in the selected
column.
3.7. CowBoss is also capable of multi-level filtering, which means that following
a primary filtering operation subsequent filtering can be done to further
eliminate unwanted records. This is accomplished by activating filters
(clicking on the down-arrow) in more than one column.
4. Sire Summary
4.1. Pressing on the Sire Summary button will sort your “Bull ID” column and
give you a SubTotal for each column for each bull.
4.2. Use the Remove Sire Summary button before you do any other sorting.
4.3. If you wish to do a sort within a Sire Summary listing, then do the sort first
(e.g. sort 365 day weight), and then apply the sire summary. The calves will
be sorted within each sire summary listing.
5. Other Tips:
5.1. See your local Manitoba Agriculture and Food office for assistance in
the use and/or interpretation of this program. A listing of offices in
your region can be found on the Internet at:
http://www.gov.mb.ca/agriculture/contact/agoffices.html
5.2. More than 300 calves - If you have more than 300 calves to record,
consider splitting them up into different management groups.
5.3. Entering Numbers - When entering numbers, use the NUM LOCK and the
number keypad at the right of the keyboard.
3
5.4. If you notice the word “sex” coming up automatically ever time you type “s”
(for steer) in the Sex column, then do the following:
5.4.1. Select Tools, Options.
5.4.2. Select the Edit tab in the Options window, as pictured below, and take
out the check mark in the box labeled “Enable Auto-Complete for cell
values.” The check is not needed for the CowBoss program.
5.5. Excel cursor movement:
• Ctrl-Home takes you to the Home corner (top-left) of the worksheet
• Home takes you all the way to the left of the row you are on.
• Ctrl-PageDown takes you to the next worksheet.
• Ctrl-PageUp takes you to the previous worksheet.
5.6. If you do not see “red tabs” in the top-right corner of cells such as the
“weaning date” cell (O5) and the User Tip cells (in row 13), then do the
following:
5.6.1. Select Tools, Options.
5.6.2. Select the View tab in the Options window, as pictured below, and put
the “dot” (click on) the “Comment indicator only” selection. While you
are there, we recommend that you include all the other checks and dots
as pictured in the figure below.
4
5.7. Saving your File to the A Drive - Rather than using Excel’s “Save As”
function to save to the A Drive, save to hard drive first and then use
Windows Explorer to transfer the file to the A drive. The Excel “Save As” is
too slow, taking over 5 minutes to save CowBoss to the A Drive, whereas
Windows Explorer takes only about 20 seconds. Furthermore, you can
NOT overwrite a CowBoss file with “Save As” because Excel makes a
second copy before it overwrites (erases) the first one. CowBoss is too
large to allow a second copy on a floppy disk.
5.8. Buying Excel - CowBoss requires users to have a computer that runs in a
Windows 95 environment (or higher), the Microsoft Excel 97 program (or
higher), a working knowledge of Excel and a compatible printer. Producers
who do not have Microsoft Excel ’97 (or higher) can purchase it from most
computer stores. Having Excel also enables producers to use the Cost of
Production programs and other Decision-Support Software (a total of over
40 programs) that are available for download from the Manitoba Agriculture
and Food web site at http://www.gov.mb.ca/agriculture/
5.9. Transferring data from older versions for CowBoss - You can transfer
data from older versions of CowBoss if you transfer the data to WORD first.
It works like this. First highlight a block of data in an “old” CowBoss, rightclick and select copy. Then open WORD and paste the data into a blank
WORD document. Then copy/paste it from WORD into the same location in
5
the “new” CowBoss. This prevents retyping information and avoids errors.
It works well for large blocks of information especially.
5.10.
The #VALUE error - is easy to produce accidentally in Excel. It can
be created by entering text, or even a space, into a cell that requires a
numerical or “date” value. To correct the error, simply put your cursor on the
cell that contains the “space” or the bad text, and press the delete key.
5.11.
Use Copy/Paste NOT Cut/Paste - Avoid using Cut/Paste to move
input cells. It can destroy formulas. However, Copy/Paste will work just fine
for input cells. Calculated cells (blue background) cannot be moved.
5.12.
Printing in Black and White (or Gray Scale) – If you have a colour
printer, it can usually be set to print in Gray Scale mode. If your printer
supports this feature, then the printer manual will explain how to set it up for
Gray Scale printing (a software switch.) In the case of some HewlettPackard colour printers, you select “File, Print, Properties, Quality, and Print
in Gray Scale” from the Excel program.
Grant Palmer, P.Ag. and Ralph Pieper, P.Ag.
Farm Management Specialists
Manitoba Agriculture and Food
Updated: October 15, 2002
6