1
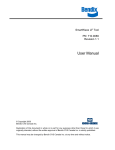
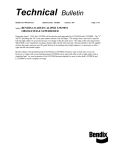
SmarTire ™ Low Frequency (LF) Tool PN: BW2820 Revision 1.2 User Manual TABLE OF CONTENTS 1. 2. 3. 4. 5. 5.1. 6. INTRODUCTION .........................................................................................................................3 OVERVIEW ...............................................................................................................................3 GETTING STARTED ...................................................................................................................5 USING THE SMARTIRE™ LF TOOL ..............................................................................................5 PROGRAMMING SENSOR ID NUMBERS ......................................................................................6 SMARTIRE™ LF TOOL ...............................................................................................................6 VERIFYING CORRECT INSTALLATION ..........................................................................................7 2 1. INTRODUCTION The SmarTire™ TPMS by Bendix CVS LF tool is a handheld device designed to provoke data transmissions from SmarTire™ sensors. The tool can be used to assist the installer during: • New Installations – programming sensor ID numbers & vehicle configuration into the receiver • Sensor Replacement - programming new sensor ID numbers into the receiver • Installation Verification (without moving vehicle) NOTE: The SmarTire™ LF tool is compatible ONLY with SmarTire™ low- and high-pressure commercial sensors. 2. OVERVIEW Transmission End Learn LED Initiate LED Low Battery LED On/Off & Mode Select Button Initiate/Learn Button Battery Cover 3 Transmission End: This part of the tool must be pointed towards the tire to initiate or learn a sensor. Learn LED: The learn LED will be ON (green) as long as the learn mode is selected. When pressing the learn button, the LED will blink rapidly for 5 seconds and then change to one blink per second after the learn transmission has been completed. Initiate LED: The initiate LED will be ON (green) as long as the initiate mode is selected. When pressing the initiate button, the LED will blink rapidly for 5 seconds and then change to one blink per second after the initiate transmission has been completed. Low Battery LED: The low battery LED will flash amber once every second when the onboard 9-Volt battery is near empty. Approximately 20 additional initiate/learn operations can be performed after the battery LED blinks for the first time. The battery LED will light up solid amber during the shut down process to signal that the user can let go of the ON/OFF button. ON/OFF & Mode Select Button: Press and hold this button for 2 seconds to power ON the SmarTire™ LF tool. A beep will sound and the initiate LED will light up when the tool is ON. Press this button without holding to toggle the SmarTire™ by Bendix CVS LF tool between the sensor initiate and sensor learn function. Note that the LED for each mode lights up when toggled. With the tool turned ON, press and hold the button for 4 seconds until the battery LED lights up, then release the button to shut down the tool. Initiate/Learn Button: Press this button to either initiate or learn a sensor depending which mode is currently selected by the mode select button. Initiation transmissions are used when instant sensor updates on the SmarTire™ gauge or in the diagnostics software are needed. Learn transmissions are used when reprogramming sensor ID numbers into the SmarTire™ receiver. 4 3. GETTING STARTED The SmarTire™ by Bendix CVS LF tool is powered by a standard 9-Volt battery. To install the battery, open the battery access panel on the back of the tool and connect the supplied battery to the 9-Volt battery connector. Insert the battery into the slot and close the battery access panel. Press and hold the ON/OFF button for 2 seconds to power up the tool. 4. USING THE SMARTIRE™ LF TOOL The SmarTire™ LF tool is very easy to use. Simply hold it approximately 2 inches (5 cm) away from the tire’s surface positioned at the center of the tire’s sidewall at the location of the valve stem (SmarTire™ sensors should be installed at the valve and their location should also be indicated by a rim mounted label). Press and release the initiate/learn button (a single beep will be heard) and hold the tool in place for 5 seconds until 4 quick beeps are heard to ensure the wireless signals emitted from the tool reached the sensor. 5 For dual-wheel assemblies, position the SmarTire™ by Bendix CVS LF tool approximately 2 inches (5 cm) away from the tire’s surface positioned at the center of the outboard tire’s sidewall opposite the valve stem. The transmission from the tool will pass through the outboard tire and provoke a data transmission from the sensor mounted on the inboard tire. NOTE: Dual-wheel assemblies should always be mounted with valve stems 180° opposite each other. 5. PROGRAMMING SENSOR ID NUMBERS 5.1. SMARTIRE™ LF TOOL There are multiple user interfaces that can be used to program sensors into the system and a general description is found below. For more detailed information, consult your system’s Owner’s Manual. 1. Enter the setup mode for your user interface. Find and enter the “learn sensor” mode. 2. Select which sensor you’d like to replace. The user interface will indicate that it is searching for a sensor. The sensor inside the tire for the wheel position to be programmed must now be provoked to transmit its ID. 3. Turn the SmarTire™ LF tool ON by pressing and holding the On/Off button for 2 seconds. 4. Press the On/Off/Mode Select button once to toggle the tool mode to the learn sensor function. The LED under the head with the question mark must now be ON. 5. Hold the SmarTire™ LF tool pointed towards the tire’s sidewall adjacent to sensor’s location approximately 2” away from the tire’s surface. The sensor should be located at the valve stem with a rim label indicating its location. Do not touch the edge of the rim. 6 6. Press and release the initiate/learn button once & hold LF initiator tool in position for 5 seconds until the 4 rapid beeps are heard. Do not hold down the initiate/learn button. 7. When completed correctly, the user interface should indicate “learn complete”. Two possible error conditions are: Learn Time Out: A learn transmission was not provoked fast enough and the system timed out. Repeat the learn process. Duplicate Sensor ID: The sensor ID that was programmed to the wheel position is also programmed to another wheel position. 8. Repeat the steps above until you have completed programming all of the necessary tire locations, then exit the user interface’s setup mode. 6. VERIFYING CORRECT INSTALLATION To ensure that the system is properly configured after new sensor ID numbers have been programmed in the receiver, verify the programming by following the steps below: 1. Power-up the receiver by switching the ignition on. 2. Press the On/Off/Mode Select button once to toggle the tool mode back to the initiate function. Check that the LED under the antenna symbol is now ON. 3. Place the LF initiator next to each sensor position and press the initiate/learn button to cause each sensor to transmit ID number and tire data. 4. Check the display to confirm that the signal was received by the receiver (wheel position on the screen should have changed to a dark symbol). 5. If a sensor’s transmission was not received, repeat step 2. If the problem persists, power down the system and repeat the “Programming Sensor ID Number” process or consult the troubleshooting section in the SmarTire™ Tire Pressure Monitoring System by Bendix CVS Operator's Manual (BW2799). FCC NOTICE This device complies with Part 15 of the FCC Rules. The SmarTire™ LF tool is a Part 15 low power transmitter below 1705 kHz. The device has a rated RF power output of less than 0.2 micro Watts. Due to the transmit frequency range and low level of output power the device is not subject to the routine RF exposure valuation as per Section 2.1093 of the FCC rules. Operation is subject to the following two conditions: (1) this device may not cause harmful interference, and (2) this device must accept any interference received, including interference that may cause undesired operation. This equipment has been tested and found to comply with the limits for a Class B digital device, pursuant to Part 15 of the FCC Rules. These limits are designed to provide reasonable protection against harmful interference in a residential installation. This equipment generates, uses and can radiate radio frequency energy and, if not installed and used in accordance with the instructions, may cause harmful interference to radio communications. However, there is no guarantee that interference will not occur in a particular installation. 7 If this equipment does cause harmful interference to radio or television reception, which can be determined by turning the equipment off and on, the user is encouraged to try to correct the interference by one or more of the following measures: Reorient or relocate the receiving antenna. Increase the separation between the equipment and receiver. Connect the equipment into an outlet on a circuit different from that to which the receiver is connected. Consult the dealer or an experienced radio/TV technician for help. Changes or modifications to this device without the express approval of the manufacturer may void the user’s authority to use this device. EUROPEAN REGULATIONS This device complies with R&TTE 1999/5/EC through harmonized standards (EN301 489-1 and EN330 330-1). The equipment has been tested and found to comply with the above directive and in addition it meets the requirements for low powered transmitters/receivers as defined by the relevant radio approval authority and complies with low voltage directive 73/23/EEC. The directive is designed to provide reasonable protection against harmful interference or susceptibility. Changes made to this device without the express approval of the manufacturer may void the user’s authority to use this device RSS210, RSSGEN Operation is subject to the following 2 conditions: (1) This device may not cause harmful interference, and (2) This device must accept any interference received, including interference that may cause undesired operation. Duplication of this document in whole or in part for any purposes other than those for which it was originally intended, without the written approval of Bendix Commercial Vehicle Systems LLC is strictly prohibited. The information provided in this manual is for informational purposes only and is subject to change without notice and should not be construed as a commitment by Bendix. Bendix assumes no responsibility or liability for any errors or inaccuracies that may appear in this publication. Trademarks The SMARTIRE trademark is owned by Bendix Commercial Vehicle Systems LLC. Any references in this catalog to any other company or trademark are solely for identification purposes. The trademarks are the property of their respective companies and are not affiliated with or endorsing Bendix Commercial Vehicle Systems LLC. Bendix Commercial Vehicle Systems LLC does not represent any parts shown as products manufactured or remanufactured by the companies so named herein. 901 Cleveland Street • Elyria, Ohio 44035 • 1-800-AIR-BRAKE (1-800-247-2725) 13151 Vanier Place • Suite 150 • Richmond, British Columbia, Canada V6V 2J1 • 604-276-9884 BW2809 ©2010 Bendix Commercial Vehicle Systems LLC, a member of the Knorr-Bremse Group 7/10 • All Rights Reserved • www.bendix.com 8