1
Installation Tips
Riser Installation
a. To ensure proper operation and performance for the life of
your Rain Gun, the riser must be stable and solidly installed to
resist vibration. An unsupported riser is insufficient for proper
operation. Additionally, a PVC riser will not support the
reaction load of a Rain Gun. Some options that may be used
are: (Note: confirm friction loss and flow in your application)
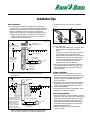
• Option 1: Galvanized riser strapped to a 6" x 6" pressure
treated wood post (See Figure 4).
Figure 4
Max. of 72” height is
recomended. Post should be
continuous to base of Rain Gun.
Use hi-torque
stainless steel bands
Keep riser vertical
Min. of 36” depth
is recommended.
Compact dirt
around post.
2" Elbow swing
assembly
Lateral
Provide drain valve
as necessary
Use pressure
treated wood
Figure 5
2” Galv.sch. 40
Using thread adapter
Figure 6
Using bolt flange
Figure 7
c. Inclined operation:
• The preferred installation on an inclined plane
is on a vertical riser regardless of angle of
incline.
• If the riser must be set at an angle, use the rear
counterweight (part number L00270) for
proper rotation of your Rain Gun. The weight is
designed to help the Rain Gun rotate up hill.
• If you are using a portable gun stand, please
consult the manufacturer to be sure it is
designed to support inclined terrain.
d. For more help with your installation, please call
your Rain Bird Dealer or District Manager. The
toll free Rain Bird number is listed on the back
page of this guide.
Traveler Installation
• Option 2: Galvanized riser set in a pillar of concrete
(See Figure 5).
12” to bolt
flange
b. Install Rain Gun to riser as shown in Figure 6
or 7.
10”
12”
a. Make sure that the pressure at the gun is over
45 psi. Most users underestimate the pressure loss
in the pipe, which is very high. Adjust your spoon
bracket in relation to the nozzle size and the
pressure at the gun.
b. On sloped terrain, weight compensation may be
required for proper rotation. For such conditions,
a rear counterweight is available (Part number
L00270, sold separately).
c. As an alternative to using a counterweight, some
travelers can be vertically adjusted.
Center Pivot Installation
Dimensions of concrete
required will vary depending on riser height, soil
bearing capacity, and
Rain Gun flowrate.
Example shown is for
compact clay soil with
18 mm nozzle and
maximum pressure 80 psi.
2" Elbow swing assembly
Lateral
Provide drain valve
as necessary
• Option 3: A portable gun stand designed to support a Rain
Gun. (Contact your dealer for a recommended supplier.)
a. For proper operation, make sure that the pressure
at the gun is over 45psi. Many users underestimate
the pressure loss in the pivot, which is very high,
especially at the end-gun location. Adjust your
spoon bracket in relation to the nozzle size and
the pressure at the gun (Refer to spoon bracket
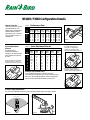
adjustment guide, Table 2).
b. Make sure that the pivot end-gun mounting
position is stable.