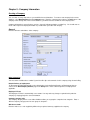
1
2007 T4 TimeSaver User Manual Copyright © 1987-2008 ELM Computer Systems Inc. All rights reserved ii Table of Contents Chapter 1 - Introduction................................................................................................................................1 About T4TimeSaver.NET .........................................................................................................................1 Technical Support.....................................................................................................................................1 Receiving Updates ....................................................................................................................................1 Requesting System Enhancements ............................................................................................................2 Hardware Requirements............................................................................................................................2 License Agreement ...................................................................................................................................2 Warranty Information ...............................................................................................................................3 Chapter 2 - Getting Started ...........................................................................................................................4 Installation................................................................................................................................................4 Starting the Program .................................................................................................................................5 Registration ..............................................................................................................................................5 User Names and Passwords.......................................................................................................................5 Main Menu ...............................................................................................................................................6 Use of Special Keys..................................................................................................................................6 Toolbar Icons............................................................................................................................................6 Split Screen Options .................................................................................................................................7 Getting Help .............................................................................................................................................8 Chapter 3 - Working with Databases.............................................................................................................9 Creating a Database ..................................................................................................................................9 Opening a Database ..................................................................................................................................9 Convert Database................................................................................................................................10 Closing a Database .................................................................................................................................10 Repair Database......................................................................................................................................10 Chapter 4 - Setup........................................................................................................................................11 User Settings...........................................................................................................................................11 New Company Defaults Page..............................................................................................................11 T4 Adjustment Defaults Page..............................................................................................................11 Data Entry Pages.................................................................................................................................11 Electronic Filing Page.........................................................................................................................12 Options ...............................................................................................................................................13 User Administration................................................................................................................................13 Rates and Constants ................................................................................................................................13 File Locations .........................................................................................................................................14 Change Authorization Code ....................................................................................................................14 Change Your Password...........................................................................................................................14 Edit Setup Files.......................................................................................................................................15 System Settings...................................................................................................................................15 Paths ...................................................................................................................................................15 User Settings.......................................................................................................................................15 Chapter 5 - Company Information ..............................................................................................................16 Creating a Company ...............................................................................................................................16 General ...............................................................................................................................................16 Adjustment Options ............................................................................................................................17 Net Pay ...............................................................................................................................................17 Selecting a Company ..............................................................................................................................18 Editing Company Information.................................................................................................................18 Deleting a Company ...............................................................................................................................18 \Unlock all Companies in Database.........................................................................................................18 Chapter 6 - Entering Slips...........................................................................................................................19 iii Add Slips................................................................................................................................................19 Delete Slips ............................................................................................................................................19 Sorting Slips ...........................................................................................................................................19 Selecting Slips ........................................................................................................................................19 Entering Data..........................................................................................................................................19 Overriding Calculated Fields ..................................................................................................................20 T4 Input Window....................................................................................................................................20 T4A Input Window.................................................................................................................................22 T5 Input Window....................................................................................................................................23 Chapter 7 - Adjusting T4s...........................................................................................................................25 Making Adjustments to T4s ....................................................................................................................25 Reversing Adjustments ...........................................................................................................................25 Setting Adjustment Options ....................................................................................................................25 CPP/QPP Adjustment Options ................................................................................................................25 EI Adjustment Options ...........................................................................................................................26 Transfer Over Remittance .......................................................................................................................26 Other Options .........................................................................................................................................27 Chapter 8 - Entering Summary Form Information .......................................................................................28 T4 Summary ...........................................................................................................................................28 T4A Summary ........................................................................................................................................29 T5 Summary ...........................................................................................................................................30 Chapter 9 - Producing Reports ....................................................................................................................31 Validating Data.......................................................................................................................................31 Printing Slips ..........................................................................................................................................32 Printing Summary Reports......................................................................................................................34 Printing Adjustment Reports ...................................................................................................................36 Printing Edit List Reports .......................................................................................................................36 Printing Company List............................................................................................................................38 Chapter 10 - Electronic Filing.....................................................................................................................39 Instructions for Federal Returns ..............................................................................................................39 Electronic Filing Preparation ..................................................................................................................39 CD or DVD Filing ..................................................................................................................................41 Diskette Filing ........................................................................................................................................41 Internet Filing to CRA ............................................................................................................................41 Chapter 11 - Appendices............................................................................................................................43 Data Backup ...........................................................................................................................................43 Technical Notes ......................................................................................................................................44 Province/Sate Codes ...............................................................................................................................45 Country Codes ........................................................................................................................................46 1 Chapter 1 - Introduction About T4TimeSaver.NET ELM Computer Systems Inc. has provided custom programming and consulting services to accounting firms and to small business since 1978. The T4 TimeSaver development team is committed to providing software for producing Canadian tax information returns which is superior to any other system available. This newest version of the T4TimeSaver program suite has been rewritten from the ground up to provide a solid foundation for both current and future technology, as well as for new product features. New features: • Easy to read data entry screens • Split-screen data entry gives the ability to view slips and summaries side-by-side • Improved onscreen report preview • Enhanced printer compatibility • Ability to save returns and reports as PDF files • Ability to export reports in formats such as Excel, HTML, RTF and others Limitations of 2007 Initial Production version: • Processes T4, T4A, and T5 returns only • Prints returns as facsimiles to plain paper but does not print to pre-printed CRA forms • Does not support importing data • Some advanced tools such as the merging and transferring of companies and the global updating of contact information and adjustment options are not available Technical Support As a registered user you may telephone, fax, or e-mail us with your questions about the installation and use of the T4 TimeSaver.NET program. Our technical support hours are 9am to 5pm ET. Technical Support Hot Line: Local to Toronto: Fax Number: Email: Product Website: Corporate Website: 1-800-268-3211 (416) 495-1624 (416) 495-0044 [email protected] www.t4timesaver.ca www.elmcomputers.com To submit an error log to our technical support team via FTP, select Send Error Log to Technical Support from the Help menu. Technical support is available in the French language at our Montreal office. (Support from our Toronto office is available only in English). French Language Technical Support: Telephone number: (514) 499-9669 Receiving Updates You will receive notification by email when there is a significant update to T4 TimeSaver.NET. These updates will be sent by Canada Post to any customer that purchased the update mailing. Otherwise, the updates will be available to download from our website. 2 The Downloads section of the T4TimeSaver.ca website will give details about all updates in the Current Year Release section. Requesting System Enhancements We value your suggestions at ELM Computer Systems Inc. and attempt, as much as possible, to incorporate them into future versions of T4 TimeSaver.NET. Many of the features now available in the system are the result of comments made by people like you who have used the program for years. If there is a feature which you would like to see in T4 TimeSaver.NET please call or send us a note and let us know. We cannot promise that all suggestions will be incorporated into the system but we assure you that each one will be given our careful consideration. Thank you in advance for helping us to make T4 TimeSaver.NET the finest tax slip preparation software available in Canada. Hardware Requirements Computer Any Pentium class PC Operating System Windows 2000 , Windows XP, .Windows Vista or Windows 2003. 1 Note: Windows is a registered trademark of Microsoft Corporation. All product names mentioned in this manual and not listed are trademarks of their respective companies. System Memory A minimum of 128 Mb RAM is required to run T4 TimeSaver.NET. Typically, any system able to run a current version of Windows will be able to run T4 TimeSaver.NET. Disk Drives A hard disk drive with at least 100 Mb of available disk space is required for installation of the program files while leaving sufficient space for data. Data may be stored on either a hard disk or on removable media; T4 TimeSaver.NET performs much better if data is stored on a hard disk. The software and/or its data files may also be installed on a network file server. For optimal performance of both T4 TimeSaver and other software ensure that you have sufficient room available on your hard disk for the virtual memory swap file maintained by Windows. Typically this file is 50% greater than the size of the available RAM installed on your system. Printer Slips and summaries are generated as PDF files which can be printed on ink jet and laser printers. You may also file most types of returns on diskette, CD, DVD, or via the internet, significantly reducing your paper requirements and the labour involved in producing these returns. License Agreement T4 TimeSaver.NET ("program") is owned by ELM Computer Systems. ELM Computer Systems grants to you as a registered user a nonexclusive, nontransferable license to use the program. You are expressly prohibited from distribution of the program to others outside your office, regardless of whether such distribution is for profit. All rights, title and interest in and to the program, and all documentation, code and logic which describes and/or comprises the program are vested in ELM Computer Systems. Your right to use the program is conditional upon and limited by the terms and conditions of this license. You may not: (a) modify, adapt, translate, reverse engineer, decompile, disassemble, or create derivative works based on the program; or (b) loan, rent, lease or sublicense the program or any copy, without the prior written consent of ELM. Any violation of these provisions will constitute an automatic revocation of your license to use the program and will subject you to substantial liability under the applicable legislation of the jurisdiction in which the program is being used. 3 You are permitted to use the program on any and all personal computers in your office, with no restriction on the number of concurrent users. Use of the program at other offices (i.e. different street addresses) is prohibited unless separate licenses have been purchased for each office. Warranty Information We warrant to you for ninety (90) days from the date you received the software package that the package contains an accurate reproduction of the program, and the copy of the User Manual is accurately reproduced. The program itself is excluded from our warranty. To obtain replacement of these materials, you must (i) return the inaccurate package or copy of the User Manual to us within the warranty period, or (ii) first notify us in writing within the warranty period that you have found an inaccuracy and then return the materials to us. This limited warranty only covers the original user of the software package, and we make no other warranties expressed or implied. ANY AND ALL WARRANTIES RELATING HERETO ARE LIMITED IN DURATION TO THIS NINETY-DAY WARRANTY PERIOD. REPLACEMENT OF THE DISK CONTAINING THE PROGRAM OR USER MANUAL IS YOUR EXCLUSIVE REMEDY AND SOLE MEASURE OF RECOVERABLE DAMAGES. Disclaimer The Package (The program and the User Manual) is licensed "as is", without warranty of any kind, either express or implied, including but not limited to the implied warranties of merchantability and fitness for a particular purpose, without limitation; all warranties against infringement or the like respecting the package are hereby disclaimed by us. We do not warrant that any functions contained in this package will meet your requirements or that your use of the package will be uninterrupted or error-free. We shall have no liability to you or any third party regarding the package, the User Manual or otherwise in warranty, contract, tort, or otherwise. In no event will we be liable for any direct, incidental, special, indirect, general, or consequential damage or loss of any nature (such as damage to property, damages resulting from delay, claims of third parties, loss of profits, or injury to person) which may arise in connection with the use of or inability to use this package. This clause shall survive failure of an exclusive remedy. We specifically disclaim liability for any and all forms generated by the Package for submission to CRA or Revenu Québec. It is the users' responsibility to ensure that the proper forms are used and, with respect to the Relevé slips, that the serial numbers on the forms are unique and within the range assigned to the user by ELM Computer Systems, Inc. 4 Chapter 2 - Getting Started Installation T4 TimeSaver.NET may be installed on any hard disk drive accessible to your computer. Single User and Network installations are described below. If you used T4 TimeSaver last year, you may install the program without affecting last year’s database(s), nor will reinstalling the current program affect the current year’s database(s). For fastest program response and most secure retention of data it is recommended that data files be stored on either a local or network hard disk. Data files can also be stored on many USB flash drives provided sufficient space is available. To install T4 TimeSaver.NET from the CD follow these steps: 1. Copy the original CD media and store the original in a safe place. 2. Close all open applications to avoid possible conflicts with open programs. 3. Insert the copy of the installation CD in an appropriate drive. 4. Click on the Windows Start button. For Windows XP select Run from the menu displayed, or for Windows Vista type Run in the Search box. Type d:t4setup (replace “d:” with the drive letter in which the install CD is located.) Click OK to continue. To install T4 TimeSaver from the internet follow these steps: 1. Download the installation package from our website: http://www.t4timesaver.ca/contents/t4_timesaver_downloads.html 2. Close all open applications to avoid possible conflicts with open programs. 3. Click on the Windows Start button. For Windows XP select Run from the menu displayed, or for Windows Vista type Run in the Search box. Type location\t4setup (replace “location” with the name of the folder to which you downloaded the installation package.) Click OK to continue. When the setup program begins, follow the directions on your screen. 5 Workstation Installation: Select Workstation from the Select Install Type window. This will install the program on either the local hard drive or any network drive available to the computer, placing all resources required by the software only on the local workstation. Network Administrator Installation: Select Network Administrator from the Select Install Type window to install the program on a network drive. Then, run T4NETNODE.EXE from each workstation to copy the necessary files to run the program from the workstation. Starting the Program A T4 TimeSaver.NET icon will be automatically created on your desktop. Additionally, the Start menu will contain the T4 TimeSaver.NET icon in the T4 TimeSaver.NET program group. Registration As soon as T4 TimeSaver.NET is started you will see a registration screen. Your copy of T4 TimeSaver.NET must be registered before full functionality of the program is activated. Enter the unique authorization code issued to you by ELM Computer Systems to register this copy of the program. You can then click on the OK button on the registration screen to begin using T4 TimeSaver.NET. You may enter data into T4 TimeSaver.NET without registering the program by clicking on the OK button without entering an authorization code, but you will be unable to produce a valid return until the registration number is entered. (Several functions will also be unavailable until the software is registered.) The opportunity to register will be available every time you start the program until registration has been completed. T4 TimeSaver.NET program is copyright (c) 1987-2008 by ELM Computer Systems Inc. Please refer to the License Agreement for full details of the agreement between ELM Computer Systems Inc. and users of the package. User Names and Passwords If you purchase the license for the Plus version of T4 TimeSaver.NET, the authorization code you have been given will cause T4 TimeSaver.NET to prompt you for a user name and password each time you start the software. You can enter any name you wish to for a username. There should be a unique user name assigned to each person or workstation. The first time you enter a new user name, you will be prompted to enter a password for the user and to confirm that this is a new user. (You can change the password later by selecting the Change Your Password option from the Setup menu. 6 Each user name is associated with a corresponding user profile which contains the settings associated with the user. Each user can establish their own preferences and default values by selecting User Settings from the Setup menu. Main Menu The title bar of the main window contains the name of the program and the name of the current database. Beneath it is the main menu. Each menu item can be accessed by clicking its name. Each menu has a submenu of functions relating to the menu name. Any menu or submenu item that is greyed out is not currently available. Some functions will only be available when a form is open. Use of Special Keys Many of the menu items have short-cut key strokes which can be used instead of opening up the menu and selecting the function. These are listed below: F1 F2 F4 Ctrl + P Ctrl + A Ctrl + D Ctrl + S Ctrl + PgUp PgUp PgDn Ctrl + PgDn Accesses on-line help Lists the valid options for a box Overrides calculated field Opens print window (with current employee selected, where applicable) Adds a slip to the current company Deletes the current slip from the current company data Allows you to select from the list of slips for the current company and return type Moves to the first slip for the current company Moves to the previous slip for the current company Moves to the next slip for the current company, adding a new slip if current slip is the last slip Moves to the last slip for the current company Toolbar Icons Make use of the following icons that appear in the toolbar directly below the main menu: Company Name - Displays the current company name. Use the dropdown box to select from the list of companies. Select a different company - Add a new company - - Opens the Add new company dialog window. Edit company information - Print current form - Revert - New - - Opens the list of companies. Highlight the desired one and click Select. - Opens the Edit company information dialog window. - Opens the Print dialog window for the currently open form. - Restores data entry fields to their original values. - Adds a new slip of the type currently in focus. 7 Delete - - Deletes the current slip. You will be asked to confirm the deletion. Go to first form - - Switches to the first slip for the company in the current sort order. Go to previous form - - Switches to the previous slip for the company in the current sort order. Go to next form - - Switches to the next slip for the company in the current sort order. Go to last form - - Switches to the last slip for the company in the current sort order. Find specific slip - - Opens the list of recipients to locate a specific slip. Sort Order - Displays the current sort order. Use the drop down box to select from the list of sort orders. Slip number - - Displays the current and total number of slips. Split Screen Options You may view multiple forms at the same time by making use of the split screen option. Begin by opening the forms you wish to view. You may open as many as you desire. Each form will have a tab along the top. Switch between forms by clicking on the tab of the desired form. To view two forms concurrently, click on the tab on one form and drag the form towards the centre of the the T4 TimeSaver.NET window. The following image will appear: Continue dragging the form to the part of the image that indicates the desired location of the form (top, bottom, left, right). The screen will be split in the indicated direction. The following shows the results of dragging the T4 form to the left side of the screen. 8 Once the screen has been split, you may move forms from one side to the other, or between top and bottom sections, by clicking on the tab for the form and dragging it to the desired location. The screen may also be split further if desired. Getting Help Whenever you require help, press the [F1] key to access the on-line help screens. If context-sensitive help is available it will be displayed. Otherwise use the Contents or Search tabs to access the desired topic. Links to related topics are provided for your convenience. You can also access the help files from the Help menu. Selecting Contents or Search opens the Help to the Contents or Search tabs respectively. The Internet sites submenu lists a number of Internet sites that may prove helpful. 9 Chapter 3 - Working with Databases Creating a Database A T4 TimeSaver.NET database is a collection of the data for one or more companies in a single file on your computer. Each database can contain the data for numerous companies and you can create as many databases as you wish. (Note the Lite version of T4 TimeSaver.NET is restricted to one database with a maximum of 5 companies). To create a database select New database from the File menu. First, select the folder in which you want to store the database. You can select any local or network folder available to your computer. If a multi-user network version of T4 TimeSaver.NET is being used, the database is normally stored on a network drive so that it can be accessed by other users. Next, you will need to give the database a name. Enter a valid Windows filename. If you enter the extension, it must be ".T07N". If no extension is entered the extension will default to ".T07N". Click Save to create the database and exit the Create New Database dialog box. The new database will be automatically opened and its name will appear in the title bar of your T4 TimeSaver.NET window. If you already have a database open when you choose New database the current database is automatically closed before the new database is created unless you cancel the procedure. Opening a Database To work with an existing database, you must open it. Choose Open Database from the File menu. Browse to the path and folder that contains the required database. Select or type the name of the document you want to open in the File name field. You can open databases with the following filename extensions: T06: 2006 original T4 TimeSaver database T07: 2007 original T4 TimeSaver database T07N: 2007 T4 TimeSaver.NET database If you attempt to open a database with a “.T06” or ".T07" extension you will be asked if you wish to convert the selected database into the 2007 T4 TimeSaver.NET format. If you respond “Yes” a new database will be created which contains all of the company and employee information that was in the source database. The source database will not be affected. If no database exists you will need to create one by selecting New database from the File menu. 10 NOTE: IF YOU ARE UNABLE TO ACCESS MOST ITEMS UNDER THE “COMPANY” MENU THE MOST LIKELY CAUSE IS THAT NO DATABASE IS OPEN IN T4 TIMESAVER.NET. You will only be able to create company information if a database is open. Convert Database When you open a “.t06" or ".t07" database you will be given the option to set all dollar values to zero and to remove any “amended” markers by checking the initialize fields box. Otherwise, all dollar values will be maintained and amended slips will still be labeled amended. Closing a Database Close the current database by selecting Close database from the File menu. The database must be closed to allow you access to the file through your operating system in order to move or backup the file without closing T4 TimeSaver.NET. Repair Database The database repair routine in T4 TimeSaver performs two functions. It compacts databases to save space and it recovers from certain types of file corruption caused by power failures, software or hardware problems, and most common types of operator errors. However, certain situations such as physical damage to the data storage media (hard drive or disks), or inadvertent erasure of files cannot be rectified by database repair routine. Warning: IN NO CASE SHOULD YOU RELY SOLELY ON THE DATABASE REPAIR ROUTINE IN THIS SYSTEM TO PROTECT YOUR FILES FROM ACCIDENTAL ERASURE OR ANY OTHER LOSS OR CORRUPTION. YOU ARE RESPONSIBLE FOR ENSURING THAT ADEQUATE BACKUP COPIES OF ALL YOUR FILES (BOTH DATA AND PROGRAMS) ARE MADE ON A REGULAR, SYSTEMATIC BASIS. When to repair a database The system constantly checks the validity of its files, and if it detects any corruption it will report it. This could occur if you had turned off the computer (or re-booted) without exiting T4 TimeSaver or had a power failure. If you run out of disk space you may also experience some problems with the data. In this case, you should free up some disk space before proceeding with the database repair routine. If you get an error message about a corrupted database, you should run the Repair Database option in the File menu to attempt to correct the damage. Before using this tool it is advisable to make a backup copy of your database. You can copy the database to removable media or to another hard drive. Select the Repair Database option from the File menu. Choose Yes to select the current database or No to select another. If you have chosen to select a database, highlight the correct database directory and name from the list of available databases and click Open. You will be asked to confirm the name of database to be repaired. The process will begin as soon as you click Yes. You will be informed when the repair is complete. Any data that cannot be fixed will be discarded. You can then open the database again, and continue as usual. 11 Chapter 4 - Setup The functions in the Setup menu are to be used to set default values for the program. User Settings For the Plus version of T4 TimeSaver.NET, each user may set their own default preferences in a number of areas, such as New Company, T4 Adjustment, Data Entry and Electronic Filing options. These user settings are linked to the User Name used when logging in to T4 TimeSaver.NET. New Company Defaults Page Complete the New Company Defaults page. This information will be automatically entered into each new company you set up. You may override these defaults for individual companies as you set them up. T4 Adjustment Defaults Page Complete the T4 Adjustment Defaults page. The information on this page will be copied to the T4 Adjustment Options page of the Company Information window for each new company. See further information in Adjusting T4s regarding how to set the adjustments options to best suit your needs. Data Entry Pages Each of the data entry pages contains check boxes corresponding to the boxes on the data entry form. As you enter slip information, it may not be necessary for you to enter information into each box as some may be left blank or they may contain a default value. Place a check mark beside the name of each box where you want the cursor to stop and remove the check mark from beside any box where you do not require the cursor to stop. The following is a sample of the T4 Data Entry page: 12 Electronic Filing Page The Electronic Filing page contains information required by the system to submit information returns on diskette, CD, DVD, or via the internet. Enter the name and address of the company responsible for transmitting the electronic filing data and the names and phone numbers for accounting and technical contacts. If CRA has assigned a transmitter number for federal forms, it should be entered. See Electronic Filing Preparation for further information regarding electronic filing. You do not have to submit a test file to CRA before filing your returns electronically. We have already received approval for the electronic filing format on your behalf. 13 Options This feature allows you to personalize your display. Toolbar Icon Size Set to small, medium, large, or very large as desired. Colours Select a predefined colour scheme from the list. If you select CUSTOM, you must then select both a background colour and band colour by clicking on the appropriate boxes and selecting from the colours displayed. User Administration This feature is only available for the Plus version of T4 TimeSaver.NET to the administrator logged in with the user name "ADMIN". The administrator is able to change the password for any user, as well as deleting a user account altogether. Rates and Constants This feature is available in the Basic Version and, in the Plus version, to the administrator logged in with the user name "ADMIN". T4 TimeSaver.NET comes set with the rates and constants set by legislation for the current year. The administrator can change the rates and constants if required. Click the Defaults button to return the values to the 2007 legislated values. 14 File Locations This function displays a list of the folders used to store the files used by T4 TimeSaver. The administrator of the Plus version, logged in as "ADMIN", has the ability to allow users to set their own default data, PDF reports and/or XML filing folders, or require them to be located in a predetermined location. Removing the check mark in front of one of these options will cause that type of file location to be set only by the administrator (it would be grayed out to other users). The PDF File Options are system wide selections to be used for all users and all reports. The administrator of the Plus version, logged in as "ADMIN", has the ability to change these settings. Click the Restore Defaults button restore the folder locations to the default settings. Change Authorization Code This feature is available in the Basic version and, in the Plus version, to the administrator logged in with the user name "ADMIN". Use this feature to remove the current authorization code, allowing you to enter a new one. This would be used, for example, to upgrade from one version of T4 TimeSaver.NET to another. Click Yes to delete the existing authorization code and exit the program. The next time T4 TimeSaver is started it will be unregistered and a new authorization code will need to be entered. Click No to cancel the function and return to T4 TimeSaver.NET. Change Your Password This feature allows a user of the Plus version to change their own password. Type in the current password, the new password and then confirm the new password by typing it again. Check the Show Typing box to display the 15 password, leave it unchecked to display asterisks instead. Follow the instructions given for selecting a strong password. Press OK to implement the new password. Press Cancel to cancel the change and revert back to your current password. You will receive a confirming message. If the current password has been forgotten, the administrator, logged in as "ADMIN", will need to use the User Administration function of the Setup menu to change the password for the user. Edit Setup Files System Settings This feature allows the direct editing of some of the system settings. It should only be used under the supervision of a qualified technician. Click Yes to continue or No to cancel. Paths This feature allows the direct editing of some of the system settings. It should only be used under the supervision of a qualified technician. Click Yes to continue or No to cancel. User Settings This feature allows the direct editing of some of the system settings. It should only be used under the supervision of a qualified technician. Click Yes to continue or No to cancel. 16 Chapter 5 - Company Information Creating a Company You can enter as many companies as you would like into each database. To create a new company in the current database, select New Company from the Company menu. Enter the company name and press the OK button. If the company name already exists in the current database, you will be asked to confirm the new company name. Company information is entered in three sections: General, Adjustment Options, and Net Pay. You should enter as much of the requested company information as possible when you add a new company. General Enter the full name and address of the company. Other Information Business Number You must enter a valid business number if you wish to file slips and summaries for this company using electronic filing. Default Province of employment T4 TimeSaver.NET will automatically use the default value for the the Default Province of Employment that you entered on the New Company Defaults page in the Setup menu. Enter a different province of employment if applicable. Employer's EI rate The Employer's EI Rate is automatically set to 1.4000. You may make any changes required for this particular company by simply typing in the correct information. Company category code The company category field is a user defined field that allows you to group the companies into categories. Enter a different company category name for each group of companies. Web Access Code Enter the web access code supplied by CRA on the pre-printed summary supplied to the company 17 PDF Output Folder Set the desired location of PDF copies of printed slips and summaries for this company. You may use one location for all companies, or set up a different folder for each company. Click the Browse button to set the location. Select an existing folder or use the Make New Folder button to create a folder for this company Adjustment Options With T4 TimeSaver.NET you have the flexibility of customizing your method of adjusting CPP and EI discrepancies for individual companies. When you add a new company, T4 TimeSaver.NET will automatically insert the default values that you entered on the T4 Adjustment Defaults page in the Setup menu. You may make any changes required for this particular company by simply typing in the correct information. For further information see Adjusting T4s. Net Pay Use this screen to indicate how Net Pay should be displayed for the current company. Check the checkbox if you do not wish the net pay to display at all. If you do wish to display the net pay, decide between whether or not to include taxable benefits in the net pay calculation. Net pay will always include the standard deductions of CPP, (or QPP), EI, PPIP, income tax, pension plan contributions, charitable donations and union dues. 18 Selecting a Company To switch to another company, choose Select Company from the Company menu. A list of all the companies stored in the current database will appear. Highlight the desired company and press Select or double click on the company name. Click on the thumbtack to keep the company list open for ease of switching between companies. You can perform the same function by simply clicking on the current company name visible at the top of the form. A drop down list of the companies in the database will appear. Simply click on the company of choice. Editing Company Information You can edit the company information by selecting Edit Company Information from the Company menu. You can add any missing information or change any information entered previously in any or all of the three sections. See the section on Creating a Company for details on the various fields. Deleting a Company Delete the current company, and all slips and summary forms associated with the company, by selecting Delete Company from the Company menu. You will be given a warning and asked to confirm the deletion of the company by typing the word "DELETE". Unlock all Companies in Database Select Unlock all Companies in Database from the Company menu. Use this function when an error message is displayed stating that a particular company is locked by a user, when that user is not, in fact, accessing the company. This would occur if T4 TimeSaver.NET was not exited correctly. You will be asked to confirm the unlock. 19 Chapter 6 - Entering Slips Choose the type of slip you wish to enter by selecting it from the Forms menu. The following are some of the functions you can use: Add Slips This function is used to add a new slip of the type you are currently entering to the active company. Access this function by selecting Add Slip from the Edit menu, clicking on the Add Slip icon in the icon toolbar, or by pressing [Ctrl] + [A]. A blank data entry form will appear in which you may enter the information for an individual slip. After entering data in a box you may press either the Enter or Tab key and the cursor will move to the next box. The cursor only stops at the boxes that have been checked off on the corresponding Data Entry tab of the Setup menu. (Note: there are Data Entry tabs for the most commonly used form types – T4, T4A, and T5) You will be warned if the data you have entered is invalid. Delete Slips Select Delete Slip from the Edit menu, click on the Delete Slip icon in the icon toolbar, or press [Ctrl] + [D]. This function will delete the slip currently displayed on the screen. You will be asked to confirm the deletion. If you delete the only slip, the slip window will be closed. Sorting Slips During data entry or review of slip information you can modify the sequence of the slips by selecting the desired field from the dropdown list in the icon toolbar (located to the left of the slip number field). The fields available for sorting will vary by the type of slip. The slip currently being displayed will remain on the screen. Selecting Slips Choose Select slip from list from the Edit menu to display a list of all the recipients for the current company. Clicking on the Find Slip icon in the icon toolbar performs the same function. Select from the list by clicking on the desired recipient. The slip for the recipient selected will appear on the screen. The slips will be listed in the sort order selected in the dropdown list in the icon toolbar. Entering Data The data entry screen for each type of slip contains input fields that correspond to the boxes on the printed forms, plus some control fields required by T4 TimeSaver.NET. Descriptions of some of these boxes are listed below under the corresponding type of slip. See the guides provided by CRA for information about the regulations concerning the contents of any of the particular boxes. There are a number of features available to make data entry as quick and easy as possible. Many fields, for example the Province field, have white arrows to the right of the box. This indicates that there are a limited number of valid options for this field. Double click in the box or on the arrow to select from the valid options. 20 Overriding Calculated Fields Some fields on the slips and summaries contain calculated values. If it becomes necessary to edit a calculated field you may do so by pressing the F4 button or double clicking the icon to the right of the field. The background colour of the field will change to indicate the value is no longer the calculated value and you will be able to enter the desired value. To return to the calculated value, click the Recalculate button, press F4 again, or double click the icon to the right of the field again. You will be asked to confirm the return to the calculated value. T4 Input Window Employee Name The employee name should be entered with the surname in the first field, first name in the second field and middle initial in the third field. Province of Employment T4 TimeSaver will automatically insert into Box 10 the code for the province of employment entered in the General section of the Company Information. You may, of course, override it for a specific employee. S.I.N. Validation T4 TimeSaver will check the validity of the S.I.N. entered and will change the colour of the S.I.N. box to red if the S.I.N. is invalid. You can, however, ignore the warning and continue to enter other information. The formula used to test the value of the S.I.N. is found in the CRA Publication: Formulae for Federal and Provincial Deductions for Computer Users. CPP Pensionable Weeks If you have selected "Adjust based on number of pensionable weeks" for the CPP/QPP Adjustment Option on the Adjustment Options section of the Company Information, a value must be entered into the input field "CPP Pensionable Weeks". This field will default to 52 or 53 depending on the value entered under Maximum Number of Pensionable Weeks, but you may override this value for specific employees. 21 EI Insurable Earnings A value should only be entered in the EI Insurable earnings box when it is not equal to zero or to the gross pay amount (Box 14). If no amount in entered, Box 24 will be left blank on the printed slip as required by CRA. CPP/QPP and EI Exempt Boxes You may check one or both of the CPP/QPP and EI Exempt boxes as appropriate for the current employee. Do not check the CPP/QPP exempt box if you entered an amount in Box 16 or Box 26. Check CPP/QPP exempt only if the earnings were exempt for the entire period of employment. Do not check the EI Exempt box if you entered an amount in Box 18 or Box 24. Check EI exempt only if the earnings were exempt, or if they were not eligible for the entire reporting period of employment. Do Not Adjust CPP/QPP and EI Boxes Check one or both of these boxes to indicate that this particular slip should not be adjusted when the slips for this company are adjusted. This allows you to adjust some slips while leaving others as entered. Other Income Record other income in the boxes provided at the bottom of the window. The type code of the income should be indicated in the Box field with the corresponding Amounts directly beside. Press F2 or double click the box field to display a list of available codes. See your Tax Guide for a list and description of appropriate type codes. Status of Slip Select "O" for original, "A" for amended or "C" for cancelled. This will cause the slip to be labelled appropriately as required by CRA. It will also cause the slip to be included or excluded appropriately whenever the “Amended only” or “Originals only” options are chosen. Net Pay Calculation The employee's net pay is calculated and displayed on the screen as you enter data into each box of the T4 and may prove useful as an audit check. It will be calculated in one of the two following ways: Gross Pay - Standard Deductions - Other Deductions; or Gross Pay - Standard Deductions - Taxable Benefits - Other Deductions. The Gross Pay is the amount entered in Box 14. The Standard Deductions include the values entered in Boxes 16, 17, 18, 20, 22, 44, 46 and 55. Note that the Standard Deduction includes both provincial (Québec) and federal taxes. Taxable Benefits is the sum of the “Amounts” boxes which represent taxable benefits. Other deductions (if there are any) must be entered manually to arrive at the appropriate figure for Net Pay. You can switch between these two methods of calculating the Net Pay by clicking on the Net Pay button and then selecting the appropriate option. You can also check the "Don't display net pay" to remove this information from the display. 22 T4A Input Window Recipient Name The recipient name should be entered with the surname in the first field, first name in the second field and middle initial in the third field. S.I.N. Validation T4 TimeSaver will check the validity of the S.I.N. entered and will change the colour of the S.I.N. field to red if the S.I.N. is invalid. You can, however, ignore the warning and continue to enter other information. The formula used to test the value of the S.I.N. is found in the CRA Publication: Formulae for Federal and Provincial Deductions for Computer Users. Status of Slip Select "O" for original, "A" for amended or "C" for cancelled. This will cause the slip to be labelled appropriately as required by CRA. It will also cause the slip to be included or excluded appropriately whenever the “Amended only” or “Originals only” options are chosen. Footnotes Text footnotes may be entered in the fields provided. These will be printed on paper copies of the T4A. (Footnotes for use with electronic filing submissions may be accessed by clicking on the Electronic Filing link in the top right corner of the screen.) 23 T5 Input Window Recipient Name If the recipient is an individual or joint account, the name(s) should be entered with the surname in the first field, first name in the second field and middle initial in the third field. If the recipient is not a person, the entity name should be entered in the section marked Corporation, Trust, or Association. Recipient ID Number Validation If the recipient is an individual, enter the recipient’s Social Insurance Number (S.I.N.). For interest credited to a joint account, enter the S.I.N. of only one of the individuals. If the recipient is not an individual, enter the recipient’s business number, if available. The T4 TimeSaver will check the validity of the S.I.N. or Business Number entered and display a warning if it is invalid. You can, however, ignore the warning and continue to enter other information. The formula used to test the value of the S.I.N. or business number is found in the CRA Publication: Formulae for Federal and Provincial Deductions for Computer Users. Report Code This code helps CRA determine if this is the original T5 slip issued to the recipient, or if it amends the original. Enter O, if this is the original slip, A, if this is an amended slip (this slip changes the financial or identification information of a slip previously submitted), or C if this cancels a previously submitted slip. Recipient Type Enter one of the following valid codes to identify the type of recipient: 1, if the investment income was earned by an individual 2, if the investment income was earned by a joint account (two individuals). 3, if the investment income was earned by a corporation. 4, if the investment income was earned by an association, a trust (fiduciary-trustee, nominee, or estate), a club, a partnership, or other. 5, if the investment income was earned by a government, government enterprise, or international organization. Eligible and Other than Eligible Dividends Enter the amount of eligible dividends in box 24. Enter the amount of other than eligible dividends in box 10. The total dividends will be the sum of box 24 and box 10, but does not appear on the form. 24 Automatic Calculations For the eligible dividends, the taxable amount of dividends and the dividend tax credit are calculated and displayed automatically by the system as follows: Taxable amount of dividends = (actual dividends) * 1.45 Dividend tax credit = (taxable amount of dividends) * 18.9655% For dividends other than eligible dividends, the taxable amount of dividends and the dividend tax credit are calculated and displayed automatically by the system as follows: Taxable amount of dividends = (actual dividends) * 1.25 Dividend tax credit = (taxable amount of dividends) * 13.3333% This calculation is suppressed for corporate recipients (recipient type 3). Foreign Currency If you cannot report amounts in Canadian dollars, identify the foreign currency according to the ISO (International Organization for Standardization) 4217 Codes for the Representation of Currencies and Funds. Enter the appropriate three-letter alphabetical or three-digit numeric codes. If possible, use the alphabetical codes. For example: USD - United States, dollar JPY - Japan, yen SVC - El Salvador, colon FRF - France, franc HKD - Hong Kong, dollar ITL - Italy, lire DEM - Germany, mark DKK - Denmark, kröne GBP - United Kingdom, pound ESP - Spain, peseta Leave this area blank if you are reporting the amount in Canadian dollars. If you must report amounts in different currencies in respect of the same recipient, use a separate T5 slip for each currency. 25 Chapter 7 - Adjusting T4s Making Adjustments to T4s There are two methods of adjusting the T4s. The first method is to adjust only the T4 for the current employee by using the Adjust button on the T4 data entry form. The adjustments will be made based on the adjustment options selected for the current company. These adjustments are not reflected in the corresponding T4 summary, unless all of the slips are adjusted. The second method is to adjust all of the employees for the company at once. To do this, select Adjust/Unadjust T4 Slips from the Company menu. You can skip any individual slips that you may not want to adjust by checking the Do not adjust CPP-QPP and/or EI box(es). The adjustments will be made based on the adjustment options selected for the current company. In this case the adjustments are reflected in the corresponding T4 Summary. An adjustment report can be produced by selecting Adjust/Unadjust T4 Slips from the Company menu and clicking Adjust Slips + Report, or you can select Adjustments from the T4 submenu of the Reports menu. In either case an Adjustment Report window will open. See Printing Adjustment Reports for further details. Reversing Adjustments Reverse the adjustment on an individual adjusted T4 by clicking the Unadjust button on the T4 data entry form. The adjusted CPP, QPP, EI and tax values will be hidden. The adjustments on all of the slips for the company can be reversed by selecting Adjust/Unadjust T4 Slips from the Company menu and clicking the Undo adjustments button. Setting Adjustment Options The adjustment options for each company are stored with the company profile. Select Edit Company Information from the Company menu and then click the Adjustment Options page. You can make changes to any of the options and also enter the S.I.N. number of the employee to receive the transfer of over remittance of CPP/EI, if you choose. If you are entering data for more than one company, you may want to select the appropriate options on the T4 Adjustment Defaults page in the Setup menu. These global default options will then be used for each new company you setup. CPP/QPP Adjustment Options A - Adjust CPP/QPP if over maximum/under minimum If this option is selected, CPP/QPP will be adjusted to fall within the range: Upper Limit: the lesser of: · the CPP/QPP pensionable earnings x 4.95%; · and $1,989.90 Lower Limit: the lesser of: · (the CPP/QPP pensionable earnings - $3500) x 4.95%; · and $1,989.90 If the CPP/QPP deducted is greater than the Upper Limit, it will be adjusted down to the Upper Limit. If the CPP/QPP deducted is less than the Lower Limit, it will be adjusted up to the Lower Limit. If the CPP/QPP deducted falls within the range of the Upper and Lower Limits, no adjustments will be made to CPP/QPP. This option ignores any potential reduction resulting from the annual CPP/QPP basic exemption which must be prorated based on pensionable weeks as outlined below. This option is designed for situations where it is not desirable to enter the number of pensionable weeks on each T4 slip. 26 B - Adjust CPP/QPP based on number of pensionable weeks If this option is selected, CPP/QPP will be calculated as: (CPP/QPP pensionable earnings - prorated deduction) x 4.95% Where the prorated deduction is calculated as: (number of pensionable weeks / maximum number of pensionable weeks) x $3500 NOTE THAT ONLY ONE OF A OR B MAY BE SELECTED. C - Maximum number of pensionable weeks This number is the number of weeks in the employer's fiscal year and is used in the above calculation to prorate the CPP/QPP basic exemption. The default value is 52 weeks but can be changed to 53 weeks if required EI Adjustment Options D - Adjust EI premiums if over annual maximum If this option is selected, the EI will only be adjusted if it is greater than: · standard annual maximum of $40,000 x 1.8% or $ 720.00. NOTE THAT THIS OPTION CAN BE SELECTED ALONE OR WITH E OR F E - Adjust EI premiums based on Insurable Earnings If this option is selected, the EI will be calculated as: · EI insurable earnings x 1.8%. (If E.I. insurable earnings are not entered, gross pay will be used.) F - Adjust insurable earnings based on EI premiums This option assumes the entered amount for EI deducted is correct. When this option is selected, EI insurable earnings will be calculated as the minimum of: · EI deducted (box 18) / 1.8% ; · $40,000; and · Employment income (box 14). NOTE THAT ONLY ONE OF E OR F MAY BE SELECTED Transfer Over Remittance Transfer employer’s over remittance of CPP/QPP or EI to the following employee When adjustments reduce total deductions for the company, the employer’s portion of the over-remittance may be transferred to the tax of an owner or shareholder. If a S.I.N. is entered here, then any net overpayment of CPP/QPP and EI resulting from adjustments calculated by the program will be credited to the tax deducted for the T4 of this employee. This adjustment will be reflected in the adjusted tax on the Adjustment reports for the particular employee. Increase the gross pay with over remittance If an over remittance is created by the adjustments and you indicate that you want the over remittance to be transferred to one employee (i.e. an owner or shareholder), you may also increase the gross pay of that employee in order to keep the net pay at the same level. If this option is chosen and the transferee’s CPP/QPP is under the maximum deduction for the year, the CPP/QPP will NOT be adjusted again for this underpayment. 27 Other Options Adjust CPP/EI/QPIP differences greater than . If an amount is entered in this box, an adjustment to CPP/QPP, EI or QPIP must be greater than this threshold in order for the adjustment to be made. If the difference between the calculated amount and the entered amount for CPP/QPP, EI and QPIP is less than or equal to the threshold, no adjustments will be made and the entered amounts for CPP/QPP, EI, QPIP and tax will appear on the T4 slips. Do you want CPP, EI & QPIP to be adjusted to their calculated amounts even if there is insufficient tax to cover the difference? If this option is selected, it will adjust CPP/QPP, EI and QPIP to their calculated amounts although there may not be sufficient tax to make up the difference. Where there is insufficient tax to cover the net adjustment to CPP/QPP, EI and QPIP, this difference will be posted to the T4 Summary. The shortfall is comprised of the increase in the employer’s portion of CPP/QPP/EI/QPIP and the increase in the employee’s contribution which was not offset by tax. The employer will have to make up the difference when filing the Summary. It would then be up to the employer to collect the under-contributed employee’s portion from the employee. Enter the maximum amount by which tax may be reduced If item the above option was selected, you may enter the maximum amount by which tax may be reduced. This option prevents the tax from being decreased to zero. For example, if you only wanted tax to be decreased by a maximum of $100, enter $100 in this field. 28 Chapter 8 - Entering Summary Form Information T4 Summary Remittances Enter the amount of money already remitted to CRA. Amount Enclosed Enter the amount to be enclosed with the T4 Summary form. Adjustment Status The T4 Summary will reflect the adjusted values as long as all of the employees for the company have been adjusted. If, however, only some of the slips have been adjusted using the Adjust / Unadjust button on the T4 data entry window, the summary will reflect the unadjusted values for all of the employees. This information will appear in the box on the upper right corner of the T4 Summary data entry window. Recalculate Pressing this button recalculates the summary totals, returning overridden values to the calculated value. Person to contact about this return The default contact name and phone number entered on the New Company Defaults page of the User Settings submenu of Setup menu will appear in this area. If no default name and number were entered, these fields will be blank. In either case you can change the information at this time. Certification The default certification name and position entered on the New Company Defaults page of the User Settings submenu of Setup menu will appear in this area. If no default name was entered, these fields will be blank. In either case you can change the information at this time. 29 T4A Summary Remittances Enter the amount of money already remitted to CRA. Amount Enclosed Enter the amount to be enclosed with the T4A Summary form. Recalculate Pressing this button recalculates the summary totals, returning overridden values to the calculated value. Person to contact about this return The default contact name and phone number entered on the New Company Defaults page of the User Settings submenu of Setup menu will appear in this area. If no default name and number were entered, these fields will be blank. In either case you can change the information at this time. Certification The default certification name and position entered on the New Company Defaults page of the User Settings submenu of Setup menu will appear in this area. If no default name was entered, these fields will be blank. In either case you can change the information at this time. 30 T5 Summary T5 Summary Information Fill in the year, filer ID number, language choice, and indicate whether it is an amended or additional Summary. Also indicate if you have filed a T5 Summary before. T5 Slip Totals You must enter the unclaimed dividends and interest, and the tax on this unclaimed amount. Person to contact about this return T4 TimeSaver will automatically use the data entered on the New Company Defaults page of the User Settings submenu of Setup menu when the company was first created. You can, however, change the information if required. Certification T4 TimeSaver will automatically use the data entered on the New Company Defaults page of the User Settings submenu of Setup menu when the company was first created. You can, however, change the information if required. Recalculate Pressing this button recalculates the summary totals, returning overridden values to the calculated value. 31 Chapter 9 - Producing Reports Validating Data This report will be run automatically when you process returns for electronic filing, or it can be run at any time by selecting Validate Data Before Filing from the Reports menu. The CRA has strict filing requirements that must be met. The validation procedure will identify any missing or invalid data and allow you opportunity to correct the data before transmitting it. Select the company or companies and the type of return(s) to be validated. Select “Validation report only” to run the validation report on its own, or select a filing method to both validate and create the electronic filing submission at the same time. If the data fails the validation procedure, the filing will be aborted. See Electronic Filing Preparation for further information regarding the settings in this window. Click on Process. The Critical Error Report will be generated. This report will list the location of missing or invalid data that will cause the data submission to be rejected by the CRA or MRQ Click the Warnings button to view the missing or invalid data that may need to be corrected but will not cause rejection of the submission by CRA or MRQ. Either report can be printed by clicking the Print button. Refresh Data Use this button to incorporate any additions, deletions or changes made to the company list or changes made to individual slips since the Validating Data window was opened. Set Output Folder Allows the user to change the location of the XML submission files. See File Locations for further information. Go to Output Folder Pressing this button will open the folder that your XML submission files will be stored in. 32 Printing Slips Select the desired type of slip from the Reports menu. Then select the corresponding report option from this list of available reports. A dialog box will open, which will allow you to select which companies to print slips for, which recipients to print slips for, and which copies you wish to print. The individual slips can then be distributed to the employees or recipients and CRA. Note that the unadjusted values will print on each of the T4 slips unless all of the slips have been adjusted. You will be warned if some of the slips are adjusted and others are not. Companies Select one of the options listed: · All (to print the slips for all companies in the current database), · Current (to print the slips for only the current company), · Selected (to print the slips for the companies you select), or · Most recent (to print the slips for the company(ies) for which you most recently created any report). The companies that match the selection you have made will be listed in the box to the right. If you chose Selected, click on the box beside each company you wish to select to put a check mark in the box and to have the company name appear on the list to the right. Slips · Select one of the six options listed (Note the last two options are only available when only one company is selected): · All (to print all the slips for the selected companies), · Originals only (to print only the slips that have not been amended for the selected companies), · Amended only (to print only the amended slips for the selected companies), · Cancelled only (to print only the cancelled slips for the selected companies), · Selected (to print only the selected slips for the selected company), or · Most recent (to print the slips for the recipient(s) which you most recently created any report for). When only one company is selected, the slips that match the selection you have made will be listed in the box to the right. If you chose Selected, click on the box beside each name you wish to select to put a check mark in the box and to have the name appear on the list to the right. Copies Choose which copies of the slips you wish to print by checking one or more of the boxes. The options will change, depending on the Type of Form you have selected. 33 Options Group output by Choose to group the slips by copy number or by company. Sort slips by Choose the order in which you wish the slips to print from the given options. The options will change, depending on the type of slip to be printed. Print inactive (nil) slips also Check this box if you want slips to print for recipients who have no dollar values on the slip. PDF File Options Save PDF files Printing forms, either slips or summaries, always creates a PDF file. If Save PDF file is selected, the PDF file will be saved in the indicated file when the Print window is closed. If Save PDF file is not selected, the PDF will be deleted when the Print window is closed. This is a system wide setting, the setting selected will be used by all users and for all reports. For T4 TimeSaver Plus, only the administrator may change this selection. Save in client folders This option is only available when the Group output by option has been set to Company. Select this option if you wish to save PDFs in user-assigned client folders. The folder path is stored in the company record. If no folder path has been stored for a company included in the print job, or if the folder is not accessible (eg. it is a network folder and you are not connected to the network), you will be prompted for the folder location even if the Prompt for each client folder option is not selected. Create separate PDFs for each copy number/company Check this box to create a PDF file for each copy or company selected. Leave unchecked to create a single PDF file. The Create separate PDFs for each company will be selected automatically if Save in Client folders has been selected. Prompt for output folder Check this box to have the program prompt you for the location of the PDF files to be saved. If you are printing slips for a single company, the folder you choose will be saved and the next time you print the slips for the same company, you will be prompted with the same location. You will be prompted for the output folder regardless of whether a folder has been assigned on the company record. Quick Print Prints the selected slips to the default printer without previewing the PDF. The default printer is set using your Windows Control Panel. Preview/Print Creates the slips in PDF format and displays them in Adobe Reader or Adobe Acrobat. The PDF files will be automatically saved according to the PDF File options selected. Press the Print button from within the Adobe preview program to send the slips to the printer. Refresh Data Use this button to incorporate any additions, deletions or changes made to the company list or changes made to individual slips since the Print window was opened. Go to Output Folder Pressing this button will open the folder that your PDF files will be stored in. 34 Printing Summary Reports To print the Summary Form to be sent with the slips to CRA, select the appropriate type of summary from the list in the Reports menu, and then choose the report from the list of available reports. A dialog box will open which will allow you to select which Summary forms you wish to print and the number of copies you wish to print. Note that the T4 summary will reflect the unadjusted values from each slip unless all of the slips have been adjusted. You will be warned if some of the slips are adjusted while others are not. Companies Select one of the options listed: · All (to print the summary for all companies in the current database), · Current (to print the summary for only the current company), · Selected (to print the summary for the companies you select), or · Most recent (to print the summary for only the company(ies) for which you most recently created any report). The companies that match the selection you have made will be listed in the box to the right. If you chose Selected, click on the box beside each company you wish to select to put a check mark in the box and to have the company name appear on the list to the right. Slips Included in Totals Select one of the options listed: · All types (to include all slips in the totals), · Original only (to include only the original slips in the totals), · Amended only (to include only the amended slips in the totals), or · Cancelled only (to include only the cancelled slips in the totals). Options Group output by Choose to group the slips by copy number or by company. Print nil summaries also Check this option to print inactive (nil) forms. These are summaries that have all dollar values set to zero. These summaries will not print unless this option is checked. Print this date Check this box and enter the desired date to print the date on the summary automatically. 35 PDF File Options Save PDF files Printing forms, either slips or summaries, always creates a PDF file. If Save PDF file is selected, the PDF file will be saved in the indicated file when the Print window is closed. If Save PDF file is not selected, the PDF will be deleted when the Print window is closed. This is a system wide setting, the setting selected will be used by all users and for all reports. For T4 TimeSaver Plus, only the administrator may change this selection. Save in client folders This option is only available when the Group output by option has been set to Company. Select this option if you wish to save PDFs in user-assigned client folders. The folder path is stored in the company record. If no folder path has been stored for a company included in the print job, or if the folder is not accessible (eg. it is a network folder and you are not connected to the network), you will be prompted for the folder location even if the Prompt for each client folder option is not selected. Create separate PDFs for each copy number/company Check this box to create a PDF file for each copy or company selected. Leave unchecked to create a single PDF file. The Create separate PDFs for each company will be selected automatically if Save in Client folders has been selected. Prompt for output folder Check this box to have the program prompt you for the location of the PDF files to be saved. If you are printing slips for a single company, the folder you choose will be saved and the next time you print the slips for the same company, you will be prompted with the same location. You will be prompted for the output folder regardless of whether a folder has been assigned on the company record. Quick Print Prints the selected slips to the default printer without previewing the PDF. The default printer is set using your Windows Control Panel. Preview/Print Creates the slips in PDF format and displays them in Adobe Reader or Adobe Acrobat. The PDF files will be automatically saved according to the PDF File options selected. Press the Print button from within the Adobe preview program to send the slips to the printer. Refresh Data Use this button to incorporate any additions, deletions or changes made to the company list or changes made to individual slips since the Printing Summary Report window was opened. Go to Output Folder Pressing this button will open the folder that your PDF files will be stored in. 36 Printing Adjustment Reports A report showing all the adjustments made for each employee can be produced for the T4 slips. To generate this report, select T4 from the Reports menu. Then choose Adjustments from this list of available reports. A dialog box will open which will allow you to select the companies for which you wish to print T4 Adjustment Reports. Companies Select one of the options listed: · All (to print the adjustment report for all companies in the current database), · Current (to print the adjustment report for only the current company), · Selected (to print the adjustment report for the companies you select), or · Most recent (to print the adjustment report for only the company(ies) for which you most recently created any report). The companies that match the selection you have made will be listed in the box to the right. If you chose Selected, click on the box beside each company you wish to select to put a check mark in the box and to have the company name appear on the list to the right. Options Detail/Summary Select whether you want a detailed or summary Adjustment Report. Sort slips by Choose the order in which you wish the slips to print from the given options. Refresh Data Use this button to incorporate any additions, deletions or changes made to the company list or changes made to individual slips since the Printing Adjustment Report window was opened. Printing Edit List Reports A complete edit listing of all the slips can be produced for all types of slips. To generate this report, choose the type of slip from the Reports menu, and then select the corresponding Edit List from the list of available reports. A dialog box will open which will allow you to select the companies to print an Edit List Report for. Companies Select one of the options listed: · All (to print the edit list for all companies in the current database), · Current (to print the edit list for only the current company), · Selected (to print the edit list for the companies you select), or · Most recent (to print the edit list for only the company(ies) for which you most recently created any report). 37 The companies that match the selection you have made will be listed in the box to the right. If you chose Selected, click on the box beside each company you wish to select to put a check mark in the box and to have the company name appear on the list to the right. Fields Select one of the two options listed below: · All (to include all the fields available on the slip), or · Selected (to print only those fields which you select). If you chose Selected, click on the box beside each field you wish to include in the report. Options Sort slips by Choose the order in which you wish the slips to print from the given options. The options will change, depending on the type of slip to be printed. Layout Select either the Table or Memo style of layout Orientation Select whether you wish the report to print in the Portrait or Landscape orientation. Paper Size Select whether you wish the report to print on letter or legal sized paper. Margins Select one of the following margin options: Normal (Top and Bottom 1", Left and Right 1") Narrow (Top and Bottom .5", Left and Right .5") Moderate (Top and Bottom 1", Left and Right .75"), or Wide (Top and Bottom 1", Left and Right 2"). 38 Printing Company List A Company List is a listing of the companies in the current database with the number of active and inactive slips of each type. Select Company List from the Reports menu to generate this report. A dialog box will open which will allow you to select which companies to include and other options. Companies Select one of the options listed: · All (to print the company list for all companies in the current database), · Current (to print the company list for only the current company), · Selected (to print the company list for the companies you select), or · Most recent (to print the company list for only the company(ies) for which you most recently created any report). The companies that will be included in the report will be displayed in the box to the right. Fields Select one of the two options listed below: · All (to include all the fields available in the company record), or · Selected (to print only those fields which you select). If you chose Selected, click on the box beside each field you wish to include in the report. The Clear button will remove all check marks. Options Sort companies by Choose the order in which you wish the companies to print - by name or by business number Layout Select either the Table or Memo style of layout Orientation Select whether you wish the report to print in the Portrait or Landscape orientation. Paper Size Select whether you wish the report to print on letter or legal sized paper. Margins Select one of the following margin options: Normal (Top and Bottom 1", Left and Right 1") Moderate (Top and Bottom 1", Left and Right .75"), or Narrow (Top and Bottom .5", Left and Right .5") Wide (Top and Bottom 1", Left and Right 2"). 39 Chapter 10 - Electronic Filing Instructions for Federal Returns The following instructions are provided here for convenient reference. For complete details see the CRA website. 1. Electronic filing submissions may be made by internet or on a media such as a diskette, CD, or DVD. A complete electronic filing submission contains the transmitter identification as well as the slip and summary information for each return. No paper forms are required with the submission. 2. Anyone making an electronic filing submission must have a transmitter number. If you do not have a transmitter number, contact the CRA at 1-800-665-5164 to be assigned one. 3. Returns for employers filing over 500 returns are required by CRA to be filed electronically. It may be sent either via the internet or on a CD or DVD, however internet submissions may not exceed 5Mb. Submissions that are in excess of 5Mb are required to be submitted on CD or DVD only. The CRA encourages all employers who use computerized methods to generate returns to submit them electronically. 4. An electronic filing submission may contain only one diskette, CD or DVD. It may contain more than one type of return and it may contain returns for more than one company. A diskette will hold around 2,000 returns, a CD approximately 80,000 returns, and a DVD will hold more, depending on the software used copy the data. If you have multiple submissions each submission must be submitted in a separate envelope. Multiple envelopes may be taped together for simplified mailing. Submissions should be sent to: Electronic Media Processing Unit Ottawa Technology Centre Canada Revenue Agency 875 Heron Road Ottawa ON K1A 1A2 Telephone: 1-800-665-5164 5. Do not send CRA paper copies of any returns that have been filed electronically. 6. If corrections need to be made to a submission that has already been sent to CRA, create an electronic filing submission of the amended and/or cancelled returns and submit it to the Electronic Media Processing Unit. Do not send any original returns in the same submission as amended returns. Electronic Filing Preparation NOTE: During setup you should complete the Electronic Filing page of the User Setup Options submenu of the Setup menu if you plan to submit returns electronically. Much of the information required by T4 TimeSaver for electronic file processing is contained there. To access electronic filing, choose the type of slip required from the Reports menu and then Electronic Filing. The electronic filing dialog box will open and give you a number of options: Companies Chose one of the four options listed below: · All (to select all the companies in the current database), · Current (to select only the current company), · Selected (to select only the companies you indicate), or · Most recent (to select the company(ies) for which you most recently created any report). If you choose Selected, mark each company you wish to include in the electronic filing submission by clicking on the checkbox beside the company name. The list of selected companies will be displayed to the right. Note: With T4 TimeSaver Basic, you may only select one company at a time to file electronically. Multiple company submissions are allowed with T4 TimeSaver Plus. 40 Return types One type of return will be automatically marked when you open the Electronic Filing dialog box. You can include other types of returns by clicking on the checkbox beside the return type name. Filing Options Destination Before creating an electronic filing submission T4 TimeSaver will run a validating process to determine if there is any missing or invalid data. If such data is located it will be displayed in one of two reports. Missing or invalid data that would result in a refusal of your submission by CRA are listed in a Critical Error report. These critical errors must be corrected before submitting the returns in any format. Missing or invalid data that may need to be corrected, but would not result in a refusal of the submission by CRA are displayed in a Data Validation Warnings report. Warnings can be ignored and the submission would be accepted by CRA. The validation procedure is implemented whenever an electronic filing submission is processed, but it can also be run independently by selecting the Validation report only option. Choose the media by which the return(s) will be submitted to the CRA. Your options are: Internet, CD, DVD or Diskette. · Internet: a file will be created on your hard drive. See the section on Internet Filing to CRA for details on submission. · CD or DVD: a file will be created on your hard drive which you may then copy to the appropriate drive using your own CD or DVD writing software. NOTE: You must have access to a CD or DVD writer to use this option. See the section on CD or DVD Filing for details on submission. · Diskette: select the letter of the disk drive (either A or B) you wish to send the output to. Be sure to place a blank formatted diskette in the drive you selected. The submission will automatically be saved to the diskette in the drive indicated. See the section on Diskette Filing for details on submission. Note: with T4 TimeSaver Basic you may only select the internet as a destination for electronic filing. With T4 TimeSaver Plus you may electronically file by diskette, CD, DVD or the internet. Slip Status Each submission to the CRA must contain either original returns or amended/cancelled returns. Select "Original" to include all original returns of the type(s) selected from the selected company(ies) in your submission. Select "Amended and/or Cancelled" to include all amended or cancelled returns of the type(s) selected from the selected company(ies) in your submission. Validation Options Select whether you wish to see detailed error messages supplied by the XML schema. Transmitter Setup Pressing this button will allow you access to the information stored on the Electronic Filing page of the User Settings submenu of the Setup menu. You can add missing information or edit existing data. Clicking on the OK button will return you to the electronic filing dialog box. Process Pressing this command button will begin the processing of the electronic filing. A validation report will be generated and displayed. You may print the validation report for your convenience. Critical Errors must be corrected before you can submit an electronic filing submission. Validation warnings should be corrected, but can be ignored by pressing the Next button to continue processing. Depending on the destination selected for your electronic filing submission, you will be given further information. See the section below on the specific types of electronic filing submissions for more details. In each case you will be given the opportunity to print a Company List which you can keep for your own records as a list of companies included in the electronic filing submission. There is no need to submit a transmittal report or company list with the federal returns. 41 CD or DVD Filing When the CD or DVD option is selected as the destination for the Electronic Filing submission you will be prompted to enter the Submission Sequence Number. This is a number from 1 to 999 that will identify the submissions you send to CRA. You should enter "1" if it is your first submission, "2" if it's your second, etc. The number you enter will be included in the filename so CRA will know that it is a unique submission. Enter the appropriate number as requested and click the OK button. If you enter a duplicate number you will be warned that the filename already exists and given the opportunity to keep the sequence number you have entered and overwrite the existing file (if you did not submit the original and are redoing the submission) or to change the sequence number (if the sequence number was entered incorrectly). You will then be given the path and filename of the file to be sent to CRA. Make careful note of this information. View XML File in Browser Click this button to see the file that will be sent to CRA. Print Company List This company list can be used to track which companies have been filed on which submission. Keep this for your own records, there is no need to send a copy to CRA with your submission. Creating the submission CD or DVD Using your own software, burn the indicated file onto a CD or DVD. Label the CD or DVD with your name and telephone number so that the CRA can contact you if you need to re-file your submission. Provide complete external labelling showing the transmitter's name and telephone number, the transmitter number and your submission file name. Filing Courier or mail the CD or DVD to the following address: Electronic Media Processing Unit Ottawa Technology Centre Canada Revenue Agency 875 Heron Road Ottawa ON K1A 1A2 Diskette Filing Creating the submission diskette T4 TimeSaver will automatically copy the electronic filing submission to the floppy drive that you indicate. Label the diskette with your name and telephone number so that the CRA can contact you if you need to re-file your submission. Provide complete external labelling showing the transmitter's name and telephone number, the transmitter number and your submission file name. Filing Courier or mail the diskette to the following address: Electronic Media Processing Unit Ottawa Technology Centre Canada Revenue Agency 875 Heron Road Ottawa ON K1A 1A2 Internet Filing to CRA T4 TimeSaver is able to utilize CRA’s URL for internet filing of the T4, T4A and the T5. When the internet filing option is selected as the destination for the Electronic Filing submission an Internet Filing dialog box will appear once the Process button is selected. You will be warned if the file size exceeds the maximum of 5Mb allowed by CRA for internet filing. 42 Make note of the information given, and click the Go to Internet Filing Page button to continue. The following web page will be opened: http://www.cra-arc.gc.ca/eservices/iref/other/ift/ready-e.html Click the Enter Internet File Transfer (XML) Secure Web Site, which will open a page entitled: “Disclaimer - T4 Internet File Transfer (XML).” Read and agree to the CRA terms and conditions disclaimer, then enter the Account Number (Business Number) and Web Access Code for the company for which you are filing an internet return. If you are submitting returns for multiple companies, you can enter your own Business Number and Web Access Code. Note: in 2006 CRA could only receive submissions associated with a Business Number with an “RP” extension. This should be expanded to business numbers with other extensions for the 2007 filing season. (If you have not received your Web Access Code by January 9th contact the CRA support staff at 1-866-322-7849 to have one issued to you.) Once this information has been entered and validated you will be prompted to upload a file containing the company data in XML format to the CRA website. T4 TimeSaver will save all XML files in the following format: COMPANY_NAME_XXX.XML where “COMPANY_NAME” is the name of the company for which the file has been created with all space characters replace by an underscore character; “XXX’ is a sequential number applied by T4 TimeSaver to ensure that older files are not overwritten, and “XML” is the default file type designator required by CRA. If the submission is for multiple companies, "COMPANY_NAME" will be replaced my "MULTIPLE_COMPANIES". T4 TimeSaver Plus is able to submit returns for multiple companies over the internet in a single file which can be no larger than 5Mb in size (3,500 returns). You must use your own Business Number and Web Access Code to access the CRA website as you are acting as an agent for multiple companies. T4 TimeSaver Basic is limited to submitting returns for single companies over the internet. As above, the file can be no larger than 5Mb in size. 43 Chapter 11 - Appendices Data Backup Routine backup procedures are essential to protect against data loss or corruption in any computerized system. Do not backup your data onto existing backup disks! If you should have a power failure while doing the backup, you would lose your previous backup as well. Backup Data Files Copy the .t07N database(s) to a CD, DVD, separate hard drive or other data storage device, using Windows Explorer or other file copying software. The current database name appears in the very top bar of the T4 TimeSaver window. Be sure to close the database before attempting to back it up. Restoring Data Files Copy the stored backup of the database back to the working directory using Windows Explorer. 44 Technical Notes Data Storage T4 TimeSaver stores the data you enter in MS Access database files having the extension ".t07N". The company information is stored within the database in a table called "Company", one record per company. There is also a table within the database for each type of slip and Summary form. Data is stored in these tables, one record per employee, and connected to the company information by a company number assigned by the system. The file T4W07.INI is stored in the system settings folder and, among other things, stores the authorization number. There will be additional file(s) containing various user and machine related information stored in the user settings directory. If you have the single user version of T4 TimeSaver the file will be named SINGLE.INI. If you have the network version of the program, there will be a separate file for each user and the files will be named user.INI, where user is the user name entered when starting T4 TimeSaver. 45 Province/Sate Codes The following abbreviations apply to the Canadian provinces: NL - Newfoundland LB - Labrador PE - Prince Edward Island NS - Nova Scotia NB - New Brunswick QC - Québec ON - Ontario MB - Manitoba SK - Saskatchewan AB - Alberta BC - British Columbia NT - Northwest Territories NU - Nunavut YT - Yukon Territories The following abbreviations apply to the United States: AL - Alabama AK - Alaska AR - Arizona AR - Arkansas CA - California CO - Colorado CT - Connecticut DE - Delaware DC - District of Columbia FL - Florida GA - Georgia HI - Hawaii ID - Idaho IL - Illinois IN - Indiana IA - Iowa KS - Kansas KY - Kentucky LA - Louisiana ME - Maine MD - Maryland MA - Massachusetts MI - Michigan MN - Minnesota MS - Mississipi MO - Missouri MT - Montana NE - Nebraska NH - New Hampshire NJ - New Jersey NM - New Mexico NY - New York NV - Nevada NC - North Carolina ND - North Dakota OH - Ohio OK - Oklahoma OR - Oregon PA - Pennsylvania RI - Rhode Island SC - South Carolina SD - South Dakota TN - Tennessee TX - Texas UT - Utah VT - Vermont VA - Virginia WA - Washington WV - West Virginia WI - Wisconsin WY - Wyoming Use the code 'ZZ' for instances where none of the above apply. 46 Country Codes ARG - Argentina AUS - Australia AUT - Austria BHS - Bahamas, The BHR - Bahrain BGD - Bangladesh BRB - Barbados BEL - Belgium BMU - Bermuda BRA - Brazil VGB - British Virgin Islands CMR - Cameroon CAN - Canada CYM - Cayman Islands CHL - Chile CHN - China, People's Republic of COL - Columbia SUN - Commonwealth of Independent States CIV - Ivory Coast CYP - Cyprus DNK - Denmark DOM - Dominican Republic EGY - Egypt FIN - Finland FRA - France DEU - Germany, Federal Republic of GRC - Greece GRD - Grenada GUY - Guyana HKG - Hong Kong ISL - Iceland IND - India IDN - Indonesia IRL - Ireland ISR - Israel ITA - Italy JAM - Jamaica JPN - Japan KEN - Kenya KOR - Korea, Republic of (South) LBN - Lebanon BLZ - Leeward & Windward Islands & Belize LBR - Liberia LIE - Liechtenstein LUX - Luxembourg MYS - Malaysia MLT - Malta MEX - Mexico MAR - Morocco NLD - Netherlands ANT - Netherlands Antilles NZL - New Zealand NGA - Nigeria NOR - Norway PAK - Pakistan PAN - Panama PNG - Papua New Guinea PHL - Philippines POL - Poland PRT - Portugal PRI - Puerto Rico ROM - Romania SAU - Saudi Arabia SEN - Senegal SYC - Seychelles SLE - Sierra Leone SGP - Singapore ZAF - South Africa ESP - Spain LKA - Sri Lanka SWE - Sweden CHE - Switzerland TWN - Taiwan (Republic of China) THA - Thailand TTO - Trinidad and Tobago TUN - Tunisia TUR - Turkey ARE - United Arab Emirates GBR - United Kingdom USA - United States of America URY - Uruguay VEN - Venezuela VIR - Virgin Islands (US) YUG - Yugoslavia ZMB – Zambia OMC - All other countries