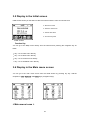
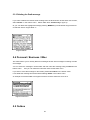
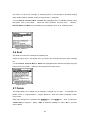
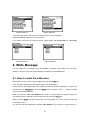
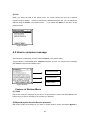
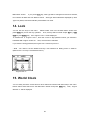
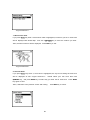
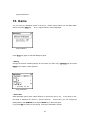
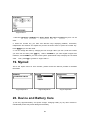
1
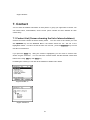
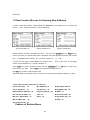
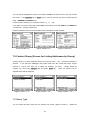
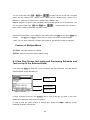
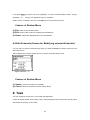
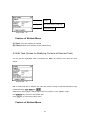
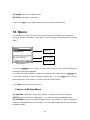
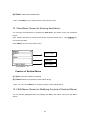
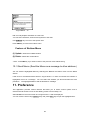
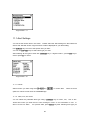
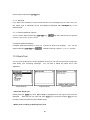
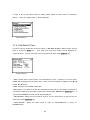
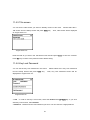
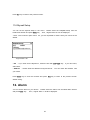
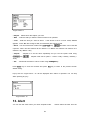
ReFlex 2 Way Personal Communicator
H200 User’s Manual
1. SAFETY INFORMATION----------------------------------------------------------------------------------------5
2. BEFORE YOU START-------------------------------------------------------------------------------------------6
2.1 WHAT'S IN THE BOX----------------------------------------------------------------------------------------6
2.2 HOW TO CHARGE BATTERY ------------------------------------------------------------------------------ 7
2.3 USING THE HOLSTER -------------------------------------------------------------------------------------8
3. ABOUT YOUR DEVICE-----------------------------------------------------------------------------------------93.1 DESCRIPTION OF YOUR DEVICE----------------------------------------------------------------------9
3.2 STATUS ICONS IN THE MAIN MENU SCREEN ---------------------------------------------------12
3.3 ICONS FOR MESSAGE LIST ---------------------------------------------------------------------------13
3.4 KEY DESCRIPTION ---------------------------------------------------------------------------------------14
3.5 DISPLAY IN THE INITIAL SCREEN -------------------------------------------------------------------16
3.6 DISPLAY IN THE MAIN MENU SCREEN ------------------------------------------------------------16
3.7 LED INDICATOR --------------------------------------------------------------------------------------------17
4. GETTING STARTED--------------------------------------------------------------------------------------------17
4.1 HOW TO SWITCH DEVICE ON AND OFF------------------------------------------------------------17
4.2 HOW TO RESET DEVICE --------------------------------------------------------------------------------18
4.3 HOW TO TURN ON BACKLIGHT-----------------------------------------------------------------------18
4.4 HOW TO LOCK KEYBOARD ----------------------------------------------------------------------------18
5. READ MESSAGE------------------------------------------------------------------------------------------------18
5.1 INBOX ---------------------------------------------------------------------------------------------------------19
5.2 INFO------------------------------------------------------------------------------------------------------------23
5.3 DRAFT---------------------------------------------------------------------------------------------------------24
5.4 PERSONAL / BUSINESS / MISC-----------------------------------------------------------------------25
5.5 OUTBOX------------------------------------------------------------------------------------------------------26
5.6 SENT-----------------------------------------------------------------------------------------------------------26
5.7 DELETE-------------------------------------------------------------------------------------------------------26
6. WRITE MESSAGE----------------------------------------------------------------------------------------------27
6.1 HOW TO SELECT THE ADDRESS -------------------------------------------------------------------27
6.2 HOW TO COMPOSE MESSAGE ----------------------------------------------------------------------29
7. CONTACT---------------------------------------------------------------------------------------------------------31
2
7.1 CONTACT LIST --------------------------------------------------------------------------------------------31
7.2 NEW CONTACT -------------------------------------------------------------------------------------------33
7.3 CONTACT VIEW -------------------------------------------------------------------------------------------34
7.4 EDIT CONTACT ------------------------------------------------------------------------------------------35
7.5 CONTACT GROUP ----------------------------------------------------------------------------------------35
7.6 NAME TYPE -------------------------------------------------------------------------------------------------36
8. SCHEDULER------------------------------------------------------------------------------------------------------36
8.1 CALENDAR ---------------------------------------------------------------------------------------------------36
8.2 NEW SCHEDULE -------------------------------------------------------------------------------------------37
8.3 VIEW DAY ----------------------------------------------------------------------------------------------------38
8.4 EDIT SCHEDULE -------------------------------------------------------------------------------------------39
9. TASK----------------------------------------------------------------------------------------------------------------40
9. 1 NEW TASK --------------------------------------------------------------------------------------------------41
9.2 EDIT TASK ---------------------------------------------------------------------------------------------------42
10. MEMO-------------------------------------------------------------------------------------------------------------42
10.1 NEW MEMO ------------------------------------------------------------------------------------------------43
10.2 EDIT MEMO ------------------------------------------------------------------------------------------------44
10.3 SEND MEMO -----------------------------------------------------------------------------------------------45
11. PREFERENCE (SETTING UP YOUR DEVICE)--------------------------------------------------------45
11.1 ALERT SETTINGS---------------------------------------------------------------------------------------------45
11.2 QUICK TEXT---------------------------------------------------------------------------------------------------47
11.3 PRIVATE TIME-------------------------------------------------------------------------------------------------48
11.4 SETUP----------------------------------------------------------------------------------------------------------48
11.4.1 SET DATE & TIME--------------------------------------------------------------------------------------48
11.4.2 DISPLAY SETTINGS-------------------------------------------------------------------------------------49
11.4.3 OWNER INFORMATION---------------------------------------------------------------------------------50
11.4.4 SIGNATURE-------------------------------------------------------------------------------------------51
11.4.5 TITLE SCREEN------------------------------------------------------------------------------------------52
11.4.6 KEY LOCK PASSWORD--------------------------------------------------------------------------------52
11.5 ABOUT------------------------------------------------------------------------------------------------------- -53
11.6 MYMAIL SETUP-----------------------------------------------------------------------------------------------54
12. ALARM---------------------------------------------------------------------------------------------------------- -54
3
13. ALERT ------------------------------------------------------------------------------------------------------------55
14. LOCK---------------------------------------------------------------------------------------------------------------55
15. WORLD CLOCK------------------------------------------------------------------------------------------------56
16. GAME--------------------------------------------------------------------------------------------------------------57
17. TX SET------------------------------------------------------------------------------------------------------------59
18. CALCULATOR -------------------------------------------------------------------------------------------------59
19. MYMAIL-----------------------------------------------------------------------------------------------------------60
20. DEVICE AND BATTERY CARE----------------------------------------------------------------------------60
21. TROUBLE SHOOTING---------------------------------------------------------------------------------------61
22. FCC COMPLIANCE STATEMENT------------------------------------------------------------------------62
4
1. Safety Information
For the efficient and safe operation of your device, read this information before using ReFlex
Two Way Messenger (H200).
Pager Transmitter Safety
The FAA has regulations concerning the use of electric devices aboard aircraft.
When boarding an aircraft, turn your device off to avoid potential interference with aircraft radio
communication or navigation equipment.
In blasting zones or wherever it is forbidden to use it, set the TX mode to OFF. This prevents
potential transmission interference with sensitive equipment or explosives devices.
Using your device in a vehicle
Safety comes first, and is the ultimate responsibility of the driver. Please:
i) Give full attention to driving – driving safely is your first responsibility.
ii) If you receive message or want to write message during you drive vehicle, pull off the road
and park your vehicle before reading or writing a message in driving conditions so require.
For Vehicle Equipped with an Air Bag
An air bag inflates with great force. Do not place objects, including both installed or portable
wireless equipment, in the area over the air bag or in the air bag development area. If in-vehicle
wireless equipment is improperly installed and the air bag inflates, serious injury could result.
Explosive Atmospheres and materials
Turn your device off when in any area with potentially explosive atmospheres and obey all signs
and instructions. Sparks in such areas could cause an explosion or fire resulting in bodily injury
or even death.
Areas with a potentially explosive atmosphere are often, but not always,
clearly marked.
They include fueling areas such as gasoline stations ; below deck on boats,
fuel or chemical transfer or storage vehicles using contains liquefied petroleum gas (such as
propane or butane) ; areas where the air contains chemicals or particles, such as ; grain, dust,
or metal powders; and any other area where you would normally be advised to turn off your
vehicle’s engine.
5
2. Before You Start
2-1.
What’s in the Box?
When you unpack the box, it contains H200 with following accessories as shown below.
Program CD
& Manual
H200
Travel Charger
Holster
Data Cable
(O p tional Items)
6
2.2 How to charge battery
Battery is not charged when you first purchase the device. You must charge the battery full
before using the device as below instruction.
H200 Pager
HRD-100
Pager
Travel Charger
Electric outlet
- Plug your charger into a main socket first.
- Insert the DC plug of the charger into the bottom of device. “ “ on DC plug must face up.
- Charging is complete when the LED on device is colored green.
When the charging is complete, please unplug your device from its charger, grasp and
-
pull the plug, not the power cord.
l
Battery Charging Indicator
Charging in process
Charging completed
LED in Device
Red light
Green light
Charger Indicator
Red light
Green light
7
* NOTES :
1. Time to complete Battery charging is approximately two to three hours.
2. You can send and receive message while charging your device.
3.
Battery Life time in one time full charging is about 7 days in normal Network Service
Condition.
4. Standby time of battery may be reduced if device is in the No Network Service area.
5.
If the battery is drained out completely and H200 power off automatically, you need to
charge the battery for 5 ~ 10 min. to power on again.
2.3 Using the Holster
1.
Please attach the Holster to your Belt.
2.
Insert the H200 into the Holster with Power button at the bottom and LCD display
facing inward as shown in below Figure.
8
3. About Your Device
Your new H200 ReFlex Two Way Messenger provides you with the proven reliability that has
made us one of the leading Wireless Messenger providers.
You can get clear and
uninterrupted messenger communicator with H200.
3.1 Description of H200
LED
Indicator
Display
Keys
<Front>
< Front Panel >
9
RF Test hole for AS only
(Do not uncover Rubber cap)
Label
Speaker Hole
< Back Side >
10
Power Button
Hold Button
< Left Side >
Rubber cap for serial port and Reset switch
< Bottom Side >
11
3.2
Status Icons in the Main menu display
You can see the status of the device with the Top line icons in Main menu.
Followings shows
you the description of each status Icons.
Icon
Description
Appears device is on 1 WAY mode.
You can receive message only
Appears device is on 2 WAY mode.
You can send and receive message
Appears device is on No Service mode.
You are out of service range
Shows the level of battery status. The more bars you see, the more power
battery has left.
Appears when keyboard is locked by Hold key in left side of device.
Appears when device is locked by password.
You must input password to use device.
Appears when vibrator is selected in Etiquette menu.
Appears when mute is selected in Etiquette menu.
Appears when Caps / Lock mode is turned on.
Appears when Caps mode is turned on.
Appears when message sending is in process.
Appears when new message has been received or unread message
remains in Inbox.
Appears when Alt lock mode is turned on.
Appears when Alt mode is turned on.
12
X
Appears when message sending is failed.
Appears when message sending is succeeded.
R
C
Appears when device is roaming status.
Appears when device is campus status.
Appears when new news / Info message has been arrived.
3.3
Icons for message List
Shows unread message.
Shows read message.
Shows duplicated read message.
Shows duplicated unread message.
X
Shows sent failed message.
Shows the message on sending process.
13
3.4
Key Description
ESCAPE
DELETE
CAPS
TAP
LOCK
ALT
ENTER
SYMBOL
SPACE
NAVIGATION
Control Buttons
Control Button
Description
Press to return to previous screen without accepting any
Escape
changes.
Also, press to access the initial screen from the
main menu screen
Caps
Lock
Press to capitalize for next typed letters.
Caps Lock -- Press button two times to activate the Caps lock
mode(uppercase letter). To exit, press again.
Space: Press to insert a space in text.
Symbol
Symbol: Press ALT key and then Space key to activates
/Space
Symbols during editing. Fourteen (14) symbols are available
at the bottom of the screen.
Enter
Press to select the highlighted option or to save settings.
14
Press left, right, up, down buttons to move within a field (Text
Navigation
field, list field, button field).
Activates the alt-mode control keys (color-coded amber). The
Alt
next key pressed activates an Alt-mode function (text for
colored amber).
Press Alt key two times to activate Alt lock mode (all numbers
and special characters). To exit, press again.
Press to move the bottom menu field from the text field.
Tab
To exit, press ESC or Up keys
Delete one character to the left of the cursor or delete the
Delete
message from the message list and/or message view screen.
Space / Symbol Display
Symbols can be used in all edit screens.
Symbol box appears when you press Space key in ALT mode as shown in below sample image.
You can select the character you want with Left/Right key and press Enter key to add the
corresponding characters.
How to use Keys
- Press Tab key to move to bottom menu and press Esc or Up key to exit.
- Use Navigation key to move a cursor. (Up, Down, Left, Right)
- Use Up or Down key to move in the upper box of list screen.
And use Left or Right key to view long text in the lower preview box.
-
Always use Enter key to select.
15
3.5 Display in the Initial screen
Initial Screen shows you the status of device as well as owner’s name and current Time.
ß Status Icon Area
ß Owner’s name Area
ß Time & Date Area
ß Function Key Area
<Initial Screen>
Function Key
You can go to the Major menu directly from the Initial Screen pressing the navigation key as
below.
Key : Go to Inbox menu directly
Key : Go to Write menu directly
Key : Go to Contact menu directly
Key : Go to Scheduler menu directly
3.6 Display in the Main menu screen
You can go to the main menu screen from the Initial Screen by pressing any key with the
exception of Left, Right, Up and Down keys (navigation keys).
<Main Menu Screen 1>
<Main Menu Screen2>
< Main menu icons >
16
Icon
Description
Read Message
Write Message
Contact
Scheduler
Task
Memo
Preference
Alarm
Etiquette
Lock
World Clock
Game
Tx Set
Calculator
Mymail (option)
3.7 LED INDICATOR
Your device LED radiates 3 Color light
l
When new message arrived – Yellow Green Color
l
During device charging with charger – Red Color
l
When device complete charging – Green Color
4. Getting Started
4.1 How to switch device on and off
Press Power Button on the left side over 3 sec to switch device on.
Press Power Button on the right side over 4 sec to switch device off.
4.2 How to reset device
In case of abnormal operation with H200, you may reset the device with the reset switch on the
17
bottom side. You can uncover rubber cap on the bottom of device and find reset switch which
is colored blue. And then, push reset switch to the right and return to the left again by using
pointed tool.
* Note : When you reset your device, the volatilized data in Inbox and Sentbox which does not
saved in Flash memory shall be removed.
Your device move the volatilized data to Flash
memory at 02:00 am everyday and when the battery level becomes below 20%.
Serial Port
Reset Switch
4.3 How to turn on backlight
The LCD Screen and keyboard keys can be backlit by pressing Power button.
Press Power button for 2 sec to turn on backlight and the back light shall be turned off
automatically when the device has been idle for some time.
4.4 How to lock keyboard
If you want to lock all keyboard, pull Hold Switch down which is located in left side.
To exit, pull Hold Switch up.
5. Read Message
You can read and respond to incoming messages & Info, forward and delete messages. It also
allows you to manage inbox, Info, Draft, Personal / Business / Misc group, Outbox, Sent and
Delete menu.
Figure Read-1 appears when you select Read in the main menu screen.
Read menu has the following 9 sub menus.
18
< Figure Read-1 >
You can move to the message folder you want using Navigation keys and press Enter key to
select the relevant folder.
Also, you can move to the folder you want directly pressing the
initial alphabet such as “D” for “Draft”
5-0
When a new message arrives
When you receive a new message, Popup box appears as shown in Figure Recv-1 screen.
If you want to read a message at that moment, select [Yes] to go directly to Inbox Message
view screen. If not, select [No] to go back to the previous screen.
<Figure Recv -1>
* Note : If you receive a new message during writing a message or setting the device, please
select [No] not to lose the contents you made.
5.1 Inbox
All received messages are saved in Inbox folder.
Upper box shows the message list with an Icon indicating its current status and lower box
shows the contents of message.
Up/Down direction key is used to move the message you want to read in the list.
19
And Left/Right direction key is used to read the contents in the Message Preview box if the
message is long.
Press Enter key to open the message while a list is selected for viewing in Figure Inbox-2.
Message List
Message Preview
Bottom Menu
<Figure Inbox-1: Inbox MSGS>
* Note : You can easily delete the highlighted message in Inbox MSGS list screen pressing the
Delete key.
<Figure Inbox-2: Message View>
After reading the message view, you can select the function of bottom menu in figure Inbox-1
and / or figure Inbox-2 by pressing the Tab key.
You can move to the bottom menu you want using the Left and Right Key and press Enter key
to execute the function.
Feature of Bottom Menu
(1) Reply
When you select the Reply in bottom menu, the Figure Reply-1 will be opened.
20
<Figure Reply-1>
If you want to write a new message in <Figure Reply-1>, select the Custom Message menu to
display the screen in <Figure Reply-2>. If you want to send multi-choice or canned message,
select the message you want with Up/Down key and press Enter key. Then, the selected
message will be sent immediately.
<Figure Reply-2>
After selection of custom message, write the relevant message in <Figure Reply-2> and select
Send function in the bottom menu to send the message. If you select Q-text in the bottom
menu, the list of text you stored in Pref. menu will be opened as shown in the screen of Figure
Qtext-1.
<Figure Qtext-1>
Select the content you want to enter among the lists with Up/Down key and press Enter key.
Then the text you selected will be added to your message.
* Note : Refer to Q text menu function in Preference.
(2) Forward
You can forward the received message to other address as below.
-
Select the Forward in the bottom menu during the <Figure Wirte-1> is opened.
-
Select the address in your address book or add the One Time Address / New address
21
by pressing Enter Key.
-
Select the “Compose ” in the bottom menu using Tab key and press Enter Key.
-
Add any text to Message if you want.
-
Select the Send in the bottom menu using Tab Key and press Enter key.
* Note : You can refer to the Write menu for more detail information.
(3) Move
If you select Move in the bottom menu, the screen of <Figure Move-1> appears and you can
move the message you select to the other folder.
After selecting the folder you want among three folders (Personal, Business, Misc),
press
Enter key to move the message to the selected folder. Then, “Moving Message” will be
displayed during the processing and return to the Inbox list screen.
<Figure Move-1>
4) Delete
Select Delete in bottom menu to delete the current highlighted list and/or opened contents.
Then, popup box "Delete entry ?" as shown in the <Figure Delete-1> will be appeared.
Select "Yes" if you want to delete, and "No" if you don't want to delete using Up/ Down key and
Enter key.
Press Esc key to go back to previous screen.
22
<Figure Delete-1>
5.2 Info
Info folder saves all Info messages from your service provider and display information data if
you are subscribed to news/information services.
Select Info icon to display <Figure Info-1>. Regular information comes in this folder.
You can save up to 16 kinds of information. If you select Info you want to view, <Figure Info-2>
screen appears.
Select the message you want in <Figure Info-2> screen and press Enter key to display <Figure
Info-3> screen.
You can Forward, Move or Delete the information data using the bottom menu of <Figure Info2> and <Figure Info-3>.
This icon shows that there is
read news.
This icon shows that there is
unread news.
<Figure Info-1>
News List
News Preview
Bottom Menu
<Figure Info-2>
23
<Figure Info-3>
5.3 Draft
You can record and temporarily save the message.
If you select save function in the bottom menu during writing a message, the message is saved
in this folder.
And if there is a new arrived message during your composition, the composed
message shall be saved to Draft Folder automatically.
Initial screen is as shown in the
screen of <Figure Draft-1>.
<Figure Draft-1>
5.3.1 Editing the Draft message
If there is any draft message you want to modify, press Enter key when the list is highlighted.
Then, the screen of Draft View Screen <Figure Draft-2> will be opened so you can modify.
And you can save the modified draft message in Draft folder again selecting the Save in the
bottom menu.
5.3.2 Sending the Draft message
If you want to send the message from the Draft Folder, select the “Send” in the bottom menu
from the Draft Screen and/or Draft View Screen. Then, screen moves to the screen of <Figure
Write-1>.
And follow the Writing Process to send a message.
24
5.3.3 Deleting the Draft message
If you want to delete the relevant draft message from the Draft Screen and/or Draft View Screen,
select “Delete” in the bottom menu. Select "Yes" when "Delete entry?" pops up.
Or you can delete the highlighted message pressing Delete key in Draft Screen<Figure Draft-2>
or Draft List Screen <Figure Draft-1>.
<Figure Draft-2>
5.4 Personal / Business / Misc
This folder allows you to classify Received messages and/or Sent messages according to kinds
of messages.
You can select the message in these folder and then send the message using Forward in the
bottom menu.
And you can follow the instruction same as the Write menu.
If you want to move the message to other folder, please select Move in the bottom menu.
If can delete the message from these folder selecting Delete in the bottom menu.
An example of Personal folder is as Figure Personal-1 and the others are same as it.
<Figure Personal-1>
5.5 Outbox
25
This folder is to show the message on sending process or the message to be failed sending.
When Outbox folder is selected, screen of Figure Outbox-1 will appear.
You can Resend, Forward, Move or Delete the highlighted and / or selected message using
the bottom menu in this folder.
Follow the same procedure as Inbox menu.
However,
Resend, Delete and Move are not possible for the message which is on sending process.
<Figure Outbox-1>
5.6 Sent
This folder is to show the messages successfully sent.
Screen of Figure Sent-1 will appear when you select one message among the Sent message
list.
You can Resend, Forward, Move or Delete the highlighted and/or selected message using the
bottom menu in this folder.
Follow the same procedure as Inbox menu.
<Figure Sent-1>
5.7 Delete
This folder allows you to delete the all message in storage box one time.
It will display the
Delete screen of <Figure`Delete-1>, <Figure Delete–2> when this folder is selected in Main
menu screen.
When each storage box is selected with Up/Down key, press Enter key, Then, a popup box
"Delete Entry ?” appears.
Select “YES” to delete all messages or select “No” if you don’t
want to delete.
26
<Figure Delete-1>
<Figure Delete-2>
If you select Info groups, the kinds of Info will be shown in <Figure Delete-3>.
Select and delete the kinds of Info you want here..
If you want to clear all Info. Folders one time, please select “All of Info Data” or “All of Info
Read Data” .
<Figure Delete-3>
<Figure Delete-4>
6. Write Message
You can compose a message using the QWERTY keyboard, insert Quick text and other
features in this menu and can send messages to wireless and email addresses.
6.1 How to select the addresses
Select Write in menu screen using navigation key and press Enter key.
Then, the Select Address Screen <Figure Write-1> will be displayed.
If there exists in the address book, the recipient you want to send the message to, move to the
relevant item with Up/Down key and press Enter key for selection. Then “
“ shall be showed
in front of the selected address.
When you select the One Time Address, the screen of <Figure Write-2> appears so that you
can directly enter the address to be used one time only and press Enter key.
When you press Enter key after entering the one time address, the cursor moves to Compose
in the bottom menu.
You can also add new address by selecting New Address in the screen of <Figure Write-1>.
27
You can follow the Contact procedure after selecting New Address. After entering address,
select the Save function in bottom menu. Then, it will return to the screen of <Figure Write-1>
and checkmark appears in the new user data.
* Note : For quick searching the address of recipient you want, type in the alphabet of the
name.
Then, cursor will move to the relevant recipient directly. For example, if you want to
find recipient "David Kim" as shown in Figure find-1, type “david kim” regardless of small or
capital letter. Then, the cursor will move to the relevant address directly.
Contact List
Find Contact
Bottom Menu
<Figure find-1>
<Figure Write-1>
<Figure Write-2>
Feature of Bottom Menu
(1) Compose
If all addresses are selected with “
message.
highlighted.
“ mark, select Compose in the bottom menu to compose a
Please press Tab key to move bottom menu and Enter key when Compose is
Then, the screen of <Figure Write-4> appears.
(2) Exit
Return to the previous screen.
28
(3) List
When you select the List in the bottom menu, the screen shows the list of the selected
recipient.<Figure Write-3>. If there is unnecessary address among the list, you can delete the
address using the Delete in the bottom menu.
If you select the Return, it will return to the
previous screen.
<Figure Write-3>
6.2 How to compose message
After selection of addresses you want, select Compose in the bottom menu.
<Figure Write-4> will be displayed in Compose selection and you can compose your message
with QWERTY keyboard and bottom menu.
Selected Contact
Compose Area
Bottom Menu
<Figure Write-4>
Feature of Bottom Menu
(1) Send
Edit and/or modify the message as you want in <Figure Write-4> screen and select Send in the
bottom menu to send a message to the recipient you selected.
(2) Mysend (option item for Service provider)
Edit and/or modify the message as you want in <Figure Write-4> screen and select Mysend in
29
the bottom menu to send a message to the recipient you selected through the Mymail address
which was set in MyMail Server. (Detailed information for Mysend, please contact the Service
provider.)
(3) Save
Select the Save function in the bottom menu in <Figure Write-4> screen to save the message to
the Draft folder and then it will return to Main Menu Screen.
(4) Edit To
Edit To function enables to go back to the screen of Select Address for adding the address.
After adding the necessary address, you can return to the previous screen selecting Compose
again in the bottom menu.
* Notes : If you want to add other address during composing the message, you can press ESC
key or move the cursor To field and press any key.
Then, it will return to the screen of Select
Address.
(5) Q-text
Q-text function enables you to add Q-text which was set in Preference.
text you want with Up/Down key and press Enter key.
added to your message.
You can select the Q-
Then, the highlighted text will be
Please refer to the Preference for detailed information.
(6) Replies
If you select Replies in the bottom menu of <Figure Write-4> screen, you can add the Option of
Replies you want.
After adding the wanted replies up to 16 items (max.), save them using
the bottom menu with Tap key and Enter key.
Then, the Replies will be sent together with
message you compose. Refer to the <Figure Wirte-5>.
30
<Figure Write-5>
7. Contact
You can store the address information of each person or group you might want to contact. You
can include name, email address, work & home phone number and even address for each
contact entry.
7.1 Contact List (Screen showing the list of stored address)
Contact List shows contact list which already saved.
You can move to the contact you want
with Up/Down key and the Preview box in the bottom shows the Tel / Fax No. of the
highlighted contact. In order to check the each Tel / Fax No., press the Right/Left key to move
next item in Preview box.
If you press the Enter key during the contact is highlighted, you can move to Contact Veiw
Screen <Figure Contact-3>. You can check the contents and/or edit the selected contact with
bottom menu using TAB key and Enter Key.
For Editing the contact you can refer to the Features of bottom menu below.
<Figure Contact-1>
<Figure Contact-2>
31
Feature of Bottom Menu
(1) Add New
In order to add new contact, you can select the Add New in the bottom menu with Tab key and
Enter key.
It moves to Contact New screen <Figure Contact-2.1> and you can enter new contact
information.
To move to the next page, you can select the Next in the bottom menu using Tab
key and press Enter Key.
To save the new Contact, select the Save in bottom menu using
Tab key and press Enter key.
Then, Pop-up box will be displayed for selecting the Category.
Please select the Category you want using Up/ Down Key and press Enter key.
Then, the
New Contact will be saved to the Category you selected.
(2) Edit
In order to edit and modify the highlighted contact, please select the Edit in the bottom menu
using Tab key and press Enter key.
You can edit and modify the highlighted contact with this
bottom menu. It will move to Contact Edit screen <Figure Contact-4.1> for the selected contact.
After editing, you can save the contents using the Save in bottom menu.
ESC key can be
used to return the previous screen without saving.
(3) Categ’s
This bottom menu shows you the Contacts List for each category.
When the Pop-up box asks
the Category you want, please select the category using Up/Down key and press Enter Key.
Then, it shows the contact list for selected category.
(4) Delete
You can delete the highlighted contact with this bottom menu.
If you select Delete in the
bottom menu, the Pop-up box asks you if you want to delete entry.
want to Delete and select “No” if you don’t want.
Select the “Yes” if you
And press Enter Key.
(5) Show as
You can select the Name type for Contact List in this bottom menu (First name first or Last
32
name first).
7.2 New Contact (Screen for Entering New Address)
In order to add New Contact, please select the Add New in the bottom menu in Contact List
Screen.
Then, <Figure Contact 2-1> will be displayed.
<Figure Contact-2.1>
<Figure Contact-2.2>
Please add the Contact information you want.
<Figure Contact-2.3>
You can use Up/Down key or Enter Key to
move to the item you want and enter the information using the Alphabet character and number
Key.
For telephone/Fax number, you can enter number, #, (, ), x, - only.
To move the next page, select Next in the bottom menu.
Then, it will move to next page
screen <Figure Contact-2.2>, <Figure Contact-2.3>.
Press Tab key to move the bottom menu and use Left/Right key or Tab key to move to the
bottom menu you want.
Press Enter key to execute the selected menu.
Use Esc Key to return to the previous menu.
Select the Save in the bottom menu to save the new contact to the suitable category you want.
* Note : Max available character for each line :
First (First Name) : 12
M Tel(Mobile) :15
W Adr (Work add): 98
Last (Last Name) : 13
Fax (Fax No.) : 15
W City(Work city) : 20
Wirelss (Wiress Address) : 15
Cmpny (company) : 15
W St/Zip : 11
Hm mail (Home Mail) : 15
Title : 23
H adr (Home add) : 98
Wk mail (Work Mail) : 15
Notes : 15
H City (Home city) : 20
Wk Tel (Work Tel) : 15
H St/Zip : 12
Hm Tel (Home Tel) : 15
Feature of Bottom Menu
33
(1) Next : Move to the next screen where you can enter address book
(2) Prev. : Move to the previous screen where you can enter address book
(3) Save : Save the currently entered contents in the address book
(4) Cancel : Ignore the currently entered contents and go back to the previous screen.
(Address book list)
* Note : ESC key can be used to go back to the previous screen without saving.
7.3 Contact View (Screen for Viewing Entered Address)
If you select the highlighted contact pressing Enter key in contact list <Figure Contact-1>,
Contact view shows full contents of each contact person <Figure Contact-3> .
You can move
to next screen for the selected contact with Up/ Down key to scroll the remaining contents in the
box.
If following list exists in the address, small triangle (
/
) will be displayed in the right-
upper part of Box. Use Left/Right key to move to the following list. Press Tab Key to move to
the bottom menu.
<Figure Contact-3>
Feature of Bottom Menu
(1) Edit : Move to the Contact Edit screen <Figure Contact-4.1> where you can edit the
existing address
(2) Snd MSG : Move to Select Address screen <Figure Write-1> to add the address.
7.4 Edit Contact (Screen for Editing Entered Address)
34
You can edit the highlighted contact if you select the Edit in the bottom menu from the Contact
List Screen. Use Up/Down key or Enter Key to move to the item you want to edit and enter
using Alphabet and number keys.
In case of phone number, you can enter number, #, (, ), x, - only.
If you want to move the next page, select Next in the bottom menu with Tab key and Enter key
<Contact-4.2>, <Figure Contact-4.3>
Features of Bottom menu is same as bottom menu description of New Contact.
<Figure Contact-4.1>
<Figure Contact-4.2>
<Figure Contact-4.3>
7.5 Contact Group (Screen for Listing Addresses by Group)
Contact group is to show classified contact list by group name – ALL / Personal / Business /
General.
If you select the Categ’s in the bottom menu from the contact list screen <Figure
Contact–1>, Pop-up box asks you to select the Category you want.
category you want using Up/Down key and press Enter key.
Please select the
Then, the Contact List for
selected Group will be displayed.
<Figure Contact – 5.1>
<Figure Contact – 5.2>
<Figure Contact – 5.3>
7.6 Name Type
You can select the Name type from the Contact List Screen <Figure Contact-1>. Select the
35
Show As in the bottom menu from the Contact List Screen.
displayed <Figure Contact-6>.
Then Name Type Screen will be
Move the cursor to the item you want as shown in Figure
Contact -6, and press Enter key to select and press Enter key again to save.
contact list shall be sorted as per the Name Type you select.
Then, the
You may press Esc key to
cancel.
<Figure Contact -6>
8. Scheduler
You can manage & record your schedule, view calendar and alarm function for each saved
schedule event.
8.1 Calendar (Screen for showing whether there exist Schedule
and Task)
If you select the Schedule from the main menu screen, the current Calendar shall be displayed.
Use Up/Down, Left/Right key to select the specific date.
If there exist schedule or task previously entered, the date is underlined.
If you press Enter key after moving the box to the underlined date, it moves to View Day screen
<Figure Scheduler – 3>.
Press Tab Key to move to the bottom menu.
<Figure Scheduler – 1>
36
Feature of Bottom Menu
(1) SchEvt : Move to the screen <Figure Scheduler – 2> and you can enter new schedule.
(2) PrevMo : Move to the previous month.
(3) NextMo : Move to the next month.
(4) Exit : Exit from the Schedule and return to Main menu screen.
8.2 New Schedule (Screen for Entering New Schedule)
If you select SchEvt in the bottom menu to input new schedule event, <Figure Scheduler 2>
screen will be displayed.
* Note : You also can press Enter key when the cursor is on the date you want to input the new
schedule event.
Event entry area
Start / End date & time
<Figure Scheduler – 2>
Alert set area
Repeat set area
<Figure Scheduler – 3>
Event : Input Schedule title on event entry area.
Start / End : Enter the start date & time and end date & time.
If it is 12 hour mode, AM/PM appears. Enter a or A to change to AM, and enter p or P to change
to PM.
Alert : Alert feature enables you to set the time when alarm need to inform you the event.
37
You can set the alert using Left / Right key
and alert time can be set with 12 options
(None / On time / Before 5 min. / Before 10 min. / Before 20 min. / Before 30 min. / Before 1 hr. /
Before 2 hr. / Before 4 hr. / Before 12 hr. / Before 1 day / Before 7 day )
Repeat : Repeat is to set the event repeatedly during the time period you set in Start/End. You
can set repeat mode using Left and Right key (
).
Repeat mode has 6 options –
Never / Daily / Weekly / Bi-Weekly / Monthly / Yearly.
After enter all information, move to Save in the bottom menu with Tab key and press Enter key
to save.
Use Esc Key or Exit in bottom menu in order to cancel the contents modified.
* Note : You can enter characters, numbers and symbols in Text field and number in date field.
Feature of Bottom Menu
(1) Save : Save the contents you entered.
(2) Exit : Move to the previous screen without saving.
8.3 View Day (Screen for Listing and Previewing Schedule and
Task set up at the Selected Date)
If you press the Enter key when the cursor is located in the date underlined, View Day Screen
shall be opened.<Figure Scheduler-4>.
Event list
Event Preview
Bottom Menu
<Figure Scheduler – 4>
If cursor is located in the list, use Up/Down key to move to the item you want. In this case,
details will be displayed in the lower Preview Box.
In order to read the whole contents in Preview Box, please use Right / Left key for the
remaining contents in Preview Box .
38
If you press Enter key when one list is highlighted, it moves to Edit Schedule Screen <Figure
Scheduler – 4>.
And you can update the event, if necessary.
While a cursor is located in the List, enter Tab Key to move to the lower menu.
Feature of Bottom Menu
(1) Exit : Move to the previous screen.
(2) Edit : Move to the screen for modifying the selected item.
(3) Delete : Delete the selected Event from the Scheduler.
8.4 Edit Schedule (Screen for Modifying selected Schedule)
You can edit or modify the selected Event when you enter the Edit in the bottom menu from the
View Day Screen.
After modifying the contents, please save it or cancel it using the bottom menu.
<Figure Scheduler – 5>
Feature of Bottom Menu
(1) Update : Save the contents you modified.
(2) Cancel : Move to the previous screen without saving.
9. Task
You can manage & record your To do list with this application.
If there is already stored Task, Figure Task-1 will be displayed with Preview Box including Due
date, Status and priority of each Task.
39
Task list
Task Preview
Bottom Menu
<Figure Task – 1>
You can use Up/Down Key to move to the task list you want and the Preview Box will show the
details for the Task highlighted.
In front of each Task, the status indication is located such as
for open status and
for closed status as shown in Figure Task-1.
If you want the whole contents of the Task in the Preview Box, please use the Left/ Right key to
check the remaining / previous contents in Preview Box.
Or, press Enter key to move the
Task Veiw Screen <Figure Task-3> and to check the overall contents.
Press Tab key to move to the bottom menu.
Feature of Bottom Menu
(1) Add New : Move to the screen <Figure Task – 2> where you can enter new Task.
(2) Edit : Move to the screen <Figure Task – 3> in order to modify the highlighted task
(3) Status : Change status of task highlighted (from Open to Close or Close to Open).
(2) Delete : Delete the selected task.
9.1 New Task (Screen for Entering New Task)
You can input the New Task by selecting the Add New in the bottom menu from the Task
Screen.
Input Task title on subject area and then set the Due date, Status, Priority of task using the Left
/ Right Key
. And then you can add some description if necessary for the Task.
Status has 2 options (Open / Close) and Priority has 3 options ( Low / Medium / High).
Use Up/Down Key to move to the specific item.
Press Tab Key to move to the bottom menu.
40
Subject
Due date / Status / Priority set
Task Description
<Figure Task – 2>
Feature of Bottom Menu
(1) Save : Save the contents you entered.
(2) Cancel : Move to the previous screen without saving.
9.2 Edit Task (Screen for Modifying Contents of Selected Task)
You can edit the highlighted Task by selecting the Edit in the bottom menu from the Task
Screen.
<Figure Task – 3>
Edit or modify Task title on Subject area, Due date, Status, Priority of task and Description using
Keyboard and the Left / Right Key
.
Status has 2 options (Open / Close) and Priority has 3 options (Low / Medium / High).
Use Up/Down Key to move to the specific item.
Press Tab Key to move to the bottom menu.
Feature of Bottom Menu
41
(1) Update : Save the modified contents.
(2) Delete : Delete the current Task.
* Note : Press Esc key if you want to return to the previous menu without saving.
10. Memo
You can record your memo and also send your saved memo as message to other addresses.
If there is already stored Memo, Figure Memo-1 will be displayed with Preview Box including
Notes.
Memo List
Menu Preview
Bottom Menu
<Figure Memo – 1>
You can use Up/ Down Key to move to the memo list you want and the Preview Box will show
the details for the Memo highlighted.
If you want the whole contents of the Memo in the Preview Box, please use the Left/Right key
to check the remaining / previous contents in Preview Box.
Or, press Enter key to move the
Memo Veiw Screen <Figure Memo –3> and to check the overall contents.
Press Tab key to move to the bottom menu.
Feature of Bottom Menu
(1) Add New : Move to the screen <Figure Memo – 2> where you can enter new Memo.
(2) Edit : Move to the screen <Figure Memo – 3> in order to modify the highlighted Memo.
(3) Snd Memo : Move to the Address Select screen <Figure Write-1> in order to transmit the
contents of highlighted memo as a message. You can select the address you want and follow
the write procedure.
42
(4) Delete : Delete the selected Memo.
* Note : Press Esc key if you want to return to the previous screen.
10.1 New Memo (Screen for Entering New Memo)
You can input the New Memo by selecting the Add New in the bottom menu from the Memo
Screen.
Input Subject and Notes in each area and save it using the bottom menu.
Use Up/Down key
to move the Text field.
Press Tab Key to move to the bottom menu.
Memo Subject
Notes Area
Bottom Menu
<Figure Memo – 2>
Feature of Bottom Menu
(1) Save : Save the contents you entered .
(2) Cancel : Move to the previous screen without saving.
* Note : You can use the Esc key to move the previous screen without saving.
10. 2 Edit Memo (Screen for Modifying Contents of Selected Memo)
You can edit the highlighted Memo by selecting the Edit in the bottom menu from the Memo
Screen.
43
<Figure Memo – 3>
Edit or modify Subject and Notes on event area.
You can enter characters, numbers and symbols in Text field.
Use Up/Down Key to move to the specific item.
Press Tab Key to move to the bottom menu.
Feature of Bottom Menu
(1) Update : Save the modified contents.
(2) Delete : Delete the current Memo.
* Note : Press Esc key if you want to return to the previous menu without saving.
10. 3 Send Memo (Send the Memo as a message to other address )
You can send the highlighted Memo by selecting the Send in the bottom menu from the Memo
Screen.
It will move to the Address Select Screen <Figure Write-1> in order to transmit the contents of
highlighted memo as a message. You can select the address you want and follow the write
procedure.
The highlighted Memo shall be attached to message.
11. Preference
This application provides various features that allow you to select various options and to
execute several functions such as Alert Setting, Quick Text and Setup, etc.
Select Prefs from the menu screen and <Figure Prefs-1> shall be displayed.
You can move the items using Up/Down Key and press Enter key to open the highlighted item.
44
<Figure Prefs – 1>
11.1 Alert Settings
You can set the various Alert in this menu.
Please select the Alert Setting from the Preference
Screen and Alert Set Screen <Figure Prefs-2> shall be displayed for your alert setting.
Use Up/Down Key to move to the specific item you want.
You can use Left/Right Key to select Alert type you want.
After selecting all the types of Alert with Left/Right key in <Figure Prefs-2>, press Enter key to
save or press Esc to cancel.
<Figure Prefs – 2>
11.1.1. Volume
Select Volume you want using the Left/Right key
in volume field.
There are three
options for volume control such as Low/Middle/High.
11.1. 2. Inbox, Info, Sch & Alm
You can select the preferable alert type using Left/Right key for Inbox, Info,
Sch & Alm.
These Alert notice you when there is new message in inbox or new information in Info. or
when it is time for Alarm.
For preview Alert, press Space key after selecting Alert type you
45
want in Figure Prefs-2 with Left/Right key.
11.1. 3. Reminder
If you want to be reminded in case there still remains some message which you don’t read, you
can select Type of Reminder among One Beep/Two Beep/Off with Left/Right key in the
Reminder field.
11.1.4. R Interval (Reminder Interval)
You can set the alert interval using Left/ Right key
and alert interval has four options
such as 1 min / 2 min / 5 min / 10 min.
5. R Repeat (Reminder Repeat)
R Repeat (Reminder Repeat) is to set no. of times for Alert to be repeated.
repeat mode using Left/Right key
.
You can set
Repeat mode has 4 options – 1 / 2 / 5 / 10 times.
11.2 Quick Text
You can save the Quick Text in this application so that you can put the text which is frequently
used during your composing messages.
You can add or delete the Quick text in this
application.
<Figure Prefs-3>
<Figure Prefs-4>
<Figure Prefs-5>
* Add a New Quick Text
Please press the Enter key when [New Text] is highlighted then the Figure Prefs-4 will be
displayed.
Enter the text you want and press Enter key to save the contents. Esc key can
be used to return the previous screen without saving.
* Modify and/ or Editing an Existing Quick Text
46
Please select the Quick Text you want to modify using the Up/Down Key.
Text which you want to modify is highlighted, please press Enter key.
will be opened for your editing.
When the Quick
Then, Figure Prefs-5
Please modify and/or edit the Quick Text and move to the
bottom menu with Tab key to execute Update and/or Delete.
Feature of Bottom Menu
(1) Update : Save the modified contents.
(2) Delete : Delete the current Quick Text.
(3) Cancel : Return to the previous screen without saving.
11.3 Private Time
If you want to turn off the Alert during a specific period of time everyday (for Example, during
the mid night), select Private Time in Preference Screen <Figure Prefs -1>. Then, <Figure
Prefs-6> will be opened for your setting the Private Time.
<Figure Prefs-6>
Please enter the time you want in Start/End field.
It will display AM/PM if Time is 12 hour
mode. When a cursor is located in AM/PM, press A or a key for AM, and press P or p key for
PM. Select ON/OFF in Set field with Left/Right key. Press Enter key to save the private time
you set. Mute icon will appear in main menu screen when it becomes the private time you set.
Press Esc Key to return to the previous screen without saving.
11.4 Setup
47
In order to set up the various items for H200, please select the Setup menu in Preference
Screen.
Then, the <Figure Prefs-7> will be displayed.
<Figure Prefs-7>
11.4.1 Set Date & Time
In order to set the current time of Device, select 1. Set Date & Time in Setup Screen <Figure
Prefs -7> and press Enter key.
Then, Date and Time setup Screen will be displayed as
<Figure Prefs-8>. You can move the cursor to the items you want using Up/Down Key.
<Figure Prefs-8>
* Time : Please set the current time in Time field using No. keys. If H200 is in 12 hours mode,
AM/PM will be displayed at the end of Time. When a cursor is placed on AM/PM, press A or a
for AM, P or p for PM.
* Date : Enter the Current Date in Date field.
* Sync mins : If you want to set the time information transferred from the station as the time of
your device, select Sync mins field in Figure prefs-8 and select Enable with Right/Left key. If
you select the Disable, the time you set will be displayed.
* Time Format : Select the Time format to 12hr for 12-hour clock format, or 24hr for 24-hour
clock format using Right/Left key.
* Date Format : Select the Date format to m/d/y for Month/Date/Year or d/m/y for
Date/Month/Year.
48
Press Enter key to save the contents you set and check the current date & time in the standby
screen.
11.4.2 Display Settings
You can set the Display condition in this menu.
Setup Screen and press Enter key.
Please select the 2. Display Settings from the
Then, Display Settings Screen will be displayed as
<Figure Prefs-9>.
<Figure Prefs-9>
*Contrast : It is used to adjust LCD Contrast. Adjust contrast with Left/Right key as shown in
Figure Prefs-9.
*Font : Select the size of font you want with Left/Right Key. There are two options for Font
such as Large and Small.
* Popup Box to confirm : Pop-up Box can be displayed as option.
There are four kinds of
Popup Box such as Delete, Esc, New Msg. and Accept. Select On for Popup box to be
displayed and Off not to be displayed.
Delete : Popup box to confirm to delete when the Delete menu is selected or Del Key is
pressed.
Esc : Popup box to confirm the returning to the previous screen without saving.
New Msg : Popup box when a new message is arrived.
Accept : Popup box to save the contents with pressing Enter key.
Press Enter key to save the contents and press Esc key to return to the previous screen
without saving.
11.4.3 Owner Information
You can set the Owner information in this menu.
49
Please select the 3. Owner Information from
the Setup Screen and press Enter key.
Then, Owner Information Screen will be displayed as
<Figure Prefs-10>.
<Figure Prefs-10>
Please enter your name, Telephone no and E-mail in each field and press Enter key to save the
contents.
11.4.4 Signature
You can set the automatic Signature in this menu.
Setup Screen and press Enter key.
Please select the 4. Signature from the
Then, Signature Screen will be displayed as <Figure
Prefs-11>.
<Figure Prefs-11>
* Display
:
In order to attach your signature automatically in the end of each messages you
send, select the Enable with Left/Right key. If you don’t want attach your signature, select
Disable.
* Signature : Please enter the signature you want to attach the messages.
Press Enter key to save the contents and press Esc key to return to the previous screen
without saving.
50
11.4.5 Title screen
You can set the Title Screen you want for Standby screen in this menu.
Title screen from the Setup Screen and press Enter key.
Please select the 5.
Then, Title Screen will be displayed
as <Figure Prefs-12>.
<Figure Prefs-12>
Enter the Title as you want in the Title Screen Text field and press Enter to save the contents.
Press Esc key to return to the previous screen without saving.
11.4.6 Key Lock Password
You can set the Key Lock Password in this menu.
from the Setup Screen and press Enter key.
Please select the 6. Key Lock Password
Then, Key Lock Password Screen will be
displayed as <Figure Prefs-13>.
<Figure Prefs-13>
* Lock
:
In order to set Key Lock function, select the Enable with Left/Right key. If you don’t
want Key Lock function, select Disable.
* Password : Please enter the new Password you want. You can enter the 4 digit password.
51
* Confirm Password : Please enter the 4 digit new Password you want again for confirmation.
* Old Password : Please enter the old Password. If you don’t’ enter the previous password
correctly, Invalid Password warning will be pop-up as Figure Prefs-14.
The Initial Password to be set from the factory is “0000”.
<Figure Prefs-14>
Press Enter key to save the contents and press Esc key to return to the previous screen
without saving.
11.5 About
You can check the current status of device in this menu.
Select the About from the
Preference Screen and Figure Prefs-15 shall be displayed for your checking.
<Figure Prefs -15>
* Message Memory
:
The total size of Message memory is 192 KB and you can check the
current Free message memory in this field.
If the memory is full and you don’t delete the
messages from Inbox and Sentbox, the device will automatically delete the oldest messages
marked with Read in Inbox and Sentbox.
And still Memory is full, the device will delete the
oldest Unread message in Inbox and Sentbox.
If you do not want a message to be deleted
automatically when memory is full, you must move that message to Personal/Business/Misc
folder.
* Power & Carrier : You can check the battery level and Carrier name.
* OS Version : You can check the current OS version for device.
52
Press Esc key to return to the previous screen.
11.6 Mymail Setup
You can set the Mymail Setup in the menu.
Preferences Screen and press Enter key.
Please select the 6.MyMail Setup from the
Then, <Figure Prefs-16> will be displayed.
* Note : This is Carrier option menu. So, you are requested to check it with your carrier for the
details.
<Figure Prefs -16>
* Set : If you want set the Mymail on, select the ON with Left/ Right key. If you don’t want,
select OFF. .
* Address : Please enter the address for Mymail Server.
You can check this address with
your carrier.
Press Enter key to save the contents and press Esc key to return to the previous screen
without saving.
12. Alarm
You can set the alarm on your device.
and press Enter key.
Please select the Alarm from the Main Menu Screen
Then, <Figure Alarm-1> shall be displayed.
53
<Figure Alarm-1>
* Subject : Please enter the subject you want.
* Date : Enter the date you want the Alram function to be operated.
* Time
: Enter the time you want for Alarm. If the device is set to 12 hour mode, AM/PM
appears. Enter A or a to change to AM, and enter P or p to change to PM.
* Alarm : You can set the time of alarm using Left/ Right key
and alarm can be set with
9 options - None / On time / Before 30 min / Before 1 hr / Before 2 hr / Before 4 hr / Before 12 hr
/ Before 1 day / Before 7 day
* Repeat
: Repeat is to set the alarm repeatedly and you can set repeat mode using
Left/Right key
.
Repeat mode has 5 options – Never / Daily / Weekly / Monthly /
Yearly.
* Set
: Please set the Alarm to ON or to OFF using Left/Right key.
Press Enter key to save the contents and press Esc key to return to the previous screen
without saving.
Pop-up box as <Figure Alarm –2> will be displayed when Alarm is operated. You can stop
Alarm pressing any key.
<Figure Alarm -2>
13. Alert
You can use this menu when you need etiquette mode.
54
Please select the Alert from the
Main Menu Screen.
If you press Enter key, Alert type will be changed from Sound to Vibrator,
from Vibrator to Mute and from Mute to Sound.
Alert type status selected is displayed by Alert
Type Icon (Silent, Sound and Vibrator) at the Status Icon Area.
14. Lock
You can lock the keys in this menu.
Please select Lock from the Main Menu Screen and
press Enter key to lock the key operation.
Then, all keys will be locked except Alt key, Caps
Hold key and Power key. And <Figure Lock-1> will be displayed.
To release lock in <Figure Lock-1>, enter the correct 4 digit password which you entered in
Password field in Figure <Prefs-13>. Then, the lock will be released.
If you enter the wrong password, the Figure Lock-1 will be kept as it is.
* Note : You need to set the Enable and Key Lock Password in Setting menu in advance.
(Refer to the 11.4.6 Key Lock Password menu.).
<Figure Lock-1>
15. World Clock
You can easily check the current time for other cities and countries with world map in the menu.
Please select World Clock from the Main Menu Screen and press Enter key. Then, <Figure
W/Clock-1> will be displayed.
55
<Figure W/Clock-1>.
1. World Clock View
If you press Enter key when 1.World Clock View is highlighted, Local time you set in Time Zone
will be displayed with World Map. Pres use Left/Right key to move the location you want.
Then, the each local time will be displayed. Press Esc key to exit.
<Figure W/Clock-2>.
2. Set Time Zone
If you press Enter key when 2, Time Zone is highlighted, the city list for setting the time zone
will be displayed as like <Figure W/Clock-3>.
Please select your own Time Zone with
Up/Down key , and press Enter key to select City you want set as Time zone. Press Enter
key again to save.
Then, it will return to the previous screen after saving.
56
Press Esc key to cancel.
<Figure W/Clock-3>.
16. Game
You can enjoy the Blackjack game in the menu. Please select Game from the Main Menu
Screen and press Enter key.
Then, <Figure Game-1> will be displayed.
<Figure Game-1>
Press Enter key again to start the Blackjack game.
* Betting
Change the Amount of Betting Money to the number you want using Up/Down key and press
Enter Key to display <Figure game-2>.
<Figure Game-2>
* Game Main
When Blackjack game starts, select whether to receive the card or not.
the result is displayed as shown in <Figure Game-3>.
At this time, you can change the
Betting Money with Up/Down key and press Enter key to start new game.
If you press Esc key while you are playing, it will exit to Main Menu Screen.
57
If the game is over,
<Figure Game-3>
* Refill the money :
You can start the game with 1000 point in total. If you need refill the money press R key in
Figure Game-1 screen.
17. Tx Set
You can set TX to On and/or Off in this menu.
Screen and press Enter key.
Please select the Tx set from the Main menu
Then <Figure Txset-1> will be displayed.
<Figure TxSet-1>
Move the cursor to the place you want, and press Enter to select.
If you select On and press Enter key again, the device will operate in Two way mode. If you
select Off and press Enter key again, the device will operate in one way mode only.
The device will return to Main Menu Screen after saving the TX mode you select.
Press Esc key to return to the Main Menu Screen without saving.
18. Calculator
You can use the device as a calculator in the menu.
Main Menu Screen.
Please select the Calculator from the
Then, <Figure Calc-1> will be displayed.
58
<Figure Calc-1>
1. Direction (Up/Down, Left/Right) key, Space, Enter, Esc, Del and number key from 1~0 are
used.
2. Press the number key you want and direction keys displaying addition, subtraction,
multiplication and division and repeat the process as shown above to press the number key.
Press Enter key to vi ew the result.
3. You can change the value by changing the unit of length. When you use it, enter the number
you want first and then press Tab key. Select Con2ENG if you want English weights and
measures, and Con2Met if you want meter system (international unit) to display the converted
value.
Then, press Esc to go back to <Figure Calc-1>.
19. Mymail
This is the Option menu for each Carriers, please contact the Service provider for detailed
information.
<Figure Mymail-1>
<Figure Mymail-2>
<Figure Mymail-3>
20. Device and Battery Care
1) Use only approved battery and power charger. Charging battery by any other method or
unauthorized product may cause damage to the battery
59
2) Keep in mind that a new battery’s full performance is achieved only after two or three times of
completed charging
3) The battery can be charged and discharged hundreds of times but it will eventually wear out.
When the operating time is noticeably shorter than normal, it is time to change to new battery.
4) Do not use device in the high temperature and humidity
5) Battery must be recycled or disposed of properly and never dispose of batteries in a fire.
6) Do not drop, knock and shake device
7) Do not use harsh chemicals, cleaning solvents, or strong detergents to clean device. Wipe it
with a soft cloth slightly dampened in a mild soap-and-water solution.
8) Do not attempt to open the casing on your device.
9) Do not expose device or charger to rain or snow. If device is flooded, never turn on power
and ask service center.
21. Trouble Shooting
1. Screen cannot be turned on at all.
It is because the batter is completely exhausted. Use it after charging.
2. Key is not pressed.
It is because Key is put on a hold. Release Hold Key.
3. When I turn on the power, it is turned off immediately.
Battery is completely discharged. Use it after charging.
4. I cannot hear the sound when I receive a message.
4.1 Your phone is set in Mute mode or the message receiving sound of Inbox is silent.
Select Melody in Pref-> 3. Sound Setting-> 3. Alert Types.
Select other sounds except Silent / Vibrate in Pref-> 3. Sound Setting-> 2. Alert-> 1.
Inbox Alert.
4.2 If Private Time is set on and it is in that period, the sound will not occur. If you want
to release Private Time, select Off in Set Item in Pref-> 6. Private Time.
5. I cannot send a message.
Check whether it is in Two Way state at present.
60
If it is not Two Way status, it is stored in Outbox temporarily and will be automatically
sent if it is Two Way.
Contact your service provider if you still cannot send a message when it is in Two Way
status.
6. I cannot see the screen clearly.
It is because Contrast is set too high or low.
Adjust it properly in Pref-> 10. Miscellaneous-> 3. Contrast.
7. I can see the screen but it does not operate at all.
Turn off the power by pressing Power Key in the upper left of the terminal for about 4
seconds and then press that key again to turn it on.
If it still does not operate, push off the Reset key to the right located at the right bottom
of the terminal and push it off to the left to turn it on.
(Caution) It will result in deleting all the messages you saved.
8. Backlight is not turned on.
Press Power Key located at the upper left of the terminal for about 2 seconds.
9. I locked it but forgot the password.
Please visit A/S center to release the Password.
Initial Lock Password is ‘0000’.
10. The letter is too small.
It is because it is set as Small Font.
Select Large Font in Pref-> 4. Font.
11. I cannot write the letter I want, instead, symbol is written.
It is in Alt Lock mode. Press Alt key to release Alt mode.
12. Periodically, the date and time are incorrect.
Please go to preference menu from the main screen and then select “4. Setup”
And select “1. Set Date & Time” and set the current Date and Time again.
And set Date and Time on “2. Set time”
13. No SVC icon appears or Fail to send message
61
You probably are in the area out of the coverage of a ReFLEX network.
22. FCC Compliance Statement
This equipment has been tested and found to comply with the limits for a Class B Digital Device,
pursuant to Part 15 of the FCC Rules.
These limits are designed to provide reasonable protection against harmful interference in a
residential installation.
This equipment generates, uses and can radiate radio frequency energy and, if not installed and
used in accordance with the instruction, may cause harmful interference to radio communication.
However, there is no guarantee that interference will not occur in a particular installation. If this
equipment dose cause harmful interference to radio or television reception. Which can be
determined by turning the equipment off and on, the user is encouraged to try to correct the
interference by one or more of the following measures :
Reorient or relocate the receiving antenna.
Increase the separation between the equipment and receiver
---- Connect the equipment into an outlet on a circuit different from that to which the
receiver is connected
---- Consult the dealer or an experienced radio/TV technician for help.
62