1
DV-76 / 77
User Manual
F/W 2.64 Ver:2.0
DV-76 / 77 Player user manual-2.64
Contents
DV-76 / 77 series User’s Guide .............................................................. 3
The Important Notice ......................................................................................... 3
Chapter 1: Introduction ........................................................................... 4
1-1. Product Overview ....................................................................................... 4
1-2. Navigation Browser..................................................................................... 6
1-3. Getting Start................................................................................................ 7
Chapter 2 How to Use ............................................................................ 8
2-1. DV-76 / 77 system provides three operation type ....................................... 8
2-2. Network equipment..................................................................................... 8
2-3. Wide area advertising with internet server.................................................. 9
2-4. Operation Mode ........................................................................................ 10
2-5 Interactive .................................................................................................. 12
2-6 Handling play list........................................................................................ 13
Chapter3. System Configuration........................................................... 15
3-1. Video & Audio ........................................................................................... 15
3-2. Network Server ......................................................................................... 16
3-3 Wired Network Connection ........................................................................ 17
3-4. Wireless Network Connection................................................................... 17
3-5. Screen Setting .......................................................................................... 18
3-6. Time.......................................................................................................... 19
3-7. Advanced Setup ....................................................................................... 20
Chapter 4 DSPCONFIG ....................................................................... 22
4-1. DSPCONFIG Command ( Basic Config ) ................................................. 22
4-2. DSPCONFIG Command II ( Advanced Config ) ....................................... 27
4-3. Serial Port Control .................................................................................... 30
4-4. Playlist ...................................................................................................... 31
Appendix A. FAQ ................................................................................. 34
1. How can I get best quality photo display?.................................................... 34
2. How can I set Wireless LAN? ...................................................................... 34
AppendixB Trees of Setup Page .......................................................... 35
2
DV-76 / 77 user manual-2.64
DV-76 / 77 series User’s Guide
DV-76 / 77 is networking HD quality advanced digital signage player. It can play high quality
advertising photo and movie on internal storage, PC on the network or internet server.
These types of operation is the best system for small office, restaurant, market, hospital and so
on.
The Important Notice
The information in this publication has been carefully checked and is believed to be entirely
accurate at the time of publication. We assume no responsibility for possible errors omissions,
or any consequences resulting from the use of the information contained herein.
The manufacturer reserves the right to change the specification of which intent to improve
function or design at any time without notice.
All rights reserved. No part of this publication may be reproduced, stored in a retrieval system,
transmitted in any form or by any means. Besides, electric or mechanical, by photocopying,
recording, without written consent of manufacturer in advance
3
DV-76 / 77 user manual-2.64
Chapter 1: Introduction
1-1. Product Overview
The features of DV-76 / 77 are low power consumption, comprehensive
functions and stable system which can be configured easily by remote control
and managed remotely via Ethernet network.
DV-76 / 77 provides four types of play mode
I.
Auto play
II.
Click-to-play with remote control
III.
Interactive
DV-76 / 77 supports three connected environments
1. Stand-alone: Without connected network
2. Internet: Connected the HTTP server by internet
3. Control by rs232 TTL level with DV-68K or other control
Each of the networking DV-76 / 77 connects with the server through either public network
directly or intranet network. In other words, all contents displayed in each terminal device can be
managed, delivered and maintained by the remote server.
The DV-76 / 77 assists business owners and corporate partners easy to show their target
promotions, product marketing, brand advertising, community news and easily.
4
DV-76 / 77 user manual-2.64
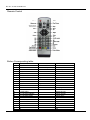
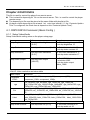
Remote Control
Button Corresponding table:
Item
1
2
3
4
5
6
7
8
9
10
11
12
13
14
15
16
17
18
19
20
21
22
23
Button Name
POWER
AUTO
VOL UP
VOL DOWN
MUTE
MENU
PLAY/PAUSE
STOP
UP
RIGHT
LEFT
OK
DOWN
#1 FILE INFO
#2, CAPTION ON/OFF
#3, CAPTION SYNC
#4, ZOOM
#5
#6, SCR SIZE
#7
#8
#9
#0
Brower
Power On/Off
Start Auto Play
N/A
N/A
N/A
Go to menu
Play
Return to main menu
Up
Right
Left
Enter or select
Down
1
2
3
4
5
6
7
8
9
0
5
Function
Power On/Off
N/A
Volume Up
Volume Down
Mute sound
N/A
Play and Pause
Stop
N/A
N/A
N/A
Show play time
N/A
Display file info
Caption On/Off
Caption Sync
Zoom the screen
N/A
Toggle screen size
N/A
N/A
N/A
N/A
DV-76 / 77 user manual-2.64
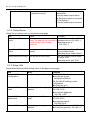
24
25
26
27
28
29
30
31
32
33
-
-
-
-
Audio
Video
REW
FF
PREV
NEXT
VIDEO
AUDIO
PHOTO
SETUP
Toggle audio output
Toggle video output
N/A
N/A
Previous list page
Next list page
Go to video page
Go to audio page
Go to picture page
Go to setup page
Toggle audio output
Toggle video output
Rewind
Fast forward
Previous clip
Next clip
N/A
N/A
N/A
N/A
The Audio button is used to toggle audio output port
This button is reserved for future use.
The Display button is used to toggle video output port. The video output is toggled
VGA, DVI, S-Video and YPbPr order. User must configure video resolution after find
video output port.
User must wait 3 second at least to change new video output mode.
The SCR SIZE button is used for toggle video screen ratio between 16:9 and 4:3 at
play time.
This setting is applied for current playing picture or movie only.
The VIDEO hot key is used to changing to movie navigation browser from another one .
This button can be use at main navigation, music and photo browser.
However, the button is not accepted at setup navigation browser.
The AUDIO hot key is used to changing to music navigation browser from another one.
This button can use at main navigation browser, movie browser and photo browser.
This button is not accepted at setup navigation browser.
The PHOTO hot key is used to changing to photo navigation browser from another one.
This button can use at main navigation browser, movie browser and music browser.
This button is not accepted at setup navigation browser.
The SETUP hot key is used to changing setup navigation browser from another one.
This button can use at all of navigation browser.
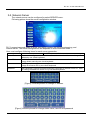
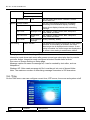
1-2. Navigation Browser
Interactive navigation browser is displayed after boot at interactive mode or press STOP button
at auto play mode. Four icons of navigation in the DV-76 / 77 as below:
1. Play Movie
Go to movie navigation browser. User can select folder, file and play the movie.
2. Play Photo
Go to photo navigation browser. User can select folder, file and play the photo.
3. Play Music
Go to music navigation browser. User can select folder, file and play the music
4. Setup
Go to system setup navigation browser (setup page). User can configure the system.
6
DV-76 / 77 user manual-2.64
Each icon in browser can be searched by remo te control for use UP, DOWN, LEFT and RIGHT..
After pick an icon with OK button or select key, user can go to each navigation browser.
1-3. Getting Started
1.
2.
3.
4.
5.
Connect Network. (Wired LAN or Wireless LAN).
Connect the Video cable (VGA cable or DVI cable, S-video cable) to Panel or TV
Connect the Audio cable.
Connect the power adapter to the DC-IN socket, the system will power on automatically.
Configure Network server . Configure server at “Server” m enu of “Setup” pa ge (more detail
see chapter3)
1: Choose Connection Mode -> Realtime or Internet
2: Setup up ID and Password if
required
3: Server folder
4: IP address
5: Return to main menu
Interactive mode show main navigation browser after Power-on by remote controller.
Interactive mode configured as select Disable items at Auto Run menu of Screen Setting on
Setup page
7
DV-76 / 77 user manual-2.64
Chapter 2 How to Use
2-1. DV-76 / 77 system provides three operation types
1. Stand-alone player.
2. Wide Area or Local Area advertising with internet server (http)
3. Control by rs232 at TTL level (use DV-68 control codes)
2-2. Network equipment
When you want to use the remote (Internet), on the need to use a network connection, the
necessary related equipment, as follows
2-2.1. Server PC on private network
Minimum Intel Processor II 350MHz 64MB RAM.
- The faster processor is better. The better processor can play more station
2-2.2. Operating system
- Windows XP Home edition, Windows XP/Vista Professional: connect under 5 DV-7x
- Windows 2000/2003 server: connect over 10 DV-7x
2-2.3. Networking
- Ethernet: 10M/100Mbps Ethernet card
- Wireless LAN card: IEEE802.11 b/g
- Server PC must have static IP address on internet. (or NAT IP forward)
2-2.4. Internet server
.- WEB server of software : http server. Example : IIS (Windows)
- WEB server running, no need any more service program.
2-2.5. Storage kits
Useable storage device
- External storage: USB memory card, USB HDD, CF memory card
- Internal Storage: CF memory card, 2.5 inch HDD.
2-2.6. Files format
- FAT32 file system support
Note: We need special FAT32 format program to support large space HDD
2-2.7. Other requirement
Networking
- Network switch, router or Wireless LAN AP
8
DV-76 / 77 user manual-2.64
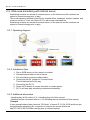
2-3. Wide area advertising with internet server
Advertising contents are stored at contents server on the Internet and the contents are
copied to internal storage prior to play.
This mode operating method is best fits for chained office, restaurant, market, hospital, and
museum and so on. User can control DV-7x with simple command too.
Advertising contents are stored at contents server on the internet and the contents are
copied to internal storage prior to play.
2-3.1 Operating diagram
2-3-2 Installation Step
1.
2.
3.
4.
Set up WEB server on the internet or intranet.
Generate share folder to root of server.
Put advertising contents to share folder.
Create play list file ”playlist.txt” to share folder
This file has the file list for play
5. Connection the DV-7x
6. Press AUTO button of remote controller or restart system
7. DV-7x will start play advertising contents automatically.
2-3-3 Additional information
- Handling play list file refer to 2-6-1 Handling play list of this manual
- Handling remote command refer to 2.-6-2 Handling remote command of this manual
Example
If user generate share folder name as “DS folder” of server IP 211.24.35.99 and there are
test.jpg sample advertising file, computer on internet can access this file as
http://211.24.35.99/ DS folder /test.jpg way at internet explorer.
9
DV-76 / 77 user manual-2.64
Note
- This type of operation is support with CF memory card or HDD only.
- If the contents are changed at running time, the screen will show current play window.
This is a normal situation, please do not power-off the system.
Additional information setting
- Adjust video output port & resolution refer to 3-1 Video & Audio of this manual
- Server configuration refer to 3-2. Network Server of this manual
- Network connection refer to 3-3 Wired Network Connection and 3.4 Wireless Network
Connection of this manual
Note: DV-7x does not support domain name, please use IP address of server
2-4. Operation Mode
Operation mode is classified by how DV-7x works after power-on. Auto play mode start
play advertising photo and movie automatically after power-on. Click-to-play mode show
main menu after power-up and user select play item by remote controller.
2-4-1 Auto play mode
Auto play mode start playing the advertising contents after power-up automatically. User
select type of auto play at Auto Run menu of Screen Setting on Setup page.
Disable: don’t use auto play mode
All files: play all kinds of file on the storage
- Movie: play movie only
- Music: play music only
- Picture Slide: show picture with configured slide effect
Music Slide: play picture and movies with background music
This auto play mode is default setting of DV-76 / 77.
.2-4-2. Click-to-play with remote control
User can go to each play mode by select the icon on the main navigation browser or press
VIDEO/AUDIO and PHOTO hot button of remote controller.
2-4-2-1. Play Movie
User can go to movie navigation browser by select Movie icon on the main navigation
browser or press VIDEO hot button of remote controller.
10
DV-76 / 77 user manual-2.64
On the movie navigation browser LEFT and RIGHT button and key is used for change
menu bar and file list. UP and DOWN button and key is used for change the menu on bar
or file on file list. The SEL key and OK button is used for select a menu or file.
The menus on menu bar have following purpose.
SERVER: select the folder of server PC at real-time streaming
- HDD: select the HDD or CF memory card
- USB1, USB2: select the USB memory
- PREV LIST: show the previous page of file list
- NEXT LIST: show the next page of file list
PLAY ALL: play all contents on file list window
- GOTO MENU: go to main navigation browser
2-4-2-2 Play Picture
User can go to Picture navigation browser by select Photo icon on the main navigation
browser or press PHOTO hot button of remote controller. All of button and key are used as
same functionality with movie navigation browser.
11
DV-76 / 77 user manual-2.64
2-4-2-3 Play Music
User can go to movie navigation browser by select Music icon on the main navigation
browser or press AUDIO hot button of remote controller.
All of button and key are used as same functionality with movie navigation browser.
2-5 Interactive
Command signals to provide RS232 999 group, the file name please use 000 ~ 999.
The “000” to set the main menu (MENU). In the main screen to set the Advanced
Settings option in DSP mode settings.
Play content files stored in accordance with the order of automatic cycle
Customers can demand, select the appropriate manner and to adjust
Repeat Mode:
The system will automatically loop play media content files.
Menu Mode:
The first track (Menu track) is 000, which is the looping track.
12
DV-76 / 77 user manual-2.64
The system broadcast “menu Track” circulating, till getting the track number which is input from RS232 interface. Like as: After playing selected track (001.mpg), the system will loop back to Menu
track.
Standby Mode
After the system boot the system state is sleep mode does not have any action until the
detected signal system will be relevant to start playing. After playing the system will show
sleep mode waiting for the next signal input.
This mode can be combined with motion detection device used in a special advertising.
Continue mode
System continue playing a file, until the system has made new input.
2-6 Handling play list
2-6-1 Handling play list by default
DV-7x handling advertising contents by use playlist.txt file on root of storage device.
Play list file list-up all files to play at the station and time, week and week-time scheduling
information too.
Create play list file
User can create play list file by use text editor such as Notepad on Windows XP. The #
mark at the first of line present a comment.
13
DV-76 / 77 user manual-2.64
Play list file is used for list-up the file and scheduling information at stand alone
display, real-time streaming with server PC and wide area advertising with internet
server operation type.
DV-7x use “mssage.txt” file as default advertising description message file. But
advertiser can specify another name of message file. The message file name must
start from “message” initial character. You can use message_xxx.bmp files too.
Week and time scheduling information are assigned by week and time directive. The
week Directive are <MON>, <TUE>, <WED>, <THU>, <FRI>, <SAT>, <SUN> and
the time directive Can be assign <00:00-24:00> way. The time can be assigned from
0 hour to 24 hour.
Play list file support following 4 types of play list. Play list file must have at least one
default play list, and if advertiser don’t want schedule, then implement default play list
only.
Default play list
- List-up the file that playing without scheduling. If there is no schedule in specified
DV-7x play list then the file in default play list will be playing. Default play list do
not have any week or time directive.
Time Scheduling playlist
- list-up the file that playing at assigned time period. The scheduling play can be
assigned by use time directive and file list.
- Advertiser can specify special message advertisement too.
Week Scheduling play list
- DV-7x can play contents by week day order. Advertiser can assign week
scheduling by use week directive and file list.
Week-Time Scheduling play list
Advertiser can assign week-time scheduling by use time directive and file list at
below of week directive.
Reference
Play list file decide play order too
The filename can include space character
2-6-2 Schedule specified date
Setup the playlist for schedule specified date , user need create a new file and assign
filename: yyyymmdd.txt.
Example: To January 1, 2010 broadcast special film, you need to edit a schedule file
name 20100101.txt
2010-01-01 day will not play playlist.txt, but direct broadcast 20100101.txt
content
14
DV-76 / 77 user manual-2.64
Chapter3. System Configuration
User can configure the system at the Setup navigation browser (setup page) go to Setup page
by press setup icon on the main navigating browser or press SETUP button of remote controller.
If your system are playing photo or movie, press STOP button prior to configure the system.
Please refer appendix A. for tree of setup page.
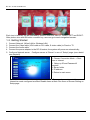
3-1. Video & Audio
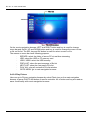
The video and audio can be configured by select VIDEO/AUDIO menu. Following picture show
the video and audio configuration window.
Note: The response time after set the configuration will be late for moment, because the
system to store new configuration data to memory
3-1-1. Video Configuration
User can configure brightness, contrast, saturation and video output port. Video output is
depending on which video cable you used. DV-7x has VGA, DVI, S-Video connector
and YPbPr component. Header ( inside ) in board. Standard outputs are be configured as
one of following items.
- DV-76 has VGA and DVI
- DV-77 has VGA and HDMI
- VGA : 640x480, 800x600, 1024x768, 1280x768, 1280x1024, 1366x768
1440x900, 1920x1080 and 1920x 1200
The YPbPr component Output is board level product only, this port is not supported on
Digital Signage Box.
Default Setting: Video Output : VGA, 1280x1024.
3-1-2. Audio Configuration
DV-7x support stereo output only now.
15
DV-76 / 77 user manual-2.64
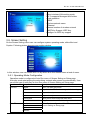
3-2. Network Server
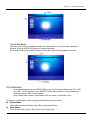
The network server can be configured by select SERVER menu.
Following picture show the server configuration window.
DV-7x supports several kinds of server connection modes, the real-time streaming, and
internet server. The server configurations are depends on this connection mode.
User must configure following items for each server connection.
Server IP
Server Folder
ID
Password
Internet
Use WEB server on the internet
Server must configure server IP address for each connection. User can change IP
address by use virtual keyboard.
The folder name is used on real-time and internet server connection. User can
change folder name by use virtual keyboard.
This ID is used at real-time streaming connection to access server PC. User can
change ID of server PC by use virtual keyboard.
This Password is used at real-time streaming connection to access server PC. User
can change Password of server PC by use virtual keyboard
[Figure] Virtual Keyboard for change IP address
[Figure] Virtual Keyboard for change folder name, user ID and password
16
DV-76 / 77 user manual-2.64
3-2-1. Internet WEB server
The internet WEB server operation can be built as following steps.
1. Setup WEB server
Please refer 2.3 Wide area advertising with internet server more detail information.
2. Setup the SERVER field on DV-7x
- Connect Mode to Internet
- Server IP to WEB server IP address
- Server Folder to the name of shared folder
3. Restart system
User will see following information while update advertising contents
Note: Do not power off or plug out the CF memory card while update advertising contents
3-3 Wired Network Connection
The wired network can be configured by select LAN menu. Following picture show the wired
network configuration window.
3-4. Wireless Network Connection (optional hardware)
The wireless network can be configured by select WLAN menu. Following picture show the
Wireless network configuration window.
Wireless LAN Support
Enable or disable Wireless LAN interface.
Wireless LAN Setting
Setting the wireless LAN information, such as ESSID、channel number and security.
17
DV-76 / 77 user manual-2.64
Mode
Select wireless LAN working mode.
DV-7x supports Managed and Ad-hoc
mode operation.
- SSID
Wireless network name
- Channel
Channel number of wireless network
- WEP Key Support, WEP Key
Configure to WEP key support
3-5. Screen Setting
On the Screen Setting menu user can configure system operating mode, slide effect and
Caption. Following picture shows screen setting window.
In this window, user can restart auto run by select Auto Run Restart items at end of menu.
3-5-1. Operating Mode Configuration
Operation mode is configured at Auto Run menu of Screen Setting on Setup page.
Auto play mode start playing the advertising contents after power-up automatically. User
can select type of auto play at Auto Run menu of Screen Setting on Setup page.
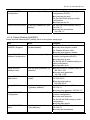
Function
Auto Run
Slide Effect
Setup value
Disable
Description
Don’t use auto play mode
All files
play all kinds of file on the storage, default setting
Movie
play movie only
Music
play music only
Picture Slide
show picture with configured slide effect
Music Slide
play picture and movies with background music
Random
Cross fade
Rightward
Leftward
Slide effect is configured at Slide Effect menu of
Screen Setting on Setup page.
18
DV-76 / 77 user manual-2.64
Upward
Increase
Decrease way
Transition Time
3 sec
User can select slide effect Transition Time as
second order too.
Caption Enable/ Disable
User can use message caption for immediate
advertising and information display, following
Cap. Position
Top/Bottom
picture shows display windows with advertising
message
Cap. Color
Message Color Red, Orange, Yellow, Green, Blue, Deep blue,
Violet, Black and White
Cap. BG color
Background
Red, Orange, Yellow, Green, Blue, Deep blue,
Color
Violet, Black and White
Cap. Scroll
Scroll speed of Quickly, Normally, Slowly
message
Auto Scaling
Enable/ Disable
Auto scaling fit the picture and movie to video output
resolution. If auto scaling is disabled, the actual
video image size is displayed on the screen. If auto
scaling is enabled, the video image was displayed on
full screen. Auto scaling is enabled as a default.
Auto Run Restart
Auto play mode is default setting of DV-7x.
Interactive mode show main menu after power-up and user select play item by remote
controller button. Interactive mode configured as select Disable items at Auto
Run menu of Screen Setting on Setup page.
Message caption file name is message.txt; it can be created by text editor, such as
Notepad on
Windows XP. After create message.txt file it must be put into root of shared folder.
Note: The maximum number of advertising message characters is 256 characters.
3-6. Time
On the TIME menu user can configure current time, NTP server, time zone and system on/off
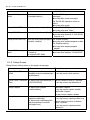
Item
Function
Descriptions’
19
DV-76 / 77 user manual-2.64
Cur. Time
Setup current
time
User can setup current time by manually or get it from
NTP server. The time setting method will be selected with
Cur. Time Setting menu.
Cur. Time Setting Setup NTP server If user configure time setting with NTP, network timing
and UTC
protocol, server to get current time, user must set NTP
server and UTC. UTC is Universal Time Coordinated.
Time Display
Display current
DV-7x can display current time on the screen. User
time
can select display location left-top, left-bottom, right-top
or right-bottom.
AUTO ON/OFF Auto power on/off User can enable or disable auto power on/off. User must
set on time and off time prior to enable auto power on/off.
Note: Don’t make overlap with message caption. If the time display and message is
overlapped, the message can be broken.
3-7. Advanced Setup
On the Advanced Setup menu user can configure screen saver enable or disable, file
sort, OSD message on/off, language and software upgrade.
Function
Screen Saver
File Sort
OSD message on/off
Language support
Font Size
Return to initial state
Software Upgrade
Descriptions
Setting screen saver. Screen saver work after 5,6,7,8, or 10 minute
from no use of system. The screen saver is disabled as default.
User can sort the play list file as name, date and size. The name is
default file sorting method.
User can enable or disable the OSD message by configure OSD
Message menu. OSD message is disabled as a default.
The system support Korean and English. User can select one of
language on Language menu. After change language, system will
restart automatically
This menu set the size of font for message and clock display. User can
choose “Large”. “Medium” or “Small” font size.
This menu set all value on the setup page to default setting value
Software Upgrade
DV-7x supports software upgrade. User can upgrade the software with following steps.
1. Get the upgrade image “DSSImage” and copy this file to USB memory.
20
DV-76 / 77 user manual-2.64
2. Insert USB memory to DS and turn-on the system.
3. Go to ADVANCE menu on Setup page, and select S/W Upgrade
4. Select upgrade firmware
5. Select Ok
6. Waiting for finish update, the update will takes around 10 minute.
7. System will restart automatically after upgrade and show main navigation windows or
start play advertising contents.
Note: Don’t power off the system being software upgrade
21
DV-76 / 77 user manual-2.64
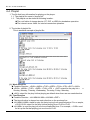
Chapter 4 DSPCONFIG
This file is used for control the player from remote server.
This is stand for dspconfig.txt file on the remote server. This is used for control the player
remote server.
The dspconfig.txt file must be stored at the same folder with playlist.txt file.
Hi-player check dspconfig.txt file at each 1 mi nute time interval. ( If the “Contents Updat e
Time” is configured, the check time is depend on this “Contents Update Time”).
4-1. DSPCONFIG Command ( Basic Config )
4-1-1 Setup Video/Audio
Setup Video/Audio setting value on the player setup page.
Item
Setup Brightness
Editor
set dsp video brightness
{0~31}
set dsp video contrast {0~31}
Setup Contrast
Setup Saturation
set dsp video saturation
{0~31}
Setup Video Output
set dsp video output
[VALUE]
Example
Ex: Set video brightness to 15
set dsp brightness 15
Ex: Set video contrast to 16
set dsp video contrast 16
Ex: Set video saturation to 17
set dsp video saturation 17 :
Ex: Set HDMI Video output and
resolution1080i
set dsp video output
hdmi_1080i
VALUE: Video resolution see below table
Resolution
Video Outpot
Composite
YPbPr
composite_640x480, component_480p, component_720p,
component_1080i, component_1080p,
vga_640x480, vga_800x600, vga_1024x768, vga_1280x768,
vga
vga_1280x1024,vga_1366x768,vga_1440x900, vga_1440x1050, vga_
1680x1050, vga_1920x1080,vga_1920x1200
dvi_480p, dvi_576p, dvi_720p, dvi_1080i, dvi_1080p, dvi_640x480, dvi
Dvi
_800x600, dvi_1024x768, dvi_1280x1024, dvi_1366x768, dvi_1400x10
50
hdmi_480p,hdmi_720p,hdmi_1080i,hdmi_1080p,hdmi_640x480,
Hdmi
hdmi_800x600, hdmi_1024x768, hdmi_1280x1024, hdmi_1366x768 h
dmi_1400x1050
Item
Editor
Example
Ex: Set audio volume to 20
Setup Audio Volume
set dsp audio vol {0~31}
set dsp audio vol 20
22
DV-76 / 77 user manual-2.64
Setup Audio Output
set dsp audio output
{stereo/surround}
Ex: Set audio output to
Stereo(2Ch)
set dsp audio output stereo
Ex: Set audio output to surround
(5.1Ch,Optical )
set dsp audio output surround
4-1-2 Setup Server
Setup Server setting value on the player setup page
Item
Editor
Example
Setup Server IP Address set dsp server ip “{ip address}”
Ex: Set Connect Server IP
Value
Note: The dsp will not connecte to address value to 192.168.1.1
origin server, If you change
set dsp server ip
server ip.
“192.168.1.1”
Setup Server Folder
Value
set dsp server folder “{folder
name}”
Setup Server Port Value
set dsp server port {num}
Ex: Set Connect Server Folder
value to share folder
set dsp server folder “share” :
Ex: Set Connect Server value
to share 1234
set dsp server port 1234
4-1-3 Setup LAN
Setup Wired Network(LAN) setting value on the player setup page.
Item
Editor
Setup LAN IP Address set dsp lan ip {auto/fix}
Configuration
Example
Ex: Set LAN IP setting to dynamic
set dsp lan ip auto
configuration(DHCP)
Ex: Set LAN IP setting to static
configuration
set dsp lan ip fix :
Setup LAN IP Address set dsp lan ipaddress “{ip
Ex: Set LAN IP address value to
Value
address}”
192.168.1.100
set dsp lan ipaddress
“192.168.1.100”
Ex: Set LAN Subnet mask value to
Setup LAN Subnet
set dsp lan subnet “{subnet
Mask Value
mask}”
255.255.255.0
set dsp lan subnet
“255.255.255.0” :
Setup LAN Gateway IP set dsp lan gateway “{gateway Ex: Set LAN Gateway to 192.168.1.1
address}”
set dsp lan gateway “192.168.1.1”
23
DV-76 / 77 user manual-2.64
Setup LAN DNS
Configuration
set dsp lan dns {auto/fix}
Setup LAN DNS Value set dsp lan dnsaddress “{dns
address}”
Ex: Set LAN DNS setting to dynamic
configuration (DHCP).
set dsp lan dns auto
Ex: Set LAN DNS setting to static
configuration
set dsp lan dns fix
Ex: Set LAN DNS address value to
192.168.1.1
set dsp lan dnsaddress
“192.168.1.1”
4-1-4. Setup Wireless LAN(WiFi)
Setup Wireless Network(WiFi) setting value on the player setup page.
Item
Setup Wiress
LAN(WiFi) Support
Editor
set dsp wlan support
{enable/disable}
Example
Ex: Enable Wireless LAN.
set dsp wlan support enable
Ex: Disable Wireless LAN.
set dsp wlan support disable
set dsp wlan ip {auto/fix}
Setup WLAN IP
Ex: Set WLAN IP address setting to
Address Configuration
dynamic configuration(DHCP).
set dsp wlan ip auto
Ex: Set WLAN IP address setting to
static configuration
set dsp wlan ip fix
Setup WLAN IP
set dsp wlan ipaddress “{ip Ex Set WLAN IP address value to
Address Value
address}”
192.168.1.100
set dsp wlan ipaddress
“192.168.1.100”
Setup WLAN Subnet
set dsp wlan subnet “{subnet Ex: Set WLAN Subnet mask value to
Mask Value
mask}”
255.255.255.0
Set dsp wlan subnet
“255.255.255.0”
Ex: Set WLAN gateway IP value to
Setup WLAN Gateway set dsp wlan gateway
IP
“{gateway address}”
192.168.1.1
set dsp wlan gateway “192.168.1.1”
set dsp wlan dns {auto/fix}
Setup WLAN DNS
Ex: Set WLAN DNS setting to
Configuration
dynamic configuration.
set dsp wlan dns auto
Ex: Set WLAN DNS setting to static
configuration.
set dsp wlan dns fix
Setup WLAN DNS
set dsp wlan dnsaddress
Ex: Set WLAN DNS value to
Value
“{dns address}”
192.168.1.1
set dsp lan dnsaddress
24
DV-76 / 77 user manual-2.64
“192.168.1.1”
Ex: Set WLAN operation mode to
managed
set dsp wlan mode managed
Ex: Set WLAN operation mode to
adhoc
set dsp wlan mode
Setup WLAN SSID
set dsp wlan ssid “{ssid}”
Ex: Set WLAN SSID to wlan
set dsp wlan ssid “wlan”
Setup WLAN Channel set dsp wlan channel {1~13} Ex: Set WLAN channel to 9
set dsp wlan channel 9 : Set WLAN
channel to 9
Setup WLAN WEP key set dsp wlan wepkeysupport Ex: Enable wepkey
{enable, disable}
set dsp wlan wepkeysupport enable
Ex: Disable wepkey
set dsp wlan wepkeysupport
disable
Ex: Set wepkey value to 0123456789
Setup WLAN wepkey set dsp wlan wepkey
value
“{wepkey}”
set dsp wlan wepkey “0123456789”
ps: support WEP 64bit
Setup WLAN Operation set dsp wlan mode
Mode
{managed,adhoc}
4-1-5. Setup Screen
Setup Screen setting value on the player setup page.
Item
Setup Photo Slide
Effect
Editor
Example
Ex:Set slide effect to random.
set dsp screen slide
{disable/random/crossfade/right set dsp screen slide random
ward/leftward/
Setup Photo Transition set dsp screen transitiontime {3/ Ex:Set transition time to 5 second.
Time
5/10/15/20/30/60}
set dsp screen transitiontime 5
Setup Caption
set dsp screen caption
{enable/disable}
Setup Caption Location set dsp screen captionposition
{top/bottom/left/right}
set dsp screen captionposition
{top±num/bottom±num/left±
num/right±num}
25
Ex:Enable Caption
set dsp screen caption enable
Ex:Disable Caption
set dsp screen caption disable
Ex:Set caption location to top.
set dsp screen captionposition top
Ex:Set caption location to bottom
upper 10 pixels
set dsp screen captionposition
bottom-3
DV-76 / 77 user manual-2.64
Setup Caption Color
Setup Caption
Background Color
set dsp screen captioncolor
{red/orange/yellow/green/blue/d
eepblue/violet/black/white}
set dsp screen captionbgcolor
{red/orange/yellow/green/blue/d
eepblue/
violet/black/white/transparent}
Setup Caption Scroll
Speed
set dsp screen captionscroll
{quick/normal/slow}
Setup Auto Scaling
set dsp screen autoscaling
{enable/disable}
Ex:Set caption color to yellow.
set dsp screen captioncolor yellow :
Ex:Set caption background color to
transparent.
set dsp screen captionbgcolor
transparent
Ex:Set caption scroll speed to slow
set dsp screen captionscroll slow
Ex:Enable auto scaling
set dsp screen autoscaling enable
Ex:Disable auto scaling
set dsp screen autoscaling disable :
4-1-6. Setup Time
Setup Time setting value on the player setup page.
Item
Setup Time Update
Editor
Example
set dsp time set {manual/ntp} EX: Update the time by manual input
set dsp time set manual
Ex: Update the time with NTP server
by automatically.
set dsp time set ntp
set dsp time ntpserver
Setup NTP Server
Ex: Set NTP server to windows.com
{bora/kriss/nist/window/apple} set dsp time ntpserver window
set dsp time ntpserver “{time Ex: Set NTP server to time.bora.net
server URL}”
set dsp time ntpserver
“time.bora.net”
set
dsp
time
zone
{-12~+12}
Ex:
Set time zone to +8
Setup Time zone
set dsp time zone +8
set
dsp
time
display
Setup Time Display
Ex: Set time display location to right{disable/lefttop/righttop/leftbot top location.
Location
tom/rightbottom}
set dsp time display righttop
set
dsp
time
color
Ex: Set time display color to yellow
Setup Time Display Color
{red/orange/yellow/green/blue set dsp time color yellow
/deepblue/violet/black/white}
set dsp time bgcolor
Ex: Set time display background color
Setup Time Display
{red/orange/yellow/green/blue
to transparent
Background Color
/deepblue/violet/black/white/tr set dsp time bgcolor transparent
ansparent}
transparent
Setup Auto Player Power set dsp time status {on/off} Ex: Enable auto power On/Off
set dsp time status on
On/Off
Ex: Disable auto power On/Off
set dsp time status off
Ex: Set player power-on time to 09:10
Setup Player Power On set dsp time on {HH:MM}
set dsp time on 09:10
Time
26
DV-76 / 77 user manual-2.64
Setup Player Power Off
Time
set dsp time off {HH:MM}
Ex: Set player power-off time to 22:30
set dsp time off 22:30
4-1-7. Setup Advanced Information
Setup Advanced setting value on the player setup page.
ITEM
Setup Screen Saver
Editor
set dsp adv screensaver
{5/6/7/8/9/10/disable}
Setup File Sort Order
set dsp adv filesort
{name/date/volume}
set dsp adv osd
{enable/partial/disable}
Setup OSD Display
Example
Ex: Enable screen saver and the
waiting time is 8 minute
set dsp adv screensaver 8
Ex: Disable screen saver
set dsp adv screensaver disable
Ex: Sort the file as date order
set dsp adv filesort date
Ex: Enable OSD display
set dsp adv osd enable
Ex: : Enable OSD display partially
set dsp adv osd partial
Ex: : Disable OSD display
set dsp adv osd disable
Setup Language
Support
set dsp adv language
{country/english}
Setup Font Size
set dsp adv fontsize
{small/normal/big}
Ex: Set language to English
set dsp adv language english
PS: The new language applied after
reboot the playe
Ex: Use small font
set dsp adv fontsize small
4-2. DSPCONFIG Command II ( Advanced Config )
4-2-1. Player Control
Item
Time Based Audio
Volume Control
Week Day Based Player
Power Off
Reboot the System
Editor
set audio vol {0~31}
{HH:MM}
Example
Ex: Set audio volume to 15 at 09:00
.set audio vol 15 09:00
PS: Support up to 16 number of
audio volume control time setup
set dsp wday
Ex: Set player to power-off at
{sun/mon/tue/wed/thu/fri/sat Sunday.
} off
.set dsp wday sun off.
PS: User can set several number of
power-off week day.
set dsp reboot on 0
Ex:Set to player reboot.
set dsp reboot on 0
PS: Player will not reboot again
before dspconfig.txt file
27
DV-76 / 77 user manual-2.64
modification
Restart Autoplay
set dsp autoplay restart 0
Content Update Time
Interval Control
set dsp contents up {ss}
Ex: Set player to restart autoplay.
set dsp autoplay restart 0
PS: Player will not restart again
before dspconfig.txt file
modification
Ex: Update playlist.txt,
dspconfig.txt, message.txt file at
every 30 second.
set dsp contents up 30
PS: The default update time interval
is 1 minute(60 second)
4-2-2. Logging Message
The logging message can be upload to the server to user notify player operation.
The logging message file information is followed.
Hi-player-DSP have two logging message file,
1. AABBCCDDEEFF_2008_08_25.txt : The log file have the logging message for play
information of contents file(“Content File Play Information Log”)
2. AABBCCDDEEFF_2008_08_25_filestatus.txt.: The log file have the logging message
for contents file download and remove information(“Contents File Status Log”).
The field of AABBCCDDEEFF at file name is MAC address of player.
The field of 2008_08_25 is the date of file creation.
Item
Setup Logging
Message Support
Editor
set dsp log status {on/off}
Setup Logging
Message Folder
set dsp log folder “{folder
name}”
Setup Logging
Message Upload
Time
set dsp log up {ss}
28
Example
Ex:Set player upload logging message
to server
set dsp log status on
Ex:Set player do not upload logging
message to server.
set dsp log status off
Ex: Set player upload logging
message to aabbcc/ccdd folder
set dsp log folder “aabbcc/ccdd”
If user do not set the logging folder, the
player will upload log information to
log/{site name} of server directory.
Ex: Set “Content File Play Information
Log” update time interval
set dsp log up 3600
If there no setup update time, The
player update the log file two times at
each day.
The “Contents File Status Log” is
generated at the new file download or
remove time.
DV-76 / 77 user manual-2.64
4-2-3. Player Live Status
The player live status can be upload to the server to user notify player operation.
The live status file information is followed.
The format of live status file is dspliv e_AABBCCDDEEFF, in here AABBCCDDEEFF is MAC
address of player.
The contents of live file
Item
Setup Live Status
Support
Setup Live Status
Upload Folder
Editor
set dsp live status {on/off}
Example
Ex: Set live status file upload to
server
set dsp live status on
Ex: Do not upload live status file to
server
set dsp live status off
set dsp live folder “{folder name}” Ex: Set live status upload folder to
aabbcc/ccdd at server.
set dsp live folder “aabbcc/ccdd”
The default upload folder is live/{site
name} at server
29
DV-76 / 77 user manual-2.64
Setup Live Status
Update Time
set dsp live up {ss}
Ex: Set live status file update time
interval to 15 seconds
set dsp live up 15
If user do not set live status update
time, the default live status file
update time interval is 1 minute(60
seconds).
4-3. Serial Port Control
Item
Define Macro
Editor
define MACRO <Value>
Example
Ex: Set SERIAL_TX to
41,42,43,44,45
define SERIAL_TX
<41,42,43,44,45> :
Setup Serial Port
set com init baudrate
Ex: Set serial port speed to
Speed (Interactive-DS
{300/1200/2400/4800/9600/1920 4800bps
Only)
0/38400/57600/115200}
set com init baudrate 4800 :
Ex: Set serial port data bit to 8 bits
Setup Serial Port Data set com init data {5/6/7/8}
Bit (Interactive-DS
set com init data 8
Only)
Ex: Set to no parity bit support
Setup Serial Port Parity set com init parity {0/1/2}
Bit (Interactive-DS
0: no parity, 1:odd parity, 2:even set com init parity 0 :
Only)
parity
Ex: Set serial port stop bit to 1 bit
Setup Serial Port Stop set com init stop {1/2}
Bit (Interactive-DS
set com init stop 1 :
Only)
set com init interval {ms}
Ex: Set delay time to 10ms
Set Serial Port
Transmission Interval
set com init interval 10 :
(Interactive-DS Only)
Set Serial Port Data
set com
Ex: Send Ascii data a,b,c,d,e
Transmission
tx/mon/tue/wed/thu/fri/sat/sun
character to serial at 09:00
(Interactive-DS Only)
{HH:MM} {data}
set com tx 09:00 “abcde”
tx: every day implementation.
Ex: Send hexadecimal data 0x41,
weekday(mon/tue/wed/thu/fri/sat/s 0x42, 0x42, 0x43, 0x44, 0x45 at
un): only the designated day will be 10:30
the implementation.
set com tx 10:30
- {data} can be have Ascii,
<41,42,43,44,45>
hexadecimal and Macro.
Ex: Send Macro SERIAL_TX data
- Use “ “ for Ascii data, < > for
at 12:00, for example the
Hexadecimal data and % % for
SERIAL_TX is configured to
Macro.
<41,42,43,44,45>, player send
- User can set 16 different mode at 0x41, 0x42, 0x43, 0x44 and 0x45
different time.
to serial port at 12:00
set com tx 12:00 %SERIAL_TX%
30
DV-76 / 77 user manual-2.64
4-4. Playlist
1. The file that have information for playing on the player.
1.1. The playlist file name is “playlist.txt”.
1.2. . The playlist can be stored at following location.
The root folder of storage device (CF, IDE, or USB) for standalone operation.
The internet server folder for internet connection operation.
2. The inside of playlist file
This is standard example of playlist file.
(1). Week Directive
Possible Directive : <SUN> <MON> <TUE> <WED> <THU> <FRI> <SAT> <ANY>
<SUN> <MON> <T UE> <WED> <THU> <FRI > <SAT> stand for the play list o
n
Sunday, Monday, Tuesday, Wednesday, Thursday, Friday, Saturday.
<ANY> stand for the play list that playing as default when there are no week directive.
(2). Time Directive
Possible Directive : <HH:MM-HH:MM> <HH:MM> <DEF>
The time directive is depend on week directive on the previous line.
<HH:MM-HH:MM> stand for play list that pl aying from specified period. For ex ample,
<12:00-13:00> stand for the play list that playing from 12:00 to 13:00.
<HH:MM> is used for play just one time at specified time. For example, <13:00> used
for list up the file that playing just one time at 13:00.
31
DV-76 / 77 user manual-2.64
<DEF> stand for the play list that plying as default when there are no time directive.
(3). Special Directive
Possible Directive : <BGM>
<BGM> can be used after ti me directive. This directive background mode in this time
period. The movie is ignored at playlist and play photo only with background music.
# stand for comment for explanation
.
3. Control the Contents
3.1. Contents list can be written bottom of time directive.
3.2. The media contents c an be movie, photo, music, message file and caption
file(.smi extension).
3.3. The all of the contents file name can be have full PAT H information. If there are
no PATH information, the folder will be d efault PATH on server folder. For
example, if the server IP address is 10. 10.10.10, and the server folder name is
“DS folder”, the contents are stored following location.
aaa.avi : http://10.10.10.10/DS folder/aaa.avi
data/01/bbb.avi : http://10.10.10.10/data/01/bbb.avi
data/01/ccc.jpg|004:music/03/ddd.mp3 : http://10.10.10.10/data/01/ccc.jpg +
http://10.10.10.10/music/03/ddd.mp3
3.4 User can give play options for all m edia contents. The “|nnn: ” is used for give
play option. The “nnn” can be following code number.
4. Media Contents Play Options
3.1. Set Play Start Time
filename|001:MMDDhhmm
example : a.avi|001:07010900 -> Start play a.avi at 1, Jul 09:00.
3.2. Set Play Stop Time
filename|002:MMDDhhmm
example : a.avi|001:07311800 -> Stop play a.avi at 31, Jul 18:00
3.3. Set Continuous Playing Time
filename|003:ssss
this option is only for photo
example : b.jpg|003:0060 -> play b.jpg file while 60 seconds.
3.4. Set BGM File
filename|003:ssss |004:BGMfilename
this option is only for photo.
the continuous time must be configured.
example : b.jpg|003:0060|004:c.mp3 -> play b.jpg file while 60 seconds with play
back ground music c.mp3
3.5. Enable/Disable Playing
filename|005:0(or 1)
this option control play or not for media file.
this option is used for do not remove file from storage even do not play.
example : a.avi|005:0 -> play a.avi file
eample .avi|005:1 -> do not play a.avi file
3.6. Set Slide Effect
filename|007:ee
this option is only for next media file is photo.
set slide effect between current contents and next contents.
32
DV-76 / 77 user manual-2.64
The “ee” can be have following code number
9 01: Not Use
9 02: random
9 03: crossfade
9 04: Rightward
9 05: Leftward
9 06: Upward
9 07: Increase
9 08: Decrease
33
DV-76 / 77 user manual-2.64
Appendix A. FAQ
1. How can I get best quality photo display?
User must use same size picture with screen size. If user use 1366x768 screen size at
42 inch LCD display, the 1366x768 sized picture have best quality.
User can change picture size by use some tool. Manufacture don’ t provide such kind
of tool.
2. How can I set Wireless LAN?
If you have Wireless LAN access point, you can set operating mode to managed and set
ESSID, channel number too. The IP address can be set to static or dynamic way.
If you don’ t have Wireless LAN access point, and want connect DV-7x with PC by
point to point, user must set operating mode to Ad-Hoc, and set ESSID, channel number
to same with the PCs. and set the IP address to static way.
34
DV-76 / 77 user manual-2.64
AppendixB Trees of Setup Page
Level 1
Video/Audio
Level 2
Brightness
Contrast
Saturation
Video Output
SD
HD YPbPr
VGA
HD DVI
Audio Output
Server
LAN
WLAN
Connect Mode
Change Server IP
Change Server Folder
Change ID
Change Password
IP Address
DNS server
Network Status
PING Test
Wireless LAN Support
Wireless LAN Setting
IP Address
DNS Server
Network Status
PING Test
Auto Run
Slide Effect
Transition Time
Caption
Caption Position
Caption Color
Level 3
Default
VGA 1280x1024
800x600, 1024x768,
1280x1024, 1366x768
Stereo
Internet
SKT LOVIEW
KT ALLPOTS
Auto
Auto
Connect, Disconnected
192.168.1.40
User define
User define
No use
Fixed Auto
Fixed Auto
Enable, Disable
Disable
Mode, ESSID, Channel, Managed mode
WEP Key
SSID : user define
WEP : user define
Auto,
Fixed Auto
Auto
Fixed Auto
Connect, Disconnected
Disable
All Files, Movie, Music,
Photo Slide, Music Slide
Disable
Random, Crossfade,
Rightward, Leftward,
Upward,
Increase, Decrease
3,5,10,15,20,30,60 Sec
Enable, Disable
Top, Bottom
Red, Orange, Yellow,
Green, Blue,
Deep Blue, Violet, Black,
White Black
35
All Files
Crossfade
3 sec
Disable
Bottom
DV-76 / 77 user manual-2.64
Level 1
Level 2
Screen Setting
Caption Background Color Red, Orange, Yellow,
Green, Blue, Deep Blue,
Violet, Black, White
White
Time
Caption Scroll
Auto Scaling
Auto Run Restart
Current Time
Time Setting
NTP Server setting
UTC Setting
Time Display
Advanced
Auto On/Off
On Time
Off Time
Screen Saver
Go to Menu
File Sort
OSD Message
Language
Font Size
Return to Initial State
S/W Upgrade
GOTO MAIN MENU
Level 3
Default
Quickly, Normally, Slowly Normally
Enable, Disable
Enable
Manually, NTP server
Disable
LT, RT, LB, RB
Enable, Disable
Disable
5,6,7,8,9,10 Min
Name, Date, Size
Enable, Disable
Korean, English
Large, Medium, Small
36
Disable
Name
Disable
English
Small