1
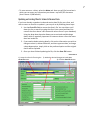
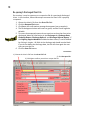
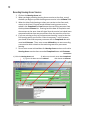
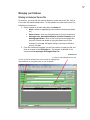
HOUSING HELP
DATABASE:
USER MANUAL
2010 Update
TABLE OF CONTENTS
Introduction ................................................................................................................ 1
Recording Client and Intake Data.................................................................................... 2
Adding A New Client ......................................................................................................................... 2
Entering Intake Data for a New Client .................................................................................................. 5
Entering Client Notes......................................................................................................................... 6
Updating an Existing Client’s Intake & Service Data ................................................................................ 7
Discharging A Client.......................................................................................................................... 8
Re-opening A Discharged Client File.................................................................................................... 10
Recording Services You Provide to Clients ...................................................................... 11
Recording Housing Access Services ................................................................................................... 12
Recording Housing Stabilization Services............................................................................................. 13
Recording Eviction Prevention Services ............................................................................................... 14
Recording Housing Application Services .............................................................................................. 15
Recording Other Services ................................................................................................................. 16
Managing your Database............................................................................................. 17
Deleting an Intake and Service File..................................................................................................... 17
Deleting a Client ............................................................................................................................. 19
Exporting Client and Service Data ...................................................................................................... 20
Where to Email the Export ................................................................................................................ 21
Compacting Your Database............................................................................................................... 22
Backing Up Your Database ............................................................................................................... 23
Appendix A: Glossary of Terms..................................................................................... 24
Intake and Discharge Data ............................................................................................................... 24
Service Data .................................................................................................................................. 27
Appendix B: Intake Guidelines for Housing Workers.......................................................... 30
Appendix C: Discharge Guidelines for Housing Workers ..................................................... 32
1
Introduction
This manual is your guide to using the Housing Help Database (HHDb). This
database was developed in Microsoft Access by City staff to assist City-funded
housing help services to collect and report client and service data.
The HHDb is comprised of two main elements, client information and
intake/service information. Each of these elements is controlled by its own
form: the Client form is for creating new clients, and the File form is for entering
intake information and recording the services you provide.
This manual provides instructions to complete all the fields in both of these
forms. The manual is divided into three sections, each section addressing a
different part of your use of the database. They are: recording your clients’ data,
recording the services you provide to clients, and managing your database.
While (of course!) all information in this manual is important,
as you read through its pages, you will occasionally come
across some information highlighted by an “Important!” icon.
These icons are used to indicate information that is not only vital to the effective
use and maintenance of your HHDb, but also may be easy to overlook or not
necessarily intuitive in your day-to-day use of the database. Please take special
notice of these points when using the HHDb.
This manual also includes three appendices of additional reference material:
• Appendix A: Glossary of Terms—a glossary of terms for the data template
is included in this document as and is similar to the glossary available in
the Performance Measures (PM) Guidebook.
• Appendix B: Intake Policies
• Appendix C: Discharge Policies
On the back page, you will find a list of 12 tips for effective use of the database.
Finally, should you have questions that are not answered by this manual, please
contact your lead City staff for further clarification or assistance.
2
Recording Client and Intake Data
Adding A New Client
Adding a new client to the database is one task where an extra effort to avoid
duplication proves very worthwhile. Following these three steps when creating a
new client file will help prevent duplicate records:
Step A: Determine that the client is not receiving service from another provider
All clients in need of housing help services should get access to them. However,
the possibility exists that a client may receive the same service from different
service providers. See Appendix B: Intake Guidelines for Housing Workers for
guidance on intake practices.
It is also important that before entering client information into the database that
you determine the members of your client household. If the client is a single
individual, the answer is obvious, but for client households with more than one
adult, the process of creating a client file should include the decision of who in
the household you will record as the primary household contact for the purpose
of record-keeping.
Step B: Make sure the client is not already in your records
To avoid creating double entries for a client’s files, you should first check that the
client is not already listed in your database. You can do this in the File form by
checking under the Go to File field (the field with the yellow background).
1. Click the downward-pointing arrow on the right side of the Go to File
field to access the drop-down list. You can then type in the first few
letters in the client’s last name to move that point in the list.
2. If the client household you are serving consists of more than a single
individual, you may also want to search to see if other members of the
household are listed as clients in the database. Decide which member of
the household is your primary household contact for the client
household, and use her or his information for the database.
3. If the client has previously been discharged, the file will have a red
background instead of the usual green. For discharged clients, there are
two options:
• If the client’s intake data is the same (i.e. the household situation
is the same & housing/demographic stats are unchanged), you
should re-open the discharged intake. See Reopening A
Discharged Client File for instructions
• If the client’s intake data has changed, create a new intake for the
client. You will not need to create a new client entry in the Client
3
Form, but you will need to complete a new intake with the new
information.
4. If there is no existing intake for the client, proceed to creating a new
Client File.
Step C: Create a new Client File
1. Click the Go to Client Form button, or the Client button on the menu bar.
2. Check if the client already exists by searching the Go to Client field. (The
lack of an intake record for a client does not necessarily mean that the
client has not been created in the Client form.)
3. Click on the Create New Client button. This step is vital. If you start to
enter client data before clicking the Create New Client button, you will
overwrite an existing client’s data.
4. Enter the details for the individual who serves as the primary contact for
a client household: (all 4 fields are required by the database)
• First Name
• Last Name
• Date of Birth Enter date in the DD Mmm YYYY format (e.g. 11 Jun
2010)
• If the client does not wish to give her or his Date of Birth,
then try to at least obtain part of the primary household
contact’s birth date—either birthday or year of birth, for
example. Enter 01 Jan 9999 if the client will not give any
information, if only the year is given then enter 01 Jan
YYYY, and if only birthday is given then DD Mmm 9999.
• Gender
• These four elements will combine to create a Client ID number,
which will appear in the grey Client ID box. This ID number is
comprised of the client’s initials, birth date and gender and allows
city staff to isolate specific records without divulging a client’s
name. Maintaining distinct client IDs is highly desirable, and for
this reason having date of birth information is very helpful.
5. Click the Save Client button
6. Close the Client form by clicking the X in the top right corner of the form.
4
Screenshot 1
1). Click Go to Client Form or the Client item on the main menu
2). Search the Go to Client drop-down list to
3). Click Create New Client
see if client already exists in the database
(form will be blank)
4). Enter client details
5). Click Save Client
6). Close the Client Form
If you are using Microsoft 2007, open the Client Form using this extra step:
1) Click the Add-Ins Tab
2) Click the Client button
5
Entering Intake Data for a New Client
Once you have created a new client, you will need to create an intake & service
file for that client. To enter this information, follow these steps:
1. Make sure that the Client Form for the client is fully completed.
2. Click the Create New File button.
3. Go to the drop-down box labelled Client Name. To find a client, either scroll
down the drop-down list and click on the correct client name, or start typing
the client’s name and when the correct name appears in the field, press the
Enter key on your keyboard.
4. If your database includes more than one project, make sure that you have
the correct project selected in the Project field.
5. Complete all fields on the intake tab, starting with the Intake Date. Enter
dates in the DD Mmm YYYY format (e.g. 11 Jun 2010)
6. Use the drop-down menu in each of the six housing and income fields to
choose the appropriate details:
• Age: Indicate the age range of the primary contact for the household.
• Housing Status at Intake: Indicate where the household was staying
the night before the Intake Date.
• History of Homelessness: Indicate the length of time the household
has been homeless.
• Primary Source of Income: Indicate the client household’s largest
source of income at time of intake.
• Secondary Source of Income: Indicate the client household’s second
largest source of income.
• Household Type: Indicate the type of household being served. The
household is defined by the combination of household members
actually seeking services.
7. For the fields Individuals Over 18 and Individuals 18 and Under, enter the
number of individuals in the household for both are categories, including the
primary contact. If there are none, enter “0”.
8. For the tick boxes on the right side of the File form, please tick the box for all
that apply for the client household:
• For the fields Presenting Mental Health Issues, Presenting Addiction
Issues, and Major Health Issue or Physical Disability, please tick the
related box if any member of the client household presents with any
of these conditions. Further explanation of the criteria for these
fields can be found in Appendix A.
• For the field Was Service Provided in English, please tick the box if
English is the language used to serve the client household. This
6
•
•
question refers only to the language of service and does not refer to
the clients’ mother tongue.
For the field Identified as Aboriginal, please tick the box if any
member of the household self-identifies as being Aboriginal, including
people who are of First Nations, Métis or Inuit heritage.
For the field On Social Housing Waiting List at Intake please tick the
box if the household has an existing application with Access Housing
Connections (Housing Connections) at the Date of Intake. This
question does not refer to any other waiting lists for housing.
9. Click the Save File button to save the file.
Screenshot 2
1). Make sure client information is complete 2). Click Create New File
3). Use Client Name to find client
4). Make sure the correct
Project is indicated
5, 6, & 7). Enter Intake Date &
8). Click on as many
9). Save the File
complete the intake questions
tick-boxes as apply
Entering Client Notes
The database contains an area for you to enter your own notes on a client.
Notes are private and for you and your co-workers’ reference only—nothing you
enter here will be submitted to the city.
7
•
To enter notes on a client, select the Notes tab. Here you will find a text box in
which you can enter any information you choose—up to 65,535 characters
(that’s almost 12,000 words!)
Updating an Existing Client’s Intake & Service Data
If you have already created an intake and service data file for your client, and
wish to return to that file to update it, you may do so by following these steps:
1. Use the Go to File field to access the client’s file. You can either scroll
down the list or search by typing the client’s last name (and then first
name if the client shares a last name with other clients in your database).
Using the drop down box also allows you to see intake and discharge
dates, which is especially important in instances where a client has more
than one intake file.
2. If you need to delete existing details, click on the information you wish to
change to select it, delete the details, and then type new data; to change
a drop-down option, simply click on the preferred option and the original
choice will be replaced.
3. Once you have finished updating the file, click the Save File button.
Screenshot 3
1). Access the client’s file using the
Go to File menu
2). Make the desired changes to intake data
3). Click the Save File button.
8
Discharging A Client
Deciding to Discharge a Client
If you have entered an intake date for a client household, they will register as an
active client until you enter a discharge date in their file. Maintaining up-to-date
client status will ensure that the reports generated from the database provide an
accurate measure of your client caseload. Appendix C offers further guidance on
discharge practices. When a client is suitable for discharge, follow these steps to
ensure that the discharge is recorded properly:
1.
From the File form, open the client’s form using the Go to File field.
2.
Ensure that all housing services that require end dates (Housing Access,
Housing Stabilization, and Housing Applications) have service end dates
entered and outcomes/service end reasons recorded. The file is now
ready for discharge.
3.
Click the Discharge tab.
4.
Enter the Discharge Date.
5.
Select the Discharge Reason from the drop-down box. Your available
choices are:
1. Stable in Housing (minimum of 3 months)
2. Working with another Support Provider
3. Refused Service
4. Lost contact/Unknown
5. Other
6.
If the discharged household requires supports, click the Ongoing Support
Needed box.
7.
If supports are required, use the drop-down box to select the type of
Discharge Referral made. Your available choices are:
1. None
2. General Counselling
3. Physical Health Services
4. Mental Health Services
5. Addiction Services
6. Other Case Management
7. Educational/Training
8. Employment Program
8.
Type in the name of the Discharge Referral Agency, if applicable.
9.
Click Save File. The form background will turn red and a message will
appear across the title bar of the window reading “File Closed – press the
<Re-open File> button to edit”. No further editing will be possible unless
the file is re-opened.
9
Screenshot 4
1). From the File form, open the client’s form using the Go to File field.
2). Ensure that all housing services that require end dates have service
end dates entered and outcomes/service end reasons recorded.
3). Click the Discharge tab
4). Enter the Discharge Date 5). Select the Discharge Reason
6). If ongoing supports are
needed, check the
Ongoing Supports Needed
box
7). If a referral is
made, select
Discharge Referral
from drop-down list
8). Type in the name of
the Discharge Referral
Agency, if applicable
9). Click Save File.
10
Re-opening A Discharged Client File
On occasion, it may be necessary to re-open the file of a previously discharged
client. In this instance, follow these steps to ensure the client’s file is properly
re-opened:
1. Choose the client’s file from the Go to File field.
2. Click the Re-open File button.
3. Click Yes to the confirmation message that appears (see screenshot).
4. The file background colour will return to green, and the file will again be
editable.
5. To ensure that exported reports do not continue to show the client to be
discharged, delete all information in the Discharge tab: Discharge Date,
Discharge Reason, Discharge Referral, and Discharge Referral Agency. If
the Ongoing Support Needed checkbox has been ticked, it can be deleted
by clicking in it again. All fields in the discharge tab should now be blank.
If you do not delete the discharge date, the file will close again the next
time you save the file.
6. Click the Save File button.
Screenshot 5
1). Choose the client’s file from the Go to File field.
2). Click Re-open File
3). Click Yes to confirm you wish to re-open the file
11
Recording Services You Provide to Clients
Housing help services you provide to your clients are grouped into four
categories in the HHDb:
1. Housing Access: This category refers to the provision of services to assist
households to obtain and move into housing.
2. Housing Stabilization/Follow-up Services: This category refers to all
supports provided to help someone stay in their housing. These supports
can be short term (e.g. housing orientation) or long term (e.g. ongoing
supports and monitoring
3. Eviction Prevention: This category is for recording interventions made by
workers to prevent an eviction, in instances where a formal eviction
process has started.
4. Housing Applications: This category refers to helping a client household
to submit a new application or renew or activate an existing application
for housing.
Three of the four housing service categories contain both service start and
service end dates; only Eviction Prevention, as a time-limited crisis intervention,
does not require an end date. The aim in recording these services is to capture
the duration rather than the intensity of service. You do not need to record
every specific instance of service activities you provide, but rather, you will
capture the length of time between beginning service and the resolution of that
service.
Multiple services of the same category to the same client household
are entirely possible, and should be recorded sequentially (do not
open a new service until the previous service is closed) for Housing
Access and Housing Stabilization services. However, because you may help a
client with several different housing applications at the same time, you can have
multiple Housing Applications started at the same time in a client’s file.
N.B.: Housing providers that maintain a waiting list for their housing may create a
client file when the client initially applies for their housing. Details such as date
housed and date stabilization services commence should be completed when the
client actually moves into this housing. If the client finds other housing before a
unit becomes available, the client file should be closed with no date housed since
the housing provider did not provide a unit within their own housing for the client.
To record service you provide to your clients, you must find the client’s active
intake & service file. Unless you are entering service information immediately
upon creating a new intake file, you will need to find the relevant intake file
using the Go to File drop-down menu (the one with the yellow background). You
can then enter specific service data by selecting the related tab in the File form.
The following sections provide instructions for the various forms of service you
may provide to your clients.
12
Recording Housing Access Services
1. Click on the Housing Access tab.
2. When you begin providing Housing Access service to the client, record
the date you begin to provide housing access service in the Initiated field.
3. When the client finds housing or when your service to the client ends,
return to the client’s file and record the date housing access service
ended in the Completed field and choose the most fitting outcome from
the drop-down Outcome list. Entering both the date of completion and
the outcome at the same time will signal that the service has indeed been
competed and that there was an outcome from the provision of service.
4. If you are assisting a client to find permanent housing, it may be that the
first housing option you find for a client is temporary. In this instance,
you should record the temporary outcome with its Completed date and
associated Outcome. Then, enter a new Initiated date to start recording
a new service which relates to the continuing search for permanent
housing.
5. Do not enter a new Initiated date for Housing Access services until earlier
Housing Access services have recorded Completed dates and Outcomes.
Screenshot 6
1). Click the Housing Access tab
3). When service ends, enter date Completed
2). Type in the date service is Initiated
and choose an Outcome
13
Recording Housing Stabilization Services
1. Click on the Housing Stabilization tab.
2. In the Initiated field, type in the date that housing stabilization services
were initiated.
3. When stabilization services end, enter the date housing stabilization
services were completed in the Completed field and click in the Service
End Reason field to choose the appropriate reason for services ending.
Entering both the date of completion and the service end reason at the
same time will signal that the service has indeed been competed and that
there was indeed a reason for ending the service.
4. Do not open a new service by entering an Initiated date until previous
service has been closed off with a Completed data and a Service End
Reason.
Screenshot 7
1) Click the Housing Stabilization tab
2) Type in date
3) When service to client ends, 4) When service to client
service Initiated
enter date service Completed ends, select Service End
Reason from drop down list
14
Recording Eviction Prevention Services
1. Click on the Eviction Prevention tab.
2. In the Initiated field, type in the date that eviction prevention services
were initiated.
3. When the result of the eviction prevention service is known, enter the
outcome by clicking in the Outcome field and choosing the appropriate
outcome of the eviction services.
Screenshot 8
1) Click the Eviction Prevention tab
2) Type in date that service is
3) Choose the most appropriate
Initiated
Outcome from the drop-down list
15
Recording Housing Application Services
1. Click on the Housing Applications tab.
2. Choose the type of housing application from the drop-down list under
Application Type and enter the date the housing application was
Initiated,
3. When you have confirmation that the application is completed, enter the
date it was Completed.
4. You may have multiple housing application services initiated at the same
time—one for each separate application for which you are assisting the
client.
Screenshot 9
2) Choose the Application Type
from the drop-down list…
1) Click the Housing Applications tab
3) When the application
…then enter the date
is complete, enter the
application is Initiated
date Completed
16
Recording Other Services
Recording other services allows you to indicate that you have provided services
to your clients that do not fall within the four categories of housing help services.
1. Click on the Other Services tab.
2. Tick either or both of the two options available:
• Provided Information and Referral: Tick if you provided the client
household with information and/or assistance making a referral
for a service not provided by your project or agency.
• Provided Personal Supports: Tick if you provided the client
household with support services such as emergency supplies,
trusteeship services, individual advocacy, provision of information
about mainstream services, and transportation to services. These
services may also include the provision of life skills support, such
as assistance with nutrition, clothing, personal hygiene,
budgeting, bill paying, shopping, and household
cleaning/maintenance.
Screenshot 10
1) Click the Other Services tab
2) Click to enter a tick mark in Provided Information and
Referrals and/or Provided Personal Supports
17
Managing your Database
Deleting an Intake and Service File
On occasion, you may find the need to delete an intake and service file, such as
in the case of accidental duplication. To safely delete an intake and service File,
follow these instructions:
1. Delete records on all tabs other than the Intake tab:
• Notes—delete by highlighting notes and then clicking the delete
key
• Other Services—click any checked boxes to clear the checkmark
• Housing Access, Housing Stabilization, Eviction Prevention, and
Housing Applications—click on the small arrow to highlight the
row with records and delete by using the delete key on your
keyboard. A message will appear asking if you want to delete a
record, click Yes.
2. If the file has been discharged, you will first need to re-open the file and
clear all records on the Discharge tab. This process is detailed in the
section titled Re-opening A Discharged Client File.
Screenshot 11
1). Click on the selected service tab
2). Click on the arrowhead next to the records to highlight the
row and delete by using delete key on your keyboard
18
3. After all records on the other tabs are cleared, click on Edit in the menu
bar (see screenshot below) and select Delete Record, you will receive a
message prompt asking you to confirm that you wish to delete a record.
Click on Yes to delete the record.
Screenshot 12
1). Click on the Intake tab
2). Select Edit on the menu bar
3). Select Delete Record. You will receive a message asking if
you to confirm that you wish delete the record.
4). Click Yes to
confirm deletion.
19
Deleting a Client
You may on occasion wish to delete a client file. Only client files that are not
associated with an intake and service file can be deleted. If you wish to delete
the intake as well as the client, you will need to first delete any intake associated
with the client file. To delete a client entry, follow these steps:
1. Open the Client form.
2. Select the client you wish to delete using the Go to Client box.
3. Choose Delete Record from the Edit menu.
• If the client does have an associated intake file, you will receive an
error message: “The record cannot be deleted or changed because
table ‘Case’ includes related records.” You will first need to locate
and delete the intake before deleting the client file.
4. If the client does not have an associated intake file, you will receive a
prompt asking you to confirm deletion of the client file. Click Yes to
confirm deletion.
Screenshot 13
1 & 2). Open the Client form & select the client you wish to delete from Go to Client.
3). Select Edit on the menu bar
3). Select Delete Record. You will receive a message asking if
you to confirm that you wish delete the record.
4). Click Yes to
confirm deletion.
20
Exporting Client and Service Data
Export reports from your database are due at the end of each quarter (at the
end of March, June, September, and December—check the Reporting Schedule
online at http://www.toronto.ca/housing/info-agencies-housing.htm for precise dates).
To send an up-to-date report, check that all information on your active clients is
up to date, and then generate a report:
1. Click the Export button.
Screenshot 14
1). Click the Export button
2. A dialog box will appear with a selection of folders to which you may
choose to save the report. Choose a location to save the spreadsheet—
pick a spot where you’ll be able to find it easily. The desktop is usually a
good choice if you delete your exports after submitting them.
3. The report data will be automatically exported in the form of a Microsoft
Excel spreadsheet. The file will be named “HousingHelpExport_”
followed by a series of numbers. The first 8 of those numbers will be the
date you created the export, in the format YYYYMMDD (the rest of the
numbers indicate the time you created the export). You can use this
information to locate the correct file if you have multiple HHDb exports
stored in the same location on your computer.
21
Screenshot 15
2). After clicking Export button, the
Browse for Folder dialog box appears
3). Choose an appropriate location to save
the Export
If you are using Microsoft Office 2007, generate the Export using this extra step:
1). Click the Add-Ins Tab
2). Click the Export button
Where to Email the Export
For Housing Help Programs Outside of Shelters & Support to Daily Living
Programs: please email the exported spreadsheet to [email protected] and cc your
City of Toronto lead staff for the project
• For Housing Help programs Within Shelters: please email the exported
spreadsheet to [email protected] and cc your City of Toronto lead staff for the
project.
•
22
Compacting Your Database
Running the Compact and Repair Database utility in Microsoft Access can help
improve the performance of the database. This utility makes a copy of the
database file and then rearranges the information more efficiently to preserve
space on your computer. To set up this utility to run automatically:
1.
2.
3.
4.
Go to Tools on the menu bar.
Select Options; the Options window will open.
Click on the General tab.
Check the box labelled Compact on Close.
This will automatically compact and repair the database every time it is closed. If
you would rather compact the database only occasionally, follow this procedure:
1. Go to Tools on the menu bar.
2. Select Database Utilities.
3. Select Compact and Repair Database.
Limitations to Database Compacting:
1. You must have enough storage space on your hard drive for the
compacting operation.
2. You can not compact an open database. In a multi-user environment, the
compact operation will fail if another user has the database open.
Screenshot 16
23
Backing Up Your Database
It takes a great deal of diligence and hard work to keep the information in the
Housing Help database up to date. Don’t let your hard work go to waste through
an accident or a technical glitch—protect your work by backing up the database.
It is essential that your organization respect its commitment to preserve client
confidentiality. All database information (including printed documents) should
be treated in the same manner that your organization treats all other clientrelated information. We assume that your organization has policies related to
the treatment of confidential information and that you follow these policies at
all times.
Backup copies of your database are confidential information. The following
suggestions should be implemented in compliance with your organization's
policies on maintaining the confidentiality of client records.
•
•
Every day you use the database adds information to the database, so every
day you enter new information you should also make sure the database is
backed up.
If your agency does not have a system for automatically backing up data on
your computers, you can back up the database by copying it to a removable
media, such as a CD, DVD, flash memory stick, or tape—a password
protected medium is preferable.
•
Before copying the database, close it to make sure that no one is using it.
•
Backup copies should be stored at a secure off-site location.
•
•
•
Backups should be checked periodically to make sure that the backup was
successful and that the data can be recovered from the backup if needed.
Follow a rotational backup strategy: keep backups from multiple points in
time so that if problems develop in the database, you can go back to the last
good copy without losing too much of your information.
If your organization is planning a move, or upgrading your computers, it is a
good idea to make a backup of the database to a secure removable media
immediately beforehand as these sorts of changes are prime opportunities
for your database to be accidentally deleted.
24
Appendix A: Glossary of Terms
Intake and Discharge Data
Case ID: a numeric identifier generated by the agency. This number can be up to 10
digits. Note: if you use the MS Access software provided by the City, the Case ID is
assigned automatically for each new case.
Agency Name: the non-profit organization delivering the SSHA funded housing help
project(s).
Project Name: the name of your SSHA funded housing help project.
Client ID: The use of a consistent identifier is important to track service use and repeat
clients. The Client ID is automatically generated by the database based on client
information that allows the tracking of discrete clients without providing any
identifying information to City of Toronto staff.
Date of Intake: Enter the date on which you began intake of the client. To enter dates
in the database, please use a “DD Mmm YYYY” format, such as 20 Jan 1989 or 29 Mar
2009.
Age: Indicate the age range of the individual who is your client household’s primary
household contact.
1. Age 16-24
2. Age 25-64
3. Age 65 and over
Housing Status at Intake: Indicate where the household was staying the night before
the Date of Intake
1. Outside/On the Street
2. Shelter
3. Temporary Housing (Motel, Family, Friends)
4. Housed
5. Discharged from Health Facility
6. Discharged from Corrections
7. Unknown
History of Homelessness: Indicate the length of time the household has been
homeless.
1. Less than 1 Year
2. Greater than 1 Year
3. Not Homeless
4. Unknown
25
Primary Source of Income: the client household’s largest source of income.
1. Employment: income from part time, full time, or seasonal employment
2. EI: income from Employment Insurance benefits.
3. OW: income from Ontario Works through Toronto Employment and Social
Services.
4. ODSP: income from the Ontario Disability Support Program through the
Ministry of Community and Social Services.
5. CPP: income from the Canada Pension Plan.
6. OAS: income from Old Age Security.
7. Panhandling: income from soliciting cash donations in public places.
8. Other: any source of income not listed above.
9. None: has no reported income.
Secondary Source of Income: the client household’s second largest source of income.
1. Employment: income from part time, full time, or seasonal employment
2. EI: income from Employment Insurance benefits.
3. OW: income from Ontario Works through Toronto Employment and Social
Services.
4. ODSP: income from the Ontario Disability Support Program through the
Ministry of Community and Social Services.
5. CPP: income from the Canada Pension Plan.
6. OAS: income from Old Age Security.
7. Panhandling: income from soliciting cash donations in public places.
8. Other: any source of income not listed above.
9. None: has no reported secondary source of income.
Household type: the type of household being assisted. The household is defined by the
combination of household members actually seeking services.
1. Single: a person 16 years or older that lives alone.
2. Couples without children: couples with no children.
3. Lone parent: households with one parent and at least one child. A guardian can
be counted as parent.
4. Two Parent: households with two parents and at least one child. Guardians can
be counted as parents.
5. Extended: extended family members or relatives living together as a household
on an ongoing basis.
6. Other: household types other than those listed above (e.g. unrelated
roommates).
Individuals over 18: the number of household members over 18 years old.
Individuals 18 and under: the number of household members 18 years old or younger.
Presenting Mental Health Issue: households with a member who has a mental health
issue. The assessment should be based on your observations and/or what you already
know about them, and can include people who:
• Freely declare that they have a mental health issue
• Are seeking services for a mental health issue
• Are receiving treatment for a mental health issue including taking medication, and
• Exhibit behaviour that strongly suggests they have a mental health issue
26
Presenting Addiction Issues: households with a member who has an addiction issue.
The assessment should be based on your observations and/or what you already know
about them, and can include people who:
• Freely declare that they have an addiction issue
• Are seeking services for an addiction issue
• Are receiving treatment for an addiction, including harm reduction programs, and
• Exhibit behaviour that strongly suggests they have an addiction issue
Major Health Issue or Physical Disability: households with a member with a serious
physical health issue that would cause them to have major difficulties conducting daily
activities, and limit the amount or kind of activities in which they can participate.
Disabilities refer to conditions or health problems that have lasted or are expected to
last six months or more. For young children, they include only those conditions or
problems that have been diagnosed by a professional.
Was Service Provided in English: Indicate whether English is the language used to
serve the client. This question refers only to language of service, not the clients’
mother tongue.
Identified as Aboriginal: households who self-identify as being Aboriginal, including
people who are of First Nations, Métis or Inuit heritage.
On Social Housing Waiting List at Intake: whether the household has an existing
application with Access Housing Connections (Housing Connections) at Date of Intake.
This question does NOT refer to any other waiting lists for housing.
Services Provided: Information and Referral: whether the household was provided
with information and/or assistance making a referral for a service not provided by the
project or agency.
Services Provided: Personal Supports: services that assist households in a variety of
ways, including providing emergency supplies, trusteeship services, individual
advocacy, provision of information about mainstream services, and transportation to
services. Services may also include the provision of life skills support, such as assistance
with nutrition, clothing, personal hygiene, budgeting, bill paying, shopping, and
household cleaning/maintenance.
Discharge Date: Enter the date that the working relationship with the household ends.
The relationship can end because either the housing related services are complete (e.g.
household is housed and can maintain housing), or housing support activities cannot
be resumed (e.g. no contact with the household for 6 months, refused services, etc).
To enter dates in the database, please use a “DD Mmm YYYY” format, such as 20 Jan
1989 or 29 Mar 2009.
27
Discharge Reason: Specify the reason the household was discharged as a client:
1. Stable in Housing (min. of 3 months): household has been housed for a
minimum of 3 months.
2. Working with Another Support Provider: the household is receiving support
services from another provider.
3. Refused Service: the household clearly and directly expressed an unwillingness
to receive services and/or ended the working relationship with the housing
help program.
4. Lost Contact/Unknown: attempts to contact the client household have been
unsuccessful, and the last contact with the household was over 6 months ago.
5. Other: any other reasons not listed above.
Ongoing Support Needed: Indicate whether the household requires support to keep
their housing, as assessed by the housing worker, or for other circumstances.
Discharge Referral: For the primary referral established prior to discharge, Indicate
which type of program or supports to which the referral is made. In the case of
multiple referrals, select as the primary referral the referral which will be most
important in supporting the client household to keep their housing.
1. None
2. General Counselling
3. Physical Health Services
4. Mental Health Services
5. Addiction Services
6. Other Case Management
7. Educational/Training
8. Employment Program
9. Financial Literacy/Trustee
10. Other
Discharge Referral Agency: Report the name of the agency or agencies to which the
client was referred.
Service Data
File ID: a numeric identifier assigned automatically for each new case.
Client ID: The Client ID is automatically generated by the database based on client
information that allows the tracking of discrete clients without providing any identifying
information to City of Toronto staff.
Service Type: The types of housing help service provided to the client household. The
same household can receive these services multiple times while the case is active.
1. Housing Applications: helping a client household to submit a new application, or
renew or activate an existing application, for housing.
2. Housing Access: the provision of services to assist households to obtain and
move into housing.
3. Housing Stabilization/Follow-up Services: all supports provided to help someone
stay in their housing. These supports can be either short term (housing
orientation) or long term (ongoing supports and monitoring).
4. Eviction Prevention: interventions made by workers to prevent an eviction,
where a formal eviction process has started.
28
Date Initiated: the date you began to provide a housing service.
Date Ended: the date you finished providing a housing service.
To enter dates in the database, please enter dates in the “DD Mmm YYYY “format, such
as 20 Jan 1989 or 29 Mar 2009.
Service Outcomes: The outcome of a housing service you have provided.
Housing Access Outcomes: services to assist households to move into housing. Housed
refers to situations where there is written or verbal contract between the household
and a landlord for a specified time period. Housed in any of the permanent housing
options (options #1-4) does NOT include situations where: housing was identified for the
household, but they did not move into it; referrals to another agency providing housing
access services; and households moved into any type of hostels/shelters.
1. Private Independent: secured housing in the private rental market with no or
occasional support to tenants.
2. Private Supportive: same as the “Private Independent” housing except that
support services are provided for tenants to stabilize in housing on a temporary
or long-term basis. Supports can include counselling, direct rent payment to
landlord, trusteeship, mental health services, addiction services, meal programs,
etc.
3. Non-Profit Independent: secured housing in rent-geared-to-income housing with
no or occasional supports to tenants.
4. Non-Profit Supportive: same as the “Non-Profit Independent” except that
supports are provided for tenants to stabilize in housing, and are usually
delivered on a regular and/or ongoing basis.
5. Family/Friends: client household confirmed moving to or continued staying with
family or friends.
6. Shelter: household moved to a shelter.
7. Lost Contact: attempts to contact the client household have been unsuccessful,
and last contact with the household was over 6 months ago.
8. Other: any other housing type or situations not listed above.
Housing Stabilization/Follow-up Services End Reasons: reasons to end the housing
stabilization or follow-up activities.
1. Lost Housing: the household has been evicted or left their housing voluntary.
2. Support Not Needed: housing follow-up support activities have been successful
and a thorough housing stability evaluation with the client household indicates
that supports are not required.
3. Refused Service: the household clearly expressed that they do not require
and/or want stabilization or follow-up services.
4. Lost Contact: attempts to contact the client household have been unsuccessful,
and last contact with the household was over 6 months ago.
5. Other: any other situations not listed above.
29
Eviction Prevention Outcomes: the outcome of crisis intervention and eviction
prevention activities:
1. Eviction Prevented: crisis intervention activities such as mediating
landlord/tenant relationships, judicial /tribunal-related activities, legal aid,
emergency income supports such as rent bank, shelter funds, utilities fund, and
other services, that have successfully helped to keep the household housed.
2. Household Re-housed: situations where the household was supported to secure
and move to new housing to avoid eviction or following an eviction.
3. Household Evicted: situations where interventions did not prevent the
household from losing their housing.
4. Lost Contact: attempts to contact the client household have been unsuccessful,
and last contact with the household was over 6 months ago.
5. Other: any other situations not listed above.
Housing Application Types: The type of housing application completed and submitted,
new or renewed. The various housing programs listed here:
1. Housing Connections: the coordinated access system for those seeking
subsidized rental housing (including municipal non-profit, private non-profit and
cooperative). Applications can be made by mail, on-line, through Housing Help
Centres, and through other providers with TAWL access. For further
information, please visit: www.housingconnections.ca
2. Supportive Housing: housing programs that provide support to tenants such as
information, counselling, direct rent payment, mental heath services and/or
addiction services on an ongoing basis or until the client household is ready to
move to more independent accommodations. For further information on
supportive housing programs in Toronto, please search for supportive housing
at: www.211toronto.ca
3. Alternative Housing: housing programs designated by the Social Housing Unit of
SSHA as alternative housing providers. In most cases, these programs provide
occasional or ongoing supports to tenants. Alternative housing providers can
take tenants off their own waiting list as well as the Housing Connections list.
4. Homes for the Aged: homes for seniors that are usually long term care facilities
with private and or semiprivate accommodation. Services may include health
care and social and recreation programs. Information on Toronto Long-Term
Care Homes and Services is available at http://www.toronto.ca/ltc and
www.211toronto.ca.
5. VAW (Violence Against Women): programs that assist women and their children
that are victims of violence to find affordable and/or transitional housing. For
information on the application process and VAW housing programs, please
contact Housing Connections or specific VAW shelters and programs.
6. Aboriginal Housing: housing programs specifically for Aboriginal clients.
7. Other: any other not-for-profit or private housing.
30
Appendix B: Intake Guidelines for Housing Workers
All clients in need of housing help services should get access to them. However,
the possibility exists that a client may receive the same service from different
service providers. For clients, this can mean relating their personal situation to
housing workers at more than one agency. To improve client services and
maximize existing resources, the City and housing workers must try to ensure
that housing help services are coordinated, services are easily accessible to the
client, efforts do not overlap and duplication of services or tasks is consciously
avoided.
Therefore, it is the responsibility of all housing workers to determine if new
clients are working with another housing help service provider.
1. If the client is not working with another housing worker, the housing
worker should initiate providing housing help services to the client.
2. If the client is working with another housing worker, the following
guideline should be followed:
• Identify all services accessed by the client
• Obtain written or verbal consent from client to communicate with
the service providers
• Case conference with service providers (and preferably the client)
• Establish who will act as the primary coordinator of services for
the client, and whether there is a role for any other service
provider.
3. If it is established that there is not a logical role for all service providers,
then the client should be encouraged to decide which provider they
would like to assist them. Where applies, the principle of streamlining
support by the original housing worker could be the encouraged.
4. If the client is already accessing services through another worker, but a
case conference is not possible; the housing worker should determine a
strategy to proceed. They can provide the individual with housing help
services or refer the individual to the other worker.
5. If a client declines to identify whether he or she is accessing other
services, the housing worker should initiate providing services to that
client.
In all cases, the housing worker should document the assessment of the client’s
need for services and provide a rationale for the decision. The City may request
a report on this information (in a form that does not identify clients) as a
condition of funding.
The diagram on the next page outlines the procedure to follow when
implementing this guideline.
31
Intake Guidelines for Housing Help Clients
Is client already
receiving
housing help
services?
Yes
1. Other housing workers
identified
Yes
2. Consent is asked to
communicate with other
housing worker(s)
3. Other service providers
contacted and willing
No
1. Case conferencing
with other housing
worker(s)
No
1. Housing worker
determines strategy
2. Case is
documented
2. Primary coordinator
is established with
client
Worker would duplicate effort
Worker has a role
Worker would duplicate effort
Housing worker
does not provide
service
Housing worker
provides service
Worker has a role
32
Appendix C: Discharge Guidelines for Housing Workers
Not all clients need housing follow-up services and case management once they
are housed, but some clients do. For clients in need of these services, it is the
responsibility of the housing worker to either provide them or help their clients
to connect to them. This guideline helps to clarify housing workers’ role in this
area.
Once an individual is housed, and before they can be discharged as a client, the
housing worker who housed them has the responsibility to assess the client’s
need for housing stabilization services. These services can range from housing
follow-up services to ongoing case management.
1. If the client can manage independently, with few supports, already has
supports in place, or refuses support services, the housing worker can
discharge the client.
2. If the client is in need of housing stabilization supports, the housing
worker, at a minimum, must make an effort to connect them with
appropriate supports. These support services can be provided by:
• any housing worker that assisted with housing the client
• another staff from the same agency
• another service provider through a referral process, and/or an
informal network of family or friends.
Supports can be time-limited or ongoing. In all cases, the service
provider should work with the client to help them live independently.
3. Once a reasonable effort has been made to connect with the client in
need of housing access or housing stabilization supports, the housing
worker can discharge the client if contact is lost for over 6 months. The
exception is when the client has a history of unpredictable contact with a
housing worker and is expected to return needing assistance.
In all cases, the housing worker should document the assessment of the client’s
need for services and provide a rationale for the decision. The City may request
a report on this information (in a form that does not identify clients) as a
condition of funding.
The diagram on the next page outlines the procedure to follow when
implementing this guideline.
33
Discharge Guidelines for Housing Help Clients
Does client
clearly
require housing
stabilization
services?
Yes
Housing worker
determines
appropriate
support
services with
client
No
(Client stable
for at least 3
months)
Housing worker
or colleague
provides
supports
Housing worker
discharges
client
Housing worker
refers client to
supports
Informal network
provides
supports
Client refuses
supports
Housing Help Database: 12 Top Tips
Practice makes perfect. Refresh your skills with
the Housing Help Database to quash any bad
habits. Attend a training session, reread the user
manual, practice with the self-training
presentation, or try out a few scenarios.
•
Watch for changes in the client household
composition. If a client household has two adults
and your primary household contact leaves the
client household, the original client file should be
closed and a new file created with the new
primary household contact.
•
Use a consistent date format. Enter dates in a
consistent format. One of the most common
mistakes in entering dates comes from reversing
the day and the month. If you consistently enter
all dates in the format of “DD Mmm YYYY” (that’s
two digits for day, three letters for month, and
four digits for year—e.g. 06 Feb 2010), you can
help to prevent this mistake from happening.
•
Intake data is for the whole household, not just
the primary household contact. The information
on the intake form does not apply to just the
primary household contact, but to any member of
the client household.
•
Keep separate project data separate. If your
agency has more than one housing help project,
make sure you are recording data for the correct
project by double-checking the Project field,
located third from the top on the File form.
•
Remember to close off service. When you enter
an intake date for a service, but not a service
ended date, it will appear that you are still
providing service to that client. Get in the habit
of taking a moment to consider the clients you
have served with whom you have not had recent
contact (before quarterly reporting is a good time
for this).
Even if a client discharge isn’t
appropriate, you can still indicate that you are not
actively providing a housing service by entering a
service end date. Don’t forget to record an
outcome or reason for end of service!
•
Keep an eye on discharges. It can prove a
challenge to maintain proper caseload size
information, especially if your clients are known
to disappear for lengthy stretches before
returning for service. Incorporate discharge
planning into your updating of the database to
make sure that your active client caseload is
properly represented.
•
Don’t be fooled by the FileID number. The File
ID field is populated automatically to uniquely
identify each file. This is an important database
function and does not affect the data you are
collecting. This field cannot be changed and it is
not a “file counter”, (i.e. it should not be used to
determine the number of files in the database).
•
Avoid overwriting client data. When entering a
new client or a new intake, make sure that the
form you are working in is blank by using the
Create New Client and Create New File buttons. If
not, you could be editing an existing file instead
of creating a new file.
•
• Be careful when editing data. Databases
automatically update information as you type.
Even if you don’t click the save button, any
changes you make to the information will be
preserved when you close the database program.
Keep your database up-to-date. Most data
entry mistakes happen in the rush to update your
information in time for quarterly reporting. If you
incorporate updating your database into the
regular practice of serving your clients, it will save
you from any reporting deadline stress, you will
make fewer mistakes, and in the long run you will
spend less time updating the database.
•
Back up your database. It takes a lot of
diligence and hard work to keep the information
in the Housing Help database up to date. Don’t
let your hard work go to waste because of a
technical glitch—protect your work by backing up
the database. Make sure your organization has a
plan for preserving the safety of your data.
•