1
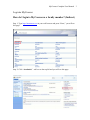
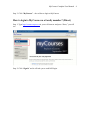
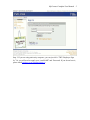
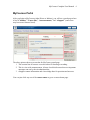
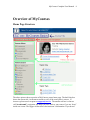
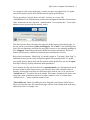
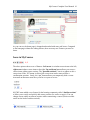
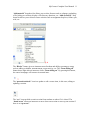
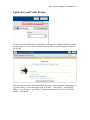
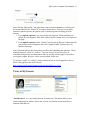
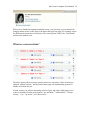
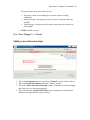
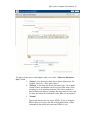
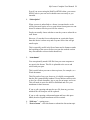
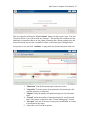
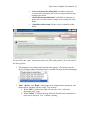
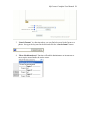
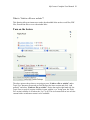
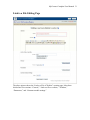
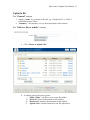
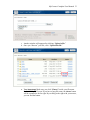
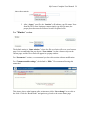
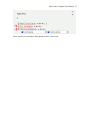
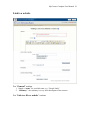
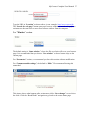
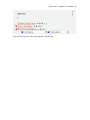
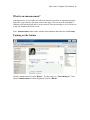
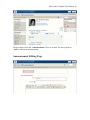
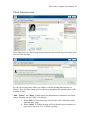
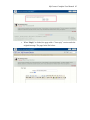
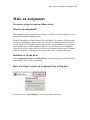
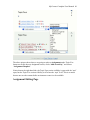
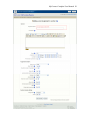
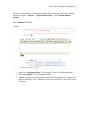
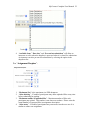
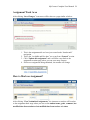
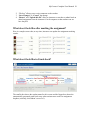
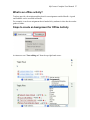
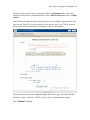
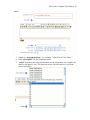
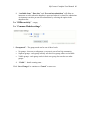
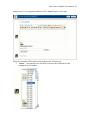
MyCourses Complete User Manual
1
MyCourses Complete User Manual
Table of Contents
Login to MyCourses …………………………………. 4
Indirect login …………………………………. 4
Direct login …………………………………… 5
MyCourses Portal …………………………………. 7
Overview of MyCourses …………………………………. 8
Home page Structure …………………………………. 9
Icons in MyCourses …………………………………. 11
Update Personal Profile Picture …………………………………. 13
Views in MyCourses …………………………………. 14
What are course sections? …………………………………. 15
What are course items? …………………………………. 16
Create Forum …………………………………. 17
What is a forum? …………………………………. 18
Forum Editing Page …………………………………. 19
Adding a new discussion topic …………………………………. 23
Upload a file or create a web link …………………………………. 30
What is “Link to a file or a web site”? …………………………………. 31
Link to a file editing page …………………………………. 32
Upload a file …………………………………. 33
Link to a web site …………………………………. 37
Create an announcement …………………………………. 40
Announcement editing page …………………………………. 42
Check announcement and other features …………………………………. 45
Create Assignment Drop box …………………………………. 48
What is assignment drop box? …………………………………. 49
Assignment Editing Page …………………………………. 51
Assignment work area …………………………………. 55
Create Assignment offline activity …………………………………. 58
What is an offline activity? …………………………………. 58
Assignment editing page …………………………………. 59
Assignment work area …………………………………. 62
Appendix A …………………………………. 65
2
MyCourses Complete User Manual
Log into MyCourses
How do I login to MyCourses as a faculty member? (Indirect)
Step 1: Type http://intranet.twu.ca in your web browser and press “Enter,” you will see
this page:
Step 2: Click “Academics” - red box on the top left and you will see this page:
3
MyCourses Complete User Manual
Step 3: Click “MyCourses” – the red box to login to MyCourses
How to login to MyCourses as a faculty member? (Direct)
Step 1: Type http://courses.mytwu.ca in your web browser and press “Enter,” you will
see:
Step 2: Click “Sign in” and it will take you to twuPASS login:
4
MyCourses Complete User Manual
Step 3: If you are using university computer, you can just click “TWU Employee Sign
In.” Or, you will need to supply your “twuNAME” and “Password. If you do not have it,
please email [email protected] or [email protected] .
5
MyCourses Complete User Manual
6
MyCourses Portal
After you login to MyCourses (either Direct or Indirect), you will see a portal page where
it lists “Calendar,” “Course lists,” “Announcements,” and “eSupport” (some users
may have more features listed).
The above picture shows a screen shot for MyCourses portal page.
1. This section lists all courses a user has either for learning or teaching.
2. This is a site-wide announcement. Always check this because there are important
messages sent out by the site administrators.
3. eSupport contact information and a knowledge base for questions and answers.
User can just click any one of the course names to get to a course home page.
MyCourses Complete User Manual
OVERVIEW OF MYCOURSES
7
MyCourses Complete User Manual
8
Overview of MyCourses
Home Page Structure
The above picture shows a portion of MyCourses course home page. The dark blue box
shows the course title. An instructor needs to verify if the course title is correct. If
incorrect, please send a request to [email protected]. The smaller red box is what we
call “breadcrumb” navigation; this helps you trace back to your course if you are “deep”
inside one course. The bigger red box shows the instructor’s information. If you do not
MyCourses Complete User Manual
9
see a picture in your course home page, it means you have not supplied one. To update
your profile picture, please check out this tutorial: update profile picture.
The top green box is a quick short cut to ALL activities in a course. The
“Administration” box includes many useful course management functions for instructors.
(Note: students do not have the same “Administration” view as instructors. To see what
students can see, please read this tutorial: views).
This above picture shows the reader the right side of MyCourses course home page. At
the top you have two buttons: Guide and eSupport. The “Guide” is the knowledge base
where you can find many useful tips for using MyCourses (we are constantly updating it).
The “eSupport” button shows our staff schedule and contact information. These two
buttons will always be available for both instructors and students to access.
Below these two buttons, “Shuo Feng” is currently logged in. The name “Shuo Feng” is
underlined so that you can easily and quickly update your personal profile. To update
your profile picture, please check out this tutorial: update profile.You can also “Logout”
from MyCourses by clicking the button inside parentheses.
At the bottom, the first icon from the left is a question mark icon. Throughout the use of
this state-of-the-art MyCourses system, you can easily learn what a feature can do or
mean by clicking that icon (Note: not all features have such an icon). You can also see
“Switch role to…” dropdown list in the middle. This feature is handy and it can be used
at any time when an instructor needs to see what a student’s view is (to learn about
“Switch role to…,” please read this tutorial: views.
“Turn edition on” button is probably the most frequently used feature in MyCourses.
When you click this icon, the course home page will turn to the editing mode with many
added icons. Here is a sample view:
MyCourses Complete User Manual 10
As you can see, the home page is changed and marked with many red boxes. Compared
to the homepage without the editing feature, there are many new features you need to
know.
Icons in MyCourses
1, 2
The above picture shows a set of features. Left arrow is to indent course items to the left;
right arrow indents course items to the right. Up and down button allows you to move
course items within course sections. The “pen and notebook” icon is to update or edit a
course item. If the “X” button is clicked, the course item can be removed after a
confirmation question. Lastly, the “eye” button allows you temporarily hide a course
item until an instructor turns the eye on for everyone to access.
3
MyTWU team added a new feature for the learning community called “Outline sections”
to allow you to easily and quickly add course sections (for weeks or topics). You can
change course outline sections at anytime while constructing a course (Please read this
article on the look of outline sections).
4
MyCourses Complete User Manual 11
“Add material” dropdown list allows you to select features such as webpages, uploading
a file, linking to a website, display a file directory functions, etc. “Add an activity” drop
down list allows you to choose course activities such as assignment drop box, forum, quiz,
wiki, etc.
5, 6
The “Blocks” feature gives an instructor more freedom and ability to manage a course
such as adding a calendar, announcement, recent activity, etc. The “Turn editing off”
button shows right after an instructor clicks “Turn editing on”. By pressing this button,
the course homepage will return to its normal state.
7
The “pen and notebook” icon is to update or edit a course item, in this case, editing or
updating a section.
The “eye” icon can hide an entire section from students or others if it is closed. The
“down arrow” allows an instructor to move down one section or move up one section if
there is an “up arrow”.
MyCourses Complete User Manual 12
Update Personal Profile Picture:
To edit a personal profile such as uploading a portrait picture, updating addresses, emails,
writing blogs, etc, a user clicks the name at the top of the course home page as shown in
the red box.
After clicking your name, MyCourses takes you to the “Personal profile” editing page. If
you look closely, you can see options such as “Profile,” “Edit profile,” “Forum posts,”
“Blog,” “Activity report,” and “Roles.” Among these options, you need to click “Edit
profile” – second tab.
MyCourses Complete User Manual 13
After clicking “Edit profile,” the page shows your personal information, scroll down to
the bottom and look for “Picture of” section as shown above. There are two possible
scenarios: upload a picture (no picture at all) or update a picture (deleting previous
picture).
1. If you upload a picture, you can just click the “Browse” button and find your
picture in local computer, then click “Update Profile” button at the very bottom of
the page.
2. If you update a picture, check “Delete” box first, click “Browse” button and find
your picture in local computer, then click “Update Profile” button at the very
bottom of the page.
Note: Sometimes the profile picture does not show after uploading and updating. This is
mostly because of “cache” or “cookies.” The web browser we use always try to
remember used pictures or information in order to quickly load the page for you when
you request it again; however, it does cause problem in this case.
To clear the “cache” or “cookies,” please read this article or check appendix A (let us
know if the page does not work for you).
http://support.nexis.com/lexiscom/record.asp?ArticleID=wg_cache
Views in MyCourses
“Switch roles to” is a very handy function for instructors. This menu allows you to
switch temporarily to another role so that you can see what the course looks like to
someone with that role.
MyCourses Complete User Manual 14
When you've finished navigating around the course, you can return to your normal role
using the button on the course page or the link at the top of any page. For example, notice
the difference between these two pictures. The second picture “hides” the “Downloads”
section in the student view.
What are course sections?
The above picture shows a course section (in this case 4 sections). After an instructor
adjusted “outline sections,” the MyCourse home page will automatically generate X
number of sections for you.
In each section, you will see alternating colours of grey and white, displaying a set of
icons we introduced earlier in the tutorial: “pen and book,” “Add material,” “Add an
activity,” “eye,” “up arrow,” and “down arrow.”
MyCourses Complete User Manual 15
What are course items?
“Course item” is a generic term we use to identify individual files (PDF, word, video or
audio) and actives (forums, assignments or wiki) that are listed in one course section. In
the above picture, we have a course item in PowerPoint, a PDF file, a Forum, and an
Assignment.
MyCourses Complete User Manual 16
Create Forums
MyCourses Complete User Manual 17
Making a Forum
What is a forum?
This activity can be the most important - it is here that most of the discussion takes place.
Forums can be structured in different ways and can include peer rating of each posting.
The postings can be viewed in a variety of formats and can include attachments. By
subscribing to a forum, participants will receive copies of each new posting in their email.
A teacher can impose subscription on everyone, if necessary.
What is the icon for forum on MyCourses?
Turn on the feature
The above picture shows that we are going to make a Forum under Topic Five. Instructor
first needs to scroll down to the lower section and click “Add an activity” and select
“Forum.”
Notice that on the right hand side, the Topic Four (or week 4) section visibility is open
with the “eye” being open (what is an eye?), but Topic Five section visibility is off where
the “eye” is off. This is to ensure that no one sees the content before an instructor wants it
to be available.
MyCourses Complete User Manual 18
Forum Editing Page
MyCourses Complete User Manual 19
The above picture shows the Forum editing and creation page. It has been divided into
four sections: “General,” “Grade,” “Post threshold for blocking,” and “Common
module settings.”
For “General” section:
1. Supply a forum name, e.g. “Week 5 Topic 5” (the * marker means “you must
supply a value”).
2. Choose a forum type:
A single simple discussion - is just a single topic, all on one page. Useful for
short, focused discussions.
Standard forum for general use - is an open forum where anyone can start a
new topic at any time. This is the best general purpose forum.
Each person posts one discussion - Each person can post exactly one new
discussion topic (everyone can reply to them though). This is useful when you
want each student to start a discussion about, say, their reflections on the week's
topic, and everyone else can respond to these.
Q And A Forum - The Q & A forum requires students to post their perspectives
before viewing other students' postings. After the initial posting, students can
view and respond to others' postings. This feature allows equal initial posting
opportunity among all students, thus encouraging original and independent
thinking.
3. Supply Forum Introduction (must supply)
MyCourses Complete User Manual 20
4. Force everyone to be subscribed? Default setting is no.
When a person is subscribed to a forum, it means that he or she will be sent email
copies of every post in that forum (posts are sent about 30 minutes after the post
was first written).
People can usually choose whether or not they want to be subscribed to each
forum.
However, if you choose to force subscription on a particular forum, then all
course users will be subscribed automatically, even those who enrol at a later time.
This is especially useful in the News forum and in forums towards the beginning
of the course (before everyone has worked out that they can subscribe to these
emails themselves).
If you choose the option "Yes, initially" then all current and future course users
will be subscribed initially but they can unsubscribe themselves at any time. If
you choose "Yes, forever" then they will not be able to unsubscribe themselves.
Note how the "Yes, initially" option behaves when you update an existing forum:
Changing from "Yes, initially" to "No" will not unsubscribe existing users; it will
only affect future course users. Similarly, changing later to "Yes, initially" will
not subscribe existing course users but only those enrolling later.
5. Read tracking for this forum? Default is Optional
If 'read tracking' for forums is enabled, users can track read and unread messages
in forums and discussions. The instructor can choose to force a tracking type on a
forum using this setting.
There are three choices for this setting:
•
•
•
Optional [default]: students can turn tracking on or off for the forum at their
discretion.
On: Tracking is always on.
Off: Tracking is always off.
6. Maximum attachment size. Default is 500KB
Attachments can be limited to a certain size file, chosen by the person who sets up
the forum.
Sometimes it is possible to upload a file larger than this size, but the file will not
be saved on the server and you may see an error.
MyCourses Complete User Manual 21
For “Grade” section:
1. Allow posts to be rated? Default is off. Check the box to enable this marking
feature.
2. Grade: possible scales or marks for this forum.
3. Restrict ratings to posts with dates: choose the date to open the forum and
the date to turn off the forum posting.
For “Post threshold for blocking”:
Time period for blocking, Post threshold for blocking, Post threshold for
warning
The concept of managed postings is very simple. Users will be blocked from
posting after a given number of posts in a given period, and as they approach that
number, they will be warned that they are approaching the threshold.
Setting either the warning threshold to 0 will disable warnings, and setting the
blocking threshold to 0 will disable blocking. If blocking is disabled, warnings
will automatically be disabled.
None of these settings affects the teacher’s posting.
For Common module settings:
1. Group Mode:
MyCourses Complete User Manual 22
The group mode can be one of three levels:
•
•
•
No groups - there are no subgroups; everyone is part of one big
community.
Separate groups - each group can only see their own group; others are
invisible.
Visible groups - each group works in their own group, but can also see
other groups.
2. Visible: default is shown.
Click “Save Changes” or “Cancel”
Adding a new discussion topic
1. This is the forum name that we set up from “General” section (refer to above).
2. This is the Forum Introduction from the “General” section.
3. This is the “Add a new discussion topic” button. When this is clicked, the page
takes users to a new forum posting page.
4. This is the function “Update this Forum” that an instructor can click when a
change to the original forum setup is needed.
MyCourses Complete User Manual 23
The above picture shows what happens after a user clicks “Add a new discussion
topic” button.
1. “Subject” is the discussion topic title to initiate discussions. For
example: Topic five: “Why study online?”
2. “Message” is the main text for the discussion topic. For example:
“Online courses and modules can be accessed from home, in the
workplace or at the learning institution. This allows students in
many different situations to continue their education at a time, and
in a way, that meets their individual needs. What is your opinion?”
3. “Format”
This format assumes the text is pure HTML. If you are using the
HTML editor to edit text, then this is the default format - all the
commands in the toolbar are producing HTML for you.
MyCourses Complete User Manual 24
Even if you are not using the RichText HTML editor, you can use
HTML code in your text and it should come out exactly as you
intended.
4. “Subscription”
When a person is subscribed to a forum, it means that he or she
will be sent email copies of every post in that forum (posts are sent
about 30 minutes after the post was first written).
People can usually choose whether or not they want to subscribe to
each forum.
However, if a teacher forces subscription on a particular forum,
then this choice is taken away and everyone in the class will get
email copies.
This is especially useful in the News forum and in forums towards
the beginning of the course (before everyone has worked out that
they can subscribe to these emails themselves).
5. “Attachment”
You can optionally attach ONE file from your own computer to
any post in the forums. This file is uploaded to the server and
stored with your post.
This is useful when you want to share a picture, for example, or a
Word document.
This file can be of any type, however, it is highly recommended
that the file is named using standard 3-letter internet suffixes such
as .doc for a Word document, .jpg or .png for an image, and so on.
This will make it easier for others to download and view your
attachment in their browsers.
If you re-edit a posting and attach a new file, then any previous
attached files for that post will be replaced.
If you re-edit a posting with an attachment and leave this space
blank, then the original attachment will be retained.
6. “Mail now” – coming soon…
7. “Post to forum” - click this button to submit the discussion topic.
MyCourses Complete User Manual 25
This is a page after clicking the “Post to forum” button. On the screen it says “You have
30 mins to edit it if you want to make any changes.” This usually tells a student (not the
administer or instructor) that he or she cannot constantly edit a forum postings since the
forum discussion may be sent via emails to others or the forum post is being marked.
At any time, a user can click “continue” to jump back into forum discussion main area.
1. “Discussion” lists all discussion topics instructor creates.
2. “Started by” lists the creator of one particular discussion topic; this
could be anyone in a classroom.
3. “Replies” tracks the number of replied messages for one discussion
topic.
4. “Unread” tracks the number of unread messages for one discussion
topic if the feature is turned on under “Forum editing page” section.
5. “Last post” lists who is the most recent person commented or created
a discussion for that topic.
6. “subscribe or not” has three options:
MyCourses Complete User Manual 26
“Force everyone to be subscribed” once this is turned on,
everyone in the classroom will receive a copy of email for any
posting in the forum.
“Show/edit current subscribers” will allow an instructor or
forum owner to add or remove people for accessing this entire
forum.
“Subscribe to this forum” allows a user to subscribe to this
forum.
If a user clicks the “topic” discussion (in this case, Why study online?), he or she will see
the above picture.
1. This function is very handy and it has four other options. Choose the ones you
prefer (“Display replies in threaded form” is suitable for large amount of postings):
2. “Edit,” “Delete,” and “Reply” usually appear for administrators, instructors, and
forum owners. Students can also “reply” to a message.
a. When “Edit” is clicked, the page will take you to the “Add a new
discussion topic” page.
b. When “Delete” is clicked, the page will look like this and an instructor or
topic owner can press “Yes” to delete a posting.
MyCourses Complete User Manual 27
c. When “Reply” is clicked, the page adds a “Your reply” section under the
original message. The page looks like below:
MyCourses Complete User Manual 28
3. “Search Forums” is a function where you can find a keyword in the forum or a
phrase. Just type the keyword in the box and click the “search forum” button.
4. “Move this discussion to” function will enable administrators or instructors to
move topics around inside the entire course.
MyCourses Complete User Manual 29
UPLOAD A FILE OR WEB LINK
MyCourses Complete User Manual 30
What is “Link to a file or a website”?
This function allows an instructor to make downloadable links such as word files, PDF
files, PowerPoint files or even video/audio links.
Turn on the feature
The above picture shows that we are going to press “Link to a file or website” under
Topic Five. Instructor first needs to scroll down to the lower section and click “Add
material” and select “Link to a file or website”. Notice that on the right hand side, the
Topic Four (or week 4) section visibility is open with the “eye” being open, but Topic
Five section visibility is off where the “eye” is off. This is to ensure that no one sees the
content before an instructor wants it to be available.
MyCourses Complete User Manual 31
Link to a File Editing Page
The above picture shows the “Link to a File of Website” creation page. It has been
divided into five sections: “General,” “Link to a file or website,” “Window,”
“Parameters,” and “Common module settings.”
MyCourses Complete User Manual 32
Upload a file
For “General” section:
1. Supply a “name” for your link or file title, e.g. “Google Links” or “Week 5
PowerPoint Lecture Notes.”
2. “Summary” - the summary is a very short description of the resource..
For “Link to a file or website” section:
a. Click “Choose or upload a file.”
b. A window pops up like above picture.
i. “Make a folder” will allow you to create file folders.
ii. “Select all” selects all documents in this window.
iii. “Deselect all” deselects all documents in this window.
iv. “Upload a file” will take instructor to the file upload area.
MyCourses Complete User Manual 33
c. Another window will appear after clicking “Upload a file.”
d. Once you “Browse” your file, click “Upload this file.”
e. Very important: Make sure you click “Choose” beside your file name.
Note from MyTWU team: If you have a long file name, the choose button
will be extended to the far right. By scrolling to the right with your mouse,
you can find the button.
MyCourses Complete User Manual 34
f. After “choose” your file, the “location” will indicate your file name. Note
from MyTWU team: Instructor cannot simply type the file name; the
proper procedure must be followed in order to upload a file.
For “Window” section:
The default setting is “Same window,” where the file or website will cover your browser
page. It is recommended tha you choose “New window” so that a learner stays on the
current page, and the file or link will appear in a popup window.
For “Parameters” section, we recommend you leave this section without modification
For “Common module settings”, the default is “Hide.” We recommend leaving this
untouched.
This picture shows what happens after an instructor clicks “Save change” to save his or
her work. Click the “Breadcrumb” navigation to go back to the course home page.
MyCourses Complete User Manual 35
The red arrows are pointing to files uploaded and a website link
MyCourses Complete User Manual 36
Link to a website
For “General” section:
1. Supply a “name” for your link name, e.g. “Google Links”
2. “Summary” - the summary is a very short description of the resource.
For “Link to a file or website” section:
MyCourses Complete User Manual 37
Type the URL in “Location” as shown above, in our example, http://www.twu.ca/glc.
The “Search for web page” button opens up a browser window to search web pages, so
an instructor does not have to start a new browser window from the computer.
For “Window” section:
The default setting is “Same window,” where the file or website will cover your browser
page. It is recommended that you choose “New window” so that a learner stays on the
current page.
For “Parameters” section, we recommend you leave this section without modification.
For “Common module settings,” the default is “Hide.” We recommend leaving this
untouched.
This picture shows what happens after an instructor clicks “Save changes” to save his or
her work. Click the “Breadcrumb” navigation to go back to the course home page.
MyCourses Complete User Manual 38
The red arrows point to files uploaded and a website link.
MyCourses Complete User Manual 39
CREATE AN ANNOUNCEMENT
MyCourses Complete User Manual 40
What is an announcement?
Announcement is a very handy tool where an instructor can show an important message
right after a user comes to the main course home page. The screen on the individual’s
computer will become black and he or she needs to click the message to view it before he
or she can eliminate the black screen.
Note: Announcement shares some common functionalities and behaviors with Forum.
Turning on the feature
Usually, announcement is under “Blocks”. The first step is to “Turn editing on”. Next,
choose Announcement from the dropdown list from “Blocks”.
MyCourses Complete User Manual 41
The box shows where the “Announcements” block is located. The arrow points to
“Add” to add a new announcement.
Announcement Editing Page
MyCourses Complete User Manual 42
After clicking “Add” in the announcement block, the page takes instructor to the “course
announcement” editing page. The box indicates the type of this announcement.
1. Supply “Subject” in the required field. Usually, this it the title of the
announcement.
2. Type “Message” in the editing box. This is where instructors type the contents of
the announcement.
3. “Format”
This format assumes the text is pure HTML. If you are using the HTML editor to
edit text, then this is the default format - all the commands in the toolbar are
producing HTML for you.
Even if you are not using the RichText HTML editor, you can use HTML code in
your text and it should come out exactly as you intended.
4. “Subscription”
When a person is subscribed to a forum, it means that they will be sent email
copies of every post in that forum (posts are sent about 30 minutes after the post
was first written).
People can usually choose whether or not they want to subscribe to each forum.
However, if a teacher forces subscription on a particular forum, then this choice is
taken away and everyone in the class will get email copies.
This is especially useful in the News forum and in forums towards the beginning
of the course (before everyone has worked out that they can subscribe to these
emails themselves).
5. “Attachment”
MyCourses Complete User Manual 43
You can optionally attach ONE file from your own computer to any post in the
forums. This file is uploaded to the server and stored with your post.
This is useful when you want to share a picture, for example, or a Word document.
This file can be of any type, however, it is highly recommended that the file is
named using standard 3-letter internet suffixes such as .doc for a Word
document, .jpg or .png for an image, and so on. This will make it easier for others
to download and view your attachment in their browsers.
If you re-edit a posting and attach a new file, then any previous attached files for
that post will be replaced.
If you re-edit a posting with an attachment and leave this space blank, then the
original attachment will be retained.
6. “Mail now” – coming soon…
7. “Post to forum” - click this button to submit discussion topic.
This pages shows what happens after clicking the “Post to forum” button. On the screen
it says “You have 30 mins to edit it if you want to make any changes.” This usually tells a
student (not the administer or instructor) that she/he cannot constantly edit a forum
posting since the forum discussion maybe sent via emails to others or the forum post is
being marked. Since this is an announcement and only the instructor can create, this
message is irrelevant. (Announcement shares some functionalities and behaviors with
forums).
MyCourses Complete User Manual 44
Check Announcement
The red box shows you the message that the instructor just created in previous steps. Now,
let us click the message.
As you can see, this picture looks very similar to a forum posting (and indeed it is a
forum!). There are three buttons you can choose to manipulate this announcement. (refer
to forum section)
“Edit,” “Delete,” and “Reply” usually appear for administrators, instructors, and forum
owners. Students can also “reply” to a message.
a. When “Edit” is clicked, the page will take you to the “Add a new course
announcement” page.
b. When “Delete” is clicked, the page will look like this and an instructor or
topic owner can press “Yes” to delete a posting.
MyCourses Complete User Manual 45
c. When “Reply” is clicked, the page adds a “Your reply” section under the
original message. The page looks like below:
MyCourses Complete User Manual 46
MyCourses Complete User Manual 47
CREATE AN ASSIGNMENT
MyCourses Complete User Manual 48
Make an Assignment
(Two parts: a drop box and an offline activity)
What is an assignment?
The assignment activity module allows teachers to collect work from students, review it
and provide feedback including grades.
Students can submit any digital content (files), including, for example, word-processed
documents, spreadsheets, images, audio and video clips. Assignments don't necessarily
have to consist of file uploads. Alternatively, teachers can ask students to type directly
into Moodle using an online assignment. There is also an offline activity assignment
which can be used to remind students of 'real-world' assignments they need to complete
and to record grades in Moodle for activities that don't have an online component.
Relations to Grade book
Once Assignment Dropbox and offline activity are created, the course gradebook will
automatically create an entry for grading.
Here are Steps to create an Assignment (as a drop box)
An instructor can “Turn editing on” from the top right hand corner.
MyCourses Complete User Manual 49
The above picture shows that we are going to make an Assignment under Topic Five.
Instructor scrolls down to designated section, clicks “Add an activity,” and selects
“Assignment Dropbox”.
Notice that on the right hand side, the Topic Four section visibility is open with the “eye”
open, but the Topic Five section visibility is off where the “eye” is off. This is to ensure
that no one sees the content before an instructor wants it to be available.
Assignment Editing Page
MyCourses Complete User Manual 50
MyCourses Complete User Manual 51
The above picture shows the assignment editing and creation page. It has been divided
into three sections: “General,” “Assignment Dropbox,” and “Common module
settings.”
For “General” section:
1. Supply an “Assignment Name.” For example, “Topic Five Reflection Paper.”
2. Enter “Description” for the assignment detail.
3. “Grade” dropdown list is the possible mark for the assignment. For example: the
mark for this paper is 100. Instructor selects 100 from the list. Look at the screen
shot below:
MyCourses Complete User Manual 52
4. “Available from,” “Due date,” and “Prevent late submission” will allow an
instructor to select when the dropbox is open and when it is closed for submission.
An instructor can also prevent late submission by selecting the option in the
dropdown list.
For “Assignment Dropbox”:
1. “Maximum Size” is the maximum size PER document.
2. “Allow deleting” - If enabled, participants may delete uploaded files at any time
before submitting for grading.
3. “Maximum number of uploaded files” - Maximum number of files each
participant may upload. This number is not shown to students. Please write the
actual number of requested files in assignment description.
4. “Allow notes” - If enabled, participants may enter notes into the text area. It is
similar to online text assignment.
MyCourses Complete User Manual 53
This text box can be used for communication with the grading person, assignment
progress description or any other written activity.
5. “Hide description before available” - If enabled, assignment description is
hidden before the opening date.
6. “Email alerts to teachers” - If enabled, then teachers are alerted with a short
email whenever students add or update an assignment submission.
Only teachers who are able to grade the particular submission are notified. So, for
example, if the course uses separate groups, then teachers restricted to particular
groups won't receive any notices about students in other groups.
For “Common Module settings”:
1. “Group mode” - The group mode can be one of three levels:
•
•
•
No groups - there are no subgroups; everyone is part of one big community.
Separate groups - each group can only see their own group; others are invisible.
Visible groups - each group works in their own group, but can also see other
groups.
3. “Visible” – details coming soon…
Click “Save Changes” to continue or “Cancel” to start over.
MyCourses Complete User Manual 54
Assignment Work Area
After clicking “Save Changes,” instructors will be taken to a page similar to below:
1. This is the assignment title we have just created under “breadcrumb”
navigation.
2. This is the “Available and Due date” we set up from “General” section.
3. Click “Update this assignment” and it will take a user back to the
assignment creation page where you can reset many features.
4. If there are assignments being submitted, the number will change.
How to Mark an Assignment?
After clicking “View X submitted Assignments,” the instructor or teacher will be taken
to the assignment back stage where you can see the student name, grade, comment, last
modified time from student or last modified time from teacher and status.
MyCourses Complete User Manual 55
Imagine there is an assignment submitted; click “status” button on the right.
Instructor or teacher will be taken to the marking area. From the top:
1. “Grade” – this dropdown list will allow you select the final mark for this
assignment for the student.
MyCourses Complete User Manual 56
2. “The box” allows you to write comments to the student.
3. “Save Changes” or “Cancel” the change.
4. “Browse” and “Upload this file” allow an instructor or teacher to submit back an
edited assignment from the instructor’s local computer so that students can see
how they did.
What does it look like after marking the assignment?
Here is a sample screen shot; at any time, instructor can update the assignment marking
results:
What does it look like in Grade book?
The smaller box shows the student name for this course and the bigger box shows the
automatically generated grade book entry when an instructor creates an assignment
dropbox (currently, this student’s score is 0).
MyCourses Complete User Manual 57
What is an offline activity?
Teachers provide a description and due date for an assignment outside Moodle. A grade
and feedback can be recorded in Moodle.
For example, it can be an assignment that is handed in by students in class but the teacher
grades it online.
Steps to create an Assignment for Offline Activity
An instructor can “Turn editing on” from the top right hand corner.
MyCourses Complete User Manual 58
The above picture shows that we are going to make an Assignment under Topic Five.
Instructor scrolls down to designated section, clicks “Add an activityand selects “Offline
activity” .
Notice that on the right hand side, the Topic Four section visibility is open with the “eye”
open, but the Topic Five section visibility is off where the “eye” is off. This is to ensure
that no one sees the content before an instructor wants it to be available.
The above picture shows the assignment editing and creation page. It has been divided
into three sections: “General,” “offline activity,” and “Common module settings.”
For “General” section:
MyCourses Complete User Manual 59
5. Supply an “Assignment Name.” For example, “Topic Five in Class Essay.”
6. Enter “Description” for the assignment detail.
7. “Grade” dropdown list is the possible mark for the assignment. For example: the
mark for this paper is 100. The instructor selects 100 from the list. Look at the
screen shot below:
MyCourses Complete User Manual 60
8. “Available from,” “Due date,” and “Prevent late submission” will allow an
instructor to select when the dropbox is open and when it is closed for submission.
An instructor can also prevent late submission by selecting the option in the
dropdown list.
For “Offline activity” – empty
For “Common Module settings”:
1. “Group mode” - The group mode can be one of three levels:
•
•
•
No groups - there are no subgroups; everyone is part of one big community.
Separate groups - each group can only see their own group; others are invisible.
Visible groups - each group works in their own group, but can also see other
groups.
4. “Visible” – details coming soon…
Click “Save Changes” to continue or “Cancel” to start over.
MyCourses Complete User Manual 61
Assignment Work Area
After clicking “Save Changes”, instructor will be taken to a page similar to below:
1. This is the assignment title we have just created under “breadcrumb”
navigation.
2. This is the “Available and Due date” we set up from the “General”
section.
3. Click “Update this assignment” will take a user back to the assignment
creation page where you can reset many features.
4. Offline activity will always have “0 submitted assignment” (distinguish
this from “assignment dropbox”).
How to Mark an Assignment?
After clicking “View X submitted Assignments,” instructor or teacher will be taken to
the assignment back stage where you can see the student name, grade, comment, last
modified time from student or last modified time from teacher and status.
MyCourses Complete User Manual 62
Imagine there is an assignment submitted; click “status” button on the right.
Instructor or teacher will be taken to the marking area. From the top:
5. “Grade” – this dropdown list will allow you select the final mark for this
assignment for the student
MyCourses Complete User Manual 63
6. “The box” allows you to write comments to the student.
7. “Save Changes” or “Cancel” the change.
8. “Browse” and “Upload this file” allow an instructor or teacher to submit back an
edited assignment from the instructor’s local computer so that students can see
how they did.
What does it look like after marking the assignment?
Here is a sample screen shot; at any time, instructor can update the assignment marking
results:
What does it look like in Grade book?
The smaller box shows the student name for this course. Number 1 box shows the
automatically generated grade book entry when an instructor creates an assignment
dropbox. Number 2 box shows the automatically generated offline activity.
MyCourses Complete User Manual 64
Appendix A: Clearing Cache and Cookies
Clearing Cache on Microsoft Internet Explorer 6.0
®
1.
2.
3.
4.
5.
Click Start and select Settings, then Control Panel.
Double-click Internet Options to open Internet Properties.
Click Delete Files.
Click OK on the Delete Files dialog box.
Click OK.
Clearing Cache on Microsoft Internet Explorer 7.0
®
1.
2.
3.
4.
5.
6.
7.
8.
Click Start and select Settings, then Control Panel.
Double-click Internet Options.
Click the General tab.
Click Delete under the Browsing History section.
Click Delete Files in the Delete Browsing History dialog box.
Click OK.
Click Close.
Close and re-launch your browser.
Clearing Cache on Firefox 1.5
1.
2.
3.
4.
5.
Click Tools and select Options.
Click the Privacy icon.
Click the Cache tab and click Clear Cache Now.
Click OK.
Exit and re-launch the browser.
Clearing Cache on Firefox 2.0
1.
2.
3.
4.
5.
Click Tools and select Options.
Click the Advanced icon and click the Network tab.
Click Clear Now under the Cache section.
Click OK.
Exit and re-launch the browser.
Safari 2.0 for Macintosh
1. Click the Safari menu and select Empty Cache.
2. Click Empty on the Are you sure message box.
3. Exit and re-launch the browser.
MyCourses Complete User Manual 65
Firefox 1.5 for Macintosh
1.
2.
3.
4.
5.
Click the Firefox menu and select Preferences.
Click the Privacy icon and click the Cache tab.
Click Clear Cache Now.
Click the X in the top left corner to close the Privacy window.
Exit and re-launch the browser.
Firefox 2.0 for Macintosh
1.
2.
3.
4.
5.
Click the Firefox menu and select Preferences.
Click the Advances icon and click the Network tab.
Click Clear Now under the Cache section.
Click the X in the top left corner to close the Advanced window.
Exit and re-launch the browser.
BlackBerry Handheld
Clearing the content caches clears both the rendered pages and server data:
1. Highlight the Browser icon and click the trackwheel.
2. Click the trackwheel again to display the Browser Options menu.
3. Scroll down to Options and click the trackwheel to open the Browser Options
screen.
4. Scroll down to General Properties and click the trackwheel to open the General
Properties screen.
5. Click the trackwheel to open the Cache menu.
6. Scroll down to Clear Content Caches and click the trackwheel to clear the cache
and return to the General Properties screen.
7. Press the Escape button to page back to the main menu.