1
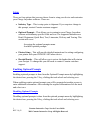
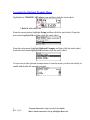
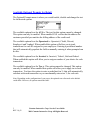
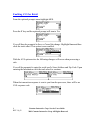
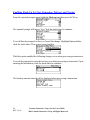
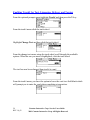
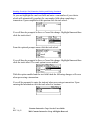
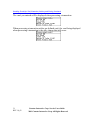
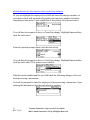
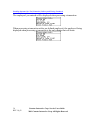
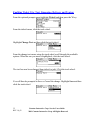
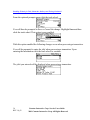
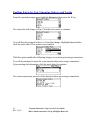
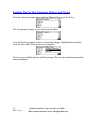
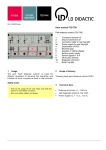
CHARGE ANYwhereTM
USER MANUAL
Setup
There are four options that you can choose from to setup your device and customize
your Charge Anywhere software. These are:
· Industry Type – This is setup prior to shipment. If you require a change to
this prompt, contact Comstar customer support.
· Optional Prompts – This allows you to customize your Charge Anywhere
software with industry specific fields and text. The supported industries are
Retail, Restaurant, Quick Rest, Taxi, Limousine, Delivery and Towing. This
section will cover:
Accessing the optional prompts menu.
Available optional prompts.
· Printer Setup – This will provide detailed instructions for setting configuring
your printer with your CHARGE ANYwhere device
· Receipt Header – This will allow you to review the header that will print on
your receipts. To change this you will need to contact Comstar customer
support.
Enabling Optional Prompts
Enabling optional prompts is done from the Optional Prompts menu by highlighting
the desired one, pressing the Y key, clicking the track wheel and selecting save.
When enabling certain optional prompts you will be prompted at another screen to
enter additional information. After entering the required information click the track
and select save.
Disabling Optional Prompts
Disabling optional prompts is done from the optional prompts menu by highlighting
the desired one, pressing the N key, clicking the track wheel and selecting save.
1
REV 10_02
Comstar Interactive Corp. Service Users Guide
2001 Comstar Interactive Corp. All Rights Reserved
Accessing the Optional Prompts Menu
Highlight the CHARGE ANYwhere icon and then click the track wheel.
CHARGE ANYwhere Icon
From the menu options highlight Setup and then click the track wheel. From the
next menu highlight Ok and then click the track wheel.
From the setup menu highlight Optional Prompts and then click the track wheel.
From the next menu highlight Ok and then click the track wheel.
You are now at the optional prompts menu. From this menu you have the ability to
enable and disable the optional prompts.
2
REV 10_02
Comstar Interactive Corp. Service Users Guide
2001 Comstar Interactive Corp. All Rights Reserved
Available Optional Prompts for Retail
The Optional Prompts menu is where you would enable, disable and change the text
for the desired options.
The available optional text for AVS is: The text for this option cannot be changed.
This option can only be enabled. When enabled AVS verifies that the address the
customer provided you matches the billing address of the credit card.
The available optional text for Operator# is: Operator#, Clerk#, Driver#,
Employee# and Vendor#. When enabled this option will allow you to track
transactions for each ID assigned to your employees. Entering a predefined number
that will automatically populate the field or manually entering it when prompted can
do this.
The available optional text for Invoice# is: Invoice#, Ticket#, Job# and Order#.
When enabled this option will allow you to assign a number of your choice for each
transaction.
The available optional text for Tax is: This option cannot be changed. This option
can only be enabled. When enabled this option will allow you to apply tax to each
transaction. You have the option to enter a predefined tax % that will automatically
calculate with each transaction or you can manually enter a tax % for each sale.
Note: Depending on the configuration of your pager, the optional text referenced as the default
could differ. However, all options remain the same.
3
REV 10_02
Comstar Interactive Corp. Service Users Guide
2001 Comstar Interactive Corp. All Rights Reserved
Enabling AVS for Retail
From the optional prompts menu highlight AVS.
Press the Y key and the optional prompt will turn to Yes.
You will then be prompted to Save or Cancel the change. Highlight Save and then
click the track wheel. This option is now enabled.
With the AVS option active the following changes will occur when processing a
sale:
You will be prompted to enter the credit card’s Street Address and Zip Code. Upon
entering the information click the track wheel to continue.
When the transaction response is sent to you from the processor, there will be an
AVS response code.
4
REV 10_02
Comstar Interactive Corp. Service Users Guide
2001 Comstar Interactive Corp. All Rights Reserved
Enabling Operator# for Retail
From the optional prompts menu highlight Operator# and then press the Y key.
From the operator# menu click the track wheel.
Highlight Change Text and then click the track wheel.
From the change text menu, using the track wheel scroll through the available
options. When the one you want is highlighted, click the track wheel.
The text has now been changed from operator# to employee#.
From the operator# menu, you have the option to leave the employee# text field
blank which will prompt you to enter the employee# when completing a transaction.
5
REV 10_02
Comstar Interactive Corp. Service Users Guide
2001 Comstar Interactive Corp. All Rights Reserved
Enabling Operator# for Retail Continued
Or you can highlight the employee# text field and enter an operator number of your
choice which will automatically populate the operator number field when
completing a transaction. Upon completion of this portion click the track wheel.
You will then be prompted to Save or Cancel the change. Highlight Save and then
click the track wheel.
From the optional prompts menu click the track wheel.
You will then be prompted to Save or Cancel the change. Highlight Save and then
click the track wheel. This option is now enabled.
With this option active and the text field blank the following changes will occur
when processing a transaction:
6
REV 10_02
Comstar Interactive Corp. Service Users Guide
2001 Comstar Interactive Corp. All Rights Reserved
Enabling Operator# for Retail Continued
You will be prompted to enter the employee# when processing a transaction. Upon
entering the information click the track wheel to continue.
The employee# you entered will be displayed when processing a transaction.
When processing a transaction with a pre defined employee#, the employee# being
displayed when processing a transaction is the only change that will occur.
7
REV 10_02
Comstar Interactive Corp. Service Users Guide
2001 Comstar Interactive Corp. All Rights Reserved
Enabling Invoice# for Retail
From the optional prompts menu highlight Invoice# and then press the Y key.
From the invoice# menu, click the track wheel.
Highlight Change Text and then click the track wheel.
From the change text menu, using the track wheel scroll through the available
options. When the one you want is highlighted, click the track wheel.
The text has now been changed from invoice# to ticket#. Click the track wheel.
You will then be prompted to Save or Cancel the change. Highlight Save and then
click the track wheel.
8
REV 10_02
Comstar Interactive Corp. Service Users Guide
2001 Comstar Interactive Corp. All Rights Reserved
Enabling Invoice# for Retail Continued
From the optional prompts menu click the track wheel.
You will then be prompted to Save or Cancel the change. Highlight Save and then
click the track wheel. This option is now enabled.
With this option activated the following changes occur when processing a
transaction.
You will be prompted to enter the Ticket# when processing a transaction. Upon
entering the information click the track wheel to continue.
The Ticket# you entered will be displayed when processing a transaction.
9
REV 10_02
Comstar Interactive Corp. Service Users Guide
2001 Comstar Interactive Corp. All Rights Reserved
Enabling Tax for Retail
From the optional prompts menu highlight TAX and then press the Y key.
From the tax menu, you have the option of leaving the tax rate (%) text field blank,
which will prompt you to enter the percentage of tax to charge when completing a
transaction.
Or you can highlight the Tax Rate (%) text field and enter the tax percentage that
will automatically be charged to each sale processed. Upon completion of this
portion click the track wheel.
You will then be prompted to Save or Cancel the change. Highlight Save and then
click the track wheel.
From the optional prompts menu click the track wheel.
10
REV 10_02
Comstar Interactive Corp. Service Users Guide
2001 Comstar Interactive Corp. All Rights Reserved
Enabling Tax for Retail Continued
You will then be prompted to Save or Cancel the change. Highlight Save and then
click the track wheel. This option is now enabled.
With the Tax option enabled and the tax rate% left at 0.00 the following changes
will occur when processing a transaction:
You will be prompted to enter the Tax Amount when processing a transaction. Upon
entering the information click the track wheel to continue.
The tax amount you entered will be displayed and added to the total sale when
processing a transaction.
When processing a transaction with a pre defined tax amount, the following changes
will occur when processing a transaction:
You will be prompted to confirm that you want to apply the predefined tax % to the
transaction. Highlight Yes and then click the track wheel. (by selecting no, tax will
not be applied to the transaction.)
The tax amount that you pre-defined will be displayed and added to the total sale
when processing a transaction.
11
REV 10_02
Comstar Interactive Corp. Service Users Guide
2001 Comstar Interactive Corp. All Rights Reserved
Available Optional Prompts for Restaurant/Quick Restaurant
The optional prompts menu is where you would enable, disable and change the text
for the desired options.
The available optional text for Server Id is: Server Id, Bartender Id and Waiter Id.
When enabled this option will allow you to track transactions for each ID assigned
to your employees. Entering a predefined number that will automatically populate
the field or manually entering it when prompted can do this.
The available optional text for Ticket # is: Ticket#, Job#, Order# and Invoice#.
When enabled this option will allow you to assign a number of your choice for each
transaction.
The available optional text for Table # is: Table#, Station#, Register#, Trailer#
Bike#, Truck#, Van#, Sedan# Car# and Cab#. When enabled this option will allow
you to track transactions for each ID assigned to your employees. Entering a
predefined number that will automatically populate the field or manually entering it
when prompted can do this.
The available optional text for Food/Beverage is: Food and Take out. When this
option is enabled and you are processing a transaction, the screen will prompt you to
enter separate dollar amounts for the text that you select. The totals will then be
combined when the transaction is processed.
The available optional text for Tax is: This option cannot be changed. This option
can only be enabled. When enabled this option will allow you to apply tax to each
transaction. You have the option to enter a predefined tax % that will automatically
calculate with each transaction or you can manually enter a tax % for each sale.
The available optional text for Tips is: This option cannot be changed. This option
can only be enabled. When enabled this option will allow you to add a tip amount to
the total transaction.
Note: Depending on the configuration of your pager, the optional text referenced as the default could differ.
However, all options remain the same.
12
REV 10_02
Comstar Interactive Corp. Service Users Guide
2001 Comstar Interactive Corp. All Rights Reserved
Enabling Server ID for Restaurant/Quick Restaurant
From the optional prompts menu highlight Server ID and then press the Y key.
From the server id menu click the track wheel.
Highlight Change Text and then click the track wheel.
From the change text menu, using the track wheel scroll through the available
options. When the one you want is highlighted, click the track wheel.
The text has now been changed from server id to bartender id.
From the server id menu you have the option to leave the bartender id text field
blank, which will prompt you to enter the bartender id when completing a
transaction.
13
REV 10_02
Comstar Interactive Corp. Service Users Guide
2001 Comstar Interactive Corp. All Rights Reserved
Enabling The Server ID for Restaurant/Quick Restaurant Continued
Or you can highlight the bartender id text field and enter a bartender id of your
choice, which will automatically populate the bartender id field when completing a
transaction. Upon completion of this portion click the track wheel.
You will then be prompted to Save or Cancel the change. Highlight Save and then
click the track wheel.
From the optional prompts menu click the track wheel.
You will then be prompted to Save or Cancel the change. Highlight Save and then
click the track wheel. This option is now enabled.
With this option enabled and the text field blank the following changes will occur
when processing a transaction:
You will be prompted to enter the bartender id when processing a transaction. Upon
entering the information click the track wheel to continue.
14
REV 10_02
Comstar Interactive Corp. Service Users Guide
2001 Comstar Interactive Corp. All Rights Reserved
Enabling The Server ID for Restaurant/Quick Restaurant Continued
The bartender id you entered will be displayed when processing a transaction.
When processing a transaction with a pre defined bartender id, the bartender id being
displayed, when processing a transaction is the only change that will occur.
15
REV 10_02
Comstar Interactive Corp. Service Users Guide
2001 Comstar Interactive Corp. All Rights Reserved
Enabling Ticket # for Restaurant/Quick Restaurant
From the optional prompts menu highlight Ticket# and then press the Y key.
From the ticket# menu, click the track wheel.
Highlight Change Text and then click the track wheel.
From the change text menu, using the track wheel scroll through the available
options. When the one you want is highlighted, click the track wheel.
The text has now been changed from ticket# to job#. Click the track wheel.
You will then be prompted to Save or Cancel the change. Highlight Save and then
click the track wheel.
16
REV 10_02
Comstar Interactive Corp. Service Users Guide
2001 Comstar Interactive Corp. All Rights Reserved
Enabling Ticket # for Restaurant/Quick Restaurant Continued
From the optional prompts menu click the track wheel.
You will then be prompted to Save or Cancel the change. Highlight Save and then
click the track wheel. This option is now enabled.
With this option enabled the following changes occur when processing a transaction:
You will be prompted to enter the job# when processing a transaction. Upon
entering the information click the track wheel to continue.
The job# you entered will be displayed when processing a transaction.
17
REV 10_02
Comstar Interactive Corp. Service Users Guide
2001 Comstar Interactive Corp. All Rights Reserved
Enabling Table # for Restaurant/Quick Restaurant
From the optional prompts menu highlight Table# and then press the Y key.
From the table# menu click the track wheel.
Highlight Change Text and then click the track wheel.
From the change text menu, using the track wheel scroll through the available
options. When the one you want is highlighted, click the track wheel
The text has now been changed from table# to station#.
From the table# menu, you have the option to leave the station# text field blank
which will prompt you to enter the station# when completing a transaction.
18
REV 10_02
Comstar Interactive Corp. Service Users Guide
2001 Comstar Interactive Corp. All Rights Reserved
Enabling Station # for Restaurant/Quick Restaurant Continued
Or you can highlight the station# text field and enter a station number of your choice
which will automatically populate the station number field when completing a
transaction. Upon completion of this portion click the tack wheel.
You will then be prompted to Save or Cancel the change. Highlight Save and then
click the track wheel.
From the optional prompts menu click the track wheel.
You will then be prompted to Save or Cancel the change. Highlight Save and then
click the track wheel. This option is now enabled.
With this option enabled and the text field blank the following changes will occur
when processing a transaction:
You will be prompted to enter the station# when processing a transaction. Upon
entering the information click the track wheel to continue.
19
REV 10_02
Comstar Interactive Corp. Service Users Guide
2001 Comstar Interactive Corp. All Rights Reserved
Enabling Station # for Restaurant/Quick Restaurant Continued
The station# you entered will be displayed when processing a transaction.
When processing a transaction with a pre defined station#, the station# being
displayed when processing a transaction is the only change that will occur.
20
REV 10_02
Comstar Interactive Corp. Service Users Guide
2001 Comstar Interactive Corp. All Rights Reserved
Enabling Food/Beverage for Restaurant/Quick Restaurant
From the optional prompts menu highlight Food/Beverage and then press the Y key.
From the food menu click the track wheel.
Highlight Change Text and then click the track wheel.
From the change text menu, using the track wheel scroll through the available
options. When the one you want is highlighted, click the track wheel
The text has now been changed from food to take out. Click the track wheel.
21
REV 10_02
Comstar Interactive Corp. Service Users Guide
2001 Comstar Interactive Corp. All Rights Reserved
Enabling Food/Beverage for Restaurant/Quick Restaurant Continued
You will then be prompted to Save or Cancel the change. Highlight Save and then
click the track wheel.
From the optional prompts menu click the track wheel.
You will then be prompted to Save or Cancel the change. Highlight Save and then
click the track wheel. This option is now enabled.
With this option enabled the following changes will occur when processing a
transaction:
You will be prompted to enter the take out amount when processing a transaction.
Upon entering the information you will click the track wheel to proceed. Take out
will appear on your transaction.
22
REV 10_02
Comstar Interactive Corp. Service Users Guide
2001 Comstar Interactive Corp. All Rights Reserved
Enabling Tax for Restaurant/Quick Restaurant
From the optional prompts menu highlight TAX and then press the Y key.
From the tax menu, you have the option of leaving the tax rate (%) # text field blank
which will prompt you to enter the percentage of tax to charge when completing a
transaction.
Or you can highlight the Tax Rate (%) text field and enter the tax percentage that
will automatically be charged to each sale processed. Upon completion of this
portion click the tack wheel.
You will then be prompted to Save or Cancel the change. Highlight Save and then
click the track wheel.
From the optional prompts menu click the track wheel.
23
REV 10_02
Comstar Interactive Corp. Service Users Guide
2001 Comstar Interactive Corp. All Rights Reserved
Enabling Tax for Restaurant/Quick Restaurant Continued
You will then be prompted to Save or Cancel the change. Highlight Save and then
click the track wheel. This option is now enabled.
With the Tax option enabled and the tax rate% left at 0.00 the following changes
will occur when processing a transaction:
You will be prompted to enter the tax amount when processing a transaction. Upon
entering the information click the track wheel to continue.
The tax amount you entered will be displayed and added to the total sale when
processing a transaction.
When processing a transaction with a pre defined tax amount, the following changes
will occur when processing a transaction:
You will be prompted to confirm that you want to apply the predefined tax % to the
transaction. Highlight Yes and then click the track wheel. (by selecting no, tax will
not be applied to the transaction.)
The tax amount that you pre-defined will be displayed and added to the total sale
when processing a transaction.
24
REV 10_02
Comstar Interactive Corp. Service Users Guide
2001 Comstar Interactive Corp. All Rights Reserved
Enabling Tips for Restaurant/Quick Restaurant
From the optional prompts menu highlight Tips and then press the Y key.
The Tips prompt changes to yes, click the track wheel.
You will then be prompted to Save or Cancel the change. Highlight Save and then
click the track wheel. This option is now enabled.
There are two available options with this prompt. They are tip amount known and tip
amount unknown. Please see Types of Transactions page 21 and 26 for details.
25
REV 10_02
Comstar Interactive Corp. Service Users Guide
2001 Comstar Interactive Corp. All Rights Reserved
Optional Prompts for Taxi, Limousine, Delivery and Towing
The optional prompts menu is where you would enable, disable and change the text
for the desired options.
The available optional text for Hook-up is: This option cannot be changed. This
option can only be enabled. When enabled this option will prompt you to enter the
hook-up amount when processing a transaction. This optional prompt is only
available for towing.
The available optional text for Truck# is: Truck#, Cab#, Sedan#, Van#, Truck#,
Bike#, Trailer#, Table#, Station# and Register#. When enabled this option will allow
you to track transactions for each ID assigned to your employees. Entering a
predefined number that will automatically populate the field or manually entering it
when prompted can.
The available optional text for Operator# is: Operator#, Clerk#, Driver#,
Employee# and Vendor#. When enabled this option will allow you to track
transactions for each ID assigned to your employees. Entering a predefined number
that will automatically populate the field or manually entering it when prompted can
do this.
The available optional text for Ticket # is: Ticket#, Job#, Order# and Invoice#.
When enabled this option will allow you to assign a number of your choice for each
transaction.
The available optional text for Trip Miles is: Trip Miles and Mileage. When enabled
this option will prompt you to enter the mileage for the trip when processing a
transaction.
The available optional text for Time On is: This option cannot be changed. This
option can only be enabled. When enabled this option will prompt you to enter the
time on for the trip when a transaction is processed.
26
REV 10_02
Comstar Interactive Corp. Service Users Guide
2001 Comstar Interactive Corp. All Rights Reserved
Optional Prompts for Taxi, Limousine, Delivery and Towing Continued.
The available optional text for Time Off is: This option cannot be changed. This
option can only be enabled. When enabled this option will prompt you to enter the
time off for the trip when a transaction is processed.
The available optional text for Tolls is: This option cannot be changed. This option
can only be enabled. When enabled this option will prompt you to enter the amount
of tolls to be added to the transaction.
The available optional text for Extras is: This option cannot be changed. This option
can only be enabled. When enabled this option will prompt you to enter any extra
charges that need to be included in the transaction.
The available optional text for Tips is: This option cannot be changed. This option
can only be enabled. When enabled this option will allow you to add a tip amount to
the total transaction.
Note: Depending on the configuration of your pager, the optional text referenced as the default
could differ. However, all options remain the same.
27
REV 10_02
Comstar Interactive Corp. Service Users Guide
2001 Comstar Interactive Corp. All Rights Reserved
Enabling Hook-Up for Taxi, Limousine, Delivery and Towing
From the optional prompts menu highlight Hook-up and then press the Y key.
The optional prompt will turn to Yes. Click the track wheel to continue.
You will then be prompted to Save or Cancel the change. Highlight Save and then
click the track wheel. This option is now enabled.
With this option enabled the following changes occur when processing a transaction.
You will be prompted to enter the hook-up cost when processing a transaction. Upon
entering the information, click the track wheel to continue.
The hook up amount entered will be displayed when processing a transaction.
28
REV 10_02
Comstar Interactive Corp. Service Users Guide
2001 Comstar Interactive Corp. All Rights Reserved
Enabling Truck# for Taxi, Limousine, Delivery and Towing
From the optional prompts menu highlight Truck# and then press the Y key.
From the truck# menu click the track wheel.
Highlight Change Text and then click the track wheel.
From the change text menu, using the track wheel scroll through the available
options. When the one you want is highlighted, click the track wheel
The text has now been changed from truck# to van#.
From the truck# menu, you have the option to leave the van# text field blank which
will prompt you to enter the van# when completing a transaction.
29
REV 10_02
Comstar Interactive Corp. Service Users Guide
2001 Comstar Interactive Corp. All Rights Reserved
Enabling Truck# for Taxi, Limousine, Delivery and Towing Continued
Or you can highlight the van# text field and enter a van number of your choice
which will automatically populate the van number field when completing a
transaction. Upon completion of this portion click the tack wheel.
You will then be prompted to Save or Cancel the change. Highlight Save and then
click the track wheel.
From the optional prompts menu click the track wheel.
You will then be prompted to Save or Cancel the change. Highlight Save and then
click the track wheel. The van# option is now enabled.
With this option enabled and the text field blank the following changes will occur
when processing a transaction:
You will be prompted to enter the station# when processing a transaction. Upon
entering the information click the track wheel to continue.
30
REV 10_02
Comstar Interactive Corp. Service Users Guide
2001 Comstar Interactive Corp. All Rights Reserved
Enabling Truck# for Taxi, Limousine, Delivery and Towing Continued
The van# you entered will be displayed when processing a transaction.
When processing a transaction with a pre defined van#, the van# being displayed
when processing a transaction is the only change that will occur.
31
REV 10_02
Comstar Interactive Corp. Service Users Guide
2001 Comstar Interactive Corp. All Rights Reserved
Enabling Operator# for Taxi, Limousine, Delivery and Towing
From the optional prompts menu highlight Operator# and then press the Y key.
From the operator# menu click the track wheel.
Highlight Change Text and then click the track wheel.
From the change text menu, using the track wheel scroll through the available
options. When the one you want is highlighted, click the track wheel.
The text has now been changed from operator# to employee#.
From the operator# menu, you have the option to leave the employee# text field
blank which will prompt you to enter the employee# when completing a transaction.
32
REV 10_02
Comstar Interactive Corp. Service Users Guide
2001 Comstar Interactive Corp. All Rights Reserved
Enabling Operator# for Taxi, Limousine, Delivery and Towing Continued
Or you can highlight the employee# text field and enter the employee number of
your choice which will automatically populate the employee number field when
completing a transaction. Upon completion of this portion click the tack wheel.
You will then be prompted to Save or Cancel the change. Highlight Save and then
click the track wheel.
From the optional prompts menu click the track wheel.
You will then be prompted to Save or Cancel the change. Highlight Save and then
click the track wheel. This option is now enabled.
With this option enabled and the text field blank the following changes will occur
when processing a transaction:
You will be prompted to enter the employee# when processing a transaction. Upon
entering the information click the track wheel to continue.
33
REV 10_02
Comstar Interactive Corp. Service Users Guide
2001 Comstar Interactive Corp. All Rights Reserved
Enabling Operator# for Taxi, Limousine, Delivery and Towing Continued
The employee# you entered will be displayed when processing a transaction.
When processing a transaction with a pre defined employee#, the employee# being
displayed when processing a transaction is the only change that will occur.
34
REV 10_02
Comstar Interactive Corp. Service Users Guide
2001 Comstar Interactive Corp. All Rights Reserved
Enabling Ticket # for Taxi, Limousine, Delivery and Towing
From the optional prompts menu highlight Ticket# and then press the Y key.
From the ticket# menu, click the track wheel.
Highlight Change Text and then click the track wheel.
From the change text menu, using the track wheel scroll through the available
options. When the one you want is highlighted, click the track wheel.
The text has now been changed from ticket# to job#. Click the track wheel.
You will then be prompted to Save or Cancel the change. Highlight Save and then
click the track wheel.
35
REV 10_02
Comstar Interactive Corp. Service Users Guide
2001 Comstar Interactive Corp. All Rights Reserved
Enabling Ticket # for Taxi, Limousine, Delivery and Towing Continued
From the optional prompts menu click the track wheel.
You will then be prompted to Save or Cancel the change. Highlight Save and then
click the track wheel. This option is now enabled.
With this option enabled the following changes occur when processing a transaction.
You will be prompted to enter the job# when processing a transaction. Upon
entering the information click the track wheel to continue.
The job# you entered will be displayed when processing a transaction.
36
REV 10_02
Comstar Interactive Corp. Service Users Guide
2001 Comstar Interactive Corp. All Rights Reserved
Enabling Trip Miles for Taxi, Limousine, Delivery and Towing
From the optional prompts menu highlight Trip Miles and then press the Y key.
From the trip miles menu, click the track wheel.
Highlight Change Text and then click the track wheel.
From the change text menu, using the track wheel scroll through the available
options. When the one you want is highlighted, click the track wheel.
The text has now been changed from trip miles to mileage. Click the track wheel.
You will then be prompted to Save or Cancel the change. Highlight Save and then
click the track wheel.
37
REV 10_02
Comstar Interactive Corp. Service Users Guide
2001 Comstar Interactive Corp. All Rights Reserved
Enabling Trip Miles for Taxi, Limousine, Delivery and Towing Continued
From the optional prompts menu click the track wheel.
You will then be prompted to Save or Cancel the change. Highlight Save and then
click the track wheel. This option is now enabled.
With this option enabled the following changes occur when processing a transaction.
You will be prompted to enter the mileage when processing a transaction. Upon
entering the information you will click the track wheel to proceed.
The mileage you entered will be displayed when processing a transaction.
38
REV 10_02
Comstar Interactive Corp. Service Users Guide
2001 Comstar Interactive Corp. All Rights Reserved
Enabling Time On for Taxi, Limousine, Delivery and Towing
From the optional prompts menu highlight Time On and then press the Y key.
The time on line will change to Yes. Click the track wheel to continue.
You will then be prompted to Save or Cancel the change. Highlight Save and then
click the track wheel. This option is now enabled.
With this option enabled the following changes occur when processing a transaction.
You will be prompted to enter time on when processing a transaction. Upon entering
the information click the track wheel to continue.
Time is entered in the 24-hour format.
The time on you entered will be displayed when processing a transaction.
39
REV 10_02
Comstar Interactive Corp. Service Users Guide
2001 Comstar Interactive Corp. All Rights Reserved
Enabling Time Off for Taxi, Limousine, Delivery and Towing
From the optional prompts menu highlight Time Off and then press the Y key.
The time off line will change to Yes. Click the track wheel to continue.
You will then be prompted to Save or Cancel the change. Highlight Save and then
click the track wheel. This option is now enabled.
With this option enabled the following changes occur when processing a transaction.
You will be prompted to enter time off when processing a transaction. Upon entering
the information click the track wheel to continue.
Time is entered in the 24-hour format.
The time off you entered will be displayed when processing a transaction.
40
REV 10_02
Comstar Interactive Corp. Service Users Guide
2001 Comstar Interactive Corp. All Rights Reserved
Enabling Tolls for Taxi, Limousine, Delivery and Towing
From the optional prompts menu highlight Tolls and then press the Y key.
The tolls line will change to Yes. Click the track wheel to continue.
You will then be prompted to Save or Cancel the change. Highlight Save and then
click the track wheel. This option is now enabled.
With this option enabled the following changes occur when processing a transaction.
You will be prompted to enter the tolls amount when processing a transaction. Upon
entering the information, click the track wheel to continue.
The tolls amount you entered will be displayed when processing a transaction.
41
REV 10_02
Comstar Interactive Corp. Service Users Guide
2001 Comstar Interactive Corp. All Rights Reserved
Enabling Extras for Taxi, Limousine, Delivery and Towing
From the optional prompts menu highlight Extras and then press the Y key.
The extras line will change to Yes. Click the track wheel to continue.
You will then be prompted to Save or Cancel the change. Highlight Save and then
click the track wheel. This option is now enabled.
With this option enabled the following changes occur when processing a transaction.
You will be prompted to enter the extras amount when processing a transaction.
Upon entering the information, click the track wheel to continue.
The extras amount you entered will be displayed when processing a transaction.
42
REV 10_02
Comstar Interactive Corp. Service Users Guide
2001 Comstar Interactive Corp. All Rights Reserved
Enabling Tips for Taxi, Limousine, Delivery and Towing
From the optional prompts menu highlight Tips and then press the Y key.
The Tips prompt changes to yes, click the track wheel.
You will then be prompted to Save or Cancel the change. Highlight Save and then
click the track wheel. This option is now enabled.
There are two available options with this prompt. They are tip amount known and tip
amount unknown.
43
REV 10_02
Comstar Interactive Corp. Service Users Guide
2001 Comstar Interactive Corp. All Rights Reserved
Printer Setup
Highlight the CHARGE ANYwhere icon and then click the track wheel.
CHARGE ANYwhere Icon
From the menu options highlight Setup and then click the track wheel. From the
next menu highlight Ok and then click the track wheel.
From the setup menu highlight Printer Setup and then click the track wheel. From
the next menu highlight Ok and then click the track wheel.
From the printer setup menu highlight the printer that you are working with and then
click the trackwheel. From the menu select Properties and then click the
trackwheel.
This will display the properties for the printer selected.
Standard Printer Properties
Pulsar Impact Printer Properties
44
REV 10_02
Comstar Interactive Corp. Service Users Guide
2001 Comstar Interactive Corp. All Rights Reserved
Printer Setup Continued
You can adjust each setting by highlighting it and then pressing the space bar until
the desired setting is displayed. After all changes are completed, click the
trackwheel. From the next menu select Save and then click the trackwheel.
Select the printer that you are using with the device by highlighting it in the Printer
Setup menu. Press the trackwheel and from the menu highlight Save and then click
the trackwheel. Printer setup is now complete.
45
REV 10_02
Comstar Interactive Corp. Service Users Guide
2001 Comstar Interactive Corp. All Rights Reserved
Receipt Header
Highlight the CHARGE ANYwhere icon and then click the track wheel.
CHARGE ANYwhere Icon
From the menu options highlight Setup and then click the track wheel. From the
next menu highlight Ok and then click the track wheel.
From the setup menu highlight Receipt Header and then click the track wheel.
From the next menu highlight Ok and then click the track wheel.
From the receipt info screen you are able to view what the receipt will look like.
This is changed wirelessly by contacting Comstar Interactive Corp. customer
support.
46
REV 10_02
Comstar Interactive Corp. Service Users Guide
2001 Comstar Interactive Corp. All Rights Reserved