1
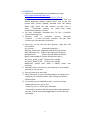
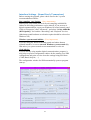
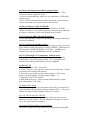
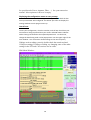
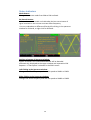
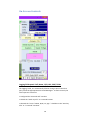
SIM User’s Guide
By Ben Rejeb Nizar.
Dany ON4NB.
Irv W4IWK .
Peter KG6VQH
Copyright © 2013
29 July 2015
1
Contents
Introduction ......................................................................................3
Distinctive features of SIM Highlights ………………….……………………….4
System Requirements........................................................................6
Installation……………….........................................................................7
Interface Settings (Sound Card +Transceiver) …….……………….…….…8
Set input signal level …………………………………………………………………..11
Set Transmit Power and Audio Level…………………………………………….11
Set Your Personal Info ………..………………………………………….……………13
Set your Station info ……………………………………………………………………14
Favourite language menu .…………………………………………….………….…14
Status Indicators…………………………………………………………………………..15
On-Screen Controls..........................................................................16
How to select a SIM station for starting a QSO …………………………….20
TX Macro’s ……..…………………………………………………………………………..21
Making QSO’s…................................................................................22
Log Book ……………………………………………………………………………………..23
Special Mouse Commands ..............................................................24
Technical Description of SIM31 mode .………………………………………..25
FAQ (Frequently Asked Questions) ……………………………………………...27
2
Introduction
SIM is an experimental computer program, designed to
facilitate basic amateur radio communications when using a
very weak signal with SIM31, a new QRP digimode specially
designed for making reliable, confirmed QSOs under
extreme conditions on all amateur bands.
“SIM31” stands for “Structured Integrated Message BPSK 31
bauds”.
This new mode, using audio DSP techniques, provides an
important message encoding innovation and thus a new
simplified approach to the operation mode when compared to
the already known modes, thereby overcoming some of the
difficulties of communication between amateurs of the world..
It is designed to establish human to human contacts by
exchanging full structured info with possible plain text option;
But moreover, it also allows to initiate contacts with full
automatic stations, even under noisy and weak conditions as
-18db S/N on 3000 Hz equivalent noise bandwidth.
SIM mode require very stable oscillators in both transmitter and
receiver. It needs a narrow bandwidth of less than 45Hz, No need of
external modem; a 48 Khz windows compatible sound card model
was just enough .
Compared to other digimodes, SIM31 is probably the only one
to have that new kind of “Automatic QSO’s mode” with
translation functionality ( Automatic translation of included
structured messages only ) Languages: English, French,
Russian, Dutch, Spanish, Italian, German, Portuguese… The
program does not translate plain typed text.
Remark : for the moment, due to our software limitation, only
Latin characters are used, Russian characters was planed for
advanced future versions.
Then, you can set your software in Automatic mode <Auto
SIM QSOs>, and initiate a “full automatic call” SIM-PSK will
- Reply to the callsign who just answered manually to your
callsign.
- Afterwards, it will detect and fill in all received info’s
concerning the current QSO, (Name, QTH, LOC, RSQ …),
- At the end, all info’s about the QSO will be saved into
the
SIM-Logbook
and
optionally
uploaded
automatically, in real time, to one or more services of
your choice : eQSL.cc. , HRDLog.net, HAMQTH.com and
HAMLog.eu or to local logbooks as Dx-Keeper , Mixw2.
3
The program does all that automatically, without any operator
assistance...
Note: it’s recommended never
working alone without any presence!!
leaving
your
transceiver
As you can guess, it is only possible to upload a QSO in real
time when you have enabled this option, and if an internet
connection is available.
Remark : uploading your ADIF File into an amateur radio
service (eQSL.cc, LOTW ... ) could be made later, at the end of
your contacts if you prefer ; up to you, it’s in the menu tag
"Log" .
SIM also implements a new mode "SIM63" running at twice
the baud rate of SIM31.
You can make QSOs in both modes using nothing more than
mouse clicks
Distinctive features of SIM Highlights
SIM is an experimental amateur radio digital communications
program optimized for making very weak signal contacts using a
narrow bandwidth while decreasing the number of bits required to
send a word. SIM uses the same sound card DSP technology used by
most other digital communications programs.
Distinctive features of SIM are:
• Structured Messaging which compresses frequently used amateur
radio phrases to a few bytes and translates phrases into the
operator's native language. Currently supported languages are:
English, French, Russian, Dutch, Spanish, Italian, German, and
Portuguese. Note, the translation feature does not apply to typed
text.
An expanded concept of varicode, to encompass not only individual
characters but words and phrases.
"Thanks for coming back to my call." Message, for example, is sent
as only 6 characters rather than 34 characters as usually required.
• SIM decodes all SIM31 signals in a Signal Report panel displaying
the type of call (CQ, CQ Auto, etc.), the call sign, and the country of
origin among other info. Double-clicking on a call-sign, zeros in on
that offset frequency and prepares SIM to respond.
Optionally, SIM can be configured to verbally announce new
decoding’s. This is great for monitoring while attending to other
tasks near your communications equipment.
4
The Signal Report panel can be configured to automatically report
decoded call signs and your transmissions to PSK-Reporter.
• Rather than a waterfall, SIM displays signals in a 2800Hz bandwidth
Spectrum panel. This is sufficient since SIM only decodes 4 modes:
SIM31, SIM63, PSK31, PSK63.
• Automated logging is supported via the ADIF format. Optionally,
the contact log can be Auto-uploaded to one or more of: eQSL,
HRDLog, HAMQTH, or HAMLog using your internet connection.
• Much of a typical QSO can be handled by clicking a handful of
buttons with little or no typing. These buttons are similar in concept
to predefined macros as used in other programs. They are simpler to
use and make it easy to insert custom text in the middle of a QSO.
• There's an option so that SIM QSOs can be fully automated for the
station calling CQ. The replying station has to conduct their end of
the contact manually.
When a contact is concluded, it is
automatically logged and the originating station resumes calling CQ.
Logging is automatic only for the station that is in Auto-QSO mode,
The station that manually answered the call has to click the “Save
QSO” button.
In compliance with ham-radio regulations, it’s recommended that
you don't leave your transmitter in Automatic-QSO Mode without
your presence or leave your station in automatic mode for
extended periods of time.
• A meeting place frequency has been selected for each of the ham
bands, and these are available via a list-Box menu. Combined with
automatic reporting to PSK-Reporter, this maximizes your chance of
finding other SIM users. Currently, most of the stations are in Europe
and North America. Example 14067.0 Khz for 20m band.
Summary
All these features combine to make SIM an interesting and easy to
use communications program. The software is updated frequently
from user suggestions—usually about once a week. See the
Installation and Setup section on the page that follows for download
instructions.
5
System Requirements
If you are already using another sound-card based digital mode, you
are all set. SIM can use either the built-in sound card or an external
sound card based interface such as: SignaLink, RigBlaster, Navigator
or a home-brewed interface
•
•
•
•
•
•
•
•
SSB transceiver and antenna.
Computer running Windows XP or later, as Win Vista,
Win7, Win8, Win8.1 and Win10, but it should also run
under Linux +Wine, OS-X, and probably FreeBSD and
other Unix-like operating systems with windows
emulator.
1.0 GHz or faster CPU and 100 MB of available memory
Monitor with at least 1024 x 780 resolution (more is
better) (1024X600 pixel format version can be
downloaded separately )
Sound devices supported by your operating system.
(48000 Hz raw sampling rate was needed for full
decoding performance).
Audio cable or equivalent USB connection between transceiver
and computer.
Computer-to-radio interface such as a serial port, to
switch on/off your PTT line, and/or communicate with
the "CAT" control, Or VOX for T/R switching.
No need to synchronise your computer clock to UTC.
6
Installation
1. SIM can be downloaded from the SIM31Home page:
http://www.on4nb.be/sim31.php
or http://www.on4nb.be/last_release/sim_psk.rar
NB: To have the best decoding performance and the
newest enhanced options, please make sure to get the
newest daily version (V6XXX) available from the SIM31
Home page. Check for new releases at least once a
week.
Sometimes changes are made that break
compatibility between versions.
2. For your installation, download the .rar file, it contains
all the supporting files.
3. Manually create an installation directory. Preferably
C:\SIM31\ . to avoid permission problems, DO NOT place
this directory inside Windows directories.
4. Unzip the .rar file into the new directory. Eight files will
be installed.
sim_psk.exe :
(executable program )
SIM_Log_Viewer.exe (separate program for log viewer)
ASCII_Converter.exe (ASCII to Hex converter program)
pskreporter.dll :
(library for PSK-Reporter option)
HRD5_InterfaceSIM.dll (Ham radio Deluxe Library )
sim_users_guide_en.pdf (English user’s guide)
sim_users_guide_fr.pdf (French user’s guide)
SIMCQ.wav (sound alert when a SIM31 frame was
received)
5. Manually create a shortcut on your desktop or your taskbar
pointing to sim_psk.exe.
6. Run the shortcut to start SIM.
7. When SIM starts, a pop up window appears allowing you to
configure your sound card plus other setting parameters.
Details follow.
8. For installing a new updated version, it’s quick and easy:
-Download new sim_psk.rar file.
-Unzip sim_psk.rar at the same old folder.
- You need to overwrite old files by new decompressed ones.
No care, all data setting and logged QSO’s remain safe and
unchanged.
7
Interface Settings (Sound Card +Transceiver)
Before starting the program, please check first for the 2 system
recommendations follows:
Raw sampling rate Setting : (Very important)
SIM expects your sound card to do its raw sampling at 48000 Hz,
Otherwise decoding performance can be altered. If you are new to
digital communications, open your Windows OS sound control panel.
Click on "Properties", then "Advanced", and select “16 bit, 48000 Hz
(DVD Quality)” for both the “Recording” and “Playback” devices.
(Maximum sound hardware acceleration option should be selected on
Windows XP )
Windows system sound inhibit : (Very important)
If you are using the Windows default sound card rather than an
external interface, be sure to turn off Windows system sounds (By
Win mixer), so system sounds are not transmitted over the air.
Good Advice :
If you're already using another digital communications program, it
may help to open its configuration window before starting your SIM
configuration and print or write down the settings being used there
(COM, Baud, Stop bit, …).
The configuration window for SIM automatically opens at program
start up .
8
Set Input and Output Sound Driver popup menus
Select your input and output sound drivers from the lists. If the
correct one doesn’t appear in its list:
• If it's an external interface, make sure it's connected via USB cable
and has power.
• There's a limit of 24 audio drivers listed in this popup, you may need to
remove old unused ones to make room for all to show up.
Set Direct Hardware PTT (RTS/DTR)
If you will use RTS or DTR for PTT command (Press To Talk),
choose an exclusive serial port being used (com port can be physical
or virtual ). Otherwise, leave at the default value (NONE).
Set CAT through HRD (Ham Radio Deluxe) :
Check HRD checkbox, HRD was intended to be already started and
correctly configured.
SET CAT Through OmniRig engine:
Check OmniRig1 or OmniRig2 check-Box, then you can setup some
more details as main/sub transceiver, SSB_USB/DIG_USB modes or
PTT method: CAT/RTS/DTR/RTS+CAT/None . OmniRig was
intended to be already installed and correctly configured.
SET CAT Through CIV-Commander (DXLab suite) :
Check CIV-Commander check-Box, then you can setup mode
USB/DATA_U and PTT option method: CIV-Commander was
intended to be already started and correctly configured.
Set Direct CAT
Check “SET Direct CAT” check-Box.
a. Select Com port, your transceiver, baud rate, and stop bits. (Check
your transceiver settings and manual.)
b. Select the type of input used for input sound by CAT on your
transceiver (microphone, rear panel, digital input …..)
c. Enable PTT by CAT if needed.
d. RTS/DTR auto power. Some external USB interfaces require
power through the CAT cable.
Set Manual Hex String
This allows you to select special features offered by your transceiver
when starting the SIM program (Power, Antenna, Filter, ...). See your
transceiver manual. Most operators will leave it empty.
Set CAT TX ON and CAT TX OFF
These fields were filled in automatically when you selected your
transceiver in step 5 above. You can edit them if needed for special
cases. See your transceiver manual.
Set manual CAT Hex String for exit options
This allows you to reset your transceiver settings when exiting SIM
9
for special needs (Power, Antenna, Filter, ...). See your transceiver
manual. Most operators will leave it empty.
Displaying the configuration menu at every startup.
At bottom left of the interface settings window, you can uncheck the box
once you have SIM well configured. This allows you to do not display the
settings window at each program start up.
Overall test :
To test your configuration, close this window, and call CQ. Check that your
transmitter is being keyed and that your Power and SWR meters indicate
audio is being transmitted at the expected power level. To check CAT,
change the band being used via the popup menu near the upper right of the
main window. Your transceiver should change to the new frequency.
If things aren't working correctly, double check the sound card and
COM port settings. If still not working, try changing some of the other
settings in the PTT and CAT sections one at a time.
SIM Main Window :
10
Set Input signal level
For all digital modes, it's usually best to reduce the Transceiver's AGC gain
to the minimum to avoid signal distortion. Other DSP functions can also
impact the received signals so turn off all transmit or receive special filters
,compressors and equalizers. SIM31 does all the processing of RX and TX for
you, it is VERY important that your Transceiver does not process or alter the
TX and RX signal at all. If you are already using another digital mode, you
shouldn't have to make adjustments for SIM and you can easily switch back
and forth between programs.
For most PC internal sound card’s, there is an input amplifier option, it
should be disabled at the beginning, otherwise it can distort the input signal
before digital conversion .
While receiving a SIM or PSK signal, adjust the input signal level while
watching the yellow vertical bar graph (at the right of the SIM Spectrum
Window). The signal should no peak more than the middle at the 0dB
mark.
The background noise level should be around 20% on the bar graph (the
lower green line). If it's too low, decoding performance will be hurt.
With the same input/output sound card drivers, the optimal settings,
once they are done, should remain good for all other digital modes,
regardless of the used software.
Any high Input level should be alerted by the program with “ Please
Reduce input signal Level” and then background spectrum colour
become red.
Set Transmit Power and Audio Level:
DSP functions can also impact the transmitted signals so turn them all off.
If you are already using another digital mode, you shouldn't have to make
adjustments for SIM and you can easily switch back and forth between
programs
If you are using an external USB sound card interface such as: SignaLink,
RigBlaster, or Navigator follow their instructions for setting transmit power
and audio levels. Adjustments are made in three possible places.
1-- External Interface. See the manual for your interface—it may be a
manual control on the interface and/or a software control.
11
2—PC Internal Sound card. The volume level as set in the Windows: Sound
control panel. You can open it by clicking the “Output” button in the lower
right corner of the SIM window.
Increase the mixing control of the audio output to reach the maximum
possible RF output example 100 watt, and then decrease the setting until
the RF output will fall back to about 30%.This will be a good audio level to
drive your TX transceiver. So, 30 Watts will be a good choice for a 100 Watt
CW Transceiver.
If you are using a sound card that is also the Windows default
audio device, be sure to turn off all Windows sounds so they
are not transmitted over the air.
3-- Power Level slider: located at the right of main window.
starting point is the default full power .
A good
The transmit power setting on your Transceiver. If it is rated at 100 watts
for CW and USB, the usual maximum power for use with digital modes is
about 30 watts. With the adjustment above, your power output will be
reduced accordingly.
To check the output audio quality and transmit level of your setup, click the
"Tune" button on the main SIM screen. Your transceiver will be switched to
transmit mode for a few seconds, with a steady audio tone equivalent to
the level of a real SIM-31 signal.
Listen to the generated audio tone using the RF monitoring of your radio, or
any other method. If your transceiver supports this function look at the
transmit ALC and adjust it to zero. This will get the strongest output
without distortion or splatter. The tone should be perfectly smooth and
constant, with no clicks or glitches. Too high of an audio level can generate
spurious signals and interference. If you use more than about one-third
the rated power for digital modes, you are likely to overheat your
transmitter, tuner, etc. , finally make sure to suppress any unwanted
RF signal, which would return back to the transceiver.
SIM31 is a good weak signal mode. Many SIM31 radio operators use
much less than the maximum one-third of rated power mentioned
above. SIM31 can decode signals as weak as -18dB.
Good digital practice is to use the minimum power necessary to
communicate, with good antenna systems long distance
communications can be achieved with just 2 or 3 watts.
12
Set Your Personal Info
To configure your personal info, select the menu: Setup > Personal info
and fill in your personal info: Call, Name, QTH, Grid, Birth Date, Age, Year
Licensed, Clubs, Websites, and QSL methods. There is a limit of 12
characters for your Callsign, NAME and QTH. This info will be inserted into
Structured Messages.
13
Set your Station info
To configure information about your station, select the menu: Setting >
Station info and select or fill in: Transceiver, Output Power, Antenna,
Antenna Height, and additional station info. When you select an entry from
one of the popups, it will be sent as a SIM Structured Message rather than
as individual characters.
There is also a checkbox to display PSK characters as all upper case on your
system rather than as all lowercase.
Set your Favourite Language for SIM Messages
To select the language used to display Structured Messages on your system,
select the menu: SIM and then one of the listed languages. An operator in
Russian can see a Structured Message conversation in Russian while his
contact in the USA sees the Structured Message conversation in English.
14
Status Indicators
Mode button:
Changes the current mode from SIM to PSK and back.
Re-Decode button:
Indicates the current mode and redecodes the last two minutes of
signal received on the current accurate offset frequency.
You can redecode at a different offset by left-clicking in the spectrum
window for 31 baud, or right click for 63 baud. .
Red Bar at bottom of Spectrum window:
Signals received in the indicated bandwidth will be decoded
automatically, displayed to the upper window and reported to PSK
Reporter—if that option is selected in the PSK-R menu.
Left Clicking in the Spectrum window:
Changes the offset frequency and sets the speed to SIM31 or PSK31
Right-Clicking in the Spectrum window:
Changes the offset frequency and sets the speed to SIM63 or PSK63
15
On-Screen Controls
Logging Fields panel: Call, Name, QTH, LOC, RSQ* fields
The logging fields, are automatically filled in during a QSO as the other
party sends the appropriate Structured Messages. To work correctly the
other operator must have:
• configured the “Personal Info” window
• clicked the “Send my Info” or 2nd Round buttons
• selected the “Insert ? Name, QTH, Loc, Age..” checkbox in the “Send my
Info” or “2nd Round” windows.
16
“Save qso” button:
This button is enabled at the end of QSO and logs the QSO to the entities
selected in the Personal Info window.
Clear button:
This button clears the above fields.
Frequency Controls :
The first control selects a ham band and a predetermined SIM meetingplace frequency. The second control displays the selected frequency and
allows it to be adjusted.
Yellow buttons: CQ CQ, QRZ?, ANSWER CQ button
These buttons don't open windows, they transmit preset Structured
Messages using SIM varicode.
CQ CQ transmits: CQ de your call sign and transmit wattage (Both as
entered in the Station Info window.) You can modify the CQ call in the
Setting menu > “Macro's …” Choices include CQ DX, CQ Asia, among
others.
QRZ? : transmits QRZ? de your call sign
ANSWER CQ : transmits the call sign in the CALL field de your call sign
All three yellow buttons transmit a little more info than described above.
Try each of them off the air to see exactly what is being sent.
Green buttons: Send my Info, 2nd Round, Custom, Send 73 bye, and Tchat
These buttons open a window that allow you to select both Structured
Messages and to type text. Your choices for Structured Messages can be
saved so you only have to configure greetings and good-byes on your first
use. During a QSO, if you don't want to change Structured Message or
enter text, you can quickly hit the “TX All NOW” button and immediately
transmit.
You probably won't use more than two or three of these buttons in a QSO.
Between them they offer a lot of overlapping functionality that you can
customize to meet your operating style.
17
Remember that the Structured Messages are sent as a few bytes of
varicode rather than letter by letter so the effective speed is much faster
than PSK.
The <<name and << qth buttons will transmit the name and qth of the
other contact as received and displayed in the logging panel. This lets the
other party know if you received their NAME and QTH correctly.
If you want to enter text, start typing in the text area. Transmission doesn't
start until your click the button labelled: “Click this Button to <<Start TX>>
while you type”. This sends both call signs and any Structured Messages
selected above the text area. It then sends the first character of your typed
text and pauses. Your typing, the Structured Messages below the text area,
and the closing call signs aren't sent until you click the “TX ALL NOW”
button. You can edit text until it has been sent.
A good way of using this functionality to speed a conversation is to start
typing your reply while you are receiving info from the other party. When
the other operator finished, click the Start TX button, finish your reply, and
end the transmission with the TX ALL NOW button.
Pink indicator/button RX / Halt TX:
When this indicator displays RX in disabled-style text, it indicates that SIM is
receiving. When this button displays Halt TX, it indicates that SIM is
transmitting. Clicking it will abort the transmission.
Hz indicator and selector
This indicator displays the offset frequency SIM is using for receiving and
transmitting. You can use it to fine tune the offset frequency. For example:
click in the Spectrum panel to set the offset to 1500 and you'll likely be off a
few Hz. Use the up or down arrows to zero in on exactly 1500.
Rx S/N display
This indicates the signal to noise ratio of the signal being received.
UTC Time display :
Indicates the current time.
Auto-SIM (sec) indicator and control
This adjusts the time between CQs when using the SIM Auto-QSO mode.
Auto-SIM QSO's Mode button :
18
to setup your station as an automatic SIM station .
Input and Output buttons:
The input button opens the Windows sound configuration control panel for
input from the receiver. The output button opens the Windows Volume
Mixer control panel for output to the transmitter.
Tune Button :
Sends a signal to the transmitter so you can check your TX power, your
SWR, the clarity of your signal, etc. The length of time for the tune can be
set in the Setup menu > “Macro's …” .
19
How to select a SIM station for starting a QSO
The easiest and most convenient method to select a SIM station is
probably to use the Scan panel (See the screenshot below).
Scan panel
Double-click on a on the most recent occurrence of desired call sign
in the Scan Signal Report panel, the program will prepare itself to start a
QSO as follows :
a. The call sign is copied into the CALL pad for answering.
b. Rx cursor is positioned on the spectrum at the right frequency.
c. SIM mode and baud-rate are set.
d. If you've contacted this station before, your log is used to
display the date and other details of your last contact. The
Name, QTH, and LOC fields are also populated.
Nothing else to do, just click the < Answer CQ > button to answer the
selected station on the air. Just two mouse clicks, without any
keyboard entry, are sufficient to start a SIM31 QSO.
e. Wait for response.
f. If not ok, Click again “Answer CQ” Button and wait until
success.
Very easy isn’t it ?
As you see, You can make QSOs using nothing more than mouse clicks.
We should response to an automatic calling station by the same
procedure.
20
TX Macro’s
SIM31 mode is mainly a structured message based mode, but it can
also handle a classic “plain text” messages.
A structured message must be preferred here anyway, because it's a
lot faster and more robust against noise and large spread distortions.
Most classic ham radio messages were prepared in a macro list, and
coded as structured binary messages, so they could be sent faster
and be less sensitive to noise and QRM.
You can choose your messages to send among the macro list content,
simply by selecting each message in a "list-box".
You can also prepare messages in plain text mode, with free content
of your choice.
Of course, in this case, as each letter has to be separately encoded, it
takes more time for transmitting, exactly like a PSK mode.
Or, it remains possible to type a text in real time, during a contact, at
keyboard, exactly like any other classic mode as BPSK31.
21
Making QSO’s
By long standing tradition and / or legal obligations, a minimal valid
QSO requires to exchange call-signs, a signal report, and several
other info’s which are also generally sent.
SIM-PSK is particularly designed to facilitate such QSOs, thanks to the
short structured messages.
But please be fair play, don't initiate an automatic calling before
having answered manually to other interesting automatic call-signs
on the air.
The process works best if you use the structured formats and follow
recommended standard procedures as in the following example.
Example of QSO:
1. BUTTON CQ CQ : CQ CQCQ DE ON2VH ON2VHF ON2VHF
2. BUTTON ANSWER : ON2VHF ON2VHFON2VHF DE F1ABL
F1ABL F1ABL R-12
3. BUTTON MY_INFO: F1ABL F1ABL F1ABL DE ON2VHF
ON2VHFON2VHF RR-9
Hi dear OM
Happy to meet you in SIM31 mode
NAME : LAURENT LAURENT LAURENT
QTH :
LOCATOR :
HW? ***** BTU *************
F1ABL F1ABL DE ON2VHF ON2VHF PSE
KN
4. BUTTON MY_INFO: ON2VHF ON2VHF ON2VHF DE F1ABL
F1ABL F1ABL RR-12
Hi dear OM LAURENT
Thank you for call/answer
NAME : MICHEL MICHEL MICHEL
QTH :
LOCATOR :
HW? ***** BTU *************
ON2VHF ON2VHF ON2VHF DE F1ABL F1ABL
F1ABL PSE KN
5. BUTTON MY_STATION (ON2VHF).
6. BUTTON MY_STATION (F1ABL).
7. BUTTON BYE 73 (ON2VHF)..
8. BUTTON BYE 73 (F1ABL). End of QSO
22
Log Book
NB :With automatic QSO mode, the program does collect and save
the information’s automatically, and then can be uploaded in real
time to eQSL.cc , HRDLog.net , HAMQTH.com and HAMLog.eu, so
there is nothing to do manually during an automatic QSO. At the end
of automatic traffic, we just need to check and correct manually any
possible false info; afterwards, the Log result can be uploaded to web
ham radio login services via ADIF files.
Format of a QSO with structured SIM Mode:
All the fields, Call-sign, NAME, QTH, LOCATOR, are initially structured
in the program during setup, so, except on errors , the program
should get easily and automatically all these info’s during a contact,
afterwards, it will display them on the screen and will write each info
at the right pad, without any operator assistance .
You just have to verify their authenticity, and then confirm by
manually clicking the button <Save qso> at the end of QSO….
Save a QSO manually :
In some rare case, ( eg for not structured messages, transmitted in
plain text mode or by classic BPSK31 mode) you must double click
manually, on the strings "NAME, QTH, LOCATOR" in order to copy
them one by one into their reserved pad’s. Then you will press the
button <Save qso>, for saving info’s of this QSO into the Logbook
data base.
Remark: double-click rather on the string NAME before QTH.
Reserved pads:
Log menu
23
Special Mouse Commands
SIM RX REPORTER
WINDOW
Received text window
Double-click a desired call-sign on the
scanner panel (upper window), the
program by itself prepare to answer by
settings all required parameters (Call-sign
, Mode , baud rate and frequency) so you
are ready to click <Answer CQ> button to
answer, many times if needed, to start a
QSO …
Double click any call-sign on received text,
to copy it into the CALL pad before
answering.
Double-click on QTH string to put it into
QTH pad (for message insertion and later
loggin).
Double-click on Locator string to put it into
LOCATOR pad (for later Loggin).
Left click onto spectrum position: rewinds
the last 2 minutes signal recorded and
decodes it at 31 bauds default mode :
PSK31 or SIM31.
SPECTRUM
( REWIND )
Right click onto spectrum position:
rewinds the last 2 minutes signal recorded
and decodes it in 63 bauds default mode
(PSK63 or SIM63).
You are ready to use SIM-PSK. Good DX.
24
Technical Description
SIM is an experimental amateur radio digital communications
program optimized for making weak signal contacts using a narrow
bandwidth while decreasing the number of bytes required to send a
word. It offers two modes: SIM31 with a bandwidth of only 45Hz
and SIM63 which is twice as fast but uses twice the bandwidth. SIM
uses the same sound card DSP technology as other digital
communications programs.
Distinctive features of SIM are:
• Structured Messaging which compresses frequently used amateur
radio phrases to a few characters and translates phrases into the
operator's native language. Currently supported languages are:
English, Russian, Dutch, Spanish, Italian, German, and Portuguese.
Only lowercase latin characters can be used--even for Russian
translation. There are 53 supported characters: A-Z (uppercase only)
0-9 <CR> <SPACE> . , : - = + ? ' ( ) ! / @ # * Special characters such as
"É" are converted to "E"
• An expanded concept of varicode, to encompass not only individual
characters but words and phrases."Thanks for coming back to my
call." is sent as only 6 characters rather than the 34 Characters
required by PSK.
SIM31(Structured Integrated Message BPSK31.)
Name of software: SIM
Modulation :
DBPSK « Differential Binary Phase Shift Keying
».
Speed :
31 bauds , 187 char/min ( or 31.25 wpm).
Pulse shape :
Similar to classic BPSK31
Bandwidth :
About 45 Hz
It's interesting to note that the CW mode
identifier, which is a part of the SIM31 Signal
Header during CQing, is limited to the same
spectrum bandwidth as the SIM31 signal itself.
This means that the CW generated by the
SIM31 program is actually narrower than
average CW. In other words, it is completely
free of key clicks!
Code :
"varicode" able to encode characters or
messages ( words or full sentences.).
Demodulation :
Coherent demodulation .
Synchronization :
Automatic on signal
25
Error correction :
FEC (Forward Error Correction) tolerates one
error bit per character
Convolution code : NO.
Interleaved:
YES
Repetition :
YES, only for some structured messages as
CQCQ, QRZ, QRALOC, NOM, QTH,
Drift tolerance :
10 Hz/min (depending on signal level).
Lower limit of intelligibility: -17dB in text mode.
Until -18.5 dB in message mode
(white noise in equivalent bandwidth of 3 kHz)
Reception mode :
Indifferent (LSB or USB)
Note:
The frequency adjustment is simplified by
staying in USB on all bands
Characters set :
53 "fixed code" A..Z 0..9<CR><SPACE> . , : - = +
? '() !/ @#*
No delete character on error nor wait character.
Lowercase characters are converted to uppercase,
Special Characters : The special characters such as "É" are
converted into standard capitals characters, (in this example: "E")
but can be displayed in lowercases locally
Messages:
The messages used as macro by the ham radio are
coded and structured.
26
Frequently Asked Questions (FAQ):
1/ How I can switch to SIM63 baud rate ?
Just by clicking the spectrum panel by right mouse button, instead of
left right button reserved for SIM31.
Left click mouse button ------ instantly decoding SIM31.
Right click mouse button ---- instantly decoding SIM63.
No menu command was needed to switch between SIM31/SIM63.
2/ I can receive SIM31 signals but I decode them only 50% of time,
how can I fixe this ?
First is to exit all SIM program’s and restart again your PC.
Second, The raw sampling rate of your sound card may be not set to
48000Hz, SIM expects your sound card to do its raw sampling at 48000 Hz.
Open your Windows OS sound control panel. Click on "Properties", then
"Advanced", and select “16 bit, 48000 Hz (DVD Quality)” for both the
“Recording” and “Playback” devices.
Exit and restart again SIM program.
(For Windows XP , you need also to enable the Maximum sound
hardware acceleration option)
3/ How I Can activate CAT commands for My Rig?
SIM program gives us 4 ways to do it :
•
By HRD (Ham Radio Deluxe) if you already use it : just check
HRD box , HRD was intended to be already started and
correctly configured.
•
By OmniRig 1 or 2 if you already use it : just check OmniRig1
or OmniRig2 checkbox, you can then setup some more details
as main frequency or sub-frequency , SSB_USB/DIG_USB
modes or PTT method: CAT/RTS/DTR/RTS+CAT/None .
OmniRig engine should be already correctly installed and
configured.
•
By CIV-Commander if you already use it : just check CIVCommander checkbox, you can then setup some more details as
mode USB/DATA_U and PTT method: CIV-Commander was
intended to be already started and correctly configured.
•
By direct CAT commands, then you can choice one of the presetting Rigs within the CAT-Rig list, if your rig wasn’t listed ,
you can select the most similar commands rig, otherwise it
remain possible to choose manual setting and then typing
manually the TX-ON /TX_OFF commands Hexadecimal
Strings for your non listed Rig , please refer to your transceiver
manual. It will be nice to send an email to the developer to
inform him about your rig missing. [email protected]
27
4/ Can I transmit QSL info by structured message?
Yes we can do it and then we can get better transmission reliability,
at “My Info” Tx Macro select QSL message from the drop list box
messages as below :
this assumes we have already set our QSL info’s in the program setup
menu setting personal info.
5/ How can I change the font or the size of received text ?
By menu bar Font.
6/ How I can answer a received automatic station calling CQAuto?
Only by manual response, similar to normal manual QSO:
• Double-click, by left mouse button, over the call-sign
displayed on scan report panel (Upper window) , the program
will prepare itself to start a QSO as follows :
a/ The call sign is copied into the CALL field for answering.
b/ Rx cursor is positioned at the right frequency.
c/ SIM mode baud-rate are set.
d/ If you've contacted this station before, your log is used to
display the date and other details of your last contact. The
Name, QTH, and LOC fields are also populated.
28
•
•
•
Click “Answer CQ” Button ( Right of main program window).
Wait for response.
If not ok, Click again “Answer CQ” Button and wait, repeat
“Answer CQ” until success.
7/ How SIM automatic mode is running?
You can convert your station to an automatic station, so no manual
action was allowed during automatic mode, your station will do all
things for you, during unlimited long time, including :
• Calling CQ-Auto every delayed time.
• Listening for other manual station response +/-15 Hz.
• Checking for correct call received using Checksum.
• Sending a QRZ? Request if call sign is not sure yet.
• Answering by sending info’s as a first round.
• Decoding info’s of received station.
• Filling log fields by decoded info’s (NAME , QTH, QRA LOC,
RSQ … )
• Answering by sending decoded (NAME + QTH) +73 message
on second and final round of the automatic QSO.
• Saving automatically QSO info’s to Local SIM Log.
• Saving automatically QSO’s ,in real time, to web service’s Log’s
if selected and internet was allowed (eQSL.cc, HRDLog.net,
HamLog.eu, HAMQTH.com….) .
8/ How Can I put my station on automatic mode ?
a/ Listen to the band for at least 10 minutes to mark most
active frequency’s.
b/ Select a free cursor frequency by clicking left button on free
spectrum position.
c/ Select a convenient minimum delay between CQ-Auto calling
d/ Click “ SIM Auto-QSO Mode” button at left main window.
e/ a popup window will be displayed , then you can Setup info’s to
be send in first round , Click Ok , and station become totally
automatic , don’t try to interfere manually , it’s not possible, it’s all
automatic or all manual, no possible mixing the two modes.
29
9/ How can I save My current QSO?
At the end of a QSO , and after checking for the QSO info’s
exactitude (NAME, QTH, QRA LOC ….), you can click over “Save qso”
Button located on main window and then it ask you to enter some
comments and click “OK” Button , then QSO will be stored to the
local SIM LogBook , in add the program will try to send them
automatically at the desired checked Web Log’s (eQSL.cc ,
HRDLog.net, HamLog.eu, HAMQTH.com ) .
10/ How can I edit or modify my SIM-log Book ?
Menu Log SIM-LogBook
11/ How can I view my SIM_logBook separately from program?
For a separate program viewer of your SIM_LogBook
Menu Log SIM_LogBook viewer
With this separate program, you can display permanently your
LogBook in a free corner of your screen (for who have a large screen)
, but only for view , modification are not allowed here.
12/ How can I export my QSO’s to my favourite Log program?
All your old SIM QSO’s should be saved at the local SIM LogBook, so
you can access to all your old saved QSO’s easily any time you want.
ADIF file should be the standard method for exporting your SIM31
QSO’s to other Log program’s.
menu bar Log Export QSO’s , a popup window will be displayed
, fill in the asked parameters and then Click “Export Selected QSO’s”
button .
13/ How can I save my Local SIM Logbook before formatting a C:
Hard Disk ?
The local SIM logbook data base was in a unique file:
C:\SIM_PSK31\DataLog_SIM.dta so just save this file in secure place
before formatting your C:\ hard disk , after formatting the disk
please replace the saved file to the same folder C:\SIM_PSK31\ ,
then your old database QSO’s will be recovered .
14/ How can I export my old local SIM Logbook when changing for a
new PC ?
Similar to the upper question, is to move the old data base file
C:\SIM_PSK31\ DataLog_SIM.dta at the new PC at the
C:\SIM_PSK31\ folder .
NB: DataLog_SIM.dta have “read only” file attribute.
30
15/ How can I adjust the Tune length ?
For Simple click down, Tune button delay should be adjusted from :
menu bar Setup Macros Tune Length.
NB: Tune Button can be remain clicked down as long time as wanted
manually by mouse Button.
16/ How my plot can be reported to PSK-Reporter map ?
Check Menu_bar Psk-R Enable Auto PSK-Reporter
This need pc already connected to the internet.
17/ Can I see who has reported me to PSK-Reporter map ?
Yes by menu bar Psk-R Go to My PSK-Reporter Map.
18/ How I can be alerted by a Wanted callsign ?
SIM program has his own callsign SIM-Alerter :
Menu Alerter SIM Alerter
You can be alerted by a Yellow colour when a desired callsign has
meet the desired criteria :
- Wanted Continent.
- No worked CQ-Zone.
- No worked ITU-Zone.
- No worked DXCC country.
- No Worked Callsign since .
- Wanted CQ-Zone.
- Wanted prefix.
- Wanted Callsign …
- ….
31