1
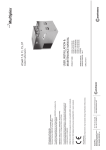
OPERATING INSTRUCTIONS ASTRO HOIST Type E89-CTO CONFORM TO EN 1808 - MARCH 1999 MACHINE DIRECTIVE 98/37 EC All persons operating this equipment must read and completely understand this manual. Any operation in violation of these instructions is at the operator’s own risk. Keep this manual with the hoist at all times. Only use spare parts and steel wire rope from POWER CLIMBER Manufacturer POWER CLIMBER BVBA Satenrozen 7 B- 2550 Kontich BELGIUM Reference: 38816-01 / 38701-E Tel. +32-3-451 05 00 Website: www. PowerClimber.be Tel: +32-3-451.05.00 Fax: +32-3-451.05.01 e-mail: [email protected] Issue date: 6 Dec 2012 Revision: C E-mail: [email protected] Website: www.PowerClimber.be Page: 1 of 14 Fax +32-3-451 05 01 This document and all copies are the property of Power Climber BVBA. All dimensions and data are indicative only. The user must ensure that the equipment complies with local rules and regulations. INDEX INDEX .................................................................................................. 2 GENERAL INFORMATION ................................................................. 3 PRECAUTION - LIMITATIONS ......................................................... 4 TECHNICAL DATA – HOISTS E89-CTO ............................................ 5 TECHNICAL DATA – CENTRAL CONTROL BOX ............................. 6 TECHNICAL DATA – STEEL WIRE ROPE......................................... 7 OPERATING INSTRUCTIONS ............................................................ 8 OPERATING INSTRUCTIONS (Cont.)................................................ 9 INSTALLATION ................................................................................. 10 INSTALLATION (Cont.) .................................................................... 11 DAILY CHECKLIST AND ROUTINE TESTS..................................... 12 MAINTENANCE................................................................................. 13 Reference: 38816-01 / 38701-E Tel. +32-3-451 05 00 Issue date: 6 Dec 2012 Revision: C E-mail: [email protected] Website: www.PowerClimber.be Page: 2 of 14 Fax +32-3-451 05 01 This document and all copies are the property of Power Climber BVBA. All dimensions and data are indicative only. The user must ensure that the equipment complies with local rules and regulations. GENERAL INFORMATION The equipment configuration covered in this manual is two Astro type traction hoists, controlled by one central control box. Astro Types: Astro E-89-CTO (Three Phase) Central control boxes: 95300 (Three Phase) This equipment is to be used on Temporary Suspended Platforms (TSP). The hoists and the central control box are to be mounted on a suitable platform and suspended with steel wire ropes from a suitable suspension system. The strength of the platform and suspension system used in combination with the hosts must be in relation to the Working Load Limit (WLL) of the hoist. The suspension system can be: Counterweighted roof beams Parapet clamps Davits Fixed suspension points Other The suspension system must be calculated for a load of WLL x 3. (WLL = Working Load Limit of the hoist) (The maximum allowed stress with this load must be below Yield) Reference: 38816-01 / 38701-E Tel. +32-3-451 05 00 Issue date: 6 Dec 2012 Revision: C E-mail: [email protected] Website: www.PowerClimber.be Page: 3 of 14 Fax +32-3-451 05 01 This document and all copies are the property of Power Climber BVBA. All dimensions and data are indicative only. The user must ensure that the equipment complies with local rules and regulations. PRECAUTION - LIMITATIONS 1. Only authorized, trained and physically fit persons shall operate the suspended access equipment. 2. Before using the equipment, the operator should read and understand fully the contents of this manual. Serious injuries to personnel may result if the instructions are not followed. 3. At the connection to the power source a main switch must be available. 4. An earth leakage circuit breaker (ELCB) of 30 mA and an automatic fuse of 20 A (Type C) must be used at the power source. 5. Before using the equipment, operators must carry out the daily checks and make sure that the equipment is in perfect working condition. 6. Before using the equipment the suspension system must be checked to ensure the stability of the SAE (Suspended Access Equipment) at all times. 7. In case the area below the SAE is open to the public, preventive measures have to be taken to safeguard the people below. (e.g. barriers, roof protected walkways, etc.) 8. An area must be available to allow access operators to get on and off the platform. 9. The operators must stop working with the equipment and notify the supervisor if faults, damage to the equipment or other circumstances may jeopardize safety. 10. Only steel wire specified by the manufacturer shall be used. The steel wire ropes shall be inspected regularly, using the guidelines as indicated on the steel wire rope specifications sheet. 11. The operator shall check for obstructions along the travel of the platform. 12. The equipment may not be used when the wind speed is more than 12,5 m/s (= 45 km/h) 13. When the work is finished the operator shall bring the equipment in the out of service position, switch off and isolate from the main supply. 14. The equipment as described in this manual may not be used for operation in silo’s, shafts and underground access, because special precautions may be required for these specific applications. 15. Physical, environment and operating conditions for electric equipment Temperature range -10 ºC and +55ºC Humidity range Between 30% and 95 % Altitude above sea level Up to 1200 m Contaminants Degree of protection IP 54 Reference: 38816-01 / 38701-E Tel. +32-3-451 05 00 Issue date: 6 Dec 2012 Revision: C E-mail: [email protected] Website: www.PowerClimber.be Page: 4 of 14 Fax +32-3-451 05 01 This document and all copies are the property of Power Climber BVBA. All dimensions and data are indicative only. The user must ensure that the equipment complies with local rules and regulations. TECHNICAL DATA – HOISTS E89-CTO ASTRO Type Electric motor E89-CTO 400V / 50Hz / three phase 1,5 HP Working Load Limit (WLL) 8.000 N (800 Kg) Climbing Speed Rope Dia. Running currect Self weight 8,5 m/min 9,5 mm 3,5 A 52 kg The ASTRO Hoist is producing 84 DBA in up direction, and 80 DBA in down direction. DESCRIPTION The ASTRO is a self-reeving traction hoist, which has a single wrap traction sheave and a roller chain traction principle for multiple steel wire rope sizes. Power is supplied by an electric motor via the QUADRANT drive. In the event of power loss, slow and controlled descent can be achieved by manual release of the main brake. The overload limiter is adjusted at 125% of the working load limit of the hoist. SAFETY ROPE SUSPENSION ROPE SLACK ROPE LEVER SLACK ROPE SAFETY DEVICE INSPECTION SHIELD ‘NO POWER’ EMERGENCY DESCENT LEVER HOUR METER ELECTRICAL BOX MAIN BRAKE NAME PLATE ASTRO SERIAL NO. SUSPENSION ROPE DEPARTURE ROLLER STRIKER PLATE OVERSPEED SAFETY DEVICE MANUAL TRIP BUTTON (OVERSPEED SAFETY DEV.) TOP LIMIT SWITCH RESET KNOB (OVERSPEED SAFETY DEV.) 'POWER ON' LIGHT INSPECTION WINDOW (OVERSPEED GOVERNOR) MAIN HOUSING WITH QUADRANT DRIVE AND TRACTION MECHANISM ELECTRIC MOTOR OVERLOAD DEVICE SUPPLY CABLE Reference: 38816-01 / 38701-E Tel. +32-3-451 05 00 Issue date: 6 Dec 2012 Revision: C E-mail: [email protected] Website: www.PowerClimber.be Page: 5 of 14 Fax +32-3-451 05 01 This document and all copies are the property of Power Climber BVBA. All dimensions and data are indicative only. The user must ensure that the equipment complies with local rules and regulations. TECHNICAL DATA – CENTRAL CONTROL BOX CONNECTION TO HOIST Types: 95300 (Three Phase 3x400V+N+E/50Hz) The central control box can be hooked over the rear guard rail in the middle of the platform. The control box is equipped with a Male CEE plug for the power connection and a Female CEE plug to power tools (230V/50Hz/single phase, 16 amp). The connection to the hoists is made by steel Harting plugs. Inside the control box is a mercury switch to maintain the horizontal level of the platform. Connection plugs to hoists: 10 pole Connection plugs to overload limiter: 4 pole Self weight of control box : 10 kg Reference: 38816-01 / 38701-E Tel. +32-3-451 05 00 Issue date: 6 Dec 2012 Revision: C E-mail: [email protected] Website: www.PowerClimber.be Page: 6 of 14 Fax +32-3-451 05 01 This document and all copies are the property of Power Climber BVBA. All dimensions and data are indicative only. The user must ensure that the equipment complies with local rules and regulations. TECHNICAL DATA – STEEL WIRE ROPE The recommended steel wire rope to be used with the Astro hoist is the Power Climber Greenflex. Specifications 5 x 26 WSR (Warrington Seale Compacted) construction HDDP (High Density Polypropylene) core Right hand regular lay Preformed Galvanized DIA 9,5 (+0/-0,3mm) Weight Breaking loads 0.340 kg/m Actual 66.8 kN Calculated 80.0 kN Hoist type E89-CTO Recommended steel wire Greenflex Dia.9,5mm Steel wires must be replaced in any of the following conditions: More than 10 broken wires over a length of 30xd Kinking, crushing or any other distortion of the steel wire rope structure Excessive corrosion Damage due to heat Reduction of the nominal diameter by more than 10 % Reference: 38816-01 / 38701-E Tel. +32-3-451 05 00 Issue date: 6 Dec 2012 Revision: C E-mail: [email protected] Website: www.PowerClimber.be Page: 7 of 14 Fax +32-3-451 05 01 This document and all copies are the property of Power Climber BVBA. All dimensions and data are indicative only. The user must ensure that the equipment complies with local rules and regulations. OPERATING INSTRUCTIONS A. FUNCTION & DESCRIPTION 1. Emergency stop: Pushing this button disconnects the power to both hoists. 2. Operating buttons: Hold to run operation for up/down direction of the hoist. 3. Warning light Overload: This red light indicates the presence of an overload. 5. Selector switch: Switching to operate left hoist / both hoists / right hoist. 6. Mercury switch: Maintains the horizontal level of the platform. Cuts the down direction of the lower hoist and the up direction of the upper hoist. 7. Top limit switch: when the striker plate activates the top limit switch of either hoist, the up direction of both hoists is cut. Only down is possible. 8. Overload switch: The up direction of both hoists will be cut when the switch is activated due to overloading of either of the hoists. 9. Pigtails for power supply cable. 10. Power supply cable with retainer. 11. Tool outlet 230V/50Hz/single phase (16 amp). 12. Overspeed stop: The down direction of the hoist will be cut when button is pushed and the safety device will grab on the suspension wire rope. This device will also be automatically engaged in case of overspeed of the hoist. 13. Handwheel: To operate the hoist manualy up to reset the overspeed in case the safety device has tripped and there is a power failure. 14. Hoist Connection:10 Pole plug to connect the hoist with the central control box. 15. Overload switch connection: 4 pole plug to connect the overload switch to the hoist. Reference: 38816-01 / 38701-E Tel. +32-3-451 05 00 Issue date: 6 Dec 2012 Revision: C E-mail: [email protected] Website: www.PowerClimber.be Page: 8 of 14 Fax +32-3-451 05 01 This document and all copies are the property of Power Climber BVBA. All dimensions and data are indicative only. The user must ensure that the equipment complies with local rules and regulations. OPERATING INSTRUCTIONS (Cont.) B. OPERATING INSTRUCTIONS TO START 1. 2. Turn the selector switch (4) in the required position to operate both hoists. The platform can now be driven up or down using the operating buttons (2). OVERLOAD CONDITION 1. 2. 3. The overload switch (8) opens the up circuit in both hoists. The red light (3) indicates an overload on the platform. Remove excessive weight to reset the overload device. (It might be required to remove a bit more weight to allow the springs to reset) The platform can now be operated again in up direction. OUT OF LEVEL CONDITION When the inclination of the platform is more than 6°, the up direction of the upper hoist, and the down direction of the lower hoist will be cut until the platform becomes level again. Out of level condition PHASE PROTECTION RELAY (FOR 3 PHASE HOISTS ONLY) 1. 2. The control box of a 3-phase system has a phase protection relay. The main contactor can only be switched on if the three phases (L1, L2, L3) are connected in the correct sequence. The neutral and earth wires have to be correctly connected. If the platform will not operate with the power supply connected, change over a pair of phases on the incoming supply only. Reference: 38816-01 / 38701-E Tel. +32-3-451 05 00 Issue date: 6 Dec 2012 Revision: C E-mail: [email protected] Website: www.PowerClimber.be Page: 9 of 14 Fax +32-3-451 05 01 This document and all copies are the property of Power Climber BVBA. All dimensions and data are indicative only. The user must ensure that the equipment complies with local rules and regulations. INSTALLATION 1. Install central control box on the rear platform guardrail. 2. Connect plug from the central control box to matching plug of the ASTRO hoist. 3. Plug in power supply cable to the pigtail on the central control box, and secure the retainer to the mid-rail of the platform. 4. Both hoists have to be connected to the central control box for either hoist to operate. Attention: Use 30 mA earth leakage relay at power source. 5. Check that the overspeed safety device is reset by rotating the rest knob anti-clockwise all the way. 6. Push slack rope lever backwards with one hand and feed the ‘bullet’ end of the suspension rope into the entry guide, and push firmly into the hoist. 7. Operate the ASTRO in up direction; to self reeve the suspension rope. 8. To lift the ASTRO operate in the up direction. Line up the holes in the stirrup bar with the holes in the stirrup and push home the bolts. Reference: 38816-01 / 38701-E Tel. +32-3-451 05 00 Issue date: 6 Dec 2012 Revision: C E-mail: [email protected] Website: www.PowerClimber.be Page: 10 of 14 Fax +32-3-451 05 01 This document and all copies are the property of Power Climber BVBA. All dimensions and data are indicative only. The user must ensure that the equipment complies with local rules and regulations. INSTALLATION (Cont.) 9. Bolt the ASTRO to the stirrup with the suspension rope departure roller to the outside of the platform. Mount the ASTRO hoist with bolts M12 and self-locking nuts on stirrup. 10. Reeve the safety rope by pushing the bullet end into the entry guide on top of the ASTRO. 11. Push the rope through the slack rope safety device compartment. A weight of about 8 kg should be hung on the bottom of the safety rope to keep it straight. 12. Install the striker plate to activate the top limit switch after testing the platform during the first run up. The striker plate should be clamped on the safety wire at a distance of min. 200 mm from the Talurit clamp. Check the function of the top limit switch each time before using the platform. IMPORTANT: When rigging is complete, carry out the routine tests to ensure safe and correct operation. When de-reeving the suspension rope, push the slack rope lever backwards, and manually keep tension in the rope above the hoist to avoid rope jams. Reference: 38816-01 / 38701-E Tel. +32-3-451 05 00 Issue date: 6 Dec 2012 Revision: C E-mail: [email protected] Website: www.PowerClimber.be Page: 11 of 14 Fax +32-3-451 05 01 This document and all copies are the property of Power Climber BVBA. All dimensions and data are indicative only. The user must ensure that the equipment complies with local rules and regulations. DAILY CHECKLIST AND ROUTINE TESTS Check before using the Astro hoist. 1. OVERSPEED GOVERNOR Check flywheel rotation through the inspection window by powering the ASTRO up and down about 1 m. 2. OVERSPEED SAFETY DEVICE MANUAL TRIP BUTTON Raise the platform about 1 m. Power hoist down and press the button. Downward travel is electrically cut off. Manually release the main brake by pulling the ‘No Power’ emergency descent lever, to ensure that the safety device is activated and preventing further downward movement. E86/E89 To reset, power hoist up about 10 cm and turn reset knob anticlockwise to reset. Normal operation is restored. 3. ‘NO POWER’ EMERGENCY DESCENT Power the ASTRO up about 1 m. Disconnect the power supply. Operate the ‘No Power’ emergency descent lever in the direction shown. The ASTRO descends at controlled speed. 4. SLACK ROPE SAFETY DEVICE Lower platform to the ground. Slacken the suspension rope. Pull up on the safety rope to make sure the safety device is gripping the rope. 5. TOP LIMIT SWITCH Run the ASTRO in up direction and manually press down the top limit switch. The ASTRO stops and can only be powered downwards, while the limit switch knob is depressed. 6. EMERGENCY STOP Move the platform about 1 m. While moving press the emergency stop. The platform will stop immediately and cannot be driven up or down. To reset twist the knob in the direction of the arrow on the top of the knob. Note: Resetting Overspeed when no power is available It is neccesary to take the load off the overspeed safety device in order to reset. 1. Locate the insertion point of the handwheel on the opposite side of the hoist to that of the electric motor. Remove cap on and fit in the handwheel 2. Grip the handwheel firmly. Rotate the handwheel clock-wise whilst at the same time pulling on the emergency descent lever 3. Release emergency descent lever BEFORE releasing your grip on the handwheel. 4. Repeat as required until it is possible to reset the overspeed safety device. Reference: 38816-01 / 38701-E Tel. +32-3-451 05 00 Issue date: 6 Dec 2012 Revision: C E-mail: [email protected] Website: www.PowerClimber.be Page: 12 of 14 Fax +32-3-451 05 01 This document and all copies are the property of Power Climber BVBA. All dimensions and data are indicative only. The user must ensure that the equipment complies with local rules and regulations. MAINTENANCE MAINTENANCE MAY ONLY BE EXECUTED BY PERSONS AUTHORISED BY THE MANUFACTURER! A. ROUTINE MAINTENANCE The Suspended Access Equipment should be inspected by a qualified person on a regular basis, which for normal platform use should be every three months. Carry out the daily checklist procedure as detailed in the manual. Make any adjustments and rectify any problems as necessary. Open the central control panel and disconnect all plugs and sockets to check for any signs of water penetration. B. ANNUAL MAINTENANCE Annual maintenance should preferable be done preferably in a workshop equipped with a test rig. Remove the hoist and control box from the platform, completely strip the hoist, inspect all parts and replace worn parts if necessary. Clean, lubricate and reassemble. Test the hoist on a test rig. (Carry out the daily check list) Test the overload limiter at 125 % of WLL. Check the central control box and all plugs and socket connections for any signs of water penetration. Record the hour meter reading, which is located in the electrobox on the motor. Fill in the maintenance sheet of each hoist indicating repairs done or parts replaced. Mount the hoist and the control box back on the platform. Run the platform over the full height of the building and carefully inspect the steel wire ropes for kinks, broken wires or other damage. Also inspect the trailing supply cable for damage. Replace any damaged ropes or supply cable. DO NOT USE EQUIPMENT THAT IS NOT OPERATING PROPERLY! Reference: 38816-01 / 38701-E Tel. +32-3-451 05 00 Issue date: 6 Dec 2012 Revision: C E-mail: [email protected] Website: www.PowerClimber.be Page: 13 of 14 Fax +32-3-451 05 01 This document and all copies are the property of Power Climber BVBA. All dimensions and data are indicative only. The user must ensure that the equipment complies with local rules and regulations.