1
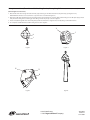
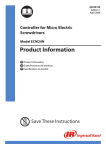
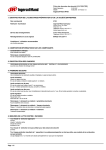
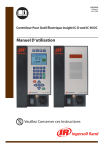
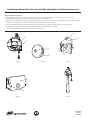
Installation Manual for Floor Controlled Locking Device Balancer Accessory
Set-up Instructions, Floor-Controlled Locking Device, Super-Duty Balancer (Part number BIL-3224)
(Refer to figures for reference)
1. Disassemble and remove large manual lock knob (1) by inserting a 3 mm Allen wrench into the pinhole (3). (see figures 1 & 2)
NOTE: Manual lock knob is not needed for the set up of the floor-controlled locking device.
2. Align hole in flat plate (5) with hole (2) located above where the lock knob was located. Make sure the flange on the flat plate (5) is pointed
away from the locking device and the gap in the flange cradles the pin (6) as shown in figure 3.
3. Insert screw (4) through the hole on the flat plate (5) and into the balancer. Tighten the screw (4) using a 6 mm Allen wrench.
4. Assemble the top plate (7) with the two screws (8) using a Philips head screwdriver. (see figure 4).
5. For complete assembled balancer with locking device refer to figure 5.
4
2
5
1
1
3
Figure 1
Figure 2
6
Figure 3
7
8
Figure 4
Figure 5
45534682
Edition 1
June 2007
Set-up Instructions, Floor-Controlled Locking Device, Heavy-Duty Balancer (Part number BIL-7343)
(Refer to figures for reference)
1. Disassemble and remove large manual lock knob (1) by inserting a 3 mm Allen wrench into the pinhole (3). (See figures 1 & 2).
NOTE: Manual lock knob is not needed for the set up of the floor-controlled locking device.
2. Align hole in flat plate (5) with hole (2) located above where the lock knob was located. Make sure the flange on the flat plate (5) is pointed
away from the locking device and the gap in the flange cradles the pin (6) as shown in figure 3.
3. Insert screw (4) through the hole on the flat plate (5) and into the balancer. Tighten the screw (4) using a 6 mm Allen wrench.
4. For complete assembled balancer with locking device refer to figure 4.
3
1
2
1
Figure 1
4
Figure 2
5
6
Figure 3
Figure 4
www.irtools.com
© 2007 Ingersoll Rand Company
45534682
Edition 1
June 2007