1
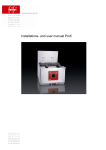
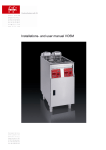
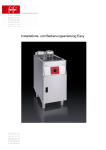
9
Instructions for the installation and user manual
Elegance « S » / « M »
Elegance « S »
Elegance « M »
®
a FRANKE Company
L:\INFORM\CDFrifri\2006\frifri\English\Technic\Manuals\215122
31/01/2006 Page : 1/51
Table of Contents
4
1
Description .............................................................................................................. 5
1.1
Construction ......................................................................................................... 5
1.2
Accessories ........................................................................................................... 7
1.3
Mode of Functioning .......................................................................................... 8
1.4
1.4.1
1.4.2
1.4.3
1.4.3.1
1.4.3.2
1.4.3.3
Technical data .................................................................................................... 9
Identification of the appliance……............................................................... 9
Codification of the appliance number......................................................... 9
Dimensions ....................................................................................................... 10
Dimensions of the deep fat fryer .................................................................. 11
Dimensions of the control panel................................................................... 12
Maximum dimensions above the frying vat .............................................. 13
1.4.3.4
1.4.4
1.4.4.1
1.4.4.2
1.4.4.3
1.4.4.4
1.4.5
1.4.6
1.4.6.1
1.4.6.2
1.4.6.3
1.4.6.4
1.4.6.5
Axle of drain valve........................................................................................... 14
Cut out plan...................................................................................................... 15
Cut out for the frying pot................................................................................ 15
Control panel Elegance « S-M » ................................................................... 17
Drain valve ........................................................................................................ 19
Pre-mounted bottom ...................................................................................... 20
Weights and filling data ................................................................................ 22
Electric system ................................................................................................. 22
Voltages, types of connection and versions ............................................. 22
Mains fuses ........................................................................................................ 23
Connection cable .......................................................................................... 23
Ambient conditions ........................................................................................ 24
Connection of the control print ................................................................... 24
2.
2.1
2.1.1
2.1.2
Safety regulations ................................................................................................. 25
2.1.3
Warning advice ................................................................................................. 25
Warning symbols used (depending upon country) ................................. 25
Mounting positions of warning symbols (depending upon country)
............................................................................................................................. 25
Safety instructions in the operating manual ............................................. 25
2.2
2.2.1
2.2.2
2.2.3
Basic safety regulations .................................................................................... 26
Specified use of the Elegance deep fryer ................................................. 26
Specific dangers and instructions ............................................................... 26
Safety regulations ........................................................................................... 27
2.3
2.3.1
2.3.2
Safety equipment .............................................................................................. 28
General.............................................................................................................. 28
Main switch ...................................................................................................... 28
2.4
2.4.1
2.4.2
2.4.2.1
2.4.2.2
2.4.2.3
2.4.3
2.4.3.1
Authorizied personnel ....................................................................................... 28
General ............................................................................................................. 28
Area of the deep fryer ................................................................................... 28
Owner/operator .............................................................................................. 29
Operator of the deep fryer ........................................................................... 29
Service personnel ............................................................................................ 29
Minimum training and qualifications of the authorized personnel ....... 29
Owner/operator .............................................................................................. 29
L:\INFORM\CDFrifri\2006\frifri\English\Technic\Manuals\215122
31/01/2006 Page : 2/51
2.4.3.1
2.4.3.2
2.4.3.3
Operator of the deep fryer ........................................................................... 29
Service personnel ............................................................................................ 29
2.5
Duty of maintenance ....................................................................................... 30
2.6
Availability of operating manual .................................................................... 30
3.
3.1
3.2
Display element ....................................................................................................... 30
Display « Elegance « S »........................................................................................ 30
Display «Elegance « M » ...................................................................................... 31
4.
Starting up ............................................................................................................... 32
4.1
General ............................................................................................................... 32
4.2
Initial commissioning following installation ................................................... 32
4.3
Orderly start-up .................................................................................................. 32
4.4
Restarting after a malfunction incident ........................................................ 32
5.
Fonctioning of the control panel ............................................................................. 33
5.1
Starting up of the control panel ...................................................................... 33
5.2
Fat melting cycle (FMC).................................................................................... 33
5.3
Selection of frying temperature, Elegance « S »........................................... 34
5.4
Frying cycle, Elegance « M » ............................................................................ 35
5.5
Reset of frying cycle, Elegance « M » ............................................................. 36
5.6
Programming of the parameters ................................................................... 36
5.6.1
Programmable parameters ............................................................................ 37
5.6.2
Elegance « S » .................................................................................................... 37
5.6.3
Elegance « M» .................................................................................................... 37
5.6.4
Automatic stand-by ......................................................................................... 40
5.6.5
Modification of the factory settings .............................................................. 40
5.7
Drain out frying oil .............................................................................................. 41
5.7.1
Procedure without optional oil pump ........................................................... 41
5.7.2
Optional oil pump system ................................................................................. 41
5.7.2.1
Operation of the oil pump system .................................................................. 41
5.7.2.2
How to use the optional oil pump................................................................... 42
6.
Maintenance ........................................................................................................ 44
6.1
6.1.1
6.1.1.1
6.1.1.2
6.1.1.3
Maintenance plan ............................................................................................ 44
Intervalle ............................................................................................................. 44
Cleaning intervals ............................................................................................. 44
frying oil exchange «intervals» ........................................................................ 45
After-sales service............................................................................................... 45
6.2
Periodic checks .................................................................................................. 45
6.3
6.3.1
Cleaning............................................................................................................... 46
Cleaning work ................................................................................................. 46
7.
Fault clearance ........................................................................................................ 46
7.1
Check list for fault finding ................................................................................ 46
7.2
Safety thermostat .............................................................................................. 47
L:\INFORM\CDFrifri\2006\frifri\English\Technic\Manuals\215122
31/01/2006 Page : 3/51
8.
Shutting down and storage ...................................................................................... 47
9.
Packing and transport ............................................................................................. 48
10.
Disposal .................................................................................................................... 49
11.
Spare parts list, ordering, and supplementary documents.........................................49
Guarantee card ...................................................................................................... 50
L:\INFORM\CDFrifri\2006\frifri\English\Technic\Manuals\215122
31/01/2006 Page : 4/51
Description
1. Description
1.1 Construction
c
b
d
a
f
g
e
h
a. Retaining block for heating element
b. Tilting mechanism of heating element
c. Frying basket holder
d. Frying basket
e. Door
f. Submerged heater
g. Frying pot cover
h. Control panel
L:\INFORM\CDFrifri\2006\frifri\English\Technic\Manuals\215122
31/01/2006 Page : 5/51
n
m
l
i
k
i. Frying oil drain tap
j
j. Oil receptacle
k. Bottom removable
l. Power unit
m. Option pump
n. Option lift
L:\INFORM\CDFrifri\2006\frifri\English\Technic\Manuals\215122
31/01/2006 Page : 6/51
1.2 Accessories
Grid
Frying basket holder
basket
Oil-filtering container with coarse and fine filter
Drain pipe and tube on optional oil pump system
L:\INFORM\CDFrifri\2006\frifri\English\Technic\Manuals\215122
31/01/2006 Page : 7/51
1.3 Mode of functioning
The deep fat fryers Elegance made by frifri Aro SA are available in two variants: « S and M ».
The optional oil pump and filtration system is available on both executions, the optional basket lift only on
the Elegance “M” fryer.
The deep fat fryers essentially consist of a frying pot in which a submerged heating element heats the
frying oil and keeps it at the required frying temperature.
The frying basket with the product being fried is lowered into the hot frying oil manually or by the optional
basket lift.
The size of the frying pot, the power execution of the heating elements, the control panel as well as the
optional extras are for an easy daily use of the appliance.
Below are the main differences between the two executions:
Elegance « S »
Elegance « M »
Control panel
Control panel
Membrane buttons next to the rotary knob to
action the following:
Membrane button to action the following:
. On / Off
. On / Off
. Reset safety thermostat
. Reset safety thermostat
. Pumping
. Pumping
. Navy pad for the selection and programming of the parameters :
The rotary knob with his 12 positions select the
following temperatures and function:
fat melting cycle from 60 up to 90°C
temperature from 130 up to 190°C
. Fat melting cycle, fix at 80°C
frying time
. frying temperature from 140 up to 190 °C
shake time (alarme after 30 seconds ) active or
inactive
Program :
10 frying programs
Indication by Led
Indication by Led
While fix or flashing indicate the status of the fryer
or a possible failure.
While fix or flashing indicate the status of the fryer or a possible failure.
Display :
Shows alternatively the selected as well as the actual parameters.
Safety thermostat :
cut off all the functions of the deep fryer :
. if the temperature exceed 216°C
. if the working probe is disconnected
Available options:
. Oil pump system
Available options
. Oil pump system
. Automatic basket lift
L:\INFORM\CDFrifri\2006\frifri\English\Technic\Manuals\215122
31/01/2006 Page : 8/51
1.4 Technical data
1.4.1 Identification of the appliance
Every deep fryer is provided with a technical identification plate.
Always have this identification plate available when making enquiries to our customer services
department.
Example according to type plate
N° art : Article number form the price list
Type
: Technology
N° APP : Item code
OF : Order of fabrication
U : Voltage
P : Power
Cable: Section and number of conductors of the supply cable
1.4.2 Codification of the appliance number
Example:
60 Y 422 1 01 – 0 2 2 – 07 1 0 – 03 0001
. Current number
. Year of manufacturing
. Optional basket lift
. Optional oil pump
. Fryer range “Elegance”
. Number of supply cable
. Number of baskets
. Buzzer
. Electrical network
. Power (standard / high power execution)
. Size of the item & number of control panel
. Technology
. Product name
L:\INFORM\CDFrifri\2006\frifri\English\Technic\Manuals\215122
31/01/2006 Page : 9/51
1.4.3 Dimensions
General view:
L:\INFORM\CDFrifri\2006\frifri\English\Technic\Manuals\215122
31/01/2006 Page : 10/51
1.4.3.1 Dimensions of the deep fat fryer
L:\INFORM\CDFrifri\2006\frifri\English\Technic\Manuals\215122
31/01/2006 Page : 11/51
Type
L
L2
Optional oil pump
Optional
basket lift
211
197.5
163
1
1
311
297.5
263
1
1
411 – 412
397.5
363
1
1 or 2
422
397.5
363
1or 2
2
1.4.3.2 Dimensions of the control panel
Control panel Elegance « S »
L:\INFORM\CDFrifri\2006\frifri\English\Technic\Manuals\215122
31/01/2006 Page : 12/51
Control panel Elegance « M »
1.4.3.3 Maximum dimensions above the frying vat
Maximum lifting out position of the heating element
Upper position of the basket
Holder (only when fitted with the
Automatic basket lift)
L:\INFORM\CDFrifri\2006\frifri\English\Technic\Manuals\215122
31/01/2006 Page : 13/51
1.4.3.4 Axle of drain valve
L:\INFORM\CDFrifri\2006\frifri\English\Technic\Manuals\215122
31/01/2006 Page : 14/51
1.4.4 Cut out plan
1.4.4.1 Cut out for the frying pot
The operation consists in making in the plate of
work the cut out to receive the vat.
Then the frame delivered with the fryer must be
fixed in the way to act as support for the vat but
its role is also to shut tightly the cut out.
Working plate
Frame
Soudure
Welding between both
Frame
Working plate
L:\INFORM\CDFrifri\2006\frifri\English\Technic\Manuals\215122
31/01/2006 Page : 15/51
Cut out plan in the working plate :
Axle of the drain valve 422
Axle of the drain valve
211 – 311- 411
L
Type
211
311
L (mm)
194
294
L:\INFORM\CDFrifri\2006\frifri\English\Technic\Manuals\215122
411
422
394
31/01/2006 Page : 16/51
1.4.4.2 Control panel
Elegance « S - M »
The operation consists to fix the box of the control panel
from the inside of the stove or working table with four
bolts. The aim is to fix the control panel concisely in the
front of the stove or working table. The square helps to
adjust the control box.
L:\INFORM\CDFrifri\2006\frifri\English\Technic\Manuals\215122
31/01/2006 Page : 17/51
Cut out plan for the Elegance control panel:
The cut out is identical for both technologies
L:\INFORM\CDFrifri\2006\frifri\English\Technic\Manuals\215122
31/01/2006 Page : 18/51
1.4.4.3 Drain valve
The operation consists in making on the front of the furniture the cut outs for the axle of the
drain valve and to fix the locking device of the drain valve.
Locking device:
Cut for the model 211 – 311 – 411
Cut for the model 422
L:\INFORM\CDFrifri\2006\frifri\English\Technic\Manuals\215122
31/01/2006 Page : 19/51
1.4.4.4 Pre-mounted bottom.
We deliver separately of the vat a removable bottom,
Where the following elements are assembled:
. Oil receptacle
. Power unit
. Optional oil pump (if ordered)
The aim is to fix on the bottom of the furniture two
squares to receive this assembled unit.
It is necessary as well to foreseen the way of the supply cable (s) of the deep fat fryer
Passage for the supply cable
Square for the pre-mounted bottom
Bottom of the piece of furniture
L:\INFORM\CDFrifri\2006\frifri\English\Technic\Manuals\215122
31/01/2006 Page : 20/51
Plan to fix the squares
Type
211
311
411
422
L
97.5
197.5
297.5
297.5
L:\INFORM\CDFrifri\2006\frifri\English\Technic\Manuals\215122
31/01/2006 Page : 21/51
1.4.5 Weights and filling data
Type
211
311
411
422
Net weight (without accessories) ( kg )
-
-
-
-
Number of basket
1
1 ou 2
1 ou 2
2
1x 0.9
1x 1
1x 1.65
2x 0.9
Filling qty per frying basket ( Kg )
ou 2x 0.5
ou 2x 0.9
Frying oil qty.min ( l )
7.5
12.5
17
2 x 7.5
Frying oil qty.max ( l )
9
14.5
20.5
2x9
Frozen chips (output per hour) ( Kg )
17 - 22
27 - 32
34 - 44
34 - 44
Prefried chips (output per hour) ( Kg )
20 - 25
30 - 35
40 - 50
40 - 50
1.4.6 Electric system
1.4.6.1 Voltages, types of connection and versions
Voltage tree-phase 3NAC 400 V – 50/60Hz : 3L + N + PE
Standard version tree phase with neutral and earth
Voltage tree-phase 3AC 400 V – 50/60Hz : 3L + PE
Special version without neutral
Voltage tree-phase 3AC 440 V – 50/60Hz : 3L + PE
Special version for ships
Voltage tree-phase 3AC 230 V – 50/60Hz : 3L + PE
L:\INFORM\CDFrifri\2006\frifri\English\Technic\Manuals\215122
31/01/2006 Page : 22/51
Special version tree-phase without neutral
Voltage tree-phase AC 230V – 50/60Hz : L + N + PE
Special single-phase version
1.4.6.2 Mains fuses
Electric consumption of the deep fryer
Type
211
311
411
422 ( 2 Supply cables)
Power
422 (1 Supply cable)
7.5 Kw
9 Kw
11 Kw
11.4 Kw
15 Kw
15 Kw
18 Kw
22 Kw
AC 230V
32.6 A
39.1 A
-
-
-
-
-
-
3AC 230V
18.8 A
22.6 A
27.6 A
27.6 A
37.65
A
37.65 A
-
-
3AC 400V
10.8 A
13 A
15.8 A
15.8 A
21.7 A
21.7 A
26 A
31.6 A
3NAC 400V
10.8 A
13 A
15.8 A
15.8 A
21.7 A
21.7 A
26 A
31.6 A
3AC 440V
9.9 A
11.8 A
14.5 A
14.5 A
19.7 A
19.7 A
23.6 A
28.9 A
capacity
1.4.6.3 Connection cable
Type
211
311
411
422
No. Of cables
1
1
1
1 or 2
Cable length (m)
2
2
2
2
Connector Plug
No
No
No
No
L:\INFORM\CDFrifri\2006\frifri\English\Technic\Manuals\215122
31/01/2006 Page : 23/51
1.4.6.4 Ambient conditions
Type
211 – 311 – 411- 422
Min Temperature. ( °C )
+5
Max Temperature. ( °C )
+ 60
Max humidity.. ( %)
60
1.4.6.5 Connection of the control print.
The fryer is delivered with the control box separated from the peripheral elements (probe, switch, lift).
(*) color of the multi-conductor cable
Elegance control « S »
1
1. Connection of the power unit box
1. Control safety contactor (*Brown)
2. Control the work contactor (*Black)
3. Pilotage Pump (*Grey)
4. Nc
5. +24Vdc (*Red)
2
3
4.1
4.2
6. 0V
2. Connection of the switch (detection /heating element)
3. Buzzer solas
4. Probe of temperature
4.1 Regulation (Green = (+) / White = (-))
4.2 Security (Green = (+) / White = (-))
5
2
3
4.2
4.1
1
Elegance control « M »
1. Connection of the power unit box
1. Control pump (*Grey)
2. Control lift (+)
3. Control lift (-)
4. Piloting the work contactor (*Black)
5. Control (Piloting) the safety contactor (*brown)
6. NC
2. Connection of the switch (detection /heating element)
3. Buzzer solas
4. Probe of temperature
4.1 Regulation (Green = (+) / White = (-))
4.2 Security (Green = (+) / White = (-))
5. Connection :
Grey : 0V (*blue)
Orange : +24Vdc (*red)
L:\INFORM\CDFrifri\2006\frifri\English\Technic\Manuals\215122
31/01/2006 Page : 24/51
2. Safety regulations
2.1 Warning advice
2.1.1 Warning symbols used (depending upon country)
The following warning symbols are fitted to the deep fryer as appropriate :
High voltage
. Warning of dangerous electrical voltage.
. Electric shocks lead to serious injury or death.
. Only authorized specialist personnel may carry out work on electrical installations.
. Follow the specific technical safety instructions !
. Always disconnect the deep fryer from the mains power before carrying out work on
electrical installations.
Hot surfaces / hot internal components
. Warning of heat which can lead to injuries.
. Always allow hot surfaces to cool down before carrying out work on these components; or
wear heat resistant gloves.
Hot frying oil
. Warning of hot frying oil which can lead to injuries.
. Always allow the hot frying oil to cool down before carrying out work on submerged
components-or wear safety glasses.
2.1.2 Mounting positions of warning symbols (depending upon
country)
Advice
. The manufacturer has mounted warning symbols (stickers) at all the relevant positions on
the deep fryer before delivery.
. If during operation or within the scope of cleaning work any of these warning symbols
become detached the operator of the deep fryer is obliged to apply these warning
symbols again immediately!
2.1.3 Safety instructions in the operating manual
L:\INFORM\CDFrifri\2006\frifri\English\Technic\Manuals\215122
31/01/2006 Page : 25/51
In this operating manual there are three stages of safety advice :
First stage :
WARNING
. A warning advises of a high level of danger, Non-observance of the respective safety
regulation can lead to injuries or death.
According to the type of danger, instead of STOP one of the following symbols may be combined with
the signal word Warning :
WARNING
. Warning of electric shock
WARNING
. Warning of heat.
Second stage :
CAUTION
. The CAUTION symbol highlights important instructions. Non-observance of these intructions
can lead to damage to the deep fryer or to other material assets.
Third stage :
ADVICE
. ADVICE texts contain supplementary information to increase the general level of safety
and to ease the work.
2.2 Basic safety regulations
2.2.1 Specified use of the Elegance deep fryer
The deep fryer is exclusively intended for the frying of fresh deep-frozen foods which during the frying
process do not react to endanger people, material assets or the environment.
The elegance deep fryer is exclusively authorized for supervised operation.
Any other use of the deep fryer is regarded as non-specified.
The observance of the operating manual and the following of the maintenance and repair instructions
from the manufacturer are also part of the specified use.
L:\INFORM\CDFrifri\2006\frifri\English\Technic\Manuals\215122
31/01/2006 Page : 26/51
2.2.2 Specific dangers and instructions
WARNING
. The deep fryer is exclusively authorized for supervised operation.
. If the oil receptacle pot contains hot frying oil, protective clothing, gloves and safety
glasses must be worn while handling.
. Never hose down the deep fryer with water from a spray head, a water hose or a highpressure cleaner.
. There is a danger of fire and/or the safety thermostat will switch off the deep fryer if it is
started up without first filling it with fat or frying oil to above the bottom oil level mark.
. During operation the frying oil level must not fall below the bottom oil level mark. There is a
danger of fire and/or the safety thermostat will switch off the deep fryer.
. During operation the frying oil level must not go above the upper oil level mark. There is a
danger of overflowing or frothing over.
. Used, contaminated frying oil is increasingly likely to ignite and also tends to froth over.
. If the frying oil ignites never try to quench it with water but instead immediately put on the
frying pot (pot) cover or use a fire extinguisher with a special filling (halon) or use a
quenching cover.
CAUTION
. If too much deep-frozen or wet frying product is put into the hot frying oil frothing over of
the hot frying oil will occur and this will reduce the quality of the fried food.
. Do not move the deep fryer in the heated state. This leads to a risk of the hot oil slopping
over.
. For safe draining or transferring the frying oil it must have cooled down to a temperature
below 175°C.
. Never clean the submerged heater with a steel brush or by burning off (dry operation).
Verifiable improper cleaning of the submerged heater will lead to the exclusion of all
guarantee.
2.2.3 SAFETY REGULATIONS
WARNING
. If incorrectly operated, the deep fryer can cause serious or fatal injuries to personnel. The
personnel who operate and maintain the deep fryer must be trained in the correct
operation and handling of the appliance and must have read and understood the safety
regulations in this operating manual before starting work on or with it.
WARNING
. Never change or remove safety devices.
. Do not switch off safety devices by making changes to the deep fryer.
. Never remove warning symbols which may have been fitted to the deep fryer
(depending upon country). Immediately replace missing or defective warning symbols.
L:\INFORM\CDFrifri\2006\frifri\English\Technic\Manuals\215122
31/01/2006 Page : 27/51
WARNING
. Never operate the deep fryer in a damaged condition.
. Report immediately any irregularities, especially those which affect safety, to your
managers.
WARNING
. When exchanging electrical or mechanical components ensure that the deep
fryer is disconnected from the mains power supply.
. Always check all safety functions after completing servicing work.
2.3 Safety equipment
2.3.1 General
Apart from the warning symbols applied to the deep fryer (depending upon the country) it is also fitted
with the following safety equipment :
Main switch
Safety contactor
Safety thermostat
2.3.2 Main switch
The main switch disconnects the deep fryer from the mains and connects it up again.
*
Elegance « S »
*
Elegance « M »
2.4 Authorized personnel
2.4.1 General
Only those personnel who have been authorized for the respective work may work on and with the deep
fryer. Personnel are seen as authorized if they fulfil the minimum training and knowledge requirements as
listed in this section and have been assigned a fixed area of responsibility.
2.4.2 Area of responsibility of personnel
L:\INFORM\CDFrifri\2006\frifri\English\Technic\Manuals\215122
31/01/2006 Page : 28/51
2.4.2.1 Owner/operator
The owner/operator is the legally, higher-ranking person who is responsible for the specified use of the
deep fryer and for the training as well as the tasks of the authorized personnel. He establishes the
competencies and authorities to issue directives of the authorized personnel with respect to his operation.
2.4.2.2 Operator of the deep fryer
He is responsible for the following work :
. He fills frying oil into the deep fryer.
. He monitors frying quality and tops up the frying oil and carries out cleaning and filtering.
. He starts up the process and monitors it.
. He prepares the deep fryer for the product to fry
. He loads the deep fryer with the food to be fried.
. He localizes problems and organizes their rectification.
2.4.2.3 Service personnel
He is responsible for the following work :
. The cleaning, maintenance and repair of the deep fryer according to the work described in
Sections « 6. Maintenance and 7.Fault rectification »
. The dismantling, storing and disposal of the deep fryer.
2.4.3 Minimum training and qualifications of the authorized
personnel
2.4.3.1 Owner/operator
. He is a person trained in business management (in a management function).
. He has the relevant experience in assessing dangers and in personnel management.
. He has read and understood the section « 2. Safety regulations »
2.4.3.2 Operator of the deep fryer
This is a person who has been instructed in the operation of the deep fryer and is aware of the existing
dangers.
2.4.3.3 Service personnel
These are people who have completed successfully the relevant occupational training, are familiar with
the servicing of the deep fryer and have the necessary qualifications from their tasks.
L:\INFORM\CDFrifri\2006\frifri\English\Technic\Manuals\215122
31/01/2006 Page : 29/51
Servicing work on the electrical equipment of the deep fryer may only be carried out according to the
electro technological regulations by electrical specialists or by trained personnel under the leadership
and supervisor of an electrician.
2.5 Duty of maintenance
The owner/operator is obliged to clean and maintain the deep fryer at regular intervals.
. to only operate the deep fryer in perfect and undamaged condition.
. to only use original consumables and original spare parts.
. To check the safety equipment-after maintenance and repair work-for the correct function « 2.3
Safety devices, 2 - 6,).
2.6 Availability of operating manual
A copy of this operating manual must be available at all times to the personnel at the installation location
of the deep fryer.
3. Display element
3.1 Display Elegance « S »
d
b
a
c
d
a. Rotary knob :
Selector of frying temperature
b. Button « On/Off » + green LED :
ON/OFF switch. Put the control panel under tension and cut off as well
The LED symbolizes the status of the function.
c. Button « Safety Reset » + red LED :
Reset the safety thermostat.
Illuminated LED indicate an overheating or another failure.
d. Button « Pump » + yellow LED :
e. Yellow Led « heating » :
L:\INFORM\CDFrifri\2006\frifri\English\Technic\Manuals\215122
Control of the oil pump, active only if the rotary knob is in position “0”.
Symbolize that the fryer is in phase of heating.
31/01/2006 Page : 30/51
3.2
Display Elegance « M »
g
h
i
g
j
f
e
a
b
c
k
l
m
n
o
d
a. Display :
Shows the values of the parameters.
b. Button « On/Off » + Green led :
ON/OFF switch. Put the control panel under tension and cut off as well
The LED symbolizes the status of the function.
c. Button « Safety Reset » + red LED :
Reset the safety thermostat.
Illuminated LED indicates an overheating or another failure.
d. Button « Pump » + yellow LED :
Control of the oil pump, active only if the control is off.
e. Button « Start Program » + yellow Led « heating » :
Start frying cycle
Stop of the buzzer “shake time” and end of frying cycle
Reset frying cycle
The led symbolize that the fryer is in phase of heating.
f. Navigation pad :
Choice of the parameter and the instruction
g. Led parameter « Temperature »
Indicate the parameter on display
h. Led parameter « Time »
Indicate the parameter on display
i. Led parameter « cast Iron of fat »
Indicate the parameter on display
j. Led parameter « Shake »
Indicate the parameter on display
k,l,m,n. Led « Program »
Indicate the parameter on display
o. Enter key « Program»
Allows to enter into the program mode
(to press simultaneously with the On/Off button)
L:\INFORM\CDFrifri\2006\frifri\English\Technic\Manuals\215122
31/01/2006 Page : 31/51
4. Starting up
4.1 General
ADVICE
. Carry out the start-up procedure which is displayed in your specific case.
. The start-up procedure includes all work which is required before the actual frying
process.
. You can find the operating instructions for the frying process in Section « 5.Operation, 51 ».
4.2 Initial commissioning following installation
1. Carry out the necessary checks and preparatory work.
CAUTION
. Remove any remains of packaging which are still around.
. Clean the deep fryer and the accessories, which accompany the delivery, with a non –
caustic cleaning agent, which is permitted for the food area.
. Check that the deep fryer is correctly levelled and is firmly fixed to the floor, wall or within
a combination unit.
. Check that the deep fryer is correctly connected to the mains power circuit- by direct
cabling or by a power plug.
2. Prepare frying liquid for the frying process (See Section « 5. Operation, 5-1»
4.3 Orderly start-up
An orderly start-up assumes that the deep fryer has not been disconnected from the power circuit.
After checking the frying pot and the oil receptacle (and if necessary the frying oil pump and the frying
basket lift) the deep fryer can be switched on.
4.4 Restarting after a malfunction incident
Restarting after a malfunction assumes that the deep fryer has not been disconnected from the power
circuit, if...
>
... the safety thermostat has triggered.
>
... the safety thermostat has been reset.
>
... a service technician has rectified a defect on the appliance.
After checking the pot and the oil receptacle the deep fryer can be switched on again.
L:\INFORM\CDFrifri\2006\frifri\English\Technic\Manuals\215122
31/01/2006 Page : 32/51
5. Functioning of the deep fat fryer
5.1 Starting up of the control panel
Remarks :
If the fryer undergoes a general power supply cut-off, it is obligatory to initialize the thermostat of safety
during its first powering.
Elegance « S »
(1)
. Button « On/Off » (1) Puts the control panel under tension. The green
led indicates that the temperature control is operational.
. Button « Reset » (2) the buttom "Reset" (2) allows to initialize the
safety thermostat and authorizes the piloting of the heating.
(2)
The red led switch off when the thermostat is initialized.
Elegance « M »
(1)
(2)
. Button « On/Off » (1) puts the control panel under tension. The
green ed indicates that the temperature control is operational.
. Button « Reset » (2) the button "Reset" (2) allows to initialize the
safety thermostat and authorizes the piloting of the heating.
The red led switch off when the thermostat is initialized.
5.2 Fat melting cycle (FMC)
The position fat melting cycle allows to melt slowly fat by heating up with breaks in-between. In this way
the fat is liquefied and heated up without any smoke and deterioration.
Elegance « S »
(3)
. The rotary switch ( 3 ) must be placed on the first
position« FMC ».
. The yellow led in the drop symbolize the heating, and the
regulation of temperature is in work phase if it is switched on
. Setting of the FMC is of 75°C.
L:\INFORM\CDFrifri\2006\frifri\English\Technic\Manuals\215122
31/01/2006 Page : 33/51
Elegance « M »
By switching “ON” of the control panel, the fryer goes
automatically into the FMC position.
(4)
. The yellow led (4) of parameter FMC is then switch on.
. The display ( 5 ) shows alternatively the real temperature in
the vat and the setting of the FMC.
(5)
. It is possible to adjust the setting between 60 and 90°C but
only in the programming mode.
If you do not wish to use the function FMC, you can select directly the requested frying temperature, but
the fryer will continue the alternate heating phase (factory setting) to obtain a temperature equal to the
FMC setting.
.Afterwards it will heat continuously to reach the selected frying temperature.
5.3 Selection of frying temperature, Elegance « S »
. Turn the rotary know (1) on the requested frying temperature
(ex :180°C).
(1)
(1)
(2)
(2)(2)
(2)
L:\INFORM\CDFrifri\2006\frifri\English\Technic\Manuals\215122
. The yellow led (2) in the drop symbolizes the heating, the
temperature control is in phase of work to reach its value in this
case 180°C.
. As soon as the
yellow led (2) in
the drop is off, the
oil is at the
selected
temperature and
you can start
frying.
31/01/2006 Page : 34/51
5.4 Frying cycle, Elegance « M »
. To pass from
the FMC cycle to
a frying program,
it is necessary to
press the button
"P" (1).
(1)
. The yellow led (2) of the parameter "Temperature" switch on.
(2)
(2)
(5)
(5)
(3)
(3)
. The display (3) shows in alternation the real temperature in
the vat and the selection (example: 180°C).
. The yellow led (4) indicate the selected program (In that
case: program French fries)
. The led of the touch "P" (5) flashes when the deep fryer is in
phase of heating and becomes fixed when the instruction is
reached.
(4)
Remarks :
It is possible to change from one program to another by the button of the navi pad ( ↓/ ↑).
For the first four programs (chips, chicken, fish and dessert) the respective led is illuminated.
(2)
(6)
(5)
. To start a frying cycle, it is necessary to press the button « P ».
(6).
(3)
. The yellow led (7) of the parameter « Time » is switched on
(7)(7)
. Display (8) shows the selected frying time.
. If the temperature of the oil is equal or higher as the selected
one:
(8)
* The basket lift receives the order to go down
* The count down of frying time begins
. If the temperature of the oil is lower than the selected one :
The order to lower the basket lift is memorised but the basket
lift will only lower once the selected frying temperature is
reached.
L:\INFORM\CDFrifri\2006\frifri\English\Technic\Manuals\215122
31/01/2006 Page : 35/51
Shake Time
(9)
After 30" an acoustic signal gives information to the user to shake
(10)
the basket.
. The yellow led ( 9 ) of shake is illuminated.
. The acoustic signal is active during 10' ' it is possible
to stop it by pressing the button « P » (10)
Remarks :
The function of the shake can be removed, see the section «programming mode»
By the installation of the fryer it’s possible to go into action on the control print and to modify the
configuration :
. Stop of the buzzer (either manual or automatic after 10 )
For the shake and the end of frying cycle refer to section "Programming of the functions"
End of frying cycle
(12)
(12)
. The display (11) flashes on « 0.00 ».
. The acoustic signal is valid during 10' ' it is possible to stop it
by pressing the button "P" (12)
(11)
. The lift receives the order to go up.
. Waiting for a new start of frying cycle.
5.5 Reset of frying cycle, Elegance « M »
The reset of the frying cycle is possible by maintaining the button "P" pressed
during three seconds.
5.6 Programming of the parameters
L:\INFORM\CDFrifri\2006\frifri\English\Technic\Manuals\215122
31/01/2006 Page : 36/51
5.6.1 Programmable parameters
The parameters that can be changed are the following :
Temperature :
Selection from 130°C up to 190°C
Frying time :
Selection from 0.00 up to 59.59 min.
Temperature of fat melting cycle and “Stand-by” position:
Selection from 60°C up to 90°C
The shake time (fix at 30’’) :
ON (active) / OFF (inactive)
5.6.2 Elegance « S »
On the Elegance range « S » there is no programmable parameter
5.6.3 Elegance « M »
The range Elegance "M" has 10 programs; the modification of the parameters is realized in the
programming mode.
The modification of the settings can only be done in one program and not on several at the same time. If
you need to change parameters in different programs please repeat the operation descript below step
by step.
To enter into the « programming Mode » :
The control must be switched off.
Press simultaneously on the button :
. « Enter key » and. « ON / OFF »
L:\INFORM\CDFrifri\2006\frifri\English\Technic\Manuals\215122
31/01/2006 Page : 37/51
« Programming mode »:
. The led of the enter key is illuminated (1).
The Buzzer signal warns that we are in program mode
. The control unit goes on program 1
(2)
(3)
* The digital display shows the program number (2).
(1)
. The led program «Fries» is switched on (3).
« Choice of the program »:
. Select the program you would like to change by the navi
pad (↓ / ↑).
Remarks :
In our example we choose to modify the program « Fish ».
« Example Programs 3 »
(5) the selected program 3 (5).
* The digital display shows
* The led program «Fish» is switched on (6).
(6)
Then you validate your choice while pressing on the button
“Enter key” (7).
« Modification of the parameters»
(8)(8)
. The control unit switch on the parameter temperature (8)
(10)
(9)
. The display shows the last temperature in the memory (9).
. You can now :
(9)
Select another parameter by the button of the navi pad
(11)
( ← / → ) (10).
Modify the parameter of the temperature by the buttons of
the navi pad ( ↑ / ↓)(11).
Remarks :
In our example we choose to modify the parameter « time » .
L:\INFORM\CDFrifri\2006\frifri\English\Technic\Manuals\215122
31/01/2006 Page : 38/51
« Modification of the parameter time »
(12)
(12)
(14)
. The control unit switch to the parameter time (12).
. The display shows the last time in the memory (13).
(13)
. Modify the parameter by the buttons of the navi pad
( ↑ / ↓) (14).
Remarks :
In our example we choose to modify the parameter "time" with an instruction of 3.46
« New selection»
. The new selection flashes (15).
. You have to validate your choice by pressing the Enter Key
(16).
(15)
. The new instruction is in memory, the display becomes fix
with the new value.
(16)
Remarks :
You can change the other parameters of program 3 in the same way .
« To leave the programming mode »
(17)
(17)
. You can leave the "programming Mode" at any time by
pressing the button "ON/OFF" (17).
« The control unit of the deep fat fryer is disconnected from the
tension »
L:\INFORM\CDFrifri\2006\frifri\English\Technic\Manuals\215122
31/01/2006 Page : 39/51
5.6.4 Automatic stand-by
After 20 minutes of non use of the fryer in the frying mode, the fryer goes automatically into the "Stand-by"
mode (equivalent with the FMC).
It is possible to modify on the control print (PCB board) the setting of this function. Refer in the section «
Modification of the of factory settings»
5.6.5 Modification of the factory settings
The Elegance range has different factory settings which can be changed if needed by a
technician who is certified by frifri aro S.A.
To change these settings an intervention on the main print board is needed and the fryer
must absolutely be disconnected from the supply network.
Pour Changer ce réglage, il faut intervenir sur la carte de régulation en séparant
impérativement la friteuse du réseau électrique.
After having disconnected the fryer from the supply network you need to take off all the steel
sheets covering the main control board.
There is a bloc of micro switch on the PCB board with two positions (ON or OFF). You need to put
the switch in the requested position according to the following table.
N° Switch
1
2
3
4
5
Function
Display
Temperature
FMC / Stand-by
Reset Buzzer
Twin
Measure of the
Temperature
ON
°F
Continu
Manuel
Esclave
Master
OFF
°C
Automatic after 20
minutes
Automatic after
10’’
Master
Esclave
L:\INFORM\CDFrifri\2006\frifri\English\Technic\Manuals\215122
31/01/2006 Page : 40/51
5.7 Drain out frying oil
Advice
. The procedure described in the following is also valid in the general sense for exchanging
the frying oil or the frying oil filter.
If the deep fryer is equipped with the option pump, the oil can be pumped between
the oil receptacle and the vat.
5.7.1 Procedure without optional oil pump
Wear protective clothing, gloves and safety glasses!
- Open the drain valve by turning down the drain tab of ¼ anti-clockwise.
- Let the oil run at a temperature of max. 60°C into the receptacle.
- The residues from frying will be kept back by the coarse filter.
- Close the drain valve again.
- Wipe the tank with a cloth.
- Put the filtered oil back into the tank and add oil if required, up to the MAX.
Mark.
5.7.2 Optional oil pump system
5.7.2.1 Operation of the oil pump system
. The operation of the oil pump system becomes activated by the button pump.
. The led of the push button indicates if the order of pumping is active.
Remark:
The pumping cycle is set at maximum 6 minutes and the system stops automatically but it is possible at
any time to stop the function while pressing on this same push button “Pump”.
L:\INFORM\CDFrifri\2006\frifri\English\Technic\Manuals\215122
31/01/2006 Page : 41/51
Elegance « S »
(2)
(2)
(1)
. The control knob pump is active if the control panel of the
fryer is under tension « ON » (1) and the rotary knob in the
position « 0 » (2)
Elegance « M »
. The control knob pump is active if the fryer is « Off » (1)
The LED of the push button « On / Off » is off.
(1)
5.7.2.2 How to use the optional oil pump
Wear protective clothing, gloves and safety glasses!
. The maximum temperature for the oil pump should not be of more than 175°C.
. Fix the flexible red tube to the drain pipe.
Flexible red tube:
L:\INFORM\CDFrifri\2006\frifri\English\Technic\Manuals\215122
Drain pipe:
Assembled unit:
31/01/2006 Page : 42/51
. Fix the assembled unit to the fast coupling in the rear of the fryer.
. Open the drain tap and let flow the frying oil from frying pot into the
oil receptacle
. Start the pump by the pressing the button “Pump” on the control
panel
. Rinse the vat and the heating element or evacuate oil into an external vat if the oil is used.
. Close drain tap.
L:\INFORM\CDFrifri\2006\frifri\English\Technic\Manuals\215122
31/01/2006 Page : 43/51
. Wait up to the the end of the pump cycle or stop it manually by the control
knob.
. Fix the drain pipe directly to the fast coupling in the back of the fryer by
uncoupling it from the red tube.
Caution: Parts can be very hot causing burnings. It’s imperative
to wear gloves isolating heat.
The pump must be stopped for this operation.
. Finish the pumping of the oil which is in the oil receptacle, check oil level and if required fill up with
fresh oil up to the maximum mark.
Caution: Do not run the pump without oil.
If you are using cleaning or rinsing products it’s imperative to let circulate oil after
the cleaning process because residual oil in the head of the pump has a start up
role by the next pumping cycle.
6. Maintenance
This section deals exclusively with the preventative maintenance of the deep fryer. In the case of faults
section should be consulted « 7. .1 »
6.1 Maintenance plan
6.1.1 Intervalle
6.1.1.1 Cleaning intervals
Cleaning area
Daily
Monthly
External surfaces and covers
<
Control panel
<
Drain pipe and flexible red tube
<
Frying pot
<
Frying pot cover
<
Frying basket
<
Frying basket holder
<
Internal surfaces and covers
<
<
Connecting cable
Oil receptacle
<
Deep fryer surrounds
<
Heating element/submerged heater
<
L:\INFORM\CDFrifri\2006\frifri\English\Technic\Manuals\215122
<
31/01/2006 Page : 44/51
6.1.1.2 Frying oil exchange « intervals »
Frying oil
Daily or according to
According to wear
Intensity of use
and situation
Sieve
<
Exchange
<
6.1.1.3 After-sales service
The detailed work, which should be carried out within the scope of the basic service and intermediate
service, can be found in the separate.
Deep fryer in intensive
use
Deep fryer in « fast
food »
(8 to 12 hrs /day)
(more than 12 hrs/day)
Intermediate service
Intermediate service
Intermediate service
2.
Intermediate service
Intermediate service
Basic Service
3.
Intermediate service
Basic Service
Intermediate service
4.
Intermediate service
Intermediate service
Basic Service
5.
Basic Service
Intermediate service
Intermediate service
6.
Intermediate service
Basic Service
Basic Service
7.
Intermediate service
Intermediate service
Basic Service
8.
Basic Service
Basic Service
Basic Service
9.
Intermediate service
Intermediate service
Basic Service
10.
Intermediate service
Basic Service
Basic Service
Etc.
Basic service every third
year
Basic service every
second year
Basic service each year
Interval
Deep fryer in normal use
(Years)
(less than 8 hrs/day)
1.
6.2 Periodic checks
Rotary knob (Cleanliness, fixing, function)
Oil catchments container (cleanliness, filling level)
Frying oil quality according to hygiene regulations
<
<
<
Frying pot (Cleanliness, settled frying residues)
<
Drain pipe and fast coupling (cleanliness, function, sealing after installation ) <
Submerged heating (surface)
L:\INFORM\CDFrifri\2006\frifri\English\Technic\Manuals\215122
<
31/01/2006 Page : 45/51
6.3 Cleaning
6.3.1 Cleaning work
Caution
. Only use non-caustic,non-abrasive cleaner.
. Only use non-abrasive cleaning cloths.
. Only use cleaners which are permitted for the food area.
. Always carry out cleaning work only after the frying oil and the deep fryer have cooled
down to a temperature level at which no scalding can occur.
Cleaning area
Cleaning work
External surfaces and covers
Clean with damp cloth
Control panel
Clean with damp cloth
Fast coupling (option pump)
Cleaning agent / hot water
Frying pot
Dishwashing/ hot water
Frying basket
Dishwashing/ hot water
Frying basket holder
Dishwashing/ hot water
Frying oil pot cover
Dishwashing/ hot water
Internal surfaces and covers
Clean with damp cloth
Connecting cables
Clean with damp cloth
Oil receptacle container
Dishwashing/ hot water
Deep fryer surrounds
Clean with hard and soft brushes and damp cloths
and follow special instructions if necessary
7. Fault clearance
7.1 Check list for fault finding
Elegance « S »
Red LED switched on is synonym of a problem with :
. Overheating
. connection of working or safety thermostat
. Safety thermostat
. PCB board
L:\INFORM\CDFrifri\2006\frifri\English\Technic\Manuals\215122
31/01/2006 Page : 46/51
Elegance «M »
Error 1 : Break down or disconnection of the working probe
Error 2 : Overheating, the temperature of the frying oil is over
225°C
Error 3 : Connection of the working probe is inverted
7.2 Safety Thermostat
The deep fryer is equipped with a safety thermostat according to the current regulations.
The safety thermostat triggers at a temperature of 225 °C.
The safety thermostat switches off the deep fryer in the following situations:
CAUTION
. The control thermostat is defective.
. If the connecting of the temperatures probes is defective.
. A power failure (mains) has occurred.
. The frying oil temperature is too high.
. The heating elements are heating « dry » i.e. no frying liquid is present.
. Too little frying liquid is present.
To restart the fryer after a shut down by the safety thermostat, a pass through the position « 0 » is required.
ADVICE
. Clarify reason for the triggering of the safety thermostat.
8. Shutting down and storage
This section provides the necessary advice for the situation where the owner/operator of the deep fryer
wishes to shut the appliance down and store it for a long period.
This refers to the desired shutdown of the deep fryer and not the non-use of the appliance for operating
or production reasons.
L:\INFORM\CDFrifri\2006\frifri\English\Technic\Manuals\215122
31/01/2006 Page : 47/51
WARNING
The work of shutting down and storing the deep fryer may only be carried out by personnel
who are authorizied to carry out such work. They must fulfil the qualification and training
requirements for service personnel according to section « 2-1 »
You should proceed as follows for the shutting down work :
1. Disconnect the deep fryer from the electrical supply.
CAUTION
Be sure to follow the local regulations for handling frying oils (disposal, water pollution
regulations etc).
2. Drain frying oil (See section « 5.4 Drain out frying oil, 5-11)
ADVICE
Ambient conditions for storage
. Be sure to follow these specifications since the deep fryer could suffer damage otherwise!
. Temperature range : + 5 °C at + 60 °C
. Relative humidity : 20 % at 60 %
. Restarting : See section « 4. Starting up, 4-1 »
9. Packing and transport
WARNING
. Only personnel with shipping and transport experience are authorized to carry out the
packing and transportation of the deep fryer.
. The safety regulations in Section, 2 Security, 2- 1 »
The following advice must be followed for packing and transport :
1. Disconnect the deep fryer from the electrical supply.
CAUTION
. Be sure to follow the local regulations for handling frying oils (disposal, water pollution
regulations etc.)
L:\INFORM\CDFrifri\2006\frifri\English\Technic\Manuals\215122
31/01/2006 Page : 48/51
2. Drain frying oil (see section « 5.4 Drain out frying oil »
3. Place the deep fryer on a suitable transport base in the vertical position (all lines emptied, frying pot
and oil receptacle emptied, frying baskets removed as necessary) and fix to the transport base. Etc.
CAUTION
. When securing the deep fryer onto the transport base it must not be subject to chafe at
the fixing points.
10. Disposal
WARNING
. Only personnel with the necessary qualifications and training may carry out the
dismantling and disposal of the deep fryer (service personnel according to Section
« 2.Safety regulations, 2-1 »).
. The safety regulations in Section « 2 Safety regulations, 2-1 » must be strictly followed!
The following advice must be followed for disposal :
1. Disconnect the deep fryer from the electrical supply.
CAUTION
Be sure to follow the local regulations for handling frying oils (disposal, water pollution
regulations etc.).
2. Drain frying oil (see section « 5.4.5.2 Drain out frying oil »)
. Dismantle the deep fryer and recycle the individual parts according to the type of material. Dispose
of non-recyclable materials according to type.
ADVICE
. Your local authority can provide information on disposal and collection points.
. When disposing of materials it is essential to follow the relevant country and regional laws
and guidelines.
. The deep fryer contains no materials, the disposal of which required special approval.
11. Spare parts list, ordering, and supplementary documents.
In order to avoid misunderstandings in the ordering of consumables and spare parts, we request that you
always provide the following data with your order:
L:\INFORM\CDFrifri\2006\frifri\English\Technic\Manuals\215122
31/01/2006 Page : 49/51
. Appliance identification according to the type plate
. Description and article number of consumer material or spare part according to the separate
material list supplied by the manufacture with the appliance.
. Amount of required consumables and/or spare parts
ADVICE
Definition
Consumes goods and spare parts, which are specifically for the deep fryer, are all
components which are listed in the separate material list supplied by the manufacture with
the appliance. It is essential to use these components.
Consumer goods and spare parts which are specifically for the deep fryer are to be exclusively procured
from « FriFri Aro SA » or its contract partners. If during the guarantee period a claim is made in which it is
established that spare parts, which were not specific to the deep fryer and were not made by « FriFri Aro
SA » have been installed, then the remaining guarantee period of the appliance becomes invalid.
The firm of « FriFri Aro SA » declines any form of liability I fit is established in a case of product liability that
spare parts which were not « Frifi Aro SA » products made specifically for the deep fryer have been
installed.
Order address
Frifri Aro SA
Chemin de St. Joux 7
CH-2520 La Neuveville
Phone + 41 (0) 32 752 46 52
Fax
+ 41 (0) 32 751 36 43
e-mail [email protected]
Guarantee card :
Please fill in the details on the back and send to FriFri Aro SA.
To validate your rights for guarantee, please fill this card after the starting of the deep fryer.
You can send this card of guarantee to the company) FriFri Aro SA.
- by post,
- by telefax [+41 (0) 32 751 36 42 ] ou
- by e-mail [ [email protected] ]
L:\INFORM\CDFrifri\2006\frifri\English\Technic\Manuals\215122
31/01/2006 Page : 50/51
Guarantee card (back)
To validate you right to claims under the guarantee please fill in the card after starting up the
deep fryer.
You can send this guarantee card to
Frifri Aro SA
- by post,
- by fax [+41 (0) 32 751 36 42] ou
- by e-mail [ [email protected] ]
Company stamp and signature of buyer
Appliance identification :
..................................................
Delivery date :
..................................................
Start up date :
..................................................
Oyner/operator’s address :
..................................................
L:\INFORM\CDFrifri\2006\frifri\English\Technic\Manuals\215122
31/01/2006 Page : 51/51