1
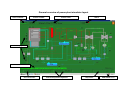
USER MANUAL OF THERMAL POWER PLANT (TPP)
SIMULATOR SOFTWARE
This is the manual for Thermal Power Plant (TPP) Simulator laboratory exercise. The
manual consists of useful information about simulator software, which helps the user
to get familiar with software interface, operation and functions. It is highly
recommended to read the manual before start to work with the simulation exercise as
well as to print it out and have it available during the simulation.
Table of contents
1. The mouse
2. Keyboard function keys
3. Initial conditions
4. Picture directory
5. Run & freeze simulation
6. Snapshots
7. Simulator help menu
8. Pop-up windows
9. Process pictures
10. Variable lists
11. Malfunctions
12. Description of pictures
13. Description of symbols
14. Simulator speed ratio
15. Alarm system
16. Instructor help
17. Exit the simulator software
1. The mouse (two bottoms)
Left button - open valves, start pumps
Right button - close or stop
Mouse over - shows information about valves, pumps
2. Keyboard function keys
Present windows layout:
F1
F2
F3
F4
Shift F4
F5
F6
Shift F6
F8
Shift F8
F10
F11
Home
Shift Home
Page up
Page down
Run simulation
Freeze simulation
Stop the simulation, and exit the application
Snapshot
Replay
Operating condition
Recall picture
Initial condition
Alarm log
Page acknowledge (Alarm)
Variable list
Alarm list
Picture directory
Select picture
Previous picture
Next picture
Download keyboard layout (PDF)
3. Initial conditions
“Initial Conditions” is a description of a specific situation. Loading an initial condition
(exercise) implies that you together with the model itself also load a set of
parameters that describe the starting point of your simulation.
To reach a specific training objective, the instructor normally needs to modify the
“Initial Condition”. If you change the value of one of the above mentioned variables
and store it, you have in fact created a new Initial Condition. It is possible to change
the variables, define new initial concision and save it. An Initial condition must be
chosen prior to starting the simulation. Snapshots can be converted to initial
conditions too.
4. Picture directory
• Press [Home] key to get Picture Directory
• Select one of the options and view Process Display
5. Run & freeze simulation
Run
To set the simulator in Run mode, press the Run pushbutton [F1].
The indication in the header bar changes from Freeze to Running indicates that the
simulator is in Run mode.
The simulated time displayed in the header bar of the display starts incrementing.
Freeze
To set the simulator in Freeze mode, press the Freeze pushbutton [F2] on the
keyboard.
The mode indication in the header bar changes from Running to Freeze.
The simulated time displayed in the header bar of the display stops incrementing.
6. Snapshots
A snapshot is a copy of all the variables and parameters needed to describe the state
of the simulator. A snapshot consists of one or more binary files stored on the system
hard disc and can be seen as a "picture" of the simulated plant state at a given time.
Snapshots will only exist during a training session and cannot be transferred to or
used in later training sessions unless they are converted into initial conditions. A
snapshot is marked with the simulated time when it was taken and is identified by this
time mark.
There are two ways to take snapshots, automatically or manually.
Automatic snapshots
Snapshots are taken automatically when setting the 'snapshot interval'. Default
snapshot interval at simulation start-up is 00:00, i.e. no snapshots taken
automatically. However, setting the 'snapshot interval' to 00:10 will cause snapshots
to be taken at 10 minutes intervals.
Manual snapshots
To force a snapshot to be taken independently of the set snapshot frequency, press
the Snapshot pushbutton. This permits the saving of situations not captured by the
"automatic snapshot" feature.
Snapshots saved using the auto snapshot facility are most often used for this
purpose. Up to 100 snapshots may be saved and are thus accessible from the
snapshot directory during a training session.
Snapshots are used for:
1. Creating initial conditions
2. Performing a replay
3. Do a backtrack
7. Simulator help menu
The simulator includes a help system. At the bottom of right corner there is a help
function button, which gives clear information of the pictures of the plant, symbols,
keyboard and mouse, functions, etc. For each main display it is possible to activate
sub windows with relevant help information.
8. Pop-up windows
“Variable list”, “Malfunction list”, and “Alarm list” keys contain pop-up windows
with more information about the process.
9. Process pictures
The simulator comprises the following process pictures:
Picture no.
Picture name
010
100
120
140
150
160
170
180
190
200
210
240
250
260
300
380
400
410
420
430
440
500
600
610
700
710
720
Steam Plant Overview
Fuel Oil System
Secondary Steam System
Burner Plane A
Burner Plane B
Burner Plane C
Burner Plane D
Boiler Consumption Control
Block Master Control System
Combustion Air/Flue Gas System
Combustion Air Preheaters
Boiler Water System
Boiler Steam System
Main Steam Lines
Steam Turbines
Electric Generator
Cold Condenser System
Main Condensate system
Low Pressure Feed Heaters
Feed Water Deaerator System
High Pressure Feed Heaters
Make-up Deaerator
Hot Condenser System
Direct Heater System
Denox Plant
SCR Reactor 1
SCR Reactor 2
800
810
820
830
840
850
860
Desulphurization Plant
Lime Silo
Slake System
Feeder System
Absorber
Product System
Mixing System
Colour cods for pictures
The following colours are used to indicate the various mediums:
Medium
Oil
HP steam
Air
Water
Colour
Magenta
Red
White
Blue
10. Variable lists
All model variables are listed in pop-up lists provided. The variable lists are activated
by pressing [F10] key. The lists include tag name, descriptive text and alarm status,
where applicable and actual value at the present state of the simulation.
The value of an independent variable can be changed in the variable list. The
dependent variables are those are continuously updated by the simulator. It is not
possible to change the dependent variables.
11. Malfunctions
Many of the components included in the simulator are capable of being in a faulty
condition or having malfunctions. The instructor can set/reset faults on the
malfunction pages, which are pop-up lists similar to the variable lists. The user does
also have access to the malfunction lists, but the state of the malfunction is hidden
for the user.
12. Description of pictures
Available in the simulator help menu
13. Description of symbols
Available in the simulator help menu
14. Simulator speed ratio
It is possible to change simulator speed ratio up to 5 times normal speed. Set
simulation speed to 5 means that clock run 5 times faster than normal.
• Click on “speed ratio” section
• Set speed ratio
• Press [Enter] to save the data
Note: Before changing speed ratio make sure simulation is stopped
15. Alarm system
Information about Alarms can be found on the “Alarm page” [F8]
• when alarm runs, it is indicated in the section “Alarm Group”
• in order to see the details of the alarms go to “Alarm Log Summary Display”
page [F8]
• right click the mouse on the alarm to acknowledge it
16. Instructor help
For more information contact Tommy Anderson by e-mail: [email protected]
17. Exit the simulator software
There are two options to exit power plant simulator software
First option
•
•
•
right click on task bar icon of power plant simulator
select “Simulator Exit”(see the picture)
left click on “Simulator Exit”
Click to exit
Second option
•
•
press [F3] key
press [Y] key
• press [Enter] key
18. Operational modes
Power Plant Simulator software has two operational modes:
1. Instructor mode
2. Operator mode
General overview of power plant simulator layout
Clock indicator
Picture number
Picture name
Alarm
Select page
Mouse over info
Unit conversion
Instructor/Operator Kayboard
Help menu
PPS taskbar icon