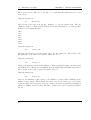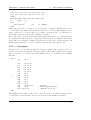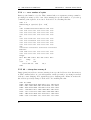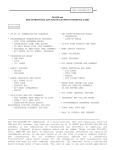
1
Senior
Assembler & Simulator
user manual
September 4, 2008
Contents
1 Senior assembler
1.1 Command line syntax . . . . .
1.2 Assembler source file structure
1.2.1 Reserved words . . . . .
1.2.2 Mnemonics . . . . . . .
1.2.3 Identifiers . . . . . . . .
1.2.4 Labels . . . . . . . . . .
1.2.5 Comments . . . . . . . .
1.2.6 Numbers . . . . . . . .
1.2.7 Directives . . . . . . . .
1.3 Special I/O ports . . . . . . . .
.
.
.
.
.
.
.
.
.
.
.
.
.
.
.
.
.
.
.
.
.
.
.
.
.
.
.
.
.
.
.
.
.
.
.
.
.
.
.
.
2 Senior simulator
2.1 Command line syntax . . . . . . . . .
2.2 Simulator commands . . . . . . . . . .
2.2.1 h/? — print help . . . . . . . .
2.2.2 p — print registers . . . . . . .
2.2.3 l — list program . . . . . . . .
2.2.4 r — run a number of cycles . .
2.2.5 d0 — dump data memory 0 . .
2.2.6 d1 — dump data memory 1 . .
2.2.7 g — run until CTRL-C pressed
2.2.8 e — toggle event . . . . . . . .
2.2.9 q — quit . . . . . . . . . . . .
.
.
.
.
.
.
.
.
.
.
.
.
.
.
.
.
.
.
.
.
.
.
.
.
.
.
.
.
.
.
.
.
.
.
.
.
.
.
.
.
.
.
.
.
.
.
.
.
.
.
.
.
.
.
.
.
.
.
.
.
.
.
.
.
.
.
.
.
.
.
.
.
.
.
.
.
.
.
.
.
.
.
.
.
.
.
.
.
.
.
.
.
.
.
.
.
.
.
.
.
.
.
.
.
.
.
.
.
.
.
.
.
.
.
.
.
.
.
.
.
.
.
.
.
.
.
.
.
.
.
.
.
.
.
.
.
.
.
.
.
.
.
.
.
.
.
.
.
.
.
.
.
.
.
.
.
.
.
.
.
.
.
.
.
.
.
.
.
.
.
.
.
.
.
.
.
.
.
.
.
.
.
.
.
.
.
.
.
.
.
.
.
.
.
.
.
.
.
.
.
.
.
.
.
.
.
.
.
.
.
.
.
.
.
.
.
.
.
.
.
.
.
.
.
.
.
.
.
.
.
.
.
.
.
.
.
.
.
.
.
.
.
.
.
.
.
.
.
.
.
.
.
.
.
.
.
.
.
.
.
.
.
.
.
.
.
.
.
.
.
.
.
.
.
.
.
.
.
.
.
.
.
.
.
.
.
.
.
.
.
.
.
.
.
.
.
.
.
.
.
.
.
.
.
.
.
.
.
.
.
.
.
.
.
.
.
.
.
.
.
.
.
.
.
.
.
.
.
.
.
.
.
.
.
.
.
.
.
.
.
.
.
.
.
.
.
.
.
.
.
.
.
.
.
.
.
.
.
.
.
.
.
.
.
.
.
.
.
.
.
.
.
.
.
.
.
.
.
.
.
.
.
.
.
.
.
.
.
.
.
.
.
.
.
.
.
.
.
.
.
.
.
.
.
.
.
.
.
.
5
5
6
7
7
7
7
8
8
8
11
.
.
.
.
.
.
.
.
.
.
.
13
13
14
14
14
15
16
16
17
17
17
17
3
Contents
4
Contents
1 Senior assembler
The Senior assembler is an assembler for the Senior DSP assembly language. The assembler uses three passes. In the first pass all source code, except undefined identifiers
and labels, is translated to a hex format. In the second pass all remaining identifiers and
labels are translated (if possible) and inserted into the right place in the hex code. In
the third pass, hex file output is generated provided there were no errors in the previous
passes. The hex file output is a text file for use with the Senior simulator only.
The following sections in this chapter will describe the use of the Senior assembler and
the source file structure.
The Senior assembler instruction set is described in a separate document.
1.1 Command line syntax
The assembler command line uses the following syntax:
srasm infile [outfile ]
where srasm is the name of the Senior assembler program, infile is the name of the
assembler source file and outfile is the optional name of the output hex file. If no name
is given for the output hex file one will be generated using the name of the infile as
the base with the extension .hex added. For instance if the infile is named test1.asm
the outfile will be named test1.hex. The output hex file will always be written in the
same directory as the input source file, unless a certain path is specified in the outfile
parameter. For instance, running the command:
> srasm test1.asm out/test01
Senior assembler
Assembled successfully into ’out/test01’
will generate the file test01 (without .hex extension) in the out directory (provided it
exists). Running the command:
> srasm src/test1.asm
Senior assembler
Assembled successfully into ’src/test1.hex’
will generate the file test1.hex in the same directory as the infile test1.asm.
5
1.2. ASSEMBLER SOURCE FILE STRUCTURE
CHAPTER 1. SENIOR ASSEMBLER
1.2 Assembler source file structure
The assembler source file typically consists of several sections. Usually there is first a
section with defines and aliases declaring names of constants, registers and such for later
use in the code. There are four memory spaces (ram0, rom0, ram1 and code) defining
where definitions and code eventually end up. Here is an example of a source file:
; === main.asm ===
; This is the main program
.alias
#define port1
.ram1
.skip
sp
0x0011
ar3
128
stack
.align 1024
.code
#include "output.asm"
main
set
call
main_loop
call
call
jump
sp,stack
stream_init
;initialize stack pointer
;initialize stream
read_header
layer2_decode
main_loop
.rom0
table_bitrate
.dw
0, -1,-1,-1,1, -1,2, 3, 4, 5, 6, 7, 8, 9, 10
table_C
.scale 2.0
.dfu
1.33333333333, 1.60000000000, 1.14285714286, 1.77777777777
table_D
.scale 1.0
.df
0.06250000000, 0.03125000000, 0.01562500000, 0.00781250000
Concerning indentation, label definitions MUST reside at the beginning of a line, hash
directives (#), dot directives (.) and comments MAY start at the beginning of a line
6
CHAPTER 1. SENIOR ASSEMBLER
1.2. ASSEMBLER SOURCE FILE STRUCTURE
and everything else MUST NOT start at the beginning of a line. The various parts of
the source code structure is explained in the following sections.
1.2.1 Reserved words
Reserved words are words that can not be used for anything else but their designated
purpose. These are typically all the mnemonics (instructions and such), names of registers, accumulators, scale factors, etc, in short everything that is declared in the assembler
by default. For instance the word call (for the instruction call) is reserved and can
not be used as an identifier or a label, but for instance the words call or call4 are not
reserved and can be used freely.
1.2.2 Mnemonics
Mnemonics are typically the instruction words and its various options and operators.
An assembler source line, with an instruction, always start with the instruction itself
followed by its arguments, if any. The exact syntax for all instructions and its options,
the instruction set, is described in a separate document.
All mnemonics must be written in the source code using lowercase lettering.
1.2.3 Identifiers
In the assembler source file context, identifiers are names that refer to something typically defined by the programmer. A label, a constant or the definition of a register. The
assembler lines
.alias
#define port1
sp
0x0011
ar3
would define the identifiers sp and port1 for reference to the address register ar3 and
the constant 0x0011 respectively, for later use in the code.
Identifiers must use the syntax [a-zA-Z ][a-zA-Z0-9 ]*. This means they must start
with a lowercase or uppercase letter from a to z or the underscore sign ( ), then followed
by a mix of any number of (0 or more) lowercase or uppercase letters a to z, digits 0 to
9 or underscore signs.
For instance, these are acceptable identifiers: start1, data , AC9 xy, and these are not
acceptable: 7level, -track, acer~.
1.2.4 Labels
Labels are identifiers and must follow the rules as such (see previous section). Label
definitions MUST reside at the beginning of a line and MUST NOT be followed by
anything else for the remainder of the line, except comments.
7
1.2. ASSEMBLER SOURCE FILE STRUCTURE
CHAPTER 1. SENIOR ASSEMBLER
1.2.5 Comments
Comments may reside anywhere in the code. A comment is initiated by the semicolon
character (;) and is active until the end of the line.
1.2.6 Numbers
Numbers can be either integer numbers or floating point numbers. Integer numbers can
be entered using the decimal, hexadecimal or binary base. Decimal number are entered
just the way they are, with an optional leading minus sign (-) if it is a negative number.
Hexadecimal numbers are initiated using either 0x or $ and binary numbers start with
%. For instance, these are decimal numbers: -17, 32700, and these are hexadecimal
numbers: 0x3A7F, $9001, and this is a binary number: %10010110.
Floating point numbers can be entered in a decimal form only using the syntax [0-9]+[.][0-9]+,
that is starting with one or several digits followed by a decimal point followed by one or
several digits. Negative floating point numbers may be entered with a leading minus sign
(-). For instance, these are floating point numbers: 3.14159265359, -0.33333333333.
1.2.7 Directives
The assembler makes use of cpp (C pre processor) before processing the assembly source
code. Hence cpp must be available in the search path when running the assembler. Cpp
makes it possible to use some of its pre processor directives in the assembly code.
#include
The #include directive is a cpp directive. It includes another source file exactly as it is
in the place of the #include directive. This way it is possible to divide a project into
several assembly source files and include them wherever needed. The #include directive
takes a file name within quotation marks as its only argument, like this:
#include "init.asm"
#define
The #define directive defines identifiers for constants. Look at the section Identifiers
above for the definition of identifiers. A constant identifier may be defined like this:
#define port1
0x0011
.code
The .code directive is one of four memory space directives. It sets an internal memory
space pointer to direct the following code generation to the program memory space.
This program memory space is used for actual program content, that is instructions.
The directive is valid until another memory space directive occurs.
8
CHAPTER 1. SENIOR ASSEMBLER
1.2. ASSEMBLER SOURCE FILE STRUCTURE
.ram0
The .ram0 directive is one of four memory space directives. It sets an internal memory
space pointer to direct the following code generation to the first part of data memory 0.
This directive is typically used together with the .skip directive (see below) to reserve
larger sets of RAM memory. For instance the following code:
.ram0
array4
.skip 128
would reserve 128 data words in data memory 0 for access with the label array4. The
directive is valid until another memory space directive occurs.
.rom0
The .rom0 directive is one of four memory space directives. It sets an internal memory
space pointer to direct the following code generation to the second part of data memory
0. This directive is typically used for ROM table content. It is stored in the hex output
file together with the rest of the generated program content and loaded into the simulator
at start. Used together with the .dw, .df or .dfu directives it is possible to generate
ROM table data, for instance like this:
.rom0
.dw
.dfu
.df
0, -1,-1,-1,1, -1,2, 3, 4, 5, 6, 7, 8, 9, 10
1.33333333333, 1.60000000000, 1.14285714286, 1.77777777777
0.06250000000, -0.03125000000, 0.01562500000, -0.00781250000
The directive is valid until another memory space directive occurs.
.ram1
The .ram1 directive is one of four memory space directives. It sets an internal memory
space pointer to direct the following code generation to data memory 1. This directive
is typically used together with the .skip directive (see below) to reserve larger sets of
RAM memory. For instance the following code:
.ram1
table7
.skip 12000
would reserve 12000 data words in data memory 1 for access with the label table7. The
directive is valid until another memory space directive occurs.
9
1.2. ASSEMBLER SOURCE FILE STRUCTURE
CHAPTER 1. SENIOR ASSEMBLER
.skip
The .skip directive increments the internal memory space pointer for the current memory space by the number of its one and only argument. Skipping, thus reserving, that
amount of memory. This directive only makes sense in the ram0 or the ram1 memory
space.
.align
The .align directive takes one positive number as its argument. That argument will
adjust the current memory space pointer to the next multiple of the argument number.
For instance, if the current memory space pointer is at 1000 and the directive .align
256 is set, the memory space pointer would be adjusted to 1024, since 1024 is divisible
by 256. If using .align 4 nothing will happen, since 1000 is already divisible by 4.
.alias
The .alias directive defines identifiers for already existing definitions of registers, accumulators, other identifiers and such. It takes two comma separated identifier arguments.
The first one must not be previously defined while the second one must be previously
defined. For instance, the following:
.alias
sp
ar3
would define the identifier sp to be the very same as the address register ar3.
.scale
The .scale directive affects the way floating point numbers are stored. The directive
takes one positive floating point number as its only argument. The directive will set a
range for floating point numbers to be stored. For instance, the following:
.scale 2.0
would set the range [-2.0,2.0[ for signed floating point numbers and the range [0,2.0[
for unsigned floating point numbers. The directive is valid until another .scale directive
is set. Any floating point number outside the range will be saturated to within the range,
with a given warning.
The default .scale directive value is 1.0.
.dw
The .dw directive will store a 16 bit integer number at the memory space pointer in the
current memory space. The directive takes a comma separated list of signed or unsigned
constants as its argument. It is only useful in the rom0 memory space. It may be used
for instance like this:
.rom0
.dw
10
7, -3, data3, $3F12 ; data3 is a previously defined constant
CHAPTER 1. SENIOR ASSEMBLER
1.3. SPECIAL I/O PORTS
.df
The .df directive will store a signed floating point number at the memory space pointer
in the current memory space. The directive takes a comma separated list of signed
floating point constants as its argument. It is only useful in the rom0 memory space.
Each value will be divided by the scale factor (set by the .scale directive) and then
converted to a binary representation with a sign bit and 15 fractional bits. This 16 bit
value is finally stored in memory. If the value does not fit this representation it will be
saturated. It may be used for instance like this:
.rom0
.scale 2.0
.df
0.0, 0.5, -1.0, 1.0, -2.0, 2.0
which will be equivalent with the following code:
.rom0
.dw
$0000, $2000, $C000, $4000, $8000, $7FFF
Note that the sixth value (2.0) has been saturated.
.dfu
The .dfu directive is similar to the .df directive. The difference is that .dfu uses an
unsigned representation with 16 fractional bits. It may be used for instance like this:
.rom0
.scale 2.0
.dfu
0.0, 0.5, 1.0, 1.5, 2.0
which will be equivalent with the following code:
.rom0
.dw
$0000, $4000, $8000, $C000, $FFFF
Note that the fifth value (2.0) has been saturated.
1.3 Special I/O ports
There are four I/O ports that have special meaning for the assembler and simulator.
They are the following:
Address
$0010
$0011
$0012
$0013
I/O
in
out
out
out
Description
Read data from the external file "IOS0010"
Write data to the external file "IOS0011"
Stop simulation and exit simulator
Stop simulation, same as pressing CTRL-c
11
1.3. SPECIAL I/O PORTS
CHAPTER 1. SENIOR ASSEMBLER
These I/O ports are either in or out only, to be used with the instructions in or out
respectively.
Using the instruction:
in
r14,$0010
will read the next data from the file ”IOS0010” to general register r14. The file
”IOS0010” must be a plain text file with 16 bit hexadecimal values, one value per line.
It may look something like this:
0087
7a71
bb27
005e
308d
006d
0022
Using the instruction:
out
$0011,r21
will write data from the general register r21 to the file ”IOS0011”. The format of the
file ”IOS0011” is the same as for the file ”IOS0010” above.
Using the instruction:
out
$0012,r0
will stop the simulation and exit the simulator. This is useful when using external scripts
and makefiles for running several simulations sequentially without human intervention.
The contents of the source register (r0) will be ignored.
Using the instruction:
out
$0013,r0
will stop the simulation and return to the simulator prompt, thus remaining in the
simulator environment. This is useful when there is a need to inspect processor status
(registers, flags, stack, memories, etc) at a certain point in the program after running at
full speed. Think of it as a break point. The contents of the source register (r0) will be
ignored.
12
2 Senior simulator
The Senior simulator is a simulator for the Senior DSP. Although the Senior DSP has
a pipelined architecture the simulator operates from a programmers point of view, so
that each instruction is seemingly executed immediately, though all cycle events are kept
track of and executed accordingly. In other words, the Senior simulator is not a fully
true pipeline cycle simulator.
2.1 Command line syntax
The simulator command line uses the following syntax:
srsim [-r] [-p pm size ] [-0 dm0 size ] [-1 dm1 size ] program
where srsim is the name of the Senior simulator program and program is the filename
of the program to simulate, the file produced as output from the Senior assembler. All
other arguments are optional and work as follows:
Option
-r
-p
-0
-1
Description
run program directly when loaded
set size for program memory
set size for data memory 0
set size for data memory 1
Maximum value
--65536
65536
65536
Default value
--65536
65536
65536
For instance, running the command:
> srsim -p 4096 test1.hex
Senior simulator
Allocated 4096 words for program memory
Allocated 65536 words for data memory 0
Allocated 65536 words for data memory 1
Read 924 words to program memory
sim>
will set program memory size to 4096, load the program test1.hex to program memory
and wait for command input at the sim> prompt. OBSERVE, all sizes for program
memory and data memories must be large enough to hold its designated content or
there will be a memory access violation.
When using the option -r, simulation may be aborted by pressing CTRL-c which will
also exit the simulator.
13
2.2. SIMULATOR COMMANDS
CHAPTER 2. SENIOR SIMULATOR
2.2 Simulator commands
The simulator has a few ”in house” commands (explained below) for use when simulating.
It is always possible to repeat the last command by pressing CTRL-d .
2.2.1 h/? — print help
Print a list of available commands. It should look something like this:
sim> h
Senior simulator
---------------------------------------p
print registers
r <n>
run <n> cycles
d0 [n] dump dm0 from address [n]
d1 [n] dump dm1 from address [n]
g
go, until CTRL-C
e
toggle event
l
list program around pc
h/?
display this help
q
quit
---------------------------------------sim>
2.2.2 p — print registers
Print the contents of all 32 general registers, all 32 special registers, all 4 accumulators,
the contents of the hardware stack, the settings of all flags, the value of the program
counter, the hardware stack pointer and the cycle counter. It should look something like
this:
sim> p
r:
0000 0040 0000 0000 0000w0000 0000 0000
0000 0000 0000 0000 0000w0000 0000 0000
0000 0000 0000 0000 0000 0000 0000 0000
0000 0000 0000 0000 0000 0000 0000 0000
sr:
0000 0000 0000 0000 0000 0000 0000 0000
0000 0000 3F12r0000 0000 0000 0000 0000
0000 0000 0000 0000 0000 0000 0000 0000
0000 0000 0000 0000 0000 0000 0000 0000
acr:
0000000000 0000000000 0000000000 0000000000
hwstack:
14
CHAPTER 2. SENIOR SIMULATOR
2.2. SIMULATOR COMMANDS
0000 0000 0000 0000 0000 0000 0000 0000
0000 0000 0000 0000 0000 0000 0000 0000
flags:
MV:0 MS:0 MN:0 MZ:0 AV:0 AC:1 AN:0 AZ:0
pc:
hwsp:
cc:
0003
0
3
test1.asm:14:
set
r7, #$3F7A
sim>
Lastly, the next source code line to be executed may be printed. Printed is the source
code file name, line number and then the actual source code line. The simulator is not
aware of the source code file location, so for this to work the source code file has to be
in the same directory as from where simulator is started.
After each and one of the general and special registers there may be one of the characters
r or w printed in either lowercase or uppercase. A lowercase r or w signifies this register
is scheduled for a reading or writing, respectively, at a later cycle. An uppercase R or W
signifies this register is to be read or written, respectively, at the current cycle.
2.2.3 l — list program
List the source code program around the current program counter address. Some addresses before and some after the current program counter will be printed. The current
source code line to be executed is notified with an arrow, ->. It should look something
like this:
sim> l
->
set
r5,2
lsr
lsr
lsr
lsr
lsr
set
and
and
and
and
and
st0
cmp
move.eq
r1,r8,12
r2,r8,10
r3,r8,9
r4,r8,6
r6,r8,4
r8,1
r1,15
r2,3
r3,1
r4,3
r6,3
(ar2++),r1
3,r4
r5,r8
; bitrate
; mode_single_channel
; channels (1 or 2)
sim>
The simulator is not aware of the source code file location, so for this to work the source
code file has to be in the same directory as from where the simulator is started.
15
2.2. SIMULATOR COMMANDS
CHAPTER 2. SENIOR SIMULATOR
2.2.4 r — run a number of cycles
Run a specified number of cycles. This command takes one argument, an integer number,
specifying how many cycles to run. After running the specified number of cycles the p
command, print registers, is executed. It should look something like this:
sim> r 4
Simulating 4 cycle(s):[100..104[
r:
0040 000aW0000w0000w0001w0002 0a04 0000
0001 0001 0000 0000 0000 0000 0000 0000
0000 0000 0000 0000 0000 0000 0000 0000
0000 0000 0000 0000 0000 0000 0000 0000
sr:
0000 0000 0004 007e 0000 0000 0000 0000
0000 0000 0000w0001 0000 0000 0000 0000
0000 0000 0000 0000 0000 0000 0000 0000
0000 0000 0000 0000 0000 0000 0000 0000
acr:
0000000000 0000000000 0000000000 0000000000
hwstack:
0008 00b5 0000 0000 0000 0000 0000 0000
0000 0000 0000 0000 0000 0000 0000 0000
flags:
MV:0 MS:0 MN:0 MZ:0 AV:0 AC:0 AN:0 AZ:0
pc:
hwsp:
cc:
00c2
1
104
test1.asm:79: and
r6,3
sim>
2.2.5 d0 — dump data memory 0
Dump (print) 128 address contents, starting from a specified address, from data memory
0. This command takes one optional argument, an integer number, specifying from what
address to start dumping. If no argument is given, dumping will continue from after the
last address previously dumped. It should look something like this:
sim> d0 33368
8258: 9592 8276
8260: 6a6e 7d8a
8268: 9592 8276
8270: 7fd9 6dca
8278: aa0a e0e6
8280: f9b8 be32
8288: 5ed7 7c2a
16
8276
7d8a
83d6
41ce
1f1a
9236
8583
9592
6a6e
a129
0648
55f6
8027
aecc
b8e3
471d
d4e1
c946
7885
8c4a
f374
e707
18f9
12c8
9930
7e9d
b3c0
3c57
18f9
e707
4c40
8163
66d0
ed38
70e3
471d
b8e3
73b6
877b
36ba
2b1f
7f62
CHAPTER 2. SENIOR SIMULATOR
8290:
8298:
82a0:
82a8:
82b0:
82b8:
82c0:
82c8:
82d0:
sim>
62f2
5134
9d0e
aecc
1f1a
6dca
7c2a
41ce
cf04
2528
7a7d
dad8
8583
c946
2b1f
73b6
7885
89be
dad8
7a7d
2528
877b
8c4a
d4e1
36ba
89be
89be
9d0e
5134
62f2
be32
83d6
9236
e0e6
cf04
cf04
809e
0c8c
7f62
12c8
b3c0
8163
9930
30fc
30fc
2.2. SIMULATOR COMMANDS
8f1d
c3a9
70e3
5ed7
0648
aa0a
8027
7642
7642
c3a9
8f1d
3c57
7fd9
55f6
f9b8
a129
7642
7642
0c8c
809e
f374
66d0
7e9d
4c40
ed38
30fc
30fc
2.2.6 d1 — dump data memory 1
Dump (print) 128 address contents, starting from a specified address, from data memory
1. This command works in the same way as the command d0, but from data memory 1.
See above.
2.2.7 g — run until CTRL-C pressed
Run continously until CTRL-c is pressed. Having run the command and then pressed
CTRL-c it should look something like this:
sim> g
Running...(break with CTRL-C)...
Execution aborted at PC:626, CYCLE:3892040
sim>
2.2.8 e — toggle event
Toggle event messaging on or off. Some events during simulation like saturation from
calculations or delay slot jump activation, may be notified by event messaging. It can
be useful when stepping through a program but may be annoying when running at full
speed. Toggling event messaging should look something like this:
sim> e
Event is on
sim> e
Event is off
sim>
Event Messaging is off by default.
2.2.9 q — quit
Quit and exit the simulator.
17