1
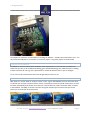
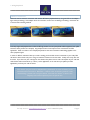
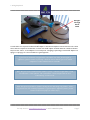
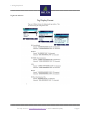
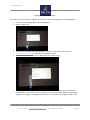
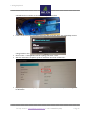
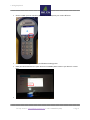
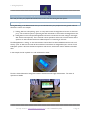
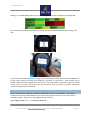
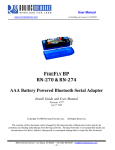
Adding Peripherals to DFS Digital Fish Science Application Big Fin Scientific 1.0 4/20/2015 Initial Release For help, write to: [email protected] or call 512-808-0FIN (0346) Adding Peripherals Table of Contents INTRODUCTION ....................................................................................................................................................................... 3 BACKGROUND .......................................................................................................................................................................... 3 SERIAL SETTINGS ....................................................................................................................................................................... 3 BLUETOOTH SERIAL ADAPTERS .............................................................................................................................................. 3 BLUETOOTH ADAPTER DESCRIPTION............................................................................................................................... 3 CONFIGURING THE ADAPTER ............................................................................................................................................ 4 TURNING ON THE ADAPTER .............................................................................................................................................. 5 STATUS: SEEKING CONNECTION ...................................................................................................................................... 5 STATUS: CONNECTED ........................................................................................................................................................ 6 CONNECTING A SCALE, PIT-TAG READER OR OTHER PERIPHERAL TO DFS................................................................... 6 USING YOUR PERIPHERALS IN DFS MEASUREMENT VIEW ................................................................................................. 12 METHODOLOGY ................................................................................................................................................................ 12 QUESTIONS AND COMMENTS .............................................................................................................................................. 13 For help, write to: [email protected] or call 512-808-0FIN (0346) Page 2 Adding Peripherals Introduction This document will explain the procedures necessary to add peripherals (scales, PIT-tag readers, etc) to the Digital Fish Science Application. For instructions on the use of the Application in general, download the “User Manual: DFS/2” from www.bigfinscientific.com. Background Peripherals which transmit and/or receive “serial” data can be connected to the Digital Fish Science Application. Examples of serial data protocols are: RS-232, RS-485, USB and Bluetooth Wireless, among others. The primary method by which to make the signal connection to the Digital Fish Science application is via Bluetooth, since this method requires the least amount of additional hardware (sometimes none). The other available method is via USB, in-conjunction with the Big Fin I/O Hub and possibly RS-232-to-USB adapters, depending on your hardware. This document will cover how to connect to your devices using Bluetooth, or BT for short. If your serial peripherals (a scale, for example) does not have BT built-in, we’ll use a USB or RS-232-to-Bluetooth adapter. Serial Settings For the DFS application, you’ll need to use the following serial settings (which are set on each of your peripheral devices): Data bits: 8 Parity: None Stop bits: 1 (one) Flow control: none Bits per second: 9600 Bluetooth Serial Adapters In this document, we’ll assume you have a scale which does *not* have Bluetooth built-in. In order to “BT-enable” your scale, we’ll use a Bluetooth “dongle” or adapter which makes the translation from RS-232 (wired serial) and BT (wireless serial). It translates in both directions. Bluetooth Adapter Description We use the following adapter: Microchip RN-270M (previously Roving Networks, now Microchip). Technical information on this adapter can be found here: http://ww1.microchip.com/downloads/en/DeviceDoc/rnbt-srl-um-1.0r.pdf For help, write to: [email protected] or call 512-808-0FIN (0346) Page 3 Adding Peripherals We chose this adapter because it can be powered either by DC adapter or by batteries, allowing for unplugged operation. WARNING: Do not use an DC power adapter with the module at the same time as using Alkaline batteries. Use only NiCad batteries in conjunction with a DC power adapter. Configuring the Adapter There are some dip-switches and some jumpers on the unit which you must set properly. If the unit comes from us, these switches and jumpers will already be set for you. Top dipswitch settings. Switch 4 is set to “on”. Internal “jumper” settings. Position the jumpers as shown. For help, write to: [email protected] or call 512-808-0FIN (0346) Page 4 Adding Peripherals The jumpers are accessed in the same fashion as accessing the batteries – carefully remove the bottom cover. You may need some small pliers or screwdriver to remove the jumpers. Any excess jumpers can be discarded. Turning on the Adapter The adapter is turned on and off via the red button on the top of the unit. To turn the unit on, hold the red button until you start to see the LEDs start flashing (green and blue alternating), then release the button. Holding it further will cause the unit to go into a special mode, so release the button as soon as you see the lights. To turn the unit off, hold the button down until the lights flash and then turn off. Status: Seeking Connection After power-on, the unit will be in “ready to connect” mode. A green LED will blink, twice per second for about 15 seconds, then once-per-second for about 3 minutes. The twice-per-second is a special mode which is not used and which automatically turns off after the 15 seconds. If the unit does not create a connection within 3 minutes, it shuts itself off. The ability to connect is the same during both the twice-per-second and once-per-second period; you can treat them as the same status. For help, write to: [email protected] or call 512-808-0FIN (0346) Page 5 Adding Peripherals Status: Connected When the unit has created a connection with another BT device (explained below), the green LED on the adapter lights solid (no blinking). If the adapter loses the connection, it will revert to blinking and seeking a connection for 3 minutes before shutting itself off. Connecting a Scale, PIT-Tag Reader or other Peripheral to DFS Currently supported peripherals are scales and PIT-tag readers, but more peripherals will be supported soon (GPS antennae, salinity readers, for example). Any peripheral with a serial output can be connected to the DFS application. We’ll use a scale as our example peripheral, but the same connection methodology applies to the other peripheral types. In order for DFS to understand what your scale is sending (and to be able to send commands to your scale), DFS will need to know which scale you’re using and need the command-set for that scale. Luckily, this is easy, after the first time. If you don’t see your scale type on the selection list, please write us with a description of your scale and we’ll add that scale command-set (or “driver”) to the application, so the next time you update your DFS application, you’ll see your scale in the list. The “driver” for your scale is independent of Bluetooth or other method of scale communication connection. Bluetooth / USB or other connection protocol is like establishing a phone line with your device, whereas the “driver” is akin to the language used when speaking over the phone line. For help, write to: [email protected] or call 512-808-0FIN (0346) Page 6 Adding Peripherals StraightThrough Serial Cable A serial cable is not required, but allows the BT adapter to be located someplace removed from the scale. Often times, scales are exposed to the elements, in which case the BT adapter should be linked via a cable and located away from the “action”, as the adapters are not waterproof. Wrapping a ziplock bag around the BT adapter and taping it or zip-tying it to a secure location is a typical approach. If you have a hardware configuration which does not allow for this type of approach, please contact us for help. We’ll be able to advise you as to which adapters or cable combinations to consider. Note: Set your scale communication mode to “print”, wherein weight data is sent on-command. Other options, like “continuous” where weight data is sent continuously, will not work. Note: Set your tag reader’s “format” setting to the “ISO Long” tag format. Other tag formats are not currently supported. If you require a different format, please contact us (see last page for contact info.) For help, write to: [email protected] or call 512-808-0FIN (0346) Page 7 Adding Peripherals Tag format reference: For help, write to: [email protected] or call 512-808-0FIN (0346) Page 8 Adding Peripherals Making the BT Connection in DFS Now that you have the hardware configured, here’s how you connect your peripheral in the DFS application: Go to the General Settings | Basic area of the application. Click on “Select Scale” A selection list of available scale types will appear. If yours is not on this list, please write to: [email protected] and include your make/model of scale. You’ll then be presented with a list of available BT devices, similar to this: The BT adapters we’re using are called “FireFly” or “FireBat”. In this example, you would select the FireFlyBP device. If you have more than one FireFly, you can determine which FireFly is which using the 4-digit code to the right of the Hyphen in the BT name, shown above in this example as: “7FD9”. That For help, write to: [email protected] or call 512-808-0FIN (0346) Page 9 Adding Peripherals code will also be on a sticker on the side of the adapter, shown here: If this is the first time you’ve attempted connection with the FireFly device, you will probably receive a message similar to this: Click on “Pair”. If the application asks for a pairing code, enter “1234”. After the connection is completed, you’ll see the device name under “Select Scale”. Repeat this process for other peripherals, such as a PIT-tag reader. In this example, our PIT-tag reader has BT built-in. For help, write to: [email protected] or call 512-808-0FIN (0346) Page 10 Adding Peripherals Choose “enable” (but not “search for BT devices” or the like) from your reader’s BT menu: Select “Connect PIT-tag reader” from the DFS General Settings menu. Select your device from the list. If your device is not available, please contact us (see above for contact info.) For help, write to: [email protected] or call 512-808-0FIN (0346) Page 11 Adding Peripherals Using your Peripherals in DFS Measurement View Now that you have your peripherals attached, here’s how to use them during fish-data capture: Methodology During data-taking, in the Measurement View, you can take data from your peripheral via two general methods. We’ll use a scale for our example. 1) Pushing data from scale (clicking “print” on many scales causes the weight data to be sent out the serial port.) This is useful if a person is operating the scale and wishes to control when the weight data is sent. 2) Pulling data from the scale (the DFS application will send a command to the scale, asking for the weight data and the scale responds). This is useful for remote operations of the scale, such that the fish-board operator can take scale data without an additional person or interacting w/ the scale. The DFS application is “waiting” on the communication channel which has been established with the scale, such that any “push” of data from the scale will be received and entered into the weight field of your current record. Subsequent “pushes” will erase that data and replace it with the new, without the need for deletion of the field value. In this example, the fish is placed on a scale and allowed to settle. The fish is shown below after having been moved to the fish-board for length-measurement. The order of operations is flexible. For help, write to: [email protected] or call 512-808-0FIN (0346) Page 12 Adding Peripherals Zooming in on the DFS Measurement View, we see the weight value has been populated to the Weight field. Note that the PIT tag number had already been scanned. This was accomplished while the fish was lying on the scale. As with the scale, the DFS application is waiting on the communication channel which has been established with the Tag reader, looking for anything which looks like a tag number to come across. Once received, the tag number is populated to the Tag field of the current record. If the tag number is the last field required to finalize the fish record, the record is stored and a new record is started. If not, any further tag numbers received will overwrite the tag field value automatically. Questions and Comments With so many hardware configurations available, it’s impossible to cover all the possibilities. If the examples contained in this document are insufficient for your system setup, please contact us for help at the number or email address below. Thank you for being a Big Fin Scientific customer! [email protected] or 512-808-0346 (8080-FIN). For help, write to: [email protected] or call 512-808-0FIN (0346) Page 13