1
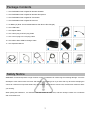
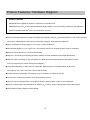
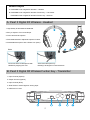
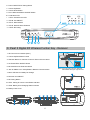
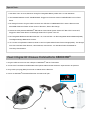
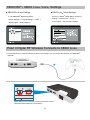
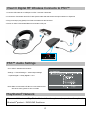
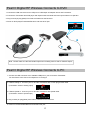
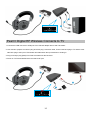
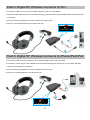
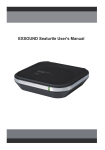
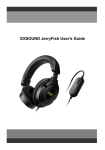
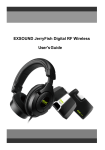
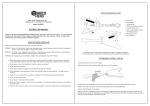
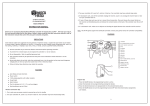
EXSOUND Pearl II Digital RF Wireless User's Guide Pearl II Digital RF Wireless Manual Catalog • Package Contents ------------------------------------------------------------------------------- 03 • Safety Notice ------------------------------------------------------------------------------------- 03 • Product Features / Hardware Diagram ----------------------------------------------------- 04 • Product Operation & LED Indicator --------------------------------------------------------- 07 • Pearl II Digital RF Wireless Connects to XBOX360® ----------------------------------- 10 • XBOX360®/XBOX Live ® Voice Settings ---------------------------------------------------- 11 • Pearl II Digital RF Wireless Connects to XBOX Live® ---------------------------------- 11 • Pearl II Digital RF Wireless Connects to PS3™ ----------------------------------------- 12 • PS3™ Audio Settings -------------------------------------------------------------------------- 12 • PlayStation® Network --------------------------------------------------------------------------- 12 • Pearl II Digital RF Wireless Connects to DVD ------------------------------------------- 13 • Pearl II Digital RF Wireless Connects to PC -- -------------------------------------------- 13 • Pearl II Digital RF Wireless Connects to TV ---------------------------------------------- 14 • Pearl II Digital RF Wireless Connects to Wii™ ------------------------------------------- 15 • Pearl II Digital RF Wireless Connects to iPhone/iPad/iPod --------------------------- 15 • Important Information-- --------------------------------------------------------------------------16 2 Package Contents 1. One EXSOUND Pearl II Digital RF Wireless Headset 2. One EXSOUND Pearl II Digital RF Wireless Microphone 3. One EXSOUND Pearl II Digital RF Transmitter 4. One EXSOUND Pearl II Digital RF Receiver 5. AA Battery*2 (Note: These Bundle Batteries Can Not be Re-Charged.) 6. One USB Cable 7. One Optical Cable 8. One 3.5mm plug to RCA*2 plug Cable 1 2 3 4 5 9 10 11 9. One 3.5 mm plug to 2.5 mm plug Cable 10. One USB to Micro USB Re -Charge Cable 11. One Operation Manual 6 7 8 Safety Notice WARNING: Continued exposure to high volumes of noise in headsets can cause long-term hearing damage. Your ears will adapt to loud volume levels over time and damage your hearing even if you don't feel any discomfort. Keeping the volume at a safe level is important while using the headset. The louder the sound is set, the less time it takes to affect your hearing. When putting the headset on, it is advised to turn the volume to a low level, and then slowly increase it to a moderate and comfortable level. 3 Product Features / Hardware Diagram Product Features EXSOUND Pearl II Digital RF wireless –Experience Surrounding Your XBOX360®/PS3™/Wii™/LCDTV/iPhone/iPad/DVD Dolby Digital 5.1 Sound via Dolby Headphone with Digital RF Wireless, Bundled XBOX360® /PS3™ Communication Function Connect with XBOX360®/PS3™/DVD with Digital Input (Optical); while Wii™/iPhone/iPad/LCD TV w ith Analog Interface (RCA Jack); Optical Bypass Output Connect with Other Amplifier. Multi Platforms Supported Dolby Certification for Dolby Digital 5.1, Pro Logic II, Dolby Headphone Decode Dolby Digital 5.1, Pro Logic II to 5.1 Surrounding Sound. Play Original Sounds’ Content, no Missing Empower Stereo Sound to 5.1 Channel Surrounding Output 5.1 Surrounding Sound through Stereo Headset via Dolby Headphone with Digital RF Wireless With Own New Technology IC, X6, & Amplifier IC to Bass Boost with Expander Stereo with Clearer Position for Every Single Sound. Perfect Gaming Sound Quality Using XBOX360®/PS3™ USB Power for Transmitter; While Usin g Re-chargeable Battery for Receiver. Last Than 10 Hours, No Lost Power Concern and Be Green Excellent Quality of Digital RF Transmission & Up to 15 Meters. No Distance Concern Connect up to 4 Receivers at Same Time. Sharing Gaming & Fun Receiver NOT at Headset Inside to Avoid RF too Close to Human Head. Health Care Consideration Build in Communication with XBOX360® via XBOX Live®, & PS3™. Enjoy Charting while Playing with Fingers Comfortable to Wear & Styling Headset Design 4 Hardware Diagram A. EXSOUND Pearl II Digital RF Wireless – Headset B. EXSOUND Pearl II Digital RF Wireless Fuction Key – Transmitter EXSOUND Pearl II Digital RF Wireless Fuction Key – Receiver A. Pearl II Digital RF Wireless - Headset 1. High Quality & Soft Material Headband. 1 2. Easy to Adjust to Fit in Head Shape. 2 3. Omni-direction Microphone. 4. Soft Metal Material to Adjust Microphone Position. 5. Detachable Microphone with a Smart Lock (Note). 3 Note: Connect & Remove Microphone with Secure the Microphone by Headset by aligning two dots Rotating it 90 degrees counterclockwise 4 B. Pearl II Digital RF Wireless Fuction Key - Transmitter 1. Input Channel (Optical) 2. Output Channel (Optical) 3. Input Channel (RCA) 4. Slide Switch to select Digital or Analog Input 5. USB Port for Power 5 5 6. Power ON/OFF & RF Paring Button 7. Volume Up Button 8. Volume Down Button 9. PLII & DH2 Movie/Music ON/OFF Button 10. 5 Indicators LED i. LED A: Power/Source LED ii. LED B: PLII ON/OFF iii. LED C: DH2 ON/OFF iv. LED D: Movie & Music Selection v. LED E: RF Paring C. Pearl II Digital RF Wireless Fuction Key - Receiver 1. G6 Connector to Headset (Note.) 2. Volume Up/Down/Mute Control 3. Selection Button for Volume Control for Sound & Voice Heard 4. X6 Sound Effect ON/OFF Button 5. Mic Mute/Un-mute Selection Button Note : Plug 6-pin round plug into Receiver with ARROW facing the right direction. 6. Jack for XBOX Live® & PlayStation® Network Communication 7. Micro USB Port for Battery Re-Charge 11 8. Receiver Unit ON/OFF 9. RF Pairing Button 10 10. LED1: Pairing & Volume Level Status Indicator 11. LED2: Battery & Re-Charging Status Indicator 12. Battery Case Cover 12 5 1 2 3 6 7 4 6 8 9 Product Operation & LED Indicator Product Operation & LED Indicator - Transmitter 1. Connect XBOX360®/PS3™ with Optical Cable; Connect Wii™, iPhone, iPad, LCDTV with RCA Cable 2. Slide Switch Selected to Right Input 3. Connect to XBOX360®/PS3™ or Other Device USB Port with USB Cable for Power. 4. Press Power Button to Power ON, Press Again is OFF 5. Set up Transmitter i. VOL+ Button: Volume Up Switch ii. VOL- Button: Volume Down Switch iii. PLII/DH2 Button: Default PLII & DH2 ON with Movie Mode, Press again, PLII & DH2 ON with Music Mode , Press again , DH2 OFF, Press again neither DH2 Nor PLII OFF (Original sound), Press again, back to default iv. Reset Button: Press Volume Up & Down together, then press Power will reset to OEM setting, all 4 LED will Flash 3 times with white color 6. Pairing RF between Transmitter & Receiver i. Pressing Pairing Button at Transmitter for 2 Secs, then the Pairing LED will Flashing, then Press Paring Button at Receiver ii. While Pairing, LED on Transmitter & Receiver Flash Fast. iii. While Paired, LED on Transmitter will ON; While LED1 on Receiver will be OFF. If Not Paired Successfully, This LED1 will be Flashing, need to Re-Pairing. 7. 5 LEDs for Indicators LED A Indicates Power/Source: Blue Color Means Power On; White Means Dolby Digital Source Played. LED B Indicates PLII ON/OFF: ON with White Color, While OFF Would Turn Off LED LED C Indicates DH2 ON/OFF: ON with White Color, While OFF Would Turn Off LED LED D Indicates Movie & Music Mode Selection: Movie Mode with White Color, Music Mode with Green LED E Inticates RF Pairing Stutas: While Paring Flashing, Paired Would be ON 7 Product Operation & LED Indicator - Receiver 1. Install Batteries into the Receiver. 2. Volume Up/Down/Mute Control: Adjust Volume Level from Sound & Voice, Press Middle to Mute and Press Again Un-mute 3. Sound & Voice Selection Button: Select Sound or Voice to Adjust the Volume Up/Down/Mute by Volume Control. 4. X6 Sound Effect ON/OFF Button: Switch to ON/OFF of Super 3D Sound Effect. 5. Mic Mute/Un-mute Selection Button: Switch to Mic On/Off. 6. Jack for Communication Functions: Connect XBOX360® with XBOXLive® and PS3™ with PlayStation® Network. 7. Micro USB Port for Battery Re-Charge: Use Micro USB Cable to Re-Charge the Chargeable Battery. Note: To Re-Charge the Chargeable Battery Must Power Off the Receiver Unit. 8. Receiver Unit ON/OFF: Switch Power On/Off for the Receiver. 9. LED1 Indicates Pairing & Volume Level Status in Green Color: (i)While RF Signal is Pairing, LED Flashed Slowly; RF Signal Paired then LED off. (ii)While Adjusting Volume, LED Flashed Quickly; While the Volume Reaches Max Level, the LED Would be Always On Till Stop Pressing the Volume Control; While the Volume Reaches Min Level, the LED Would be Off; While the Volume Switch to Mute, the LED Flashes Slowly. 10. LED2 Indicates Battery & Re-Charging Status in Green Color: While Battery is Re-Charging, the LED Would be Always On; While Re-Charging Finished, the LED Would be off. If Battery is Going to Out of Power or Re-Charging Failed, the LED Flashed. Ex. The Batteries in The Receiver is NOT Chargeable or The Batteries Do Not Be Installed Well. 8 About Dolby Digital 5.1 / Pro Logic II / Dolby Headphone 1. Most of Gaming/Movie Titles Are DVD Format, and Encoded with Dolby Digital 5.1 Technology, Multi – Channels Sound. Need to Have Pearl ll Wireless, with Dolby Digital 5.1 Decoder to Have Original Sound Play back. 2. Sound with Analog Interface, with 2 Channels, Maybe Different Format, Like Pro logic II with WiiTM and Lt Rt from other Devices , Pro Logic II with simulate these 2 Channels into 5.1 Channels. 3. Dolby Headphone, either Multi-Channel Sounds from Dolby Digital 5.1 or Pro Logic ll ,Dolby Headphone Technology will Down Mix these Multi-Channels into 2 Channel without Lost Data, and Use 2 Speaker Drivers to Playback these Multi-Channels Sound with Surrounding Effect. Dolby Surround Sound SUB CENTER LEFT FRONT RIGHT FRONT LEFT SURROUND RIGHT SURROUND More Information Please Visit - www.Dolby.com. 9 Special Note: 1. Last More Than 10 Hours, Based on Using Re-Chargeable Battery Ni-MH AA 1.2V with 2050mAh. 2. The Bundled Batteries Is NOT CHARGEABLE. Suggest to Purchase Another CHARGEABLE ones to Save Earth. 3. Re-Charge Function: Plug the USB Connector into USB Port of XBOX360®/PS3™ and the Receiver with MicroUSB Cable then Switch off the Power of Receiver, Start to Re-Charge. 4. Please be Kindly Advised XBOX360® Still Deliver Power While System Power OFF But PS3™ Does NOT; Suggest to Have Other Device to Recharge While PS3™ System Turn Off. 5. Re-Chargeable Batteries Must Be Ni-MH AA 1.2V, Can NOT Be 1.5V Re-Chargeable Alkaline Batteries(RAM). That Might Damage Batteries & Product. 6. To Connect to PlayStation® Network, Need to Use Our Optional BlueTooth® Stereo Dongle(A2DP). This Dongle Also Can Used with Other Devices, Like Notebook, Hand Phone...etc with BlueTooth® Embedded for Two-Ways Transmission. Pearl II Digital RF Wireless Connects to XBOX360® 1. Plug the USB connector into the USB port of XBOX360® and the Transmitter. 2. Connect the Transmitter and XBOX360® with Optical cable and slide switch the input selection to Optical in 3. Plug round 6-pin plug (Male) from Pearl II headset into the Receiver. 4. Power on XBOX360®/Transmitter/Receiver and start to RF pair.. 10 XBOX360® / XBOX Live® Voice Settings ■ XBOX360® Audio Settings In The XBOX360® ■ XBOX Live ® Voice Settings Dashboard Select : Press the “ XBOX® Global Button “and go to: System Settings -> Console Settings -> Audio -> Settings -> Preferences -> Voice -> Digital Output -> Dolby Digital 5.1 Voice Output -> Play through Headset Pearl II Digital RF Wireless Connects to XBOX Live ® 1. Connect XBOX Live® communication link cable (2.5 mm plug to 3.5 mm plug) to the Receiver and XBOX360 ® controller Adjust Others Voice Volume by Turning the Volume Control. ( Selection Button switches to Voice Side.) 11 Pearl II Digital RF Wireless Connects to PS3™ 1. Connect USB cable to an USB port on PS3™ and the Transmitter. 2. Connect the Transmitter and PS3™ with Optical cable and slide switch the input selection to Optical in 3. Plug round 6-pin plug (Male) from Pearl II headset into the Receiver. 4. Power on PS3™/Transmitter/Receiver and start to RF pair. PS3™ Audio Settings Go to PS3™ dashboard and select : Settings -> Sound Settings -> Audio output settings ->Optical Digital -> Dolby Digital 5.1 CH Note: Make sure that the DTS Box is not checked as this will cause some games to have no Audio ® PlayStation Network If you would like to use Play Station Network function, please also purchase the optional ® Bluetooth product – EXSOUND SeaHorse 12 Pearl II Digital RF Wireless Connects to DVD 1. Connect the USB connector into an USB port of USB output AC adapter device and Transmitter. 2. Connect the Transmitter and DVD player with Optical cable and slide switch the input selection to Optical in 3. Plug round 6-pin plug (Male) from Pearl II headset into the Receiver. 4. Power on DVD player/Transmitter/Receiver and start to RF pair. Note : Please make sure the DVD Audio Output source setting have to selet to “S/PDIF Output” Pearl II Digital RF Wireless Connects to PC 1. Connect the USB connector to an available USB port on your PC and the Transmitter. You Can Select Your Source from Optical In or Analog In 2. If Select Analog In : Connect your PC and the Transmitter with 3.5 mm plug to RCA cable. (Transmitter: switch to Analog input) 3. If Select Optical In : Connect your PC and the Transmitter with Optical cable. (Transmitter: switch to optical input) 4. Plug round 6-pin plug (Male) from Pearl II headset into the Receiver. 5. Power on PC/Transmitter/Receiver and start to RF pair. 13 Pearl II Digital RF Wireless Connects to TV 1. Connect the USB connector to USB port of an USB AC adapter device and Transmitter. 2. User needs to prepare one RCA*2 plug to RCA*2 plug connection cable, Connect the RCA plug to TV and the other side RCA plug to the input of Transmitter and slide switch the input selection to Analog in. 3. Plug round 6-pin plug (Male) from Pearl II headset into the Receiver. 4. Power on TV/Transmitter/Receiver and start to RF pair. 14 Pearl II Digital RF Wireless Connects to Wii™ 1. Connect the USB connector into an available USB port of Wii™ and Transmitter. 2. Plug RCA Cable into RCA Input of Transmitter with Wii™ Standard Audio Cable and slide switch the input selection to Analog in 3. Plug round 6-pin plug (Male) from Pearl II headset into the Receiver. 4. Power on TV/Transmitter/Receiver and start to RF pair. Pearl II Digital RF Wireless Connects to iPhone/iPad/iPod 1. Connect the USB connector to USB port of an USB AC adapter device and Transmitter. 2. Connect the 3.5mm plug to iPhone/iPad/iPod and the other side RCA plug to the input of Transmitter and slide switch the input selection to Analog in. 3. Plug round 6-pin plug (Male) from Pearl II headset into the Receiver. 4. Power on Transmitter/Receiver and start to RF pair. 15 Important Information PlayStation, PlayStation 2, PlayStation 3, PS2, PS3 and the respective images/logos are registered trademarks of Sony Computer Entertainment Inc. XBOX, XBOX360, XBOX Advanced AV Pack, XBOX Communicator, XBOX Live and the respective images/logos are registered trademark or trademarks of Microsoft Corporation in the U.S and/or other countries. All other trademarks are property of their respective owners. Wii and the respective images/logos are registered trademarks or trademarks of Nintendo Phuten CO, Ltd. iPod,iPhone,iPad and the respective images/logos are registered trademarks of Apple Computer Inc. Manufactured under license from Dolby Laboratories.Dolby, Pro Logic, and the double-D symbol are trademarks of Dolby Laboratories. FCC CAUTION: Any Changes or modifications not expressly approved by the party responsible for compliance could void the user's authority to operate the equipment. This device complies with part 15 of the FCC Rules. Operation is subject to the following two conditions:(1)This device may not cause harmful interference,and (2)this device must accept any interference received, including interference that may cause undesired operation. FCC ID:ZPP-EX971101 16