1
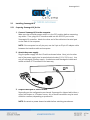
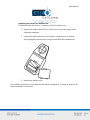
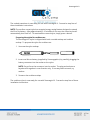
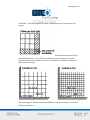
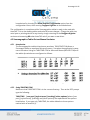
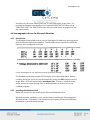
Summagrid IV 1 Part 1 Summagrid IV User Information Part 1 explains how to install and run Summagrid IV. It covers all of the basics including, preparation for installation, set up, configuring the tablet and digitizing. First Time Users Read this section first before attempting to install and use the tablet. Take the necessary time to familiarize with Summagrid IV and how it works. Advanced Users Go to Part 2: Summagrid IV Programming Reference. This part of the manual provides information on Summagrid IV commands, output formats and writing software drivers. Following chapters in Part 1: Chapter 1 Chapter 2 Chapter 3 Chapter 4 Chapter 5 Pre-Installation Considerations Installing Summagrid IV Tablet Digitizing with Summagrid IV Summagraphics LT Drivers and Utilities Maintenance and Troubleshooting Summagrid IV 2 Chapter 1 Pre-Installation Considerations The following chapter provides pre-installation tasks that should be completed before installing Summagrid IV. It covers the Equipment Checklist and Guidelines for Unpacking Equipment. 1.1 1.1.1 1.1.2 Pre-Installation Considerations Checklist of Equipment Guidelines for Unpacking Equipment 3 3 3 Summagrid IV 3 1.1 Pre-Installation Considerations 1.1.1 Checklist of Equipment Below is a checklist of the equipment required for a complete Summagrid IV system. Required Equipment Summagrid IV tablet with controller electronics PC interface cable Power supply 9-pin-to-25-pin AT adapter cable Stylus/Cursor options: three-button stylus, four-button cursor or 16-button cursor Stylus or cursor holder Stylus/cursor conversion kit (includes batteries for cordless usage and cables for corded usage) Mounting hardware for stand Recommended Optional Equipment 1.1.2 Tablet stand Summagraphics Drivers/Utilities Software Guidelines for Unpacking Equipment Consider the following guides when unpacking and inspecting the Summagrid IV equipment. Check the cartons received with those listed on the invoice. Report any discrepancies to the carrier and/or place of purchase. Inspect the outside of cartons for signs of damage that may have occurred during shipping. Report any shipping damages to the carrier immediately. Note any positional markings on the carton when removing the equipment. Unpack and inspect each piece of equipment for damage and report any discrepancies to the place of purchase. Summagrid IV 4 Chapter 2 Installing Summagrid IV Tablet The following chapter offers basic instructions for setting up Summagrid IV and running the tablet in the default configuration. If the user wishes to change any of the DIP switch settings or other default parameters, refer to the appropriate sections, which are noted throughout the chapter. 2.1 2.1.1 2.1.2 Pre-Installation Overview Equipment Overview Controller Overview 5 5 5 2.2 2.2.1 Installing Summagrid IV Preparing Summagrid IV for Use 6 6 Summagrid IV 5 2.1 Pre-Installation Overview 2.1.1 Overview Below are the components that make up a complete Summagrid IV system: 2.1.2 Tablet PC interface cable 9-pin-to-25-pin AT adapter cable Power supply Stylus/Cursor options: three-button stylus, four-button cursor or 16-button cursor Stylus/cursor conversion kit (includes batteries for cordless usage and cables for corded usage) Stylus or cursor holder Summagraphics Drivers/Utilities Software (optional) Controller Overview All of the cables and accessories plug into the Summagrid IV controller. Each of the controller ports are described below. RS-232C Port: Interfaces the Summagrid IV to an RS-232C compatible computer. Cursor/Stylus Port: Port for the three-button stylus, or four or 16-button cursor when used coded. An ON/OFF switch and a power LED are also located on the Summagrid IV controller. Summagrid IV 6 2.2 Installing Summagrid IV 2.2.1 Preparing Summagrid IV for Use 1. Connect Summagrid IV to the computer. Make sure the controller power switch is in the OFF position before connecting any cables. Then, plug the PC interface cable into the RS-232C port on the Summagrid IV controller. Attach the other end of the cable into the serial port on the back of the computer. NOTE: If the computer has a 9-pin port, use the 9-pin-to-25-pin AT adapter cable between the interface cable and computer. 2. Attach the power supply. Plug the power supply into the I/O cable as shown below. Next, join the other end of the power supply into its rated electrical outlet (110 V, 220 V, etc.). Use only a Summagrid IV power supply. A substitute could damage the tablet and would void both FCC certification and warranty. 3. Prepare the stylus or cursor for use. Depending on the configuration purchased, Summagrid is shipped with either a stylus, four-button or 16-button cursor. Any of these transducers may be used corded or cordless, depending on preference. NOTE: Be certain to power down the tablet before switching transducers. Summagrid IV 7 Preparing the cursor for cordless use. To prepare either the four or 16-button cursor for cordless use: 1. Remove the battery door from the back of the cursor by using a small flathead screwdriver. 2. Insert three AAA batteries into the battery compartment as marked. Summagraphics recommends using Duracell MN2400 AAA batteries. 3. Replace the battery door. The cordless transducer is now ready for use with Summagrid IV. Proceed to step four of these installation instructions. Summagrid IV 8 Preparing the cursor for corded use. To prepare either the four or 16-button cursor for corded use: 1. Remove the battery door from the back of the cursor by using a small flathead screwdriver. Remove the batteries if the cursor was previously used cordless. 2. Carefully plug the four-pin connector of the cursor cable into the socket located in the battery compartment. NOTE: Do not force the connector into the socket. The plug and socket are keyed and fit together in one direction only. If one way does not work, try another. 3. Place the cursor cable within the groove at the bottom of the cursor. 4. Replace the battery door. 5. Plug the cursor cable into the stylus/cursor port on the Summagrid IV controller. Summagrid IV 9 The corded transducer is now ready for use with Summagrid IV. Proceed to step four of these installation instructions. NOTE: The cordless cursor/stylus has a special energy saving feature designed to extend the life of its battery. After approximately 5-10 minutes of non-use, the cursor/stylus will automatically shut itself off. To reactivate the cursor/stylus, simply press a button. Preparing the stylus for cordless use. The Summagrid IV stylus is shipped with both a corded endcap and cordless endcap. To prepare the stylus for cordless use: 1. Unscrew the stylus endcap. 2. Insert one lithium battery (supplied by Summagraphics) by carefully plugging the battery connector into the socket on the stylus. NOTE: Do not force the connector into the socket. The plug and socket are keyed and fit together in one direction only. If one way does not work, try another. 3. Screw on the cordless endcap. The cordless stylus is now ready for use with Summagrid IV. Proceed to step four of these installation instructions. Summagrid IV 10 Preparing the stylus for corded use. 1. Unscrew the cordless endcap. Carefully unplug the lithium battery from its socket by grabbing the small connector. Be cautious not to pull on the wires directly. 2. Plug the three-pin connector of the corded endcap into the socket on the front half of the stylus. Next, screw the corded endcap onto the front half of the stylus. 3. Plug the stylus cable into the stylus/cursor port on the Summagrid IV controller. The corded stylus is now ready for use with Summagrid IV. Proceed to step four of these installation instructions (next page). CAUTION: The cordless stylus uses a lithium battery as its power source. The battery is used in this product may present a fire, explosion or chemical burn hazard if mistreated. Do not recharge, crush, short circuit, disassemble, heat above 100 degrees Celsius (212 degrees Fahrenheit) or expose contents to water. Replacement batteries are available from Summagraphics. The replacement battery to be used is Summagraphics part number 62-5004-025. Keep the battery in its original package until ready to use. Dispose of used battery promptly. Do not crush, disassemble or incinerate. Summagrid IV 11 4. Check the DIP switch settings. The DIP switches are located on the top of the controller. There are three banks of eight switches, labeled A, B and C. The switches are set in the following default configuration after receiving the tablet. (Refer to Appendix B for a complete table of Summagrid IV DIP switch settings.) Summagrid IV Default DIP Switch Settings Summagrid IV 12 NOTE: To change the DIP switch settings, depress the side of the switch the user wishes to activate using a small screwdriver. Do not use a lead pencil. 5. Power up Summagrid IV. To turn the tablet on, press the power button, located on the controller. The system emits a single tone, informing that the Summagrid IV is functioning properly. The power light illuminates, letting the user know that the tablet is on and receiving power. Summagrid IV 13 Chapter 3 Digitizing with Summagrid IV This chapter provides an overview of Summagrid IV, including how the tablet works and information on using the stylus and cursors. 3.1 3.1.1 3.1.1.1 3.1.1.2 3.1.1.3 Operational Overview How Summagrid IV Works Active Area Proximity Resolution 14 14 14 14 14 3.2 3.2.1 3.2.2 3.2.3 Using the Stylus and Cursors Overview Summagrid IV Stylus Options Summagrid IV Cursor Options 16 16 16 16 Summagrid IV 14 3.1 Operational Overview 3.1.1 Overview Summagrid IV is a digitizer. A digitizer is an input device that translates graphic information, such as a drawing or photograph, into a computer readable format. The Summagrid IV has two main parts: tablet and pointing device. The pointing device may either be the stylus or cursor. The stylus/cursor emits a low-intensity signal. A grid within the tablet reads this signal with the stylus/cursor is moved across the tablet. Therefore, for the tablet grid to sense this signal, the stylus/cursor must be used over the grid, or active area and close enough to the grid, or in proximity. (Active area and proximity are described below.) The Summagrid IV expresses the stylus/cursor position as an X, Y coordinate pair, which is called a report. Valid reports can only be collected when the stylus/cursor is in the tablet’s active area and in proximity. Reports are in absolute coordinates (measured from the tablet’s origin) and are expressed in inches, millimeters or counts of resolution (described below). 3.1.1.1 Active Area The active area is the region on the tablet surface in which the stylus/cursor position can be identified. It’s marked on the tablet by corner brackets. 3.1.1.2 Proximity Proximity is the maximum distance above the active area that the stylus/cursor can be held and report a position. The proximity limit for the Summagrid IV is .50”. Together, the active area and proximity establish a three-dimensional volume within which the stylus/cursor can issue reports. Reports issued from outside this volume are out of proximity (out-of-prox) and, therefore, do not represent the current position of the stylus/cursor. 3.1.1.3 Resolution Resolution is the “fineness” of detail that the tablet can distinguish. Resolution is expressed in lines per inch (lpi) or lines per millimeter (lpmm). Reports are measured in counts of resolution. One count is the distance between two lines of resolution. As shown below, each square is one count of Summagrid IV 15 resolution. The tablet reports the same coordinates for any point within the square. With different resolution settings, the user can receive different reports for the same tablet location. In the illustration below, points A and B are the same physical locations on the tablet, but their coordinates are different because of the resolution setting. The Summagrid IV tablet provides two different resolution functions: Fixed and Variable resolutions. Summagrid IV 16 3.2 Using the Stylus and Cursors 3.2.1 Overview Summagrid IV supports several different stylus and cursor options, which are described below. Any of these transducers may be used corded or cordless, depending on the users’ preference. 3.2.2 Summagrid IV Stylus and Cursor Options A stylus is a pen-shaped instrument used to locate points on the tablet. With its similarity in size and shape to a pen or pencil, it is natural to the hand and is recommended for freehand drawing. Summagrid IV supports a three-button stylus. A cursor is a handheld device, also used to locate points on the tablet. The cursor has a cross hair for precisely sighting points and is therefore recommended for tracing and menu picking. Summagrid IV supports two different cursor options: 3.2.3 Four-Button Cursor 16-Button Cursor General Tips The cursor is the most accurate when held parallel with the tablet surface. To activate, press a cursor button. The three-button stylus has two barrel buttons and a refill tip button. Locate points on the tablet by gently pressing any of these buttons. The cursor and stylus buttons are programmed by the application software. Reference the application’s manual for information on programmable options. When using the stylus/cursor cordless, if you notice a decrease in the proximity limit or no proximity at all, you may need to replace the stylus/cursor batteries. Refer to Chapter 2 for information on how to install the batteries. If you do not have extra batteries on hand, you may use the stylus/cursor corded until you obtain batteries. Summagrid IV 17 Chapter 4 Summagraphics LT Drivers and Utilities (optional) Chapter 4 offers information on using the Summagraphics LT Drivers/Utilities. It covers the following drivers and utilities: Summagraphics ADI Drivers, Summagraphics Tablet Driver/Mouse Emulator, Microsoft Windows Driver, SG3TEST Tablet Test Utility, UIOFRST Tablet Reset Utility and SEND.COM Tablet Configuration Utility. 4.1 4.1.1 4.1.2 4.1.3 4.1.4 Introduction Overview The Drivers/Utilities Diskette DOS Prompt vs. Batch Files TSR Applications 19 19 19 19 19 4.2 4.2.1 4.2.2 4.2.3 4.2.4 4.2.5 4.2.6 Summagraphics Driver for Autodesk Applications Introduction Using DGMG.COM Examples Configuring AutoCAD for Use with DGMG.COM Using DGPMG.EXP Configuring AutoCAD for Use with DGPMG.EXP 20 20 21 22 22 23 23 4.3 4.3.1 4.3.2 4.3.3 4.3.4 4.3.5 Summagraphics Tablet Driver/Mouse Emulator Introduction Using TABLETMG.COM Examples Using TABLETMG.COM from CONFIG.SYS Changing An Installed Driver’s Parameters 25 25 25 29 29 29 4.4 4.4.1 4.4.2 4.4.3 Summagraphics Driver for Microsoft Windows Introduction Installing the Windows Driver Modifying Driver Defaults with the Control Panel 30 30 30 33 4.5 4.5.1 4.5.2 4.5.3 4.5.3.1 Testing the Tablet: The SG3TEST Utility Introduction Running SG3TEST Main Menu The SG3TEST Main Menu Display Coordinates Option 37 37 37 37 38 Summagrid IV 18 4.5.3.2 Diagnostic Tests Option 39 4.6 4.6.1 4.6.2 4.6.3 Resetting the Tablet: The UIOFRST Utility Introduction Running UIOFRST from the DOS Prompt Examples 42 42 42 43 Summagrid IV 19 4.1 Introduction 4.1.1 Overview This chapter is a guide to using the Summagraphics Drivers/Utilities software. It assumes the user has experience with basic DOS tasks such as changing directories, copying files and creating batch files. If the user is unfamiliar with any of these tasks, refer to a DOS user’s manual before continuing. 4.1.2 The Drivers/Utilities Diskette You’ll find four subdirectories on the drivers/utilities diskette: ADIDVR – Contains the UIOF format drivers for Autodesk® applications (both protected mode and real mode versions). TABLTDVR – Encompasses the UIOF format version of the Summagraphics tablet driver/Microsoft® mouse emulator. WINDVR – Contains the UIOF format Wintab-compliant drivers for Microsoft® Windows UTILITY – Accommodates the following utilities: UIOFRST, SG3TEST and SEND Before installing any of the drivers or utilities, make a backup copy of the Drivers/Utilities diskette. Use only your copy and store the master in a safe place. 4.1.3 DOS Prompt vs. Batch Files Run most of the Drivers/Utilities by typing commands at the DOA prompt, or by creating batch files. We have included examples of running the drivers/utilities from the DOS prompt, as well as sample batch files, throughout the chapter. Additional information on batch files and how to create them can be found in the DOS user’s manual. 4.1.4 TSR Applications Some of the drivers in this manual are TSR (Terminate and Stay Resident) programs. Strange behavior in the software can be caused by the sequence in which the user loads or runs TSR programs on the system. If this occurs, experiment with the loading sequence. If one sequence does not work, try another. Summagrid IV 20 4.2 Summagraphics Driver for Autodesk Applications 4.5.1 Introduction There are two UIOF/Microgrid format drivers for Autodesk applications. Use these drivers if AutoCAD has already been configured for a real or protected mode ADI driver. NOTE: Summagraphics’ ADI drivers are less likely to encounter initialization problems when “shelling out” of AutoCAD, therefore, Summagraphics recommends using the ADI drivers supplied on the Drivers/Utilities disk instead of AutoCAD’s internal drivers. Summagraphics provides both a real mode driver and a protected mode driver: DGMG.COM – Real mode driver for ADI™ (Autodesk Device Interface) applications. This driver can be used on all DOS versions of AutoCAD. DGPMG.EXP – Protected mode driver for ADI version 4.2 supported applications. Use this driver if you have a release 11 or 12 386 DOS extender version of AutoCAD and wish to take advantage of AutoCAD’s protected mode capabilities. DGMG.COM and DGPMG.COM require tablet dip switches to be configured as follows: Check Summagrid DIP switches to confirm the proper settings. Summagrid IV 21 4.2.2 Using DGMG.COM First make sure that DGMG.COM is in the current directory. Then, at the DOS prompt type the following: DGMG [Com port] [Transducer] [Mode] where [com port], [transducer] and [mode] are replaced with the options listed below. If the user only types DGMG, the tablet defaults to the options marked with an asterisk (*). NOTE: Use of the /AS option makes DGMG.COM a non-ADI specification driver. Although the /AS option allows the screen and tablet to have the same aspect ratio, approximately two inches on the right-hand side of the screen cannot be accessed when in this mode. As a result, certain dialog box buttons (Cancel and OK) cannot be accessed by the tablet. However, the user may activate these commands by using the ESC and ENTER keys on the keyboard. Summagrid IV 22 Disabling the Driver /OFF Disables driver 4.2.3 Examples For a Summagrid IV tablet with a 16-button cursor connected to Com 1 in standard ADI mode, type the following at the DOS prompt: 4.2.4 Configuring AutoCAD for Use with DGMG.COM After installing the ADI driver, start up AutoCAD and follow the instructions listed below. 1. If running AutoCAD release 11, select Configure AutoCAD from the AutoCAD main screen menu and press ENTER to proceed to the configuration menu. If running AutoCAD release 12, choose Configure from the file dropdown menu and select ENTER to proceed to the configuration menu. 2. At the configuration menu, choose Configure Digitizer. AutoCAD asks if you want a new digitizer. Since you’re installing for the first time, type Y and then press ENTER. A list of digitizer options appear on the screen. If you are running AutoCAD release 11, select Autodesk Device Interface and press ENTER. If you are running AutoCAD release 12, choose ADI Digitizer (Real Mode) and select ENTER. 3. Next, you’re prompted for the hexadecimal interrupt code (INT0XXh)<79>. Press ENTER to accept the default of 79 and return to the configuration menu. Summagrid IV 23 4. If you’re running AutoCAD release 11, select Exit to Main Menu and choose ENTER. 5. Type Y to save configuration changes and press ENTER. 4.2.5 Using DGPMG.EXP Below are instructions for installing the protected mode ADI 4.2 driver for AutoCAD release 11 or 12. These instructions assume the user installed the driver for use with AutoCAD. If using a different Autodesk product, refer to the specific product’s documentation for installation information. 4.2.6 Configuring AutoCAD for Use with DGPMG.EXP AutoCAD Release 11 After installing the ADI 4.2 protected-mode driver, start up AutoCAD and follow the instructions listed below. 1. Choose Configure AutoCAD from the screen menu. A listing of the current configuration appears on the screen. Press ENTER to proceed to the configuration menu. 2. At the configuration menu, choose Configure Digitizer. AutoCAD asks if you want a new digitizer. Since you’re installing for the first time, type Y and then press ENTER. A list of digitizer options appear on the screen. Select ADIP386 digitizer and press ENTER. 3. Next, you are prompted for the size of the tablet. A number of options appear on the screen. Select the number corresponding to the tablet size and press ENTER. 4. Next, you’re prompted for the type of pointing device (stylus or cursor) that’s being used. AutoCAD will ask for the number of buttons on the pointing device. Enter the appropriate number and press ENTER. 5. You’re now asked to name the serial port. Type COM 1 or COM 2 and select ENTER. If using a computer with a non-standard serial port, specify the IRQ Summagrid IV 24 number and address of the port in the hexadecimal by choosing the Allow Detailed Configuration option from the configuration menu before running Configure Digitizer. The configuration is complete and the Summagraphics tablet is ready to be used with AutoCAD. Return to the main menu and select Y to save changes. Change the table size, serial port or pointing device at any time by simply returning to the Configure Digitizer section and answering NO when AutoCAD asks if you want a new driver. AutoCAD Release 12 1. Copy the protected mode driver from the Summagraphics Drivers/Utilities diskette to the \ACAD\DVR directory. COPY A:\ADIDVR\DGPMG.EXP C:\ACAD\DVR 2. Start AutoCAD. The AutoCAD Drawing Editor appears on the screen. Type ACAD –R [ENTER] to go directly to the configuration menu. 3. Select Configure from the file dropdown menu. A listing of the current configuration appears on the screen. Press ENTER to proceed to the configuration menu. 4. At the configuration menu, choose Configure Digitizer. AutoCAD asks if you want a new digitizer. Since installing for the first time, type Y and then press ENTER. A list of digitizer options appear on the screen. Select Summagraphics Microgrid Series, ADI 4.2 by Summagraphics and press ENTER. 5. Next, the user is prompted for the size of the tablet. Select the number corresponding to the table size and press ENTER. 6. Provide information on the type of pointing device (stylus or cursor) being used. AutoCAD will prompt for the number of buttons on the pointing device. The DGPMG.EXP driver supports both the three-button stylus as well as the 4- and 16button cursors. Enter the appropriate number and hit ENTER. 7. Name the serial port. Type COM 1 or COM 2 and press ENTER. If using a computer with a non-standard serial port, specify the IRQ number and address of the port in Summagrid IV 25 hexadecimal by choosing the Allow Detailed Configuration option from the configuration menu, then running Configure Digitizer as described above. The configuration is complete and the Summagraphics tablet is ready to be used with AutoCAD. Exit to the drawing editor and select Y to save changes. Change the table size, serial port or pointing device at any time by simply returning to the Configure Digitizer section and answering NO when AutoCAD asks if you want a new driver. 4.3 Summagraphics Tablet Driver/Mouse Emulator 4.5.1 Introduction The Summagraphics tablet driver/mouse emulator, TABLETMG.COM allows a Summagrid tablet to emulate a Microsoft mouse. Use when the application’s setup menu includes a listing for TABLETMG.COM or Microsoft Mouse (MOUSE.COM) and the tablet dip switches are configured as follows: Check the Summagrid IV DIP switches to confirm proper settings. 4.3.2 Using TABLETMG.COM Make sure that TABLETMG.COM is in the current directory. Then at the DOS prompt type the following: TABLETMG [com port] [stylus/cursor] [tracking] [other options] where [com port], [stylus/cursor], [tracking] and [other options] are replaced with the options listed below. If you type only TABLETMG, the tablet defaults to those options marked with an asterisk (*). Summagrid IV 26 NOTES: When using the BA (Base Address) option, all four digits must be specified. Example: Com 1 - \BA03F8 Use the \BA switch only when the serial port is located at a non-standard address within the computer. /C3 /C4 /C16 /CM#### Three-button stylus Four-button cursor 16-button cursor Allows a user-defined mapping of the cursor/stylus buttons. The \CM argument is followed by 1-4 digits that specify which stylus/cursor switches are assigned to standard mouse buttons. Each digit represents that value of a stylus/cursor switch and its position after the \CM argument represents the mouse button that it is assigned to. The first digit after the \CM argument corresponds to the left mouse button, the second digit to the right mouse button, the third digit to the middle mouse button and the fourth digit corresponds to an emulation of both the left and right mouse buttons being pressed simultaneously. Summagrid IV 27 EXAMPLE: TABLETMG \CM2134 The above example shows stylus/cursor switch #2 being mapped to the left mouse button, stylus/cursor switch #1 being mapped to the right mouse button, stylus/cursor switch #3 being mapped to the middle mouse button and stylus/cursor switch #4 being mapped to both the right and left mouse buttons. Tracking Options The following options will work only if the application is set up to use a Microsoft Mouse (MOUSE.COM). Applications that are compatible specifically with TABLETMG.COM should configure tracking automatically or allow the user to configure tracking through the application’s set up utility. The use of the following options will be overridden by the application. Relative Mode /R Relative mode is the default setting. There are four relative mode options: /S## /H## /V## /P# Sets both horizontal and vertical sensitivity – Range: 0-99, Default: 50 Sets only the horizontal sensitivity – Range: 0-99, Default: 50 Sets only the vertical sensitivity – Range: 0-99, Default: 50 This option is the ballistic gain profile. It controls acceleration of the screen cursor. The driver comes with four built-in ballistic gain profiles: Slow, Moderate, Fast and Unaccelerated. Specify 1, 2, 3 or 4. Absolute Mode /A Absolute mode maps the tablet’s entire active area to the computer screen. Relative mode options (/S, /H, /V and /M) should not be used in Absolute mode. NOTE: Applications accept input from MOUSE.COM as either absolute screen coordinates or relative mouse units, also referred to as “mickeys.” Absolute mode works only with those applications that accept input as absolute screen coordinates. To verify that absolute mode is working, position the screen pointer, then lift the cursor/stylus out of the tablet’s active area and place it at a different location on the tablet. The screen cursor should snap to a new location. If it does not, then the Summagrid IV 28 application works only in relative mode and the absolute mode option will have no effect. Other Options /M# Overrides an application that changes the mouse cursor for text modes by locking the mouse cursor to the default text cursor. To enable locked cursor type /M1; to disable locked cursor type /M0. The default is /M0. /N### Specifies how many screen updates to skip before actually plotting the cursor. This feature is useful for laptop computers and other systems with slower LCD displays. A small value is recommended because driver performance can be affected. ### is a number between 0-255. The default is /N0. Disabling the Driver /OFF Disables Driver Memory Location Options: /U, /E and /HI These options allow the user to maximize the amount of memory available for DOS application programs. The strategy is to move a majority of the TABLETMG.COM drivers to a memory location outside of the 640K area used by most application programs. The /U command moves the driver to the upper memory area between 640K and 1MB. The /E command moves the driver into expanded memory. The /H1 command shifts the driver into the high memory area between 1MB and 1.064MB. The computer system needs to support these options before they can be used. The designated memory must be installed as RAM. To use /E, the user must have either expanded memory hardware, such as an Intel Above Board, or a software driver, such as EMM386 or QEMM in the machine. To use /H1, the user needs to have an 80286, 80386 or 80486 family processor and the HIMEM.SYS driver (or equivalent) loaded before installing the mouse driver. MS-DOS 5.0 systems should also have the line. DOS = UMB in the CONFIG.SYS file. Summagrid IV 29 Only TABLETMG.COM can be relocated. TABLETMG.SYS cannot be relocated. The user cannot relocate TABLET.COM into another memory area without first removing the mouse driver by using the TABLETMG/OFF command. 4.3.3 Using TABLETMG.COM For a Summagrid IV with a 16-button cursor attached to COM 1: 4.3.4 Running the Driver from CONFIG.SYS Another way to install the driver is by including TABLETMG.SYS as a device driver in the CONFIG.SYS file. In doing so, the system automatically installs the driver each time the user boots or turns on the system. Line Syntax DEVICE = TABLETMG.SYS [com port] [stylus/cursor] [tracking] [other options] The command options are the same as for those running TABLETMG.COM from the DOS prompt or a batch file. Most of the command line arguments described for TABLETMG.COM also works for TABLETMG.SYS. The exceptions are the /OFF command and the memory location options /U, /E and /HI. Example: For a Summagrid IV with a 16-button cursor attached to Com 1: DEVICE = TABLETMG.SYS /1 /C16 4.3.5 Changing An Installed Driver’s Parameters Command-line options can be combined together. For example, the user can utilize both /H and /V together, and it will work in the same way as using /S. Commandline options can also be issued after the driver is initially installed by running TABLETMG.COM again. Another example, the user can go back and change the Summagrid IV 30 sensitivity of the cursor tracking with the /S command option at any time. It is possible to change the parameters of an installed TABLETMG.SYS driver using TABLETMG.COM. The TABLETMG drivers will not install twice, as long as they are the same version. 4.4 Summagraphics Driver for Microsoft Windows 4.5.1 Introduction The Windows driver allows you to use the Summagrid IV tablet as a pointing device with the Microsoft Windows software. The Windows driver requires the tablet dip switches to be configured as follows: Check Summagrid IV DIP switches to confirm proper settings. The Windows driver also requires 250 kilobytes of free hard disk space. Before installing the driver, check for free disk space by issuing the DIR command on the target drive. DOS will respond with nnnn bytes free. If there is insufficient disk space, remove or move enough files to accommodate the driver and run the installed program. 4.4.2 Installing the Windows Driver Below are instructions for installing the Microsoft Windows driver. Windows must be installed on your system before installing the Summagraphics Windows driver. If Windows is not installed on the system, follow the installation procedures in your Windows manual. Summagrid IV 31 1. Insert the Summagraphics Drivers/Utilities diskette into the A: Drive. At the DOS prompt, type the following: A:[ENTER] 2. Change to the WINDVR directory by typing: CN \WINDVR [ENTER] 3. Run the INSTALL program by typing: INSTALL [ENTER] The INSTALL program installs the Summagraphics Windows driver and the SUMMA.EXE control panel program onto the computer. The INSTALL program prompts for the following information. Hard drive where Windows is installed Name of Windows directory Whether you want to save (by renaming) the previous version of the drivers or remove them Serial communications port to which your graphics tablet is connected INSTALL then creates a subdirectory called SUMMA under the Windows directory, copies the drivers and starts the Windows SETUP program. 4. In the Windows SETUP program, at the System Information screen, use the up/down arrow keys to highlight the MOUSE line and press ENTER. 5. Use the up/down arrow keys to choose OTHER (requires disk provided by hardware manufacturer) and press ENTER. 6. Type the full pathname of the SUMMA subdirectory under the Windows directory. Example: C:/WINDOWS\SUMMA [ENTER] 7. Use the up/down arrow keys to select Summagraphics UIOF Wintab Driver and press ENTER. 8. Accept the new configuration shown on the screen by pressing ENTER. NOTE: If you’re reinstalling the driver, an anomaly with the Windows 3.1 Setup program may occur. After selecting the required driver, the Setup program will prompt again for the location of the driver. To continue, simply re-enter the driver pathname. Summagrid IV 32 Example: C:\WINDOWS/SUMMA [ENTER] 9. Install the Summagraphics Control Panel icon in one of the program manager groups so that it is easily accessible: Run Windows. Open the Windows Program Manager by double-clicking on its icon. Under the file dropdown menu, choose NEW. The New Program Object dialog box appears. Select Program Item and click OK. The Program Item Properties dialog box appears. Type SUMMA in the Description box. Enter the path name for the Summagraphics Control Panel in the Command Line box and click OK. For example, if Windows is installed on your C: Drive, in a directory called, WINDOWS, you would type: C:\WINDOWS\SUMMA.EXE. The SUMMA icon should appear in the current group’s window. If desired, it may be dragged to a different group’s window. 10. To run the control panel, click on the SUMMA icon. Summagrid IV 33 4.4.3 Modifying Driver Defaults with the Control Panel Summagrid IV 34 Summagrid IV 35 Summagrid IV 36 Summagrid IV 37 4.5 Testing the Tablet: The SG3TEST Utility 4.5.1 Introduction Summagrid IV 38 Summagrid IV 39 Summagrid IV 40 Summagrid IV 41 Summagrid IV 42 4.6 Resetting the Tablet: The UIOFRST Utility 4.6.1 I n t r o d u c t i o n Summagrid IV 43