1
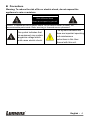
VC-AC09 USB Capture box User Manual-English [Important] To download the latest version of Quick Start Guide, multilingual user manual, software, or driver, etc., please visit Lumens http://www.MyLumens.com/support.php Table of Contents Copyright Information....................................................................................... 2 Chapter 1 Safety Instructions .......................................................................... 3 Precautions .................................................................................................. 4 Chapter 2 Preface .............................................................................................. 5 Chapter 3 System Requirements ..................................................................... 6 3.1 Minimum Hardware Configuration ...................................................... 6 3.2 Recommended Hardware Configuration ............................................ 6 3.3 System Requirements ........................................................................ 6 Chapter 4 Hardware and Driver Installation ................................................... 7 Chapter 5 Components and Connection ........................................................ 8 5.1 Components ....................................................................................... 8 5.2 Connection........................................................................................ 8 Chapter 6 Video Capture Device Instruction .................................................. 9 6.1 Display "Filter Properties Dialog Window" In Common Software....... 9 6.2 Display " Filter output pin " In Common Software ............................ 10 Chapter 7 Audio Capture Device Instruction ................................................ 12 Chapter 8 Compatible Software Instruction ................................................. 14 Chapter 9 Troubleshooting............................................................................. 15 English - 1 Copyright Information Copyrights © Lumens Digital Optics Inc. All rights reserved. Lumens is a trademark that is currently being registered by Lumens Digital Optics Inc. Copying, reproducing or transmitting this file is not allowed if a license is not provided by Lumens Digital Optics Inc. unless copying this file is for the purpose of backup after purchasing this product. In order to keep improving the product, Lumens Digital Optics Inc. hereby reserves the right to make changes to product specifications without prior notice. The information in this file is subject to change without prior notice. To fully explain or describe how this product should be used, this manual may refer to names of other products or companies without any intention of infringement. Disclaimer of warranties: Lumens Digital Optics Inc. is neither responsible for any possible technological, editorial errors or omissions, nor responsible for any incidental or related damages arising from providing this file, using, or operating this product. English - 2 Chapter 1 Safety Instructions Please use the product following the safety instructions below: 1 Operation 1.1 1.2 1.3 1.4 Please use the product in the recommended operating environment. Do not use this product near water or source of heat. Use attachments only as recommended. Use the type of power source indicated on the HD Camera. If you are not sure of the type of power available, consult your dealer or local electricity company for advice. 1.5 Do not block slots and openings in the case of this product as poor ventilation may lead to overheating of this product. 1.6 Except as specifically instructed in this User Manual, do not attempt to open or remove covers by yourself. It may expose you to electric shock or other hazards. Refer all servicing to licensed service personnel. 1.7 Unplug this product from the wall outlet and refer servicing to licensed service personnel when the following situations happen: If the power cords are damaged or frayed. If liquid is spilled into the HD Camera or the HD Camera has been exposed to rain or water. 2 Storage 2.1 Never push objects of any kind through cabinet slots. Never allow liquid of any kind to spill into the HD Camera. 2.2 Do not place this product or accessories on top of vibrating equipment or heated objects. 3 Cleaning 3.1 Unplug all the cables before cleaning. Use a damp cloth for cleaning. Do not use liquid or aerosol cleaners. English - 3 Precautions Warning: To reduce the risk of fire or electric shock, do not expose this appliance to rain or moisture. Note Risk of Electric Shock Please do not open it by yourself. Caution: To reduce the risk of electric shock, do not remove cover (or back). No user-serviceable parts inside. Refer servicing to licensed service personnel. This symbol indicates that this equipment may contain dangerous voltage which could cause electric shock. This symbol indicates that there are important operating and maintenance instructions in this User Manual with this unit. English - 4 Chapter 2 Preface Thank you for purchasing VC-AC09 USB Catpure Box! VC-AC09 is easy to carry, has a superior performance, superior compatibility, simple installation and many other features. It can capture one HDMI 1080p60 input and output signal; compatible with Windows, Linux, Mac OS X and USB 2.0 interface, compatible with many USB 3.0 chipsets (Intel, Renesas, ASMedia, Fresco Logic), compatible with expended USB 3.0 interface via PCI x1 1.1; the HDMI video capture meets UVC and UAC standard, without having to install drivers and settings, the real PnP, easy to use. English - 5 Chapter 3 System Requirements 3.1 Minimum Hardware Configuration Intel Core Solo 1G of RAM Available USB3.0 interface 3.2 Recommended Hardware Configuration Intel Core i5 2G of RAM Available USB3.0 interface 3.3 System Requirements System should be one of the following systems (x86 version or x64 version): Microsoft Windows Server 2003 Microsoft Windows Server 2008 R2 Microsoft Windows 7 Linux (Kernel version 2.6.38 and above) OS X (10.10 and above) English - 6 Chapter 4 Hardware and Driver Installation VC-AC09 supports hot-plugging/swap. Insert the USB3.0 cable head to USB3.0 interface, the other side of the cable into your computer's USB3.0 interface. It’s PnP devices, without having to install drivers, if POWER and ACTION lights lit, which means it working properly. <Remark> In actual use, first plug HDMI cable, then plug the USB3.0 interface. Because an HDMI signal sources are often not reliable grounding, Ground and the computer will be relatively large voltage difference, it may cause the signal source or capture not working properly. English - 7 Chapter 5 Components and Connection 5.1 Components 1. HDMI : Video input interface 2. USB 3.0 : Capture output 3. Power : Power indicator 4. Action : Working lights 5.2 Connection Capture Box DVI-HDMI PTZ Video Camera USB 3.0 Computer English - 8 Chapter 6 Video Capture Device Instruction VC-AC09 is based on UVC (USB video class), UAC(USB audio class) STANDARD, without having to install drivers and settings. Different types of operating systems compatible with the corresponding interface: Windows: DirectShow, DirectSound Linux: V4L2 / ALSA ……… In Windows, for example, will have a new image device: XI100DUSB-HDMI Video VC-AC09 provides screen brightness, contrast, hue, saturation, and other options set by DirectShow "filters" dialogue box to set these options. 6.1 Display "Filter Properties Dialog Window" In Common Software AMCAP:Double click "AmCap.exe", choose HD video device " XI100DUSB-HDMI Video " in "Devices" menu, then click "Video Capture Filter ..." in "Settings" menu, pop-up " Filter Properties dialog window". English - 9 In the " Proc Amp" panel, you can set the brightness, contrast, hue, saturation, and other relevant parameters 6.2 Display " Filter output pin " In Common Software AMCAP:Double click "AmCap.exe", choose HD video device " XI100DUSB-HDMI Video " in "Devices" menu, then click "Video Capture Pin ..." in "Settings" menu, pop-up " Filter output pin" window. English - 10 Frame Rate: Set the output frame rate, currently supports 25/29.97/30/50/59.94/60 fps Color Space / Compression: currently offers two kinds of color spaces, YUY2 and RGB 24 Output: Set the screen output size, resolution is currently supported 640x480/768x576 / 800x600/1024x768/1280x720/1280x800/1280x960/ 1280x1024/1368x768/1440x900/1600x1200/1680x1050/1920x1080/ 1920x1200, the default output is 1920 * 1080. English - 11 Chapter 7 Audio Capture Device Instruction For Windows as an example, VC-AC09 is based on the Microsoft DirectShow interface. After installation in operating system, the relevant audio devices will be added on. Any software which is compatible with DirectSound, DirectShow can use the recording device for capturing sound. In Windows7, for example, will show a new audio device: XI100DUSB-HDMI Audio Through system "Volume Control" to adjust recording volume, specific steps as follows: 1. In system notification icon area on right corner double-click " " button to pop-up " Open Volume Control" window. 2. In the pop-up display recording equipment list, select "Digital Audio Interface (XI100DUSB-HDMI Audio)", click the "Properties" button, the system will pop up the corresponding device's properties dialog box 3. In Properties dialog box, select "Levels" property page, then you can operate volume control and "Quiet" according to your requirement. English - 12 English - 13 Chapter 8 Compatible Software Instruction VC-AC09 is currently compatible with the following capture software (tested): Windows Media Encoder (Windows) Adobe Flash Media Live Encoder (Windows, OS X) Real Producer Plus (Windows) VLC (Windows, OS X, Linux) QuickTime Broadcaster (OS X) QuickTime Player (OS X) Wirecast (Windows, OS X) etc… English - 14 Chapter 9 Troubleshooting This chapter describes problems you may encounter while using VC-AC09. If you have questions, please refer to related chapters and follow all the suggested solutions. If the problem still occurred, please contact your distributor or the service center. No. 1. Problems Detection failed in the computer VC-AC09 Solutions 1. Enter [Console], activate [Device Manager], disable the USB3.0 device and then restart. 2. Enter [Console], activate [Device Manager], disable the USB3.0 device and then restart. English - 15