1
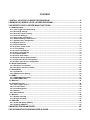
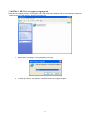
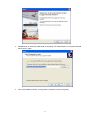
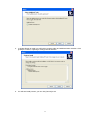
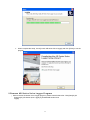
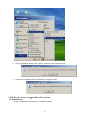
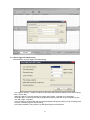
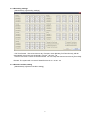
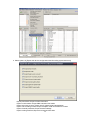
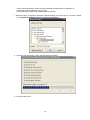
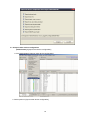
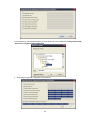
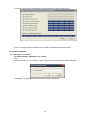
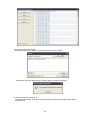
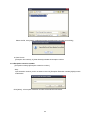
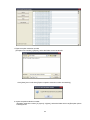
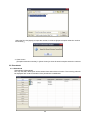
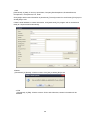
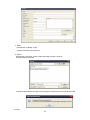
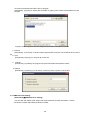
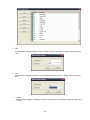
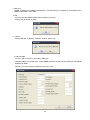
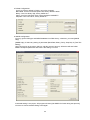
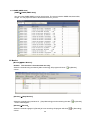
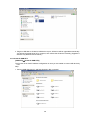
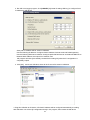
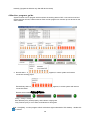
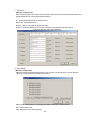
AR series Voice Logger Program
User’s Manual
Version1.0.0
CONTENT
1 INSTALL AR VOICE LOGGER PROGROGRAM.............................................................2
2 REMOVE AR SERIES VOICE LOGGER PROGRAM......................................................4
3 AR SERIES VOICE LOGGER MAIN FUNCTIONS ..........................................................5
3.1 ADMINISTRATOR .......................................................................................................................... 5
3.1.1 Voice logger hard disk setting........................................................................................................... 6
3.1.2 Recording settings ............................................................................................................................. 7
3.1.3 Record Condition setting ................................................................................................................... 7
3.1.4 Channels Settings............................................................................................................................... 9
3.1.5 Voice logger information.................................................................................................................... 9
3.1.6 Address settings of AR device ........................................................................................................ 10
3.1.7 System power management .............................................................................................................11
3.1.8 Display Options..................................................................................................................................11
3.1.9 Proxy IP Address .............................................................................................................................. 12
3.1.10 System events viewer..................................................................................................................... 12
3.1.11 Color Setting.................................................................................................................................... 13
3.1.12 Create new CDR file........................................................................................................................ 14
3.1.13 Stop create CDR file ....................................................................................................................... 14
3.1.14 Program update............................................................................................................................... 14
3.1.15 Device auto restart.......................................................................................................................... 16
3.1.16 Restore device factory default....................................................................................................... 16
3.1.17 Export this device configuration ................................................................................................... 16
3.1.18 Import other device configuration ................................................................................................ 19
3.2 EXCEPTION NUMBER ................................................................................................................. 21
3.2.1 Exception Line number .................................................................................................................... 21
3.2.2 Exception extension number........................................................................................................... 23
3.3 PHONEBOOK ............................................................................................................................. 25
3.3.1 Phonebook......................................................................................................................................... 25
3.3.2 PBX Extension Setting ..................................................................................................................... 28
3.4 PABX....................................................................................................................................... 31
3.4.1 PABX SMDR Parameter .................................................................................................................... 31
3.4.2 PABX (SMDR data) ............................................................................................................................ 35
3.5 MONITOR .................................................................................................................................. 35
3.6 OTHER FUNCTION ..................................................................................................................... 36
3.6.1 Voice Logger record ......................................................................................................................... 36
3.6.2 Local PC folder.................................................................................................................................. 39
3.6.3 User Management ............................................................................................................................. 40
3.6.4 Statistic .............................................................................................................................................. 41
3.6.5 Search Result .................................................................................................................................... 41
3.7 BACKUP ................................................................................................................................... 42
3.7.1 Backup manually .............................................................................................................................. 42
3.7.2 Restore manually .............................................................................................................................. 43
3.8 USB KEY................................................................................................................................. 44
3.8.1 Create AR update USB key .............................................................................................................. 44
3.8.2 Create IP USB KEY............................................................................................................................ 46
4 MONITOR PROGRAM GUIDE .......................................................................................48
5 AR GK MONITOR PROGRAM USER’S GUIDE ............................................................50
1 INSTALL AR Voice logger progrogram
Install AR voice logger program,put program CD in CD-ROM, the installation will run automatically. Otherwise,
please browse the CD directory, double click setup.exe.
1. Select Setup Language, choose [English], then [OK]
2. In Setup procedure, click [Next] to install AR series voice logger program.
2
3. Clike[Browse], to select the install folder, then [Next]. The default folder is C:\Program Files\AR
Series Voice Logger
4. Then select additional Tasks, check [Create a desktop icon] and click [Next]
2
5. In window Ready to Install you will find the program folder and additional tasks selection. Click
[Install] to continue, or [Back] to modify previous selection.
6. You will see install process, you can click [Cancel] to exit.
3
7. When complete the setup, check [Launch AR series Voice Logger] and click [Finish] to run the
program.
2 Remove AR Series Voice Logger Program
1. Before remove AR Series Voice Logger program, please close all others first. Click [Start]Æ [All
Programs]Æ [AR Series Voice Logger]Æ [Uninstall AR Series Voice
Logger]
.
4
2.
Click [ Uninstall AR Series Voice Logger] Æ [Yes] to remove or [No] to exit.
3.
It will show uninstall process in the window, click [OK] to finish
3 AR Series Voice Logger Main Functions
3.1 Administrator
Proper configuration is necessary for complete recording.
5
3.1.1 Voice logger hard disk setting
[Administrator] Æ [Voice logger hard disk setting]
Low capacity warning:If there should be an alert when AR HDD disk capacity is less than warning
value, (YES or NO)
Warning Capacity: The limit capacity for system alert. Range: 10-81920.Unit : Mega Byte,
Reserved space: If HDD space is less than [Reserved space], HDD will not be occupied anymore.
Unit: MB, range: 10-81920.
Loop recording: If the hard disk space is less than [Reserved space], [YES] for loop recording which
will cover initial file, [NO] for stop recording.
Percentage available: The proportion of HDD spare space and total space
6
3.1.2 Recording settings
[Administrator]Æ [Recording settings]
- Full Time Record:Record 24 hours a day. Example, check [Monday Full Time Record], AR will
automatically record 24 hours in Monday, from 00:00 to 23:59
- Interval Time record: There are 8 time intervals. You can setup the start and end time in [Time field].
Remark: The system will not record if Start/End time is 00:00-00:00
3.1.3 Record Condition setting
[Administrator]Æ [Record Condition setting]
7
Pause time before recording: AR will start to record right after pause time setting in Timeout mode.
Range: 00-20 Unit: Second
Min recording time: Voice record will not be stored if the time less than [Min recording time], system
will show the CDR only. Range: 01-120, Unit: Second
Max recording time: Limit of each voice record. Range: 01-600 Unit: Minute
Partition file if reach max record time: If the voice record time reaches max limit, [YES] for cutting file
apart, [NO] for keeping CDR only instead of voice file.
Store missed call to hard disk: [YES] for store, [NO] for ignore.
Store no record outbound to hard disk: [YES] for recording all no record outbound calls in hard disk,
[NO] for ignore.
Hot Key for start record manually: [Hot Key] mode, press keys to start record manually anytime during
talking. Hotkey: 0-9, *, #. Length: 1- 8 digits
Hot Key for stop record manually: [Hot Key] mode, press keys to stop record manually anytime during
talking. Hotkey: 0-9, *, #. Length: 1- 8 digits
Voice Trigger duration: [Voice Trigger] mode, AR will start recording if it detects sound corresponded.
Range: 100-10000, Unit: Millisecond
Max. silence time: [Voice Trigger] mode, AR will stop recording if it does not detect any sound
corresponded. Range: 100-10000, Unit: Millisecond
Voice trigger level: [Voice Trigger] mode, AR will start recording if the velum corresponded. Otherwise,
system will stop recording. It’s for voice trigger recording condition. Range: 1-32
On hook detection: Range: 200-2000, Unit: Millisecond
Off hook detection: Range: 200-20, Unit: Millisecond
Ring Off Time: AR presumes this time as ringer off
Upload: Upload alert beep. Clike […] to browse the folder, select the wav file you need then click
[upload]. It will be effective when [Channel settings] / Recording reminder beep is selected.
8
3.1.4 Channels Settings
[Administrator]Æ[Channels Settings]
You may set each channel individually.
Channel ID: AR Channel number. Range: 01-16
PBX Line no Channel: PBX line number channel which correspond with Channel ID. The extension
number will display in program with proper setting.
Port type: Please select line or extension port type.
Ext No: Input extension number if select [Port type] as EXT.
Channel Name: Define the channel name
Recording time: Always On/Always Off/Periodic
Rec Liver: Setup recording velum. Range: 1-32
Time field: It is effective only if [Recording time] is periodic.
Recording condition: Start recording when [Time out] / [Voice Trigger] / [Polarity Reversal] / [Hot
Key]. Please refer section 3.1.3 for detail setup.
Recording remind beep: Alert beep during talk to remind the call is recorded. [0] will not remind.
Unit: second
Enable announcement: Check this option, AR will announce the call is being recorded when
incoming call is answered.
AM2000 device Setting
Conference Device Voice: Conference recording velum adjustment
Audio Device Voice Level: Digital handset microphone and speaker adjustment
Recorder begin Condition: 數位錄音時,If there’s nothing connected with AM2000, default recorder
condition is [Voice Logger]. If there’s optical sensor connected with AM2000, recorder condition is
[Hook Detect].
AM2000 Volume: It is effective when AM2000 connects with AR [PHONE] port.
3.1.5 Voice logger information
[Administrator]Æ[Voice logger information]
9
You may input AR Device ID, Device Name, Device clock, read Firmware version, Voice Card Version,
setup Clock Synchronize proxy in Voice logger information.
Clock Synchronized with [Administrator’s PC] or Caller ID.
[Administrator’s PC]: Update AR clock with administrator’s PC time once log in.
[Caller ID]: Update AR clock with incoming Caller ID
3.1.6 Address settings of AR device
[Administrator]Æ[Address setting of AR device]
1. DHCP is available: AR will obtain an IP address automatically.
2. DHCP is not availave: Configure the IP address properly in local area network, for example
Network MAC address: Each AR device has its unique MAC address. It will be displayed
automatically.
You may log in AR device to configure IP address via USB connection, or you may create
USB key to configure AR IP address directly.
10
3.1.7 System power management
[Administrator]Æ[System power management]
Current power source: Power adaptor or Battery.
Electrical source voltage: Current voltage for power adaptor / 0V for battery
Battery residual: 0% for power adaptor / Actual residual portion of battery (0%-100%)
Battery residual time: 00 Hour 00 Min for power adaptor / Actual residual time for battery
Charging setting: The external power will charge the battery simultaneously when gives the system
power supply. [Battery content] depends on battery capacity. Scope (1.0AH-100.0AH)
Non-Charging: When battery's voltage is less than [Non-Charging], the external power supply will not
charge t battery.
Slow Charging Area: When battery’s voltage is between [Non-charging] and [Slow charging area], the
external power supply will charge battery slowly.
Constant/Quick: When battery’s voltage between [Non-charging] and [Constant/Quick], the external
power supply will charge battery constantly and quickly.
Normal charging: When battery’s voltage between [Constant/Quick] and [ Normal charging], the
eternal power supply will trickle charge battery.
Non-Charging for high: When battery’s voltage greater than [Normal charging], the external power
supply will not charge battery.
Battery Type: Nickle-hydrogen/Lead acid/Lithium/Lithium polymer. They have different voltage range
Charging mode:
a. Off – The external power supply won’t charge battery when both of them connected with AR
device.
b. High Speed – The external power supply will charge battery with high speed when battery’s
voltage between [Slow charging area] and [Constant/Quick]
c. Low speed -- The external power supply will charge battery with low speed when battery’s voltage
between [Slow charging area] and [Constant/Quick]
Low power warning: Define low power portion. AR program will popup warning window when AR
device in low power status.
Little power warning: Define little power portion. AR program will popup warning window when AR
device is in little power status.
3.1.8 Display Options
[Administrator]Æ[Display Options]
This setting is for PC program display.
11
Display Inbound calls info prompt: Check this option, incoming calls will pop up instantly
Show full phonebook when Inbound: Check this option, incoming calls with complete phonebook
will pop up.
How many seconds clear information after hook on: Setup the time to clear the information after
hook-on.
Incoming popup window leave time: Halt time for incoming call pop up.
Phonebook view time: Halt time for phonebook
When log in voice logger, download CDR of: Display Today/Past 3days/Past 1week/Past 1 month
voice record file.
3.1.9 Proxy IP Address
[Administrator]Æ [Proxy IP Address]
Proxy server: Proxy server for remote log in AR device
Connecting agent server Channel: TCP port 5056 for proxy server connecting. .
3.1.10 System events viewer
[Administrator]Æ[System events viewer]
You may check AR running status and user’s by viewing system envents.
12
Download: Download system events corresponded in PC program
Export: Export system events to excel file and save it in PC
All: All downloaded system events will display in viewer
Search: Search system events by username or date
3.1.11 Color Setting
[Administrator]Æ[Color setting]
Set window’s color as you like. Then click [Voice Logger ]Æ[Search]Æ[All records], all the colors
13
will be changed accordingly. The Window background color will be effective when reboot.
3.1.12 Create new CDR file
[Administrator]Æ[Create new CDR file]
Create CDR file by stored voice recording data.
Setup: You can [create all CDR file] or [set CDR time] to built the records
3.1.13 Stop create CDR file
[Administrator]Æ[Stop create CDR file]
You may stop create CDR file anytime during creating procedure. [Administrator] Æ [stop crate
CDR file]. Then click [Yes] to continue, [No] to exit.
3.1.14 Program update
[Administrator]Æ[Program update]
14
[Administrator] Æ [Program update] Æ […] to select KTS_WINCE.EXE folder Æ [Update]
AR program will display [Update successful, please rebooting] Æ Click [Yes] to continue, [No] to exit.
The updated firmware will be validated only after rebooting.
The device will be rebooting in 10 seconds after click [YES]
15
3.1.15 Device auto restart
[Administrator]Æ[Device auto restart]
Restart AR device without neither unplug power supply nor pressing [reset] button
Click [Device auto restart], device will be rebooting in 10 seconds. Press [Cancel] to exit.
3.1.16 Restore device factory default
[Administrator]Æ[Restore device factory default]
Select [Restore device factory defual], click [YES] to continue, [NO] for exit.
Select the options you’d like to restore, [Recover] to continue, [CLOSE] to exit.
3.1.17 Export this device configuration
[Administrator]Æ[Export this device configuration]
It will be easy to backup AR device configuration by this function. This function is for user [admin]
only.
Step:
1. Log in AR device , click [Administrator]Æ[export this device configuration]
16
2. Select options in [Export this device configuration New Recording system 86xxxxxx]
Export phone book: Export contact information
Export ext information: Export PBX extension information
Export login user account: Export user ID, password and anthorization
Export non-recording number: Export exception LINE and Extension number
Export Channel parameter: Export Channel settings
Export working time field; Export time interval information
17
Export general parameter: Export AR other parameter (including other configuration of
phonebook, user management, proxy IP, etc)
Export SMDR parameter: Export PABX SMDR information
3. Select the option, click [Export], browse the path and folder you want to save it. The factory default
is C:\Program Files\AR Series Voice Logger\Configuration\
5. Select the path and folder Æ [OK], the task will be proceeded
6. Click [CLOSE] to exit
18
3.1.18 Import other device configuration
[Administrator]Æ[Import other device configuration]
1. Click [Administrator]Æ[Import other device configuration]
2. Select options in [Import other device configuration]
19
3. Click [Import] Æ select path and folder you want to save it. Factory default is C:\Program Files\AR
Series Voice Logger\Configure\86xxxxxx
4. Click [OK] to import the configuration to this device.
20
5. It shows [Import device configuration success] when finish. Click [CLOSE] to exit.
6. AR voice logger program will display all imported configuration after this procedure.
3.2 Exception Number
3.2.1 Exception Line number
[Exception number]Æ[Exception line number]
Step:
Input line number you do not want to record in [Exception number], [OK] to save modification.
Click [Write],all exception line number will be stored in AR device.
21
4. Export Exception line number
[Exception line number] Æ[Export], select the folder to save as text file.
Click [Save], then it will show [Export exception phone number successfully]
5. Import exception line number :
[Exception line number] Æ [Import] Æ [Open], select the folder which has [Exception phone
number].txt file.
22
Select the file, click [Open], it will show [Import exception phone number successfully]
6. Clear Screen
[Exception line number] Æ [Clear Screen] to delete all exception number
3.2.2 Exception extension number
[Exception number]Æ[Exception extension number]
Step:
Input extension number you do not want to record in [Exception Extension number]Æ[OK] to save
modification.
Click [Write],all exception extension number will be stored in AR device.
23
1. Export exception extension number
[Exception line number] Æ[Export], select the folder to save as text file
.
Click [Save], then it will show [Export exception extension number successfully]
2. Import exception extension number:
[Exception extension number] Æ [Import] Æ [Open], select the folder which has [Exception phone
number].txt file.
24
Select the file, click [Open] to import the number, it will show [Import exception extension number
successfully]
3. Clear Screen
[Exception extension number] Æ [Clear Screen] to clear all saved exception extension numbers.
3.3 Phonebook
3.3.1 Phonebook
[Phonebook]Æ[Phonebook]
You may add, edit, delete, print all the contact information with this function. The incoming calls will
be displayed with contact information if the phonebook is established.
25
1. Add
[Phonebook] Æ [Add] Æ You may input Name, Company, Businessphone1, BusinessPhone2,
Homephone1, Homephone2, Fax, email.
Click [Add] to add contact information in phonebook, [To excel] to save it in excel format, [Print] to print
all and [Exit] to exit.
If there’s email address in contact information, click [send email], PC program will run outlook and
ready to compose email automatically.
2.Delete
[Phonebook] Æ [Delete] Æ Select contact. Click [Yes] to delete, [No] to exit
3. Edit
[Phonebook] Æ [Edit] Æ Select contact. Click to edit. After that, contact information will be
modified.
26
4. Read
[Phonebook] Æ [Read] Æ [All]
Contact information can be sorted.
5. Export
[Phonebook] Æ [Export] Æ Select Path and folder to export Æ [Save]
The exported file is text file
It will show [Phonebook file export successfully] once phonebook is completely exported.
6. Import
27
To import an phonebook text file in AR PC program
[Phonebook] Æ [Import] Æ Select path and folder Æ [Open], new contact will be added in AR PC
program.
Program will show [Contact add success] when phonebook completely imported.
7. To Excel
[Phonebook] Æ [To Excel] Æ Contact will be exported with excel file. The file will be save in user’s
PC.
8 . Print
[Phonebook] Æ [Print], you can print all contact out.
9. Outlook
[Phonebook] Æ [Outlook], AR program will synchronize Microsoft Outlook contact.
10. Search
[Phonebook] Æ [Search], you can search contact by name or phone or other field.
3.3.2 PBX Extension Setting
[Phonebook]Æ[PBX Extension setting]
You can add, edit, delete, read, import and export extension number information. It will be
convenient to search AR CDR by extension number.
28
1. Add
[PBX Extension setting] Æ [Add] Æ Input extension number and name Æ [New] to add, [Cancel] to
exit.
2.
Edit
[PBX Extension Setting] Æ [Edit] Æ Edit extension number and name Æ [Edit] to save, [Cancel] to
exit.
3. Delete
[PBX Extension setting] Æ [ Delete] Æ Select contact(s) you want to delete Æ [Yes] to delete, [No]
to exit.
29
4. Read
[PBX Extension setting] Æ [Read], you can read all the sorted contact information
5. Export
Export AR device PBX extension setting to user’s PC.
[PBX Extension setting] Æ [Export] Æ Select path/folder you want to save to Æ [Save]. The
exported file is text format.
It will display [Export Extension Successfully] when data completely exported.
6. Import
Import PC saved PBX extension setting to AR device.
[PBX extension setting] Æ [Import] Æ Select PBX Extension Setting.txt Æ [Open]
30
7. It will display [Import Extension Successfully] when data completely imported.
3.4 PABX
3.4.1 PABX SMDR Parameter
[PABX]Æ[PABX line no SMDR configuration]
AR Voice logger obtains SMDR information from PBX output. SMDR configuration is the most
important procedure to have precise data.
Remark: If PBX is disconnected with AR device or there’s no SMDR output from PBX, please ignore
this setting. However, CDR will not include extension information.
31
1. PBX type:
[PABX] Æ [PABX line no SMDR configuration] Æ Choose PBX Type Æ [Read] Æ It will display all the
SMDR configuration of this PBX.
2. Edit :
You may edit PBX SMDR configuration through this function.
Change the parameter Æ [Edit]
3. Delete:
Select PBX type Æ [Delete] Æ [Yes] to continue, [No] to exit.
4. Add New PBX :
You may add ne PBX if it is not listed in PBX type.
[Add New PBX] Æ Input PBX type Æ input SMDR parameter Æ [OK], the new PBX type with SMDR
database is added
Remark: [*] is the necessary parameter you have to input.
32
5. RS232 Configuration:
Com Port: Factory default is COM1, can not be changed.
Baud Rate: Com Port transmit speed rate, factory default is 9600
Binary: Com Port binary digit, factory default is 8
Parity: Com Port Odd-even check, factory default is NOPARITY
Stop Bits: Com Port end bit, factory default is 1
6. SMDR Configuration:
You may get the PBX type and SMDR database from PBX factory, otherwise, you need [SMDR
Help]
[SMDR Help] Æ Select any setting of parameter (Baud Rate, Binary, Parity, Stop bits) Æ [Test This
setting]
User need to pick up the phone, dial out, wait few second, hang up. AR device will test PABX
SMDR correspond parameter and check if the setting is correct.
If selected setting is not proper, AR program will show [No SMDR info found during test process]
You have to choose another setting to test again.
33
If selected setting is correct, AR program will provide parameter setting result in the left side of upper
window. Input these settings in parameter setting underneath and click [Add New PABX].
34
3.4.2 PABX (SMDR data)
[PABX]Æ[PABX (SMDR data)]
You can review PABX SMDR record by this function, The record contains SMDR date, date buffer,
Length. You may export records to text file and save it in your PC.
3.5 Monitor
[Monitor]Æ[Start Monitor]:
Remark:
This function is for authorized user only.
Select the channel being recordedÆ [Start monitoring], AR program will show
column.
in [Monitor]
[Monitor] Æ[Stop Monitor]:
Select the channel being monitored Æ [Stop Monitoring] to end monitoring the calls.
column will disappear.
in [Monitor]
[Monitor]Æ[Record]:
Select the channel engaged Æ [Record] to force recording. AR program will show
column.
35
in [Recording]
[Monitor]Æ[Not Record]:
Select the channel being recordedÆ [Not Record], this conversation will not be recorded and
disappear in [Recording] column].
[Monitor]Æ[Device Monitor]:
Please refer Chapter 4.
3.6 Other Function
AR program will show AR Voice Logger recorder / Hard disk status / User /Statistic information when
you log in successfully.
3.6.1 Voice Logger record
It will show records in voice logger hard disk.
Complete record contains:
Time: Start date and time of record
Type: Inbound / Outbound / Conference / Audio
Talking time: Record elapse
Phone number: Inbound Caller ID and outbound phone number
Phone name: Obtain the phone name from [Phonebook] data
Ext: Extension number from [PABX SMDR] data
Ext Name: Extension name from [Phonebook] extension data
Channel: Channel ID from [Channel Settings]
Channel name: Correspond channel name from [Channel Settings]
Note: Select a record Æ press mouse right key Æ [Edit CDR file note] Æ Input note, it will be shown
in Note column
Save path:Save path of voice data
Key Features:
1. Play: Play voice record with AR program player. You can see Device ID / Device Name / Phone
number / Extension number / Channel / Date and Type in AR program player
36
Stop Download: During playing record, you may click [Stop Download] anytime to end playing (It
will show 100% progress when the record is completely downloaded)
Add File: Select AR voice record file in PC folder Æ [Add File] Æ play. Click [Previous] or [Next]
for multi files.
Pause: Pause during playing
Play: Continue playing
2. Download: Download records from Voice logger to Local PC. You can download voice file with avl /
avn / wav format
avl:Voice record can only be played by authorized user with AR voice logger program
avn:Voice record can only be played by AR voice logger program player.
Wav: Voice record can be played by any player without encrypted.
3.Delete: Delete records from Voice logger device. You can delete voice/CDR or both of them.
Delete CDR and voice data: Voice logger records will be deduct when click [Delete CDR and voice
record]
Delete Voice data: Delete voice data only, CDR will be kept in voice logger.
4. Mark:Use
to flag the important record
Select important record Æ [Mark], this record will be flagged
Select the marked record Æ [Unmark], this record will be a normal record without flag.
5. Export CDR Table: AR program will export CDR table to excel file. You can save it in your PC.
6.Search: Search records by various condition in AR hard disk.
37
Click [All records] to search all records in AR HDD
Click [Inbound] to search all inbound calls in AR HDD
Click [Missed Inbound] to search all missed inbound calls in AR HDD
Click [Outbound] to search all outbound calls in AR HDD
Click [Confab] to search all conference records in AR HDD
Click [Audio] to search all audio records in AR HDD
Click [Mark] to search all marked records in AR HDD
Search: Search AR HDD by various conditions. The results will be shown in [Search Result
(Device)]
Search by date: You can choose Today / Past 3 days / Past 1 week / Past 2 weeks / Past 1 month /
Past 3 months / All
Advance search: You can select more search conditions (duplicable), the result will be shown in
Search Result].
7.Download path:
[Download Path] Æ click […] to choose the folder you’d like to save CDR.
Default folder c:\Program Files\AR Series Voice Logger\Recorders\
38
8. Other features of mouse right key:
Listen: If the voice record less than 30 sec, [Listen] is same as [Play]. Otherwise, [Listen] elapse
time is 30 sec only.
Send Email: Select record(s) in Voice Logger Æ [Send Email] Æ Select file format (wav / avn
/avl / CDR only). The record(s) will be downloaded in your PC and then sent to others by email.
Print: Print all the record in current window
Add to phonebook: Add record information to [Phonebook]
Synchronize this day’s record: Synchronize records of specific date in [Voice Logger] window.
Clear Play Mark: Reset played record color mark to un-played color mark.
3.6.2 Local PC folder
Download [Voice Logger] record file, it will be saved in [Local PC folder] and user’s PC. [Local PC
folder] contains complete record detail. All the operations and features are same as [Voice
Logger]
39
Additional Features
1. Open Folder: Upload specific folder record to [Local PC folder], you can review and play all the
record in uploaded folder.
2. Open:Upload specific record to [Local PC folder], you can review and play record in uploaded
single file.
3.6.3 User Management
Only Administrator can manage this function.
Administrator can Read / Add / Edit / Delete user’s name, password and authorization. User name
and password are contained by at most 15 alphabet and figure. Administrator factory default, ID:
admin (Can not be changed) / Password: 1111
Suggestion: Change administrator password after first log in
You can review user status (online /offline) in [User]
Configure authorization:
Administrator can configure Name /Password /Search recording records /Listen recording records/
Delete recording records / Monitor talking real time /Download recording records / Host setting /Stop
Record /Make CDR Notes and Mark CDR for various user
40
3.6.4 Statistic
1. You may review current date / month or specific date /month record statistic chart here.
2. Blue area is [Inbound calls], green area is [Outbound calls] and red area is [Missed calls]
3. Click specific area of date chart, you can find records in [Search Result (Voice Logger
/Computer)]. Click specific area of month chart, upper area will show the specific date Inbound /
outbound calls by hour interval.
4.You can also specify the date to get statistic chart.
3.6.5 Search Result
1. Search records in Voice logger, the result will be shown in [Search Result (Device)].
2. Search records in Local (PC) folder, the result will be shown in [Search Result (Computer)].
41
3. Click specific area of date chart, the records will be shown in [Search Result (Device)]
3.7 Backup
All the records in AR Voice logger can be back up on user’s PC.
3.7.1 Backup manually
Before backup, please make sure PC is turning on, AR program is running, PC logged in AR device
by LAN .
[Backup] Æ [Backup] Æ Input start and end date in [Achieve from] and [To] Æ Select voice file format
(avl/avn/wav) Æ [Path] Æ[Start]
You can see download task and progress on the window. During backup, you can click [Stop backup]
anytime.
42
3.7.2 Restore manually
All the backup record in PC or storage media can be restore to AR device manually.
Before restore, please make sure PC is turning on, records storage media is connect with PC, AR
program is running, PC logged in AR device by LAN .
[Backup] Æ [Restore] Æ [Select the folder] Æ Choose the records folder or single file on storage
media folder (PC HDD /other storage media) Æ [OK] Æ [Start restoring]
43
You can see restore files and restore result on the window. During backup, you can click [Stop
backup] anytime. All the selected record will be restore in AR device.
3.8 USB KEY
3.8.1 Create AR update USB key
[USB KEY]Æ[Create AR update USB key]
Create an AR update USB key if user is unable to connect with AR neither LAN nor internet 具體的
Step:
1. Connect USB disk with PC, and find it in [My computer]
44
2. Run AR voice logger program, click [USB KEY]Æ[Create AR update USB key]. Browse upgrade
file [KTS_WinCE.exe] in your PC and upload to your USB disk.
Click [OK] to proceed, [Cancel] to exit.
AR program will show [Firmware upgrade disk is successful] when the file is completely copied.
3. Check USB disk, there will be an Update.txt file and KTS_WinCE.exe saved in it.
45
4. Plug this USB disk to AR device USB device 2 port, AR device will be upgraded automatically.
You will see [Upgrade done] in PC program, then restore the AR device manually. (Upgrade is
effective only after AR device reboot)
3.8.2 Create IP USB KEY
[USB KEY]Æ[Create IP USB KEY]
The function is for fixed IP address configuration in case you are unable to connect AR device by
LAN.
Step:
1. Connect USB disk with PC, and find this disk in [My computer]
46
2. Run AR Voice logger program ,click [USB KEY]Æ[Create IP setting USB key] to configure fixed
IP address for AR device
Save path: IP address will be saved in USB disk
Use the following IP address: Configure fixed IP address, Subnet mask and Default gateway.
Use the following DNS server address: Configure preferred DNS server and Alternate DNS serve
Network MAC Address: the unique ID of network card
AR program will show [Successfully created file for setting IPl] when the IP configuration is
completely copied.
3. Click [OK] and check USB disk, there will be IP set.txt file saved in USB disk.
4. Plug this USB disk to AR device, AR fixed IP address will be configured automatically according
with USB disk. You will see [IP configuration done] in PC program, then restore the AR device
47
manually. (Upgrade is effective only after AR device reboot)
4 Monitor program guide
System monitor is a PC program which monitors the working status of AR. It can monitor local and
remote devices via LAN, USB or internet. Each monitor program can monitor up to 6 devices on the
same window
appears, it means system and internet
a Normal status:If
connection working proper.
Extraordinary status: If
connection failed
appears, it means system and internet
Remote server status 遠端伺服器運行狀況:
Proxy 1, Proxy 2, Proxy 3
Blue: Remote proxy works properly, and indicator is light green
Grey: Remote proxy is out of order, and indicator is dark green
Hide:Click[Hide],monitor program will will minimize at right underneath of PC desktop,double click
to restore.
48
1. Set Device
[Monitor]Æ [Set Device]
Each monitor program can monitor up to 6 devices. Input Device IP/ Device ID/Domain Name and
proper password, you can monitor AR device easily.
IP:Input LAN virtual fixed IP or Internal real IP
Device ID:Input AR device IP
Domain Name:Input AR device domain name
Proxy IP: AR GK IP address. You may log in AR device remotely through this proxy IP
Auto Run: Auto run when starts Windows.
2. Alarm setting
[Monitor]Æ [Alarm Set]
When the monitor program detects device is out of order, it will sound alarm. You can stop the
alarm by checking [Device (number) Don’t alarm].
Alarm Voice: Check this box, the program will alarm. Otherwise, it keeps silence.
Play: Listen alarm voice
Stop: Stop alarm voice during listening
49
Browser: Browse wav/asf file for alarm voice
5 AR GK Monitor Program user’s guide
AR GK is the proxy server to log in remote AR device properly.
Blue [Concatenation], Proxy connected
Grey [Concatenation],Proxy disconnected
Auto Run When Windows Start:Check [Auto Run When Windows Start], PC will run AR GK monitor
program automatically.
Hide:Click [Hide],AR GK Monitor program will minimize at right underneath of PC desktop. Click
, the program will be restored in desktop.
50