1
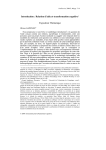
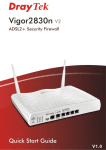
MULTIPOINT™ Workstation MWS400UL USER MANUAL MULTIPOINT™ Workstation MWS400UL TABLE OF CONTENTS INTRODUCTION2 FEATURES ......................................................................................................... 3 APPLICATION .................................................................................................... 4 PACKAGE CONTENTS ...................................................................................... 4 MINIMUM SYSTEM REQUIREMENTS ............................................................... 5 OPERATING SYSTEMS SUPPORTED .............................................................. 5 FOR OPTIMUM VIDEO DISPLAY ...................................................................... 6 REGULATORY COMPLIANCE .......................................................................... 6 SUPPORTED DISPLAY RESOLUTIONS................................................................................................... 6 DEVICE INSTALLATION - SOFTWARE ................................................................... 7 INSTALLING MWS400UL HARDWARE ................................................................... 9 THE STATION ASSIGNMENT AND FIRMWARE UPDATE .............................................................................................. 11 VERIFYING THE MWS400UL CONNECTION.......................................................................................................... 22 SPLIT SCREEN ON Windows Multipoint Server 2011 ............................................................................................................. 23 ADJUSTING THE SCREEN RESOLUTION ............................................................ 26 DEVICE DRIVER UN-INSTALLATION .................................................................... 28 VESA MOUNTING ................................................................................................... 31 TROUBLE SHOOTING TIP...................................................................................... 32 2 MULTIPOINT™ Workstation MWS400UL INTRODUCTION Thank you for purchasing the MultiPoint Workstation. The MultiPoint Workstation (MWS400UL) is designed specifically for Windows MultiPoint Server 2011. Simply connect it to an available USB port /or Gigabit Ethernet Port on the server, and attach a monitor, keyboard, and mouse to add a new workstation. The MWS400UL features four high-speed USB 2.0 ports, audio and microphone ports, Gigabit LAN port, a VGA port that supports resolutions up to 1680 x 1050, and a power switch that can also reset this device. Add up to ten MWS400UL per server. The MWS400UL provides an inexpensive and reliable way to expand your Windows MultiPoint Server 2011 for school and office running “office application”; “Home Entertainment” and “Full Screen Movie Playback” are not recommended. © 2011 Microsoft. All rights reserved. Microsoft, Active Directory, MultiPoint Server, Office, .NET Framework, Windows, and Windows Server are trademarks of the Microsoft group of companies. All other trademarks are property of their respective owners. FEATURES Resolutions up to 1680x1050 (1600x900 is recommend) 4 x high-speed USB 2.0 Ports Stereo Audio Output (Speaker/Headphone) and Mono audio input (Mic) I/O Switch (Power button), power on/off and Reset the device. USB 1.1 & 2.0 compliant Plug-and-Play compliant Up-stream over USB or LAN workstation with Giga bit LAN. 3 MULTIPOINT™ Workstation APPLICATION PACKAGE CONTENTS 4 MWS400UL VESA Mounting kits USB2.0 cable (1.8 Meters) 3A/5V AC Power Adapter CD (Driver and User Manual) MWS400UL MULTIPOINT™ Workstation MWS400UL MINIMUM SYSTEM REQUIREMENTS ● Available USB 2.0 Port ● CPU – One of the following: x64-based Intel Pentium, Intel quad core (i7, i5, i3), XEON, Intel dual core. Compatible processor (MultiPoint Server supports up to four core & eight core CPUs on one server) Note: 1) AMD Opteron / Athlon, AMD Embed chipset is not recommend due to unstable keyboard/mouse operation which may not recognize under USB1.1 device. 2) Intel Itanium Processor is not supported. ● RAM – The required RAM depends on the number of Workstation is needed: 2 GB for 4 stations 4 GB for 6 stations 8 GB for 10 stations ● Multi-core processor support Support up to 4 & 8 multi-core processors; dual-core is less powered and therefore only 2 to 3 workstation can be supported. ● Minimum disk space for setup 32 GB OPERATING SYSTEMS SUPPORTED For optimal multimedia performance, we recommend the following CPUs: Dual-core processor: support up to 3 stations under low processing application. Quad-core processor: support up to 6 stations under low processing application. Core-i5 processor: support up to 6 stations under low processing application. Core-i7 processor: support up to 6 or 10 stations under low processing application. Windows MultiPoint Server 2011 5 MULTIPOINT™ Workstation MWS400UL FOR OPTIMUM VIDEO DISPLAY Technically, short video playbacks can be supported but the operating system needs to be - i7 processor - Intel Sandy bridge chipset Note: Extended video display at full screen is not recommended; it often exhausts CPU and force system with much lower performance. REGULATORY COMPLIANCE FCC / CE / C-tick / VCCI Tested to comply with FCC Standards. SUPPORTED DISPLAY RESOLUTIONS Aspect Ratio Color Bits Refresh Rate 32 60 16:10 Resolution 1600*900 (is recommended) 1600 * 1200 32 60 16:10 1680 * 1050 32 60 16:10 1440 * 900 32 60 4:3 1400 * 1050 32 60 16:9 1360 * 768 32 60 5:4 1280 * 1024 32 60 4:3 1280 * 960 32 60 16:10 1280 * 800 32 60 15:9 1280 * 768 32 60 16:9 1280 * 720 32 60 4:3 1152 * 864 32 60 4:3 1024 * 768 32 60 4:3 800 * 600 32 60 16:10 6 MULTIPOINT™ Workstation MWS400UL DEVICE INSTALLATION - SOFTWARE Installing the device driver enables Windows MutliPoint Server 2011 to recognize the MWS400UL. Please make sure the MWS400UL is unplugged from your server before executing the setup program. Step 1 Insert the Driver installation CD into the CD-ROM drive. The installer should start automatically. If it does not, double click Setup.exe to start the Installation Wizard. Step 2 Driver Installation Wizard, click Next to continue 7 MULTIPOINT™ Workstation MWS400UL Step 3 License Agreement; review it and check I accept the terms of the license agreement Click Next to accept the License Agreement. Step 4 Setup is searching for installed features... *You may notice the screen flashes during hardware installation. It is part of the normal process. . 8 MULTIPOINT™ Workstation MWS400UL Step 5 Driver Installation Wizard, click Finish to continue and restart the computer. INSTALLING MWS400UL HARDWARE Step 1 Connecting monitor to the VGA connector of the MWS400UL, turn on the monitor. Connecting power adapter, Giga LAN cable, USB cable, keyboard, and mouse to the MWS400UL. Step 2 Connect one end of the USB cable to the MWS400UL and the other end to an available USB 2.0 port of your computer. Or Connect one end of the Giga LAN cable to the MWS400UL and the other end to an available Giga LAN port of Router. The driver installation will proceed automatically. Step 3 Repeat steps 1 & 2 for the remaining MWS400UL on to other workstation. 9 MULTIPOINT™ Workstation MWS400UL INSTALLING DRAWING of MWS400UL HARDWARE via GigaLAN Port Figure 1: 10-Seat Implementation of Windows MultiPoint Server2011 with using MWS400UL 10 MULTIPOINT™ Workstation MWS400UL THE STATION ASSIGNMENT AND FIRMWARE UPDATE BUILDING WORKSTATION ON SINGLE SERVER ONLY (following example drawing is using model MWS9940, the function is same as MWS400UL) Step 1 The “MultiPoint Manager” page will be auto-displayed in a minute after system boot-up and administrator log-in. NOTE: If this page did not pop out automatically, please follow the illustrate below: 1. Start -> 2. All Programs -> 3. MultiPoint Manager 11 MULTIPOINT™ Workstation Step 2 Click “Network Stations” as showed: Step 2-1 Assign one station to the host server, if the firmware is old version such as 018.103. It will be updated to new firmware simultaneously when you assign the station. 12 MWS400UL MULTIPOINT™ Workstation Step 2-2 This screen is asking to assign to this host server. Click “yes” to confirm. Step 2-3 This screen was detected old firmware, click “yes” to update new firmware and assign to the host server. 13 MWS400UL MULTIPOINT™ Workstation Step 2-4 This screen shows “finish assignment”, and new firmware is 021.103. Step 2-5 If the firmware is newest, no need to update it when assign this station to host server. 14 MWS400UL MULTIPOINT™ Workstation ** You also can assign multi-stations to the host server at the same time. ** When there is 3 workstation HUB is connected, It shows 3 stations on the screen which are free / waiting for assignment inside the “status” column indicating as “not connected”. 15 MWS400UL MULTIPOINT™ Workstation Step 3 Click the block “□” to select one of the stations under the column on the left side of the “client Name” and then click “Assign to this server” at the right column as illustrated. Step 3-1 If all of the stations need to be selected, simply click “Select All” at the right column under “Device Task Item”. After that, you will find all of the stations are selected as the blocks “□”. Then, click “Assign to this server”. 16 MWS400UL MULTIPOINT™ Workstation Step 4 Click “Yes” to complete the station assignment. Repeat the same process of step3 – 4 for the any other one of the station you desire to select for station assignment. Step 5 The status column will show “Connected” workstation at lower section of the screen. NOTE: If any one of the stations needs to be disconnected, please select the station and Click “Clear Assignment” under “Device Task Item” on the right panel of the screen then click “Yes” while the dialog pop up for disconnection. 17 MWS400UL MULTIPOINT™ Workstation If all of the stations need to be disconnected, simply click “Select All” at the right column under “General Task Item”. After that, you will find all of the stations are selected as the blocks “□” and click “Clear Assignment” then click “Yes” while the dialog pop up for disconnection. 18 MWS400UL MULTIPOINT™ Workstation STATIONS RENAME (following example drawing is using model MWS9940, the function is same as MWS400UL) Renaming the station may convenient administrator recognizing MAC address location by his own design, it needs to be done before station gets assignment. Rename step: 1. Select station by one left click 2. Left click on “Rename” at right panel 3. Rename dialog will pop up then typing desire name (e.g. CL1-John, CL2-Josh) 4. Click “Submit” to complete 19 MWS400UL MULTIPOINT™ Workstation NETWORK SETTING (following example drawing is using model MWS9940, the function is same as MWS400UL) A Local Area Network setting to be prioritize either by Static IP or Dynamic IP for this Server, this Network Setting needs to be done before station gets assigned. “Dynamic IP” is recommend with Router Device: Select station by one left click highlight Left click on “Network” under “Device Task Item”. Network setting dialog will pop out then left click the DHCP for auto distributing the IP address or manually type the IP address then click “Submit” on the dialog to complete. RESTART DEVICE (following example drawing is using model MWS9940, the function is same as MWS400UL) Restart Device function can be use when there are some station did not recognize keyboard/mouse. “Restart device” needs to be done before station gets assignment. 20 MWS400UL MULTIPOINT™ Workstation Restart device step: Select station by one left click highlighting Left click on “Restart device” under “Device Task Item.” Click “Yes” on the dialog to complete 21 MWS400UL MULTIPOINT™ Workstation MWS400UL VERIFYING THE MWS400UL CONNECTION Step 1 Right click ‘Manage’ from the ‘computer’ as the screen Step 2 Point to ‘Device Manager’ on the left panel under ‘Server Manager’ go to ‘View’ and click ‘Devices by type’ as the picture showed. 22 MULTIPOINT™ Workstation MWS400UL SPLIT SCREEN ON Windows Multipoint Server 2011 Any MultiPoint Server station monitor that has a resolution greater than 1024x768 can be split into two station screens using the split screen task on the Stations tab in MultiPoint Manager. The screen that is present on the monitor at the time that the splitting occurs moves to the left half of the monitor, and a new station’s screen is created on the right half of the same monitor. The new station screen must be mapped to a keyboard, mouse, and USB Hub or Router to complete the creation of the new station. ---- refer from page 12, WMS2011 Planning Guide. Doc-Microsoft Word. After a station is split, one user can log on to the left station while another user logs on to the right station as the figure 2 show below. 23 MULTIPOINT™ Workstation Figure 2: MWS400UL 8 Seats Implementation of Windows MultiPoint Server 2011 in split screen with using MWS400UL Please follow up the steps for split screen as below: Step 1 Please follow up the procedure on illustration for getting into “MultiPoint Manager” as 1. Start -> 2. All Programs -> 3. Windows Multipoint Server -->MultiPoint Manager Step 2 Select “Stations” on MultiPoint Manager then highlight and click the local station after that click “Split station” under “Selected Item Tasks” as illustration. 24 MULTIPOINT™ Workstation MWS400UL Step 3 Click OK to continue NOTE: TO DISABLE SPLIT SCREEN Same procedure as above step1 for getting onto “MultiPoint Manager” and select “Stations” then highlight the local station and click “Unsplit station” under “Selected Item Tasks” as illustration. 25 MULTIPOINT™ Workstation MWS400UL Then click “OK” on the “Unsplit station” dialog to bring back into single station on the monitor. ADJUSTING THE SCREEN RESOLUTION By default, Windows MultiPoint Server 2011 will select the recommended resolution for each connected display. However, if you would like to choose a different resolution, follow these steps: Step 1 Please follow up the procedure on illustration for getting into “MultiPoint Manager” as 1. Start -> 2. All Programs -> 3. Windows Multipoint Server -->MultiPoint Manager 26 MULTIPOINT™ Workstation MWS400UL Step 2: Go to MultiPoint Manager => Home =>Local Station => switch to maintenance mode Step 3: Click OK to continue 27 MULTIPOINT™ Workstation MWS400UL Step 4 Press “Ctrl + Alt + Delete” to log in administrator into Maintenance Mode Step 5 Right click on the desktop and choose Screen Resolution from the contextual menu. Step 6 Click Identify to identify each display. Then click on the display to be adjusted and choose the desired resolution from the Resolution dropdown menu. (suggest: better using the system recommend resolution) DEVICE DRIVER UN-INSTALLATION The following procedure allows you to uninstall the MWS400UL device driver. Please make sure all MWS400UL are unplugged from your server before executing the device driver uninstallation program. Step 1 1. Click Start -> 2. All Programs -> 3. Control Panel 28 MULTIPOINT™ Workstation MWS400UL Step 2 Double click “Uninstall a program” as illustrated on the screen. Step 3 Select the “Magic Control Technology – MWS xx.xx.xxxx.xxxx” item. Click Uninstall button. Step 4 Click “OK” to continue 29 MULTIPOINT™ Workstation MWS400UL Step 5 Select “Yes, I want to restart my computer now” and click “Finish” to reboot. The driver is now uninstalled. 30 MULTIPOINT™ Workstation VESA MOUNTING 31 MWS400UL MULTIPOINT™ Workstation MWS400UL TROUBLESHOOTING TIPS The following troubleshooting tips may help if you are experiencing any difficulties using our device. • Check to make sure that all connectors are plugged in correctly. • Make sure that the USB port that you are using is USB 2.0. • Try a different USB 2.0 port • Check to see that the monitor is connected correctly and the power is ON. • Make sure to restart the server after the driver installation. • Unplug the USB connector from MWS400UL, re-insert after 10 seconds. • Check the website to make sure you have the latest drivers. • Reset/refresh/resynchronize your monitor. • Full screen video display is not recommended; use Intel Sandy Bridge chipset may help with better performance. For immediate support, visit http://www.mct.com.tw to find the latest documentation, Knowledge Base articles, and software for your device. Copyright© 2011 Magic Control Technology Corp. All rights reserved. All trade names are registered trademarks of their respective owners. Features and specifications are subject to change without notice. Product may not be exactly as shown in the diagrams. 32