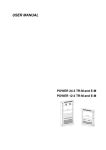
1
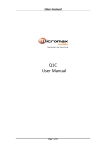
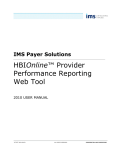
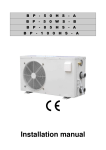
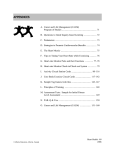
Ami® and Ami® Plus
Infant Central Apnea/Heart Rate Monitors
Caregiver’s Manual
21-02-0117 Rev. 04 06/07
WARRANTY
CAS Medical Systems, Inc. warrants to the owner that the Ami or Ami Plus monitor, exclusive of expendable parts and other accessories, shall be free from defects in material and workmanship for one year from the original date of sale. CAS’ sole obligation,
with respect to any such defect, is limited to the repair or, at CAS’ option, replacement of the monitor. Purchaser pays return
freight charges.
This warranty is made on the condition that prompt notification of a defect is given to CAS within the warranty period, and that
CAS has the sole right to determine whether a defect exists.
This warranty is conditional on the performance of periodic maintenance, as specified in the maintenance section of this manual,
by qualified service personnel. The warranty does not apply to monitors that have been partially or completely disassembled;
altered; subjected to misuse, negligence, or accident; or operated other than in accordance with the instructions provided by CAS.
This includes repair by unauthorized personnel.
This warranty represents the exclusive obligation of CAS and the exclusive remedy of the purchaser regarding defects in
the monitor.
“This warranty is given in lieu of any express or implied warranties, including any warranty of merchantability or fitness
for a particular purpose.”
No person is authorized to modify, in any manner, CAS Medical Systems’ obligation as described above.
Important: The Ami and Ami Plus User’s Manual has been renamed the
Ami and Ami Plus Caregiver’s Manual.
CAUTION: In the United States of America, Federal Law restricts this device to sale by or on the order
of a physician.
Ami, Ami Plus, CAS and the CAS Logo are registered trademarks of CAS Medical Systems, Inc. All other products and
company names are trademarks or registered trademarks of their respective companies. ©2002 CAS Medical Systems, Inc.
All rights reserved. No part of this manual may be reproduced without the permission of CAS Medical Systems, Inc.
21-02-0117 Rev. 04 06/07
Contents
Warnings
1
Warnings . . . . . . . . . . . . . . . . . . . . . . . . . . . . . . 1-1
Introduction
2
Introduction . . . . . . . . . . . . . . . . . . . . . . . . . . . 2-1
Apnea Monitoring
3
Apnea Monitoring . . . . . . . . . . . . . . . . . . . . . . . 3-1
Electromagnetic Interference
4
Electromagnetic Interference . . . . . . . . . . . . . 4-1
Electrostatic Discharge . . . . . . . . . . . . . . . . . . . . . . . . . . . . . . . . . . 4-2
Description of the Monitor
5
Description of the Monitor . . . . . . . . . . . . . . . . 5-1
Front Panel . . . . . . . . . . . . . . . . . . . . . . . . . . . . . . . . . . . . . . . . . . . . 5-2
Back Panel . . . . . . . . . . . . . . . . . . . . . . . . . . . . . . . . . . . . . . . . . . . . . 5-3
Bottom Panel . . . . . . . . . . . . . . . . . . . . . . . . . . . . . . . . . . . . . . . . . . . 5-4
Labels . . . . . . . . . . . . . . . . . . . . . . . . . . . . . . . . . . . . . . . . . . . . . . . . . 5-5
Accessories
6
Accessories . . . . . . . . . . . . . . . . . . . . . . . . . . . 6-1
Carbon Electrodes . . . . . . . . . . . . . . . . . . . . . . . . . . . . . . . . .
Lead Wires . . . . . . . . . . . . . . . . . . . . . . . . . . . . . . . . . . . . . . .
Patient Cable . . . . . . . . . . . . . . . . . . . . . . . . . . . . . . . . . . . . .
Patient Belt . . . . . . . . . . . . . . . . . . . . . . . . . . . . . . . . . . . . . . .
21-02-0117 Rev. 04 06/07
6-1
6-1
6-2
6-2
i
Remote Alarm . . . . . . . . . . . . . . . . . . . . . . . . . . . . . . . . . . . .
Power Cord . . . . . . . . . . . . . . . . . . . . . . . . . . . . . . . . . . . . . .
Carrying Case . . . . . . . . . . . . . . . . . . . . . . . . . . . . . . . . . . . .
Modem Cable . . . . . . . . . . . . . . . . . . . . . . . . . . . . . . . . . . . . .
Oximeter . . . . . . . . . . . . . . . . . . . . . . . . . . . . . . . . . . . . . . . .
Using the Monitor
6-3
6-3
6-4
6-4
6-4
7
Using the Monitor . . . . . . . . . . . . . . . . . . . . . . . 7-1
Plugging in the Monitor . . . . . . . . . . . . . . . . . . . . . . . . . . . . . . . . . . 7-1
System Check . . . . . . . . . . . . . . . . . . . . . . . . . . . . . . . . . . . . . . . . . . 7-2
Using the Monitor Effectively. . . . . . . . . . . . . . . . . . . . . . . . . . . . . . 7-2
Connecting The Monitor
8
Connecting The Monitor . . . . . . . . . . . . . . . . . 8-1
Auxiliary Connections
9
Auxiliary Connections . . . . . . . . . . . . . . . . . . . 9-1
Alarms
10
Alarms . . . . . . . . . . . . . . . . . . . . . . . . . . . . . . . 10-1
ii
Human Alarms . . . . . . . . . . . . . . . . . . . . . . . . . . . . . . . . . . . . . . . . .
Apnea . . . . . . . . . . . . . . . . . . . . . . . . . . . . . . . . . . . . . . . . . .
Heart Fast. . . . . . . . . . . . . . . . . . . . . . . . . . . . . . . . . . . . . . .
Heart Slow . . . . . . . . . . . . . . . . . . . . . . . . . . . . . . . . . . . . . .
10-1
10-1
10-1
10-2
Equipment Alarms. . . . . . . . . . . . . . . . . . . . . . . . . . . . . . . . . . . . . .
Low Battery . . . . . . . . . . . . . . . . . . . . . . . . . . . . . . . . . . . . .
Loose Leads. . . . . . . . . . . . . . . . . . . . . . . . . . . . . . . . . . . . .
Memory Full . . . . . . . . . . . . . . . . . . . . . . . . . . . . . . . . . . . . .
Service . . . . . . . . . . . . . . . . . . . . . . . . . . . . . . . . . . . . . . . . .
All Lights Flashing . . . . . . . . . . . . . . . . . . . . . . . . . . . . . . . .
10-2
10-2
10-2
10-3
10-3
10-4
21-02-0117 Rev. 04 06/07
Troubleshooting and Error
Messages
11
Troubleshooting . . . . . . . . . . . . . . . . . . . . . . . 11-1
Error Messages . . . . . . . . . . . . . . . . . . . . . . . . . . . . . . . . . . . . . . . . 11-4
Replace Battery . . . . . . . . . . . . . . . . . . . . . . . . . . . . . . . . . . 11-4
Loose Connection . . . . . . . . . . . . . . . . . . . . . . . . . . . . . . . . 11-4
Power
12
Power . . . . . . . . . . . . . . . . . . . . . . . . . . . . . . . . 12-1
Taking Care of Your Monitor
13
Taking Care of Your Monitor . . . . . . . . . . . . . 13-1
Maintenance
14
Maintenance . . . . . . . . . . . . . . . . . . . . . . . . . . 14-1
Summary
15
Summary . . . . . . . . . . . . . . . . . . . . . . . . . . . . . 15-1
Doctor’s Phone Number . . . . . . . . . . . . . . . . . . . . . . . . . . . . 15-1
Homecare Dealer’s Phone Number . . . . . . . . . . . . . . . . . . . 15-1
Glossary
Index
G-1
I-1
21-02-0117 Rev. 04 06/07
iii
Figures
Figure 5-1
Front Panel . . . . . . . . . . . . . . . . . . . . . . . . . . . . . . . . . . . . . . . . . . . . . 5-2
Figure 5-2
Back Panel . . . . . . . . . . . . . . . . . . . . . . . . . . . . . . . . . . . . . . . . . . . . . 5-3
Figure 5-3
Bottom Panel. . . . . . . . . . . . . . . . . . . . . . . . . . . . . . . . . . . . . . . . . . . . 5-4
Figure 5-4
Sample Label . . . . . . . . . . . . . . . . . . . . . . . . . . . . . . . . . . . . . . . . . . . 5-5
Figure 6-1
Carbon Electrodes . . . . . . . . . . . . . . . . . . . . . . . . . . . . . . . . . . . . . . . 6-1
Figure 6-2
Lead Wires . . . . . . . . . . . . . . . . . . . . . . . . . . . . . . . . . . . . . . . . . . . . . 6-2
Figure 6-3
Patient Cable. . . . . . . . . . . . . . . . . . . . . . . . . . . . . . . . . . . . . . . . . . . . 6-2
Figure 6-4
Patient Belt . . . . . . . . . . . . . . . . . . . . . . . . . . . . . . . . . . . . . . . . . . . . . 6-2
Figure 6-5
Remote Alarm . . . . . . . . . . . . . . . . . . . . . . . . . . . . . . . . . . . . . . . . . . . 6-3
Figure 6-6
Power Cord . . . . . . . . . . . . . . . . . . . . . . . . . . . . . . . . . . . . . . . . . . . . . 6-3
Figure 6-7
Carrying Case . . . . . . . . . . . . . . . . . . . . . . . . . . . . . . . . . . . . . . . . . . . 6-4
Figure 7-1
Connecting the Monitor to the Power Cord . . . . . . . . . . . . . . . . . . . . . 7-1
Figure 7-2
Connecting the Power Cord to the Wall Outlet . . . . . . . . . . . . . . . . . . 7-1
Figure 8-1
Rinse Electrodes . . . . . . . . . . . . . . . . . . . . . . . . . . . . . . . . . . . . . . . . . 8-1
Figure 8-2
Electrode with Lead wire . . . . . . . . . . . . . . . . . . . . . . . . . . . . . . . . . . . 8-2
Figure 8-3
Belt Placement . . . . . . . . . . . . . . . . . . . . . . . . . . . . . . . . . . . . . . . . . . 8-2
Figure 8-4
Electrode Placement . . . . . . . . . . . . . . . . . . . . . . . . . . . . . . . . . . . . . . 8-3
21-02-0117 Rev. 04 06/07
v
Figure 8-5
Wrapped Belt . . . . . . . . . . . . . . . . . . . . . . . . . . . . . . . . . . . . . . . . . . . 8-4
Figure 8-6
Lead Wires and Patient Cable . . . . . . . . . . . . . . . . . . . . . . . . . . . . . . 8-4
Figure 8-7
Patient Cable and Monitor. . . . . . . . . . . . . . . . . . . . . . . . . . . . . . . . . . 8-5
Figure 8-8
Baby and Sleeper . . . . . . . . . . . . . . . . . . . . . . . . . . . . . . . . . . . . . . . . 8-5
Figure 8-9
Power . . . . . . . . . . . . . . . . . . . . . . . . . . . . . . . . . . . . . . . . . . . . . . . . . 8-6
Figure 8-10
Turning the Monitor Off . . . . . . . . . . . . . . . . . . . . . . . . . . . . . . . . . . . . 8-7
Figure 9-1
Auxiliary Connections . . . . . . . . . . . . . . . . . . . . . . . . . . . . . . . . . . . . . 9-1
vi
21-02-0117 Rev. 04 06/07
Tables
Table 5-1
Description of Front Panel. . . . . . . . . . . . . . . . . . . . . . . . . . . . . . . . . . 5-2
Table 5-2
Description of Back Panel . . . . . . . . . . . . . . . . . . . . . . . . . . . . . . . . . . 5-3
Table 5-3
Description of Bottom Panel . . . . . . . . . . . . . . . . . . . . . . . . . . . . . . . . 5-4
Table 5-4
Description of Label . . . . . . . . . . . . . . . . . . . . . . . . . . . . . . . . . . . . . . 5-6
Table 9-1
Description of Auxiliary Connections. . . . . . . . . . . . . . . . . . . . . . . . . . 9-1
21-02-0117 Rev. 04 06/07
vii
Section
1
Warnings1
21-02-0117 Rev. 04 06/07
Warnings
Warnings
The following warnings appear throughout this manual. For more
information on a specific warning, see the section referenced in the
warning.
WARNING
The monitor may not be able to detect all episodes of
inadequate breathing. Refer to Section 3.
WARNING
Caregivers must closely watch patients who are subject to
obstructive apnea. Refer to Section 3.
WARNING
Federal Law restricts this device to sale or use by or on the
order of a licensed physician. Refer to Section 3.
WARNING
Not to be used in an explosive atmosphere. Refer to
Section 3.
WARNING
The monitor may sometimes detect false breathing signals
called artifacts. Refer to Section 3.
WARNING
Children at risk of seizures need to be closely watched to
protect them from obstructive apnea during a seizure. Ask
your physician for specific instructions on what to do if
your child has a seizure. Refer to Section 3.
21-02-0117 Rev. 04 06/07
1-1
Warnings
WARNING
The Ami and Ami Plus monitors may be affected by
electromagnetic interference from household appliances,
for example static from a television set. This interference
may keep the monitor from working properly. Refer to
Section 4.
WARNING
If at any point the monitor alarm is not loud enough to get
your attention, do not leave your child unattended. Refer to
Section 7.
WARNING
All directions in the Connecting The Monitor section must
be followed carefully. Refer to Section 8.
WARNING
To reduce the risk of strangulation, do not leave loose or
unconnected wires in the infant’s crib. Make sure that
wires are routed away from the child’s head. Refer to
Section 8.
WARNING
During an equipment alarm (except Low Battery Caution)
the monitor cannot sound any human alarms because of the
equipment problem. Therefore, during an equipment alarm
(except Low Battery Caution) someone must watch the
patient until the equipment problem has been corrected.
Refer to Section 8.
WARNING
If the monitor’s modem is in use, the monitor must be
disconnected from the phone lines before you can use the
phone. Refer to Section 9.
1-2
21-02-0117 Rev. 04 06/07
Warnings
WARNING
When the monitor is not working someone must watch the
child at all times. Refer to Section 10.
WARNING
If detergent is not fully rinsed out of the electrode belt, the
patient may get a skin rash. Refer to Section 13.
21-02-0117 Rev. 04 06/07
1-3
Section
2
Introduction2
21-02-0117 Rev. 04 06/07
Introduction
Introduction
This book explains what apnea is and how the Ami and Ami Plus monitors
detect it. It also explains how to setup the monitor, respond to monitor
alarms, and care for the monitor.
It is important that you read and understand all of the information in this
book. It is important that you also share this information with anyone who
will care for your child.
This book:
•
Explains what apnea is and how the monitor detects it.
•
Describes the monitor and its features.
•
Shows how to connect the monitor to your child.
•
Discusses how to respond to monitor alarms.
•
Explains how to care for the monitor and what to do if you have a
problem with the monitor.
If you have questions or problems with the monitor that are not answered in
this book, ask your doctor or homecare dealer for help.
Follow directions given to you by your doctor or homecare dealer.
In this manual, the following conventions are used.
WARNING
Directions that warn of conditions that put the baby or
caregiver at risk.
CAUTION
Directions that help you avoid damaging your monitor or
losing data.
Note: Directions that make it easier to use your monitor.
21-02-0117 Rev. 04 06/07
2-1
Section
3
Apnea Monitoring3
21-02-0117 Rev. 04 06/07
Apnea Monitoring
Apnea Monitoring
Apnea is a medical term meaning a time when a person stops breathing.
Central apnea occurs when a person does not make an effort to breath. Your
doctor has prescribed this monitor to help protect your child from the
dangers of an apnea event. All babies experience short, harmless periods of
apnea. Some babies, especially premature ones, have longer periods that
can be harmful.
Your doctor has probably spoken to you about the monitor and how it may
help your child. The monitor, when used according to its directions, is
intended to alert you when your child experiences central apnea. It is very
important that you immediately respond to all of the monitor’s alarms.
Everyone caring for the child must know how to respond to the monitor’s
alarms.
Everyone caring for the child must know CPR (Cardiopulmonary
Resuscitation) for infants. If you have not received CPR training, ask your
doctor or homecare dealer about how to get certified training.
The Ami and Ami Plus monitors are intended to detect central apnea
through a process called impedance monitoring. As your child’s chest
expands and contracts during breathing, the chest’s movement causes a
change in the signal between the electrodes which the monitor senses.
When central apnea happens, the child stops breathing and the chest does
not expand or contract. When the monitor detects that the chest is not
moving, the alarm sounds. The monitor does not interfere with your child’s
breathing.
WARNING
The monitor may not be able to detect all episodes of
inadequate breathing.
The Ami and Ami Plus monitors also detect your child’s heart rate with the
same electrodes used to detect breathing. A heart rate alarm will sound
when the heart rate is outside the set alarm limits. A heart rate alarm may
sound when inadequate breathing occurs.
WARNING
Caregivers must closely watch patients who are subject to
obstructive apnea.
Obstructive apnea is when the child tries to breathe, but the air does not
reach the lungs, due to a blockage in the airway. The blockage can be
caused by soft tissues in the child’s throat blocking the trachea or windpipe.
If the child has a cold, tonsillitis, enlarged adenoids, or other respiratory
21-02-0117 Rev. 04 06/07
3-1
Apnea Monitoring
problems, blockage from soft tissue can occur. The Ami and Ami Plus
monitors are not intended to detect obstructive apnea.
A child’s chest can still expand and contract even when the airway is
blocked. The Apnea alarm may not sound because it may still detect false
breathing signals. If this occurs, a Heart Slow alarm may sound since the
child’s heart rate will drop. Children who suffer from these respiratory
problems must be watched closely to protect them from obstructive apnea.
WARNING
Federal Law restricts this device to sale or use by or on the
order of a licensed physician.
WARNING
Not to be used in an explosive atmosphere.
Do not allow any person or pets to sleep with a monitored child.
Movements by people or by pets may cause your child to move. The
monitor may interpret this movement as breathing from your child and may
not alarm properly.
CAUTION
Do not rely on the monitor while the child is subject to
being jostled (use of baby swing, car travel over rough
roads, etc.). This type of motion may prevent any
impedance monitor from properly detecting breathing or
heart rate.
WARNING
The monitor may sometimes detect false breathing signals
called artifact.
An apnea alarm may be delayed, or not occur at all, if the child stops
breathing but the monitor detects false breathing signals. If this happens a
Heart Slow alarm will sound if your child’s heart rate drops.
WARNING
Children at risk of seizures need to be closely watched to
protect them from obstructive apnea during a seizure. Ask
your physician for specific instructions on what to do if
your child has a seizure.
3-2
21-02-0117 Rev. 04 06/07
Section
4
Electromagnetic
Interference
21-02-0117 Rev. 04 06/07
4
Electromagnetic Interference
Electromagnetic
Interference
WARNING
The Ami and Ami Plus monitors may be affected by
electromagnetic interference (EMI) from household
appliances, for example, static from a television set. This
interference may keep the monitor from working properly.
The monitor is an electronic device. Electronic devices can be affected by
electrical interference from household appliances. Loose electrodes can
cause electromagnetic interference. Although interference is unlikely, no
device is completely immune. The monitor was tested and conforms to
industry guidelines.
The monitor should not be operated near:
•
television sets
•
citizens band and amateur radios
•
microwave ovens
•
paging transmitters
•
radio/TV station transmitters
•
emergency vehicle two way radios
•
air conditioners
•
radio-controlled toys
•
hand-held transceivers (i.e. walkie-talkies, security, emergency)
•
Electronic Article Surveillance (EAS) (found in many stores as security
devices)
•
cordless or cellular telephones
•
food processors
•
wireless computer links communications/data transmitters
•
other Ami or Ami Plus monitors (4 ft. minimum separation)
Using the monitor near these appliances may cause the monitor to fail to
alarm. To prevent this, move the appliance as far away as possible from the
monitor. Watch the Respiration and Heartbeat lights on the monitor.
Compare with baby’s breathing and pulse. If they do not match, it may be
due to electromagnetic interference. Carefully watch the child and call the
homecare dealer for assistance.
21-02-0117 Rev. 04 06/07
4-1
Electromagnetic Interference
The monitor should not share electrical outlets with any of these
appliances. This may cause electrical interference with the monitor and
cause the monitor to fail to alarm.
Electrostatic Discharge
4-2
Electrostatic Discharge (ESD) is the small electric shock caused by static
electricity. ESD happens when you touch an object, like the monitor, after
walking across a carpeted floor when the weather is cool and dry. Touching
a wall or the crib before handling the monitored child or the Ami Monitor
can prevent this. Whenever possible, use cotton bed sheets for the baby and
a fabric softener in the laundry. The use of a spray Static Guard in carpeted
floor areas can help the minimize this type of interference.
21-02-0117 Rev. 04 06/07
Section
5
Description of the Monitor5
21-02-0117 Rev. 04 06/07
Description of the Monitor
Description of the
Monitor
The Ami and Ami Plus monitors are meant to be used in the home, in a
hospital, or on family outings. Your doctor should have told you when to
use the monitor. If you are unsure when to use the monitor, use it all the
time (except when bathing your child), but ask your doctor for more
specific directions.
The outlet for the patient cable is on the monitor’s front panel.
There are two buttons on the front panel of the monitor. These buttons are
marked Reset and Power.
The front panel of the monitor also has warning lights and other indicators
of the monitor’s operating status.
When lit, green lights show that the monitor is properly connected and that
it is detecting breathing and heartbeats.
Red lights show an alarm condition or an equipment problem. These red
lights tell you why an alarm sounds.
There are ten lights on the front of the monitor.
•
•
APNEA — Red light shows that there has been an episode of central
apnea.
HEART FAST — Red light shows that the heart is beating faster than the
set limits.
•
HEART SLOW — Red light shows that the heart is beating slower than
•
LOOSE LEAD — Red light shows that a wire, electrode, belt, or patient
cable is loose or disconnected.
•
SERVICE — Red light shows that the monitor is in need of servicing by
a licensed provider.
•
LOW BATTERY — A constant red light shows that there is not enough
•
MEMORY FULL — The monitor’s memory stores information that will
•
•
the set limits.
power to properly operate the monitor. A flashing light shows that the
monitor has enough battery power to operate properly for at least 60
minutes.
be used by your doctor. A constant red light shows that this memory is
full. A flashing light shows that data has been lost. Call your homecare
dealer if this light comes on.
RESPIRATION — Green light shows that the monitor is detecting
breathing.
HEARTBEAT — Green light shows that the monitor is detecting a
heartbeat.
21-02-0117 Rev. 04 06/07
5-1
Description of the Monitor
•
CHARGING — Green light shows that power is being supplied from an
AC outlet and the battery is being charged.
Front Panel
Figure 5-1
Front Panel
A
H
B
C
D
E
F
G
Table 5-1
Description of Front Panel
5-2
A
Audible alarm output. Do not put anything in front of this
opening.
B
Respiration and Heartbeat lights. Green lights blink once
with each detected breath or heartbeat.
C
Human Alarm lights. Red lights come on when the monitor
detects breathing effort or heart rate outside the alarm
limits set by your doctor.
D
Charging light. The green Charging light shows that power
is being supplied from an AC outlet and the battery is
charging.
E
RESET Button. Use to turn off alarm lights after the
problem is corrected. Also use with the Power button to
turn the monitor off.
F
POWER Button. Use to turn the monitor on.
G
Patient Connector. Use to connect the monitor to the
patient cable.
H
Equipment Alarm lights. Indicate an equipment alarm
event.
21-02-0117 Rev. 04 06/07
Description of the Monitor
Back Panel
Figure 5-2
Back Panel
A
C
B
D
E
F
G
Table 5-2
Description of Back Panel
A
Audible alarm output. Do not put anything in front of this
opening.
B
Battery compartment.
C
Remote alarm output.
D
Interface connector (RS-232).
E
Telephone connector.
F
Fuse holder.
G
Power cord connector.
21-02-0117 Rev. 04 06/07
5-3
Description of the Monitor
Bottom Panel
Figure 5-3
Bottom Panel
A
B
C
D
Table 5-3
Description of Bottom Panel
A
Message display.
B
ENTER button.
C
Up and down arrow keys.
D
MODE button.
The bottom panel of the monitor has a message display and control panel.
The control panel has four buttons that are used by your dealer to enter
information. If your dealer instructs you to use the control panel buttons,
follow instructions carefully.
5-4
21-02-0117 Rev. 04 06/07
Description of the Monitor
Labels
Each monitor includes labels explaining the monitor’s features and
information needed to operate this device safely. A sample label is shown
below.
Figure 5-4
Sample Label
A
B
C
D
E
F
G
H
I
J
K
L
21-02-0117 Rev. 04 06/07
5-5
Description of the Monitor
Table 5-4
Description of Label
5-6
A
Attention: It is important that you read and understand all of
the information in this manual along with any other
documentation that came with the monitor.
B
The monitor meets the IEC 601- 1 standard (an
international safety standard) for Type BF Equipment.
Type BF Equipment is constructed so the patient is
protected from hazardous electrical currents.
C
The monitor is enclosed in a case to protect against
dripping water.
D
Unprotected lead wires and cables should not be used with
this device. Inappropriate electrical connections may pose
an unreasonable risk of adverse health consequences or
death.
E
Not to be used in an explosive atmosphere, for example,
where a high amount of oxygen or flammable gas is
present.
F
The monitor may be subject to electrical interference if
used near certain household appliances. Refer to Section
4 for more information.
G
The caregiver must read and understand the entire
Caregiver’s Manual before using the monitor. The
caregiver must share this information with anyone who will
care for the child.
H
Only accessories provided by your homecare dealer may
be used with the monitor. Using other accessories may
cause the monitor to not work properly. Refer to Section 6
for more information.
I
The monitor may not alarm properly if cautionary
information and instructions are not followed. Refer to
Section 10 for more information.
J
Do not connect the monitor to an electrical outlet controlled
by a switch.
K
US Federal law restricts the sale or use of the Ami and Ami
Plus monitors without a prescription from a licensed
physician.
L
Read the instruction manual and all documentation before
operating the monitor.
21-02-0117 Rev. 04 06/07
Section
6
Accessories6
21-02-0117 Rev. 04 06/07
Accessories
Accessories
The accessories for the Ami and Ami Plus monitors include: electrodes,
patient belt, lead wires, patient cable, power cord, remote alarm, modem,
modem cable, oximeter, direct connect cables and a carrying case.
The following accessories are needed to use the monitor:
Carbon Electrodes
•
Electrodes
•
Lead Wires
•
Patient Cable
•
Patient Belt
•
Power Cord
The black electrode pads pick up the breathing effort and heartbeat signals
from the baby.
Rinse the flat sides of the pads with water each day. Do not use soap or
detergent on the pads because both interfere with breath and heart beat
signals.
Your homecare dealer may give you other types of electrodes. Your
homecare dealer will instruct you in their proper application.
It is important that any type of pre-gelled electrodes are used before the
manufacturer’s expiration date. Before the electrodes are used, check to see
if they have become dried-out or damaged during storage. Dried-out or
damaged electrodes may not properly detect the baby’s breathing effort and
heartbeat and may prevent an alarm from being detected.
Figure 6-1
Carbon Electrodes
Lead Wires
The lead wires carry the breathing effort and heartbeat signals from the
electrodes to the patient cable. Always hold the lead wires by the plastic
ends when you are connecting or disconnecting them. Never pull on the
lead wires cord because you can damage the wires inside the leads.
21-02-0117 Rev. 04 06/07
6-1
Accessories
Figure 6-2
New lead wires come joined together. When you connect the child to the
monitor, pull gently to separate the leads as much as you need to.
Lead Wires
Patient Cable
The patient cable carries the breathing effort and heartbeat signals from the
lead wires to the monitor. Hold the patient cable at the ends when you are
connecting or disconnecting. Never pull on the cable’s cord because you
may damage the wires inside.
Figure 6-3
Patient Cable
Patient Belt
The belt is made of soft foam and is used to hold the electrodes to the
infant’s chest. The belt is fastened around the infant’s chest with a velcro
strip.
Figure 6-4
Patient Belt
6-2
21-02-0117 Rev. 04 06/07
Accessories
Remote Alarm
The remote alarm allows monitoring up to 100 feet from your baby. The
remote alarm will sound anytime the monitor alarms. The Alarm light will
also come on. The alarm will sound if the monitor becomes disconnected
from the remote alarm or if the monitor’s Power button is pressed without
pressing the Reset button first.
Figure 6-5
Remote Alarm
Power Cord
A standard AC power cord which connects the monitor to an electrical
outlet.
Figure 6-6
Power Cord
21-02-0117 Rev. 04 06/07
6-3
Accessories
Carrying Case
This case holds the monitor, patient cables and electrodes when you need to
take the baby and monitor out of the home.
Figure 6-7
Carrying Case
Modem Cable
The modem is a standard feature of the Ami Plus monitors. It sends
information from the monitor, through telephone lines, to a computer at
another location. If the monitor has a modem there will be a label reading
“Modem” on the back of the monitor, below the modem jack. The modem
cable connects the monitor to a phone jack to transmit information from the
monitor to an outside source.
Oximeter
The oximeter is a separate device that can be used with the Ami or Ami Plus
monitors to record oxygen saturation levels in the blood, and pulse rate.
If an oximeter is used with the monitor, your homecare dealer will instruct
you on how to properly use the oximeter. The monitor does not alarm for
oxygen saturation; the oximeter may alarm for low oxygen saturation.
6-4
21-02-0117 Rev. 04 06/07
Section
7
Using the Monitor7
21-02-0117 Rev. 04 06/07
Using the Monitor
Using the Monitor
Plugging in the Monitor
Plug the socket end of the power cord into the power cord connector on the
back of the monitor.
Plug the other end of the cord into a wall outlet. If the integrity of the earth
ground connection is in doubt, the monitor should be operated on battery
power.
The Charging light will only illuminate when the monitor is plugged in. If
the monitor is plugged in and the Charging light is not on, check the
connection to both the monitor and the electrical outlet. If the light does not
come on, call your homecare dealer.
Note: Keep the monitor plugged in whenever possible.
Figure 7-1
Connecting the Monitor to the Power
Cord
Figure 7-2
Connecting the Power Cord to the
Wall Outlet
21-02-0117 Rev. 04 06/07
7-1
Using the Monitor
System Check
When the Ami or Ami Plus monitor is first turned on it runs through a
system check to make sure the monitor is working properly.
During this check the monitor’s alarm will beep and all the monitor’s
lights, except the Charging light, will flash individually. The Charging light
will not flash during the system check.
If you do not hear the monitor’s alarm beep, turn the monitor off and repeat
the system check. If you do not hear the alarm beep, call your homecare
dealer for further assistance.
When the system check is over, look to see if an alarm light is on. If so,
follow the instructions in Section 10 to fix the problem.
Note: The monitor should be turned off and on daily so that it can run
through the system check. It is best to do this when the baby is
awake. The monitor should always be used when the baby is
sleeping or according to instructions from your physician.
Using the Monitor
Effectively
The Ami and Ami Plus monitors are effective only if the alarms can be
heard. Before connecting the monitor to your child, you need to test how
well the alarms can be heard in every location of the home.
1. Put the monitor where it will be used most.
2. Plug the monitor into a wall outlet. Do not connect the monitor to the
baby.
3. Turn the monitor on. All lights will illuminate as the monitor runs
through a system check. A Loose Lead alarm will sound.
4. Go to each part of the home and see if you can hear the alarm. Try to do
the things you will normally do. If you will be running water, turn on
the water. If the TV will be on, turn on the TV. If you will be
vacuuming, turn on the vacuum.
WARNING
If at any point during this test the monitor is not loud
enough to get your attention, do not leave your child
unattended while you are in this room.
A remote alarm for the Ami and Ami Plus monitors is available. This alarm
allows you to hear the monitor alarms from farther away. If you think the
remote alarm is necessary, one can be obtained from your homecare dealer.
If you are using a remote alarm, repeat the test above using the remote
alarm so it can be placed in the best position. You must make sure that you
can respond to an event immediately after its first alarm. It is especially
important to consider this when using the remote alarm.
7-2
21-02-0117 Rev. 04 06/07
Section
8
Connecting The Monitor8
21-02-0117 Rev. 04 06/07
Connecting The Monitor
Connecting The
Monitor
This section will discuss how to set up the Ami and Ami Plus monitoring
systems. It is very important that all information in this section is read and
understood.
WARNING
All directions in this section must be followed carefully.
Note: Use only soap and water to clean the child’s skin where the
electrodes will be placed. The skin must be free of lotion and
powders. If the child’s skin is not clean in this area, the monitor
may not operate properly.
Use of electrodes may result in an allergic or chemical reaction
with your child’s skin. If redness or skin irritation is noticed,
contact your home care provider.
Periodic placement of the electrodes in different locations may
prevent or reduce the occurrence of skin irritation.
1. Rub the flat side of the electrodes under warm, running water for at
least one minute. Dry the electrodes before using them.
Figure 8-1
Rinse Electrodes
21-02-0117 Rev. 04 06/07
8-1
Connecting The Monitor
2. Connect the electrodes to the lead wires.
Plug the metal tips of the lead wires into the electrodes. Be sure you
push the lead wire tips in all the way.
Figure 8-2
Electrode with Lead wire
3. Lay the belt on a flat surface.
Lay the child down with the child’s back on the belt.
It is important to place the electrodes correctly. The best place is in line
with each armpit, near the bottom rib, as shown in Figure 8-4. If you
must place them somewhere else, make certain they are on the child’s
rib cage, on opposite sides of the chest. If you imagine a line going
from one electrode to the other, that line must seem to go through the
center of the child’s chest.
Figure 8-3
Belt Placement
8-2
21-02-0117 Rev. 04 06/07
Connecting The Monitor
4. Place the electrodes on the belt with the Velcro side down.
Lay the electrode pads on the belt so that when the belt is wrapped
around the child, the pads will be in the correct place. Place the pad
with the white end on the child’s right. Place the pad with the black end
on the child’s left.
The pads should be in line with the armpit and down toward the bottom
rib.
Separate the wires as much as needed.
CAUTION
If the electrodes are touching each other, an improper
signal will be sent to the monitor.
Figure 8-4
Electrode Placement
White Lead
21-02-0117 Rev. 04 06/07
Black Lead
8-3
Connecting The Monitor
5. Wrap the belt snugly but not tightly around the patient’s chest. Close
the belt and fasten it with the velcro strip.
The belt needs to be snug but not too tight. It should be possible to slide
one finger under the belt after it is closed.
Be sure that the belt does not overlap and block one of the electrodes. If
necessary remove the belt, then cut it to make it shorter.
Figure 8-5
Wrapped Belt
6. If an oximeter is being used, your homecare dealer will tell you how to
place the oximeter sensor.
7. Connect the lead wires to the patient cable.
The white connector on the lead wire goes into the hole with the white
mark on the patient cable. The black connector goes into the hole with
the black mark. Push the connectors until they snap firmly into the
cable. These connections fit tightly.
Figure 8-6
Lead Wires and Patient Cable
8-4
21-02-0117 Rev. 04 06/07
Connecting The Monitor
8. Connect the patient cable to the monitor.
Plug the patient cable into the patient cable jack on the front of the
monitor. Be sure it is firmly in place. The cable slips in only if you have
the button on the end of the cable facing up. To remove the cable from
the monitor, press the button at the end of the cable and pull straight
out.
Figure 8-7
Patient Cable and Monitor
Be sure the lead wires and patient cable are away from the child’s head
and neck. You can put a sleeper over the cable and lead wires, with the
patient cable coming out near your child’s foot, as shown in Figure 8-8.
Or, you can tape the cable to your child’s ankle; your doctor or homecare dealer have a special tape that will not harm your child’s skin.
WARNING
To reduce the risk of strangulation, do not leave loose or
unconnected wires in the infant’s crib. Make sure that
wires are routed away from the child’s head.
Figure 8-8
Baby and Sleeper
21-02-0117 Rev. 04 06/07
8-5
Connecting The Monitor
9. Turn monitor on by pressing the power button.
Figure 8-9
Power
All lights, except the Charging light, will illuminate as the monitor runs
through a system check.
When the system check is over, make sure the green indicator lights are
blinking, showing that the electrodes are firmly connected and the
monitor is receiving signals. If the electrodes are not firmly connected,
the indicator marked Loose Lead will light up and an audible alarm will
sound.
If you have been instructed to use the Signal Quality indicator, turn the
monitor over and check the quality rating. The connection rating
describes the quality of the belt, electrodes, lead wires, and patient
cable connections. The signal rating describes the quality of the
respiration effort and heart rate signals. If the rating is Best or Good the
signal and connection qualities are acceptable. If the rating is poor, you
may be instructed to follow the Signal Quality instructions in the
Section 11 to reduce the potential for false alarms.
WARNING
During an equipment alarm (except Low Battery caution)
the monitor cannot sound any human alarms because of the
equipment problem. Therefore, during an equipment alarm
(except Low Battery caution) someone must watch the
patient until the equipment problem has been corrected.
8-6
21-02-0117 Rev. 04 06/07
Connecting The Monitor
To turn the monitor off, press and hold the RESET button, then press
the POWER button at the same time.
After a delay of up to 30 seconds, the monitor will signal that it has
powered down with an audible double beep.
After the beep, the monitor may be turned on again.
Figure 8-10
Turning the Monitor Off
21-02-0117 Rev. 04 06/07
8-7
Section
9
Auxiliary Connections9
21-02-0117 Rev. 04 06/07
Auxiliary Connections
Auxiliary
Connections
Figure 9-1
Auxiliary Connections
A
B
C
Table 9-1
Description of Auxiliary Connections
A
REMOTE ALARM — Plug the small end of the remote
alarm cable into the remote alarm output jack.
B
AUXILIARY INPUTS/ DATA OUTPUT — Plug the monitor
end of the cable into the interface connector.
C
MODEM — The modem cable is plugged into the
monitor’s telephone connector like a telephone cord. Insert
the cable with the tab facing down until you feel it click.
The other end of the cable is plugged into your telephone
outlet.
Note: The internal modem always answers phone
calls on the first ring. Therefore, only connect
the modem cable when instructed by your
doctor or homecare dealer, or when you expect
the monitor to send or receive data.
To unplug the modem cable, press the tab and pull out.
WARNING
When the monitor’s modem is in use, the
monitor must be disconnected from the
phone lines before you can use the phone.
21-02-0117 Rev. 04 06/07
9-1
Auxiliary Connections
CAUTION
When monitoring a patient, make sure AC power is
connected to the monitor whenever the phone line is
connected to the monitor via a modem.
When you are monitoring a patient and the monitor is connected via
modem to the phone lines, the monitor may not accurately detect heartbeats
when the phone rings and the AC power cord is not connected to the
monitor. Without AC power during use with a modem, the monitor may
detect an extra heartbeat or miss a heartbeat during each ring.
9-2
21-02-0117 Rev. 04 06/07
Section
10
Alarms10
21-02-0117 Rev. 04 06/07
Alarms
Alarms
The monitor will sound an alarm when it detects a problem with your
child’s breathing or heart rate, or with the equipment. You must respond to
all alarms at once. Your child needs careful and prompt care when an alarm
sounds. The monitor warns you of a problem, but you must correct the
problem.
All caregivers of a monitored child must receive CPR (Cardiopulmonary
Resuscitation) training for infants. If you or any other caregiver has not
received this training, you must contact your doctor or home health care
provider as soon as possible to receive this training.
The monitor will sound an alarm for two reasons. When the monitor detects
a problem with the child’s breathing or heart rate, it will signal a human
alarm. When the monitor detects a problem with the equipment, it will
signal an equipment alarm.
You must make sure that you can respond to an event immediately after its
first alarm. It is especially important to consider this when using the remote
alarm.
The first thing to remember when answering an alarm is to always check
the child first.
Human Alarms
Human alarms warn you that the monitor has detected apnea, fast heart rate,
or a slow heart rate. For human alarms, you must respond as you have been
trained. Your doctor and homecare dealer can help you get the proper
training.
Apnea
An Apnea alarm tells you that the monitor did not detect suitable breathing
from your child.
If your child is not breathing, follow your doctor’s instructions.
When the monitor detects suitable breathing, the alarm sound will stop. The
red Apnea light will stay on until you press the RESET button.
Heart Fast
A Heart Fast alarm tells you that your child’s heart is beating faster than the
high heart rate alarm limit.
If this alarm sounds, follow your doctor’s instructions.
When the heart rate comes down below the alarm limit, the alarm sound
will stop. The red Heart Fast light will stay on until you press the RESET
button.
21-02-0117 Rev. 04 06/07
10 - 1
Alarms
Heart Slow
A Heart Slow alarm tells you that your child’s heart is beating slower than
the low heart rate alarm limit.
If this alarm sounds, follow your doctor’s instructions.
When the heart rate is above the alarm limit, the alarm sound will stop. The
red Heart Slow light will stay on until you press the RESET button.
Equipment Alarms
Equipment alarms warn you of possible problems with the equipment.
Most equipment alarms produce a continuous audible alarm for the
duration of the event.
The first thing to remember when answering an alarm, is to always check
the child first.
If the alarm is from an equipment problem, check the front display to see
why the monitor’s alarm is sounding.
Low Battery
The red Low Battery light is constantly lit and the audible alarm beeps
twice each second when the battery does not have enough power for the
monitor to work properly.
The red Low Battery light flashes when battery power is low but the
monitor will still work properly.
•
To correct a Low Battery alarm, plug the monitor into an AC electrical
outlet.
•
The green Charging light should light.
If the monitor is plugged in at all times, the monitor should not indicate
Low Battery alarms.
If the monitor is plugged into a wall outlet and power is lost, the monitor
can operate up to 20 hours if the monitor’s battery is fully charged.
Loose Leads
A Loose Lead alarm will sound constantly if there is a poor or loose
connection between the child and the monitor.
If you have a Loose Lead alarm, do the following:
Check the lead wire and patient cable connections to be sure they are tight.
10 - 2
•
Electrodes to lead wires,
•
Lead wires to patient cable, and
•
Patient cable to patient cable jack.
21-02-0117 Rev. 04 06/07
Alarms
Check the electrodes.
•
Are they in the right place?
•
Is the belt snug enough?
•
Are the electrodes clean? They should not have any lotion, powder or
oil on them.
•
Try new electrodes.
Check the lead wires.
•
Are they tightly connected to the electrodes and patient cable?
•
Try a new set of lead wires.
Check the patient cable.
•
Is the patient cable tightly connected to the monitor?
•
Try a new patient cable.
If these steps do not work, call your homecare dealer immediately for
assistance.
When the problem is corrected, the monitor will turn the alarm off but the
Loose Lead light will stay on until the RESET button is pressed.
Memory Full
The monitor will light a red Memory Full light when its memory is almost
full. The audible alarm will not sound.
If you have a Memory Full alarm:
Service
•
Follow the instructions your doctor or homecare dealer gave you, or
•
Call your doctor or homecare dealer for instructions.
A Service alarm warns you of a problem with the monitor.
To fix a service alarm:
•
Hold in the RESET button and turn the monitor off.
•
Make sure nothing is blocking the audible alarms.
•
Wait 30 seconds. The monitor will sound a double beep.
•
Turn the monitor back on again.
If the problem is corrected, no alarm will sound.
If the alarm problem is not corrected, the service alarm will sound again.
If this happens, do not use the monitor. Turn the monitor off and call your
homecare dealer immediately. A caregiver should personally monitor the
child.
21-02-0117 Rev. 04 06/07
10 - 3
Alarms
All Lights Flashing
All lights will flash if both audio alarms are not working.
If this happens, do not use the monitor. Turn the monitor off and call your
homecare dealer immediately.
WARNING
When the monitor is not working someone must watch the
child at all times.
If you cannot fix the equipment problem, consult your homecare dealer or
your physician. Always remember to watch your child closely during an
equipment problem.
10 - 4
21-02-0117 Rev. 04 06/07
Section
11
Troubleshooting and Error
Messages
11
21-02-0117 Rev. 04 06/07
Troubleshooting and Error Messages
Troubleshooting
FALSE APNEA ALARM
If you have a problem with a false alarm, or other monitor alarm, and need
assistance, this troubleshooting guide may help. Always watch the child
during an equipment problem.
Frequent apnea alarms when the child is breathing normally.
Possible Cause
FALSE HEART SLOW
ALARMS
Possible Solution
Child may be breathing shallowly.
Check electrode placement.
The belt may be too loose around
the child’s chest.
Tighten the belt, but do not over
tighten.
Frequent heart slow alarms when the child has a heart rate above the set
limit.
Possible Cause
Possible Solution
The electrodes may be dirty.
Rinse the electrodes under
running water.
The child may have lotion or
powder on the skin under the
electrodes.
Clean the child’s skin with soap
and water, rinse well and dry.
The child may have outgrown the
Heart Slow limit.
Ask your doctor about the
prescribed Heart Slow limit.
The belt may be too loose around
the child’s chest.
Tighten the belt, but do not over
tighten.
The patient may be too small for
electrodes used with a belt.
Call your homecare dealer.
LOW BATTERY ALARM
Possible Cause
The battery needs to be
recharged.
Possible Solution
Plug the power cord into the
monitor and then into the wall
outlet.
Keep the power cord plugged in
whenever possible.
21-02-0117 Rev. 04 06/07
11 - 1
Troubleshooting and Error Messages
NO CHARGING LIGHT
Possible Cause
Possible Solution
Improper connection.
Check the connection to the
electrical outlet and to the monitor.
Monitor may need to be serviced.
Call your homecare dealer.
MEMORY FULL INDICATOR
Possible Cause
The monitor’s memory is full.
LOOSE LEAD ALARMS
Call your homecare dealer.
Shows a disconnected or broken piece of equipment.
Possible Cause
11 - 2
Possible Solution
Possible Solution
The belt may be too loose around
the child’s chest.
Tighten the belt, but do not over
tighten.
The lead wires may be
disconnected.
Check the lead wires at the
electrode end and at the patient
cable to be sure they are
connected securely.
The patient cable may be
disconnected.
Check the patient cable jack on
the monitor to be sure it is plugged
in securely.
The lead wires may be broken.
Replace the lead wires.
The electrodes may be old.
Replace the electrodes.
The child may have lotion or
powder on the skin.
Clean the child’s skin with soap
and water, rinse well and dry.
The electrodes may be dirty.
Rinse the electrodes under
running water.
The electrodes may not be placed
correctly.
Place electrodes according to
instructions.
The patient may be too small for
electrodes used with a belt.
Call your homecare dealer.
21-02-0117 Rev. 04 06/07
Troubleshooting and Error Messages
FALSE HEART FAST
ALARM
Frequent heart fast alarms when the child’s heart is beating normally.
Possible Cause
SERVICE ALARMS
Possible Solution
The alarm limit may be set too low.
Call your homecare dealer.
The patient may be too small for
electrodes used with a belt.
Call your homecare dealer.
Shows a problem with the monitor.
Possible Cause
The monitor is in need of service
by authorized personnel.
Possible Solution
Call your homecare dealer.
SIGNAL QUALITY
Possible Cause
The belt may be too loose around
the child’s chest.
Possible Solution
Tighten the belt, but do not over
tighten.
The child may have lotion or
powder on the skin under the
electrodes.
Clean the child’s skin with soap
and water, rinse well and dry.
The electrodes may be dirty.
Rinse the electrodes under
running water.
The electrodes may not be placed
correctly.
Place electrodes according to
instructions.
The electrodes may be old.
Replace the electrodes.
21-02-0117 Rev. 04 06/07
11 - 3
Troubleshooting and Error Messages
Error Messages
The Ami and Ami Plus monitors display two error messages on the
monitor’s LCD display.
Replace Battery
The Replace Battery error message may be displayed when the Service
light is flashing.
When the Replace Battery message is displayed contact your homecare
dealer to have the monitor serviced.
Loose Connection
The Loose Connection error message will be displayed when a Loose Lead
alarm sounds.
When the Loose Connection error message is displayed, follow the
directions for a Loose Lead alarm.
11 - 4
21-02-0117 Rev. 04 06/07
Section
12
Power12
21-02-0117 Rev. 04 06/07
Power
Power
The Ami and Ami Plus monitors can be connected to a standard household
electrical outlet in the United States.
Do not connect the monitor to an electrical outlet controlled by a switch.
Do not connect the monitor to an electrical outlet through a power strip.
Inside each monitor is a rechargeable battery. When the monitor is plugged
into an electrical outlet, the battery charges. With a charged battery the
monitor can be used where electrical outlets are not available. The battery
will charge fully within five hours. A fully charged battery will power the
monitor for 20 hours before needing to be recharged.
21-02-0117 Rev. 04 06/07
12 - 1
Section
13
Taking Care of Your
Monitor13
21-02-0117 Rev. 04 06/07
Taking Care of Your Monitor
Taking Care of Your
Monitor
Your monitor and its accessories may be cleaned to keep them in good
working order. You must follow the guidelines for cleaning in this book. If
you have any questions about cleaning or maintaining your monitor or its
accessories, please contact your homecare dealer.
CAUTION
Do not soak the monitor, or allow moisture to get inside.
Do not use solvent or abrasive cleaners on any monitor
equipment or accessories.
Use a damp cloth to clean the monitor. Only your homecare dealer should
disinfect the monitor.
The electrodes may be rinsed daily, on the flat side, with running water.
The belt should be hand washed.
•
Remove the electrodes before washing.
•
Use lukewarm water and mild detergent.
•
Do not use bleach.
•
The belt must be air dried. It cannot be dried in an automatic dryer.
WARNING
If detergent is not fully rinsed out of the electrode belt, the
patient may get a skin rash.
The lead wires and patient cable may be cleaned, if necessary, by wiping
them with a soft, damp, cloth.
Inspect the monitor’s cables and lead wires each day. If they look worn or
have any noticeable breaks or kinks, replace the cables or lead wires.
21-02-0117 Rev. 04 06/07
13 - 1
Section
14
Maintenance14
21-02-0117 Rev. 04 06/07
Maintenance
Maintenance
If your monitor should need service, please call your homecare dealer.
Your monitor may only be serviced by certified personnel. Do not attempt
to open the monitor case to make repairs.
21-02-0117 Rev. 04 06/07
14 - 1
Section
15
Summary15
21-02-0117 Rev. 04 06/07
Summary
Summary
It is important that you read and understand all of the information in this
book. It is important that you also share this information with anyone who
will care for your child. This summary is not intended to replace a complete
understanding of the information in this book.
Follow all instructions in this book. Heed all warnings in this book. Follow
your doctor’s instructions.
Everyone caring for the child must know how to respond to the monitor’s
alarms.
Everyone caring for the child must know CPR (Cardiopulmonary
Resuscitation) for infants.
You must make sure that you can hear and respond to an alarm immediately
after it first sounds. It is especially important to consider this when using
the remote alarm.
Know how to contact your baby’s doctor and your homecare dealer. Space
is provided below for the phone numbers for your doctor and homecare
dealer.
Doctor’s Phone Number
_________________________________________
Homecare Dealer’s Phone
Number
_________________________________________
21-02-0117 Rev. 04 06/07
15 - 1
Glossary
Accessories
Things that attach to the monitor and that are needed to monitor the
baby.
Adapter
Something that changes an electrical outlet with two holes into an
electrical outlet that will accept a power plug with three prongs.
Apnea
Periods of not breathing.
Audible Alarms
A sound that comes from the monitor when an alarm occurs.
Bradycardia
A slow heartbeat. A heart rate that is below the low heart rate alarm
limit set in the monitor.
Cardiopulmonary
Resuscitation (CPR)
A procedure that is used to revive the baby when the heart stops
beating and breathing has stopped.
Central Apnea
With central apnea, there is no breathing effort, no air gets into the
baby’s lungs.
Desaturation
A low blood oxygen level.
Dusky
A blue-gray color of the skin.
Electrodes
Pads placed on the baby’s skin to detect the baby’s breathing and heart
rate.
Electromagnetic
Interference
Electrical interference from electrical appliances, drapes, rugs,
bedding, TV and radio broadcasting signals, and static electricity.
Event
Something that happens to your baby to make the monitor alarm.
Home Care Dealer
A person who rents monitors and their equipment, fixes monitors,
collects data, helps set up monitors in the home, and answers questions.
Leadwires
Wires that connect the electrodes to the patient cable.
Midaxillary Line
An imaginary line coming down from the armpit.
Mixed Apnea
A mixture of central apnea and obstructive apnea.
Obstructive Apnea
The baby has breathing movements (efforts) but no air gets into the
baby’s lungs.
Patient Cable
The cable that connects the leadwires to the monitor.
Protected Leadwires
Leadwires where you cannot see the metal pin. The metal pin end of
the leadwire is covered in plastic.
Pulse Oximeter (Oximeter)
Monitor used to measure the oxygen level of the blood.
Respiration
The breathing in and out of air.
21-02-0117 Rev. 04 06/07
Glossary - 1
SpO2 (%SpO2)
Abbreviation used when oxygen saturation level of the blood is
measured with a pulse oximeter.
Sensor
Pads placed on the baby’s skin to detect the oxygen saturation level in
the baby’s blood.
Sensor Site
The area where the sensor will be applied. Most likely it will be either
the toe, foot, finger, or hand.
Stimulation
An action you take to get your baby to start breathing or change his/her
heart rate.
Tachycardia
A fast heartbeat. A heart rate that is above the high heart rate alarm
limit set in the monitor.
Three Pronged Electrical
Outlet (3-Prong Outlet)
A wall socket with three holes where a power plug may be inserted.
Glossary - 2
21-02-0117 Rev. 04 06/07
Index
A
alarm 10-1, 11-1
equipment 5-2, 8-6
human 5-2, 8-6
remote 5-3, 6-1, 6-3, 7-2,
9-1
sound 3-1, 3-2, 5-1, 7-2, 8-6,
10-1, 10-3
apnea 11-1
B
battery
H
heart
beat 5-1, 5-2, 6-1, 6-2
fast 5-1, 10-1, 11-3
slow 3-2, 5-1, 10-2, 11-1
human alarms 10-1
L
lead
loose 7-2, 11-2, 11-4
wires 5-6, 6-1–6-2, 8-2, 8-4,
10-2–10-3, 11-2
charging 5-2
low 11-1
belt 6-1, 6-2, 8-2, 8-3, 8-4, 11-1,
11-3
M
maintenance 14-1
memory
C
cable
mode 5-4
modem 6-4, 9-1
modem 6-4, 9-1
patient 5-1, 5-2, 6-2, 6-4,
8-5
cardiopulmonary resuscitation
3-1, 10-1, 15-1
charging 5-2
cleaning 6-1, 8-1, 13-1
CPR
see cardiopulmonary
resuscitation
D
display 5-4
E
electrical interference 4-1
electrodes 3-1, 5-1, 6-1, 6-2, 6-4,
8-1, 8-3, 8-4, 8-6, 10-3, 11-1,
11-2, 11-3, 13-1
enter button 5-4
equipment alarms 10-2
full 5-1, 10-3, 11-2
O
oximeter 6-4, 8-4
P
patient belt 6-1, 6-2
patient cable 8-4–8-5
power 5-1, 5-2, 5-3, 8-6, 8-7, 12-1
R
reset 5-1, 5-2, 8-7
respiration 4-1, 5-2
S
service 11-3, 11-4
summary 15-1
W
warnings 1-1
F
front panel 5-2
21-02-0117 Rev. 04 06/07
Index - 1
21-02-0117 Rev. 04 06/07